
After the successful installation of the OFS ALM Applications Pack Release 8.1.0.0.0, follow the post-installation procedures mentioned in Post-installation Checklist.
Topics:
· Verify the Log File Information
· Backup the OFS_ALM_SCHEMA_IN.XML file, OFS_BFND_SCHEMA_OUTPUT.xml, and Silent.props Files
· Adding Atomic Schema Details in the tnsnames.ora File
· Access the OFSAA Application
· Post Deployment Configurations
You can use this checklist to have a quick glance at everything that you will be doing post installing this application. The link provided in each step takes you to a section either within this document or to another referenced document.
NOTE |
See the Post-Installation section in the OFS AAI Release 8.1.0.0.0 Installation and Configuration Guide to complete these procedures. |
Table 10: Post-installation Checklist
Sl. No. |
Activity |
1 |
Verify the installation logs. |
2 |
Back up the OFS_ALM_SCHEMA_IN.xml, OFS_ALM_SCHEMA_OUTPUT.xml, and Silent.props files. |
3 |
Add Atomic Schema Details in the tnsnames.ora file |
4 |
Stop the OFSAA Infrastructure services. |
5 |
Create and deploy the EAR or WAR files. |
6 |
Build the EAR or WAR file once and Deploy Across Multiple OFSAA Instances |
7 |
Start the OFSAA Infrastructure services. |
8 |
Access the OFSAA Application. |
9 |
|
10 |
Post Deployment Configurations · Configure OBIEE to Deploy OFS ALM Analytics · Configure GDPR · Validate Instrument Table · Login as System Administrator · Create Application Users · Map ICC Batch Execution Rights to User · Save Post-Load Change Transformations · Changes in the .profile file for Solaris Operating System |
See the following logs files for more information:
· Pack_Install.log file located in the OFS_ALM_PACK/logs/ directory for OFS ALM Application Pack installation logs.
· Log file(s) located in the OFS_ALM_PACK/OFS_AAI/logs/ directory for Infrastructure installation logs.
· The OFSAAInfrastucture_Install.log file located in the $FIC_HOME directory for Infrastructure installation logs.
Back up the OFS_ALM_SCHEMA_IN.xml, OFS_ALM_SCHEMA_OUTPUT.xml, and Silent.props files for future reuse to upgrade the existing applications or install new applications.
Table 11: Directory of Files to Backup
File Name |
Directory |
OFS_ALM_SCHEMA_IN.xml |
OFS_ALM_PACK/Schema_Creator/conf |
OFS_ALM_SCHEMA_OUTPUT.xml |
OFS_ALM_PACK/Schema_Creator/ |
Silent.props |
OFS_ALM_PACK/appsLibConfig/conf |
Add TNS entries in the tnsnames.ora file for every Schema created for the Application Pack.
To add the Atomic Schema in the tnsnames.ora file, follow these steps:
1. Log in to the system as a non-root user.
2. Navigate to the OFS_ALM_PACK/Schema_Creator/conf directory.
3. Edit the tnsnames.ora file using a text editor and add the Atomic Schema as follows and Save the file.
<ATOMICSCHEMANAME> =
(DESCRIPTION =
(ADDRESS_LIST =
(ADDRESS = (PROTOCOL = TCP)(HOST = <HOST NAME>)(PORT = <PORT NUMBER>))
)
(CONNECT_DATA =
(SERVICE_NAME = <SID NAME>)
)
To access the OFSAA application, follow these steps:
1. Open a browser and enter the URL in the following format:
<scheme>://<IP address/ hostname>:<port>/<context-name>/login.jsp
For example, https://192.0.2.2/ofsaa/login.jsp
The OFSAA Login window is displayed.
Figure 28: OFSAA Login Window
Description of OFSAA Login Window as follows
With the installation of every OFSAA Application Pack, there are two seeded user profiles configured in the system:
§ SYSADMN System Administrator
§ SYSAUTH System Authorizer
The SYSADMN and SYSAUTH users are configured with a default password, which you will require to log in for the first time. See the MOS Doc ID: 2691681.1 for the password.
2. Log in to the application using the SYSADMN User ID and the default password. After the first login, you are prompted to change the password.
ATTENTION |
The password change is required only for a new installation scenario and not for upgrade scenarios. |
On successful login, the OFSAA Landing page is displayed.
Figure 29: OFSAA Landing Page
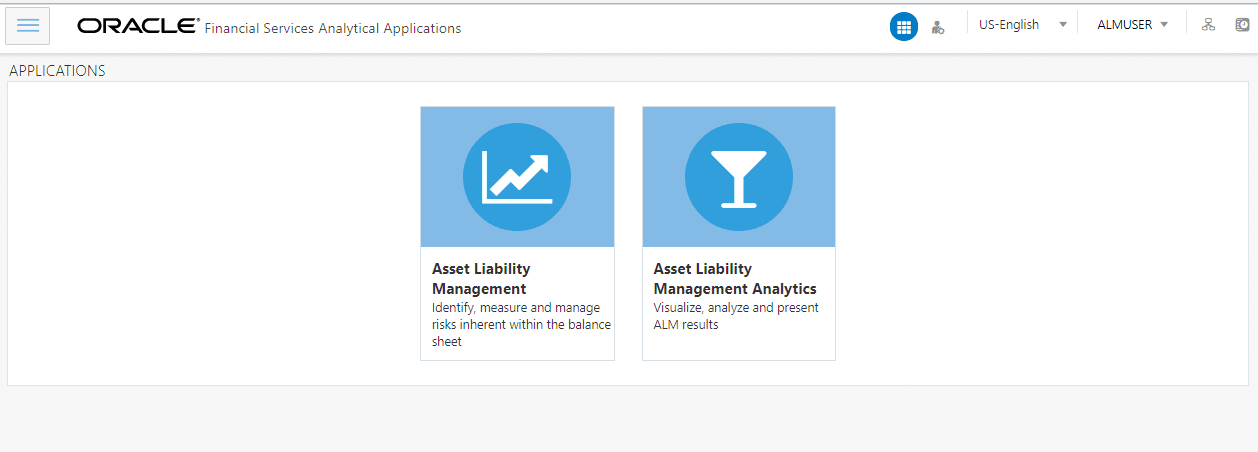
Description of OFSAA Landing Page as follows
OFSAA Landing page shows the available Applications as tiles, for which a user has access to. Click the respective Application tile to launch that particular application. You can change the landing page based on your preference.
In an integrated environment, where you have multiple applications installed on the same domain or infrastructure, OFSAAI allows you to see the other licensed applications through the UI. For more information, see the View OFSAA Product Licenses after Installation of Application Pack in the OFS Analytical Applications Infrastructure User Guide Release 8.1.0.0.0.
This section lists the various configurations to be completed before you use the OFSAA Applications.
Topics:
· OBIEE Configuration Steps to Deploy OFS ALM Analytics
· Logging as System Administrator
· Mapping ICC Batch Execution Rights to User
· Saving Post- Load Change Transformations
· Changes in .profile file for Solaris Operating System
NOTE |
To support the existing custom ALM Batches or Tasks created prior ALM v8.1.0.0.0 upgrade, you need to change the Application ID from ALM to OFS_ALM under the Optional Parameters in the Task Definition of Batch Maintenance window for each affected tasks.
|
OFS ALM Analytics 8.1.0.0.0 leverages several components of Oracle Business Intelligence Enterprise Edition (OBIEE) technology including Dashboards and Answers. It also includes various Dashboards and Reports for the user to carry out various ALM based analytics. For more information, see the Oracle Financial Services Asset Liability Management Analytics User Guide.
Topics:
· Deploying OFS ALMBI in OBIEE 12.2.1.4.0
· Post Installation Changes in instanceconfig.xml File
To deploy the ALMBI application, follow the OBIEE configuration steps:
1. Install and configure Oracle Business Intelligence Version 12.2.1.4.0. For more information, see Installing and Configuring Oracle Business Intelligence.
2. Ensure the BI server is up and running.
3. Deploy RPD and webcat file (files).
a. Navigate to the $FIC_HOME/ALMBI/RPD_WEBCATALOG/12.2.1.4.0 directory, which contains both ALMBI.rpd and archived ALMBI.catalog files. Copy the ALMBI.rpd and ALMBI.catalog files to a folder in the server where BI client tools are installed.
b. Modify the connection pool and set the properties using the following steps:
i. Open the OBI Administration tool.
ii. Click Start and select Programs, and then select Oracle Business Intelligence. Click BI Administration.
iii. Click File and select Open, and then select Offline mode. Select the ALMBI.rpd file from the folder where you have copied the file.
iv. See the MOS Doc ID: 2691681.1 for the ALMBI repository password.
c. Update the RPD details as follows:
v. Go to Manage and select Variables. Edit the Session variable as TNS.
For example:
Change the Default Initializer from TNS ENTRY to Actual TNS entry like, DESCRIPTION=(ADDRESS_LIST=(ADDRESS=(PROTOCOL=TCP)(HOST=<Database IP address>)(PORT=1521)))(CONNECT_DATA=(SERVICE_NAME=<Database Name>)))
vi. Edit the Initialization Block as TNS Init Block. Click Edit Data Source.
For example:
Change the Default Initialization string from “select 'TNS ENTRY' from dual “to select DESCRIPTION=(ADDRESS_LIST=(ADDRESS=(PROTOCOL=TCP)(HOST=<Database IP address>)(PORT=1521)))(CONNECT_DATA=(SERVICE_NAME=<Database Name>)))’ from dual
vii. Edit the Session variable as DBUSER.
viii. Change the Default Initializer from USERNAME to actual Database Schema Name.
ix. Edit the Initialization Block to DBUSER Init Block. Click Edit Data Source.
x. Replace USERNAME with the actual Atomic Schema Name.
xi. Edit the Session variable as DBUSERPWD.
xii. Edit the Initialization Block as DBUSERPWD Init Block. Click Edit Data Source.
xiii. Replace PASSWORD with the actual Atomic Schema Password.
xiv. Check in the changes and click Yes for global consistency check. Make sure No errors and warnings. Click Save.
xv. Close the RPD file using File or Exit.
4. Create a folder in the following location:
<Oracle_Home>/user_projects/domains/domain_name
5. Copy the ALMBI.rpd file to the this directory.
6. Open the command prompt and go to following location:
<Oracle_Home>/user_projects/domains/bi/bitools/bin
7. RPD Deployment
You can only upload the repository to a specific service instance.
Oracle provides the downloadrpd and uploadrpd commands for offline repository diagnostic and development purposes such as testing, only. In all other repository development and maintenance situations, you should use BAR to utilize BAR's repository upgrade and patching capabilities and benefits.
You can use this command to upload the Oracle BI repository in RPD format. You cannot use this command to upload a repository composed of MDS XML documents.
You can execute the utility through a launcher script datamodel.sh on UNIX and datamodel.cmd on Windows. If the domain is installed in the default folder, then the location of the launcher script looks like the following:
Oracle_Home/user_projects/domains/Domain_Name/bitools/bin/datamodel.sh or datamodel.cmd on Windows.
If the client installed does not have domain names, then the launcher script location is as follows:
Oracle_Home\bi\bitools\bin\datamodel.sh or datamodel.cmd on Windows.
Syntax:
The upload rpd command takes the following parameters:
uploadrpd -I <RPD filename> [-W <RPD password>] [-SI <service_instance>] -U <cred_username> [-P <cred_password>] [-S <host>] [-N <port>] [-SSL] [-H]
§ I specifies the name of the repository that you want to upload.
§ W is the repository’s password. If you do not supply the password, then you will be prompted for the password when the command is run. For security purposes, Oracle recommends that you include a password in the command only if you are using automated scripting to run the command.
§ SI specifies the name of the service instance.
§ U specifies a valid user’s name to be used for Oracle BI EE authentication.
§ P specifies the password corresponding to the user’s name that you specified for U. If you do not supply the password, then you will be prompted for the password when the command is run. For security purposes, Oracle recommends that you include a password in the command only if you are using automated scripting to run the command.
§ S specifies the Oracle BI EE host name. Only include this option when you are running the command from a client installation.
§ N specifies the Oracle BI EE port number. Only include this option when you are running the command from a client installation.
§ SSL specifies to use SSL to connect to the WebLogic Server to run the command. Only include this option when you are running the command from a client installation.
§ H displays the usage information and exits the command. Use -H or run .sh without any parameters to display the help content.
See the MOS Doc ID: 2691681.1 for the ALMBI repository password.
For example:
./datamodel.sh uploadrpd -I <Oracle_Home>/user_projects/domains/doamin_name/tmp/ALMBI.rpd -W Administrator1 -SI ssi -U Username -P Password
You will get the following message if RPD deployment is successful:
Operation successful.
RPD upload completed successfully.
8. Catalog Deployment
d. Open Catalog Manager.
e. Navigate to File menu and open the catalog online (File and select Open catalog) by giving the necessary credentials based on your setup (Type - (online), URL - (http://<ipaddress>:<port>/analytics-ws)
f. After the Catalog is opened, it displays a folder structure on the left hand side. Select Shared Folders in the LHS structure.
g. Go to File menu and select Unarchive. It will ask for the path for a file.
h. Browse the path of the archived catalog file saved in your local directory using the Browse button in the dialog box. Click OK.
i. The catalog will be unarchived in the specified location. A confirmation is message is displayed.
9. Open the OFS ALMBI (http://<ipaddress>:<port>/analytics)
10. Login with credentials based on your setup, and verify that catalog is available.
11. Configure the tnsnames.ora file.
j. Open the tnsnames.ora file under the <Oracle Home>/network/admin directory.
k. Ensure that Atomic Schema entry is made in the tnsnames.ora to connect to Atomic Schema of OFSAA application. For more information, see the Adding Atomic Schema Details in the tnsnames.ora File section.
l. Save the tnsnames.ora file.
12. Configure ODBC data source to connect to Oracle BI Server.
m. Navigate to Control Panel and select Administrative Tools, and then select Data Sources (ODBC).
n. Select the System DSN tab and click Add.
o. Select a driver specific to (Oracle BI Server 12c) and click Finish.
p. Enter Name and Server details (specify the Host Name or IP Address of the BI Server and click Next).
q. Enter Oracle BI Server login ID and password (enter User Name and Password created at the time of OBIEE installation). Click Next.
r. Click Finish.
13. Open the OBI Administration tool. Navigate to File and click Perform Consistency Check. Ensure that there are no errors or warnings. Close the RPD file.
14. WEBCATALOG changes
s. Click Open and select Shared Folders, and select Change Database Connection, and then Prompt For Sources_TNS.
t. Select the Prompt TNS and click Edit.
u. Change the SQL statement in default selection.
For example: select case when '@{DBNAME}' ='ALMDB' THEN '(DESCRIPTION=(ADDRESS_LIST=(ADDRESS=(PROTOCOL=TCP)(HOST=<IP ADDRESS>)(PORT=1521)))(CONNECT_DATA=(SERVICE_NAME=<DATBASE NAME>)))' end from "ALM BI"
v. Click Save.
15. Login into OFS ALMBI Application using the following URL.
For example: http://localhost:1111/ofsa (replace the port number based on your setup).
16. Navigate to FICWEBHOME and execute following:
./ant.sh
17. After the OBIEE Environment is up and running, the OBIEE URL must be updated in the AAI_MENU_B table for an end user to access the respective Business Intelligence Analytics Application.
The following update statement must be executed in the Config Schema:
UPDATE AAI_MENU_B
SET V_MENU_URL = '<URL>'
WHERE V_MENU_ID IN (‘<List of enabled BI Analytical Links for a particular Media Pack >’)
/
COMMIT
/
For ALM Media Pack as an example:
UPDATE AAI_MENU_B
SET V_MENU_URL = 'http://10.1.2.3:9704/analytics'
WHERE V_MENU_ID IN ('OFS_ALM_ABI','OFS_ALMBI_LINK')
/
COMMIT
/
(Replace the IP address and port number based on your setup.)
In case during this Application Pack installation, you enabled OFS ALM BI product only, download and apply recommanded version patches to correct the inconsistency in the OFSAA installation audit tables. This patch is not required if you enabled OFS ALM and OFS ALM BI during installation.
Perform the following changes in the instanceconfig.xml file as post-installation changes:
1. Navigate to the following directory:
$ORACLE_HOME/user_projects/domains/bi/config/fmwconfig/biconfig/OBIPS
2. Take the Back up of instanceconfig.xml file in your local system.
3. Edit the instanceconfig.xml file using a text editor as mentioned in the following table and save the file.
Table 14: instanceconfig.xml file
Tag to be changed |
Changes |
<Views> |
<Views> <Charts> <DefaultWebImageType>flash</DefaultWebImageType> </Charts> </Views> |
<Security> |
<Security> <CheckUrlFreshness>false</CheckUrlFreshness> <EnableSavingContentWithHTML>true</ EnableSavingContentWithHTML> </Security> |
4. Save and exit the file.
5. Restart the Presentation Server to save the changes using following ways:
§ Navigate to the DOMAIN_HOME/bitools/bin path and execute ./start.sh -i obips1 .
Or
§ Start and stop the System Component processes using Fusion Middleware Control:

Description of Processes for ALM BI as follows
By default, data will be redacted to WebLogic user. If you want to see redacted data (PII data on the PII dashbaord) after enabling GDPR , then create WebLogic user in OFSAA application and or any new user in OBIEE and map the user to “Data Security Group” in OFSAA using SMS.
For more information on PII dashboard, see the GDPR section in the Oracle Financial Services Asset Liability Management Analytics User Guide.
For more information on Data Protection Implementation by OFSAA, see the Oracle Financial Services Data Foundation User Guide.
Run the Instrument Table Validation. For more information, see the Doc ID 1457511.1 in MOS and Data Model Utility Guide
Check the FSI_MESSAGE_LOG file after running the Instrument Table Validation to verify that tables are classified correctly.
Post installation, the first login into Infrastructure is possible only for a System Administrator through user ID sysadmn. This ID is created at the time of installation with the password provided during installation. Enter login ID sysadmn and password that was provided during installation. Click Login.
For more information, see the Access the OFSAA Application section,
System Administration refers to a process of managing, configuring, and maintaining confidential data in a multi-user computing environment. System Administration in Security Management involves creating functions, roles, and mapping functions to specific roles. System Administration also involves maintaining segment information, holiday list, and restricted passwords to ensure security within the Infrastructure system.
You can access System Administrator in LHS menu of Security Management. The options available under System Administrator are:
For details, see the System Administrator section in the Oracle Financial Services Analytical Applications Infrastructure User Guide.
For details, see the System Administrator section in the Oracle Financial Services Analytical Applications Infrastructure User Guide.
For details, see the System Administrator section in the Oracle Financial Services Analytical Applications Infrastructure User Guide.
For details, see the User Group Role Map section in the Oracle Financial Services Analytical Applications Infrastructure User Guide.
Segment is used to control access rights on a defined list of objects. It is mapped to an information domain.
Segment Maintenance in the Infrastructure system facilitates you to create segments and assign access rights. You can have different segments for different Information Domains or same segments for different Information Domains.
User scope is controlled by segment or folder types with which the object is associated.
· Objects contained in a public folder will be displayed irrespective of any user.
· Objects contained in a shared folder will be displayed if user belongs to a user group which is mapped to an access type role with the corresponding folder.
· Objects contained in a private folder will be displayed only to the associated owner.
You can access Segment Maintenance by expanding System Administrator section within the tree structure of LHS menu. The Segment Maintenance window displays a list of available segments with details such Domain, Segment Code, Segment Name, Segment Description, Segment/Folder Type, Owner Code, and the number of Users Mapped to the segment. You can view, create, modify, and delete segments within the Segment Maintenance window.
You can also make use of Search and Pagination options to search for a specific role or view the list of existing roles within the system.
Holiday Maintenance facilitates you to create and maintain a schedule of holidays or non-working days within the Infrastructure system. On a holiday, you can provide access to the required users and restrict all others from accessing the system from the User Maintenance window.
For more information, see the Oracle Financial Services Asset Liability Management Application User Guide.
Restricted Passwords facilitate you to add and store a list of passwords using which users are not permitted to access the Infrastructure system.
You can access Restricted Passwords by expanding System Administrator section within the tree structure of LHS menu. The Restricted Passwords window displays a list of restricted passwords and allows you to add and delete passwords from the list.
You can also make use of Search and Pagination options to search for a specific password or view the list of existing passwords within the system. For more information, see the Pagination and Search and Filter section in Oracle Financial Services Asset Liability Management User Guide. While searching for any predefined restricted password, you must key in the entire password.
The Email Configuration feature helps you add email IDs and map their details in OFSAA. The configured emails receive notifications through network communication channels when any feature that is mapped to email notifications is triggered. For more information, see the Oracle Financial Services Analytical Applications Infrastructure User Guide.
All the seeded batches in the OFS ALM application are automatically assigned to the SYSADMN user during installation. To see the batches in the Batch Maintenance menu, you must execute the following query in the Config Schema of the database:
begin
AAI_OBJECT_ADMIN.TRANSFER_BATCH_OWNERSHIP ('fromUser','toUser','infodom');
end;
OR
begin
AAI_OBJECT_ADMIN.TRANSFER_BATCH_OWNERSHIP ('fromUser','toUser');
end;
Where:
· fromUser indicates the user who currently owns the batch.
· toUser indicates the user to whom the ownership must be transferred.
· infodom is an optional parameter. If specified, the ownership of the batches pertaining to that Infodom will be changed.
Create the application users in the OFSAA setup prior to use. This step may not be required if you have already setup users in the OFSAA setup.
For more information, see User Creation section in the Oracle Financial Services Analytical Applications Infrastructure User Guide.
With the installation of ALM Application Pack, preconfigured application user groups are seeded. These user groups are unique to every OFSAA Application Pack and have application roles preconfigured.
Map the application user (or users) to the respective Application User Group ( or Groups) and subsequently authorize the entitlements by logging in as SYSAUTH (System Authorizer) user.
For more information, see the Mapping/Unmapping Users section in the Oracle Financial Services Analytical Applications Infrastructure User Guide.
User Groups seeded with the OFS ALM Application are as follows:
The ALM Administrator has access to the following screens and modules:
· ADCO Prepayments for ALM
· ALM Access Code for AAI
· Application Preference: ALM Application Preference Admin, ALM Application Preference View
· Rate Management: Add Currency, Add Currency Rate, Add Economic Indicator, Add Interest Rate Copy Economic Indicator, Copy Interest Rate, Delete Currency, Delete Currency Rate, Delete Economic Indicator, Delete Interest Rate, Edit Currency, Edit Currency Rate, Edit Economic Indicator, Edit Interest Rate, Execute Economic Indicator Loader, Launch Currency Rate Validation, Launch Interest Rate Loader, View Currency, View Currency Rate, View Economic Indicator, View Interest Rate
· Process Tuning: Add, Delete, Edit, View
· Adjustment Rules: Add, Delete, Edit, SaveAs/Copy, View
· Admin BI
· Batch Maintenance: Add, Copy, Delete, Edit, Run, View, Batch Processing, Execute Batch
· Behavior Pattern: Add, Delete, Edit, SaveAs/Copy, View
· Migration Execution: Execute/Run, Cancel
· Cash Flow: Add, Delete, Edit, Run, SaveAs/Copy, View
· Authorize Map(s), Create Map, Delete Map, Modify Map
· Defi Administrator
· Detail Cash Flows: Add All Records or Products
· Discount Methods: Add, Delete, Edit, SaveAs/Copy, View
· Dynamic Deterministic: Add, Delete, Edit, Run, SaveAs/Copy, View
· Dynamic Stochastic Process: Add, Delete, Edit, Run, SaveAs/Copy, View
· FSAPPS Home Page Link
· Forecast Balances: Add, Delete, Edit, SaveAs/Copy, View
· Forecast Rates: Add, Delete, Edit, SaveAs/Copy, Seeded Loader, View
· Formula Results: Add, Delete, Edit, SaveAs/Copy, View
· Fusion Attributes: Add, Delete, Edit, View, View Dependent Data
· Fusion Expressions: Add, Delete, Edit, View, View Dependent Data
· Fusion Filters: Add, Delete, Edit, View, View Dependent Data
· Fusion Hierarchies: Add, Delete, Edit, View, View Dependent Data
· Fusion Members: Add, Delete, Edit, View, View Dependent Data
· Global Preferences: View
· Holiday Maintenance Screen: Add, Delete, Edit, Run, Save As, View
· MDB Screen, Metadata Publish
· Maturity Mix: Add, Delete, Edit, SaveAs/Copy, View
· Moody Integration for ALM
· Object Migration: Copy Migration Ruleset, Create Migration Ruleset, Delete Migration Ruleset, Edit Migration Ruleset, Home Page, Source Configuration, View Migration Ruleset
· Operator Console
· Payment Pattern: Add, Delete, Edit, SaveAs/Copy, Seeded Loader, View
· Prepayment Models: Add, Delete, Edit, SaveAs/Copy, Seeded Loader, View
· Prepayments: Add, Delete, Edit, SaveAs/Copy, Seeded Loader, View
· Pricing Margin: Add, Delete, Edit, SaveAs/Copy, View
· Product Characteristics: Add, Delete, Edit, SaveAs/Copy, View
· Product Profiles: Add, Delete, Edit, SaveAs/Copy, View
· Rate Dependency Patterns: Add, Delete, Edit, SaveAs/Copy, View
· Repricing Pattern: Add, Delete, Edit, SaveAs/Copy, View
· Static Deterministic Process: Add, Delete, Edit, Run, SaveAs/Copy, View
· Static Stochastic Process: Add, Delete, Edit, Run, SaveAs/Copy, View
· Stochastic Rate Index: Add, Delete, Edit, SaveAs/Copy, View
The ALM System Adminstrator has access to the following screens and modules
· Time Buckets: Add, Delete, Edit, SaveAs/Copy, View
· Transaction Strategy: Add, Delete, Edit, Run, SaveAs/Copy, View
· Transfer Pricing: Add, Delete, Edit, Run, SaveAs/Copy, View
· View ALM Tasks
The ALM Analyst has access to the following screens and modules:
· ALM Access Code for AAI
· ALM Application Preference: View
· Adjustments: Add, Delete, Edit, SaveAs/Copy, View
· Batch Maintenance: Add, Copy, Delete, Edit, Run, View
· Behavior Pattern: View
· Cash Flow Edits: Add, Delete, Edit, SaveAs/Copy, View
· Defi Administrator
· Discount Methods: Add, Delete, Edit, SaveAs/Copy, View
· Dynamic Deterministic Process: Add, Delete, Edit, Run, SaveAs/Copy, View
· Dynamic Stochastic Process: Add, Delete, Edit, Run, SaveAs/Copy, View
· FSAPPS Home Page Link
· Forecast Balances: Add, Delete, Edit, SaveAs/Copy, View
· Forecast Rates: Add, Delete, Edit, SaveAs/Copy, Seeded Loader, View
· Formula Results: Add, Delete, Edit, SaveAs/Copy, View
· Fusion Attributes: View Dependent Data, View Attributes
· Fusion Filters: View Dependent Data, View Filters
· Fusion Hierarchies: View Dependent Data, View Hierarchies
· Fusion Members: View Dependent Data, Fusion View Members
· Fusion Expressions: View Dependency Expressions, View Expressions
· Global Preferences: View
· Maturity Mix: Add, Delete, Edit, SaveAs/Copy, View
· Moody Integration for ALM
· Payment Pattern: View
· Prepayment Models: Add, Delete, Edit, SaveAs/Copy, Seeded Loader, View
· Prepayments: Add, Delete, Edit, SaveAs/Copy, Seeded Loader, View
· Prepayments: Add, Delete, Edit, SaveAs/Copy, View
· Pricing Margin: Add, Delete, Edit, SaveAs/Copy, View
· Product Characteristics: Add, Delete, Edit, SaveAs/Copy, View
· Product Profiles: View
· Rate Dependency Patterns: Add, Delete, Edit, SaveAs/Copy, View
· Repricing Pattern: View
· Static Deterministic Process: Add, Delete, Edit, Run, SaveAs/Copy, View
· Static Stochastic Process: Add, Delete, Edit, Run, SaveAs/Copy, View
· Stochastic Rate Index: Add, Delete, Edit, SaveAs/Copy, View
· System Administrator: The System Administrator has access to the following screens and modules:
§ Time Buckets: Edit, View
§ Transaction Strategy: Add, Delete, Edit, SaveAs/Copy, View
§ Transfer Pricing: Add, Delete, Edit, SaveAs/Copy, View
§ View ALM Tasks
§ View CFE Tasks
§ Rate Management: View Currency, View Currency Rate, View Economic Indicator, View Interest Rate
§ Process Tuning: View
The ALM Auditor has following access to following screens and modules:
· ALM Access code for AAI
· ALM Application Preference View
· Adjustments: View
· Batch Maintenance: Copy, View
· Behavior Pattern: View
· Cash Flow Edits: View
· Defi Administrator
· Discount Methods: View
· Dynamic Deterministic Process: View
· Dynamic Stochastic Process: View
· FSAPPS Home Page Link
· Forecast Balances: View
· Forecast Rates: View
· Formula Results: View
· Fusion Attributes: View Dependent Data, View Attributes
· Fusion Filters: View Dependent Data, View Filters
· Fusion Hierarchies: View Dependent Data, View Hierarchies
· Fusion Members: View Dependent Data, View Members
· Fusion Expressions: View Dependency Expressions, View Expressions
· Global Preferences: View
· Maturity Mix: View
· Object Migration: View Migration Ruleset
· Payment Pattern: View
· Prepayment Models: View
· Prepayments: View
· Pricing Margin: View
· Product Characteristics: View
· Product Profiles: View
· Rate Dependency Patterns: View
· Static Deterministic Process: View
· Static Stochastic Process: View
· Stochastic Rate Index: View
· System Administrator
· Time Buckets: Edit, View
· Transaction Strategy: View
· Transfer Pricing: View
· View ALM Tasks
· Rate Management: View Currency, View Currency Rate, View Economic Indicator, View Interest Rate
· Process Tuning: View
The user mapped to group UGCFE only get access to CFE related links.
ALM cash flow engine functionality is used to support generation of contractual and (or) expected cash flows for use with Loan Loss Forecasting.
The following ALM objects can be used:
· Rate Management
· Dimension and Hierarchy Management
· Filters
· Holiday Calendars
· Global Preferences
· Application Preferences
· Time Buckets
· Product Profiles
· Payment Patterns
· Payment Schedules
· Repricing Patterns
· Behavior Patterns
· Product Characteristics
· Prepayments
· Prepayment Models
· Forecast Rates
· Cash Flow Edits
· Static Deterministic Process
· Staging and Instrument tables seeded for selection within the Static
· Deterministic Process and related T2T procedures
· In the ALM Static Deterministic Process, Calculation Elements selection tab, users can select the following:
§ Repricing Balances and Rates
§ Run-off Components
§ Prepayment Runoff
§ Tease, Cap, Floor and Neg Am Details
§ Standard Financial Elements
§ Stop at Process Cash Flows option
User Groups seeded with the OFS ALMBI Application are as follows:
· ALMBI Administrator
· ALMBI BI Analyst
· ALMBI Data Analyst
After creating users, Log in to OFS ALM as any user who is mapped to ALM Admin or Analyst group and follow these steps:
1. Navigate to Data Management Framework and select Post Load Changes.
2. A new window is displayed. Click on each Transformation from Transformations List and click on Stored Procedure in the Right Panel, click on Edit in the Top Right Menu and Click on Finish Button in Bottom.
NOTE |
All the Transformation Stored Procedures are required to be edited and saved (Finish Button) once for getting it is available. |
For Solaris operating system, do the following changes in .profile file present in user's home directory.
Add the Oracle Developer Studio 12.5 installed path in the beginning of LD_LIBRARY_PATH variable in the .profile file.
For Solaris sparc:
LD_LIBRARY_PATH=/opt/SunProd/studio12u5/developerstudio12.5/lib/compilers/CCgcc/lib/sparcv9
For Solaris Sparc:
LD_LIBRARY_PATH=/opt/SunProd/studio12u5/developerstudio12.5/lib/compilers/CCgcc/lib/amd64
Append the path $FIC_DB_HOME/lib/libC++11/ to LD_LIBRARY_PATH variable in the .profile file.
For example:
LD_LIBRARY_PATH=$LD_LIBRARY_PATH:$FIC_DB_HOME/lib/libC++11
Users with system authorization roles can access User Group Authorization. However, to make it available on Tomcat web server, you have to perform the following configuration steps:
3. Navigate to the $FIC_WEB_HOME/webroot/WEB-INF/ folder and open web.xml file.
4. Enter the following in the web.xml file.
<init-param>
<param-name>mappedfile</param-name>
<param-value>false</param-value>
</init-param>
5. To disable the WADL for the Web Service, navigate to the following snippet in the web.xml file.
<servlet>
<servlet-name>CommonRESTServlet</servlet-name>
<servlet-class>org.glassfish.jersey.servlet.ServletContainer</servlet-class>
<init-param>
<param-name>javax.ws.rs.Application</param-name>
<param-value>com.ofs.fsapps.commonapps.util.ApplicationResourceConfig</param-value>
</init-param>
<load-on-startup>1</load-on-startup>
</servlet>
6. Add the following snippet before the <load-on-startup>1</load-on-startup> attribute.
<init-param>
<param-name>jersey.config.server.wadl.disableWadl</param-name>
<param-value>true</param-value>
</init-param>
7. Save and close the file.