Configuring Additional Networks

This section describes how to configure a local network, a VoIP network, and a Data Network.

Configuring the Local Network

The ISR applications have network default configurations to simplify initial deployment, particularly for VM environments. These configurations expect a private, internal network known as "Local" that offers the IP address range of 169.254.1.x.

The default application Local IPs are set to the following:
Component Default Local IP
Dashboard 169.254.1.20
Index 169.254.1.50
RSS 169.254.1.xyz (where xyz=RSS's Administration network host address
FACE API 169.254.1.40

This section describes adding the Local network.

To create and configure your local network:
  1. Open your vSphere Client and enter your username and password to login.
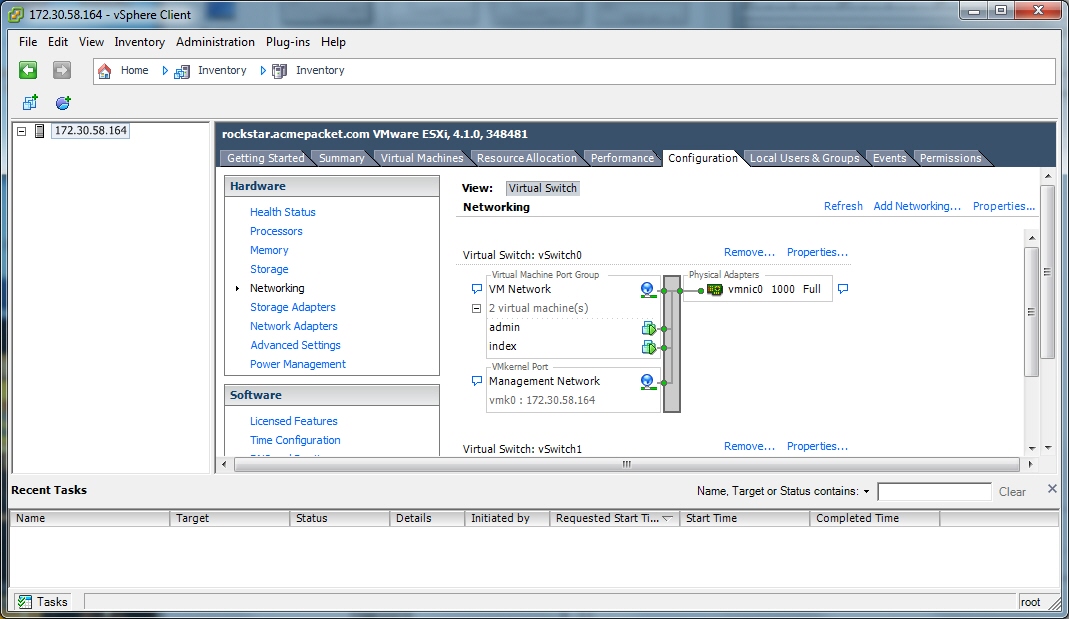
    The following window displays.
    This screenshot shows the vSphere Client home page.
  2. Click on the Configuration tab.
  3. In the left column, under the Hardware category, click on Networking.
  4. In the upper right corner of the window, click on Add Networking. The following window displays.
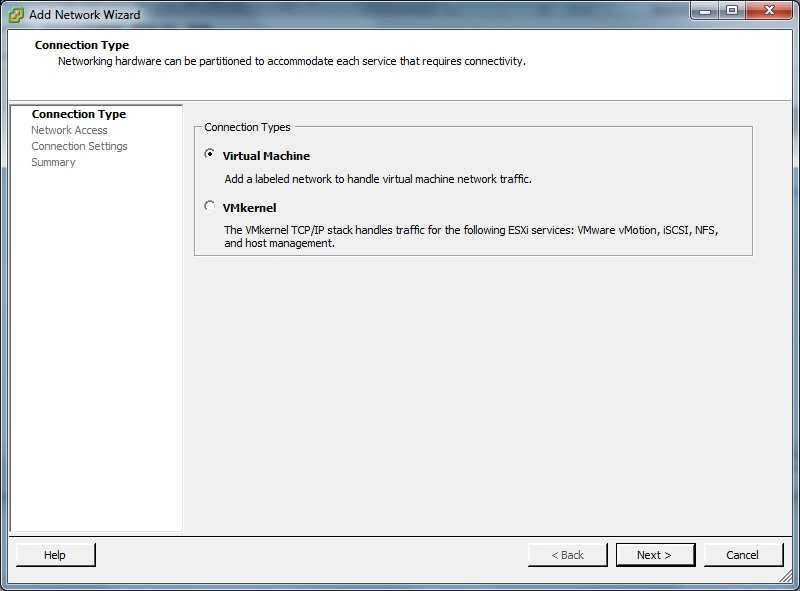
    This screenshot shows the Add Network Wizard Connection Type dialog box.
  5. Click on the radio button for Virtual Machine and click Next. The following window displays.
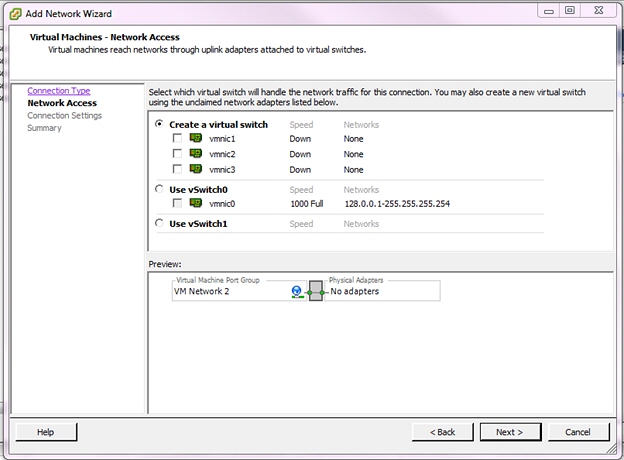
    This screenshot shows the Add Network Wizard Network Access dialog box.
  6. The Create a virtual switch radio button is enabled by default. Make sure you leave this enabled. In the case of a pure-VM solution, the virtual network you are creating is not affiliated with any of the physical network interfaces on your ESXi host. However, a bare-metal RSS installation requires a physical interface between the CIS server and RSS server(s). For more information, see "Configuring a Bare-Metal RSS Installation".
  7. Uncheck (disable) the vmnic1 adapter.
  8. Click Next. The following window displays.
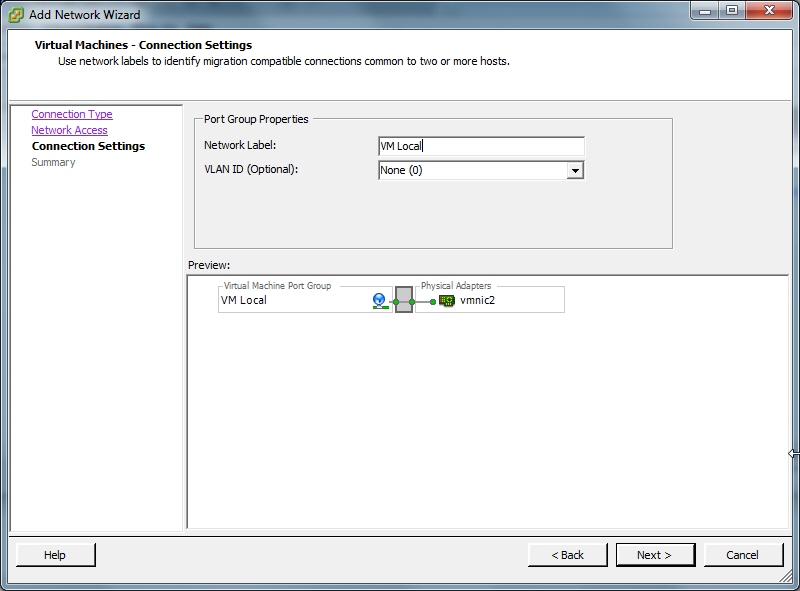
    This screenshot shows Add Network Wizard Connection Settings dialog box.
  9. In the Port Group Properties section, enter a network label for this virtual switch in the Network Label text box. For example, VM Local.
  10. The VLAN ID value is set as None(0). Do not change the default value in this field.
  11. Click Next. Click Finish.

    The local virtual switch is now created.

Configuring the VoIP Network

This section describes adding the VoIP network.

To create and configure your VoIP network:

  1. Open your vSphere Client and enter your username and password to login.
    The following window displays.
    This screenshot shows the vSphere Client home page.
  2. Click on the Configuration tab.
  3. In the left column, under the Hardware category, click on Networking.
  4. In the upper right corner of the window, click on Add Networking. The following window displays.
    This screenshot shows the Add Network Wizard Connection Type dialog box.
  5. Click on the radio button for Virtual Machine and click Next. The following window displays.
    This screenshot shows the Add Network Wizard Network Access dialog box.
  6. The Create a virtual switch radio button is enabled by default. Make sure you leave this enabled. In the case of a pure-VM solution, the virtual network you are creating is not affiliated with any of the physical network interfaces on your ESXi host. However, a bare-metal RSS installation requires a physical interface between the CIS server and RSS server(s). For more information, see "Configuring a Bare-Metal RSS Installation".
  7. Uncheck (disable) the vmnic1 adapter.
  8. Click Next. The following window displays.
    This screenshot shows the Add Network Wizard Connection Settings dialog box.
  9. In the Port Group Properties section, enter a network label for this virtual switch in the Network Label text box. For example, VM Local.
  10. The VLAN ID value is set as None(0). Do not change the default value in this field.
  11. Click Next. Click Finish.

    The VoIP network is now created.

Configuring the Data Network

This section describes adding the Data network.

To create and configure your Data network:

  1. Open your vSphere Client and enter your username and password to login.
    The following window displays.
    This screenshot shows the vSphere Client home page.
  2. Click on the Configuration tab.
  3. In the left column, under the Hardware category, click on Networking.
  4. In the upper right corner of the window, click on Add Networking. The following window displays.
    This screenshot shows the Add Network Wizard Connection Type dialog box.
  5. Click on the radio button for Virtual Machine and click Next. The following window displays.
    This screenshot shows the Add Network Wizard Network Access dialog box.
  6. The Create a virtual switch radio button is enabled by default. Make sure you leave this enabled. In the case of a pure-VM solution, the virtual network you are creating is not affiliated with any of the physical network interfaces on your ESXi host. However, a bare-metal RSS installation requires a physical interface between the CIS server and RSS server(s). For more information, see "Configuring a Bare-Metal RSS Installation".
  7. Uncheck (disable) the vmnic1 adapter.
  8. Click Next. The following window displays.
    This screenshot shows the Add Network Wizard Connection Settings dialog box.
  9. In the Port Group Properties section, enter a network label for this virtual switch in the Network Label text box. For example, VM Local.
  10. The VLAN ID value is set as None(0). Do not change the default value in this field.
  11. Click Next. Click Finish.

    The Data network is now created.