12 Customer Order Management
Customer Orders
Customer Orders allows for the viewing of customer orders at the user's store. Customer orders may be web orders as well as non web orders such as layaway, pick up, and so on.
-
Search for customer orders
-
View an existing customer order
-
Reject a customer order
-
View customer information
-
Print a customer order
-
Create a customer order pick for a specific customer order
-
Access the delivery dialog for a specific customer order
-
Enter values for CFAs (Custom Flexible Attributes)
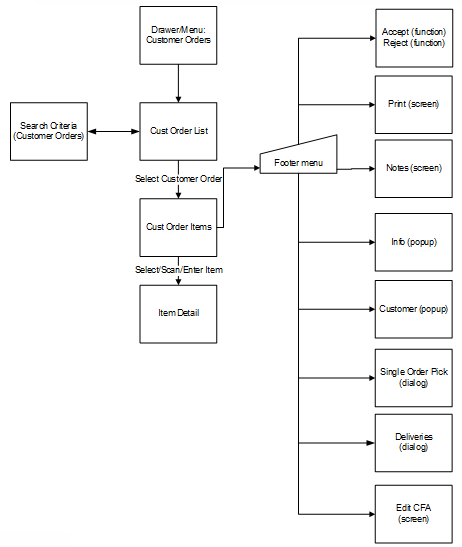
Customer Orders covers the functionality of viewing, accepting, and rejecting a customer order as well as viewing the information and customer details, specifying values for CFAs. Deliveries and single order picks can be created from within a customer order, however, Deliveries and Picking will be covered as part of their own functionality.
Customer Order List
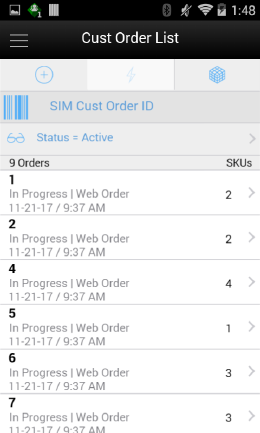
The Cust Order List screen is accessed by selecting the Customer Order menu option from within the Customer Order Management menu in the drawer/menu. The screen will display the Active status customer orders by default which is all customer orders which are in New or In Progress status. The user can click the eye glasses to direct to the Search Criteria (Customer Orders) screen. Selecting a customer order will navigate to the details for the customer order.
Search Criteria (Customer Orders)
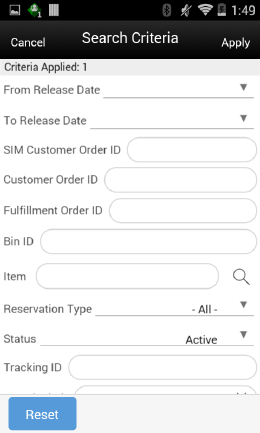
The Customer Order Search Criteria screen is accessed by the eye glasses on the Customer Order List screen. After applying the search criteria, the results will be listed on the Customer Order List screen and the criteria applied will show.
-
From/To Release Date
-
Store Customer Order ID
-
Customer Order ID
-
Fulfillment Order ID
-
Bin ID
-
Item
-
Reservation Type
-
Status
-
Customer Name
-
Tracking ID
-
Search Limit
Customer Order Items
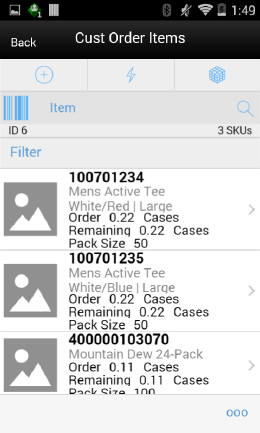
The Cust Order Items screen is used to select a customer order from the Customer Order List screen. The items are listed for the customer order. The item image for the line items is displayed per configuration.
Line items appear in a list and selecting a line item will navigate to the item details of that item. Scrolling in the list of items on the left will display a filter. The filter can be used to narrow down the list of items. Filtering can occur by item ID or item description.
Scanning or entering an item in the scan bar will navigate to the Item Detail (Customer Orders) screen for that item. The ellipsis in the lower right hand corner will access the Footer menu which will contain all of the functions that can be performed on a customer order.
Note:
If the order has duplicate items, meaning an item exists on the customer order more than once, the items will appear multiple times in the list with the corresponding line numbers listed as well. This applies to all screens that display the item within customer orders, customer order picking, customer order deliveries, and customer order reverse picking.Footer Menu
The footer menu is accessed from the ellipsis footer menu on the Customer Order Items screen. The menu functions will include the following.
Info: Info will access the Info popup.
Notes: The Notes option accesses the notes common dialog to capture notes. Notes can only be added when the Customer Order is in New or In Progress status.
Edit CFA: This option takes the user to Edit CFAs screen to enter values for the CFAs that are set up for Customer Orders.
Edit Customer Order: This option takes the user to the Edit Customer Order screen to specify the Hold Location.
Customer: The customer information popup for the customer order will display, view only.
Pick: Pick will generate a pick for the customer order and navigate the user to the Pick Items screen for the new pick. All picking rules apply. If picking by Area is configured for the store, the user will navigate to the Create Pick popup to select an Area first. See Customer Order Picking.
Delivery: Navigates to the Delivery dialog (Delivery List screen) for the current customer order. See Customer Order Deliveries.
All states of customer orders as well as all types (web order, pick up, layaway, and so on).
The user must have 'Access Customer Order Delivery' permission.
Accept: Accept will be only for New web order types of customer orders and will set the customer order to In Progress status.
Reject: Reject will be only for New and In Progress web order types of customer orders. All item quantities that have not yet been picked will be canceled/rejected. A system generated reverse pick will be created for the rejected items. For more information, see Customer Order Reverse Picks.
Back: Back will return to the Customer Orders List, no changes made to status.
Print: Print will display the common print dialog to print the customer order report.
Edit Customer Order
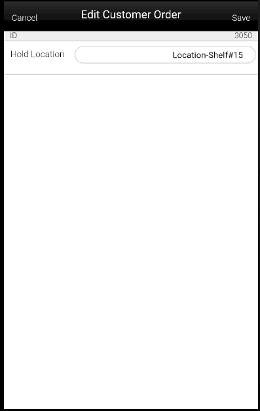
This screen can be accessed by clicking on Edit Customer Order footer menu option from the Customer Order Items screen. This screen enables the user to specify the hold location of the customer order. This screen is available only when the Customer Order status is New or In Progress. Also, system parameter 'Customer Order Fulfilment Restriction' is set to 'Restricted' for this screen to be available.
Info (Customer Orders)
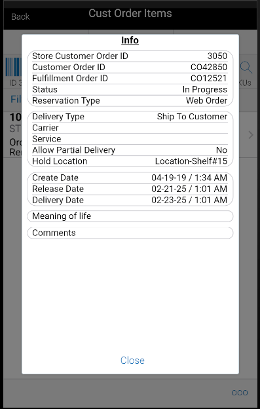
The Info popup contains read-only information about the header level of the customer order. It is accessed through the Info menu option in the Footer menu on the Customer Order Items screen. Details include:
-
Store Customer Order ID
-
Customer Order ID
-
Fulfillment Order ID
-
Status
-
Reservation Type
-
Delivery Type
-
Carrier
-
Service
-
Allow Partial Delivery
-
Hold Location: Location where the items are put for pickup by a customer.
-
Create/Release/Delivery Date
-
Comments
-
CFAs along with the value. The CFAs, without a value captured, will have a blank value against them
Edit CFAs Screen

The Edit CFAs screen displays the list of CFAs (flexible attributes) that have been set up for Customer Orders, in EICS and lets the user enter values for them. The value can be one of the following: Date, Text, Decimal, Long depending on the 'data type' set up for the CFAs, while creating them in EICS. Appropriate security permission is needed for entering CFA values.
Customer

The Customer popup has read-only information about the customer for web order types of customer orders. It is accessed through the Customer menu option in the Footer menu on the Customer Order Items screen. The user must have access customer details security permission.
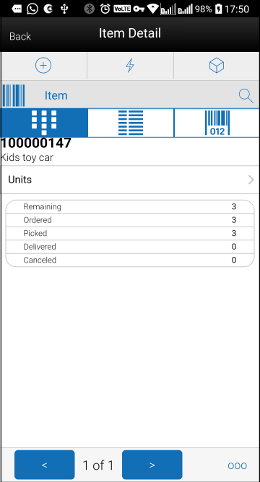
Item Detail (Customer Orders)
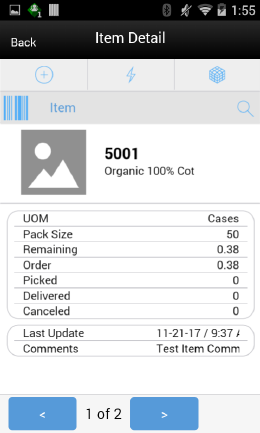
The Item Detail screen allows selecting or scanning an item and is accessed from the Customer Order Items screen. Scanning or entering an item on this screen in the scan bar will refresh the item detail screen for the item on the customer order. The user can page through the items on the customer order. This screen is view only.
The item information including the image (which is system configured) displays in the header. The bottom portion of the screen contains fields of:
-
UOM
-
Pack Size
-
Remaining
-
Order
-
Picked Quantity
-
Delivered Quantity
-
Canceled Quantity
-
Last Update
-
Comments
Lastly, if the item is a substitute for another item, the Substitute For field will display with the original item listed.
Customer Order Picking
The Picking process is a formal process of the system telling the user what items need to be picked and the user going out, physically picking the items, and setting them aside. Once the items are set aside, they will then be used during the fulfillment process for shipping to, or pick up by the customer.
Features:
-
Search for customer order pick
-
View/edit an existing customer order pick
-
Delete a customer order pick
-
Create a customer order pick
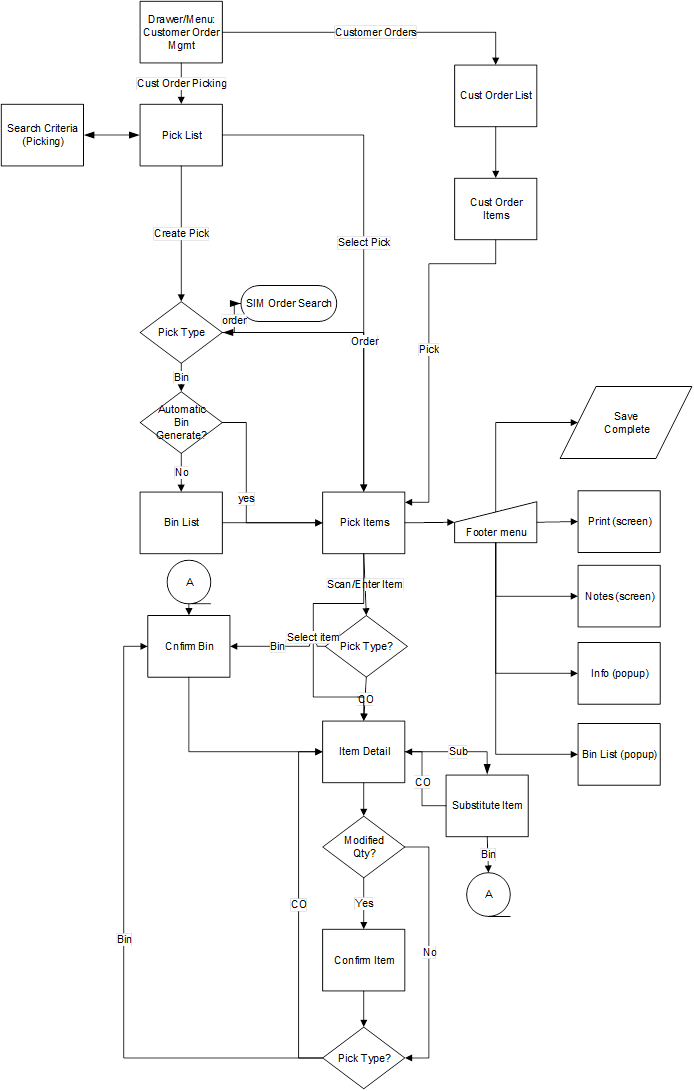
The user will access the Customer Order Picking Dialog from the Customer Order Mgmt menu in the drawer. The Pick List screen will display the list of Active picks. The user can go to the Search Criteria (Pick List) screen to search for picks using alternate criteria.
From the Pick List screen, the user can select a pick to go to the Pick Items (detail of pick) for viewing or editing purposes.
Also from the Pick List screen, the user can Create a pick. The pick may be created by bin or customer order. When creating by customer order, the user will need to specify which order is being picked and, once that is done, the system will generate a pick and navigate to the details of that Pick on the Pick Items screen. When creating by bin if the system is configured to automatically generate the bins, the user will go to the details of the Pick (Pick Items). Otherwise, if manual bin capture, the user must first capture the bins before going to the Pick Details.
Once in a pick, the user can pick items, add substitutes, print, add notes, view info, modify bins, save, or complete the pick.
Pick List
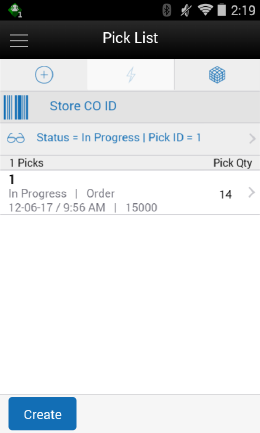
The Pick List screen is accessed by selecting the Customer Order Picking menu option from within the Customer Order Mgmt menu in the drawer/menu. The screen will display the Active status customer orders picks by default which is all picks which are in New or In Progress status. The user can click the eye glasses to go to the Search Criteria screen. Selecting a pick will navigate to the details for the customer order pick. Selecting Create will display the Create Pick popup.
Important fields on this screen include:
-
ID: System-generated Pick ID.
-
Status: Status of the customer order pick.
-
Type: Either Bin or Store Customer Order.
-
Suggested Pick Quantity: Total quantity to be picked across all line items.
-
Date: Date that the pick was either created or completed.
-
User: User that created or completed the pick.
Search Criteria (Pick List)
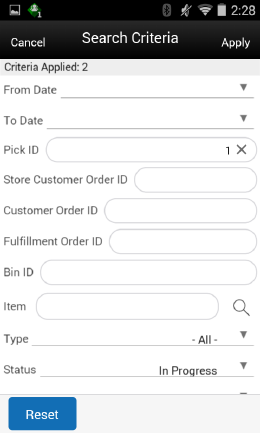
This is the Customer Order Pick Search Criteria Screen. It is accessed by the eye glasses on the Pick List screen. After applying the search criteria, the results will be listed on the Pick List screen and the criteria applied will show. Search criteria includes:
-
From/To Date
-
Pick ID
-
Store Customer Order ID
-
Customer Order ID
-
Fulfillment Order ID
-
Bin ID
-
Item
-
Status
-
Reservation Type
-
User
-
Search Limit
Create Pick
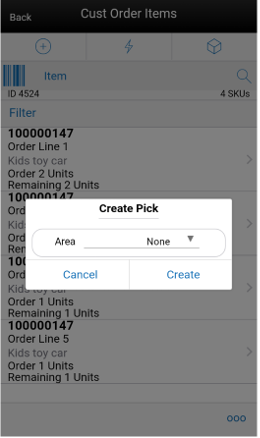
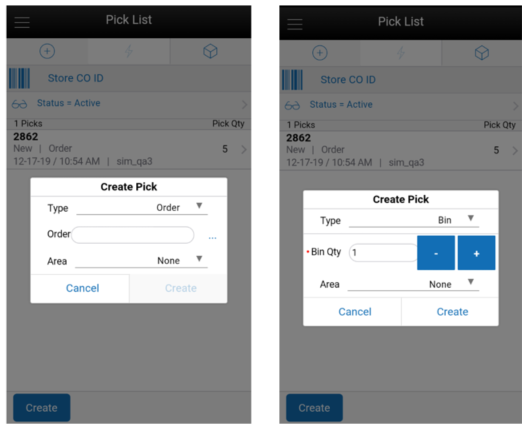
The Create Pick popup is accessed by selecting the Create button from the Pick List screen. The create pick allows for the creation of a customer order pick by either Store customer order ID or by bin. The type will default per the store setting Default Customer Order Picking Method. The store must be configured for Reserve Customer Order Inventory Upon Receiving set to No in order to create or generate a pick by bin or Store Customer Order. This means that inventory is reserved when the customer order arrives into the store and therefore it should be picked from inventory. When set to Yes, inventory is reserved based upon receipts and therefore should be picked from the receipt. The user would not want the store to pick from inventory when it should be picked based upon what was received on the delivery.
When selecting Store Customer Order, the user must enter in the Store customer order ID to be picked or use the search function to select one from the list. When creating a pick by Store Customer Order ID, there will only be one Customer Order Fulfillment Order per pick transaction.When creating a pick by bin, the user will define the number of bins to be put on the pick. Initially, the bin quantity will be defaulted based upon the store admin setting Default Number of Bins. The user has the potential to override this quantity if the store admin setting Override Bin Quantity is set to Yes.
Picks created by Bin allows for multiple customer orders to be put on the pick; one store customer order per bin. It will first look to all store customer orders that are the oldest based upon release date. All other rules for creating the pick will be the same as those above for picking by store customer order ID.
In both by Store Customer Order ID and bin a pick can be created by Area. Picking by Area allows a user to create a pick for a customer order that is for a specific Area of the store. This is only possible if the store configuration Allow Picking by Area is set to Yes and the system admin of Customer Order Fulfillment Restriction is set to Transaction Controlled (meaning that the entire customer order does not have to be picked in one pick). Areas are set up in EICS in the Area dialog. If Area is an option, the system will give a list of Completed status Areas, with one of the options being None for no area.
Upon selecting Create, the user will navigate to the Pick Items screen for the generated pick.
Customer Orders that will be available for picking will follow these rules:
-
Customer order must be a web order type.
-
Customer order must still be open.
-
There cannot be an existing open pick for the customer order.
-
If Area is being used, open picks are allowed for the customer order, so long as it is not for the same area.
-
-
Customer order must have at least one item on the order with items remaining to be picked.
-
If the system admin Customer Order Fulfillment Restriction equals Transaction Controlled, the system will also need to check that there is stock available to be picked for at least one item.
-
If pick is by Area of None, all items from the customer order will be put on the pick.
-
If the pick is for a specific area, the system will put the items from the customer order which are in the selected area.
-
-
If Customer Order Fulfillment Restriction equals Restricted, there must be enough available stock for all items on the pick to be fully picked in their entirety.
-
Items that have substitute equal to Yes on the customer order (meaning they allow for substitutes) will have their stock ignored. This is because they can have items substituted for them.
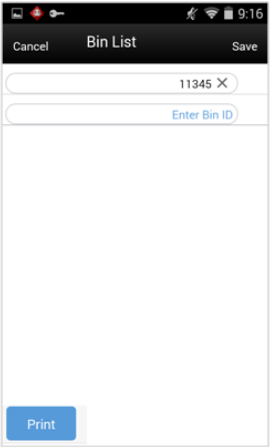
The Bin List screen applies to those picks which are by bin. Picks by bin will have bins manually or system generated per the store admin setting. For manually-captured bins, the user will be directed to the Bin List screen immediately upon creating the pick prior to going to the Pick Items screen. Bins are only editable for manually-captured bins. System and manually captured bins can be viewed from the Bin option within the footer menu of the Pick Items screen. The bins can be printed through the Print button.
Pick Items
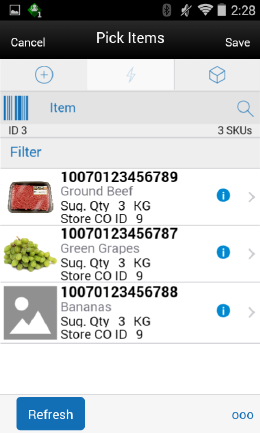
The Pick Items screen is accessed by selecting an existing pick from the Pick List screen, or by creating a new pick. The Pick Items displays all of the items on the pick including substitute items which will be listed below the original item with an arrow referencing up to the original item. Fields will include the suggested pick quantity, quantity (actual picked quantity) and store customer order ID or bin ID based upon the pick type. Selecting an item will navigate to the Item Detail screen for that item. Scanning an item will also navigate to the Item Detail screen for that item and the quantity may be updated per the quantity scanned. If the pick is by bin, the user will go to the Confirm Bin screen to scan the bin prior to going to the Item Detail screen.The items are listed in order with those items with stock on hand in the backroom being displayed first, followed by items with shopfloor stock on hand, and lastly those that do not have stock on hand in either the backroom or the shopfloor. All items are ordered by macro sequence location.Items will have an icon displayed denoting the pick status of the item. If the item's pick quantity has quantity left to be picked there will be a blue circle with an 'i'. If the item's pick quantity is fully picked, it will be a green circle with a check mark. If the item's pick quantity has exceeded the amount to be picked (because changes to the customer order have been made such as a delivery or cancelation), there will be a red circle with a '!'.Refresh will refresh the customer order pick and pull in any delivered or canceled quantities that have happened for the delivery. The Adjusted Pick Quantity will reflect the new suggested pick quantity.
The footer menu is accessed from the ellipsis footer menu on the Pick Items screen. The menu functions will include the following:
Info: Info will access the Info popup.
Notes: The Notes option accesses the notes common dialog to capture notes. Notes can only be added for picks by Store Customer Order ID. The note will be saved on the customer order and not the pick.
Bins: Accesses the Bin List screen.
Refresh: Perform the same function as the refresh on the Pick Items screen.
Confirm: Confirms the pick and move it to Completed status and, the user returns to the Pick List screen.
Save: Saves the pick as In Progress status and return the user to the Pick List screen.
Delete: Allows for deleting of a New or In Progress status pick and moves it to Canceled status. The user will return to the Pick List screen.
Cancel: Exits to the Pick List screen and no changes will be saved.
Back: Back is only applicable to view only picks and will exit to the Pick List screen.
Print: Print will display the common print dialog to print the customer order pick report.
When confirming, if any of the store customer order quantities on the pick transaction have been canceled or delivered since the pick was created, and the total pick quantity for the item is now greater than the remaining pick quantity:
-
The Adjusted Pick Qty field will be updated to indicate to the user how much is needed to pick based upon the changes (delivery and cancels) that were made on the customer order.
Upon confirm, the system will check the system admin, Customer Order Fulfillment Restriction:
-
If it is set to Restricted, the entire customer order pick must be picked in its entirety.
-
If it is set to Transaction Controlled.
-
When the item has a variable unit of measure, it can be difficult to pick the exact amount suggested. For example: picking 2 pounds of bananas might end up truly being 2.2. The quantity picked may exceed the suggested if the defined tolerances are setup to allow for such.
-
Substitute Items are considered in the Total Pick Qty when doing all quantity validations.
-
The reserved quantity for the original item is decreased by the rolled up pick quantities.
-
The substituted items that have an actual pick quantity greater than zero will have their reserved quantity increased for the amount being substituted.
Item Detail (Picking)
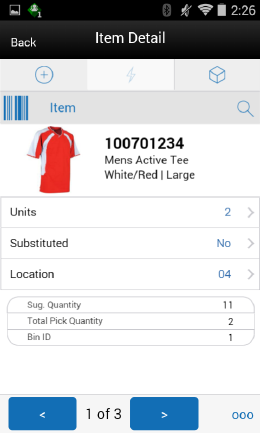
The Item Detail screen contains the details for the specific item on the customer order pick. Entering/scanning an item on this screen will refresh the screen and update item and the pick quantity for the item. If the pick is by bin, first the user will have to Confirm the bin before refreshing the details for the item. Once an item has been fully picked, the system will automatically navigate to the next item on the pick.
The Pick Quantity, represented by the field on the top of the screen with the UOM label is editable by the user and represents how many of this item is being picked. Editing the quantity is controlled by security. If the quantity is edited, the user will be prompted with the Confirm Items popup to confirm the proper item and also the confirm bin (if pick is by bin).
The suggested pick quantity displays the quantity the system suggests to be picked. The adjust pick qty is the suggested pick quantity that is updated by the system upon refresh or trying to confirm the pick. It reflects any deliveries or cancellations that have occurred on the customer order since the time the pick was generated. Total Picked is the total amount picked for the item along with all of its substitute items. Lastly, if the pick is by Store Customer Order ID, that ID will be displayed. Otherwise, if the pick is by bin, then the bin for the pick will be displayed.
If the item allows for substitute items, there will be a Substituted field that will state Yes if there is one or more items substituted, and No if there are no substitutes. Tapping on this field will navigate to the Substitute Items screen. If the item is being substituted for another item, there will be a Substituted For field and it will display the original item ID that the item is being substituted for.
If Display Sequence Fields equals Yes, the macro location and area for the item will be displayed. If it set to No, this field is not displayed.
If there is stock on hand in the backroom:
-
It will display the first available backroom location.
-
If no backroom location, it will display Backroom.
If there is no stock in the backroom and stock exists in the shopfloor:
-
It will display the first available shopfloor location.
-
If there is no shopfloor location, it will display Shopfloor.
If there is no stock on hand in the backroom or the shopfloor:
-
It will display the first backroom location.
-
If no backroom location, the first shopfloor location is displayed.
-
If no shopfloor location, it displays no location.
The screen has arrows on the bottom that will prompt the user to the next item on the pick.
Confirm Item/Confirm Bin
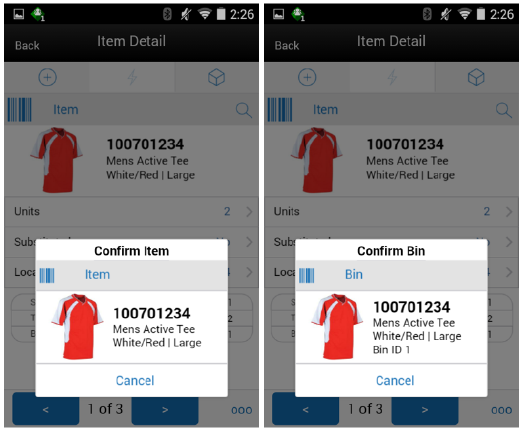
After editing the pick quantity the user will be required to confirm the item in the Confirm Item popup. This is to validate the proper item is being picked.
For picks that are by bin, the user also needs to validate that the items are being placed into the proper bin. When entering or scanning an item or editing the pick quantity, the user will be directed to the Confirm Bin popup to scan the bin for the item.
Note:
The confirm bin will occur after the Confirm Item (if applicable).Substitute Items

The Substitute Items screen is accessed by selecting the Substituted field on the Item Detail (Picking) screen. This screen will list all of the available substitute items for the item being picked (if there are any). If the Item Substitution - Store Discretion equals Yes, the user does not have to use one of the items in the list, and can also enter/scan an item for substitution. It will be added to the pick as well as to the Substitute Items list. If the user does not have store discretion, only items from the list can be selected.
Info (Picking)
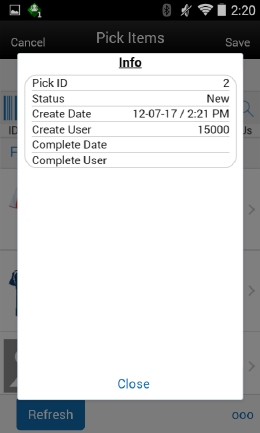
The info screen is an informational popup that contains read-only information about the header level of the customer order pick. It is accessed through the Info menu option in the Footer menu on the Pick Items screen. Details include:
-
Pick ID
-
Status
-
Create Date
-
Create User
-
Complete Date
-
Complete User
Customer Order Deliveries
Delivering of a customer order consists of collecting the items that have been picked and then getting them to the customer (shipment or pickup). This might be for a customer pickup or shipping them to the customer.
Features:
-
View customer order delivery (web order and non-web orders)
-
Edit an existing customer order delivery (web order)
-
Delete a customer order delivery (web order)
-
Print a customer order delivery
-
Create a customer order delivery (web order)
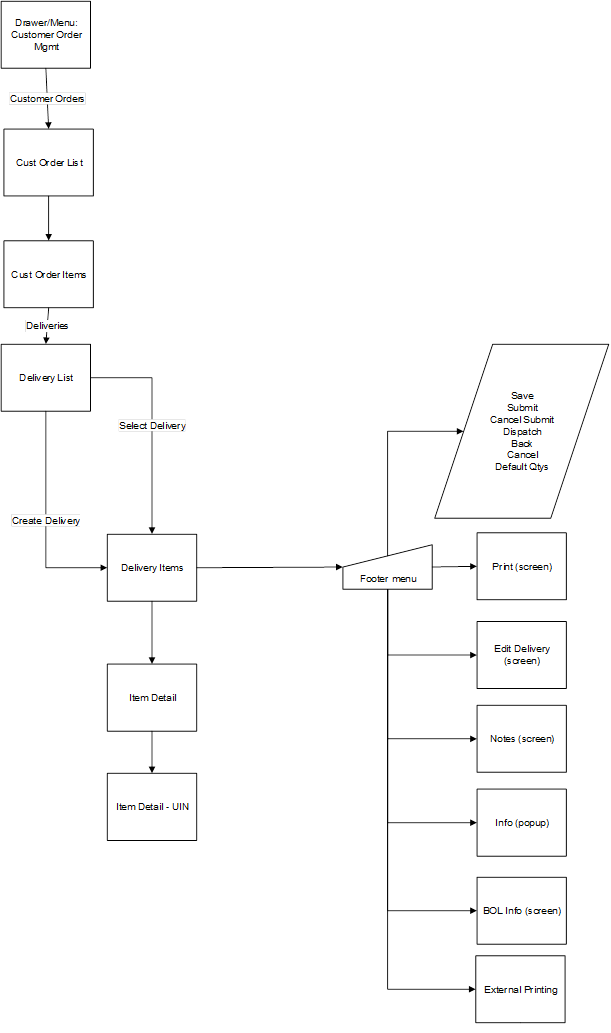
Customer order deliveries will be accessed from the Customer Order dialog on the Cust Order Items footer menu. Customer order deliveries can be created and edited for web order types, non web orders can only be viewed and are fulfilled through the POS system. Customer order deliveries will allow for viewing, creating, editing, saving, submitting, dispatching, printing, BOL, and deleting customer order deliveries
Delivery List
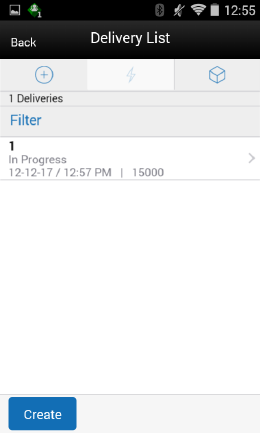
The Delivery List screen is accessed by selecting the Delivery menu option within the footer menu of a specific customer order. The screen will display all of the customer orders delivery for the specific customer order delivery. The deliveries displayed may be for web orders that were created within the system, a third-party system such as POS, or they may be for POS on holds and layaways.
Since there will never be a large number of deliveries for a specific customer order, there is no search criteria screen. There is however a filter bar, which allows for filtering by: delivery ID, status, date, and user. Selecting a delivery will navigate to the details for the customer order delivery. The Create button will attempt to create the delivery and navigate to the Delivery Items screen.
Creating a new delivery is also an option. New Deliveries can only be created for web order customer orders that are still in an In Progress status, which means there is remaining quantity yet to be fulfilled.
In case the system is configured to require picking, it will validate there are item quantities on the customer order that have been picked which have not yet been delivered prior to creating the delivery. Next, the system will check the Allow Partial Delivery indicator which is on the customer order fulfillment order. If this is set to No, it means that the entire order must be delivered together. The system would not allow the creation of the delivery unless the entire order has been picked. If picking is not required, the delivery will be created. The Allow Partial Delivery indicator will then be validated upon dispatch of the delivery.
Once the system creates the delivery, the delivery will consist of all of the items that were auto populated from the customer order fulfillment order including substitutes.
Delivery Items
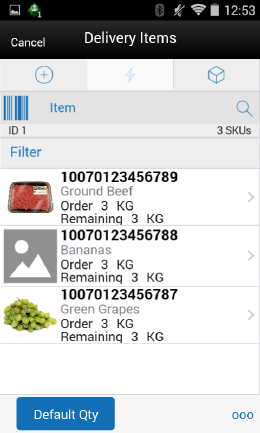
The Delivery Items screen is accessed by selecting an existing Delivery from the Delivery List screen, or by creating a new delivery. Delivery Items displays all of the items on the delivery including the order and remaining quantities.
Selecting an item will navigate to the Item Detail (Customer Order Deliveries) screen for that item. Scanning an item will also navigate to the Item Detail screen for that item and the quantity may be updated per the quantity scanned.
The items are listed in ascending order by item ID. A Default Qty button will be displayed in the footer which will default in the delivery quantities on the delivery (non UIN items) to what is remaining to be delivered.
If any item in the customer order has Customer Order Ship Alone indicator set to Yes, then the system will not allow the user to deliver this item along with other items. Those items will need to be shipped alone.
The footer menu is accessed from the ellipsis footer menu on the Pick Items screen. The menu functions will include the following:
Info: Info will access the Info popup.
BOL Info: Accesses the BOL Info popup.
Notes: The Notes option accesses the notes common dialog to capture notes. The note will be saved on the customer order and not the pick.
Default Qty: Default Qty will default in the delivery quantity to what is remaining.
Edit Delivery: Displays the Edit Delivery popup to edit header level information on the delivery.
Refresh: Refreshes the delivery by getting the most current customer order/fulfillment order information. There may be other picks or deliveries that have occurred in the time the delivery was originally created.
Cancel Submit: Sets a submitted status delivery back to In Progress.
Dispatch: Dispatch will check if the Allow Partial Indicator is set to No, it will validate that the entire order is being delivered together. If not, the system will restrict the user from dispatching. Those users with certain privileges will be able to override this and it will be a warning. Also, if the store parameter Manifest Customer Order Deliveries is set to No and system parameter Tracking ID Required is set to Yes, the system should check if the Tracking ID has been captured or not, if not captured, an error message will be displayed. Upon dispatch of the delivery the delivery will move to Completed status, and user returns to the Delivery List screen. The stock on hand and customer order reserved quantities will be decremented by the delivered quantities. The customer order fulfillment order will have the delivered and remaining quantity updated. If the entire customer order has been fulfilled, meaning there is no remaining quantity, the customer order will be set to Completed status. Submit: Submit will submit the delivery and set it to Submitted status. Submit is only available when store configured for Dispatch Validate to Ship Submit. Submitting will set the delivery to a Submitted status and not allow for edits, since there are no updates to inventory at this point. The only step possible will be to cancel Submit or Dispatch. When the system is configured for Ship Direct, submitting is not possible. If the store parameter Manifest Customer Order Deliveries is set to No and system parameter Tracking ID Required is set to Yes, the system should check if the Tracking ID has been captured or not, if not captured, an error message will be displayed.
Save: Saves the delivery as In Progress status and return to the Delivery List screen.
Delete: Deletion of an In Progress status delivery and move it to Canceled status. User will return to the Delivery List screen.
Back: Back is only applicable to view only deliveries and will exit to the Delivery List screen.
Cancel: Exits to the Delivery List screen and no changes will be saved.
External Printing: Displays the external printing dialog to select a printer for pre-shipment or manifesting.
Print: Print will display the common print dialog to print the customer order delivery report.
Item Detail (Customer Order Deliveries)
The Item Detail screen contains the details for the specific item on the customer order delivery. Entering/scanning an item on this screen will refresh the screen and update item and the delivery quantity for the item.
The delivery quantity, represented by the field on the top of the screen with the UOM label is editable by the user and represents how many of this item is being delivered. Editing the quantity is controlled by security. Users will enter in the quantity to be delivered. If picking is required, the quantity will not be allowed to exceed the pick quantity. If picking is not required, the quantity cannot exceed the remaining quantity.
If the item has Customer Order Ship Alone indicator set to Yes, then the system will not allow the user to deliver this item along with other items. Those items will need to be shipped alone.
The pack size will be displayed if the UOM is set to cases. The remaining, order, picked, delivered and canceled quantities for the customer order will be displayed. Lastly, if the item is a substitute for another item, the Substitute For field will display with the original item listed.
The Item Detail has an UIN tab to take user to the UIN screen to add/remove UINs for UIN items (if system is configured to use UINs and if the item is a UIN item).
There is an Extended Attributes tab that enables the user to view/capture Extended Attributes for the item. If the item is not configured to capture extended attributes or there are no extended attributes captured, the list will be empty.
Info (Customer Order Deliveries)
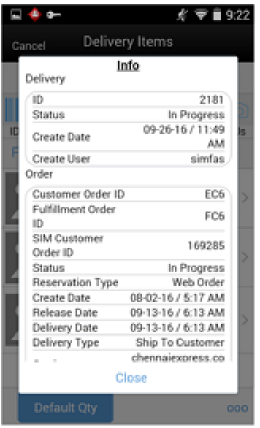
The Info popup contains read-only information about the header level of the customer order delivery. It is accessed through the Info menu option in the Footer menu on the Delivery Items screen. Delivery details include:
-
ID
-
Status
-
Create Date
-
Create User
Order details include:
-
Customer Order ID
-
Fulfillment Order ID
-
Store Customer Order ID
-
Status
-
Reservation Type
-
Create /Release/Delivery Date
-
Delivery Type
-
Carrier
-
Service
-
Allow Partial Delivery
-
Comments
BOL Info
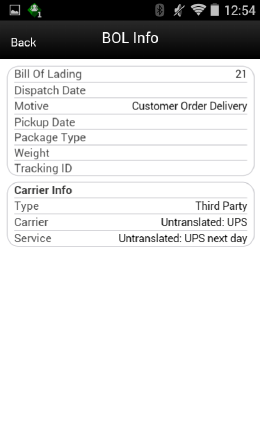
The BOL Info screen contains read-only information about the Bill of Lading (BOL) for the customer order delivery. It is accessed through the BOL Info menu option in the Footer menu on the Delivery Items screen. Fields include:
-
Bill of Lading
-
Dispatch Date
-
Motive
-
Pickup Date
-
Package Type
-
Weight
-
Tracking ID
-
Ship to Address
-
Carrier Type
-
Carrier
-
Service
-
Carrier Name and Address
The Ship From section is populated with the information of the sending store. If Ship To details exist, a Ship To button will be displayed. Selecting Ship To will display the Ship To details which is the information of the customer.
Edit Delivery
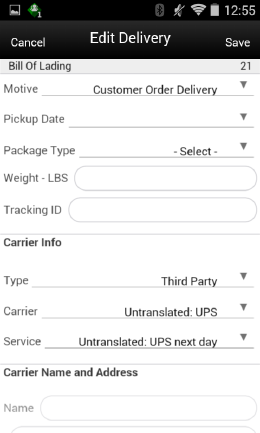
This is the Edit Delivery screen for Customer Order Deliveries. It allows the user to edit details on the Customer Order Delivery or BOL. It is accessed when selecting the Edit Delivery menu option from the Footer menu on Delivery Items. The Edit Delivery option is only editable when the delivery is in an editable status. The user must have proper permission to access this screen. Fields for edit include:
-
Motive
-
Pickup Date
-
Package Type
-
Weight
-
Tracking ID
-
Carrier Type
-
Carrier
-
Service
-
Carrier Name and Address
If the carrier is on the customer order, the carrier type will be defaulted to third party and the carrier will be populated from the customer order. If there is no carrier on the customer order, the type will default to the sender for shipments and receiver for pick-ups.
The Service, example 2 day, next day, and so on, are defaulted from the customer order. They are not required. For additional details on BOL, Manifesting, and pre-shipment, see Chapter 9, "Shipping and Receiving Common Components".
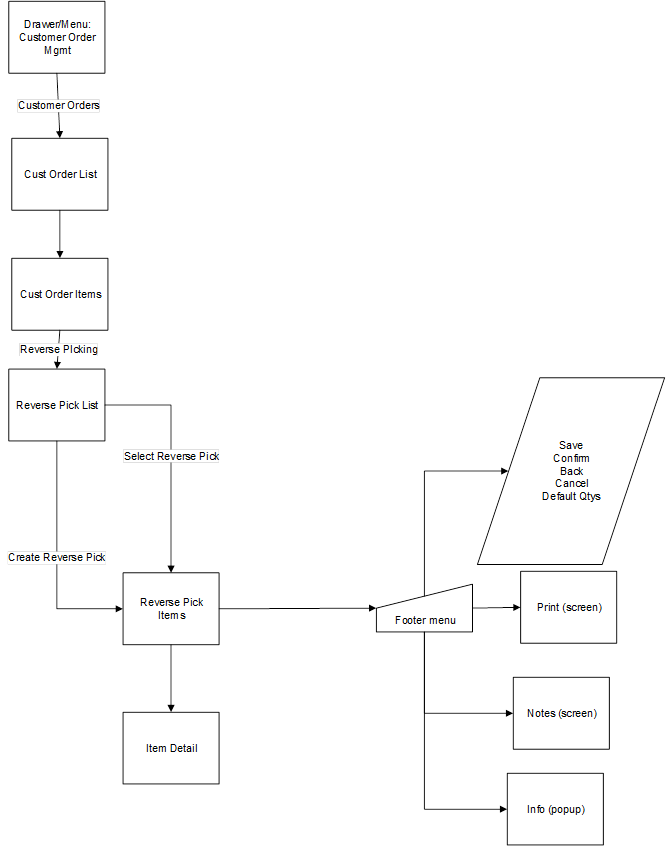
Customer Order Reverse Picks
Canceling of customer orders can come in from an external system, such as an Order Management System. When this happens, a reverse pick list will be generated. If there are items that physically need to be un-picked, the user will action the reverse pick list which will then take the items that were canceled and move the picked quantities back to the appropriate area in the store. If the items that are being canceled are not picked, then the system generated reverse pick will just be created in a Completed status with no action required through the application.
A system-generated reverse pick may get created if the user rejects an open customer order.
A manual reverse pick might also be necessary. This happens when the user discovers that something which was picked has to be unpicked, maybe because it has been damaged. The manual reverse pick will reverse the pick quantities.
Note that reverse picking and canceling is more of an exception process.
-
View customer order reverse picks
-
Edit an existing customer order reverse pick
-
Delete a customer order reverse pick
-
Print a customer order reverse pick
-
Create a customer order reverse pick
Customer order reverse picking will be accessed from the Customer Order dialog on the Customer Order Items footer menu. Customer order reverse picks can be created and edited for web order types. Customer order reverse picking will allow for viewing, creating, saving, editing, confirming, and deleting of customer order reverse picks.
Reverse Pick List
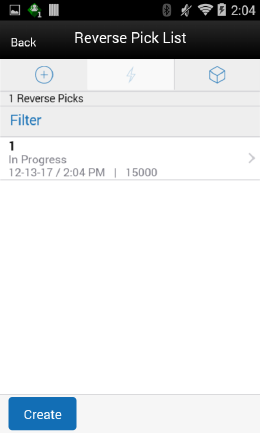
The Reverse Pick List screen is accessed by selecting the Reverse Pick menu option within the footer menu of a specific customer order. The list will contain all of the Reverse Picks for the specific Customer Order. The screen will list both externally created system- generated reverse picks as well as manually created reverse picks. Reverse Picks are only for web orders. The Reverse Pick List screen lists reverse pick records for all statuses. This list screen does not have a filter as there normally would not be that many reverse picks for a customer order fulfillment order to filter on.The fields will include the Reverse Pick ID, status, last update date, and user for the reverse pick. A user can navigate to the details of a reverse pick by tapping on a reverse pick record. Finally, the user can create a new manually created reverse pick.
-
New Reverse Picks can only be created for Web Order customer orders that are still in an In Progress status. The user might want to create a manual reverse pick because something that was picked might have become damaged and therefore it must be un-picked.
-
Before creating a new manual reverse pick, the system needs to perform some validations. The system must be configured for manual or auto picking and if so, then reverse picks can be created. This means that if Reserve on Receiving is set to Yes and Auto Picking is not turned on, then a reverse pick would not be allowed to be created. There must be at least one item on the customer order with a physical picked quantity. By physical picked quantity it means a quantity that is still physically sitting there as picked, and it has not been delivered (which means shipped or picked up by the customer). Once the reverse pick is created, it will consist of all the items auto populated from the customer order fulfillment order including the substitute items. The Suggested Reverse Pick Quantity will be set to zero for manual picks. For manual reverse picks, the quantity cannot exceed the physical picked quantity.
External System-Generated Reverse Pick
-
When a system generated reverse pick is created, it will put all items on the reverse pick, including the substitute items. However, only those items that have a suggested quantity will be allowed to be reverse picked. The Suggested Reverse Pick Quantity will be populated with what should be reverse picked based upon the cancellation from the external system. For externally system generated reverse picks, the Quantity cannot exceed the remaining quantity or the suggested reverse pick quantity.
-
If a cancelation comes into SOCS that is for more than what is remaining on the order, the cancelation will be rejected and a system-generated reverse pick will not be created.
-
When creating the system generated reverse pick, the system will first try and cancel those items that have not been picked. If this quantity is exceeded, it will cancel those items already picked. When all items that are canceled have not been picked, there will not be anything to un-pick and therefore the reverse pick will be auto completed and put into a Completed status and updates will happen to the customer order and inventory as stated below. When some or all items that are canceled are picked, this creates a system-generated reverse pick in New status. This occurs so the user can action it and un-pick the items. Updates will occur upon confirmation of the reverse pick as described below.
Reverse Pick Items
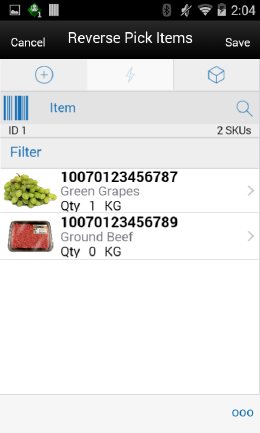
The Reverse Pick Items screen is accessed by selecting an existing Reverse Pick from the Reverse Pick List screen, or by creating a new Reverse Pick. The Reverse Pick Items display the items in alphanumeric order by item description and the items are determined based upon the following rules:
-
Manually created reverse picks will put only the items that:
-
Have a physical pick quantity, meaning they have been physically picked and therefore can be reverse picked.
-
OR, if there is reverse pick qty, meaning one had already been entered by the user on the reverse pick and saved (the PPQ may not exist any longer on the customer order depending on what has happened to the order).
-
-
Externally generated (system) reverse picks will put all items on the reverse pick that have a suggested quantity. Meaning the items that are being canceled by the external system. If the item being canceled has a substitute(s) those will be put on the reverse pick along with the original item.
-
All completed and canceled status reverse picks will display all items from the customer order.
Selecting an item will navigate to the Item Detail screen for that item. Scanning an item will also navigate to the Item Detail screen for that item and the quantity may be updated per the quantity scanned.
The footer menu is accessed from the ellipsis footer menu on the Reverse Pick Items screen. The menu functions will include the following:
Info: Info will access the Info popup.
Notes: The Notes option accesses the notes common dialog to capture notes. The note will be saved on the customer order.
Default Qty: Default Qty will default in the quantity.
-
Manually created reverse picks will default the quantity to the physical pick quantity.
-
Externally generated (system) reverse picks will default the quantity to that of the suggested quantity.
Confirm: Confirm will complete the Reverse Pick and move it to Completed status.
-
For manual reverse picks, the pick quantity on the customer order will be decremented by what was a Reverse picked. The Reserved quantity and the canceled quantity will not get updated as the items are not being canceled on the order, so they need to remain as reserved. They are simply being un-picked.
-
For the externally (system) generated reverse picks the pick quantity will be decremented on the customer order. The reserved quantity (if it had been reserved) will be decremented by what was reverse picked and put back to the backroom. The Canceled quantity on the customer order will be incremented by the reverse picked quantity. If all items have been canceled and there have been no deliveries, the status of the customer order will move to Cancelled. If there is no remaining order quantity on the order, and some of the items have been delivered, the customer order will move to Completed status.
Save: Saves the reverse pick as In Progress status and return to the Reverse Pick List screen.
Delete: Delete will allow for deleting of an In Progress status reverse pick and move it to Canceled status. User will return to the Reverse Pick List screen.
Back: Back is only applicable to view only reverse picks and will exit to the Reverse Pick List screen.
Cancel: Exits to the Reverse Pick List screen and no changes will be saved.
Print: Print will display the common print dialog to print the customer order reverse pick report.
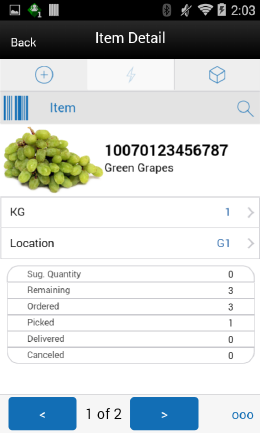
Item Detail (Customer Order Reverse Picks)
The Item Detail screen contains the details for the specific item on the customer order reverse pick. Entering/scanning an item on this screen will refresh the screen and update item and the reverse pick quantity for the item.
The reverse pick quantity, represented by the field on the top of the screen with the UOM label is editable by the user and represents how many of this item is being reverse picked. Editing the quantity is controlled by security. The suggested quantity will populate with the amount to be reversed for system generated reverse picks. Manually created will have the suggested quantity set to zero.
Users will enter in the quantity to be reverse picked.
-
For manual reverse picks, the user must enter in a quantity less than or equal to the physical pick quantity for the item.
-
For system generated (external) reverse picks the quantity must be less than or equal to the suggested quantity for items which are units. It must be less than or equal to the remaining quantity for variable UOM items (that is, Kg, Lbs, and so on).
The pack size will be displayed if the UOM is set to cases. Other fields include remaining, order, picked, delivered and canceled quantities for the customer order will be displayed. Lastly, if the item is a substitute for another item, the Substitute For field will display with the original item listed.
Info (Customer Order Reverse Picks)
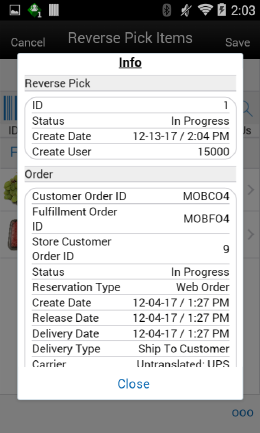
The Info popup contains read-only information about the header level of the customer order reverse pick. It is accessed through the Info menu option in the Footer menu on the Reverse Pick Items screen. Reverse Pick details include:
-
ID
-
Status
-
Create Date/User
Order details include:
-
Customer Order ID
-
Fulfillment Order ID
-
Store Customer Order ID
-
Status
-
Reservation Type
-
Create /Release/Delivery Date
-
Delivery Type
-
Carrier
-
Service
-
Allow Partial Delivery
-
Comments