13 Item Basket
Item Basket is a way of creating a list of items that can be utilized for other things such as line busting, gift registries, and so on. Item Basket allows a user to capture items and their quantities.
Note:
An item basket that has only items on it is considered 'static' meaning that the number of items does not change. An item basket that has only hierarchies or hierarchies and items is considered 'dynamic' meaning that the items on the basket can change based upon the items associated to the hierarchy. The desktop allows for item baskets that are 'dynamic' or 'static' to be created, viewed and edited. Whereas, on the mobile application only static item baskets (ones with items) can be created, viewed, and edited.Features:
-
Create a new item basket
-
View or edit and existing item basket
-
Delete an In Progress Item Basket
-
Copy a Completed Item Basket
Item Basket
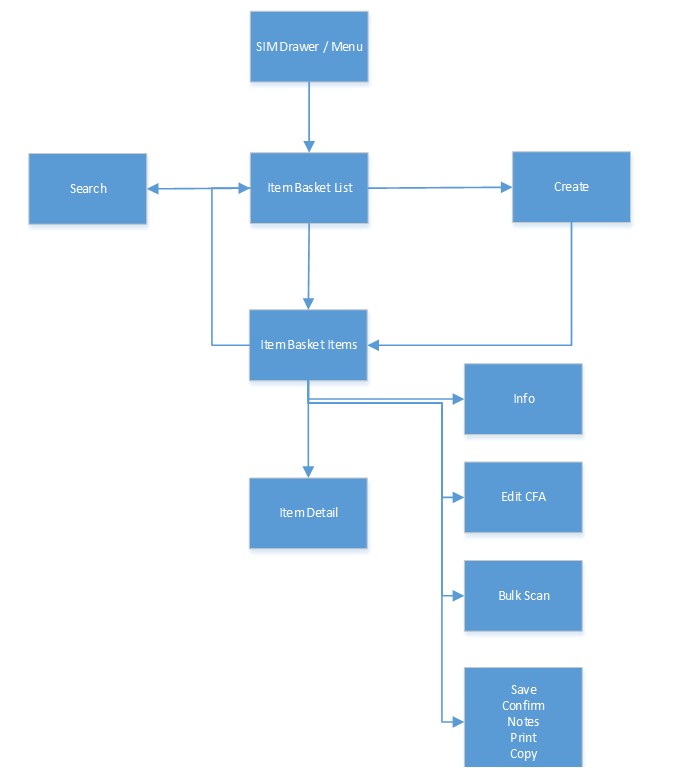
Item Basket is accessed through the Item Basket menu within the drawer. Selecting the menu option takes the user to the Item Basket List screen. On this screen, the option is given to search for Item Basket records which will be presented on the Item Basket List screen. From here one can edit or view an item basket, or create an item basket, in all cases the user is directed to the list of items on the Item Basket Items screen. The user can select an existing item or scan/enter a new item directing to the Item Detail screen where functions allow the user to add, view, and edit the details of the items. The user can specify values for CFAs (Custom Flexible Attributes) that have been setup for the item basket within the Edit CFAs screen. Lastly, additional functions will include Notes, Print, Copy, Delete, Save, and Confirm.
Item Basket List
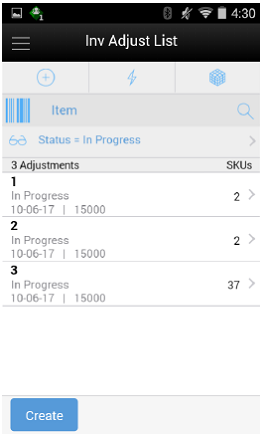
When navigating to Item Basket, the Item Basket List screen displays the In Progress item baskets as the default list. The user can use the search criteria eye glasses to navigate to the Search Criteria (Item Basket) screen to enter search criteria for item baskets. When scanning/entering an item in the scan bar, the system adds the item to the entered search criteria and narrows down the current list of item baskets.
Creating a new item basket navigates to the Create Item Basket popup to enter in header level information, and then it will navigate to the Item Basket Items screen with no details (items) to build a new item basket. Selecting an item basket from the list navigates directs the user to the details for that item basket.
Search Criteria (Item Basket)
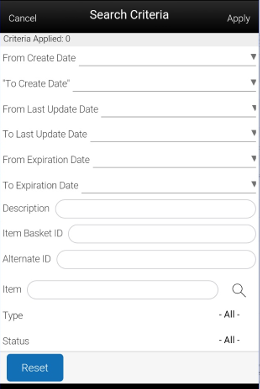
The Item Basket Search Criteria screen is accessed by the eye glasses on the Item Basket List screen. After applying the search criteria, the results are listed on the Item Basket List screen and the criteria applied is shown.
Create Item Basket
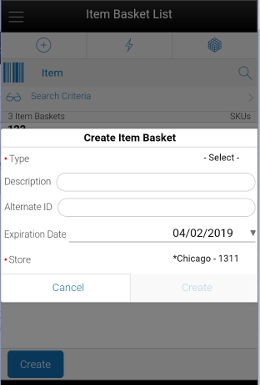
The Create Item Basket screen is used when creating a new item basket and it is accessed when selecting Create from the Item Basket List screen. All item baskets created on mobile will be static. A user must have create permissions to create a new item basket. The type of item basket is required to be selected from the list. The type is populated from the list of item basket types defined in Code Info dialog within EICS.
Description is an optional text field to describe the item basket. Alternate ID is also an optional field to hold an alternate ID given to the item basket by the user, different from that of the system generated item basket ID. Expiration date is a field to hold an optional expiration date used to update item baskets to 'canceled' status when the expiration date has passed. Lastly, the store field is required and the options will include the user's store or 'All Stores'. 'All Stores' is only available to users that have the proper permission, and this option will allow for the creation of item baskets in which all stores would have access to use.
Item Basket Items
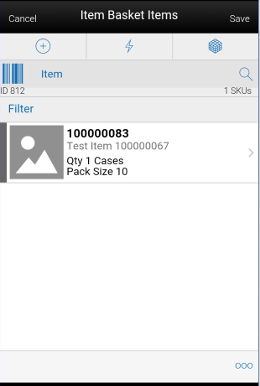
The Item Basket Items screen is where a new item basket is created. Initially, this screen will not have any items. The items screen is also displayed when selecting an existing item basket transaction from the Item Basket List. The items are listed for the item basket. The item image for the line items is displayed per configuration.
Line items appear in a list and selecting a line item navigates to the item details of that item. If an item has been changed in the current session, it is indicated by a bar on the left of the item. Scrolling in the list of items displays a filter. The filter can be used to narrow down the list of items. Filtering can occur by item ID and description.
Scanning or entering an item in the scan bar navigates you to the Item Detail screen for that item. The quantity may be updated depending on the scan mode. If the scan type is 'Bulk Scan' the user will navigate to the Bulk Scan screen.
The ellipsis in the lower right hand corner accesses the footer menu which contains all of the functions that can be performed on an item basket.
The footer menu is accessed from the ellipsis footer menu on the Item Basket Items screen. The menu functions include the following:
-
Info: Accesses the Info popup.
-
Notes: Accesses the notes dialog to capture notes.
-
Bulk Scan: Bulk Scan will navigate to the Bulk Scan screen. User must have proper permissions.
-
Edit Item Basket: The Edit Item basket option navigates to the Edit Item Basket screen. User must have proper permissions.
-
Edit CFA: Lets the user enter values for the CFAs that are set up for Item Basket.
-
Copy: The copy function is only available for those item baskets in a 'Completed' status. It takes the current item basket, copies the items and quantities, and creates a new editable item basket with a new ID. It references the copied item basket's ID.
-
Confirm: Confirms and completes the Item Basket setting it to 'Completed' status.
-
Save: Saves the item basket in 'In Progress' status to be completed later.
-
Delete: Marks the item basket to 'Canceled' status.
-
Cancel: Exits the item basket; changes made in that session are not saved.
-
Print: Displays the common print dialog to print the item basket report.
Item Detail
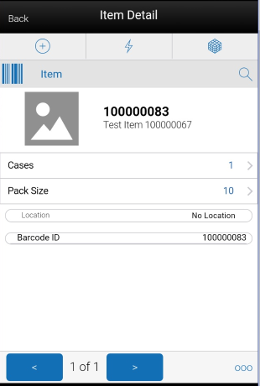
The Item Detail screen is used for selecting or scanning an item from the Item Basket Items screen. Scanning or entering an item on this screen in the scan bar, updates the quantity per the scan mode and refreshes the Item Detail screen for the item and quantity scanned.
The quantity can be edited and updated manually if permissions allow. The item information including the image (which is system configured) displays in the header. The bottom portion of the screen contains fields for quantity with UOM, pack size, and location. The barcode ID will display the contents of the last entered or scanned barcode. The barcode ID is purely informational.
The footer menu, ellipsis button, contains a reset function as well as remove and restore functions. You can page through existing items on the item basket using the arrows on the bottom.
Edit Item Basket
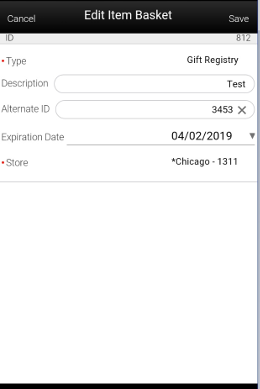
The Edit Item Basket screen is used to edit header level information about the item basket. Edit Item Basket is accessed by selecting Edit Item Basket from within the footer menu of Item Basket Items, and a user must have proper permissions. The fields are the same as those on the Create Item Basket screen and include: type, description, alternate ID, expiration date, and store.
Edit CFAs
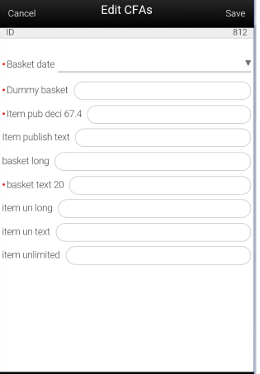
The Edit CFAs screen displays the list of CFAs (flexible attributes) that have been set up for Item Baskets in EICS and lets the user enter values for them. It is accessed by selecting the Edit CFAs menu option within the footer of Item Basket Items and the user must have proper permissions.
The CFAs that are set up as being required must have a value entered for it before confirming the item basket. The value can be one of the following: Date, Text, Decimal, Long depending on the 'data type' set up for the CFAs defined during setup in EICS. Appropriate security permission is needed for entering CFA values.
Info Screen (Item Basket)
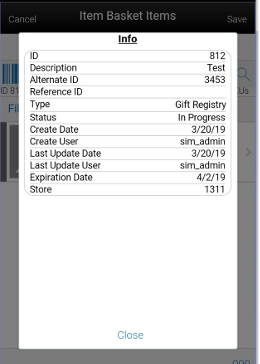
The Info screen is an informational popup that contains read-only information about the header level of the item basket. Info is accessed by selecting Info from within the footer menu of Item Basket Items. Details include ID, description, alternate ID, reference ID, type, status, create date/user, last update date/user, expiration date, and store and the CFAs that have a value.
Bulk Scanning
Bulk scanning is the ability to be able to enter/scan one or more items on a transaction and apply them to the transaction all at once or in bulk. This enables retailers the ability to use RFID to scan many items to add to a transaction.
From the <transaction> items (Item Basket Items) screen, if the scan type is Bulk, after entering/scanning one or many items the user will be directed to the Bulk Scan screen. On the Bulk Scan screen, a counter will tally total, valid, invalid, and expected scans. The Bulk Scan screen can also be accessed via the Bulk Scan menu option from the footer menu on the <transaction> items screen.
Once on the Bulk Scan screen items can continue to be entered/scanned as well as the option to import an item basket.
Selecting the Items option from the footer menu will direct the user to the Bulk Items screen which will list all items that have been collected. Here the user can remove items from the bulk collection if necessary. Once complete, the user can select Apply and the system will apply the items and navigate back to the <transaction> items screen. Bulk scanning is currently used within Item Basket.
Bulk Scan
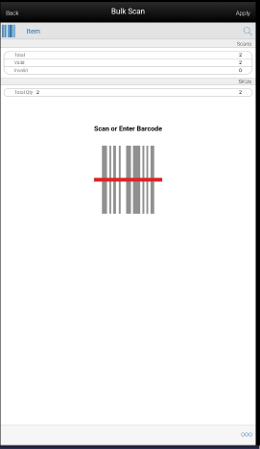
The Bulk Scan screen can be accessed via the Bulk Scan footer menu option from the Item Basket Items screen if the user has proper security permissions. It can also be accessed when scanning/entering an item from the Item Basket Items screen when the scan type is set to Bulk. The Bulk Scan screen allows a user to enter/scan in multiple items at once (that is, RFID) or one by one. In both scenarios the system will gather the items and create a counter of the "scans" including: total, valid, and invalid as well as the total quantity. The system does not apply any validations when items are entered/scanned. Validation does not take place when scanning/entering an item on this screen. The validation takes place once all of the bulk scanning is complete and the user chooses to apply the items to the transaction.
The footer menu is accessed from the ellipsis footer menu on the Bulk Scan screen. The menu functions include the following:
-
Items: Navigates to the Bulk Items screen to view the items that were scanned/entered on the Bulk Scan screen.
-
Import Basket: Navigates to the Select Item Basket screen to import an item basket into the Bulk Scan screen. Only 'static' item baskets can be imported.
-
Apply: Takes all of the items that were scanned/entered, as well as imported item baskets, and executes the item validations and applies the items to the transaction and the user is returned to the Item Basket Items screen with items in the list.
-
Clear: Clears out all of the items that were scanned/entered or imported from an item basket. All of the counters on the Bulk Scan screen are re-set to zero.
-
Back: Navigates back to the Item Basket Items screen and the items that were scanned/entered or imported via an item basket are saved to the Bulk Scan.
Bulk Items
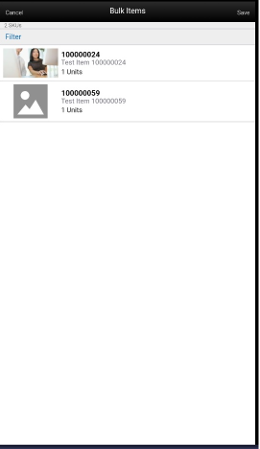
The Bulk Items screen is accessed via the Bulk Items menu option within the footer on the Bulk Scan screen. This screen lists all of the items that have been entered/scanned or imported from an item basket on the Bulk Scan screen. There is a filter at the top of the screen to allow for filtering on item ID and item description. The user is able to delete items that are not needed on the transaction. Deleted items can be restored if accidentally deleted. Save will save the deletions made and return to the Bulk Scan screen.
Select Item Basket
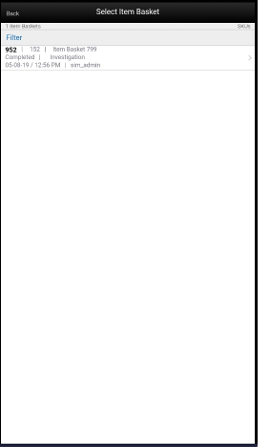
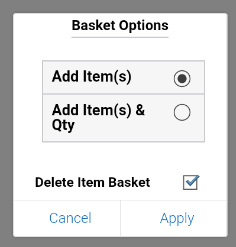
The Select Item Basket screen is accessed via the Import Item Basket footer menu option on Bulk Scan. This screen allows a user to import a 'completed' status item basket that was created for the user's store or All Stores. Upon selecting the item basket the user will be given the option to add only the items without the quantities or add the items with the quantities to the bulk scan. A Delete Item Basket check box is available which will set the selected item basket to 'canceled' status upon import. This allows those item baskets that are no longer of use to not show up in the list anymore and it will get picked up in the purge.