4 SERVEBASE Format
The following section describes the setup and usage of Online Credit Card Transfer for SERVEBASE handling.
Prerequisite, Supported Systems, and Compatibility
Prerequisite, Supported Systems, and Compatibility
This section describes the minimum requirements to use the Online Credit Card Transfer SERVEBASE Handling.
-
OHC Ship Transf.exe
-
OHC Tools.exe
-
Wrapper.dll
-
SPMS Parameters
-
Servebase Web Services Installation
-
CRUFLFC.dll
Compatibility
SPMS version 20.1 or later. For customer operating on version below 20.1, database upgrade to the recommended or latest version is required.
SPMS Parameters Servebase
This section describes the Parameters available to Servebase Handling and they are accessible in Administration module, System Setup, Parameter.
Table 4-1 PAR_GROUP General
| PAR Name | PAR Value | Description |
|---|---|---|
|
Enable Signature Capture for Credit Card |
0 or 1 |
0 - Disable Signature Capture for Credit Card 1 - Enable Signature Capture for Credit Card |
|
CC Type not Supported |
<Value> |
Specifies the unsupported Credit Card type. For example, (‘AX’,’DS’,’VI’,’MC’,’DI’,’DC’,’JC’,’EC’) |
|
CC Partial Reversal |
<Value> |
Specifies the Credit Card type which does not support partial reversal. For example: (‘AX’,’DS’,’VI’,’MC’,’DI’,’DC’,’JC’,’EC’) |
|
CC Type Reversal Not Supported |
<Value> |
Specifies the Credit Card types for reversal authorization not supported for online credit card system. For example, (‘AX’,’DS’,’VI’,’MC’,’DI’,’DC’,’JC’,’EC’) |
|
Online Initial Auth Amount |
<Amount> |
Specifies the initial authorization amount for all card types when the card is swiped at the terminal with online mode |
|
Show Void Settlement |
0 or 1 |
0 - To hide the voided settlement 1 - To show the voided settlement |
Table 4-2 PAR Group Interfaces
| PAR Name | PAR Value | Description |
|---|---|---|
|
Auto Incremental Auth Amount |
<Amount> |
Specifies the incremental authorization amount |
|
Enable Auto Incremental Auth |
0 or 1 |
0 - Disallows the auto incremental authorization. 1 - Allows the auto incremental authorization. |
|
Get Last Approval Code |
0 or 1 |
0 - Does not assign the last approval code for settlement 1 - Assigns the last approval code for settlement |
|
Online CC Remote Port |
16107 |
The remote port where interface communication with |
|
Online CCard Timeout |
120 |
Duration to wait (in seconds) for a response from Online Credit Card Interface. |
|
Online CCard Automatic Settlement |
0 or 1 |
0 - Settlement records will send by batch manually. (‘Credit Card Batch Settlement’ function is enabled in Management module) 1 - Ship Transfer picks up the settlement automatically. |
|
CC Auth/Settlement Folder |
Folder path |
Repository location for authorization/settlement files generated by OHC Credit Card Interface Note: To avoid adverse impact on your system, please abstain from using the following folder path:
|
Table 4-3 PAR Group Not Specified
| PAR Name | PAR Value | Description |
|---|---|---|
|
CC Transfer Format |
SERVEBASE |
Online Credit Card Format |
|
CCard Interface Name |
<Workstation IP/Name> |
Workstation IP address/name which used to run OHC Ship Transfer |
System Configuration Servebase
This section describes the various system codes setup within the Administration module.
Setting up Department Code
A debit and credit department code of each credit card type accepted by the ship must be configured for charging and posting to take place.
-
Login to Administration module and select Financial Setup, Department setup from the drop-down list.
-
Click New to create a Sub-Department code.
Figure 4-1 Department Code Setup
.png)
-
Under the Main Department section, enter the credit/debit card information such as Payment type, department code and description.
-
In the Payment Type Details section,
-
Enter the first two digits of the first set of the credit card number in Credit Card digit.
-
Enter the Credit Card ID, for example MC — MasterCard, VI — Visa, and others.
-
Select the corresponding Credit Card Internal ID from the drop-down box.
-
Enter the Credit Card Merchant Number provided by the Service Provider.
-
Set the Minimum Authorized Value to 0.
-
Select the Commission department from the drop-down list and update the commission rate in percentage.
-
Check the Debit Card No Commission charge if the commission is not applicable to debit card.
-
-
In the Department Security access, select the appropriate security level from the drop-down box.
-
Select the Payment Type under the Payment Department Type, either Both Credit and Debit card, Credit card or Debit card.
-
Click OK to save.
Setting up Merchant Details
Setting up Merchant Details
-
Pre-configured Credit Card type
-
Currency code exist in currency table
-
Merchant information from service provider
-
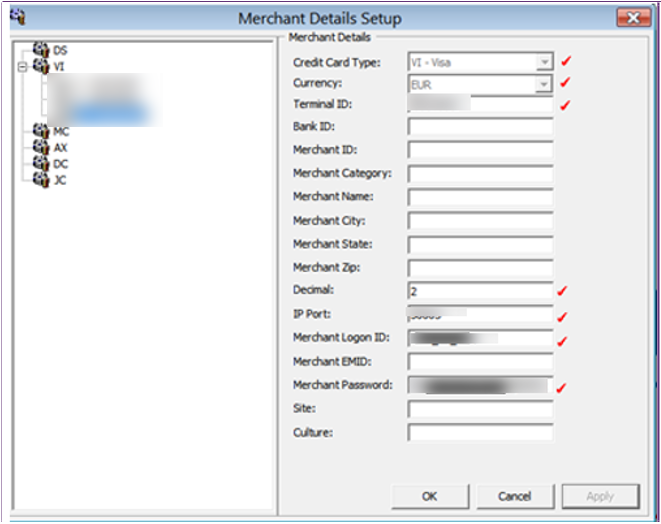
From the Financial Setup, select Credit Card Merchant setup from the drop-down list.
-
Right-click and select Add New.
Figure 4-2 Merchant Details Setup
-
Fill in these fields correctly:
-
Credit Card type
-
Currency
-
Terminal ID — The Terminal ID must match with the Pinpad Terminal ID.
-
Decimal
-
IP port
-
Merchant Logon ID
-
Merchant Password
-
-
Click OK to save.
-
Repeat steps 1 to 4 for other credit card type accepted by the Merchant.
Below are the samples Merchant Info used for testing purpose only.
Table 4-4 Sample Merchant Info (Only for Reference)
| Merchant Info | User Account 1 | User Account 2 | User Account 3 |
|---|---|---|---|
|
Credit Card Type |
MC - Master Card |
MC - Master Card |
MC - Master Card |
|
Currency |
GBP |
GBP |
GBP |
|
Terminal ID |
001 |
002 |
003 |
|
Bank ID |
FID |
FID |
FID |
|
Merchant ID |
21249872 |
21249872 |
21249872 |
|
Decimal |
2 |
2 |
2 |
|
IP Port |
30003 |
30003 |
30003 |
|
Merchant Logon ID |
FIDxx0000001 |
FIDxx00002 |
FIDxx00003 |
|
Site |
FID000000001 |
FID000000001 |
FID000000001 |
|
Culture |
en |
en |
en |
Setting up a Receipt
A receipt can be generated upon payment and this requires a report template to be set up. A Standard Credit Card receipt template is available in Administration module, System Setup, Report setup, _Receipts group. Please contact Oracle Hospitality Cruise Support if you would like to configure a customized receipt format.
Setting up the Pin Pad Terminal
In order for the program to determine the connection availability of the Pin Pad device, an IP address is assigned to the Credit Card device connecting to the Pin Pad Terminal program.
-
From the Administration drop-down menu, select Pinpad Terminal Setup.
-
In the Pinpad Terminal Setup screen, right-click and select Add New.
-
Enter the credit card device by the IP address assigned.
-
The Enabled check box is selected by default. To disable the device, deselect the check box.
-
Click OK to save.
Servebase Web Services Installation
-
After the installation is complete, open
Servebase.Pceft.Ped.Service.Server.exe.config in C:\Program Files (x64)\PXP Solutions folder and change the highlighted text value per below.
<diagnosticConfiguration keepLogFilesFor="10" logFilePath="c:\work\" />
<endpointSettings port="####" messageFormat="Native" endpointProtocol="Ip" supportDeviceIsDisplaying="true" supportCustomerInteraction="true" supportAcknowledgements="true" supportNetworkStatus="true" monoCertificatePolicy="false" />
<externalServices base="<servebaseURL>" requestTimeout="30000">
<endpointAddress type="Request">
<serialPort comPort="COM1" />
<tcp hostName="IP ADDRESS" />
<failoverService processTimePollIntervalInSeconds="300" atOnceTransactionLimit="15" ignoreProcessorTime="false" path="c:\dir\"
storeFailoverResponses="true" failedResponseListeningAvailable="true" socketIdleTime="10"/>
-
At the root of C:\, create and name the folder as Work. This is used to save the transaction log between SPMS applications and the Servebase gateway
-
Copy the Credential.xml from C:\Programs Files (x64)\PXP Solution folder into C:\Work folder.
<CustomerCode></CustomerCode>
<IpAddress></IpAddress>
<Merchant></Merchant>
<Password></Password>
<Site></Site>
<Terminal1><Terminal1/>
<Username></Username>
<WorkStation></WorkStation>
-
At the Windows desktop, click Start and click Run.
-
In the Run dialog box, type Services.msc, and click OK.
-
In the Services screen, locate and start the PEDFrameworkService. The Password in Credential.xml will encrypt after PEDFrameworkServices starts.
Store Forward Handling
The Store Forwarding handling sends the pre-authorization through ‘Authorization Connection Type = ForcedFailOver’ and receives the response from the listener port, whereas the normal handling sends the pre-authorization through ‘Authorization Connection Type = OnlineAuthorization’ and receive the response from current port.
-
Open Servebase.Pceft.Ped.Service.Server.exe.config in C:\Program Files (x64)\PXP Solutions folder and change the highlighted value per below.
<failoverService processTimePollIntervalInSeconds="300" atOnceTransactionLimit="15" ignoreProcessorTime="false" path="c:\dir\"
storeFailoverResponses="true" failedResponseListeningAvailable="true" socketIdleTime="10"/>
-
The default resend interval is set to 60 seconds. Change if necessary.
-
When registering the credit card, the Ship Transfer will not pick up the registration and send the authorization immediately. Hence, the authorization status is ‘Outstanding’ and below message is shown in the Ship Transfer log.
<AuthorizationConnectionType>ForcedFailOver</AuthorizationConnectionType>
-
The Ship Transfer resumes the sending the failed transactions to PXP Services provider after a few minutes.
Setting up Device
-
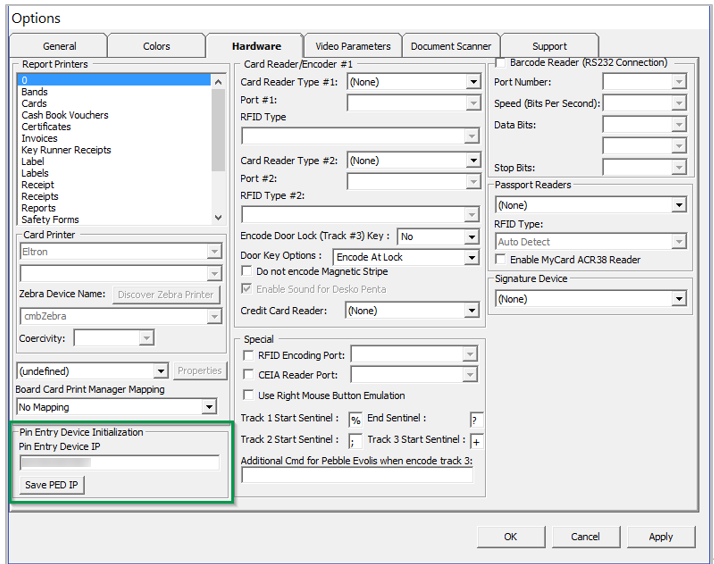
Run Management module and navigate to Option menu and Hardware tab.
-
Enter the device IP Address in Pin Entry Device Initialization’ section and click Save PED IP.
Figure 4-3 Management — Options — Hardware — Pin Entry Device Initialization
-
At the Pin Entry Device confirmation message, the Workstation name is mentioned. On the device screen, the ‘PED [IP Address] Initialization on PC [workstation name]’ is shown. Verify the device is connected to the correct workstation.
-
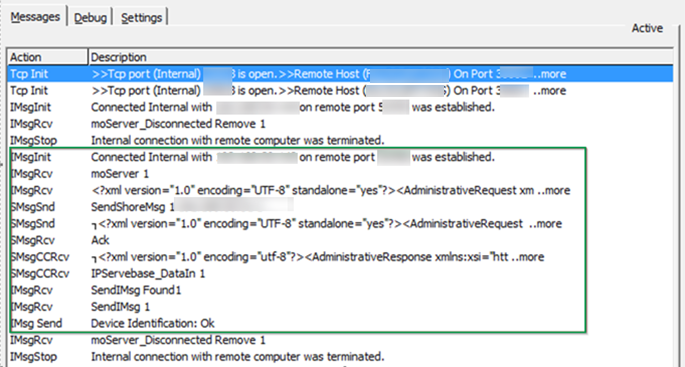
The response message from PED Framework Service is shown in the Ship Transfer Message tab when the device is successfully configured in the Management module.
Figure 4-4 Ship Transfer — Device Initialization
-
Click the Yes button on the device defined for the workstation. After the device is identified, a dialog box prompting ‘Device Identification:OK’ in SPMS. Click OK to confirm and close.
OHC Ship Transfer Setup
The Ship Transfer Interface is an interface that sends the credit card payments for authorization from SPMS to SERVEBASE Payment Gateway by batch.
Figure 4-5 OHC Ship Transfer Setup
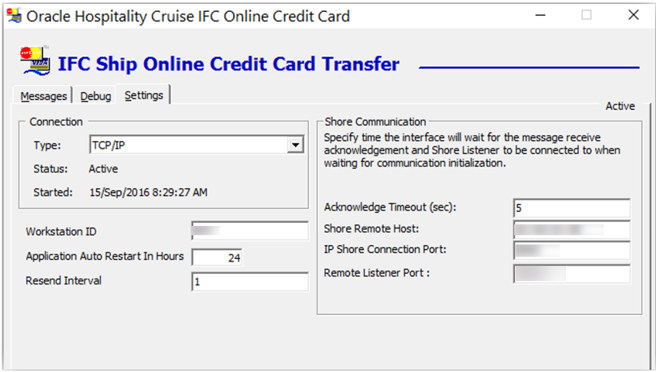
Table 4-5 Ship Transfer Application Parameter
| Settings | Value | Description |
|---|---|---|
|
Acknowledge Timeout (sec) |
<value> |
Defines the duration to wait for a response from other parties, such as third party provide, bank provider before timing out the authorization. |
|
Shore Remote Host |
<IP address/host name> |
IP address of the workstation/PC where Servebase PED Framework Services is running. |
|
IP Shore Connection Port |
5000 |
TCP Port number of another party interface to connect. |
|
Remote listener Port |
30002 |
Listener port for third party interface. |
|
Workstation ID |
<workstation id> |
Workstation ID maintained in Credit Card Merchant Setup (CCM) but not in Pin Pad Terminal Setup (TYP_PIN). The workstation ID is saved in internal system parameter. |
|
Resend Interval |
<value> |
Define the value in minutes to resend the outstanding authorizations and settlements after X minutes. |
Configuring OHC Ship Transfer
-
Start OHC Ship Transf.exe and navigate to the Settings tab.
-
In the Shore Communication section, update the value of the respective parameter.
-
Click Apply to save the setting.
-
Navigate to the Message tab and verify the connection to Servebase Services (PED Framework Service is connected successfully.
Figure 4-6 OHC Ship Transfer Connection to PED Framework Services

-
To ensure the PED Framework Service is running, see step 6 of Servebase Web Services Installation.
-
The above settings are saved in OHCSettings.par under the following tag.
Table 4-6 OHCSettings.par
| Setting Name | Description |
|---|---|
|
[#ShipTransf.Connection.Connection=TCP/IP#] |
Indicates the OHC Ship Transfer is in Active mode. |
|
[#ShipTransf.Connection.Remote Host=HOSTNAME |
Indicates the remote host IP Address where PED Framework Services running. |
|
[#ShipTransf.Connection.Remote Port=5000#] |
Indicates the TCP Port number of other party the interface connects to. |
|
[#ShipTransf.Connection.Remote Timeout=5#] |
Indicate the duration to wait for a response from other party before timing out the authorization. |
|
[#ShipTransf.Connection.Remote Listen Port=30002#] |
Indicates the listener port of the third party such as PXP Web Service port. |
|
[#ShipTransf.PARAM.Restart Interval=24#] |
Indicates the interval hours before system restarts the Ship Transfer program. |
|
[#ShipTransf.PARAM.Resend Interval=1#] |
Indicates the last sent date/time of the batch top up. The saved date/time format is YYYMMDDHHMMSS. |
Registering a Credit Card Servebase
This section describes the steps taken to register a credit card in SPMS.
-
Login to Management module and select Guest from the Cashier Menu.
-
Select a checked-in guest and click the Get Credit Card button.
-
The system prompts for a card to be swiped. Swipe the credit card through the card device.
-
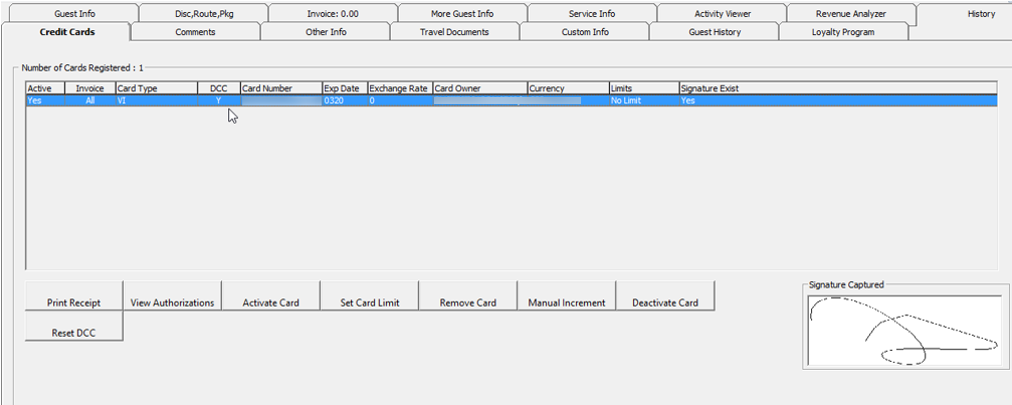
After the guest enters the credit card pin, the Servebase service checks and authenticate the initial authorization at the same time, and stores the card information in Guest Handling, Credit Card tab.
-
If initial authorization is approved or outstanding, the credit card status will be in active mode.
-
If initial authorization is declined, the credit card status is in deactivate mode.
Figure 4-7 Guest Handling Credit Card

Settling a Credit Card Batch
The Servebase Handling supports both online and offline batch settlements and the settlement function is accessible from Management Module, Cashier Menu. This function is mainly used by Financial Officers to review all the settlements created prior to sending the settlements to the Servebase service provider.
This function is enabled when parameter “Interface”,”Online CCard Automatic Settlement” is disabled. Else, OHC Ship Transfer will pick up the settlement transaction and send to Servebase service provider automatically as shown in below figure.
Figure 4-8 Management, Cashier — Credit Card Batch Settlement
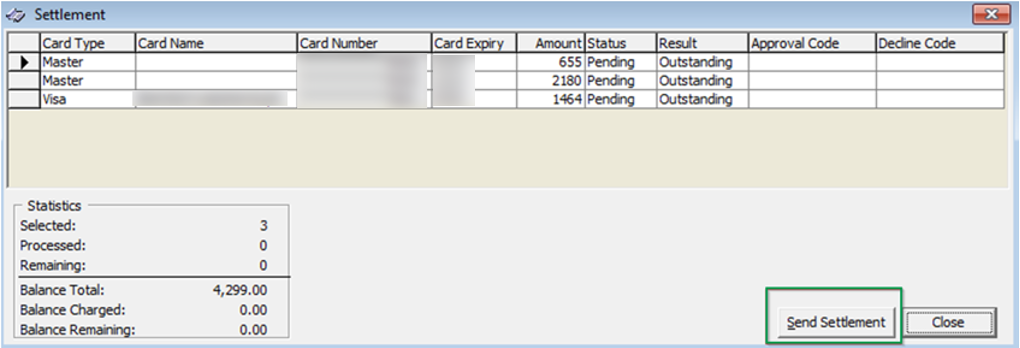
The voided settlement transaction is highlighted in red and is shown when Parameter “General”, “Show Voided Settlement” is enabled.
Figure 4-9 Management, Cashier — Batch Settlement with Voided Transaction

Please note that the program only processes the settlement with CCT_QSTATUS = 0. If the original settlement is still residing in the ‘pending send’ queue, the voided settlement will not be sent for processing. Both the original settlement and voided settlement record will be highlight if the color defined in ‘Management module, Option, Color, NoPrint’ section.
Performing a Credit Card Refund
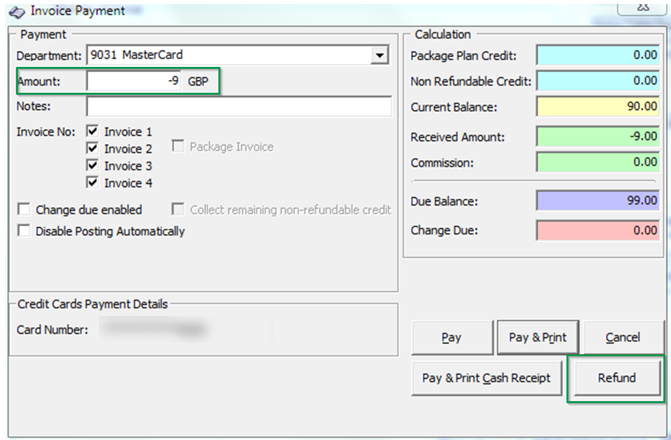
The credit card Refund function is available to Serverbase Handling only. The refund button is Enabled automatically when a negative amount is entered.
Figure 4-10 Management, Pay Invoice Refund
-
In the Guest Handling screen, clicking the Refund button will prompt a 'Request Token’ screen. Insert or Swipe the card through the device.
-
After the refund process completes successfully, the authorization code is CCA_MTYPE = 6 and POS transaction is created.
-
If guest account has a pre-registered credit card and a negative amount is entered followed by clicking the Pay button in Pay Invoice screen, you will receive a message box prompting you to perform a Refund instead.
Registering Credit Card in Advanced Quick Check In (AQCI)
-
Login to AQCI program and search for an account using the Account Search function.
-
Click the Get Credit Card button and swipe or insert the card into the card reader device when prompt.
-
After the guest has entered the pin, the Servebase service will check and authenticate the initial authorization at the same time. Details of the card is stored in Guest Handling, Credit card tab.
-
If initial authorization is approved or outstanding, the credit card status will be in active mode.
-
If initial authorization is declined, the credit card status is in deactivate mode.
-
Figure 4-11 Guest Handling Screen —Credit Card Tab
Sample Response File in Ship Transfer
The sections below describe the samples of the response messages as shown in the Ship Transfer program.
Figure 4-12 Response Message of Register Credit Card
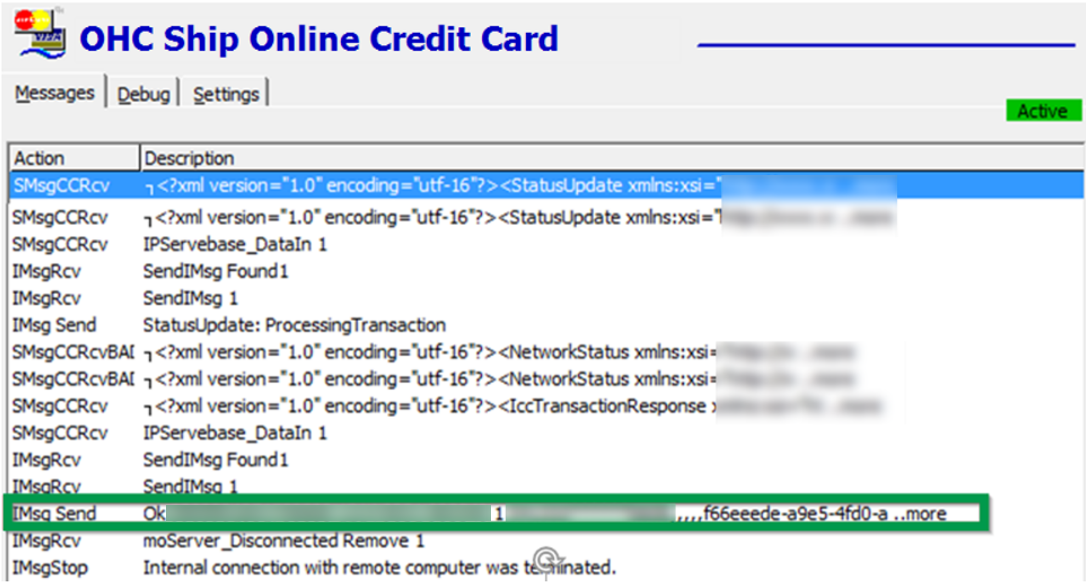
Figure 4-13 Response Message of Register Credit Card in Debug Details

Figure 4-14 Response Message of Send Authorization
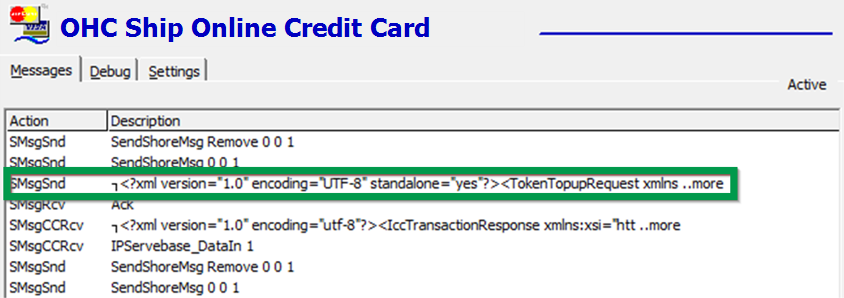
Figure 4-15 Response Message of Send Authorization in Debug Details

Figure 4-16 Response Message for Send Settlement

Figure 4-17 Response Message for Send Settlement in Debug Details

Figure 4-18 Response Message for Send Refund

Figure 4-19 Response Message for Send Refund in Debug Details

Synopsis
The following sections describe the synopsis of SERVEBASE Handling.
Register Credit Card and Send Initial Authorization
Table 4-7 Register Credit Card and Send Initial Authorization Process and Expected
| No | Process | Expected Result | Remarks |
|---|---|---|---|
|
1 |
Use the Insert method to register the credit card where invoice balance = 0 |
Initial authorization amount = ‘Online Initial Auth Amount’ |
CRD_MANUAL = I |
|
2 |
Use the Insert method to register credit card where invoice balance > ‘Online Initial Auth Amount’ |
Initial authorization amount = ‘Online Initial Auth Amount’ |
CRD_MANUAL = I |
|
3 |
Use the Swipe method to register credit card where invoice balance = 0 |
Initial authorization amount = ‘Online Initial Auth Amount’ |
CRD_MANUAL = A |
|
4 |
Register Credit Card with the Signature Capture function enabled |
Prompt for signature. Able to register credit card after accepting signature capture |
|
|
5 |
Clicking the Cancel button on Signature Pad after Credit Card accepted by bank issuer at Management module |
|
|
|
6 |
Register same credit card where the previous registered credit card is deactivated after settlement |
Same credit card will be reactivated and new initial authorization is sent |
|
|
7 |
Register the same credit card where previous registered credit card is deactivated manually |
Message ‘The Credit Card is already registered in the system’. You need to click ‘Activate’ button to activate the card manually. |
|
|
8 |
Register first credit card during Online. Swipe the same credit card during Offline |
The Second credit card will be created due to the real token does not reply to the actual credit card number. |
Table 4-8 Add Posting and Send Incremental Authorization
| No | Process | Expected Result | Remarks |
|---|---|---|---|
|
1 |
Total posting is less than the initial authorization |
|
|
|
2 |
Total posting is more than initial authorization, but less then ‘Auto Incremental Amount’ |
|
|
|
3 |
Total posting is more than initial authorization, and more than ‘Auto Incremental Amount’ |
|
Table 4-9 Pay Invoice and Send Settlement Authorization
| No | Process | Expected Result | Remarks |
|---|---|---|---|
|
1 |
Payment amount is more than Total Authorization Amount. The incremental authorization is Approved / Declined / Outstanding. |
|
|
|
2 |
Payment amount is less than total authorization amount |
|
|
|
3 |
Payment amount is same with total authorization amount. Where, incremental authorization is approved. |
|
|
|
4 |
Pay Invoice again after payment is voided. |
|
|
|
5 |
Pay Invoice while authorization still in ‘Outstanding’ status |
|
Direct Sales
Direct sales function is available when a guest does not have a pre-registered credit card. The ‘Pay Direct Sale’ is visible in Pay Invoice screen.
Table 4-10 Direct Sales Process and Expected Result
| No | Process | Expected Result | Remarks |
|---|---|---|---|
|
1 |
Do payment without pre-registered credit card |
Authorization created with CCA_MTYPE = 6 |
Table 4-11 Void Payment and Send Refund
| No | Process | Expected Result |
|---|---|---|
|
1 |
Use Void button; If original settlement CCT_QSTATUS = 0 |
Credit Card is reactivated automatically without initial authorization Original settlement and refund will not be sent out Payment type changed to Credit Card |
|
2 |
Use Void button; If original settlement CCT_QSTATUS > 0 |
The message ‘By voiding the payment, you need to swipe credit card again or change to another payment type. Are you sure you want to void the payment?’ Send refund Guest payment type remain as Cash |
|
3 |
Pay amount $80 with credit card, but invoice balance = 0 |
Initial authorization = $20 Incremental authorization = $60 send out Invoice balance = -$80 Pay -$80 will send as refund |
|
4 |
Invoice balance = $150, pay invoice = $200 |
Settlement created with CCT_AMOUNT = $200 Invoice balance = -$50 Pay -$50 will send as refund |
|
5 |
Pay -$120 on invoice balance=0 |
Servebase does not support a negative amount The message ‘Unable to refund a transaction until it has been settled’ prompt |
Table 4-12 Pay Negative Amount and Send Refund
| No | Process | Expected Result |
|---|---|---|
|
1 |
A pre-registered credit card is deactivated. Payment type is Cash. Enter the negative amount and click on Refund button. |
|
|
2 |
A pre-registered credit card is activated. Payment type is a Credit card. Enter the negative amount and click on Refund button. |
|
|
3 |
A pre-registered credit card is activated. Payment type is Credit card. Enter the negative amount and click on Refund button with swipe different credit card. |
|
|
4 |
No pre-register credit card. Payment type is Cash. Enter the negative amount and click on Refund button with swipe different credit card |
|
|
5 |
Do refund while no internet connection |
|
Multiple Credit Card
The message ‘This Credit Card is already registered in the system’ will always prompt even when the parameter ‘Check Credit Card Registration’ is disabled.
Table 4-13 Multiple Credit Card Process and Expected Result
| No | Process | Expected Result |
|---|---|---|
|
1 |
Register same credit card for the same guest where a first registered credit card is in active mode. Guest A Register Card A Guest A Register Card A again |
Message as above prompt. No Card record and Authorization create for second registration. |
|
2 |
Register same credit card for the same guest where a first registered credit card is deactivated manually. Guest A Register Card A and deactivated manually Guest A Register Card A again |
Message as above prompt. You have to re-activate the credit card manually through Activate button. No Card record and Authorization create for second registration. |
|
3 |
Register same credit card for the same guest where the first registered credit card is deactivated after settlement. Guest A Register Card A, and do settlement. Guest A Register Card A again |
No message prompts. The card is reactivated automatically. Initial authorization sends again. |
|
4 |
Register same credit card for different guest where a first registered credit card is in active mode. Guest A Register Card A Guest B Register Card B |
No message prompts. The credit card registers successfully. |
|
5 |
Register same credit card for different guest where the first registered credit card is deactivated manually. Guest A Register Card A, and deactivate manually Guest B Register Card A |
No message prompts. The credit card registers successfully. |
|
6 |
Register same credit card for different guest where the first registered credit card is deactivated after settlement. Guest A Register Card A, and do Settlement. Guest B Register Card A |
No message prompts. The credit card registers successfully. |
Multiple Pin Pad Terminal Run Simultaneously
Table 4-14 Multiple Pin Pad terminal Run Simultaneously Process and Expected Result
| No | Process | Expected Result |
|---|---|---|
|
1 |
Run the same application on different PC. Each PC connect to the different pin pad |
Able to register credit card accordingly |
|
2 |
Run a different application on different PC. Each PC connect to the same pin pad |
The message ‘The Pin Entry Device IP xxx is in used by OHC XX on workstation XX’ shall prompt. |
Activate/Deactivate Credit Card
Table 4-15 Activate/Deactivate Credit Card Process and Expected Result
| No | Process | Expected Result |
|---|---|---|
|
1 |
The Card is deactivated after performing the settlement |
|
|
2 |
Use Deactivate Card button to deactivate the card |
|
|
3 |
Card is deactivated after Direct Sales |
|
|
4 |
Card is deactivated after upgrade from an old format to SERVEBASE format |
|
Table 4-16 Manually Add Authorization
| No | Process | Expected Result |
|---|---|---|
|
1 |
Click Add Authorization button on View Authorization screen |
Authorization Value screen pops up. Incremental Authorization with CCA_STATUS= 0 is created OHC Ship Transfer will send the authorization for approval |
Offline Handling
Table 4-17 Offline Handling Process and Expected Result
| No | Process | Expected Result |
|---|---|---|
|
1 |
No internet connection while getting credit card |
|
|
2 |
Initial authorization of the offline credit card registration return declined |
|
|
3 |
Multiple Offline Token handling - Initial Authorization is ‘pending’ status |
|
|
4 |
Multiple Offline Token handling - Initial Authorization is ‘declined’ status |
Interface sends all the settlement if all the settlement belongs to credit card A is declined |
Declining Offline Token
-
Date: Credit Card A + Credit Card B
-
Initial authorization is outstanding
-
Incremental authorization is outstanding
-
Settlement is Outstanding
Table 4-18 Credit Card Process and Expected Result
|
No |
Process |
Expected Result |
|
Parameter ‘Disable C/Card and Posting when auth is decline’ = 0 |
||
|
1 |
Initial authorization response ‘decline’ |
|
|
2 |
One of the incremental authorization responses back ‘decline’ |
|
|
Parameter ‘Disable C/Card and Posting when auth is decline’ = 1 |
||
|
1 |
Initial authorization response ‘decline’ |
|
|
2 |
One of the incremental authorization responses back ‘decline’ |
|
|
Parameter ‘Disable C/Card and Posting when auth is decline’ = 2 |
||
|
1 |
Initial authorization response ‘decline’ |
|
|
2 |
One of the incremental authorization responses back ‘decline’ |
If multiple credit card, all invoices are routed to credit card B. payment department default to credit B. Posting status remains enable |
Troubleshooting Servebase
This section describes the troubleshooting steps that assist you in resolving the commonly known errors with SERVEBASE Handling.
Table 4-19 OHC Ship Transfer Interface
| Known Issue | Solution |
|---|---|
|
OHC Ship Transfer program opens/closes by itself |
|
|
Authorization/Settlement in pending status, and not send to Ship Transfer Interface |
This is due to initial authorization references is missing for the authorization/settlement. The recommended workaround is:
|
|
CRD_ACTIVATION_LOCK not updated to 1 after performing the payment. |
Ensure CCT_CCA_ID value is valid. |
|
Initial authorization getting ‘Outstanding’ status |
Check the Pin Pad Terminal Setup. Ensure the Pin Pad IP matches the device that is used to register a credit card. |
|
Message ‘Socket is not connected’, when trying to save the PED IP or Message ‘Error in connection with this Pin Entry Device’ |
Verify and ensure:
|
|
To find the outstanding CCA causing other CCT not able to process |
Please contact your consultant/support to help you regarding an SQL statement that you need to apply when this issue occurs. |
Management Module
Table 4-20 Management Module Known Issue and Solution
| Known Issue | Solution |
|---|---|
|
Showing ‘Please Wait….’, and did not prompt for ‘Insert/Swipe Card’ to notify user. |
Check and ensure the PED Framework Services is running. Ensure the Configuration file settings is the same as below: <endpointSettings port="5000" messageFormat="Native" endpointProtocol="Ip" supportDeviceIsDisplaying="true" supportCustomerInteraction="true" supportAcknowledgements="true" supportNetworkStatus="true" monoCertificatePolicy="false" /> |
|
Request Token prompts ‘Precondition failed: !string.IsnullOrEmpty (item.Credentials.CustomerCode) |
Ensure Merchant Setting is correct (CCM) |
|
Message ‘Invalid Credentials. No user records that match the supplied credentials’ when try to register credit card |
Ensure User account setup in Servebase configuration file / CCM entry is valid. |
|
Message ‘Client found response content type of 'text/html; charset=utf-8', but expected 'text/xml' when trying to register credit card. |
Ensure the correct credential file is located. And, the ship currency and match with CCM |
Windows Services
Table 4-21 Windows Services Known Issue and Solution
| Known Issue | Solution |
|---|---|
|
The PED Framework Service on Local Computer started and stopped. Some services stop automatically if they are not in use by other services or programs, |
Ensure the C:\Work folder exists. |
Transaction Status
Table 4-22 Transaction Status
| Status | Description |
|---|---|
|
Initial Authorization |
|
|
CCA_OPERATION |
1 |
|
CCA_MTYPE |
0 (Online initial auth), 1 (Offline initial auth) |
|
CCA_PREVIOUS |
Original pre-authorization reference ID, value generated from sequence CNT_POS_RES) |
|
CCA_STATUS |
0 (outstanding/pending), 1 (approved), 2 (declined) |
|
CCA_QSTATUS |
0 (pending), 2 (Transaction sent out from OHC Ship Transfer), 3 (Acknowledgement received from Credit Card provider), 8 (completed) |
|
CCA_STATUS = 0 CCA_QSTATUS = 8 |
It means pseudo/temporary token is received and waiting for real token after the connection with merchant/service provider is resume |
|
Incremental Authorization |
|
|
CCA_OPERATION |
2 |
|
CCA_MTYPE |
4 (Online incremental auth), 5 (offline incremental auth) If CCA_MTYPE = 5
|
|
Settlement |
|
|
CCT_STATUS |
0 (outstanding), 1 (approved), 2 (declined) |
|
CCT_QSTATUS |
0 (pending), 2 (Transaction sent out from OHC Ship Transfer), 3 (Acknowledgement received from Credit card provider), 8 (Completed) |
|
Direct Payment |
|
|
CCA_MTYPE |
6 |
|
CCA_STATUS |
1 (approved), 2 (declined) |
|
No Settlement create |
|