2 Quick Functions
The Quick Function is designed to facilitate and expedite billing processes during disembarkation, assigning of crew course and certificates, flight arrangements and many others.
Quick Billing
the Quick Billing function allow you to expedite the check-out processes during disembarkation, and invoices to be printed in batches using the available criteria. Function is accessible from Quick Functions menu.
Figure 2-1 Quick Billing Selection Criteria Window
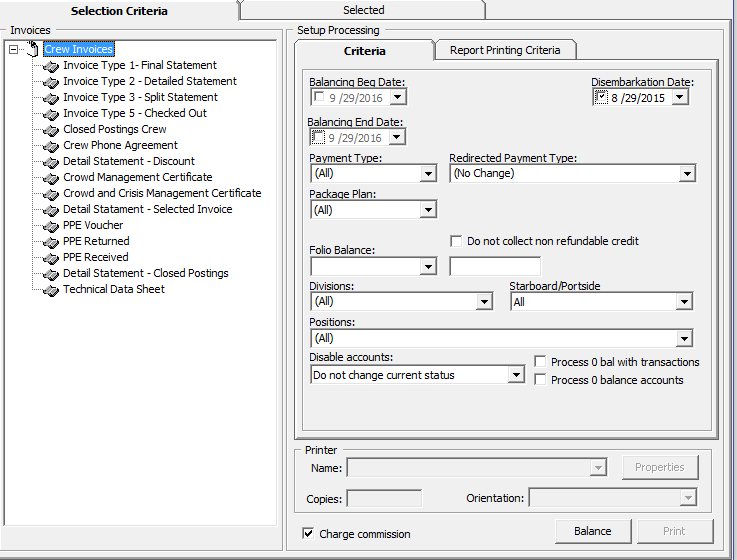
Table 2-1 Field Definition of Quick Billing Window
| Field | Description |
|---|---|
|
Crew Invoices |
Type of invoice form |
|
Balancing Begin Date |
Date to balance from |
|
Balancing End Date |
Date to balance until |
|
Disembarkation Date |
Disembarkation Date filter |
|
Payment Type |
Payment type filter |
|
Redirected Payment Type |
Redirect selected payment to another payment method |
|
Package Plan |
Filter by Package Plan |
|
Folio Balance |
Filter by folio balance e.g., greater than or equal to X value. |
|
Do not collect non-refundable credit |
Credit balance withheld for use in future cruise. |
|
Divisions |
Invoice sort order by division. |
|
Starboard/Portside |
Invoice sort order Starboard/Portside. |
|
Positions |
Invoice sort order by position. |
|
Disable accounts |
Update account status to "allow manual postings only" or "blocked all postings" |
|
Process 0 bal with transactions |
Include guests that has already settled in full and allow a reprint of the invoice in Quick Billing window. |
|
Process 0 balance accounts |
Include 0 balance accounts with/without transactions. |
|
Printer |
Printer assigned for invoice printing, number of copies to print and print orientation. |
Figure 2-2 Quick Balance Selected Tab
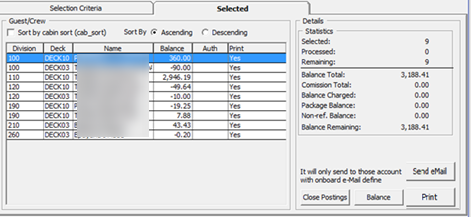
Table 2-2 Field Definition of Crew Quick Balance
| Field | Description |
|---|---|
|
Division |
Division number |
|
Deck |
Location of Cabin |
|
Name |
Crew Name |
|
Balance |
Total Invoice Balance |
|
Auth |
Authorization Status |
|
|
Invoice Printed status. |
|
Statistics |
Indicator count of selected, processed and remaining accounts with its value in balance or charged. |
|
Send eMail |
Invoices are emailed to crew on-board email account |
|
Close Postings |
Set invoice postings to Disallowed |
|
Balance |
Process balancing for selected accounts |
|
|
Print invoices for selected accounts |
Crew Quick Billing
The Selection Criteria tab in Crew Quick Billing function determines the type of invoices to print/pay based on the criteria entered for all disembarking crews. For example; crew paying by credit card or only crew with x outstanding amount.
-
From Quick Billing, Selection Criteria tab, select an invoice type, Balancing Begin Date, Disembarkation Date, Payment Type, Folio Balance (if applicable), Division and Position.
-
At the Printer section, select an invoice printer, enter the number of copies to print and choose the print orientation, and then click Print.
-
At the Quick Printing prompt, select Yes to continue.
Apart from printing invoices by batch, balancing of the new crew account is only possible when there is a credit card on file.
-
Repeat steps 1 to 3 of the above.
-
In the Disable accounts field, select the appropriate Posting status from the drop-down list.
-
Navigate to the Selected tab to verify the results, and adjust the selection until you achieve the desire result.
-
To exclude a crew from the search result, right-click on the name and then click Remove. When a crew is removed from the grid, the statistic vount is updated accordingly.
-
At the Confirmation prompt, click Yes to confirm and then click Balance.
-
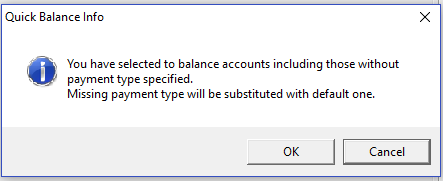
At the Quick Balance prompt select Yes and then click OK at the Quick Balance Info prompt.
Figure 2-3 Quick Balance Info Prompt

-
In the Quick Balance Info warning prompt, read the warning, and then click OK to proceed.
Figure 2-4 Quick Balance Info Window
-
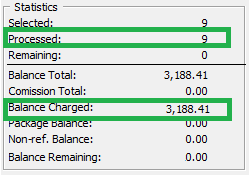
The total amount charged and number of account processed are shown in the Statistic section once the accounts is balanced successfully.
Figure 2-5 Statistic of Account Processed and Value Charged
-
Click the Close Postings to disallow postings on these accounts.
All Crew that has an on-board email account may opt to receive a copy of their invoices through eMail, and this function is controlled by a Parameter. Please consult your IT Department for setup, if this is not pre-configured.
-
Repeat step 1 to 4 of Quick Bill Balance.
-
Navigate to the Selected tab and then click Send eMail.. The Send eMail feature is disabled if no printer is assigned.
-
Without balancing the invoice, click Send eMail.
-
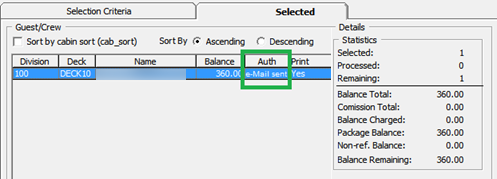
At the Quick Printing prompt, click Yes to proceed. An ‘e-Mail sent’ is added to the Auth column when then invoice is successfully sent.
Figure 2-6 Invoice Successfully Emailed Indicator
Crew Quick Cabin Assignment
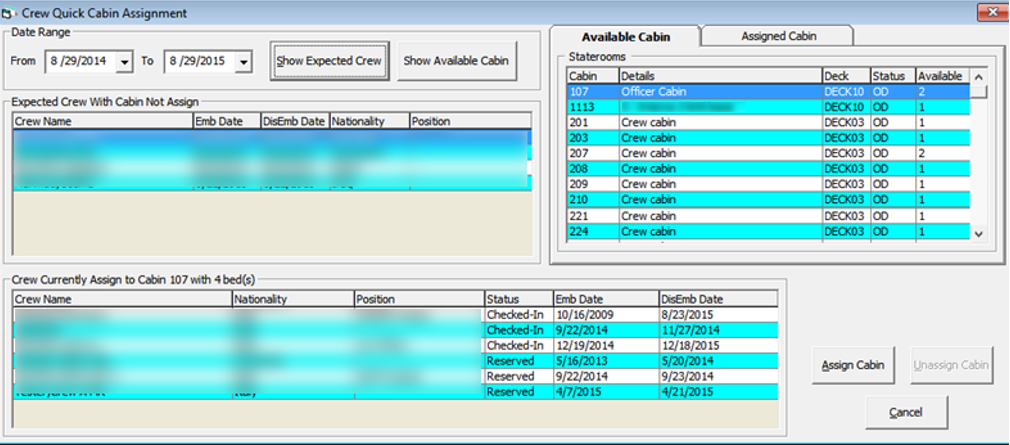
The Crew Quick Cabin Assignment function allow you to assign or unassigned cabin individually or by a group of crews, based on available cabin or cabin which has crew assigned.
Figure 2-7 Invoice Successfully Emailed Indicator Quick Cabin Assignment Window
Assigning a Cabin
-
From the Quick Functions, select Crew Quick Cabin Assignment option.
-
Select the Date From and Date To using the date editor, then click the Show Expected Crew. The expected crew that do not have a cabin assign are displayed in the Expected Crew With Cabin Not Assign grid.
-
Available cabins are shown in Available Cabin section. Selecting any cabin from the grid will show the cabin assignment history of Checked-In and Expected crew in the Crew Currently Assign to Cabin xxx with x bed(s) grid.
-
Navigate to Assigned Cabin tab to view all cabin assigned to with crew. The cabin assignment history of Checked-In and Expected Crew is shown in the Crew Currently Assign to Cabin xxx with x bed(s) grid when a cabin is selected.
-
Select the crew and the cabin from either the Available Cabin or Assigned Cabin, then click the Assign Cabin. The assigned crew cabin is now shown in the Crew Currently Assign to Cabin xxx with x bed(s) grid.
-
Other option to assign a cabin is by clicking the Show Available Cabin. This function only displays cabin without an assignment, and in the Available Cabin tab, list of available staterooms are displayed in the grid and cabin management history for Checked-In and Expected Crew are then shown in the Crew Currently Assign to Cabin xxx with x bed(s)
-
Repeat step 3 to 5 of the above to assign a cabin.
Un-assigning a Cabin
-
Repeat step 1 to 2 of Assigning a Cabin.
-
Navigate to Assigned Cabin tab to view all cabin assigned to crew.
-
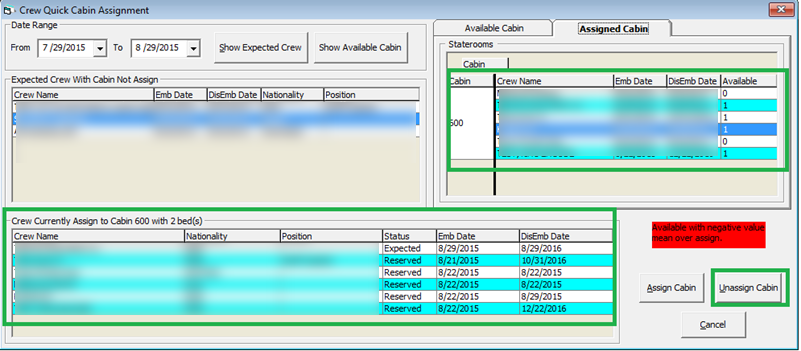
Select the cabin from the Staterooms list to display the crew assignment history for Checked-In and Expected Crew are shown in the Crew Currently Assign to Cabin xxx with x bed(s) grid
Figure 2-8 Assigned Cabin Window
-
Select crew from Staterooms grid or Crew Currently Assign to Cabin xxx with x bed(s) grid, then click Unassign Cabin to un-assign the cabin for the crew.
Quick Courses Assignment
The Quick Courses Assignment function enable you to assign crew courses and certificates.
Figure 2-9 Courses Assignment Window
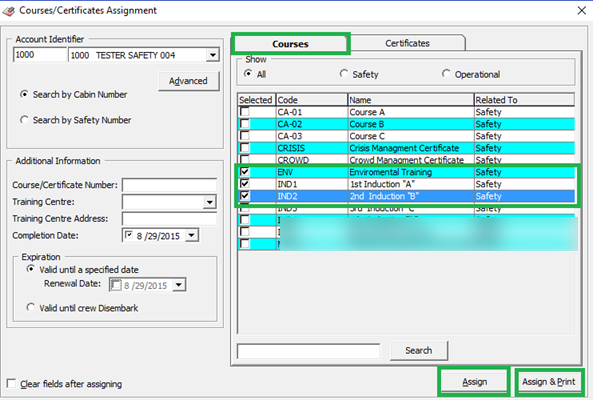
Table 2-3 Field Definition of Courses/Certificate Assignment Window
| Field | Description |
|---|---|
|
Code |
Courses/ Certificates codes setup in Administration module. |
|
Name |
Course/Certificate Name |
|
Related To |
Category the course belongs to in Safety/Operational |
Courses Assignment
- From the Quick Functions file menu, select Quick Courses Assignment option.
- Navigate to the Courses tab and select the type of course to assign by checking the check box beside the code.
- In the Account Identifier section, select to either Search by Cabin Number or Search by Safety Number.
- In the Additional Information section, fill in the Additional Information if any.
- Check the Completion Date and select the date from the date editor.
- Choose the course expiration period either by selecting the Calid until a Specified Date or Valid until Crew Disembark. If the Valid until a Specified Date is selected, check the Renewal Date and select the date from the date editor.
- Click Assign to assign the courses of click Assign & Print to assign the course assigned at the same time.
- Courses can be search using the Search Panel below the course grid.
- Checking the ‘Clear fields after assigning’ check box clears all details after the course assignment completes.
Certificates Assignment
Figure 2-10 Certificates Assignment Window
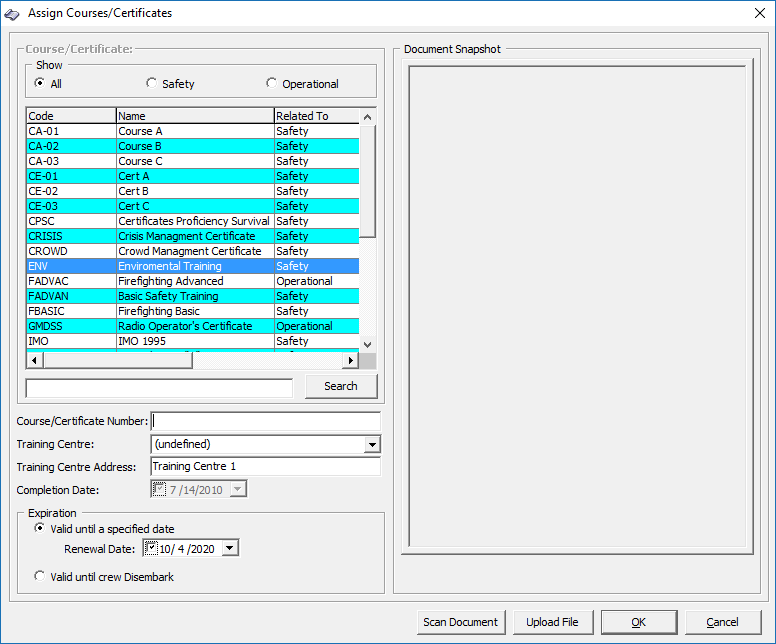
- From the Course/Certificates Assignment window, navigate to Certificates tab, and select the course to assign by checking the checkbox beside the code.
- Repeat above steps 3 to 9.
Advanced Courses/Certificates Assignment
-
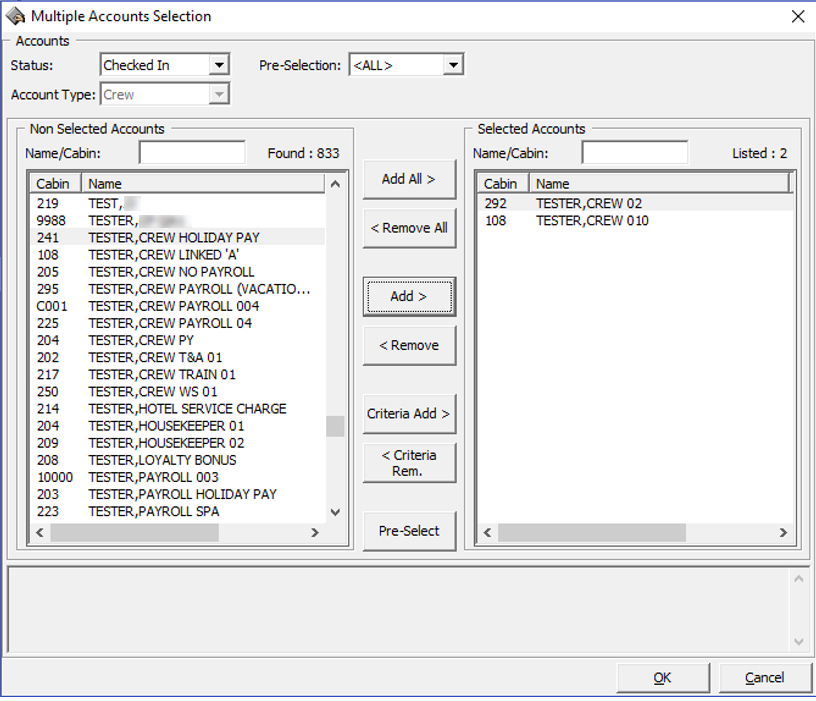
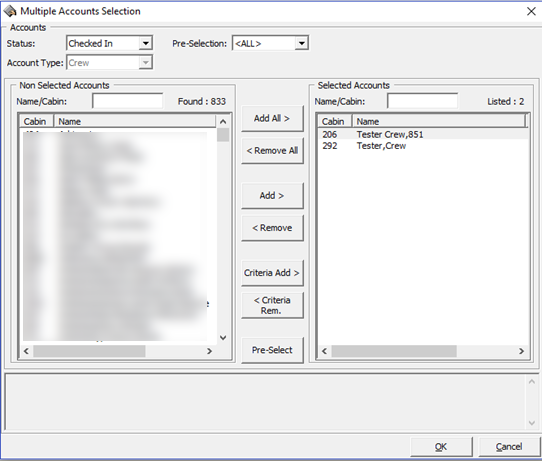
Under the Account Identifier section in Courses/Certificates Assignment window, click Advanced to open the Multiple Accounts Selection window.
-
Crew listed in the Non Selected Accounts section is based on default setting in Status and Account Type criteria.
Figure 2-11 Routing Multiple Account Selection Window
-
Choose the reservation status of the crew from Status drop-down list.
-
To select all crew, click the Add All> nutton to transfer the crew list to the Selected Account window, or individually select the crew name and then clickAdd.
-
Click OK to confirm the multiple accounts selection and this opens the New Courses/Certificates Assignment window.
-
The cabin search function under Account Identifier section is now dimmed and is replaced with (multiple selection).
-
Repeat step 4 to 9 Courses Assignment.
Quick Discounts Assignment
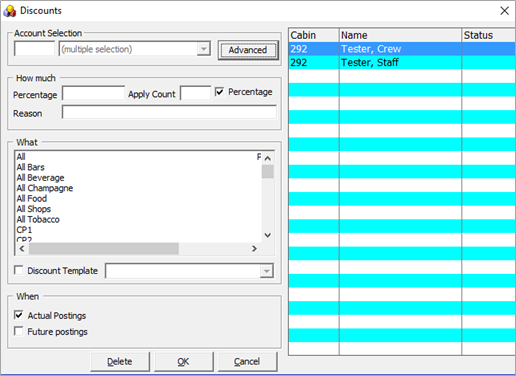
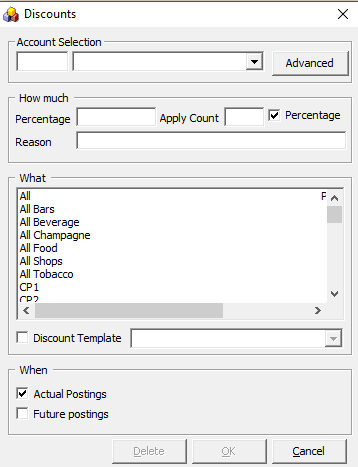
The Quick Discounts Assignment function enable you to assign discounts to multiple crew’s account, either by percentage or by value.
Figure 2-12 Quick Discount Window
Assigning Discount to Individual Crew
- From the Quick Functions file menu, select Quick Discounts Assignment.
- In the Discounts window, Account Selection section, enter the cabin number and select the respective crew from the drop-down list.
- Navigate to How much section and enter the percentage value, number of applicable discounts and reason. to apply a Value discount, uncheck the check mark next to Percentage.
- Select the department group or department code in the What section, and check whether the discount is applicable to Actual or Future Postings.
- Click OK to confirm.
Quick Effects Assignment
Figure 2-14 Quick Crew Effects Assignment
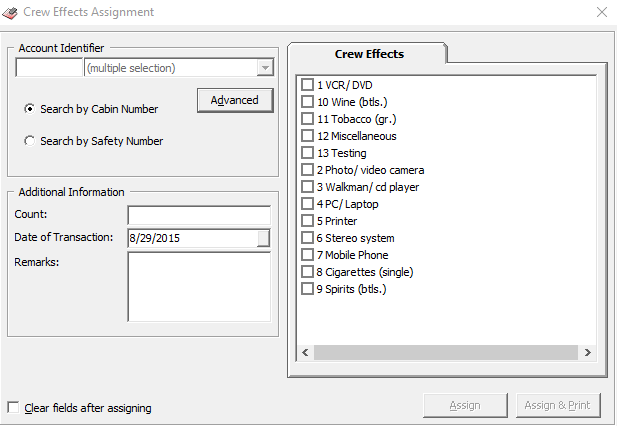
- From the Quick Functions file menu, select Quick Effects Assignment option.
- In the Account Identifier section, select option Search by Cabin Number or Search by Safety Number.
- In the Additional Information section, Count field, enter the number of items, select the Transaction date using the date editor and enter a remark if any.
- Select the Crew Effects item by checking the item check box. Multiple selection is allowed.
- Click Assign to assign the items or click Assign & Print to assign and print at the same time.
- Checking the ‘Clear fields after assigning’ clears all details after completing the assignment.
Quick Flight Assignment
Figure 2-15 Quick Flight Assignment
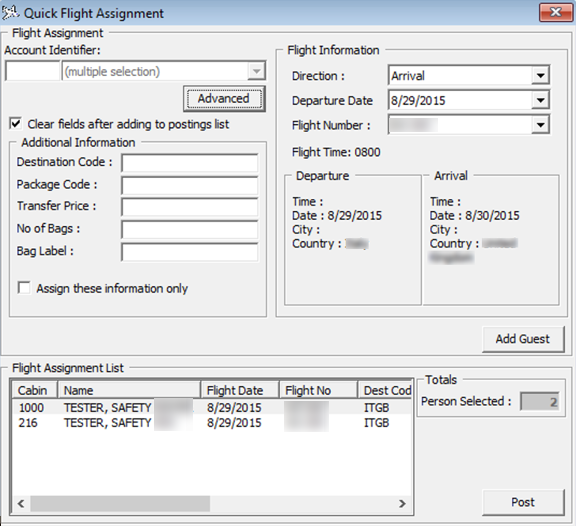
- From the Quick Functions menu, select Quick Flight Assignment option.
- Enter the account in Account Identifier field or click Advanced to select Multiple Account.
- Navigate to Flight Information section and select the Direction, Departure Date, and Flight Number from the drop-down list.
- In the Additional Information section, senter the additional information if any.
- Click Add Crew to add the selected crew to Flight Assignment List, and take note of the Total count beside the Flight Assignment Last grid.
- Click Post to update the flight assignment into the crew’s account in Crew Handling, Flight Info tab.
Quick Posting
Figure 2-16 Quick Posting
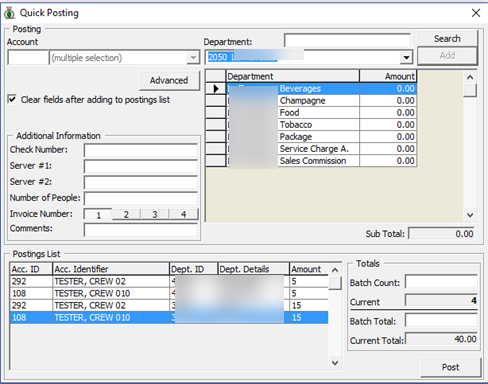
Quick Posting to Single Account
- From the Quick Functions menu, select Quick Posting option.
- Enter the cabin number or select the Account using the drop-down list.
- At the Department field, enter the department code, and then enter the value to post.
- In Additional Information section, insert thecheck number, Server#1, if any, and then choose the invoice number to post. The system default invoice is 1.
- Click Add to add the account to the Posting List grid. Repeat the above step until all checks are added to the Posting List.
- Note and tally current count and Current Totals with physical checks.
- Click Post to confirm posting.
Selecting Account Using Criteria Option
-
At the Multiple Accounts Selection window, click Criteria Add>.
-
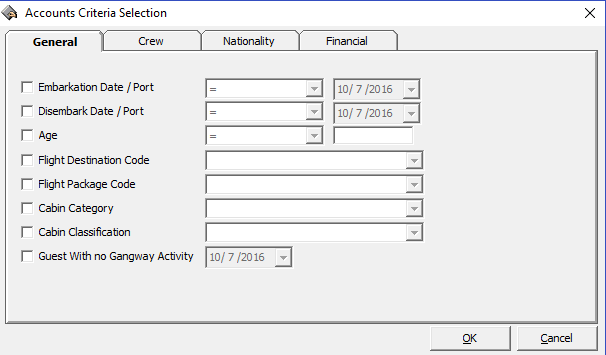
Select the options from the drop-down list in the General tab, then navigate to Crew tab.
Figure 2-18 Accounts Selection Criteria-General
-
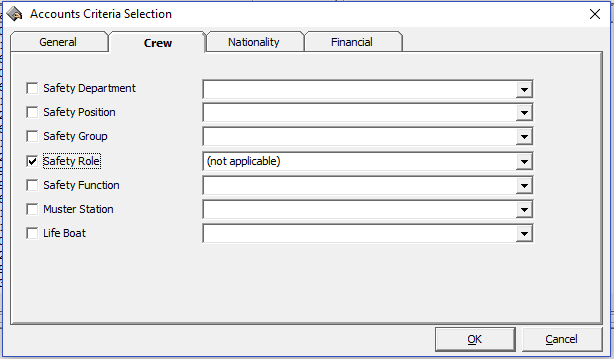
In the Crew tab, select from the available options using the drop-down menu and continue to select from the remaining tabs, if required.
-
Click OK to return to the Multiple Account Selection window.
Figure 2-19 Accounts Selection Criteria-Crew
Quick Posting Status
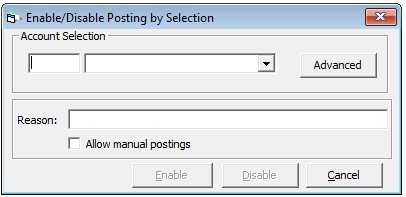
Figure 2-20 Enable/Disable Posting Selection
- From the Quick Functions File menu, select Quick Posting Status Enable/Disable from the drop-down menu.
- In the Enable/Disable Posting by Selection window, select the amount from the drop-down list or click Advanced to select multiplea ccounts.
- Insert a reason in the Reason field.
- Check the Allow manual postings check box if manual posting is allowed for Disabled accounts.
- Select one of the option — Enable or Disable the account.
Quick Remote Check-In
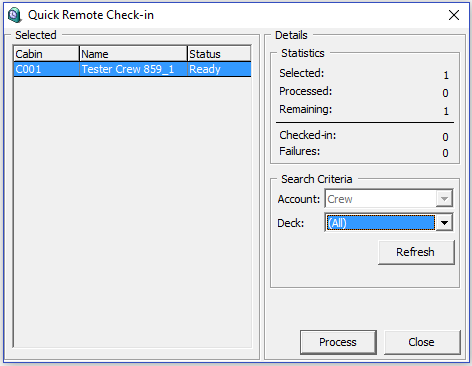
The Quick Remote Check-In enable you to check-in the crew by Deck.
Figure 2-21 Quick Remote Check-In
- From the Quick Functions options menu, select Quick Remote Check-In option.
- Select the Deck from the drop-down list and then click Refresh.
- At the Selected Crew section, cabin number and name of crews due to check in are listed, with the total selected account shown at the Statistic section.
- Click Process and select Yes at the confirmation prompt to proceed.
- The system updates the number of record processed and its status in Statistic section. Click Close to return to the main window.
