6 ResOnline Viewer Application
The ResOnline Viewer application allow you to view the guests’ information, bookings, gift orders, special request, and many more information transferred from the Fleet Management System (FMS) through DGS ResOnline Interface.
By using the ResOnline system, the IT Officers will no longer receives or uploads manifests into the system manually. Data from the shore-side reservation system such as guest information, shore excursion bookings, gift orders, and special requests are automatically transferred to the ship’s SPMS system before the voyage begins on a daily basis, allowing users to view all the reservations changes made.
ResOnline Viewer Functions
The function available in the ResOnline Viewer application are.
Table 6-1 ResOnline Viewer Functions
| Function | Description |
|---|---|
|
Field Mapping |
A selection of fields to display on each available tabs. |
|
Search XML |
A function that searches the eXtensible Markup Language (XML) reservation records. |
|
Compare DB |
A function that compares two databases. |
|
Import Reservation Data |
A function to import reservation data in XML format. |
|
Show Import Error |
A function that displays DGS ResOnline data import error. |
|
Hide/Show Tab |
A function that hide/show user selected tabs. |
|
Show All Tab |
A function that show all available tabs in the system. |
|
Copy Template |
A function to copy bookable Tour template to bookable tour date |
|
eOne Message Viewer |
A function to show the eOne data process |
|
Search Function |
A function that search the database based on selected criteria. |
|
Save/Import/Export |
Save/Import/Export User Defined template. |
|
Load |
A function that refreshes the screen according to selected template view. |
Figure 6-1 ResOnline Viewer Functions
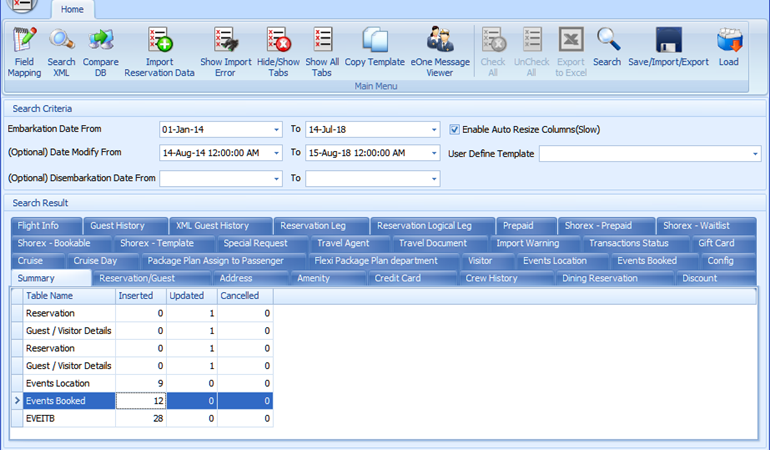
Search Criteria
-
Embarkation Date From / To
-
Date Modify From /To (optional)
-
Disembarkation Date From / To (optional)
-
User Define Template, if user wish to load information based on previously saved template.
Information Tab
Below are the default tabs provided by the application. You can choose to hide or show the tabs to suits the operations.
Table 6-2 Default ResOnline Viewer Tabs
| Tab Name | Description |
|---|---|
|
Summary |
Display a summary of changes made on each tab, for example; number of records were inserted, updated or deleted. |
|
Reservation/Guest |
Displays the reservation information and the changes made. |
|
Address |
Displays address information and changes made. |
|
Amenity |
Displays the gift order information table and changes made. |
|
Credit Card |
Displays the credit card information and the changes made. |
|
Crew History |
Displays the crew history information and the changes made. |
|
Dining Reservation |
Displays the dining information and the changes made. |
|
Discount |
Displays the discounts accorded and the changes made. |
|
Flight Info |
Displays the flight information and the changes made. |
|
Guest History |
Displays the guest history information and the changes made. |
|
XML Guest History |
Displays the reservation information and the changes made in XML format. |
|
Reservation Leg |
Displays the reservation information for back to back reservations and the changes made. |
|
Reservation Logical Leg |
Displays overland/overnight tour information for back to back reservations and the changes made. |
|
Prepaid |
Displays the pre-postings information and the changes made, including promo credit, shipboard credit, gift order credit. |
|
Shorex – Prepaid |
Displays the web booking information for shore excursion and changes made. |
|
Shorex – Waitlist |
Displays the waitlisted shore excursions booking information and changes made. |
|
Shorex – Bookable |
Displays the bookable shore excursions information and changes made. |
|
Shorex – Template |
Displays the shore excursions template information and changes made |
|
Special Request |
Displays the special services and request information’s, and the changes made. |
|
Travel Agent |
Displays the travel agency information and changes made. |
|
Travel Document |
Displays the travel documents information and changes made. |
|
Import Warning |
Displays the records with warning messages prompt during import. |
|
Transaction Status |
Displays the status of the records transferred. |
|
Gift Card |
Displays the gift card information and changes made. |
|
System Cruise |
Displays cruise information and changes made. |
|
Cruise Day |
Displays cruise day information and changes made. |
|
Package Plan Assign to Passenger |
Displays Passenger package plan and changes made. |
|
Flexi Package Plan Department |
Displays Flexi Package Plan charge department, discounts value and changes made. |
|
Events Location |
Displays Events Location and changes made. |
|
Events Booked |
Displays Events booked on selected period and changes made. |
|
Visitor |
Displays Visitors information and changes made. |
|
Config |
Display System Configuration Setup information details and changes made. |
Accessing Information using Search Criteria
Below section describes the steps to look up for any information’s, whether it is a newly inserted record or past records with changes.
-
Enter the Embarkation Date From / To, and click the Search button at the ribbon bar.
-
If you are searching for change records of a certain period, enter the Date Modify From /To (optional), and then click the Search button.
-
To view records that are more than one voyage, enter the Disembarkation Date From / To (optional), and then click the Search button.
-
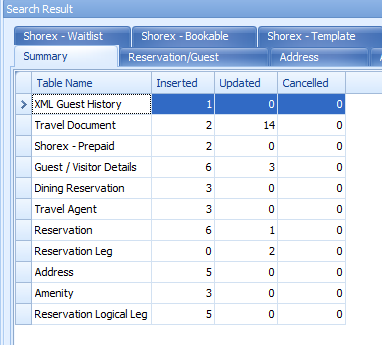
In the Summary tab, you will see a list of total records inserted, updated or cancelled.
-
Inserted column shows the number of new records/information’s transferred to the ship.
-
Updated column shows the number of changes/updates made to the guests and shore excursion information including cancellations.
-
Cancelled column shows the number of records physically removed from the database, for example; the reservations were made and cancelled at the very last minute.
Figure 6-2 Summary of Search Records
-
Viewing Information within a tab
The searched results are shown in its respective tab according to the system’s data fields. Below steps describes ways to view the search information for the period.
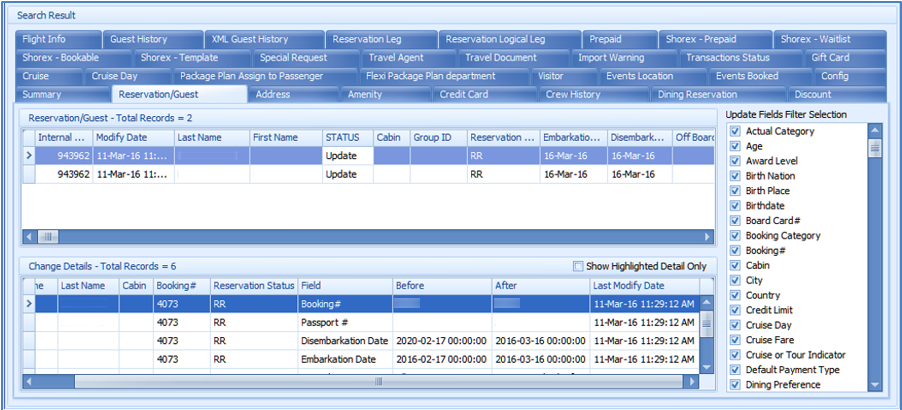
Figure 6-3 Information on Reservation/Guest Tab
-
From the ResOnline Viewer main window, select a tab to view. Searched results and all the changes are shown.
-
The Update status of the Reservation records section represents the latest update. The changed value from before and after are reflected in the Change details section.
-
Use the Update Fields Filter Selection to filter the information to display at the Change details section. Use the Check All or Uncheck All option to select or deselect all fields. The view can be saved as a template for future use. See Setting Up User Definable Template on how to save a template view.
-
Check the Show Highlighted Details to view the highlighted records in the Change Details section.
-
Click the Load button to refresh the information.
Viewing Tab Information using Built-In Filter Control
The program is pre-installed with a Built-in Filter Control function that allows you to re-order the information presented.
-
At the selected tab, right-click the header bar to open the Built-in Filter Control.
-
Choose an option from the menu to re-order the presentation of the information.
Figure 6-4 Built-In Filter Controls
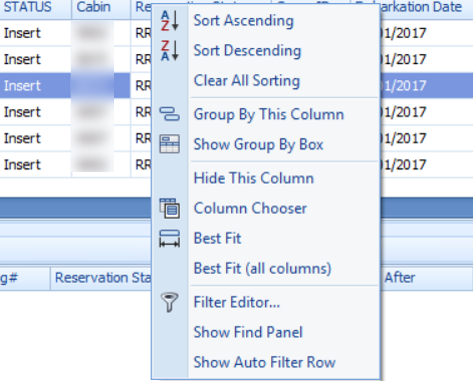
Table 6-3 Built-In Filter Controls
| Function | Description |
|---|---|
|
Sort Ascending |
Re-orders the column to display in ascending order. |
|
Sort Descending |
Re-orders the column to display in descending order. |
|
Clear All Sorting |
Removes the column sort order. |
|
Group by this column |
Select the group and displays in tree view. |
|
Show Group by box |
Hides the tree view pane above the column header. |
|
Hide This Column |
Permits you to hide the column from the table. |
|
Column chooser |
Permits you to choose, remove a field or insert hidden fields into the header. |
|
Best Fit |
Auto fit selected column according to header name. |
|
Best Fit (all columns) |
Auto fit all columns according to header name. |
|
Filter Editor |
Filters the search by field name, date selection, user ID and others using queries such as "And", "Or" and others. |
|
Show Find Panel |
Starts a keyword search bar. |
|
Show Auto Filter Row |
Shows the auto filter row separate from the list of other row. |
Configuring a View with Field Mappings
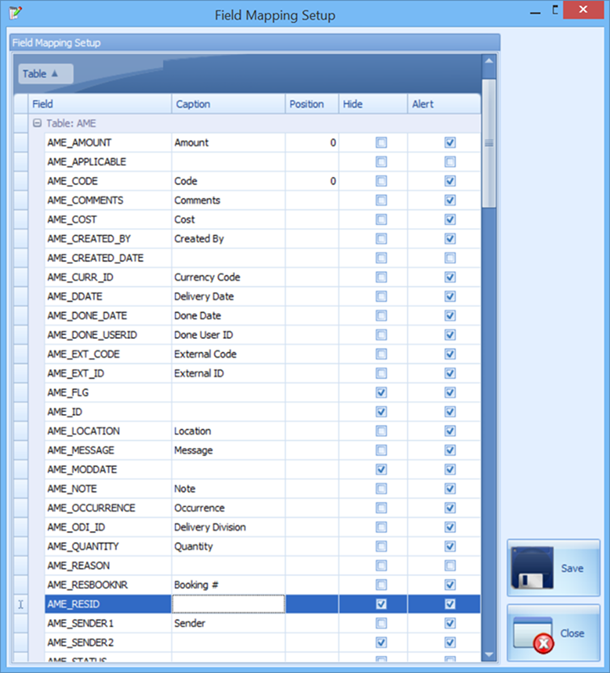
By default, all fields are shown in the available tabs. The Field Mappings function allows you to customize the tab view.
-
Click the Field Mappings button at the ribbon bar, and then click the ‘+’ sign next to the table name in the field mapping setup window.
-
The actual database fields name are shown on the table. Click the Caption field to rename the labels.
-
Enter a number in the Position field to re-order the column display if desired.
-
Check the Hide box to hide the field from the view.
-
Check the Alert box to push out a change notification to relevant parties when there are changes during reservation import. This alert notification is based on the setting defined in ResOnline Interface setting.
-
Click the Save button and then the Close button to exit the setup window
Figure 6-5 Field Mapping Setup Window
-
Click the Load button at the ribbon bar to refresh the information if you have chosen a user define template.
Searching Information using Search XML
The reservations data are usually imported from the shore-side system using an XML file format, the Search XML function is used to search these content.
-
At the ribbon bar, click the Search XML button to open a search window.
-
Enter the Reservation ID or Cabin number in the search string, or any information in the XML file, and then click the Search XML button.
-
The number of records and the detailed contents is shown on the window.
-
Click the Search within Content button to narrow down the information.
-
Click the Close button to exit.
Comparing the Database
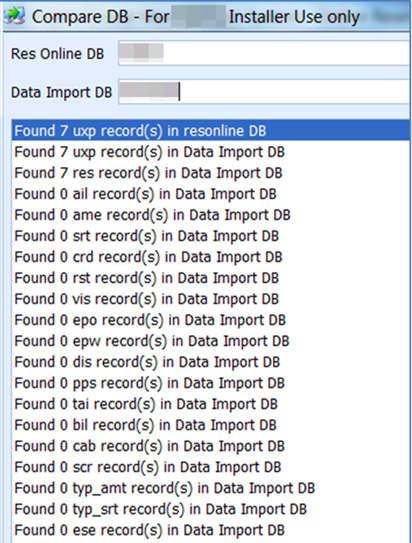
Since the reservations data are usually imported using DGS ResOnline program, the Compare DB tool is used to compare the imported data with ResOnline Data for variance prior to importing them to the ship production database. This function is for the use of SPMS Application Specialist.
-
At the ribbon bar, click Compare DB button to open a database comparison window.
-
Enter the source database in ResOnline database name field, the password in DB Password, and then select the Date from the drop-down list.
-
Repeat the same for the destination database in the Data Import DB field.
-
Click the Compare DB button.
-
Results are shown at the end of the process. If there are variances, check and update the record from the external system, and then re-import the reservation data.
Figure 6-6 Sample Data Comparison Records
-
Click the Close button to exit.
Importing Reservation Data
The Import Reservation Data function allows you to import the last minute reservations, pre-paid gift card sales and reservation changes received in an XML file format.
-
Click the Import Reservation Data button.
-
Locate the XML file using the window explorer.
-
Click the Open button to start the import process. The system prompts the number of records updated/imported, and the import progress and records processed are shown in DGS ResOnline program.
Verify Imported Data
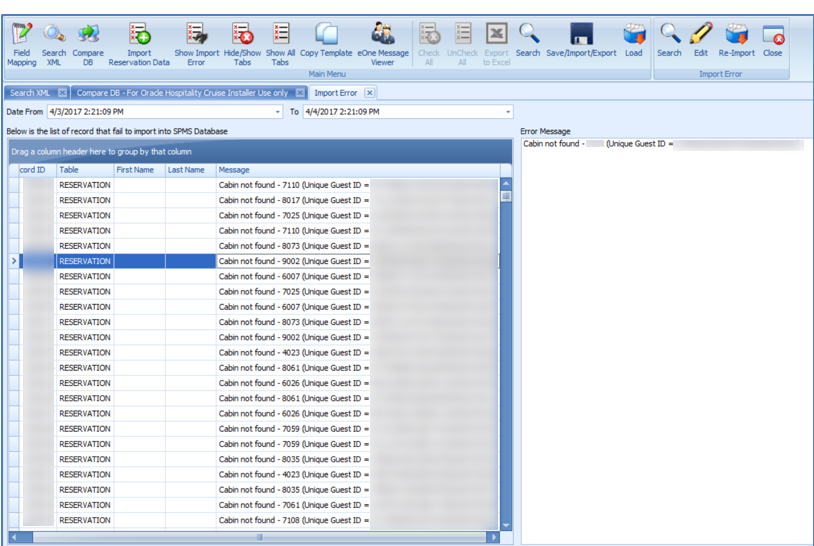
The Show Import Error function enables you to search for any error reported when importing the data.
-
Click the Show Import Error button at the ribbon bar.
-
Enter the Date From/To, and then click the Search button. Error messages are displayed, if any.
Figure 6-7 Import Error Window
-
To correct the errors, select the line item to edit, and then click the Edit button.
-
Edit the description in the Error Message box, and then click the Re-Import button.
Defining Tabs to Hide/Show
By default, all available tabs are presented on the main window. If these tabs are not relevant to users currently login, you can hide them using the Hide/Show Tabs function.
-
Click the Hide/Show Tabs button at the ribbon bar.
-
Select the tabs to hide by deselecting the respective check box and click the Save button.
-
To reset the view to its original presentation, click the Show All Tabs button or manually select the tabs to show/hide using the Hide/Show Tabs option. Alternatively, you may use the User Define Template option to define a view for all users. See Setting Up User Definable Template for more details.
Copy Template
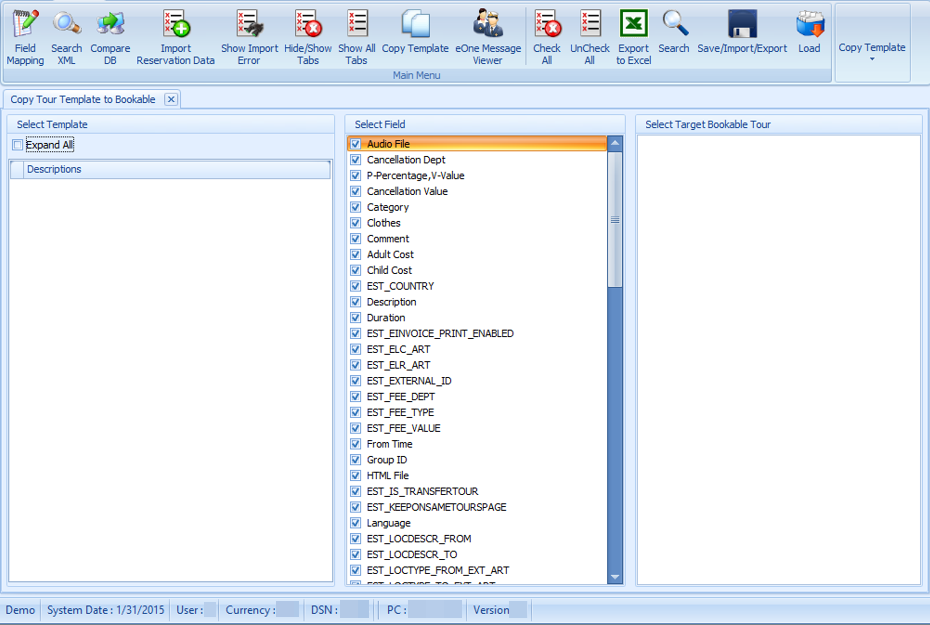
The Copy Template is a function that pushes an update made to Bookable Template into multiple bookable tours, enabling user to change the bookable tour information within ResOnline Viewer instead of individually updating the tours in Shore Excursion module.
-
Click the Copy Template button at the ribbon bar.
Figure 6-8 Copy Tour Template Window
-
Select Template: All bookable Templates currently loaded in the system, sorted by Port Name.
-
Select Field: All fields available to be copied/update from the template to the bookable.
-
Select Target Bookable Tour: All bookable tour currently loaded in the system with service date and starting time.
-
-
At the Copy Tour Template window, select the template to copy by selecting the fields from Select Field panel, and then mark the Target Bookable Tour.
-
Click the Copy button to complete the process and the click the Close button to exit.
Setting Up User Definable Template
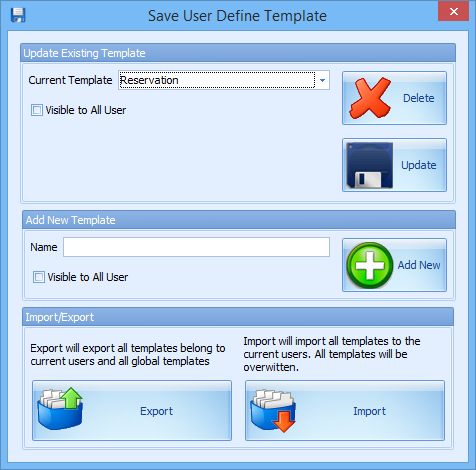
An enormous amount of information is presented upon login and you may choose to hide/show certain information in the window using this function. These templates are exportable for use on other vessels.
Adding New Template
Figure 6-9 User Definable Template Function
-
Click the Save/Import/Export button at the ribbon bar.
-
Enter a template name under Add New Template.
-
Check the ‘Visible to All User’ if the template is available to all users.
-
Click the Add New button.
Updating an Existing Template
-
Repeat the steps above 1 and 2 of Adding New Template.
-
Select the Current Template from the drop-down list.
-
Click the Update button to save the changes.
Exporting Existing Templates
-
Click the Save/Import/Export button at the ribbon bar.
-
Click the Export button and choose a destination to save to, and then click the Save button.
Importing Existing Templates
-
Click the Save/Import/Export button at the ribbon bar.
-
Click the Import button and select the XML file from the folder where the template is stored, and then click the Open button.
-
The system insert a new template or overrides the existing, if any.
Deleting Existing Template
-
Click the Save/Import/Export button at the ribbon bar.
-
Select the template to delete from the Current Template drop-down list.
-
Click the Delete button to confirm.
eOne Message Viewer
This function allows you to view the data transferred from/to SPMS through the eOne Interface using the Microsoft Message Queue (MSMQ). The information displays in each of the tab varies although the steps to obtain the information are the same
Table 6-4 MSMQ Message Type
| MSMQ Message | Description |
|---|---|
|
eOne Incoming Message: |
Displays all incoming messages received from eOne Interface. |
|
eOne Outgoing Message: |
Displays all changes sent to eOne Interface. For example update of name, embarkation/disembarkation date, check-in, when synchronization is performed and others. |
|
eOne Error Message: |
Displays all messages of records that were not processed during synchronization. |
Viewing Incoming, Outgoing or Error Messages from EONE
-
At the ribbon bar, click the eOne Message Viewer.
-
In the eOne Message form, enter the sequence number in From Message No and To Message No field.
-
Specify the Employee Number if you wish to show a specific crew account.
-
Select the Message Type from the drop-down list or leave as default.
-
Click the Search button to display the detail messages on respective window.
ResOnline Import Errors
This section describes the common error messages encountered during Data Import.
Reservation Not Found
This error message “Reservation not found – xxxxxxxxxxx (Unique Guest ID= xxxxxxx )” occurs when the guest information received does not exist in the SPMS system.
ID Does Not Exist
The “ID Does Not Exist in [Typ table] (Unique Guest ID= xxxxx) “ error occurs when the Code/ID of certain fields are either different from what was stored in the database or does not exist in SPMS.
Cruise Not Set Up
The ‘No Changes = leg_id = xxxx,cruise not setup(Unique Guest ID= xxxxxx)” error is a warning error. This occurs when the imported shore excursion booking for the next cruise is not set up in the System Cruise setup and is a reminder for you to setup the next cruise for data to be imported.