1 General Setup
The General Setup section is where you configure the codes used in module such as booking type, event category, locations, and items use by the event, special packages and profiles of the event required when creating an event. The following setup will assist you in organizing and placing the necessary orders for items required by an event
Event Settings Overview
Figure 1-1 System Setup
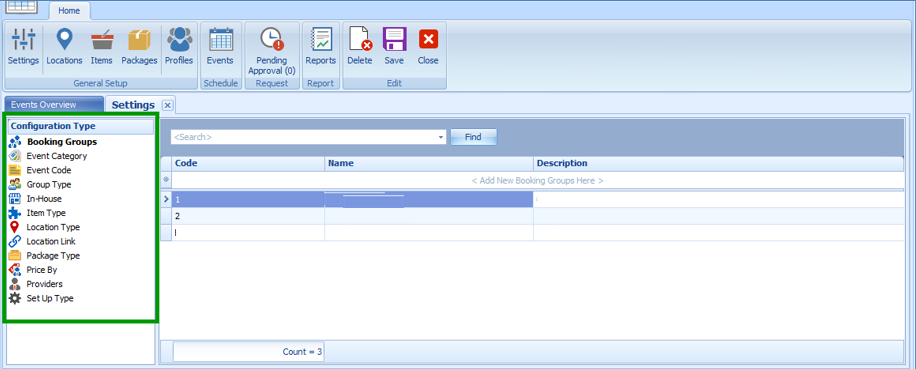
Event Settings Overview is the main configuration window where parameters and settings for furniture fitting, sound system, utensils, other equipment needed by the ship operator to organize an event is setup. The Configuration Type features Booking Groups, Event Category, Event Code, Group Type, In-House, Item Type, Location Type, Location Link, Package Type, Price By, Providers and Set Up Type Functions.
Configuration Type
Configuration Type contains all the general settings use in Event module and are described below:
-
Booking Group: The Booking Group holds the security codes that determine who is allowed to book or change an event location.
-
Event Category: The Event Category code is used to categorize the type of event and is mainly used in report printing.
-
Event Code: The Event Code holds the Priced By, Event Category, and Event Name that enables a quick entry of an Event on the Event Detail Form.
-
Group Type: The Group Type code defines the specific type of Group and they vary from one Cruise Line to another.
-
In-House: The In-House code defines an event category associated with the department or area for a non-group event.
-
Item Type: The Item Type code defines the items by groups, for example, cutleries, linens, furniture and much more.
-
Location Link: The Location Link holds a generic code for a location that groups few locations, to facilitate the copying of templates from one ship to another.
-
Package Type: The Package Type defines the Packages used to help find a specific Package.
-
Price By: Stores the price by codes available to the cruise liner.
Table 1-1 Price By Configuration Type
Field Name Description C
Consumption
F
Fixed
A
Fixed Guests
R
Fixed Cabins
L
Calculated Guests
S
Calculated Cabins
-
Providers: The Providers code defines the shipboard group responsible for fulfilling items required by the event.
-
Setup Type: The Setup Type defines the available seating or set up for the location. For example, U-Shape seating, Theatre, Pool Party, Conference, and others.
Adding New Configuration Codes
Figure 1-2 New Configuration Codes Window
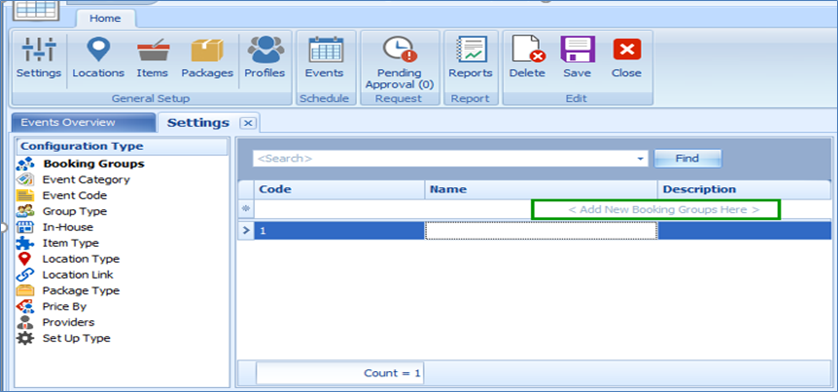
- From the ribbon bar General Setup group, click Settings and then navigate to Configuration Type to select the configuration type to add.
- The Code field is mandatory. Insert the code, name, and description in the field below the Search bar, and then click Save to save the record.
- When you click Save on the input field for the Code is empty, the system prompts a warning message ‘Please enter a unique code. Do you want to correct the value?’
- Click Yes and insert the Code accordingly.
- Click Save to save the record.
Events Overview
Figure 1-3 Events Overview
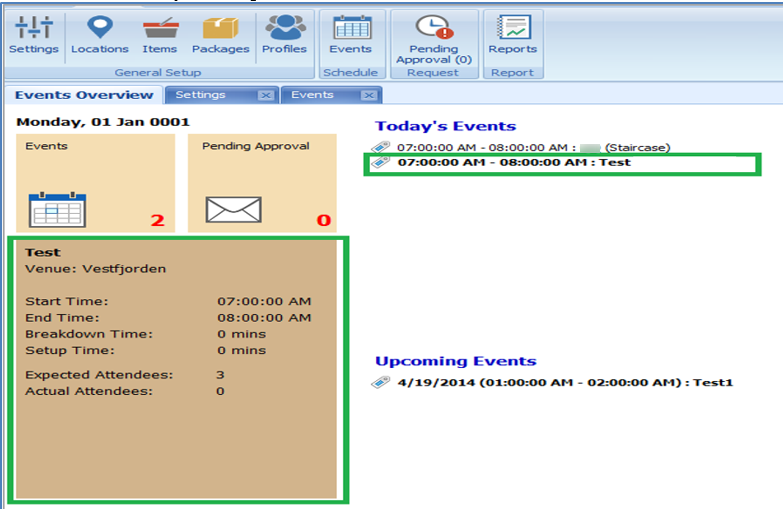
The Events Overview shows the summary of events for today and upcoming events, with the summary of total events pending approval. You may further drill down to view the event information by clicking the functions available on the window.
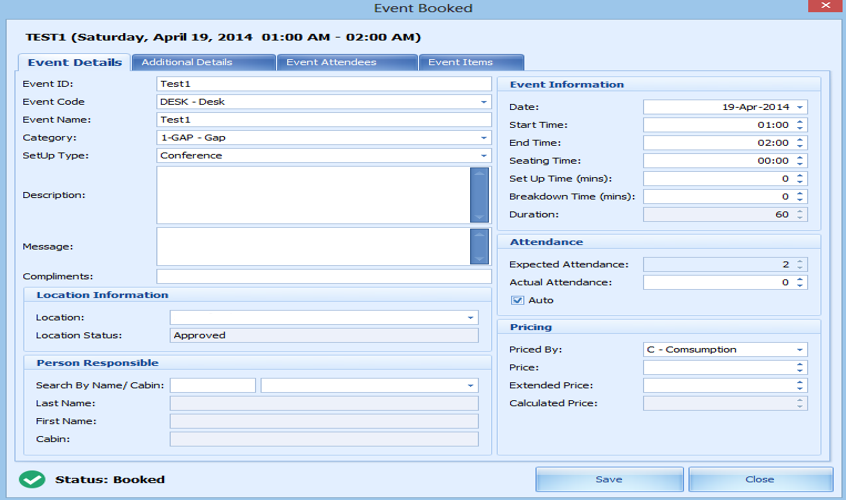
Double-clicking on any available event in Today’s Events or Upcoming Events section launches the Event Booked window.
Figure 1-4 Event Booked
Clicking the number of events in the Events section displays the event in Date, Week, Month or Timeline grid. You can also add, edit an event from this window. See Event Management section for steps to add, delete, and edit and event.
Figure 1-5 Events —Timeline View
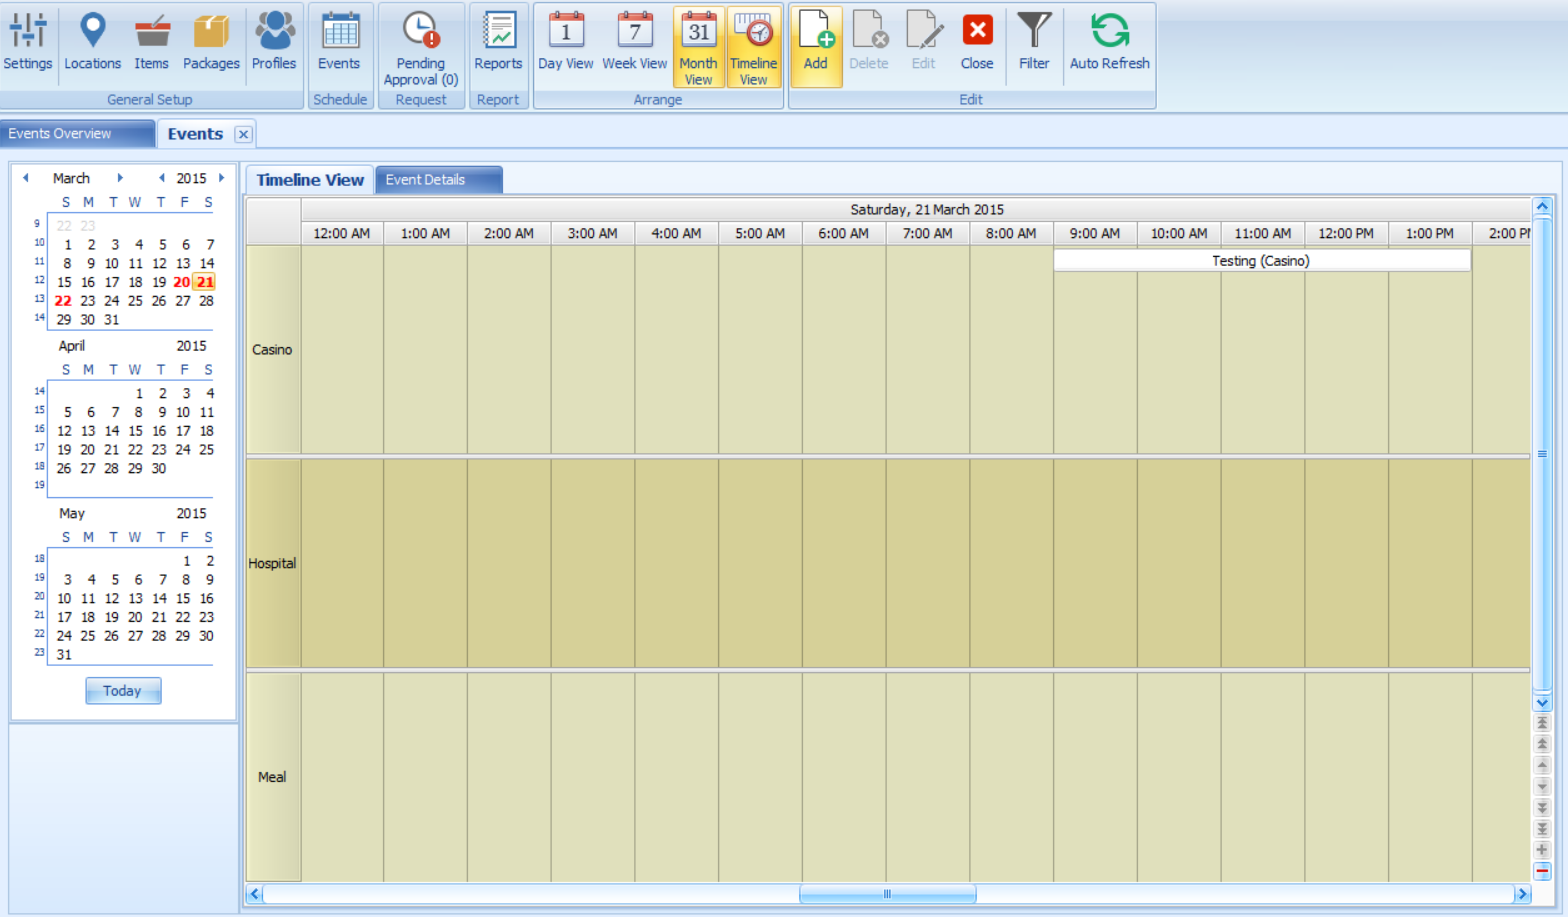
Clicking the number on Pending Approval section displays the list of events that are pending approval.
Figure 1-6 Event - Pending Approval Tab

Locations Setup
Figure 1-7 Locations Tab
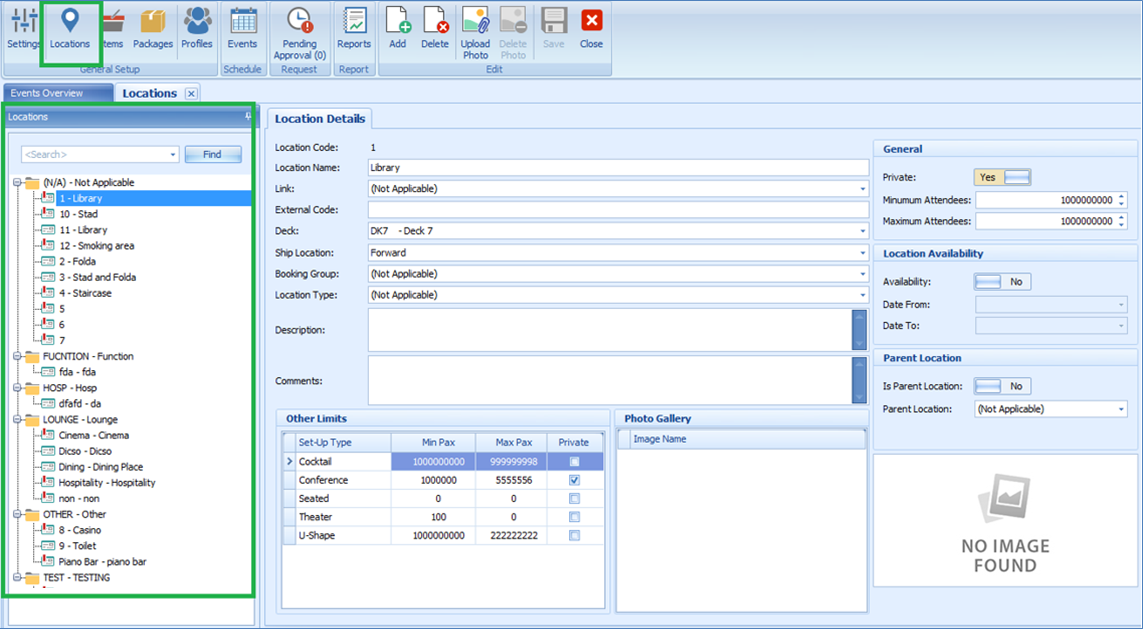
The Locations Setup is accessible through the General Setup, Locations icon at the ribbon bar. It shows the location available for an event booking and is grouped by location category.
In each of the location, you can then define the location details, seating style suitable for that location, attached a photo gallery and set the minimum/maximum person allowed, and all these settings are linked to codes configured in Event Settings Overview.
Adding New Location
- Click Location from the General Setup group.
- On the Location tab, the sub-locations are listed in a container view. Click the + button to expand the container list.
- To add a new location, select the main location, and then click Add on the ribbon bar.
- In the Location Details section, enter all the necessary fields. The Location Code, Location Name, Booking Group, and Location Type are mandatory fields and the system prompts an error when the field is empty.
- Navigate to the Other Limits section, select the Set-Up Type suitable for this location, enter the minimum/maximum person allowed for each seating type and select the Private check box for events that are held privately.
- Click the Upload Photo icon on the ribbon bar to attached images of the location to the Photo Gallery section.
- At the General section, insert the minimum/maximum attendees allowed using the arrow up/down key. Turning the Private toggle to Yes indicates that the location use with other events at the same time.
- At the Location Availability section, the availability is default to Yes. Sliding it to No will make the location unable. Select the available date from/to using the date editor.
- At the Parent Location section, select the Parent Location from the drop-down list if it is a sub-location. Sliding the toggle to Yes makes the location a Parent Location.
- Click Save at the ribbon bar to save the location.
Editing a Location
To edit a location, select the location from the location tree view and edit the information and then click Save to the changes.
Items Setup
Figure 1-8 Items Tab
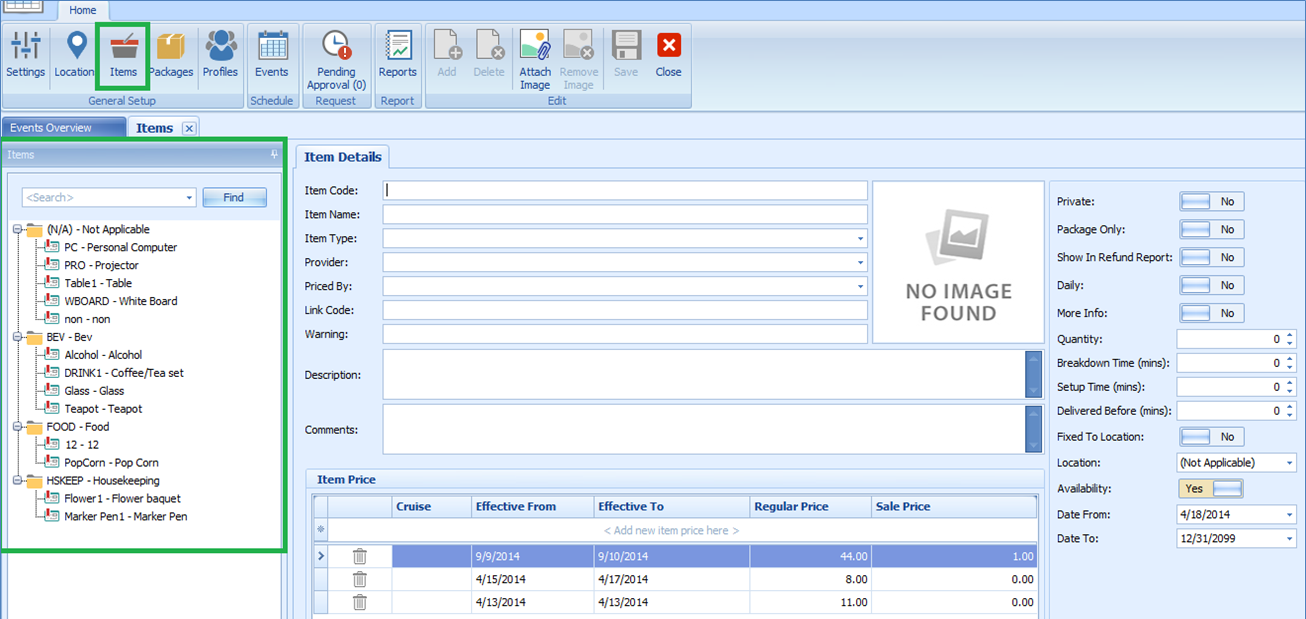
The Items Setup allows you to define every item used for an event from the type of cutleries, flower arrangements to furniture and others. Multiple prices per item based on date period is allowed, enabling a selection based on the cruise selection and Effective From and Effective To date.
Table 1-2 Control Key in Item Price
| Field Name | Description |
|---|---|
|
Private |
Determine whether the item is available for private event or public and this is based on item’s status. |
|
Package Only |
An indicator that item may be used as a Package. |
|
Show in Refund Report |
An indicator whether the items should show in Refund report use by Affair Where. |
|
Daily |
Control the quantity of the item to be multiplied by the number of days in the cruise. |
|
More Info |
A control to prompt Item Form for additional information to be entered when items are added to an event. |
|
Breakdown Time |
The number of minutes required to take down the item at the end of an event. |
|
Setup Time |
The number of minutes required to set up the item at the beginning of an event. |
|
Delivered Before |
A number of minutes the item to be delivered before the start of the event. |
|
Fixed to Location |
An indicator that item is fixed to a certain location and are movable. |
|
Availability |
Indicates the item availability by period specific. |
Adding an Item/Price
- Under General Setup group at the ribbon bar, click Item Setup. The Item Code, Item Name, Item Type, Provider, and Priced By are mandatory fields. The system prompts an error if one of the fields is empty.
- On the left of the Items tab, expand the tree view and then click Add to add a new item.
- In the Item Details section, enter all the necessary fields.
- Navigate to the Item Price section, select the cruise, effective date from/to from the drop-down list and insert the regular price and sale price. Overlapping dates is not permissible in item price setup. For an item price changed that is already booked for the current system date or future event, the price change applies to these events also.
- It is not permissible to set up item prices with an overlapping date. If the input item price has an invalid date, the system prompts a Confirmation prompt. Click Yes to edit or No to exit without making any changes.
- Various controls are available and switching these controls to Yes does affect the Item Price behavior.
- Once all the required information is entered, click Save to save the changes.
Deleting an Item
- At the Items tab container, select the item to delete, and then click Delete on the ribbon bar.
- Select Yes at the confirmation prompt to delete the item or No to return to the previous menu.
Deleting an Item Price
- Repeat steps 1 and 2 of Adding an Item.
- Select the Item and then navigate to the Item Price section.
- Right-click on the Item Price you wish to delete and click the delete prompt.
- Click Save at the ribbon bar to save the changes.