5 Cabin Overview
The Cabin Overview list provides a detailed overview of the cabin, showing the occupancy and status of the cabin. The information shown changes depending on the filter entered in the Search Criteria.
Figure 5-1 Cabin Overview Show by Voyage
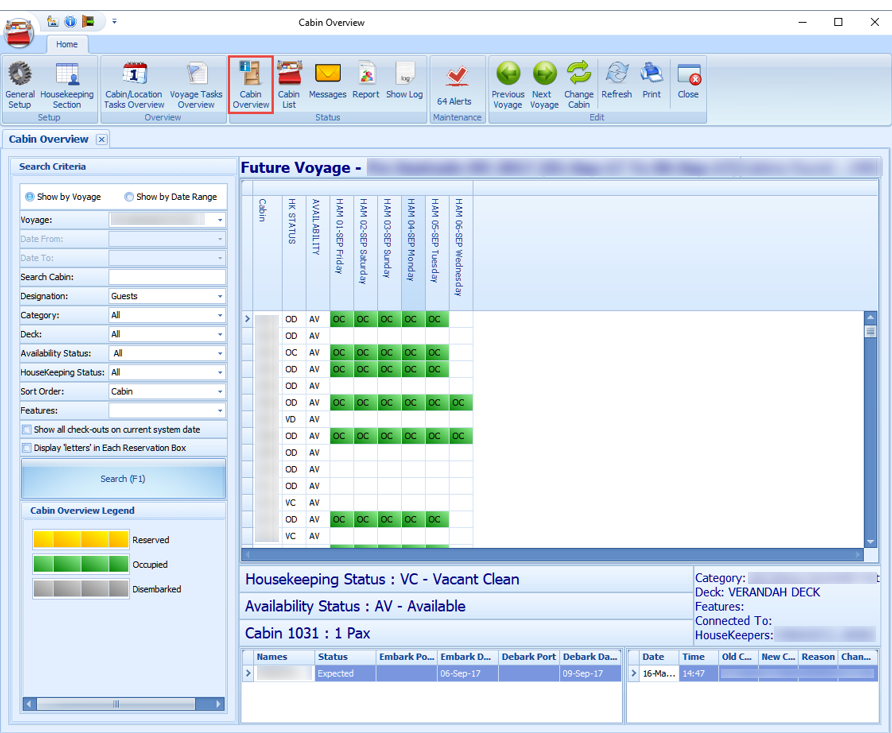
Table 5-1 Cabin Overview Field Definition
| Label | Definition |
|---|---|
|
Voyage |
Indicates the reservation for the voyage |
|
Date From |
Indicates the reservation Date From |
|
Date To |
Indicates the reservation Date To |
|
Search Cabin |
Indicates the cabin number |
|
Designation |
Indicates the type of reservations – guest, crew or resident |
|
Category |
Indicates the category of cabin |
|
Deck |
Indicates the deck of cabin |
|
Availability Status |
Indicates the availability status of the cabin |
|
Housekeeping Status |
Indicates the cleaning status of the cabin |
|
Sort Order |
Indicates the sorting of reservation to be display |
|
Features |
Indicates the feature of cabin |
|
Show all check-outs at current port |
Indicates the reservation only shows all check-outs at current port |
|
Display ‘letters’ in Each Reservation Box |
Indicates the options to display the cabin status in alphabetical view for each reservation grid |
-
From the Home tab, click Cabin Overview on the ribbon bar.
-
At the Search Criteria panel, enter the desire criteria and press F1 or click Search (F1).
-
Click the colored box (green/yellow/grey) of the cabin to preview the reservation information.
-
If Show By Voyage is selected, the Previous Voyage and Next Voyage illuminates on the ribbon bar, allowing you to navigate to the previous or next voyage.
-
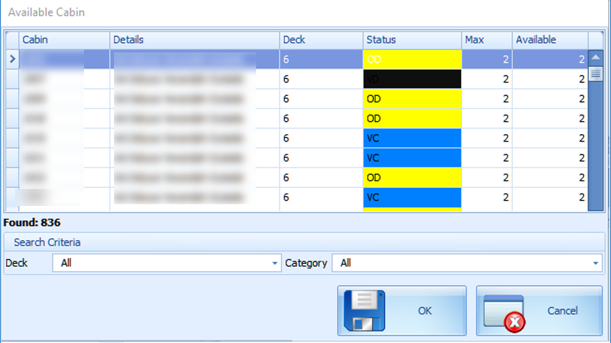
Selecting a reservation from the grid and clicking Change Cabin will open the Available Cabin window, allowing you to select another cabin. This feature would require user access right #557.
Figure 5-2 Available Cabin
-
Click Refresh on the ribbon bar to refresh the information.
-
Click Print to print a copy of the Cabin Overview.
Cabin List
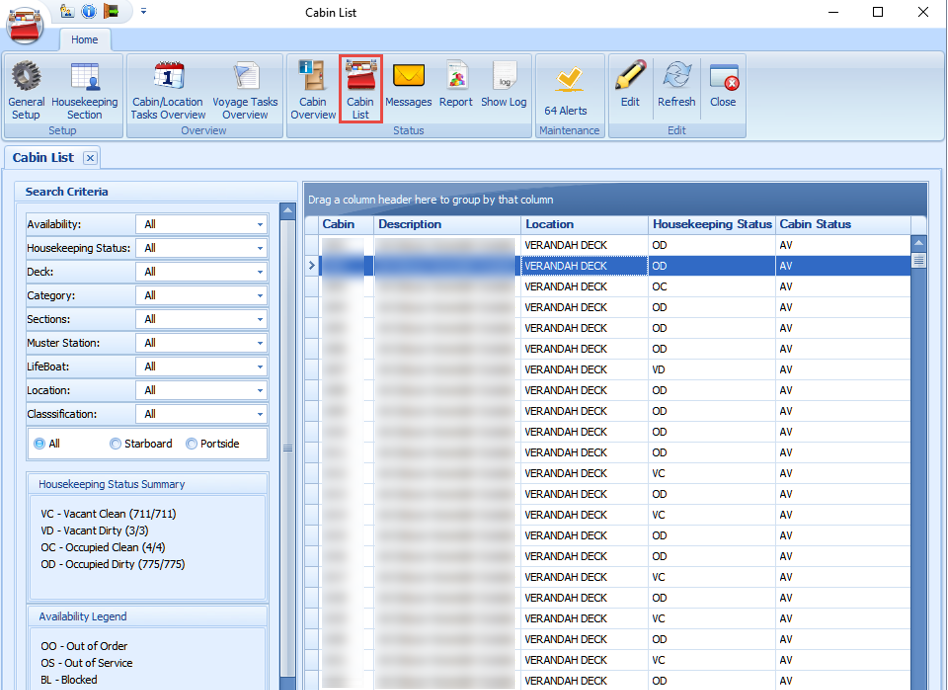
The Cabin List is a list view of all guest cabins with the current housekeeping and cabin status. Apart from the cabin list, it also provides a Housekeeping Status Summary and allow you to change the cabin status.
Figure 5-3 Cabin List Overview
-
From the Home tab, click Cabin List on the ribbon bar.
-
The default display of the Cabin List is all cabins. You may use the Search Criteria to filter for desired information.
-
To edit the Cabin Status, click Edit on the ribbon bar or double-click the cabin number.
-
On the cabin form, select the Status from the drop-down list and fill in the information accordingly.
-
Click Save to save and exit the form.
Messages
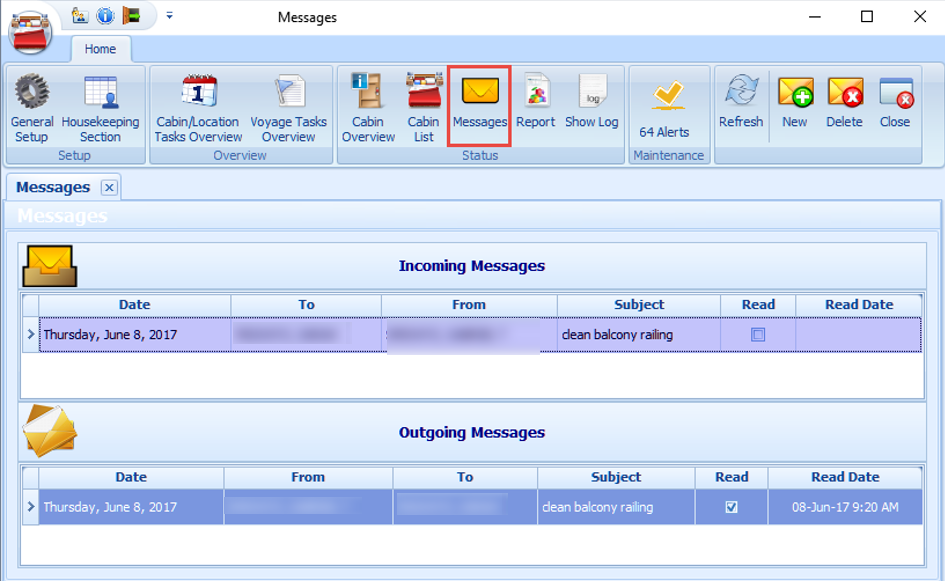
The Messages feature enables you to send internal messages between the housekeepers.
Figure 5-4 Messages Overview
-
From the Home tab, click Messages on the ribbon bar.
-
On the New Message form, click [+] to open the Crew Selection window.
-
Select the crew you wish to send the message by selecting the Department, Position or Housekeeping Section from drop-down list, and click Search.
-
Select the crew from the Select Crew Members grid.
-
Click the double right arrow (>>) to add the selected crew.
-
Click OK to close the window.
-
Fill in the Message form accordingly and click Send.
-
The Incoming Messages section displays the messages received from other Housekeepers, while the Outgoing Messages section displays the messages sent to other Housekeepers. If the logged in user is part of an Administrator group, then they will see the messages in both the Incoming and Outgoing section.
Reading Message
-
When the recipient logs in to the Housekeeping module and navigates to the Messages function, messages are listed in the Incoming Messages section.
-
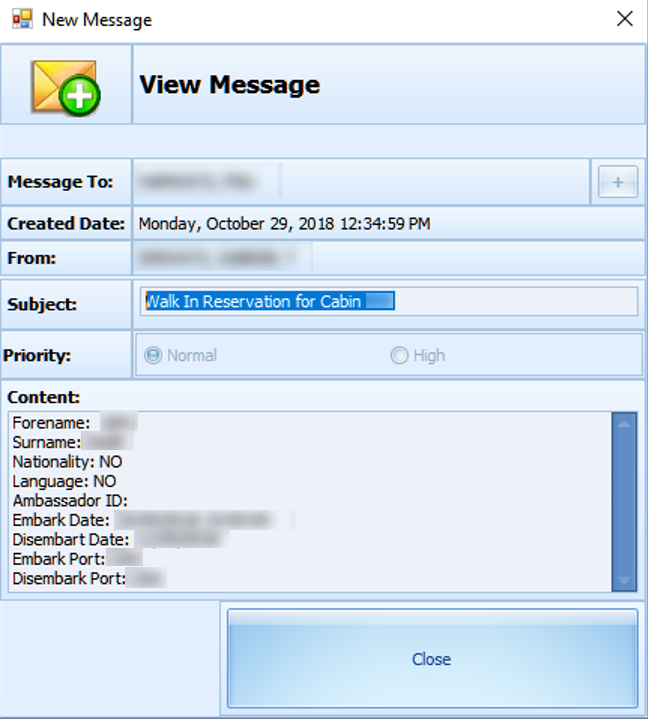
Double-clicking the message opens the View Message window, allowing you to view the message content.
-
When you click Close, this sets the message as Read.
-
Similarly, when the sender opens the Message function, they will notice that the Read check box is checked, indicating the message has been read.
Figure 5-5 View Message Window
Deleting Message
Only users from the Administrator group are allowed to delete both the Incoming/Outgoing messages.
-
On the Message function, select the message and then click Delete on the ribbon bar. Multiple selections are allowed.
-
At the confirmation prompt, select Yes to proceed or No to return to previous window.