1 Mobile Mustering Device
The Mobile Mustering is an add-on application to SPMS that simplifies the ship's access to passenger and crew movements. It provides an accurate head count and real-time passenger, crew and visitor status, and is ideal for crowd handling in a muster drill.
Using the Device
Login to the Device
- At the device log in page, tap the ‘Please use your Card to Login’ to swipe the crew board card or select Login Manually then to enter the login ID and password.
- If the selected option is by swiping a crew card, place the cursor at the search bar and then swipe board card through the card reader.
- Select the Mustering Mode and Muster Station from the drop-down list and tap on OK.
Parent topic: Mobile Mustering Device
Device Settings
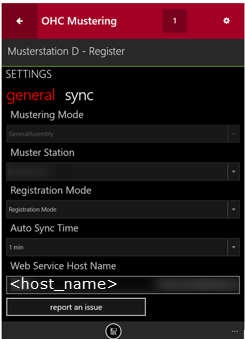
The Settings page is where you configure the host name, assign a Muster Station, set the Mustering and Registration Mode, and perform the database synchronization. You can access the Settings page, comprise of General and Sync tab from the home screen. This function is disabled for crew or users without Administrator privilege:
The options in the General tab are:
-
Change Mustering Mode: The mode is always displayed in the Menu page and is read-only page. You can only change the mustering mode in WPFDash module.
-
Mustering Station: Assign/select the muster station/lifeboat depending on the mustering mode.
-
Registration Mode: Sets the type of registration mode (Register/Unregister).
-
Auto Sync Time: Define the minute(s) for the next sync to occur.
-
Web Service Host Name: Allows you to set the web service hostname.
-
Report an Issue: Allow issues that occurred to be reported.
Figure 1-1 Mobile Mustering General Settings Tab

-
At the application landing page , tap on the gear icon.
-
At the Settings page, tap the General tab, and choose the Mustering Mode, Muster Station and Registration Mode from the drop-down list.
-
Enter the host name in the Web Service Host Name.
-
Tap the Home button to save, and then tap OK to return to the Settings page.
Parent topic: Mobile Mustering Device
Reporting an Issue Using Issue Tracker
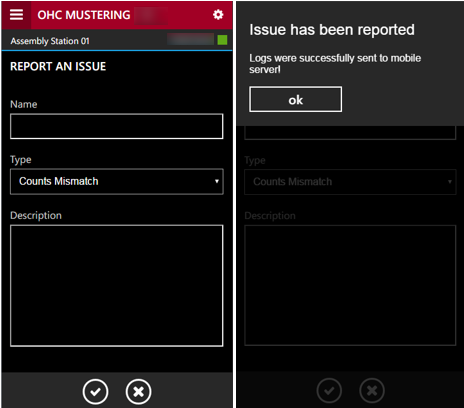
The application has an issue reporting function that allow you to report an issue whilst using the application, and this feature is available to all users accounts.
Figure 1-2 General Settings, Report An Issue Tab

You can access the Issue Tracker from Settings tab, then tap the Report an Issue and fill in the required information.
-
Name: Reported issue name. Issue name should consist of 2-3 words describing the nature of the issue.
-
Type: Issue type. Select from the drop-down list the relevant issue type.
-
Bug: Some error or incorrect behavior.
-
Crash: Application crashed, closed for an unknown reason, or showing an exception error.
-
Improvement: Areas requiring improvement.
-
Counts Mismatch: Use when there is a mismatch in numbers.
-
Photos Issue: Use when the passenger does not have a profile photo.
-
-
Description: Description of the issue. For example, “I did some action and got an error….”, “App. crashed when performing …”, “App. closed when I try to swipe a card” and others. If possible, add as much information as possible.
Parent topic: Mobile Mustering Device
Mobile Synchronization
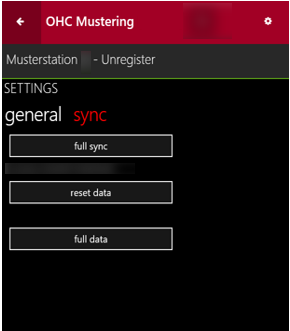
The Sync function obtains the newest database from the Mobile Server through a preset synchronization process, and the device-operating mode must be in an Online mode. The Sync tab contains the following buttons:
-
The process deletes the existing database from the device and download the latest database; all photos will be re-downloaded from the server. The Full Sync button is disabled when downloading the photos.
-
This function is executed manually and is use for troubleshooting only.
-
You cannot use the device in the event of an emergency.
-
You will receive notification prompts when you launch this function. Read and understand the notification prompt and proceed with caution.
-
Once the synchronization completes successfully, it navigate back to the Login page.
-
The process deletes the existing database from the device and re-download the latest.
-
This function is launch manually.
-
Once the synchronization completes successfully, it navigate back to the Login page.
-
Deletes all the data rows from the tables and downloaded the latest to the device.
Figure 1-3 Mobile Synchronization Mode

Parent topic: Mobile Mustering Device