1 Setting up Payroll Codes
A Payroll company is used to separate a range of shipboard payrolls that have different processing cycles or payroll currencies. Before you begin using the payroll module, you must set up a Default System Code, Payroll Company, Salary Group, Salary Position, Calculation Method, Contract Template, Scheduled Contract Changes, Tax Type and Payroll Setup Copier.
Pay code Maintenance
The Pay Codes have four (4) categories:
-
Pay Additions: This pay code is used to calculate the Gross Pay for an individual.
-
Pay Deductions: This pay code is used to deduct taxes, allocations, penalties, garnishments, and/or other onboard or shore side obligations. Pay Deductions are the sum of the (Pay Additions)minus (Pay Deductions) which equals the Net Pay of an individual.
-
Payout This pay code is used in the final payments of the net pay to an individual. A normal payout would include cash, ship’s bank, and a financial institution or accrued to the next period.
-
Benefits Contribution This pay code is use to pay benefit contributions such as social security or Medicaid or any other employer contribution information added to the contract that has to be accounted for onboard. (used for pension plan or medical plan).
Below are the sub-groups within the major pay groups maintained in SPMS and are named as the Code Type.
-
Basic Wage
-
Sick Pay
-
Travel Expenses
-
Vacation Pay
-
Allotment
-
Miscellaneous
-
Travel Deductions
-
Tax
-
Payout
Creating a Code Type
-
Log on to Payroll module.
-
Navigate to the Maintenance menu and select Pay Codes from the context menu.
-
On the Pay Code Maintenance window, right-click and select Add Pay Code Type.
-
Enter a short code and description in the Description field.
Note:
The first character of the Code Type determines the type of pay calculation to use. A Pay Additions Code Type MUST begin with an “A”, Deductions with a “D”, Pay Outs with a “P” and Benefit Contribution with a “B”. Otherwise the system will not calculate the pay correctly. -
Enter additional information in the Comment field, if any.
-
Check the Enabled checkbox to enable/disable the display of pay code types in other setup forms such as crew assignment, contract template and others.
-
To delete selected pay code, right-click and select Delete Pay Code Type.
Figure 1-1 Pay code Maintenance
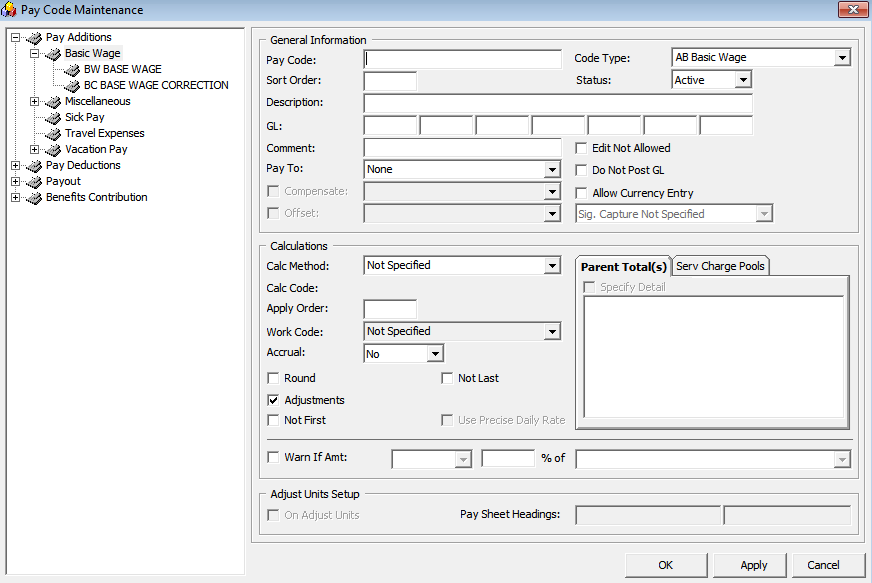
Table 1-1 Pay code Maintenance Field Definition
| Field | Description |
|---|---|
|
Pay Code |
A unique identifier for the pay code. Usually a number, but can be alphanumeric. |
|
Code Type |
The type and group of this pay code. |
|
Sort Order |
User definable sort order. If no additional sort is required, enter a zero (0) in this field. |
|
Status |
The current status of the pay code (Active or Inactive). |
|
Description |
The name of the pay code. |
|
GL |
The general ledger account number of the pay code. |
|
Comment |
Any additional information for this pay code. |
|
Pay To |
Determines if the pay code requires information on where to send the deduction or payment.
|
|
Compensate |
Works with code type ‘Benefit Contribution – BCC & BUP’ to populate pay deduction as the deduction of payroll for crew contributions to pension plan or medical plan. |
|
Offset |
Work with code type ‘Benefit Contribution’ to populate the benefit contribution pay code as the benefit posting to the balance automatically when payroll is paid out at the end of the pay period. |
|
Edit Not Allowed |
An option that disables the user from being able to modify the pay amount of the pay code while editing the contract or assignment. |
|
Do Not Post GL |
The option to not write the pay code into the GL file when generating a GL file. |
|
Allow Currency Entry |
A function to allow entry of currency conversion when adding posting or payroll adjustments. Note: Applicable to Quick Posting, New Pay Item, Cash Advance, and Payout. |
|
Signature Capture |
A signature capture is required during payout. Only applicable when selecting Payout. |
|
Calc Method |
This code determines the calculation method used to calculate the amount of the pay code. |
|
Calc Code |
Works with Calculation Method ‘A-SPEC’,’D-SPEC’ or ‘P-SPEC’. It represents a special calculation method that was added to the program to handle a calculation outside the normal methods. |
|
Apply Order |
The posting order of the pay codes when calculating the pay. The order is within the Additions, Deductions and Pay Out pay groups. Note: If a pay code is to be based on a previously calculated amount, then that amount must have a lower apply order of the pay code set-up so that its value will be available for the calculation. |
|
Work Code |
Works with the Time Attendance calculation method ‘A-TAOT, A-TAHO, A-TANO, A-PPPH’. |
|
Accrual |
Amount accrued for the next month.
Note: Only Pay Additions and Pay Outs can be accrued. |
|
Parent Total |
For certain Calculation Methods (Percent of another amount for example). you can specify the percentage to include on previously calculated pay codes For example: The new Pay Code “10% Percent Bonus” is a percentage of the person’s Basic Wage and Leave Pay. Note: The apply order field for the new pay code must be greater than the apply order field for any of the amount to be used in the calculation. When this button is selected, a list box is shown, allowing you to pick the pay codes. |
|
Service Charges Pool |
Works with the Service Charge calculation method ‘A-HBSC’ to populate the service charge pool type. |
|
Use Precise Daily Rate |
Uses a more precise formula to calculate monthly pay. Example: 10% of Monthly Wage $2100 Used with Precise Daily Rate: 10% x (2100 *12/365) * 29 (contract day) = $200.22 Without Use Precise Daily Rate: 10% x (2100/30) * 29 (contract day) = $203 Note: This option is enabled when the pay code is selected at Specify Detail. Used more on the A-PERC calculation method. |
|
Round |
Round the final amount calculated for this pay code to the nearest denomination unit of currency. |
|
Adjustments |
Option to allow the pay code for manual adjustments. Note: Applicable to Add New Pay Item, Quick Posting, and Cash Advanced. |
|
Not First |
Do not use this pay code for the first pay period of the contract. |
|
Not Last |
Do not use this pay code for the last pay period of the contract. |
|
Warn if Amt |
This restricts the amount entered on one (1) pay code based on the amounts entered for another pay code. For example: If an allocation must be at least 80% of a crew member’s base pay, you would check the Warn If checkbox, select “is less than” from the drop-down list, enter 80 in the percent text field and select “Base Pay”. |
|
Adjust Unit Setup |
Determines whether this pay code will be displayed on a person’s pay sheet so that unit information can be entered. Pay Sheet Headings: The descriptions to display at the top of the Pay Sheets for Multiple People form. Note: Apply to calculation methods assigned to ‘PPER, HOUR, PDAY, SPEC, PDTD, PDTI, PPMW, PPTE, PWEK, PYER, VACP, TAHO, TANO and TAOT’. |
Adding a Pay Code to Code Type
-
On the Maintenance, Pay Code Maintenance window, expand the tree view and right-click the Code Type you wish to add to the pay code.
-
Select Add Pay Code and complete the pay code setup form.
-
Click Apply to save or click OK to save and exit the form.
-
To edit, select the Pay code, edit and then click Apply to save the changes.
WARNING:
Please use extreme caution when updating pay codes since many of the codes are dependent on other codes.
-
Changing the Apply Order or the calculation method of the code may have an adverse impact on another code.
-
Changing the Calculation Method of an existing pay code from “Flat Rate” to “Percent of Another Amount” will not affect the pay code that is already added to an assignment.
-
Deleting a Pay Code
To delete a pay code, right-click the code and select Remove. You can only delete an unused pay code.
Salary Group
A Salary Group is similar to SPMS Operational Department. This is used to group people by their salary range and responsibility.
Creating Salary Group
-
On the Payroll Maintenance, select Salary Group from the context menu.
-
On the Salary Group window, right-click on the group listed and select Add New.
-
Enter the short code and description for the group in the Description field.
-
Enter an additional comment in the Comment field, if any.
-
In the Mapped ID field, enter the GL ID code. This code is one of the fields used for GL Output file.
-
The Enable field is checked by default. Uncheck to disable the display in other setup forms such as crew assignment, contract template and others.
-
Click Apply to save or OK to save and close the form.
-
To delete a Salary Group, right-click on the code and select Remove. You can only delete a code that is unused.
Salary Position
Salary Position groups people by its job responsibilities within a Salary Group. These groups of people typically have a similar, if not identical contract.
A set of salary positions is maintained for the entire Payroll system and is used by all companies set up in the system.
Creating Salary Position
-
Select the Salary Position from the Payroll Maintenance menu option.
-
A list of Salary Groups is shown in the Salary Position Maintenance window. Click the plus (+) key to expand the view of existing Salary Positions.
-
Right-click the Salary Group and select Add New to create a new position.
-
Enter all the require information and click Apply to save. Refer below table for field descriptions.
Figure 1-2 Salary Position

Table 1-2 Salary Position Field Definition
| Field | Description |
|---|---|
|
Group ID |
Field represents the Group ID of the Salary Group. This is generated automatically based on the selected Salary Group. |
|
Position ID |
Unique ID for Salary Position |
|
Description |
Position name |
|
Comment |
Additional comments. |
|
Mapped ID |
GL mapping field used in the GL Output field. |
|
Valid From/Until |
Validity Period for the position. If the field is blank, this means the position does not have a Validity date. The program checks the valid date against the current system date. An expired or invalid position will not be shown when creating a crew contract/assignment. |
|
Op. Position |
Links the Salary Position to Operational Department. Once the position is linked, the crew member that belongs to the operational position will be populated on the crew assignment screen. |
|
Status |
Active/Inactive. If the status is set to Inactive, the salary position will not display when creating a crew contract. |
|
Sort Order |
Sort Position by the order entered. Used as an alternative sort. If alternative sort order is not required, you may enter any number in this field. |
|
Account |
Department name used for the GL output field. |
Calculation Method Overview
The Calculation Method defines the computation of a particular pay code during pay generation. Although the Calculation Method maintenance form exists, you are not allowed to perform insertion and deletion actions, due to the values in this table as it would require code changes. However, you are allowed to set the status to enable or disable.
Below are the pay calculation methods currently available in the system for general use.
Table 1-3 Calculation Method Overview
| Pay code Type | Code | Description | Calculate based on |
|---|---|---|---|
|
Not Specified |
- |
Not Specified |
The Pay code will not populate when:
|
|
Pay Addition Calculation |
A-CEND |
Contract End |
A Flat amount added to the last pay period of a contract. |
|
A-CSTR |
Contract Start |
A Flat amount added on the first pay period of a contract. |
|
|
A-FLAT |
Flat Amount |
A Flat amount added to each pay period. |
|
|
A-HMTH |
Half Month |
A Flat amount added when the person worked for at least 15 days during a period. Half the amount will be added for 1 to 14 days. |
|
|
A-HOUR |
Per Hour |
Rate multiplied by pay sheet entered units to arrive at amount.(Rate x Units) |
|
|
A-PDAY |
Per Day |
Rate multiplied by pay sheet entered Units to arrive at amount. (Rate x Units) |
|
|
A-PDAC |
Per Day Automatic Calculation |
Amount entered as a flat amount on the contract, but computation is based on days in period during pay calculations. (Rate / Number of Day of the pay period) |
|
|
Pay Addition Calculation |
A-PERC |
Percent of another Amount |
Percentage taken from previously calculated amount. If detail pay codes are not specified, the percent is taken from the currently calculated gross pay. (Rate (%) x Base (Specified pay code)) |
|
A-PPER |
Per Pay Period |
Amount is entered as a flat amount on the contract, but computation is based on days worked and days in period during pay calculations. (Rate / Number of Days in the pay period) |
|
|
A-SPEC |
Half Month |
A special pay calculation must be written. The code for this calculation must be entered in the Calc Code field. Calc Code: STHMTH = Get full pay if worked more than 16 days. NCHMTH = Get full pay if worked more than 15 days. |
|
|
A-PWEK |
Per Week |
Weekly calculation amount of the pay period. (Rate / 7) |
|
|
A-PYER |
Per Year |
Yearly calculation amount of the pay period.(Rate / 365 or 366) |
|
|
A-SPCO |
SPA Commission Earning |
Pay code to post total amount of crew commission from SPA module (refer to table SPR) into crew member assignment. (Sum of SPR_COMMISSION) |
|
|
Pay Addition Calculation |
A-OFFS |
Negative Percentage Offset of Another Amount |
Negative amount use to offset a specified pay code. (Rate(%) x base (specified pay code)) |
|
Pay Deduction Calculation |
D-CEND |
Contract End |
Flat amount deducted on the last pay period of a contract |
|
D-CSTR |
Contract Start |
Flat amount deducted on the first pay period of a contract. |
|
|
D-FLAT |
Flat Amount |
Flat amount deducted at each pay period. |
|
|
D-PERC |
Percent of Gross (or another amount) |
Percentage of Gross Pay (or another amount) deducted on each pay period. (Rate (%) x Base (Specified pay code)) |
|
|
D-PPER |
Per Pay Period |
Amount deducted on each pay period depending on the number of days worked in the pay period. (Rate / Number of Day of the Month) |
|
|
D-PRMD |
Percent of Remainder |
A percent of current net pay is deducted each pay period. (Rate (%) x Base (specified pay code)) |
|
|
Pay Deduction Calculation |
D-SPEC |
Special |
A special pay calculation must be written. The code for this calculation must be entered in the Calc Code field. Calc Code: STHMTH = Deduct full pay if worked more than 16 days. NCHMTH = Deduct full pay if worked more than 15 days. |
|
D-OFFS |
Negative Percentage Offset of Another Amount |
Negative amount used to offset the specified pay code. Rate(%) x base (specified pay code) |
|
|
D-TAX |
Tax Rates Per Tax Table |
Amount paid out based on tax type defined in TAX table. |
|
|
D-UNTL |
Flat Amount With Maximum |
Same functionality as D-FLAT. |
|
|
D-HMTH |
Half Month |
Flat amount deducted if the person worked at least 15 days during a period. Half the amount will be deducted for 1 to 14 days. |
|
|
Payout Calculation |
P-FLAT |
Flat Amount |
Flat Amount paid out each pay period. |
|
P-PERC |
Percent of Gross |
Percent of Gross paid out each pay period. |
|
|
P-PPER |
Per Pay Period |
Amount paid out based on the number of days worked in the pay period. |
|
|
Payout Calculation |
P-PRMD |
Percent of Remainder |
Amount paid out based on the percentage of whatever has yet to be paid out. |
|
P-OFFS |
Negative Percentage Offset of another Amount |
Percentage to balance the specified pay code. |
|
|
P-SPEC |
Special |
A special pay calculation must be written. The code for this calculation must be entered in the Calc Code field. |
|
|
P-NBCP |
Negative Balance Closing |
Negative amount to be paid out. |
|
|
Benefit Contribution Calculation |
B-FLAT |
Flat Amount |
Flat amount deducted for benefit contribution. |
|
B-OFFS |
Negative Percent Offset of Another Amount |
Percentage to balance the specified benefit contribution pay. (Rate(%) x base (specified pay code)) |
|
|
B-PERC |
Percent of Another Amount |
Percentage taken from specified pay code amount. (Rate(%) x base (specified pay code)) |
|
|
B-TIER |
Tiered percent of Another Amount |
Percentage taken from two (2) sub-entries for pension plan contribution calculation. |
|
|
Pay |
A-BACL |
Being Addition to Crew's Longevity |
Rate = Vacation Pay Entitlement OR No. of Day |
|
Additions |
A-HBSC |
Hotel & Bar Service Charge |
Sum of HBT_POOLTOTAL |
|
A-HEGA |
HBSC In Excess of Guaranteed Amount |
Used to compare service charge amounts and minimum guaranteed amount. (Amount = A-HBSC – A-MUMG (Daily)) |
|
|
A-HOLP |
Holiday Pay |
Holiday Pay based on the number of holiday X defined rate and base wages on current pay period. System is auto calculated at the daily rate. (Rate x Base (specified pay code) x 12/365 x number of days in HOL) |
|
|
A-MUMG |
Make Up for Minimum Guarantee |
A calculation method that allows the user to specify the amount guaranteed they will get if the pay code does not reach the amount during the payout process at the end of the month
|
|
|
A-PDTD |
Per Diem Travel Domestic |
Domestic Travel pay amount for each pay period. The rate is defined in Contract Level set up (Base Wage x 12/365 x pay unit x Domestic Rate (if defined in contract level)). |
|
|
A-PDTI |
Per Diem Travel International |
International Travel pay amount for each pay period. The rate is defined in Contract Level set up. (Base Wage x 12/365 x pay unit x International Rate (if defined in contract level)) |
|
|
A-PPMW |
Per Previous Contract Monthly Wage |
Total monthly pay from previous contract. (Units x Base (Specified pay code)) |
|
|
A-PPPH |
Premium Points Per HSC |
Time Attendance pay code = A-PPPH and work code matches the set up in Time Attendance module. |
|
|
A-PPTE |
Per Previous Contract Total Earning |
Percentage of total contract pay from previous contract. (Rate (%) x Base (Specified pay code) ) |
|
|
A-SLBE |
Seniority Loyalty Bonus Entitlement |
Amount to be paid based on number of days specified in Seniority Loyalty Bonus set up and Bonus Longevity Setup in Contract Level. |
|
|
A-TAHO |
Per Time & Attendance Holiday Hour |
Holiday Overtime linked to Time Attendance Roster Daily, Work Code. (Rate x Number of Day of HOL records) Note: Crew's Daily Roster in Time Attendance must be in APPROVED status. |
|
|
A-TANO |
Per Time & Attendance Normal Hour |
Overtime linked to Time Attendance Roster Daily, Work Code. Additional pay for each pay period. (Rate x Number of Hours of Work Code) Note: Crew's Daily Roster in OHC. Time Attendance must be in APPROVED status. The daily roster date (TADR_DATE) must be within the pay period. |
|
|
A-TAOT |
Per Time & Attendance Over-Time Hour |
Overtime linked to Time Attendance Roster Daily, Work Code. The total Overtime hours will be deducted by Weekly Work Hour multiplied by the Rate. (Rate x (Number of hours per day – (Weekly Work Hour / 7)) Note: Crew's Daily Roster in Time Attendance must be in the APPROVED status and flagged to “Included Work Hours” |
|
|
A-VACP |
Vacation Pay Entitlement |
Vacation pay amount with Early Repatriation entitlement. The system auto calculates the daily rate. (Rate x Base (specified pay code) x 12/365 x Vacation Pay Entitlement Days x Number of Day of current pay period) / Number of Day of Contract Length) |
|
|
A-VPCT |
Vacation Pay Percentage |
Specify Details = Base Wage or (+) Daily Minimum Guarantee. |
|
|
Deductions |
D-PDTD |
Per Diem Travel Domestic |
Domestic travel pay amount deducted from each pay period. The rate is defined in contract Level setup. (Domestic Rate x Units) |
|
D-PDTI |
Per Diem Travel International |
International travel pay amount deducted from each pay period. The rate is defined in Contract Level setup. (International Rate x Units) |
Contract Template
The Contract Template allows you to define a basic contract template for each Salary Position, by person or company specific. This can be used as initial contract pay codes when adding a contract.
Figure 1-3 Contract Templates Form
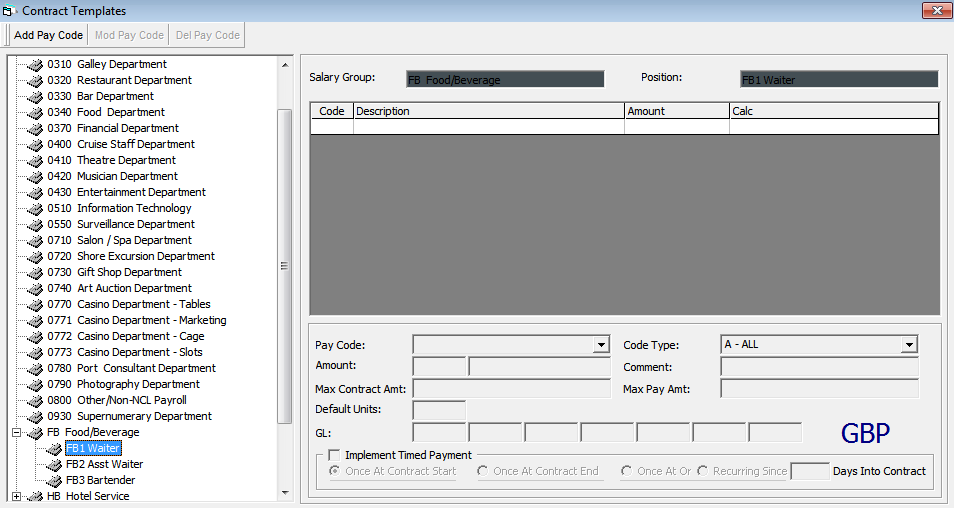
Adding Pay code to Contract Template
-
Select a Position on the Contract Template form.
-
Click Add Pay Code.
-
Navigate to the Template Pay code Maintenance form and fill in the details accordingly.
-
Click Insert to save.
Figure 1-4 Template Pay code Maintenance
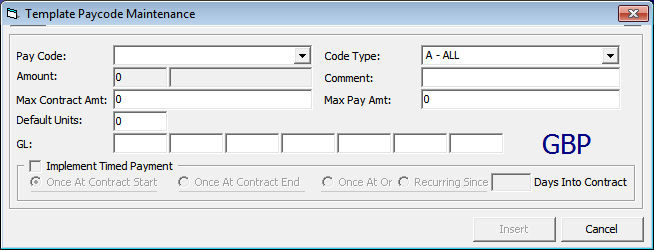
Table 1-4 Template Pay code Maintenance Field Definition
| Field | Description |
|---|---|
|
Pay Code |
Pay code Selection |
|
Code Type |
Filter for the pay code by Code Type. |
|
Amount / Rate |
Amount of pay code. Note: Shows ‘Flat Amount’ when calculation method defined is amount calculation. Shows ‘Rate / Percentage’ when calculation method defined is percentage calculation. |
|
Comment |
Pay code comments in template. |
|
Max Contract Amount |
This field holds the total amount (in payroll currency units) that this pay code can accumulate to for the entire length of the contract. Once this amount is reached, no additional amounts will be computed for this pay code. |
|
GL |
The shore side general ledger account which this pay code will be accounted for. Note: Will be auto populated if GL codes have been defined in Pay code setup. |
|
Implement Time Payment |
Pay code used for payable upon return. There are four (4) categories:
Note: This option only applies to Pay Additions and Pay Deductions. |
Creating Contract Template
-
Go to the Maintenance, Contract Templates menu. A list of all salary groups is displayed.
-
Expand the group by clicking the plus (+) key.
-
Click Add Pay Code.
-
On the Add Pay code form, enter the pay amount and necessary details.
-
Click Insert to insert a pay code into the template.
-
To modify a pay code of a template, select the pay code and click Mod Pay Code.
-
Update the details and then click Update to save the changes.
-
To remove a pay code from the template, select the pay code and click Delete Pay Code.
-
On the confirmation prompt, click OK to proceed.
Schedule Contract Changes
Schedule Contract Changes is a scheduler that changes the pay code rates and amount for the following pay period, and can only set up a schedule for future pay period. For instance, you would set up a schedule in March for a change to take effect in April. The changed pay rate is applied when a new pay period is activated and maintained by the company.
Figure 1-5 Schedule Contract Changes
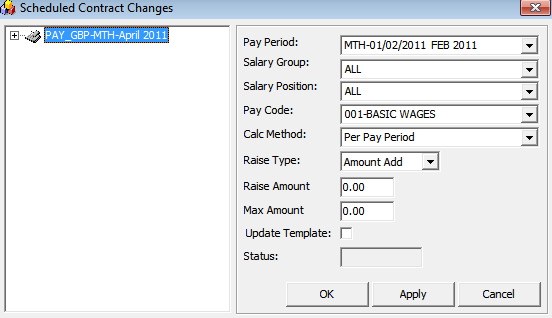
Table 1-5 Schedule Contract Changes Field Definition
| Field | Description |
|---|---|
|
Pay Period |
Effective Pay Period for the raise. |
|
Salary Group |
Department to which the raise applies. |
|
Salary Position |
Position entitled to the raise. |
|
Pay Code |
Pay code for which the raise applies. |
|
Raise Type |
Defines the type of raise.
|
|
Raise Amount |
Value of raise |
|
Max Amount |
Maximum raise amount |
|
Update Template |
If the Update Template field is checked, the contract template will be updated with the raise upon opening the specified month. For example: Checked when the raise applies to the existing contract template(s) for the selected salary group, position and pay code. |
|
Status |
Status of schedule changes. Show ‘Closed’ when changes are being processed. |
-
On the Maintenance menu, select Schedule Contract Changes.
-
On the Schedule Contract Changes form, right-click and select Add.
-
Complete the setup form and click Apply to keep the form or click OK to save and close the form.
-
To remove the schedule, right-click the selected schedule and click Remove. You are not allowed to remove a processed schedule.
Tax Types
The Tax Type set up defines the different tax deductions for different pay periods. A No Tax definition is needed if the company does not process the tax deductions for its employees or if all its employees are independent contractors.
The tax type can only be set up when the tax pay code exists, and this is done at the Pay code Maintenance, Tax under Pay Deductions menu option. You must check the Calculation Method “D-TAX – Tax rates per TAX table” and specify the applicable tax pay code.
Figure 1-6 Tax Types
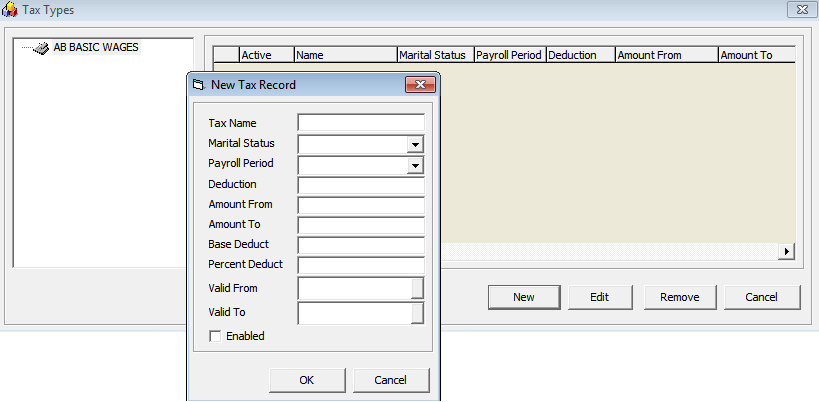
Table 1-6 Tax Types Field Definition
| Field | Description |
|---|---|
|
Tax Name |
Tax name and description. |
|
Marital Status |
Marital status of the crew. The tax amount will be updated according to the tax calculation formula. |
|
Payroll Period |
Calculation method of the tax in the particular pay period. |
|
Deduction |
Amount of deduction. |
|
Amount From |
The starting salary range that taxes will start processing from. |
|
Amount To |
The ending salary range that taxes will stop processing to. |
|
Base Deduct |
Minimum deduction (for flat rates). |
|
Percent Deduct |
Percentage of tax to deduct. |
|
Valid From |
Date the tax needs to be applied from. |
|
Valid To |
Date the tax needs to be applied to. |
|
Enabled |
Enabled or disabled for tax deductions. |
-
On the Pay code Maintenance menu, select Tax Pay code.
-
Assign the calculation method to D-TAX and specify a pay code as a taxable amount.
-
Navigate to Maintenance menu, Tax Types. The tax pay code is available on the form.
-
Select the Tax pay code and then click New.
-
Enter the tax type details and click Apply to save.
-
You may associate multiple tax record to a pay code.
The section below describes the formula used when the program calculates the tax.
The taxable amount will deduct the withholding amount, where the withholding amount equates to number of dependents, multiplied by TAX_DEDUCTIONS of the corresponding TAX_PAYROLL_PERIOD, TAX_MARITAL STATUS, TAX_VALID_FROM and TAX_VALID_TO. Both the TAX_VALID_FROM and TAX_VALID_TO are compared against ASYS.SYS_DATE.
The results are then compared against the same tax table to see if there is a record that the result falls between in the TAX_AMOUNT_FROM and TAX_AMOUNT_TO for the corresponding TAX_TYPE, TAX_PAYROLL_PERIOD, TAX_MARITAL_STATUS, TAX_VALID_FROM and TAX_VALID_TO.
If yes, then the tax amount will be the percentage (of percent value TAX__PERCENT) of the difference between the taxable amount and TAX_AMOUNT_FROM. Then adding TAX_BASE to that amount will give you the final tax amount. If no, the final tax amount will equate to zero.
Below is an example illustrating the tax deduction process.
-
In Tax Type setup:
-
Marital Status = Marital Status in crew assignment setup
-
Payroll Period = Payroll Companies Pay Cycle
-
Valid From = Between system date
-
-
In crew assignment, define the Marital Status and No. of Dependents. Add the taxable amount (Base Wage pay code) into Pay Addition and the Tax pay code into Pay Deduction. Enter the Base Wage amount $2500 and No. of Dependents equals to 2
-
Based on above Tax Type setup, the tax calculation formula are:
-
No. of Dependents x Deductions $170 (2 x 85 = 170)
-
Taxable amount after subtracting the dependents is $2330 (2500 – 170 = 2330)
-
Compare if the result is within the Amount From and Amount To
-
If yes, the amount in subtracted Amount From is $2280 (2330 – 50 = 2280)
-
Use that amount and multiply the Percent Deducted = 2280 x 12% = 273.6
-
The final tax amount is $283.6 (Result + Base Deduct amount) = 273.6 + 10 = $283.6
-
Payroll Setup Copier
-
The Payroll Setup Copier is a tool that copies the entire payroll setup from one database to another, excluding these set ups:
-
Cost Center
-
Daily Currency Setup Detail
-
Operation Position (SPO_AID_ID will be null)
-
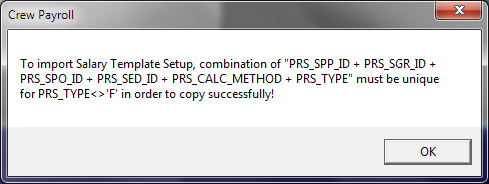
Unique record in Pay Raise table, or else the below message is displayed.
Figure 1-7 Payroll Setup Copier Unique Record Prompt
-
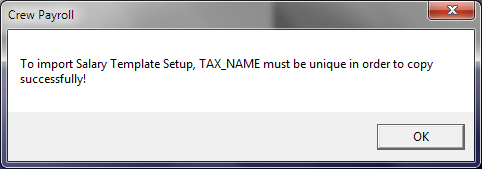
Tax name must be unique, or else the below message is displayed.
Figure 1-8 Payroll Setup Copier Unique Tax Name Prompt
-
When importing from a selected Payroll Company, all related loyalty bonuses and the vacation pay matrix is copied over, as well as inserting new records but it will not delete the existing setup.
-
When importing a Salary Template & Handling and both the source ship and target ship have a loyalty bonus and vacation pay matrix set up, the existing setup of the target ship will be deleted before the import continues.
-
If the target ship has a parent total linking or an operation position is unlinked on a source ship that has linking, the Import will re-insert the link.
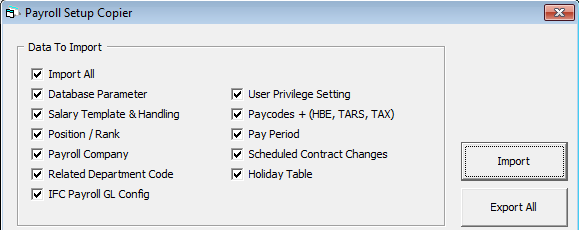
Figure 1-9 Payroll Setup Copier Options
-
On the Maintenance menu, select Payroll Setup Copier.
-
The application will disregard all checked items for the export function. Click Export All when ready.
-
On the Browse for Folder window, select the location to save the file, and then click OK.
-
When the export completes successfully, the system automatically saves the Extensible Markup Language (XML) file (PYRL_SETUP_v[version_number]) at the selected location and displays a confirmation box. Click OK to close the prompt.
-
To import the data, login to the Payroll module of the destination database.
-
On the Maintenance menu, select Payroll Setup Copier.
-
On the Payroll Setup Copier window, select the respective checkboxes for the data to be imported and click Import.
-
Select the file to import from the saved location.
-
Once the import process starts, a progress bar is shown.
-
At the end of the process, the system displays a confirmation prompt. Click OK to close the prompt.
Pay Period Setup
The Pay Period is the defined time frame for every pay cycles. You are required to activate it to begin the payroll transactions and closes it when the pay period is complete.
The pay periods are maintained by the Pay Company within the crew payroll system. The same period dates may have different statuses in different companies.
Setting Up Pay Period
Figure 1-10 Pay Period Maintenance
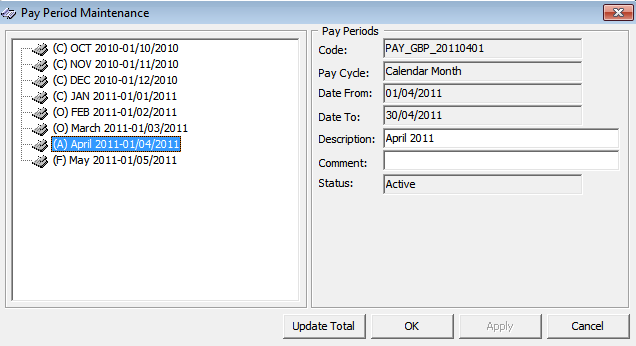
Table 1-7 Pay Period Field Definition
| Field | Description |
|---|---|
|
Code |
Unique Pay Period code auto generated by the system. |
|
Pay Cycle |
Auto default to setting in Payroll Company, Pay Cycle. |
|
Date From |
Pay Period begin date. Dates are calculated automatically based on the end of the previous pay period within a company’s pay cycle. Note: You can only specify a Date-From on the first pay period added to a pay cycle, and the subsequent pay period date are auto computed by the system. |
|
Date To |
Pay Period end date. Dates are automatically calculated based on the previous pay period end date within a company’s pay cycle. |
|
Description |
Name of the pay period. |
|
Comment |
Additional information. |
|
Status |
Status of pay period - Open, Closed, Active. |
-
In the Payroll module, select Payroll, Pay Period from the menu.
-
On the Pay Period Maintenance form, right-click and select Add to add new pay period.
-
Complete the pay period setup form.
-
Click Apply to save the record or OK to save and close the form.
-
To delete the pay period, right-click on the period and select Remove. You can only remove a pay period that does not have any transactions linked to it.
Activating a Pay Period
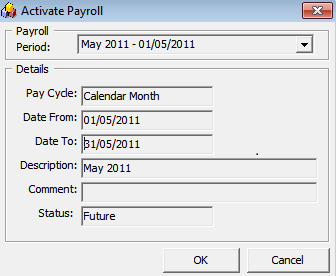
In a pay cycles, only one (1) pay period can be activated. Below are the statuses and steps to activate the pay period.
-
Closed (C): Pay Period is complete and adjustments are not allowed.
-
Open: (O): Pay Period is still open for manual adjustments and payouts.
-
Future (F): Pay Period is not yet open, although accruals may be recorded in the period due to a pay out in the previous period.
-
Active (A): Pay Period is open to all types of changes, including pay sheet updates, contract changes and manual adjustments.
Figure 1-11 Activate Payroll
-
In the Payroll module, select Payroll, Activate Pay Period from the menu. Only the future pay period can be activated.
-
Click OK to proceed. The system generates the pay records for all people with active contracts and set the new pay period as Active and the previous active period as Open.
Closing a Pay Period
To ensure the accruals are correctly accounted for, the Pay periods must be closed and no further adjustments or changes can be made thereafter.
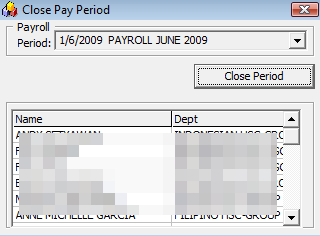
Before a pay period can be closed, all contracts within that pay period must be paid out. Otherwise you are not allowed to proceed. If there are unpaid contracts, they are displayed in the grid of the form and you will receive a notification that the Period cannot be closed.
Figure 1-12 Close Pay Period
-
In the Payroll module, select Payroll, Close Pay Period..
-
Select the period from the drop-down list. Only the oldest period within each pay cycle is listed.
-
Click Close Period to close. You will receive a “Pay Period Closed” prompt once the period is successfully closed.
By default, the system does not allow you to close a pay period if the pay period end date is after the current system date (PC Date), even though all crew members have been paid. You will receive a notification “Early closing not allowed! Pay Period end date is DDMMMYYYY’ when you try to close the period.
This can be changed by setting the parameter group “Payroll”, “Allow Closing of Pay Period Prior to End of Period” = 1. This setting overrides the above prompt and allows you to close a pay period even though the pay period end date is after the current PC date.
For example;
Current system date: 15-March-2019
Pay Period end date: 31-March-2019
Crew Detail Maintenance
The Crew Detail Maintenance function is used to maintain the crew’s personal details and contract information. Any payroll activities affecting a single crew member can be performed from within the Crew Payroll Details form.
Figure 1-13 Classic Crew Payroll Details Information
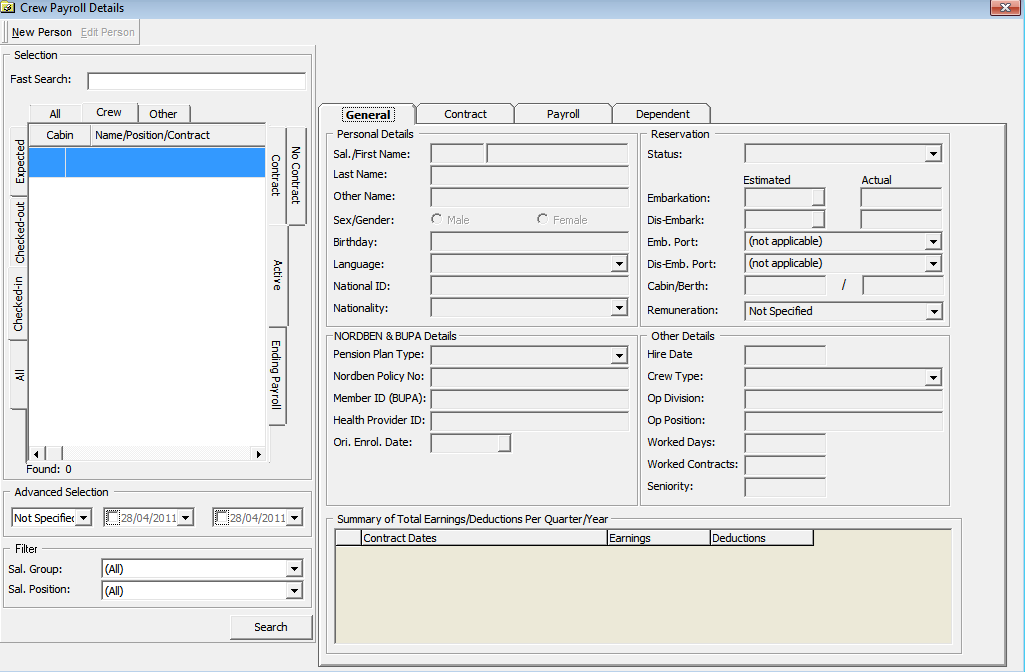
Crew Search
There are various ways to search for crew details in the Payroll module. You can either:
-
Look up the information by entering the crew ID, name or contract status using the Quick Search feature.
-
Enter a cabin number in the Fast Search field and press Enter to immediately begin the search or leave it idle for 10 seconds for an auto search
If the search results on the grid is greyed out, then the crew member listed is in another pay company instead of the one that is currently active.
Figure 1-14 Search Panel
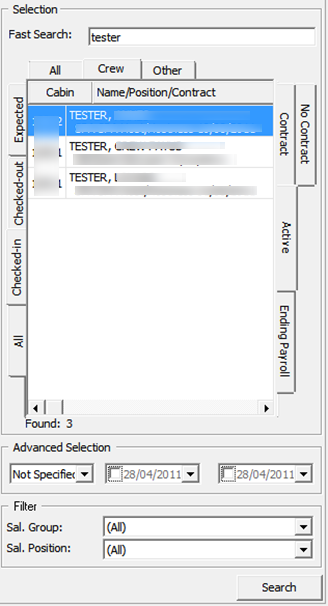
Table 1-8 Search Panel Field Definition
| Field | Function |
|---|---|
|
Fast Search |
Search by entering the following value:
Note: For searches using the crew external ID or internal ID, refer to the parameter setting in “Payroll”,”Display UXP_C_EXTERNALID As Crew ID” |
|
Crew Group |
Search by crew group in:
|
|
Reservation Status |
Search by crew reservation status in:
|
|
Contract Status |
Search by crew with contracts status in:
Note: Enable the parameter “Ending Payroll Alert”, listing the crew of ending payroll is a pop up upon program start-up. |
|
Advanced Selection |
Search the crew embarkation date, debarkation date or Not On Board status. Note: ‘Not On Board Status’ refers to NOB flag status of future reservations and previous reservations if the date falls under a future assignment date. |
|
Filter |
Search by salary group and salary position. |
Crew General Details
The General tab of the Crew Details gives you an overview of the selected crew member. It displays the basic crew information such as identification, date of birth, embarkation/debarkation date and others which are maintained in the Crew Management module. Information for non-crew personnel paid through this payroll is maintained within the Payroll program.
Figure 1-15 Crew Details
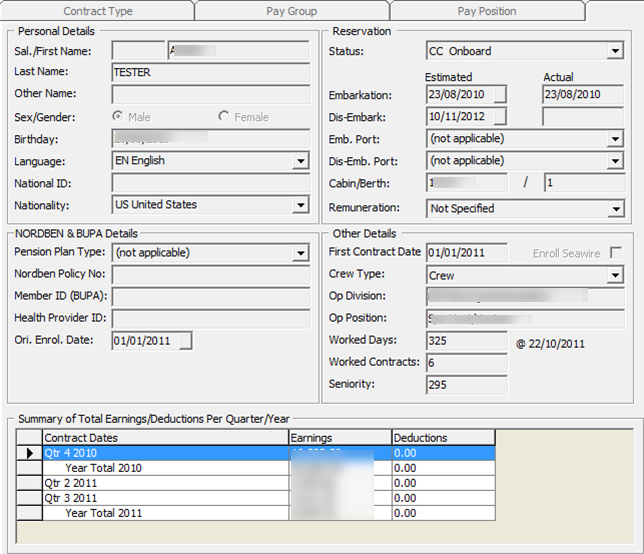
Table 1-9 Crew Details Field Definition
| Field | Description |
|---|---|
|
NORDBEN & BUPA Details |
Details used for Pension Plan and Medical Plan. |
|
Ori. Enrol. Date |
Field is required if ‘First Contract Date’ is entered. |
|
Remuneration |
Remuneration of the crew. Field is locked during edit by Contract Type, Salary Group or Salary Position.. |
|
First Contract Date |
Crew join date. This is an optional field controlled by the parameter “Payroll”, “Optional Join Date”. This field is also available in the Crew Management module, Edit Information, Other Info. Note: You can define the field name in the Administration module, Label Setup - CMJOIN. |
|
Enroll Seawire |
Flag indicating crew’s enrolment in Seawire function. |
|
Worked Day |
The crew contract start date until current system date (PC date). |
|
Worked Contract |
Total contract with the payroll company. |
|
Seniority |
The First Contract Date until current system date (SPMS date). |
Adding Non-Crew member
A non-crew member record is not visible in the Crew Management module as they are not checked-in to the system, and this record can only be found in Payroll module. However, they can be paid through the Payroll module using below steps.
-
On the Crew Edit Detail form, select the General tab. This enables a new menu bar New Person / Edit Person.
-
Click the New Person button to open the Add Personal Detail form.
-
Complete the form and then click OK to save
Crew Dependent Details
The Dependent tab stores the crew dependent information. This information is mainly used for crew entitled to a Pension or Medical Plan.
Figure 1-16 Crew Dependent Tab
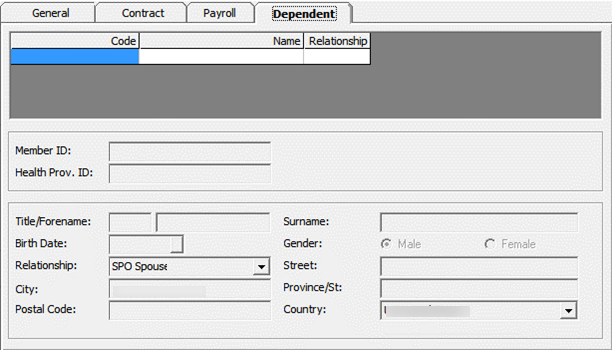
Adding/Editing/Removing Dependent Information
-
On the Crew Edit Detail form, select the Dependent tab. This enables a selection menu comprised of New Dependent, Edit Dependent and Remove Dependent.
-
Click the New Dependent and complete the necessary information.
-
Click Insert to save the record.
-
To edit the information, click Edit Dependent, update the information and click Update to save.
-
To remove the information, select Remove Dependent and then click Delete.
Contract Details Maintenance
The Contract tab stores the contract assignment of a crew member. It comprises of five (5) sub-tabs;
-
General: Includes contract information.
-
Pay Addition: Includes all the pay codes used to generate a person’s gross pay automatically.
-
Pay Deduction: Includes all pay codes that reflects in the contract and then deducted from a person’s gross pay to come up with a net pay. This could include deductions for home allotments, taxes, garnishments or other expenses.
-
Payout: Includes all pay codes that reflects in the contract and records distribution of the net pay beyond the information specified in the Contract General information.
-
Benefit: Includes all of the benefit contribution pay codes by crew contribution and employer contribution.
Creating a Contract
The General tab stores all information related to the contract such as start/end date, pay out currency, salary group and position, maximum cash advance amount and others.
Figure 1-17 Contract Form
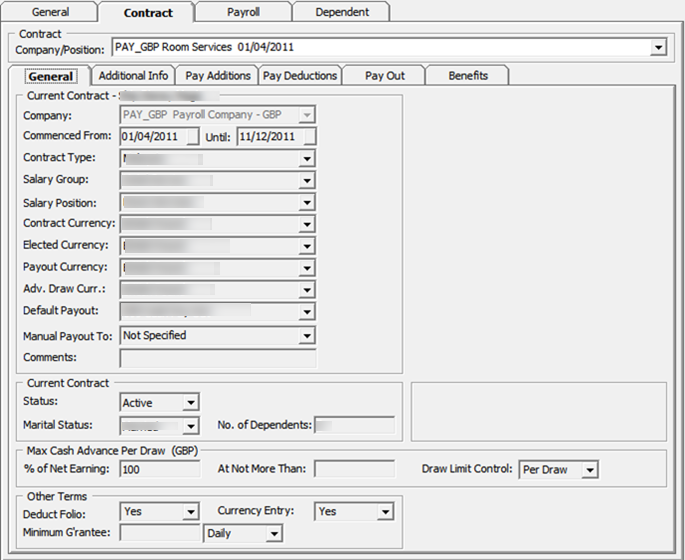
Table 1-10 Contract Details Field Definition
| Field | Description |
|---|---|
|
Company |
The payroll company for this contract. Note: You cannot update this since it comes from an active payroll company. |
|
Commenced From and Until |
The beginning and ending dates of the contract. Note: You must specify a Commenced From date. If the Until date is left blank, then the contract will remain active until a final date is entered or a new contract for the same person is created. |
|
Contract Type |
Type of contract group. |
|
Salary Group |
The department the salary is classified under. |
|
Salary Position |
Crew Work Position |
|
Contract Currency |
Currency of the contract. |
|
Elected Currency |
Currency used in allotment. |
|
Payout Currency |
Currency used for final payout. Note: Currencies must be defined in the SPMS with an active conversion rate. The currency rate and the overall Payroll currency rate must be maintained using Currency Exchange Maintenance. |
|
Adv. Draw Currency |
Currency used for cash advance. |
|
Default Payout |
Default pay code during payout. |
|
Manual Payout |
Default pay code when payout negative balance. |
|
Comment |
General comments about this contract and person. |
|
Status |
Status of the contract; Close, Active, Inactive. |
|
Marital Status |
Marital status of the crew. |
|
No. Of Dependent |
No of dependent. Use for tax calculation. |
|
Max Cash Advance |
Available balance of the current period as the suggested amount when a Cash Advance is entered.
Per Day: Only allow to withdraw ONCE per day, where day change is based on database server date. Per Draw: Allow to draw up to available balance. Per Pay Period: Only allowed to withdraw ONCE per pay period. Not Specified: Default value is "Per Draw". Note: Allows withdrawal up to Bal-To-Date amount is set up in Companies Setup, Draw Up To Bal-To-Date. |
|
Deduct Folio |
Note: You need to enable parameter “Payroll”, “Folio Posting” |
|
Currency Entry |
Flag allows currency selection when performing a posting adjustment in Add New Pay Item, Cash Advance, Quick Posting. |
|
Minimum Guarantee |
The minimum guaranteed that must be paid to the crew on each month or year or day. |
Adding New Contract
-
Navigate to Crew Edit Detail form and select Contract tab. This open a new menu with options New Contract, Edit Contract and Remove Contract.
-
On the Search function, select No Contract tab to list all the non-contracted crew.
-
Select the crew member and navigate to Contract tab
-
Click New Contract.
-
On the Add Contract form, complete the contract details form and then click Apply.
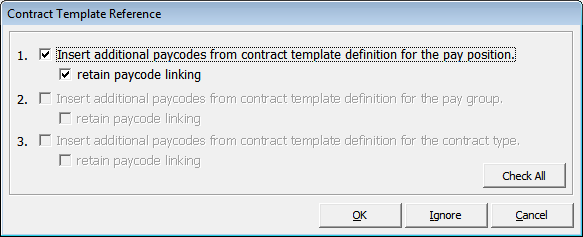
Figure 1-18 Contract Reference
-
The system prompts the Contract Template Reference form if the selected Salary Position is setup with a Contract Template.
-
Select the option and click OK to copy the pay code into new contract or Ignore to skip the copy.
-
Continue adding the additional pay code in Pay Addition, Pay Deduction, Payout or Benefit tab.
Managing Pay codes
Once you have a contract for a crew member, the contract information can be changed by adding, modifying or removing the pay code. The Crew officer can also manage the pay code by editing or adding a contract.
You can insert more than one (1) record of the same pay code in an assignment with different validity period. If duplicate pay codes have the same validity period or both without a validity period and the contract is:
-
Imported from CMS (with SPD_GUID): The program will only pay once from the larger pay code amount.
-
Normal contract (without SPD_GUID): The program will duplicate the pay code at the same time.
This only applies to a pay code that has the below calculation method:
"A-PERC", "A-TANO", "A-TAHO", "A-TAOT", "A-FLAT", "D-FLAT", "D-UNTL", "D-PERC", and "D-TAX"
Adding a Pay code
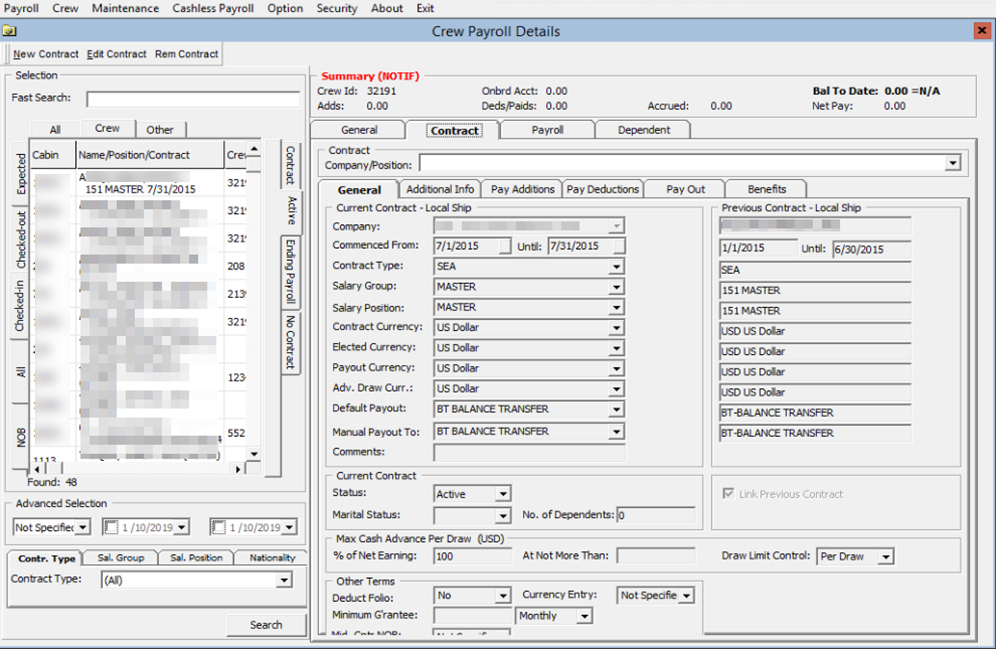
Figure 1-19 Crew Payroll Details
-
On the Crew menu, select the Edit Detail menu option.
-
Select the crew member from the crew list and then navigate to the Contract tab.
-
Click Edit Contract. This opens the Change Contract form.
-
Select the correct tab to add the different code type to the pay code. See Contract Details Maintenance for tab information. The menu bar at the top of the form changes depending on the tab you select.
-
Click Add Pay code. This opens the Contract Pay code Maintenance form and only the code type for the selected tab will populate.
Figure 1-20 Contract Pay code Maintenance
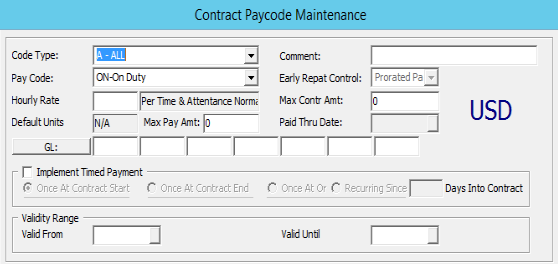
-
In the Pay Code field, select the applicable code from the drop-down list. The calculation method of the pay code is shown in the field beside the Amount.
Figure 1-21 Template Pay code Maintenance

-
Enter the rate or amount.
Note:
The amount field can hold an amount per period, per day, per hour, a flat amount or a percent amount depending upon the selected pay code. -
Complete the information on the form, click Insert and return to the Change Contract form and then click OK.
-
On the Contract Template Reference prompt, click Ignore if pay code from Contract Template is already copied onto the contract or skip to copy pay code. Click OK to recopy if there are additional pay codes created in the Contract Template.
-
At the ‘Do you want to update the active pay with these changes?’ prompt, click Yes to recalculate the pay for current period based on the changes.
Editing Pay code
Any changes made to the pay codes are immediately stored in the database when the Insert, Update or Delete command buttons are clicked, while changes to the general contract information will only occur when Apply or OK buttons are clicked.
You will receive a warning message that the pay has to be manually adjusted for the period, when a pay code is removed or the contract dates are changed, so that they are no longer active in the current pay period.
Figure 1-22 Manual Adjustment Error Prompts
Figure 1-23 Contract Pay code Maintenance
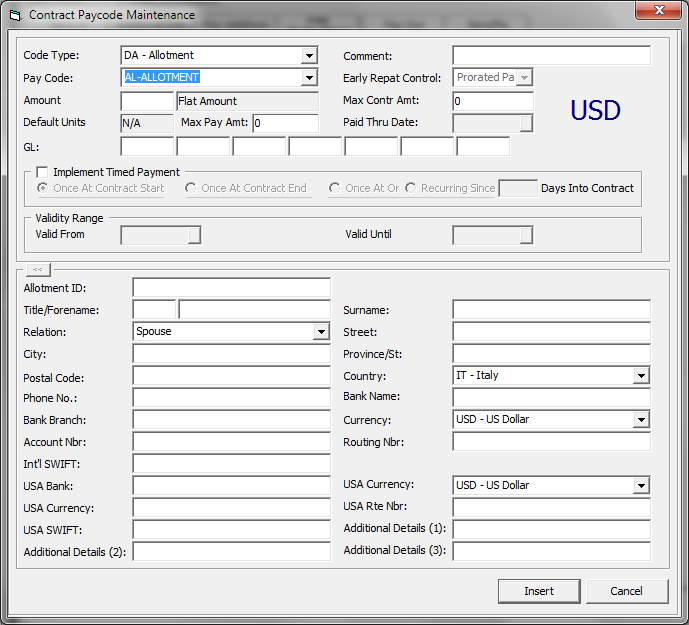
The definition of the additional fields in a pay code form when adding the pay code are as follows:
-
Fully Entitled: An option used to calculate the Vacation Pay with Early Repatriation.
-
Paid Thru Date: Used to display in Payroll GL file when Vacation Pay is assigned.
See chapter Contract Template, Adding Pay code to Contract Template for the basic field definition.
To edit Contract Pay code,
-
On the Crew menu, select Edit Detail menu option.
-
Select the crew member from the crew list and then navigate to the Contract tab.
-
Click Edit Contract. This opens the Change Contract form.
-
Select the pay code and click Mod Pay code to open the Contract Pay code Maintenance form. Change the pay code detail and click Apply to save the changes.
Note:
The Code Type and Pay code cannot be edited. -
Click OK to save and exit the form.
-
In the Contract Template Reference, click Ignore if the pay code from Contract Template is already copied into the contract or skip to copy pay code. Clicking OK will recopy the pay code if there are additional pay code created in Contract Template.
-
You will be prompted with ‘Do you want to update the active pay with these changes?’.
-
Click Yes to recalculate the pay for the current period based on the changed contract. Click No, to save without changing the current pay until the next pay period.
Removing a Pay code
The system only allows you to remove a pay code that has not been used and has zero value. Once the pay code is used, you cannot remove it. Note that you cannot delete a Pay code used for payroll calculation.
-
On the Change Contract form, select the pay code and click Del Pay code.
-
On the Contract Pay code Maintenance form, click the Delete button and select OK at the confirmation prompt.
Creating Multiple Contract
A crew member can have more than one contract for different positions held. The Crew Officer can create an individual contract or a linked contract for the crew member.
-
Individual Contract: A contract created for the same crew member. This crew member could have more than one contract. The contract criteria can be different or from a different payroll company.
-
Linked Contract: A contract of the crew member, within the same company, can be linked to another contract, so that the accrued balances from the first contract are automatically moved to the pay items list of the new contract. You can use this feature to perform mid-period promotions and demotions of crew members while retaining the paid out and accrued balances.
When creating multiple contracts, the new contract start date must not overlap with the previous contract end date. If there is an overlap, the system will display a notification requesting you to correct the dates.
The steps to create multiple contracts is the similar to Creating a Contract, when the selected crew has an existing contract.
When creating a new contract for a crew member that has a previous contract tied to the same company and its end date is one (1) day less than the start date of the new contract, a ‘Link Previous Contract’ checkbox will show on the Change/Add contract form.
Both the linked contracts must have the following criteria.
-
Must be within the same company.
-
Same Contract Currency.
-
Second contract must include pay codes for any accrued pay codes that are in the first contract.
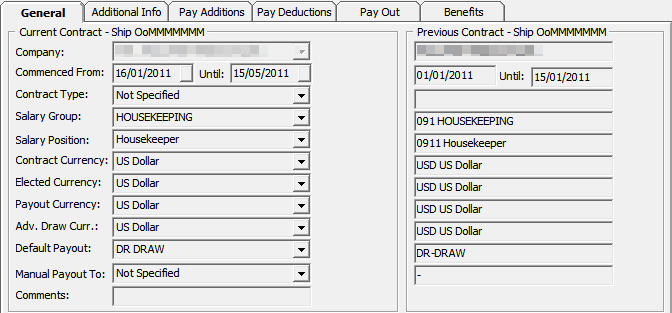
Once the linked contract is created, the crew member name will appear twice in the crew listing with a different contract. When you clicked on the crew member’s second contract it will display the previous contract information in the General tab under Contract Detail.
Figure 1-24 General Tab - Multiple Contract
Removing a Contract
A contract without payroll transactions can be removed from the payroll system using the below steps. Removing a contract is not possible when it has a Payout transaction or manual posting.
-
On the Edit Detail screen, Contract tab, select Rem Contract.
-
On the message prompt, select Yes to remove. This will place the crew member in the No Contract category.
Updating Contract End Date
The system lists any crew member that has a debarkation date change in Crew Management under ‘Payroll Notification – List of Crew with New Disembark Dates’, as shown in below diagram when you first launch the application.
Figure 1-25 Crew With New Debarkation Dates
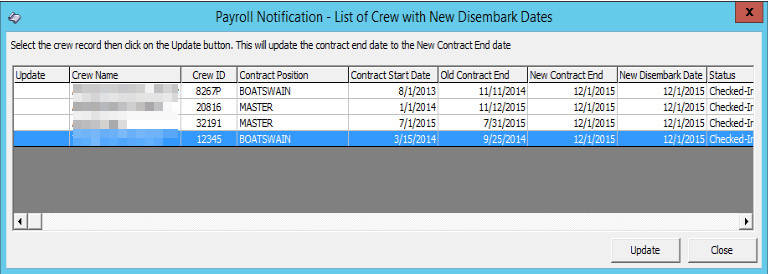
If a crew member is being paid for days beyond its contract end date, the change cannot be applied. You will receive a message prompt ‘This person has already been paid out in the active pay period. Contract changes cannot be performed’.
To update the contract end date,
-
Select the crew member from the listing and then click the Update button.
-
On the confirmation prompt, click Yes to update.
You can reopen this list from the Payroll, Update Contract End Date option if the screen closes.
Payroll Details
The Payroll tab consists of two (2) tabs.
-
Payroll: This tab includes a pay period selection, displays the pay sheet and all pay items and a frame for additional information for each pay item.
-
Benefits: This tab includes the benefit contribution items and information of each item.
The majority of the payroll activity is performed from the Payroll tab of the Crew Payroll Details.
Pay Items List
In the Payroll tab of the selected crew member, the pay items are listed under the Pay Items List section.
Each of the items in the grid are tied to a record type, described in the below table. Details of the item, such as Pay Rate, Units, and Modified Date are displayed in the Item/Audit section when you click on the item. If the payroll is in an active period, a summary of the payroll information is shown in the Edit Details form.
Checking the Show Balance-To-Date option switches the view to show the balance to date amount of each pay item.
Figure 1-26 Pay Items List
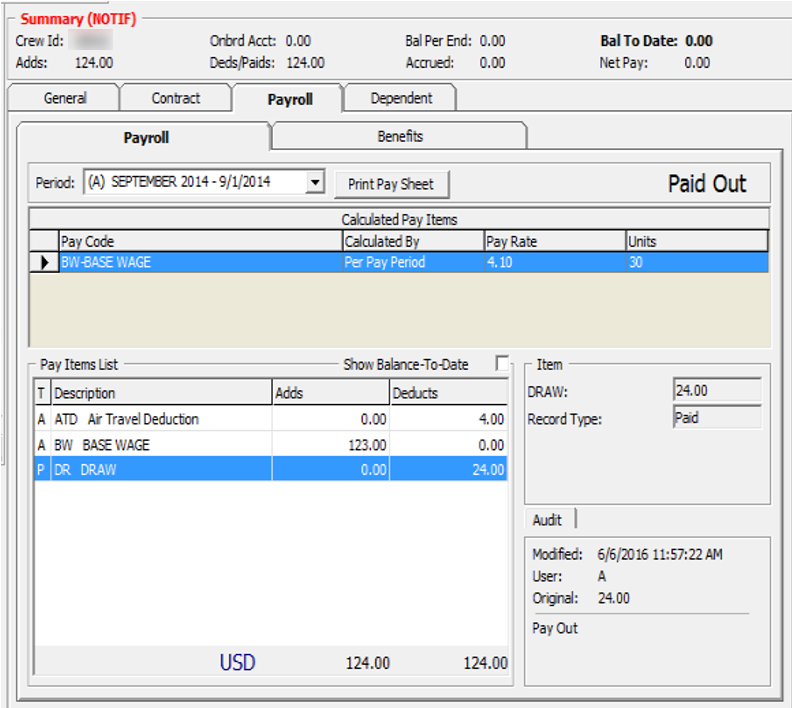
Table 1-11 Pay Items Record Type
| Record Type | Description |
|---|---|
|
A |
Automatic. Added automatically when assigning or editing pay code from contract template. |
|
M |
Manual. Added when the posting is an adjustment such as Add New Pay Item or Cash Advance. |
|
P |
Paid out. |
|
R |
Accrued from last period. |
|
F |
Accrued to next period. |
|
B |
Pay accrued from last period. |
|
S |
Semi Auto. Pay code adjustment with calculation method defined as percentage: |
|
T |
Previous month paid out: |
Update Pay Units
The Pay Sheets contain detailed information, such as unit information, and the pay rate and is used to determine the pay amount for each pay code in a contract by multiplying the units. The user is allowed to change the pay units.
You are only allowed to update the pay units for pay codes that have ‘Adjust Unit Setup’ enabled in Pay code Maintenance.
Updating Pay Units for a single crew contract.
-
From the selected crew, navigate to the Payroll tab.
-
Click the Update Pay Units button on the Crew Payroll Details form or right-click on the pay code.
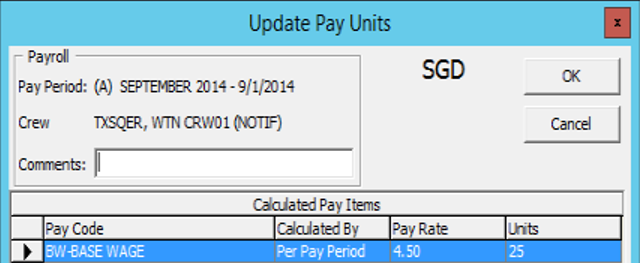
-
On the Update Pay Units form, select a Pay code and double-click the Units field.
-
Adjust the value using the inline edit.
-
Add a comment and then click OK to save.
Figure 1-27 Update Pay Units
-
Instead of clicking the Update Pay Units button, you can also update the pay units under the Payroll tab by right-clicking the pay code in the ‘Calculate Pay Items’ section.
Figure 1-28 Calculate Pay Items

Updating Pay Units for Multiple Contracts
Apart from updating the pay units for a single crew contract, you can also update pay units for Multiple Contracts using the following steps.
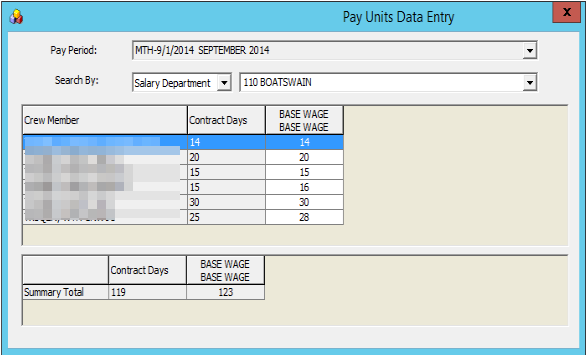
Figure 1-29 Pay Units Data Entry
-
On the Payroll menu, select Update Pay Units from the menu option.
-
On the Pay Units Data Entry form, select the Pay Period and method and from the Search By field.
-
Double-clicking the Base Wage field enables inline editing. Edit the value and then click Apply to save or click Undo to revert the changes. The records will be updated and pay is recalculated.
Posting Adjustment
The Posting Adjustments allow you to perform a payroll adjustment or adding an ad-hoc posting to the crew contract.
You can only add or adjust a payroll posting that are not paid in this pay period. Payroll adjustments will only populate for those pay codes that are setup with Adjustments in Pay code Maintenance.
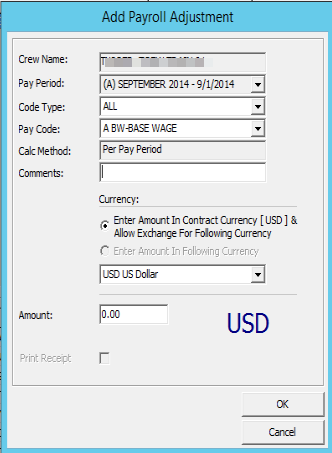
Figure 1-30 Payroll Adjustment Form
Adding Posting to Single Crew Contract
-
On the Payroll tab of the selected crew account, click the New Pay Item button. You can also right-click on the item in the Pay Item List section.
-
On the Add Payroll Adjustment form, select the Code Type from the drop-down list. The calculation of the selected code type will be shown in the Calc Method field.
-
Enter the comments in the Comments field.
-
Check the respective Currency option and enter the amount.
Note:
There must be a currency exchange rate set up in the Administration module if you select the first option.
The values entered are either in units or amount, depending on the calculation method of the pay code. For example, the pay code for Per Hour or Pay day calculation is by units.
-
Click OK to post or Cancel to discard. The record type in Pay Item List for the adjustments posted is ‘M’.
Adding Postings to Multiple Contracts
-
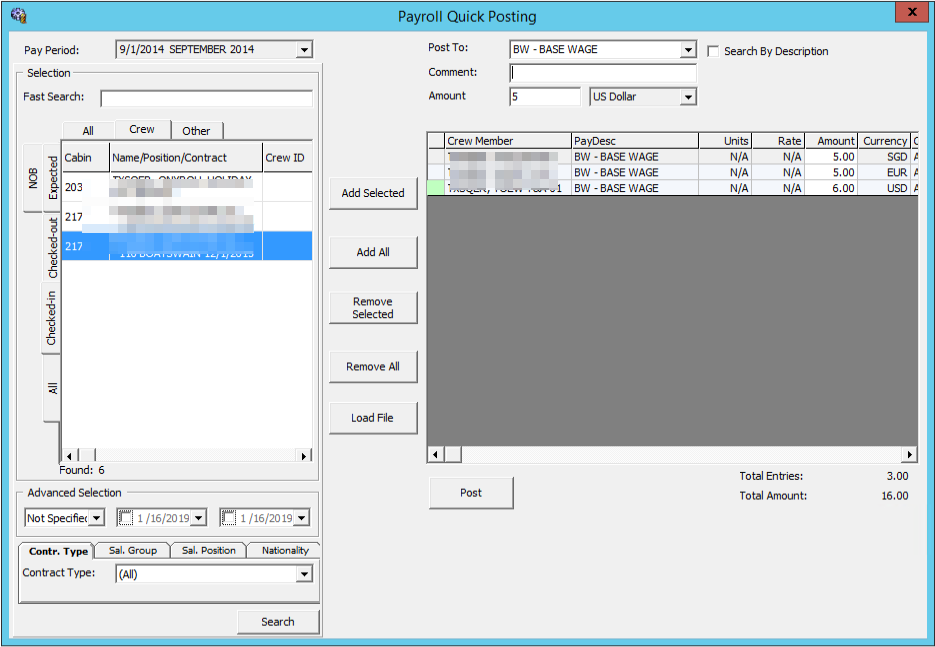
From the Payroll menu, select the Quick Posting option.
-
Select a Pay Period to list the active payroll.
-
Select a pay code from the Post To drop-down list. Check the Search by Description, if you wish to search using the pay code description.
-
Enter a comment in the Comment field.
-
Enter an amount or rate in the Amount field.
-
Individually select the crew account to post to and then click the Add Selected, or use the Add All button to add all listed accounts to the grid.
-
To remove an account, use the Remove Selected or Remove All button.
Figure 1-31 Payroll Quick Posting
-
At this point, you can still change the amount to post in the Amount field within the grid.
-
Click the Post button to proceed.
Adding Postings by File
The Load File option allows you to import bulk adjustments posting using a file import method in comma-separated values (CSV) format. In order for the file import to work, you must follow the format specified in the Appendix, Quick Posting Import File Format chapter.
Note:
The Load File validation may not necessarily go into the assignment for the selected company, but it must either go into the assignment that falls under the selected month or into the month of the system date, if none is selected. Priority is given to the date range that matches the selected pay period, followed by the matching selected company.-
Repeat steps 1 and 2 of Adding Postings to Multiple Contracts (see above)
-
Click the Load File button and browse for the file to import.
-
All valid postings are shown under the Accepted Entries section and the rejected ones under the Rejected Entries section.
Note:
You cannot to proceed if there are Rejected Entries and the button Add Accepted Entries will be disabled. You are required to correct the records and retry. -
Click the Add Accepted Entries button to add these records into the posting screen.
-
Click Post to post all the records.
Adjusting an Allotment
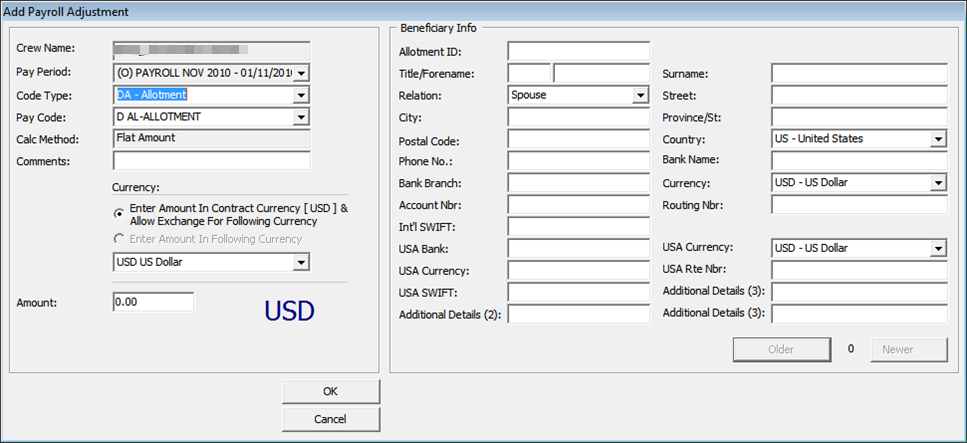
The Crew Officer is able to adjust an allotment of the crew member and, at the same time specify the beneficiary of the adjustment, provided the pay code ‘Specify To’ is enabled in Pay code Maintenance. An adjustment can only posted to record type ‘M’.
Figure 1-32 Payroll Adjustment
-
On the Payroll tab of the selected crew account, click the Void Pay Item button. You can also right-click on the item in the Pay Item List section.
-
If ‘Specify To’ is enabled, update the beneficiary information.
-
Click the OK button to remove the item from the Pay Items List and recalculate the payroll.
Folio Posting
A folio posting is a posting of a crew member’s spending while onboard. Folio Postings that are deductible from a payroll payout must have the following settings:
-
The Parameter Folio Posting is enabled or flagged with ‘Y’
-
The Deduct Folio option is checked in Payroll Companies Setup.
-
The Deduct Folio option is flagged as ‘Yes’ on the crew assignment setup.
Figure 1-33 Payroll Company Maintenance
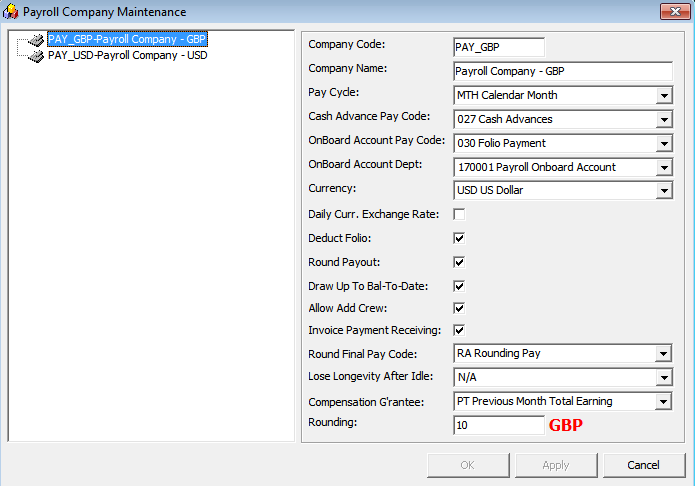
When onboard expenses are settled through Pay Invoice in the Crew module, the amount is transferred into the payroll as a pay deduction, allowing onboard expenses to be deducted.
In order for this to work, you need to define the following settings.
-
The allow Invoice Payment Receiving option is checked on the Payroll Companies setup.
-
The Payment department in the Crew module is the same as Onboard Account Department in Payroll Companies.
Transferring Folio Postings to Payroll
-
Login to the Crew module and select a crew member from the Search Panel.
-
Click the Pay Invoice button.
-
Settle the invoice to Payroll Deductible payment code.
Note:
When a Void is performed from the Crew module using the Void button, the pay deduction in the Payroll module is reversed. Similarly, when the Void Pay Items in the Payroll module is used, the Folio Payment in the Crew module is reversed. -
You cannot transfer the Pay Invoice into the Payroll system when:
-
The Crew is paid
-
The Pay Period is closed
-
The Crew member does not have contract assign.
-
When settling the invoice, the crew can opt to deduct the invoice from payroll or not. If a crew opt not to settle the invoice to payroll, the folio balance will not appear in their payroll statement as a deduction.
Performing a Folio Payout Posting
If the folio posting is not settled through the Crew module, the deduction of the onboard expenses will be included during the payroll payout. Once the payout is done, you cannot undo the folio payout posting.
Figure 1-34 Folio Payout Posting
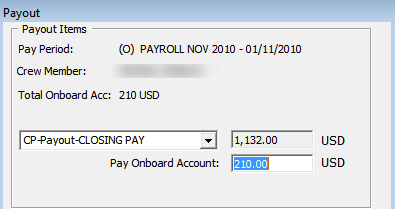
Cash Advance Posting
The Cash Advance feature handles the early pay out made against the anticipated balance for the month. A cash advance pay code is required in the Payroll Companies under Cash Advance Pay Code per the following criteria:
-
Apply Order: Greater than other pay items pay code.
-
Calculation Method: P-FLAT - Flat Amount
-
Adjustment option: Checked as payroll adjustment.
Figure 1-35 Cash Advance Posting
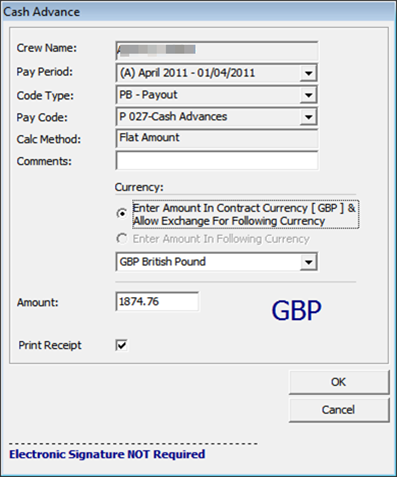
-
On the Payroll tab of the selected crew account, click the Cash Advance button. You can also right-click on the item in Pay Item List section.
-
Enter the comment in the Comment field.
-
At the Currency field, select the Currency option and the currency.
-
Enter the amount to advance in the Amount field.
-
Check the Print Receipt if a receipt is required. You can set this as default in Parameter Default Receipt Printing During Cash Advance.
-
Click OK to post the cash advance.
-
To void the cash advance, use the Void Pay Items or right-click on the posting.
The cash advance amount is controlled by these two (2) settings:
-
Draw Up to Bal-To-Date in Payroll Companies Maintenance is checked.
-
When this field is checked, the maximum cash advance amount allowed is per value in Bal to Date of the Crew Details summary screen.
-
Max Cash Advance in Crew Contract.
-
If the Max Cash Advance is setup, the system will always calculate the value based on the % of Net Earning, followed by the value in At Not More Than field. If the % of Net Earning has no value, then the value of the calculated % applies.
Below is an example of the calculation.
-
Bal-To-Date: $500
-
Monthly: $2700
-
% of Net Earning: 50%
-
At Not More Than: $300
If “Bal-To-Date” is checked: The cash advance amount is $250 ($500x50%).
If “Bal-To-Date” is unchecked: The cash advance amount is $300 ($2700x50%=$1350). Since the At Not More Than amount is $300, the withdraw amount is limited to $300 even though the calculated amount is more.
The Calculate Advance in the Payroll menu is a function that prepares a report, listing the available cash advances by crew member, using a special form to perform these calculations and places the results in the Contract record for each crew member.
The options are:
-
Onboard Crew Only is an option for companies that use 12 month contracts, and they only include crew currently onboard in the report.
-
Up Until This Date calculates the available cash advance amounts up to the date specified. This process must be performed for each company.
Figure 1-36 Calculate Maximum Cash Advances
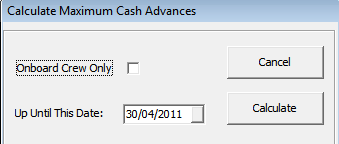
When the Calculate button is clicked, this will generate and store the available cash amount in the database and in a report. In the below example, you have the CTR_MAX_ADVANCE_CALC which calculates based on the Per Pay Period Pay code. The formula used is (base wage) / 30 (total days of current month) x 20 days.
Update Total
The Update Total button updates all the crew contracts that have calculation changes, such as a pay rate change or a currency rate change. Also, it is able to recreate the pay sheet if it is missing. This happens when a new pay period is activated but somehow the crew payroll only shows until the previous pay period. There are a few areas to process the Update Total.
-
Update Total at Pay Period setup.
-
Update Total upon system date change using parameter ‘Update BTD Total Upon System Date Change’ set as enabled.
-
Update Total when generating Payroll GL file when ‘Update Total Prior’ is configured as enabled.
Note:
The Update total is only available when there is unpaid payroll in the Open/Active pay period.
-
Access the Pay Period Maintenance form from the Payroll menu, Pay Periods.
-
Select the pay period with Open or Active status and then click Update Total.
-
The system prompts a notification the number of unpaid payrolls to update. Click Yes to proceed or No to return to previous screen.
-
Once the update progress total is done, an error log screen will prompt if there is a crew pay is missing or require a setting.
Payout Process
The Payout process pays wages to crew members on every pay period. Crew members with open payroll from a prior pay period is not allowed for payout and you are required to payout the prior payroll before proceeding to pay the current pay period.
Once the payout is performed, no adjustments can be made for that period.
Figure 1-37 Payout Process
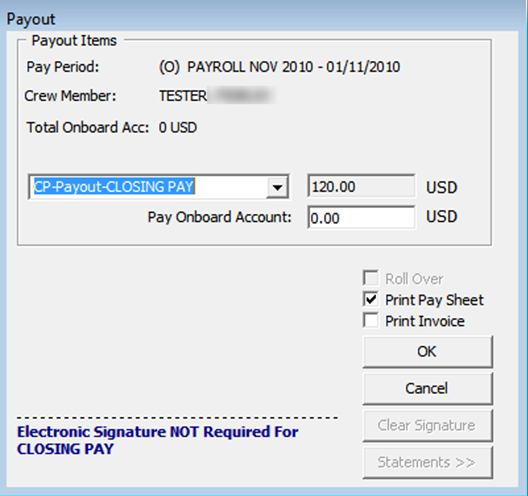
Figure 1-38 Payout Form
Paying out to Individual Crew
-
Select the crew member from the Crew Edit Details screen and navigate to the Payroll tab.
-
Select the pay period and click Pay Payroll.
-
On the Payout form, use the default payout pay code or select another from the drop-down list.
-
Change the folio amount if necessary.
Note:
The folio payments made at payout are based on the Deduct Folio setting in the crew contract setup, payroll companies’ setup and the parameter setup. If the folio amount is changed, the net payout will be recalculated. -
Check the Roll Over option only if payout need to be accrued to next pay period.
Note:
The Roll Over option is enabled when the payout pay code is set to Accrued and the contract has not ended. This moves the pay period to next and no additional transactions can be made against the crew member account within that period. -
Check the Print Pay Sheet option if required. If printing is required for all, you may default the checkbox by enabling the Parameter ‘Default Pay Sheet Printing During Payout’.
-
Check the Print Invoice option if required.
-
Click OK to proceed with payout.
Paying Multiple Crew members
Other than performing a payout to an individual, you can also perform a bulk payout.
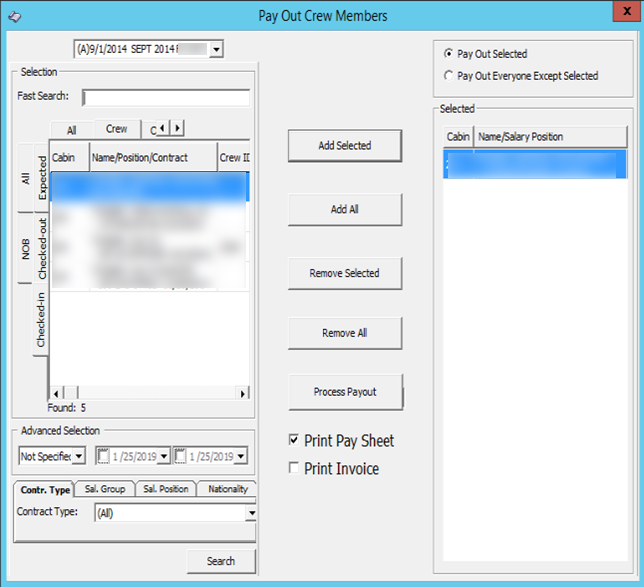
Figure 1-39 Pay Out Multiple Crew Members
-
On the Payroll menu, select Payout.
-
On the Pay Out Crew members screen, select the pay period and the crew members. Click Add Selected to move the selection to the right pane. To exclude the selected crew select the name(s) from the grid and click Remove Selected or Remove All.
-
Select the correct payout option.
-
Check the Print Pay Sheet /Print Invoice option if required.
-
Click the Process Payout button when ready, and click the Yes button at the confirmation prompt.
-
A payout progress box will display with Stop Payout option, allowing you to terminate the process for the remaining crew members.
-
The pay sheet and invoices are printed once the payout is processed for each crew member.
Reversing a Pay Out
A pay out can only be reversed for the following cases.
-
Pay Period status is Open/Active.
-
No pay out after the transaction is reversed you wish to reverse.
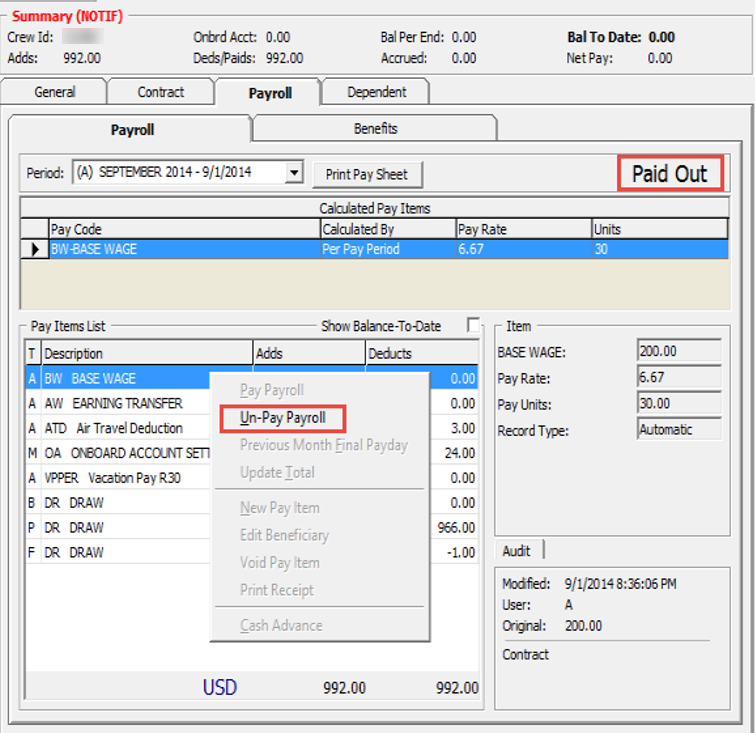
Figure 1-40 Un-Pay Payroll Option
-
Navigate to the Payroll tab of the selected crew member.
-
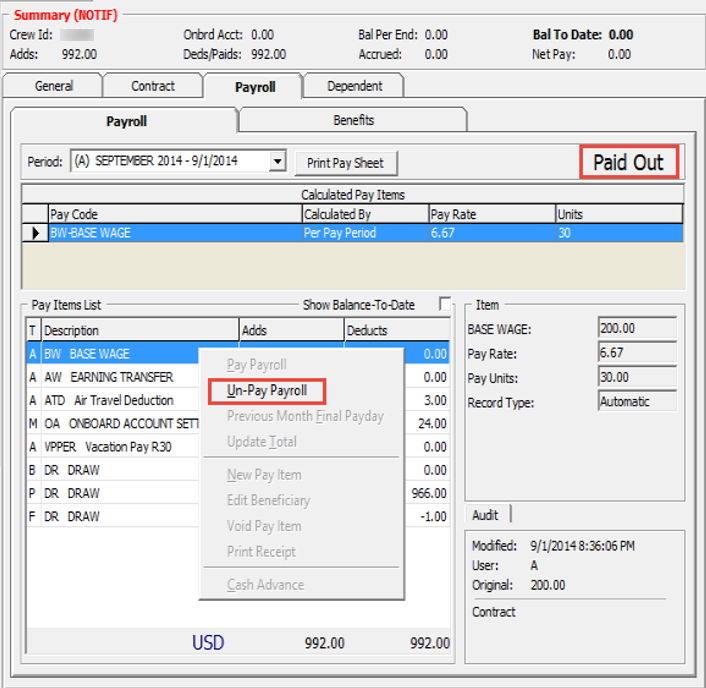
Right-click the Paid Out caption of the Payroll tab or on the Pay Items List and select Un-Pay Payroll from the option list.
-
At the confirmation prompt, click Yes to proceed. This only reverse the pay out and all accrued amount and does not reverse the folio payment.
In order to pay the rounded-up payout amount, enable the following settings in the Payroll Companies setup screen:
-
Round Payout
-
Round Final Pay code
This will accrue the remaining pennies to the next pay period and are paid during the final pay using a separate pay code defined in Round Final Pay code. Below table is an example of the rounded payout.
Table 1-12 Payout Rounding
| Without Rounding | Rounding | Rounded Amount | Pennies Amount accrued |
|---|---|---|---|
|
$1341.65 |
0 |
$1341.65 |
- |
|
$1341.65 |
2 |
$1342 |
-$0.35 |
|
$1341.65 |
5 |
$1345 |
-$3.35 |
|
$1341.65 |
10 |
$1350 |
-$8.35 |
|
$1341.65 |
-10 |
$1340 |
$1.65 |
|
$1341.65 |
-5 |
$1340 |
$1.65 |
|
$1341.65 |
-1 |
$1341 |
$0.65 |
Note:
If the contract currency is different from the onboard currency, the rounding refers to the Minimum Denomination in the Currency Exchange Rate setup.
Rounding is not applicable to multiple pay codes. The multiple payout does not use the Minimum Denomination from the Currency Exchange Rate but uses the default rounding instead.
Mark Paid
Reports are produced to aid the calculation of the payroll cash request. The report is generated based on any payments pending in the system. The Payments pending consists of any form of pay outs performed using the multiple crew member payout form or cash advances that were entered in the Quick Posting form. The pay outs and cash advances entered using the Crew Details forms are assumed to have been paid immediately, without the use of a cash request.
This is to ensure that the cash request includes the correct payments.
Figure 1-41 Mark Pay Outs and Cash Advance as Paid

-
After performing the cash advance in Quick Posting or when multiple crew member payouts are processed, select Mark Paid on the Payroll menu.
-
Select the corresponding pay code from the drop-down list to list all the pending payments.
-
Double-click on each crew member’s account to mark the payment as paid or click the Check All button to mark all payments, then click Mark As Paid to update. This places an ‘X’ in the transaction.