2 Training Mode
It is a regulatory requirement that all officers and crews are to undergo complete safety training. The Training Mode is a function that records all training completed through the course and certificate attendance.
The functions in Training Mode are similar to Drill mode, enabling the Chief Safety Officer to schedule a training drill according to the course and certificate setup for each safety rules. Other functions included in this module are Send Email, Report, Barcode Scanning, and Save Search Criteria.
Figure 2-1 Training Mode Functions
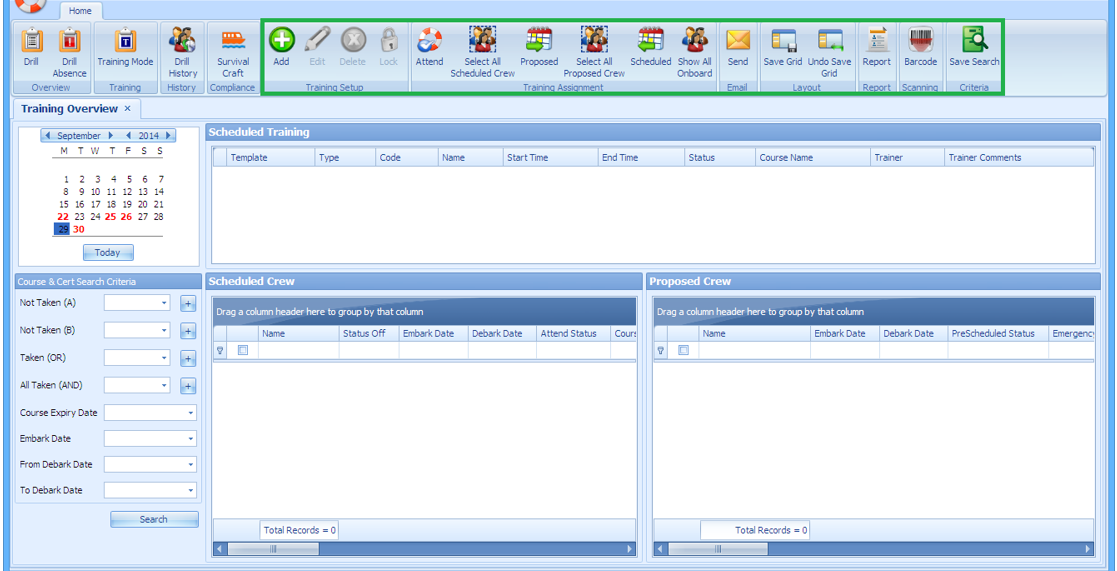
Table 2-1 Field Description of Training Drill Overview
| Field Name | Description |
|---|---|
|
Type |
Displays the drill definition without courses and certificate assigned. refer to Drill Type setup |
|
Code |
Displays all definition linked to Drill Definition setup of the selected drill type. |
|
Date |
Planned drill date |
|
Start Time |
Drill scheduled start time |
|
End Time |
Drill scheduled end time |
|
Template |
Proposed eligible crew to scheduled drill based on Safety Department, Safety Position, Safety Group and Safety Function assigned in the Drill template and all templates setup in Drill Template are shown. |
|
Trainer |
Trainer name |
|
Trainer Comments |
Details or comments of the course |
Setting up Training Drill
Similar to the Safety Drill function, you must schedule a drill in the Training Drill mode before assigning a crew to the drill.
-
At the Training Overview window, select a date from the calendar. Dates that have scheduled drills are shown in red in the calendar.
-
Click the Add button at the ribbon bar to add a drill.
-
At the Add Training window, select the Type, Code, Date, Start/End Time, Template and Trainer from the drop-down list.
-
Insert the course details/comment, if any.
-
Click the Save button to save the drill.
Editing a Drill
The Edit Drill function allows you to reschedule a drill according to their operational needs. Rescheduling is not possible when the Drill Status is locked, and the Drill Type or Code is not editable.
-
At the Training Overview window, select the drill date to edit.
-
Click the Edit button at the ribbon bar.
-
Select a new date, start/end time from the drop-down list.
-
Click the Save button to save the record.
Deleting a Drill
You can delete a drill even with crew members scheduled. However, it is not permissible when the scheduled drill has attendance marked as Absent.
-
At the Training Overview window, select the drill date to delete.
-
Click the Delete button on the ribbon bar.
-
Select Yes when prompt.
Locking a Drill
The Lock drill function is enabled when the drill is the first drill of the same type. You can lock the subsequent drills of the same type when the first drill is locked.
-
At the Training Overview window, select the first drill date of the same drill type.
-
Click the Lock button at the ribbon bar.
-
If the drill is not the first drill of the same type, you will receive a notification prompt to check for the first drill.
-
Click the OK button to return to previous screen.
Unlocking a Drill
The Unlock drill function is enabled when the drill is the last drill of the same type, and the icon is enabled for the second last drill of the same type if the last drill has been unlocked. Following a reverse sequence.
-
At the Training window, select the last drill date of the same type.
-
Click the Unlock button at the ribbon bar.
-
Click theOK button.
Assigning/Unassigning Crew to Training Drill
-
The crew is checked-in or expected.
-
The crew is assigned in the Muster list assignment.
-
Required Course and Certificate as defined in Drill Definition.
-
The training date is prior to crew expected disembarkation date.
Figure 2-2 Training Drill Crew Assignment
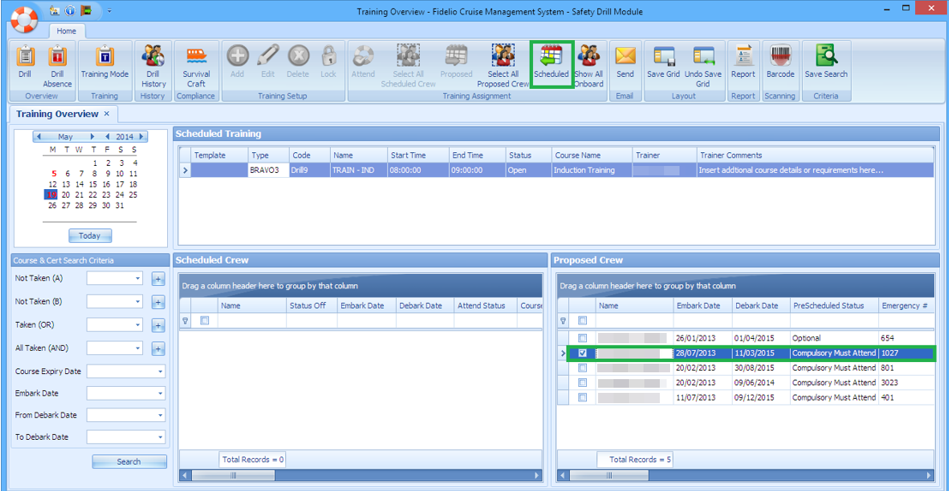
Table 2-2 Field Description of Proposed Crew Grid
| Field Name | Description |
|---|---|
|
Name |
Crew Name |
|
Embark Date |
Crew embarkation date |
|
Debark Date |
Crew debarkation date |
|
PreScheduled Status |
Defines whether attendance is compulsory or optional. Refers to rules set in Safety Drill Type and Course and Certificate taken |
|
Emergency # |
Emergency number defined in Muster List Setup |
|
Critical E Number |
Defines whether the course/certificate will auto expire after Critical E# is changed. Refers to Muster List Assignment |
|
Operational Position |
Crew Operational Position. Refers to Crew Operational Position setup |
|
Safety Department |
Safety Department assigned. Refers to Safety Department setup |
|
Safety Position |
Safety Position assigned. Refers to Safety Position setup |
|
Safety Function |
Safety Function assigned. Refers to Safety Function setup |
|
LifeBoat |
Lifeboat assigned. Refers to Lifeboat Setup |
|
Muster Station |
Muster Station location. Refers to Muster Station setup |
|
Safety Role |
Safety role assigned. Refers to Safety Role setup |
|
Safety Group |
Safety Group assigned. Refers to Safety Group setup |
|
Deck |
Deck location. Refers to Deck setup |
|
Fire zone |
Fire zone assigned. Refers to Firezone setup |
|
Stairwell |
Stairwell location. Refers to Stairwell setup |
|
Side Location |
Emergency Station location on board the ship. Refers to default system codes |
|
Craft Type |
Type of Craft. Refers to default system codes |
|
Craft Side |
Safety Boat location - port or starboard. Refers to default system codes |
|
Emergency Station |
Station type. Refers to Muster Station Setup |
Unscheduling Crew from Drill
-
From the Calendar tab, select the Drill Date, and select the drill in Schedule Drill section.
-
Crew due for drills is populated in the Proposed Crew grid.
-
From the Scheduled Crew grid, check the check boxes beside the name or click the Select All Scheduled Crew button at the ribbon bar, and click the Proposed button to unassigned. You will see the selected crew name appears in the Proposed Crew grid.
Scheduling Crew to a Drill
-
From the Calendar tab, select the Drill date, and then select the drill in the Schedule Drill section.
-
Crew due for drills are listed in the Proposed Crew grid. From the Proposed Crew grid, select by checking the check box beside the name or click the Select All Proposed Crew button at the ribbon bar.
-
Click Scheduled to assign.
-
At the Scheduled Crew grid, the Status Off field defaults to No. Only crew with disembarkation after the drill date has the status set to Yes.
Figure 2-3 Drill Status In Scheduled Crew
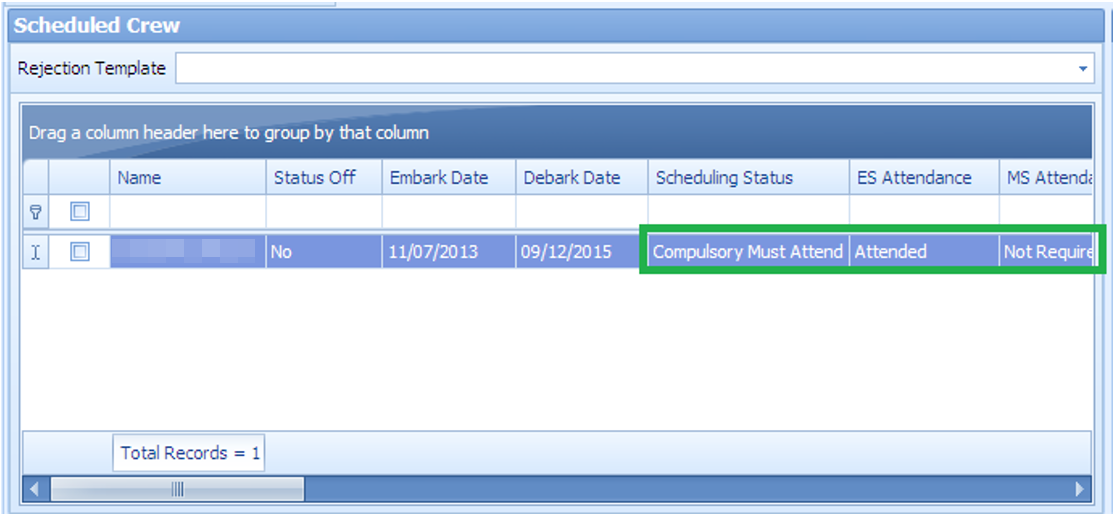
Table 2-3 Field Description of Scheduled Crew
| Field Name | Descriptions |
|---|---|
|
Name |
Crew name |
|
Status Off |
If the status is YES, this indicates that the crew disembarkation date is after the drill date |
|
Embark Date |
Crew embarkation date |
|
Debark Date |
Crew debarkation date |
|
Attend Status |
Defines whether attendance is compulsory or optional. Refers to rules set in Safety Drill Type and Course and Certificate taken |
|
Course Done |
Completed the scheduled course |
|
Emergency # |
Emergency number defined in Muster List Setup |
|
Critical E Number |
Defines whether the course/certificate will auto expire after Critical E# is changed. Refers to Muster List Assignment |
|
Operational Position |
Crew Operational Position. Refers to Crew Operational Position setup |
|
Safety Department |
Safety Department assigned. Refers to Safety Department setup |
|
Safety Position |
Safety Position assigned. Refers to Safety Position setup |
|
Safety Function |
Safety Function assigned. Refers to Safety Function setup |
|
LifeBoat |
Lifeboat assigned. Refers to Lifeboat Setup |
|
Muster Station |
Muster Station location. Refers to Muster Station setup |
|
Safety Role |
Safety role assigned. Refers to Safety Role setup |
|
Safety Group |
Safety Group assigned. Refers to Safety Group setup |
|
Emergency Station |
Station type. Reference to Muster Station Setup |
|
Deck |
Deck location. Reference to Deck setup |
|
Fire zone |
Fire zone assigned. Refers to Firezone setup |
|
Stairwell |
Stairwell location. Refers to Stairwell setup |
|
Side |
Location side of Emergency Station. Refers to default system codes |
|
Craft Type |
Type of Craft. Refers to default system codes |
|
Craft Side |
Safety Boat location - port or starboard. Refers to default system codes |
|
Side |
Location of the Muster station - port or starboard. |
Changing Attendance Status
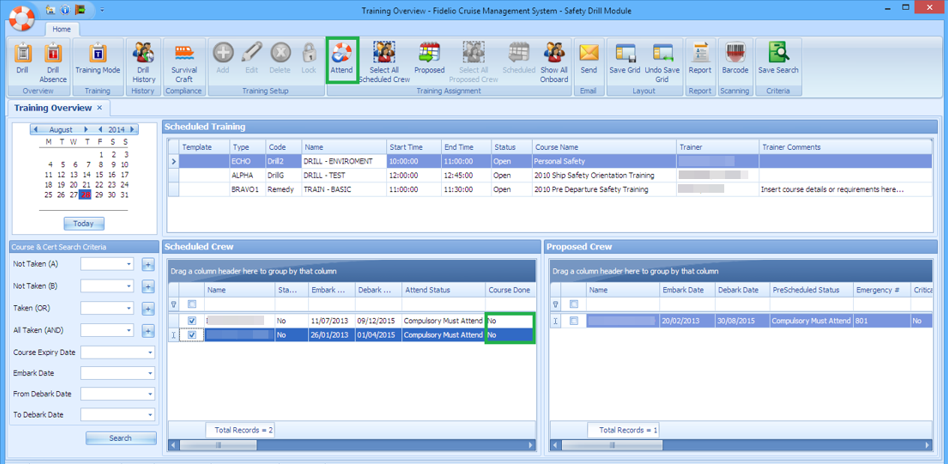
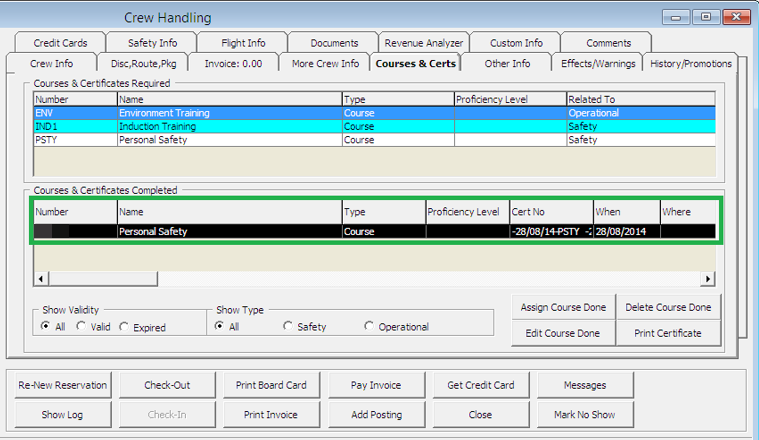
The course attendance is marked by the trainer at the end of the training drill. This process also updates the Course and Certificate as completed in Crew Handling.
Figure 2-4 Course Attendance Function
-
At the selected training drill, select the crew or click the Select All Schedule Crew button.
-
Click the Attend button to change the attendance status. This changes the ‘Course Done’ status to Yes, and the Attend button at the ribbon bar switches to Undo Attend. It also sets the Course and Certificate as ‘Completed’ in the Crew Handling window.
Figure 2-5 Course Attendance in Crew Handling
-
The system prohibit you from moving the crew from Scheduled to Proposed window once the attendance in Course Done is set to Yes. You need to first reset the status to No.
-
To reset the attendance, select the name and click the Undo Attend button.
Sending Email Notification
An email notification may be pushed to the respective Operational Department, informing them of the scheduled drill date/time and the crew involved. The function requires configuration in Parameter, Promo Group, and Operational Department. Recipient must have an email account set in Administration, Crew Setup, Operational Division.
-
Click the Send Email button at the ribbon bar.
-
At the Send Email window, select the Operational Department from the drop-down list.
-
The system will prompt two notification dialogue; the first is a push notification to Head of Operational Department, followed by an email is sent successfully. Click the OK button on both prompts to continue.
-
If you receive the below prompt, this means the SMTP is not set up correctly. Click OK to continue.
Figure 2-6 Invalid SMTP Notification

- The recipients will receive two Excel spreadsheets attached to the email – Master.xls and Schedule Details.xls. See Training Drill Report for the sample spreadsheets.
Marking Attendance Using Barcode Scanning
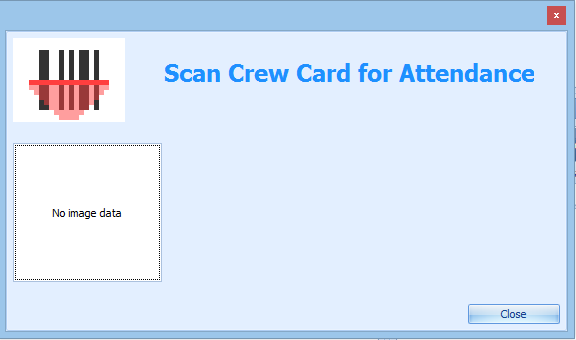
You can mark the course attendance using a barcode scanner (referenced to ‘RES_BOARDCC_EXT’) and hardware set up is required in Crew, Options, Hardware. Contact Oracle Hospitality Cruise for hardware requirements and set up.
Figure 2-7 Crew Attendance by Barcode
Training Drill Report
You can print and email a scheduled drill to the respective Operational Department for their review and planning. This function exports the scheduled drill into a Microsoft Excel file which includes:
-
Master.xls: Information pertaining to the scheduled training drill.
-
Scheduled Details.xls: Names of the crew scheduled for training.
-
Proposed Schedule.xls: Names of the crew proposed for training.
Printing Drill Report
-
Select the Training Drill Date from the Calendar tab.
-
Click the Report button at the ribbon bar.
-
Enter the destination path and click the Save button.
Figure 2-8 Sample Master Drill Report

Figure 2-9 Sample Scheduled Drill Report

Figure 2-10 Sample Proposed Drill Report

Information Look Up with Save & Search
The search function allows you to search for courses set up based on the selected drill type, and the searched information can be saved into a template for future use.
Searching for Crew by Course
-
Select one of these options from the drop-down list on the left of the Training Overview window. The return results are based on the selected filter.
-
Not Taken (A)
-
Not Taken (B)
-
Taken (OR)
-
All Taken (AND)
-
-
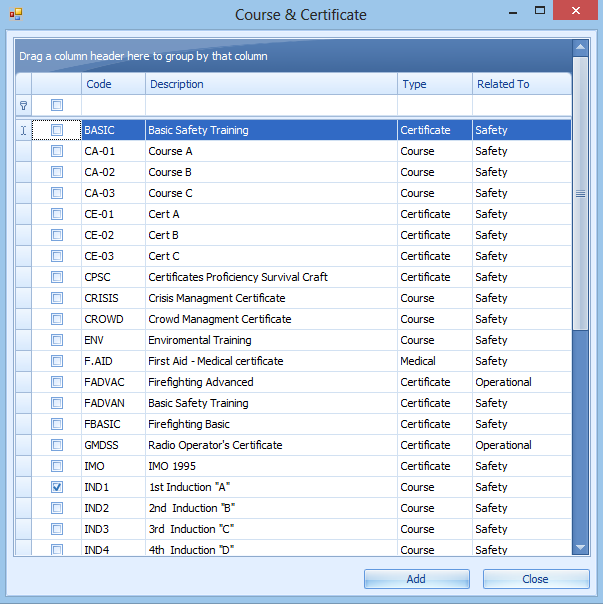
To select more than one course type, click the plus sign (+) to open a detailed Course & Certificate window, and select the Courses then click Add.
Figure 2-11 Course and Certificate Selection in Search Filter
-
At the Course & Certificate Search Criteria window, enter the applicable filter and click Search.
-
To save the search filter as a template, click Save Search button at the ribbon bar.