2 Event Overview
-
Event Overview
-
Calendar View
-
Handling List
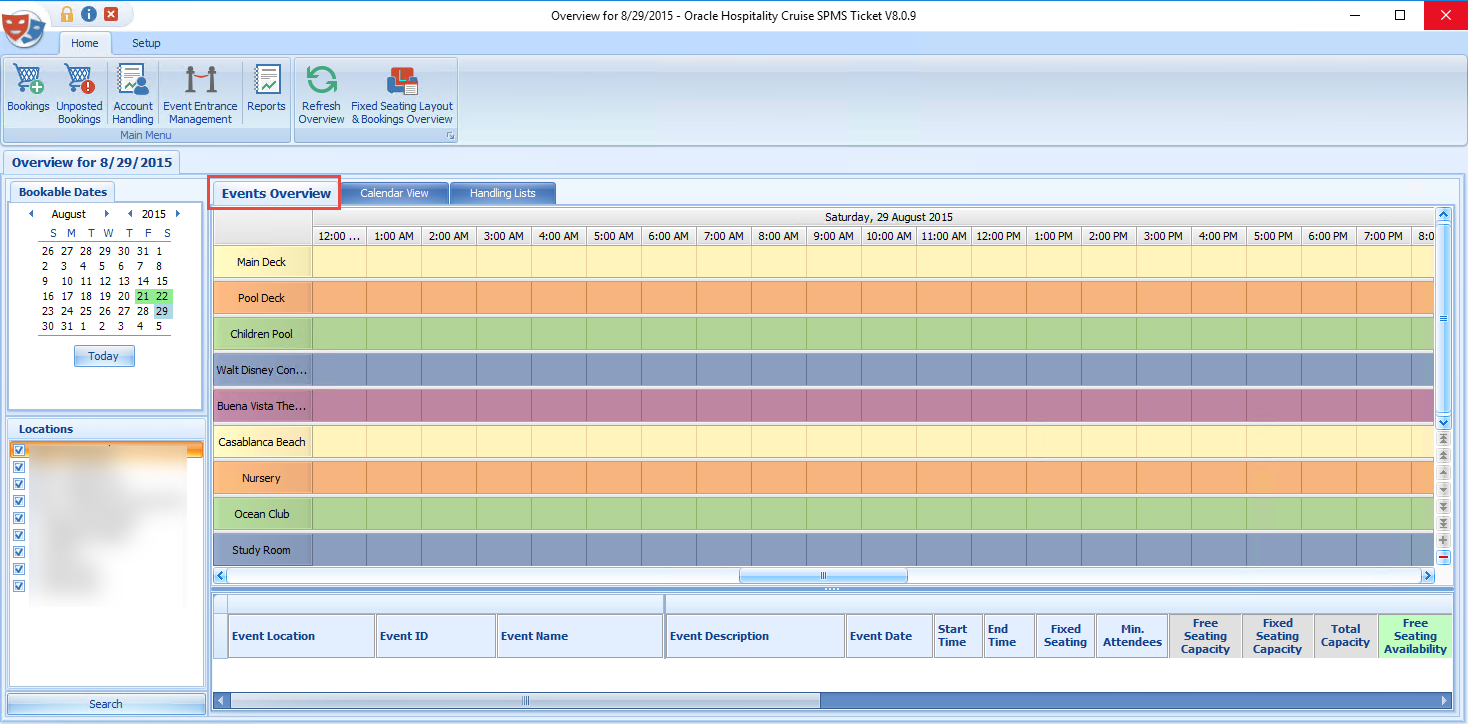
Figure 2-1 Event Overview
-
A view of all bookable events according to the event start and end time.
-
List all events of the selected date, including information such as start and end time, seating type minimum / maximum attendees, total bookings and others.
Figure 2-2 Calendar View
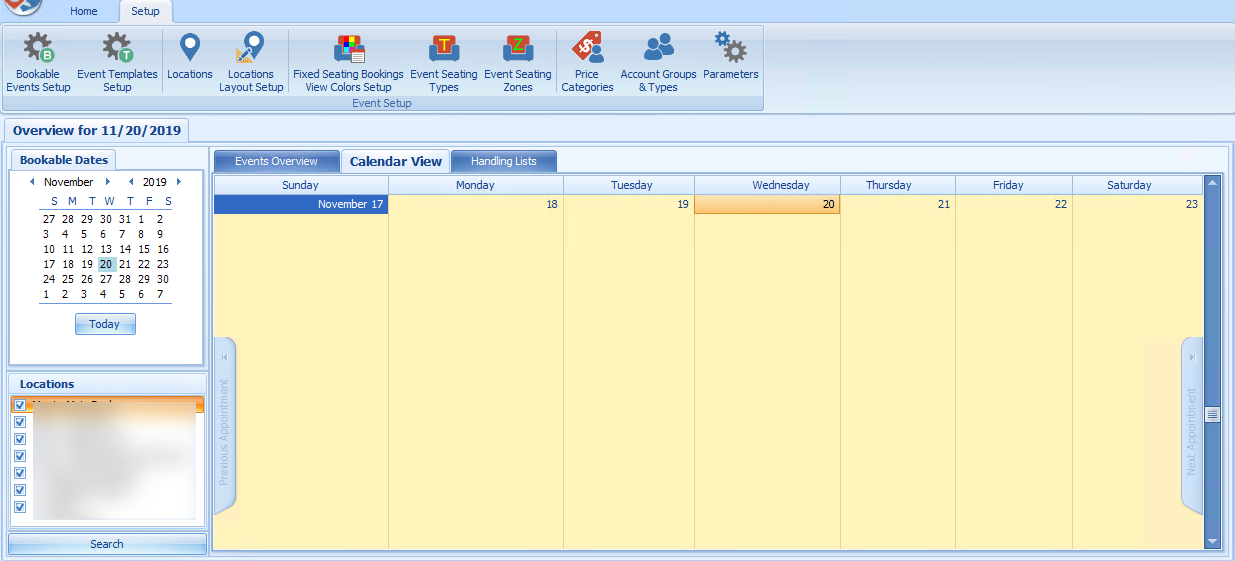
The Calendar View displays the weekly event of the selected date in time order. Scrolling downwards will move the date forward by week.
Figure 2-3 Event Handling List
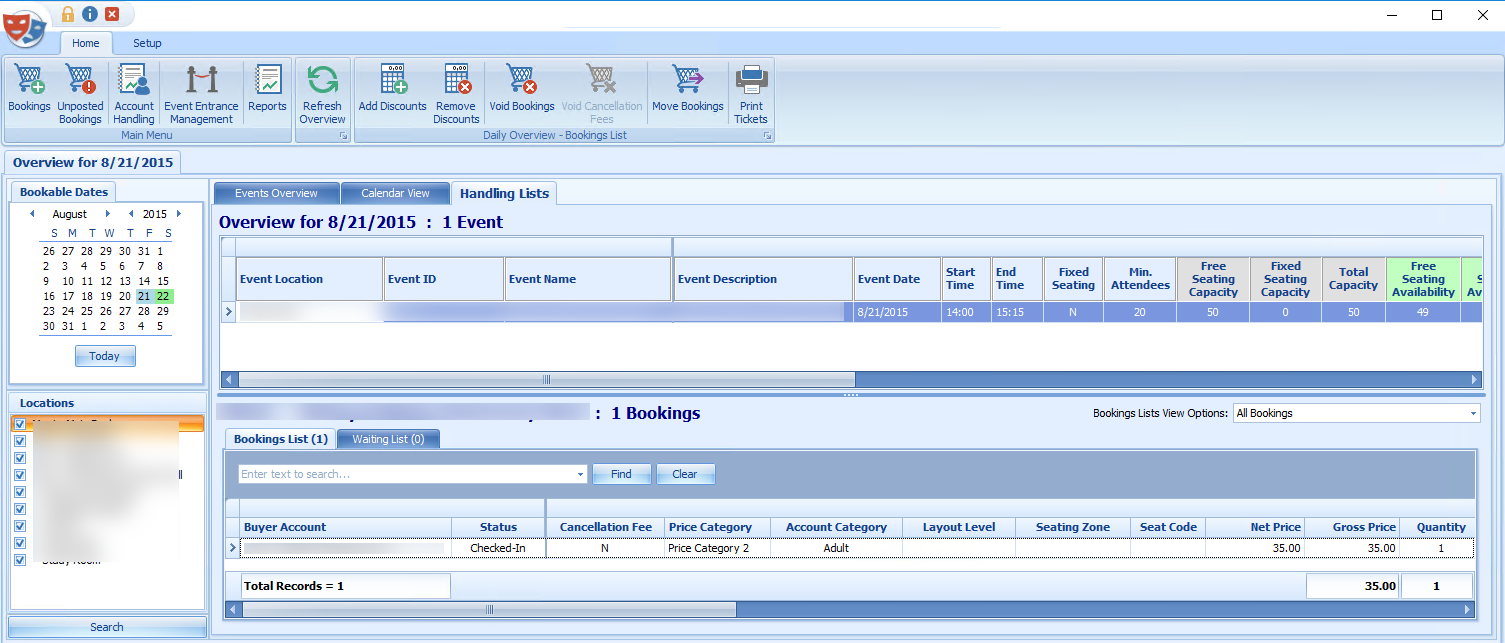
The Handling Lists provide an overview of the selected event allowing you to manage the event from one location. It lists the details and total number of events of the selected date in the grid. List of the bookings are shown in the Booking List tab while the Waiting List tab lists all the guest on waiting list. The total number of bookings for the event is shown in the far right of the grid. Scroll right to view the remaining columns.
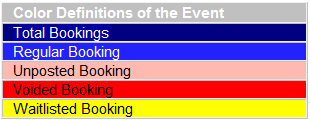
Figure 2-4 Color Definition
Booking List
Under the Booking List tab, you can perform functions such as Add Discounts, Void, Move Bookings and Print Tickets. See chapter Account Handling for more details.
Removing a Waitlist Booking
-
At the Waiting List tab, select the booking to remove.
-
Click the Move Waitlisted Bookings at the ribbon bar.
-
At the Confirm to Remove All or selected Waitlisted Bookings dialog, select the appropriate option.
Note:
If you select All, this will remove all the waitlist booking from the grid.Shifting a Waitlist Booking
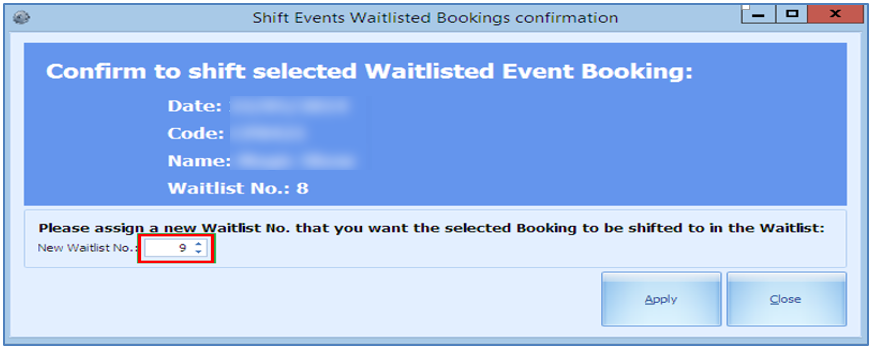
This function enables you to reorder the waitlist booking, depending on the new number you insert. For example, if the current waitlist number is eight and the new waitlist number is ten, it will move this booking to the bottom of the list.
-
Select the booking to shift from the Waiting List tab.
-
Click the Shift Waitlisted Bookings button at the ribbon bar.
-
Insert a new waitlist number and click Apply.
Figure 2-5 Shift Events for Waitlisted Bookings
Moving Waitlist Booking to Another Date
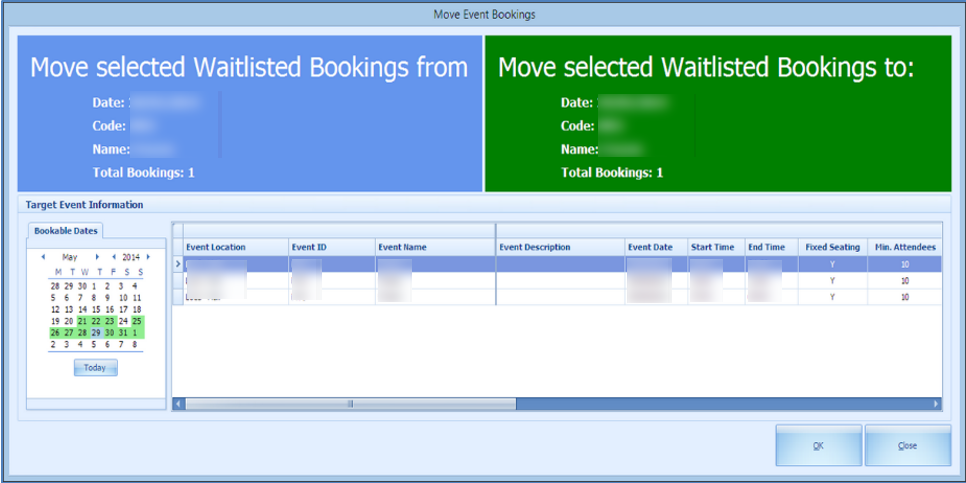
Figure 2-6 Move Event Bookings
-
Select the waitlist booking from the Waiting List tab.
-
Click the Move Waitlisted Bookings.
-
At the confirmation prompt, select the new date and click OK.
Bookings
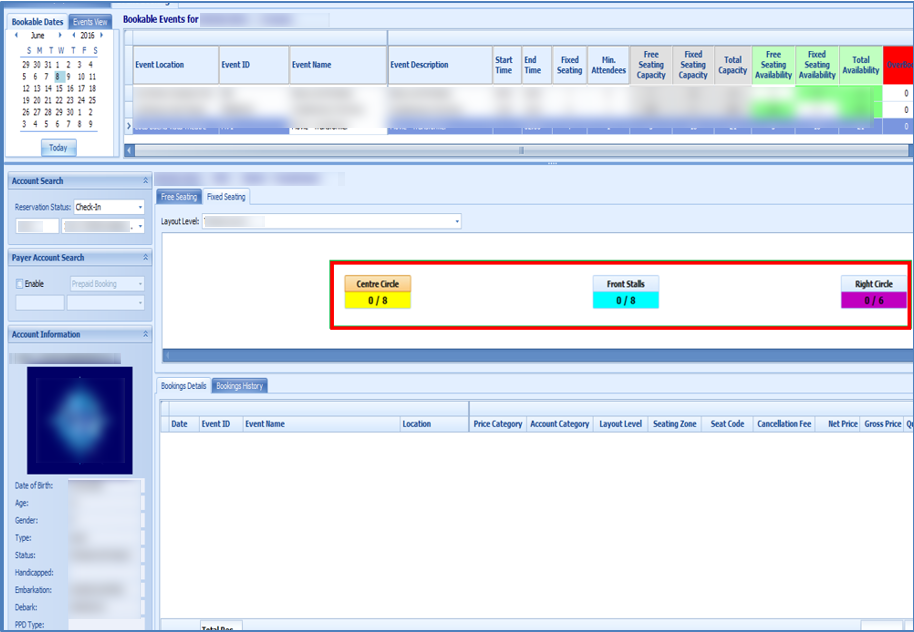
Figure 2-7 Bookable Event Fixed Seating Tab
-
Bookable Date View: Shows the bookable event by date in a calendar view.
-
Events View: Enable you to search for events of the same ID.
Bookable Date View
-
Dates marked with green denotes the event available for that date.
-
Dates marked with gray is the selected date and it corresponds to the date shown in Dates, Locations, and Events.
Events View
In the Event View tab, the system searches and return a list of events matching the event id entered in the Event code field
Ticket Price
Ticket price of the selected event is shown in the middle section of the Event Booking
Account Search
The Account Search function allow you to search for an account by reservation status (Check-In, Reservation or Check-Out Residents) and by Cabin Number/Name. The information of the account will be displayed in the Account Information section.
You can also search for the payer account type (Prepaid or Routed) by checking the Enable check box, then select the payer type and enter the account information.
The Account information displayed is of the selected guest.
Booking Details
The Booking details tab displays details of the selected event, total records and prices. Functions such as Add Discounts, Remove Discounts, Void Bookings, Void Cancellation Fees, and Move Bookings can be performed by right clicking the selected booking or use the button at the ribbon bar.
Booking History
Figure 2-8 Booking History

This tab displays the history details of event previously booked. Scroll to the right for more information.
Booking an Event
-
Click the Bookings button at the ribbon bar.
-
At the Event Bookings screen, select the date of the event and then the Event Location. The Price Category of the event is listed under the Free Seating tab.
-
At the Account Search function, search for the account.
-
Click the Price Category once. Clicking the Price Category again increases the quantity and you will receive a prompt to confirm if you would like to reserve more than one seat.
-
Click Post to post the booking fee to the account.
Fixed Seating Booking
Before you can book a seat using the Fixed Seating, ensure you have the event location and layout setup. See Locations Layout and Creating Layout Template for more information.
-
To book a Fixed Seating event, choose a event from the Event Bookings tab. Select a guest and select a fixed seating event.
-
Under the Fixed Seating tab, select a layout from the drop-down list. The available pricing for the selected layout is displayed, For example ‘0/8’ in the xxx Price Category. “0” indicates number of tickets booked, “8” indicates the total number of tickets available.
-
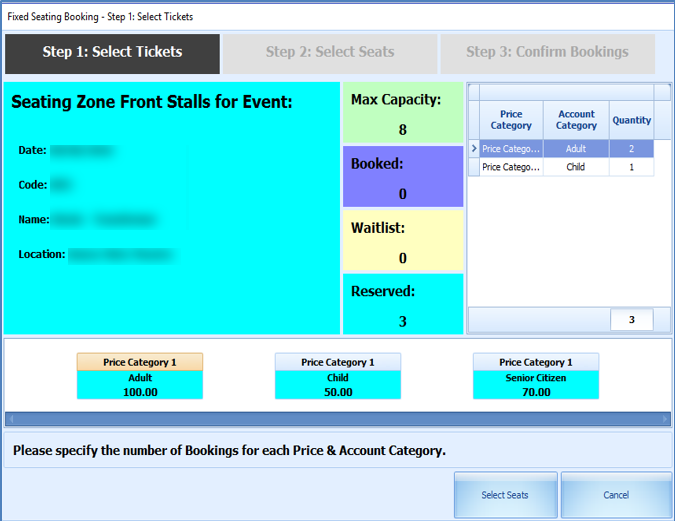
At the Booking Wizard Step 1: Select Tickets,
-
Select a Price Category and the number of tickets.
-
Click Select Seats to go to Step 2:Select Seats allocate a seat number. The default layout view for this booking is Booking View. You can change the view to Zones or Type.
-
Click Book Seats.
-
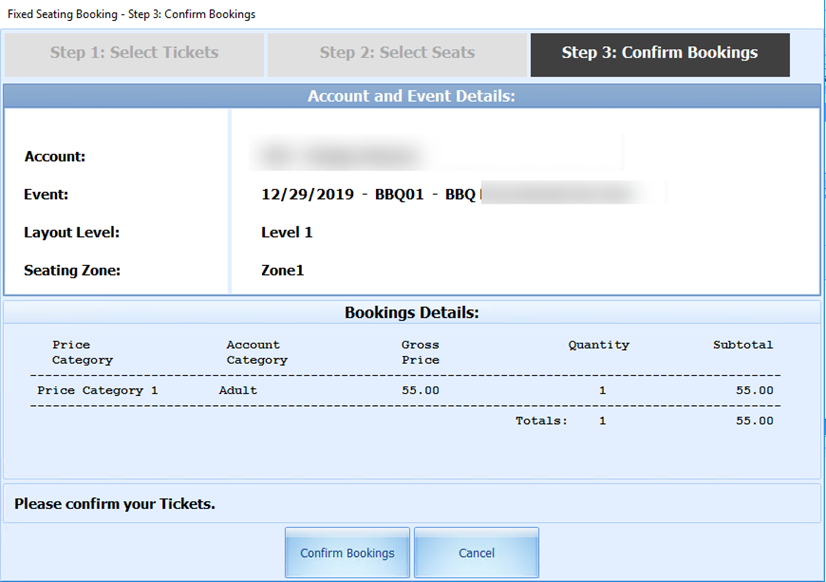
At the Step 3: Confirm Booking tab, verify the information shown and click Confirm Bookings to complete the booking.
Figure 2-9 Fixed Seating Booking Step 1: Select Tickets
-
Layout View by Zones, Types or Bookings
The information shown in the Layout by Zones and Types are similar. It list the availability of the seating zones and corresponding colors, whereas the Bookings view list the booking information of the selected seat.
Relocating Seat in Step 2 of Booking Wizard
Figure 2-10 Fixed Seating Booking Step 2: Select Seats
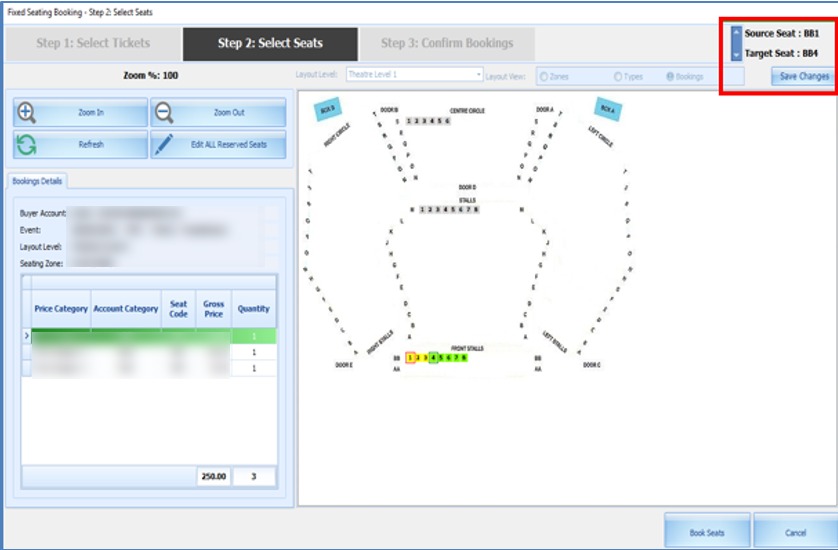
To move an allocated seat to another in Step 2:Select Seats,
-
Select Edit ALL Reserved Seats. This button toggle to Stop Editing ALL Reserved Seats and vice versa when clicked.
-
Select a new seat code to begin from the layout.
-
For example, the assign seat is BB1-BB3 and selecting BB4, this will move all three seats to BB4-BB6.
-
If the number of the allocated seats are less than the seats you are moving, a message shall prompt.
-
Click the Stop Editing ALL Reserved Seats once all seats are moved.
-
Click the Save Changes to update the layout view and at the grid.
-
Once confirmed, click Book Seats to go to next tab, Step 3: Confirm Bookings.
-
Complete the booking by clicking the Confirm Bookings.
Figure 2-11 Fixed Seating Booking Step 3: Confirm Booking
Fixed Seating Layout and Bookings Overview
This button is only available if a fixed seating event is highlighted. It displays the layout view for the selected fixed seating event.