4 Roster Daily
The Roster Daily provides an overview of the daily, weekly, and monthly roster, ILO Violations and Summary of Worked Hours Functions. The features within the Roster Daily vary, depending on the mode set in Parameter, Use Clock-In/Clock-Out.
0 - Time Approval Method
1 - Clock-In/Out Method
2 - Combination of Time Approval and Clock In/Out Method
Time Approval Method
The Time Approval Method consists of Daily Overview, Schedule Overview, Monthly Overview, Function Change and Reset Pincode.
Daily Overview
Figure 4-1 Daily Overview in Time Approval Method
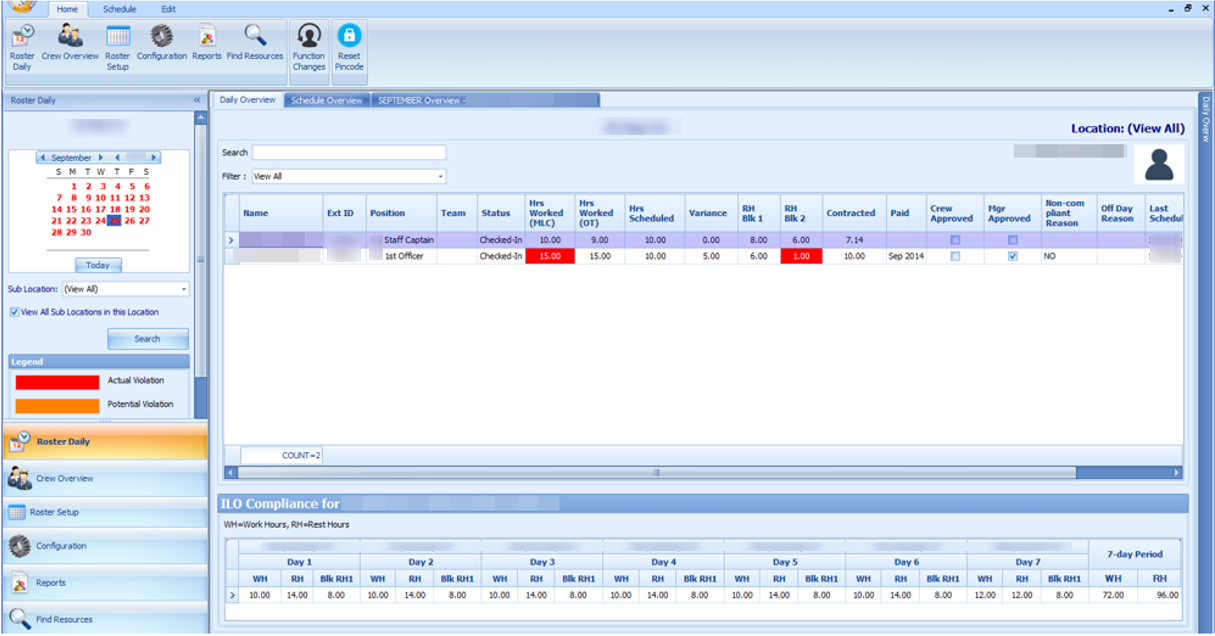
Table 4-1 Field Definition of Daily Overview Tab
| Field Name | Definitions |
|---|---|
|
Name |
Crew’s name |
|
Ext ID |
Crew identification number linked to an external system |
|
Position |
Crew Operational Position |
|
Team |
Crew’s assigned team |
|
Status |
Embarkation Status |
|
Hrs Worked (ILO) |
Actual hours worked. It sums up all worked hours regardless of work codes. The column is highlighted in red for Time Approval mode and the text is in red for Clock-In/Out mode when the total worked hours exceeds the value set in Parameter, “Time Attendance”, “ILO Maximum Work Hours in 24-hour period” |
|
Hrs Worked (OT) |
Actual hours worked. It sums up all work codes flagged with “Include into Working Hours”. The total hours worked is used to calculate the Overtime against the contracted hours |
|
Hrs Scheduled |
Hours scheduled by Manager. Sums up all hours regardless of work codes |
|
Variance |
Differences between Hrs Worked (ILO) input by Crew at Time & Attendance Terminal and Hrs Scheduled by Manager, and only shown in Time Approval mode |
|
RH Blk1 |
Scheduled largest rest hours block |
|
RH Blk2 |
The second largest rest hours block in Time Approval mode |
|
Contracted |
Contracted hours prior to overtime calculation in Time Approval mode |
|
Paid |
An indicator of whether worked hours is paid in Payroll in Time Approval mode |
|
Crew Approved |
Schedule approved by Crew at T&A Terminal |
|
Mgr Approved |
Schedule approved by Manager |
|
Non-Compliant Reason |
Non-compliant schedule reason approves by Manager |
|
Off Day Reason |
Reason entered by the crew at T&A Terminal when approving zero hours worked or when Manager approves crew zero hours scheduled |
|
Last Scheduled |
Date of last scheduled in Time Approval mode |
Below are the formulas to calculate the rest hours in two different scenarios.
-
If there is no schedule on the previous day, the system calculates the rest hour from today’s first start time and ends at the same start time the following day, for a period of 24 hours. For example, Time Slot 1 Start Time at 06:00 hours. The system calculates rest hours from today 06:00 to the following day at 06:00.
Therefore, 2(10:00 - 12:00) + 3.5(14:00 - 17:30) + 7.5(22:30 - 06:00) = 13.RH Blk 1 = 7.50, RH Blk 2 = 3.50, Total RH = 13
-
If there is a schedule on previous day, the system calculates the rest hour from end time of previous day and ends at the same end time of today, for a period of period 24 hours. For example, Time Slot 3 End Time at 22:30 hours. The system calculates rest hours from previous day 22:30 to today’s 22:30.
Therefore, 7.5 (22:30 - 06:00) + 2 (10:00 - 12:00) + 3.5 (14:00 - 17:30) = 13.RH Blk 1 = 7.50, RH Blk 2 = 3.50, Total RH = 13.
-
Select the date from the Calendar Editor, in Roster Daily.
-
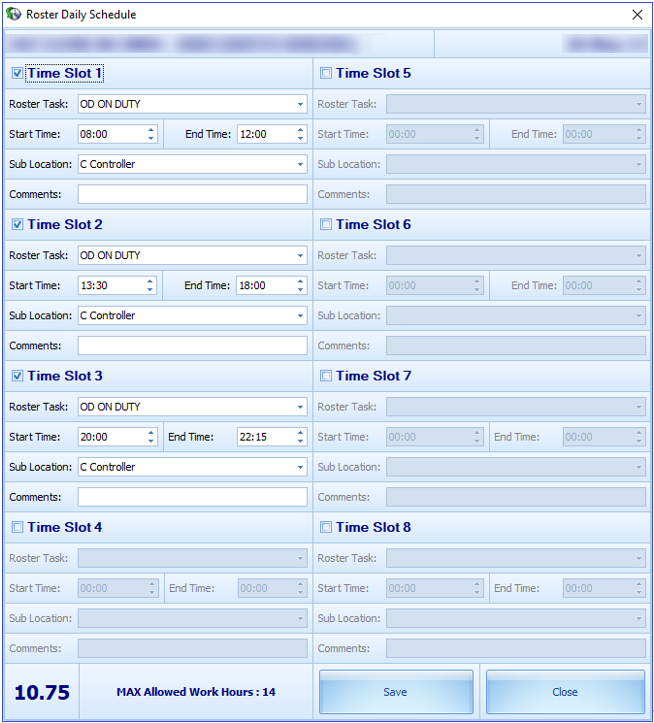
Go to the Daily Overview tab and double-click the crew name to open the Roster Daily Schedule window.
Figure 4-2 Roster Daily Schedule
ILO Compliance
Figure 4-3 ILO Compliance in Daily Overview
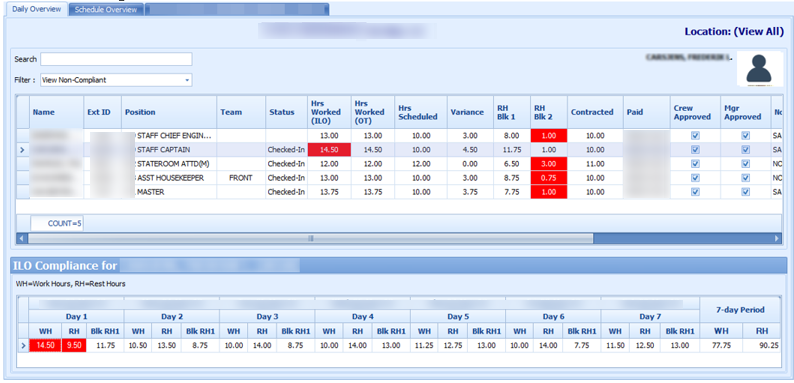
At the ILO Compliance section, the system automatically sets the columns in red when daily worked/rest hours violates the ILO Regulation. The hours shown in Worked Hours (WH) and Rest Hours (RH) are the accumulated daily worked/rest hour.
Selecting a crew will display the total WH and RH for seven-day period in the ILO Compliance section.
Modifying Roster Daily Schedule
The system allow you to modify a roster schedule created from the template by removing or adding new time slots. You are not allowed to modify or delete the schedule if the Roster has been paid through payroll. This function is only accessible by users that are granted with access rights “#3292 – Allow to Create & Modify Roster Schedule”.
At the Roster Daily Schedule window, select the time slot checkbox and enter the roster task, start/end time, and the sub location and click the Save button. See Figure 4-2.
Copying a Roster
-
At the Roster Daily window, select the date from the calendar editor.
-
At the Daily Overview tab, select the crew record from the grid.
-
At the Menu option, click the Schedule tab and then click the Copy & Paste button to copy the schedules onto other dates.
-
At the confirmation prompt, read the message prompt and then click Yes to proceed.
-
The system prompts a calendar editor when you select Yes at the confirmation prompt. Select the date to paste the copied schedule.
-
Click OK to complete the process.
Removing Roster Daily Schedule
-
From Daily Overview window, double-click the crew schedule to open the Roster Daily Schedule window.
-
Deselect the Timeslot checkbox to remove the time slot(s).
-
You can also click the Delete button under Edit tab from the Menu option to remove schedule for the day.
Schedule Overview
The Schedule Overview displays the crew schedules in a graph view, based on the following options and as shown in below figures.
Figure 4-4 Schedule Overview by Date
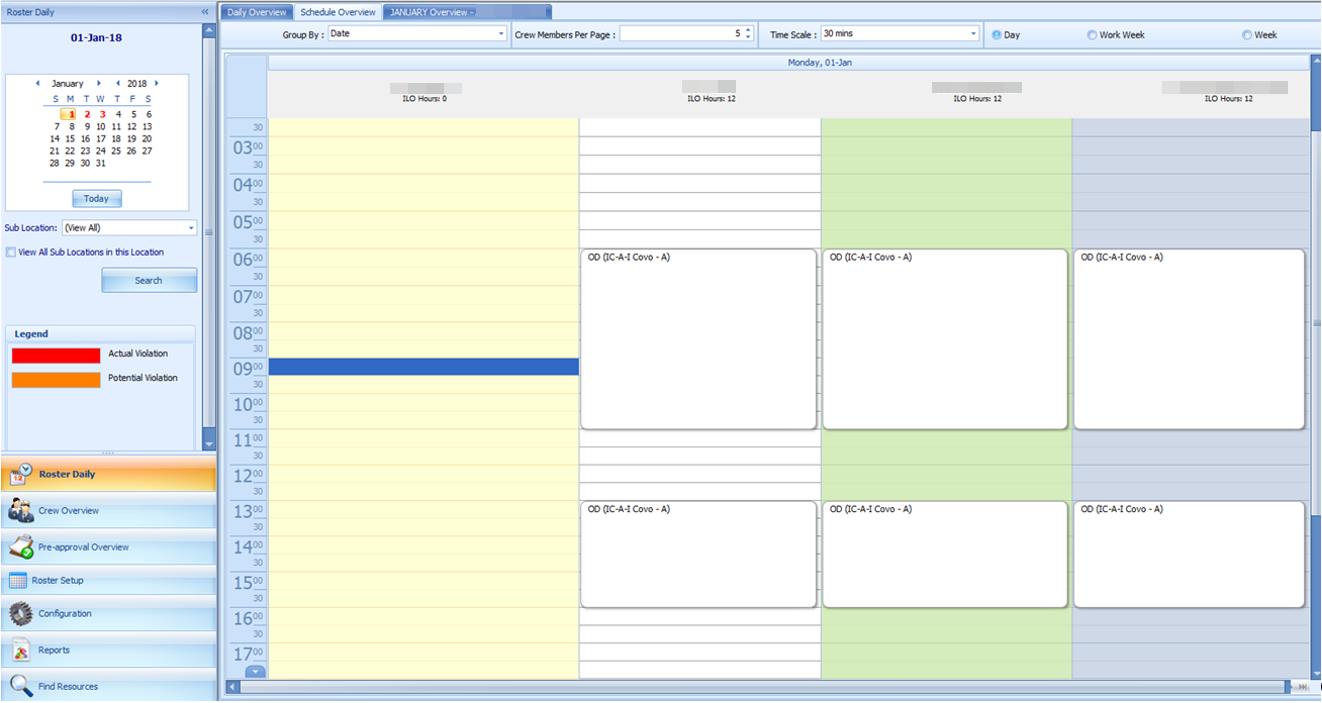
Figure 4-5 Schedule Overview by Crew Members
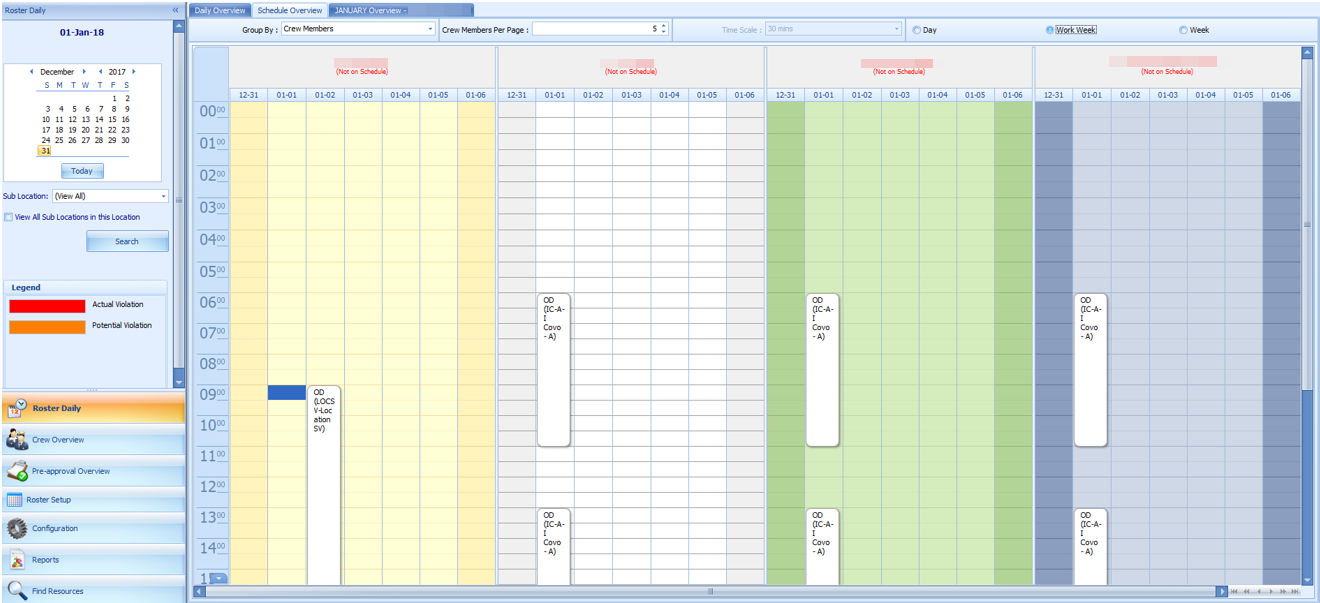
-
Date: Displays schedule by date
-
Crew Member: Displays schedule by Crew Member
-
Displays schedule with the number of members defined
-
Day View: Displays schedule by day
-
Work Week: Displays schedule by the work week
-
Week: Displays schedule by week
-
Month: Displays schedule by month
-
Displays the hour in 15 or 30 minutes block
Creating a Roster Schedule in Schedule Overview
A schedule can be added into the Schedule Overview tab using the drag and drop option or from a context menu.
Adding Schedule Using Context Menu
-
At the crew name, select the time slot from the grid.
-
Right-click to open the context menu.
-
Select the task to add the schedule. This creates the bar graph in the Overview tab.
Adding Schedule Using Time Slot
-
At the hour grid of the crew, double-click to open the Time Slot window.
-
Select the Roster Task, Sub-Location from the drop-down list and insert a comment, if any.
-
Select the Start and End Time for the task.
-
Click OK to save. The system prompts:
-
An ILO Violation if the schedule hours is more than the allowed ILO hours per day
-
An Overlapping of Time Slots warning if the schedule is overlapping with others
-
Modifying a Roster Schedule
-
At the Schedule Overview window, double-click on the selected time slot.
-
Modify the necessary information and then click OK to save.
-
You can also select the time slot and then drag the end/start time to extend or shorten the schedule or move the entire time slot to a different start/end time.
Removing a Roster Schedule
-
To delete an individual time slot, right-click the time and then select Delete from the options menu.
-
To delete all time slots, right-click on the schedule and select Delete All Time Slots from the options menu.
Monthly Overview
The Monthly Overview window provides an overview of the crew monthly schedule.
Figure 4-6 Monthly Overview
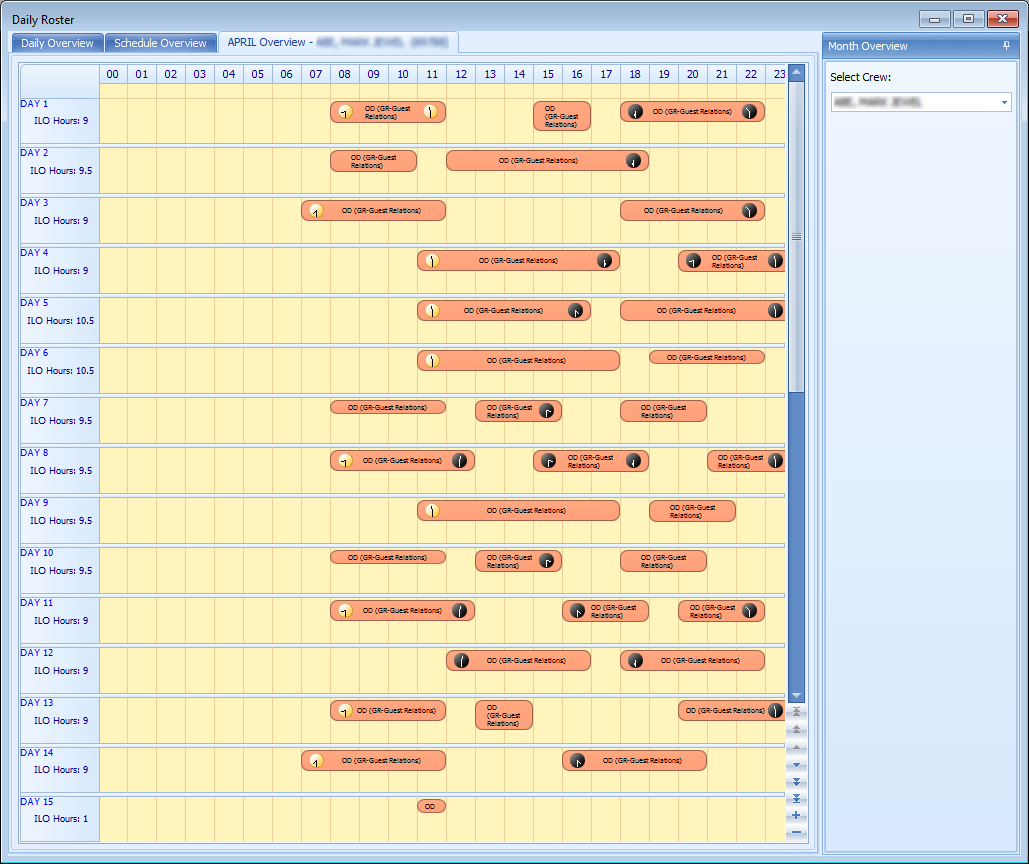
-
From the Roster Daily, Calendar Editor, select the month to view.
-
At the Daily Overview tab, select a crew and then navigate to the Monthly Overview tab to view the selected crew monthly schedule.
-
To view another crew for the same month, select the name from the drop-down list. You can only select one crew at any given time.
-
In the Monthly Overview tab, the same function as the Schedule Overview applies where you are allowed to add, modify, remove or paste a roster schedule.
-
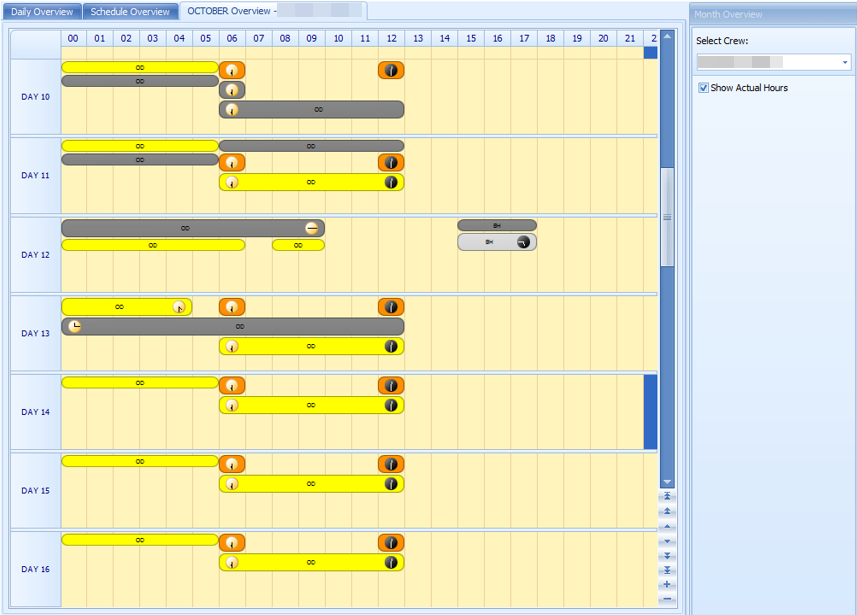
If the Parameter “Time Attendance”, “Use Clock-In/ Clock-Out” is enabled, the View Clock-In/Out menu button and Show Actual Hours checkbox will be available.
-
Select the Show Actual Hours checkbox will show the crew actual clock-in/ clock-out hours on the grid. The actual hours is displayed in grey color for each time slot.
Figure 4-7 Monthly Overview Actual Hours View
Function Change
The Function Change feature is an information window that lists all the position change and the date it was changed. The fields are not editable.
Figure 4-8 List of Function Change

Reset Pincode
The Reset Pincode allow the manager to reset the crew pin code without logging in to the Crew module. The manager must be granted with privilege rights #4662 – Reset Pincode.
-
You can only reset one pin code at a time
-
The pin code is updated to Null in RES_PIN_CODE or RES_PIN_ENCRYPTED based on parameter “Pin Code Encryption” and prompts the crew to input a new pincode at log in
To reset a pin code, select a crew from the Crew Overview and click Reset PinCode at the ribbon bar.
Clock-In/Clock-Out
This feature tracks the Crew Work Hours according to the ILO requirements. The function requires crew members to clock in/out at the start and end of their shift or when they are off for a break.
Daily Overview
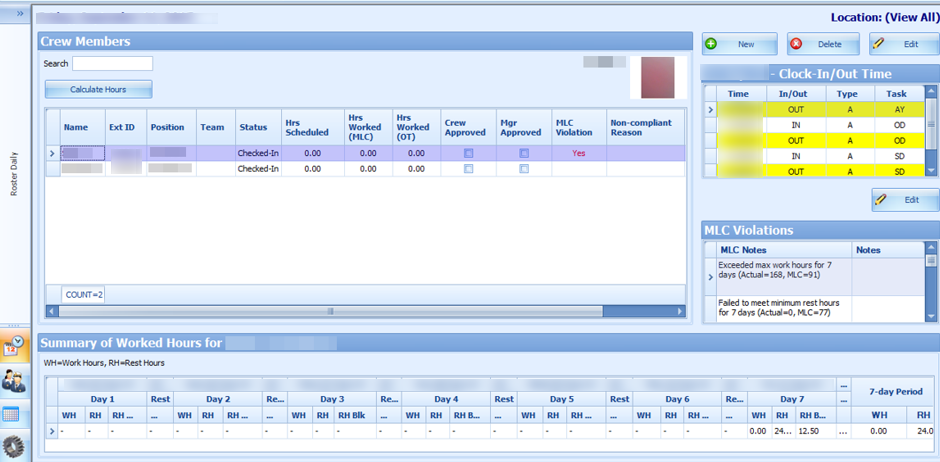
Figure 4-9 Clock In/Out Daily Overview
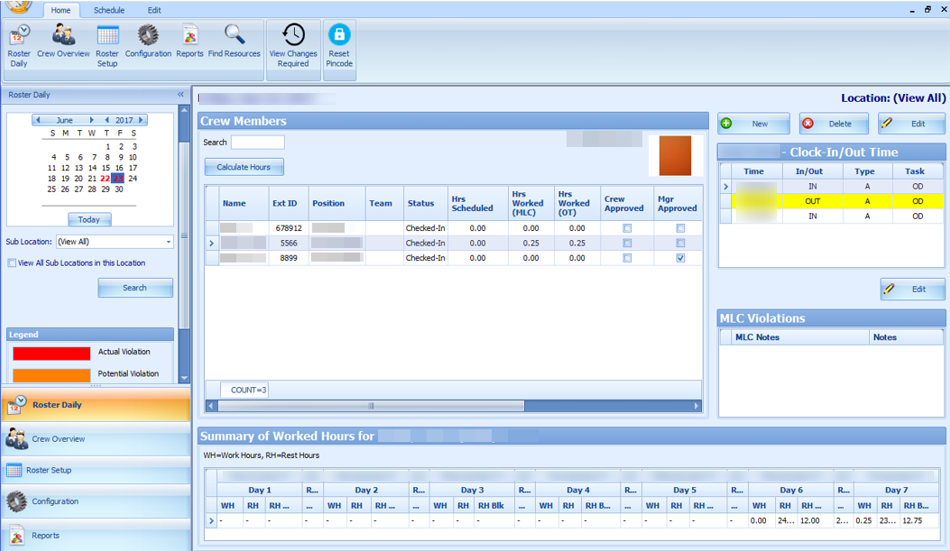
-
Calendar: Dates marked in red denotes dates with roster schedules created
-
Overview Tab: Lists all crew members that has schedule on the selected date
-
Clock-In/Out Time: Clock-In/Out time recorded by the system
-
ILO Violations: Violations of work hours if any. Refer to the Legend indicators for type of violations
-
Summary of Worked Hours: A weekly summary of hours worked or rested
Viewing of Crew Schedule
-
Select the date using the Calendar editor and the Sub-Location from the drop-down list.
-
Click Search to refresh the window.
-
At the Crew Member section, a list of crew matching the search criterion is shown.
-
Select a crew name and click Calculate Hours to refresh the information shown.
-
At the Clock-In/Out Time section, the time logged for each task is shown.
-
In the Summary Worked Hours section, the past week hours worked/rested is shown.
-
If the crew work hours violates the ILO Compliance, a note is added to ILO Violations section.
-
See Table 4-1 description in Time Approval Method section.
Approving/Disapproving Crew Daily Roster
Figure 4-10 Crew Schedule Approval
-
Allow an approval of past dates schedule or a day before yesterday’s date
-
Only allow to approve yesterday’s schedule if the past value is defined in Parameter, Time Attendance, Daily Work Time Approval or schedule is approved by the crew
-
Prohibits approval for today or future crew schedules
-
At the Roster Daily window, go to the Schedule tab.
-
Select the date to approve using the calendar editor and click Search.
-
At the Crew Members section, select a crew name. Multiple selections is allowed.
-
Click Approve or Approve All (for multiple selections)at the ribbon bar.
-
At the confirmation prompt, select Yes to proceed.
-
After the schedule is approved, the Mgr Approved column is checked. If Crew Approved column is checked, this means the schedule is approved by the crew.
-
Click Unapprove or Unapprove All (for multiple selections) to reverse the approval.
-
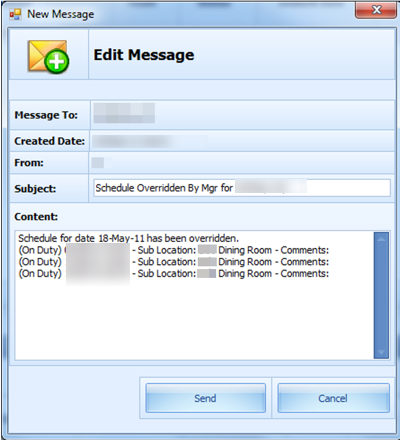
The system generates a notification message informing the crew of the schedule approval/unapproval
-
If the schedule is approved by the crew and changed by the manager, the crew is notified with a system generated message, indicating the reason for the change
Figure 4-11 Schedule Change Notification
-
When the manager approves a schedule that are yet approved by the crew, the system generates a warning message, notifying the crew of the change
-
When approving a non-compliant schedule, the system prompt you to enter a for Non-ILO Compliant Reason
-
If the approval is for a zero hours and are yet to be approve by the crew, the system prompts for a Zero Hours Recorded reason to be entered. This also applies to schedule change from worked hours to zero hours that has been approved by crew and manager
Editing Clock-In/Clock-Out Time
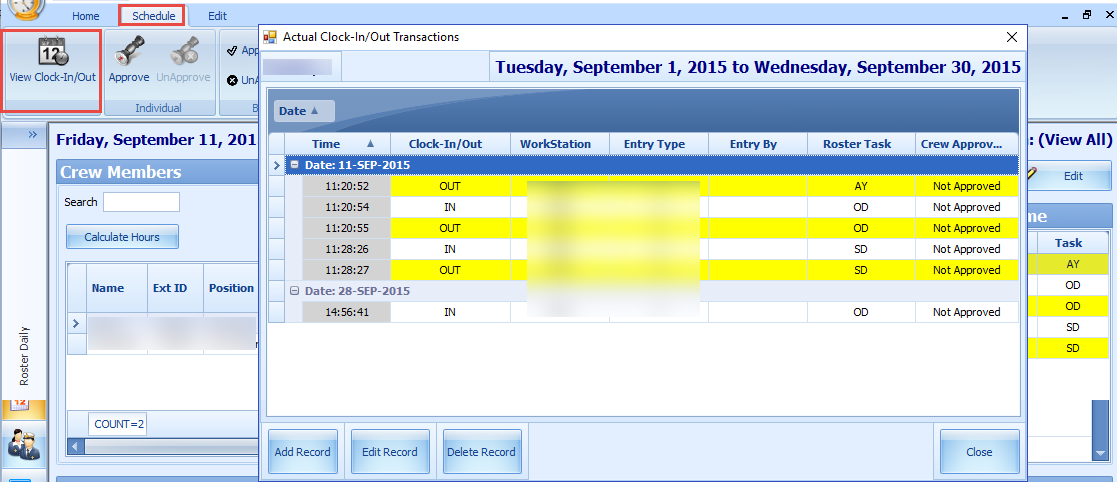
Figure 4-12 Clock-In/Clock-Out Transactions
-
Go to the Schedule tab and click the View Clock-In/Out button at the ribbon bar.
-
At the Actual Clock-In/Out Transactions window, select a record to edit.
-
Click the Edit Record button and alter the necessary details, and click Save.
-
You can also click Add Record to insert a new clock-in/out record. The "Entered by" column is empty if the record is added/edited by the crew. Otherwise it will display the user name.
-
Clicking the Delete Record prompts a confirmation window. Click Yes to proceed or No to return to previous window.
To manually add a record, see Manual Clock-In/Clock-Out.
Editing ILO Violations
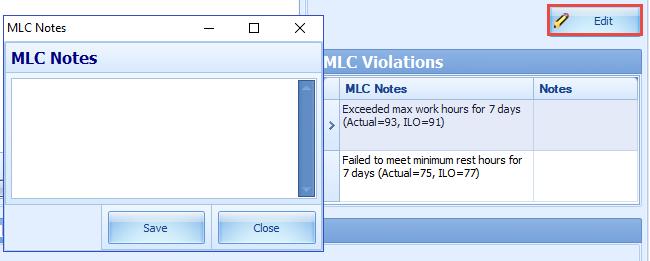
The edit function in ILO Violations enables the manager to view and input/edit the MLC notes.
To edit, click the Edit button and enter an MLC Notes in the MLC Notes window and click Save to update.
Figure 4-13 ILO Violations
View Changes Required
Figure 4-14 Crew List Requesting Work Hour Change
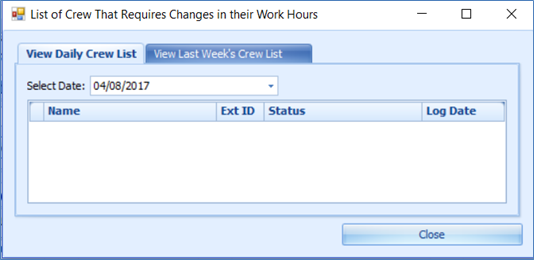
The View Changes Required function lists all changes requested by crew through the Time and Attendance Terminal and function is only accessible by the manager. A change request is generated when the crew presses the Changes Required during Clock-In/Out at the Time and Attendance Terminal, and crew member are to discuss the change with their respective manager. It displays the daily/weekly or both daily/weekly request depending on the value defined in Parameter Approved Weekly Hours and/or Parameter Approve Daily Worked Hours Clock-In/Out.
To access this function, click the View Changes Required button at the ribbon bar. The information displayed on this window is a view only. See Editing Clock-In/Clock-Out Time or Manual Clock-In/Clock-Out section on how to change the information.
Reset Pincode
To reset a pincode, see Reset Pincode in Time Approval Method.
Batch Clock-In/Clock-Out
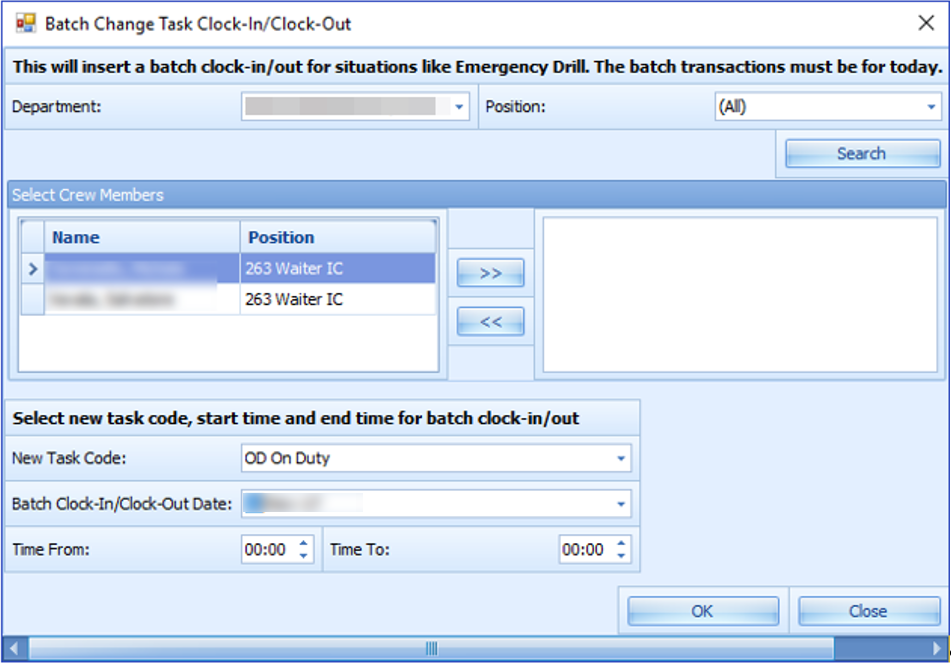
The Batch Clock-In/Out function allows the manager to perform a batch clock-in/out for the crew on selected task such as fire or emergency drill, based on the parameter set in Enable Batch ClockIn/Out. Usage of this function is only permissible to users granted with privilege access ‘#4686 - Batch Clock-In/Out’. You can only post the batch clock-in/out for task past the server time and on current system date.
-
At the main window, navigate to Schedule tab and click the Batch Clock-In/Out button from the ribbon bar.
-
At the Batch Change Task Clock-In/Out window, select the Department and Position from the drop-down list, and click Search.
Figure 4-15 Batch Clock-In/Out Task
-
At the Select Crew Members section, a list of crew matching the selection is shown. Select the names and click the double right arrow.
-
Select the New Task Code, Batch Clock-In/Out Data and Time range from the drop-down list.
-
Click OK to post the clock-in/out.
-
For crews whose last transaction was a clock-in, the system perform
-
Clock-out with the task code that corresponds with the previous clock-in.
-
Clock-in with the specified task code.
-
Clock-out with the specified task code.
-
Clock-in with the task code that corresponds with (i) and the time is 1 minute after the batch clock out time.
-
-
For crews whose last transaction is a clock-out, the system perform
-
clock-in with the specified task code.
-
clock-out with the specified task code.
-
Manual Clock-In/Clock-Out
You can manually enter a clock in/out in the In Clock In/Out mode. To access this function, go to Roster Daily, Crew Members screen, Location (View All) section.
-
Click New at the Location (View All) section.
-
At the Add Record window, select the Time, Clock-In/Out and Roster Task from the drop-down list, and click Save. The manually added Clock-In/Out time are classified as “M” type.
-
The system prompts a warning message when a manual clock-in/out is entered. The warning message defers, depending on the previous activity log. The system does not prevent an entry from being inserted or overrides the previous entry. We strongly recommend that you read the warning prompt before click the OK button.