5 Crew Overview
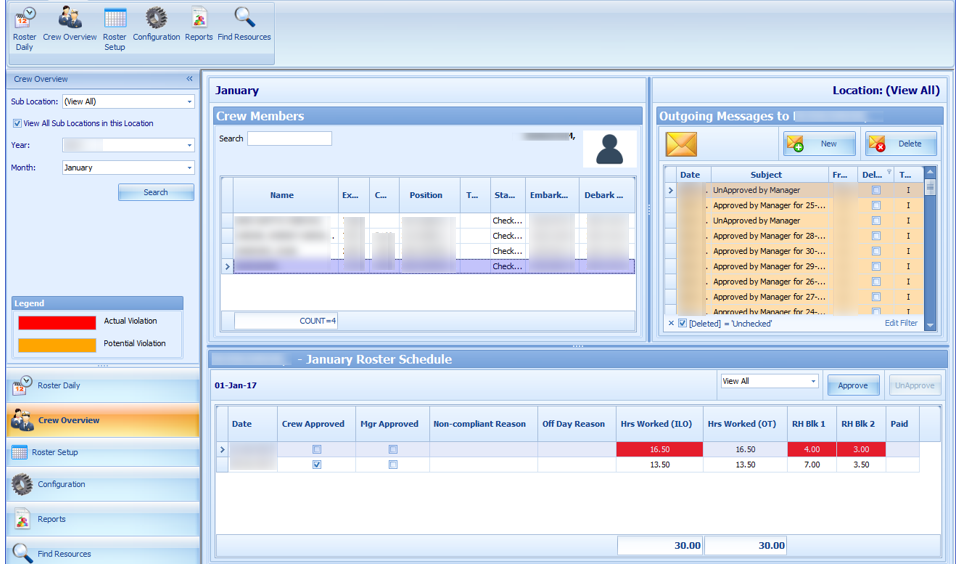
The Crew Overview window displays the crew member’s information, messages for the crew and also the crew roster schedule.
Time Approval Method in Crew Overview
Crew Members Search
Figure 5-1 Crew Overview in Time Approval Method
-
At the Crew Members Overview pane, select the Sub-Location, Year and Month then click Search.
-
At the Crew Members section, select the crew to display.
-
Enter either the crew Last name or external ID in the Search field to narrow down the search.
Roster Schedule
The Roster Schedule displays the crew monthly roster, enabling approval or disapproval of schedules. Creating and modifying of schedule is allowed in this function
Figure 5-2 Roster Schedule in Time Approval Method

Below are the available fields in Crew Overview, Roster Schedule.
Table 5-1 Roster Schedule Field Description
| Field Name | Description |
|---|---|
|
Date |
Displays the scheduled date |
|
Crew Approved |
Schedules approved by Crew at T&A Terminal |
|
Mgr Approved |
Schedule approved by Manager |
|
MLC Violation |
Hours Worked (MLC). The label is configurable in Administration module, System Setup, Labels Setup, TATE17. |
|
ILO Violation |
The default label is ILO. The label is configurable in Administration, System Setup, Labels Setup, TATE17. |
|
Non-complaint Reason |
Approval reason for non-compliant schedule. |
|
Off Day Reason |
Approval reason for zero hours schedule. |
|
Hrs Worked (ILO) |
Total hours scheduled per day. The column is highlighted if the total hours scheduled exceeds the value set in Parameter, “Time Attendance”, ILO Maximum Work Hours in 24-hour period”. |
|
Hrs Worked (OT) |
Total hours scheduled for work codes that are flagged with “Include into Working hours”. |
|
Rest Hour Block 1 |
The biggest rest hour block. The column is highlighted as a violation if the total rest hour block is less than the value set in Parameter, “ILO Minimum Block Rest Hours in 24-hour period”. Available in Time Approval Mode. |
|
Rest Hour Block 2 |
The second biggest rest hour block. The column is highlighted as a violation if the total rest hours per day is less than the value set in Parameter, “ILO Minimum Block Rest Hours in 24-hour period”. Available in Time Approval Mode. |
|
Paid |
In Time Approval mode, this is column is called Contracted. It indicates whether the worked hours have been paid in Payroll. |
Creating Roster Schedule
-
Search for the crew record.
-
At the Roster Schedule section, double-click the blank field to open the Time Slot window.
-
Select a new Time Slot and select a Roster Task and enter all necessary for that time slot.
-
Click Save to save the information and Close to exit the window and add the record to the Roster Schedule section.
Messages
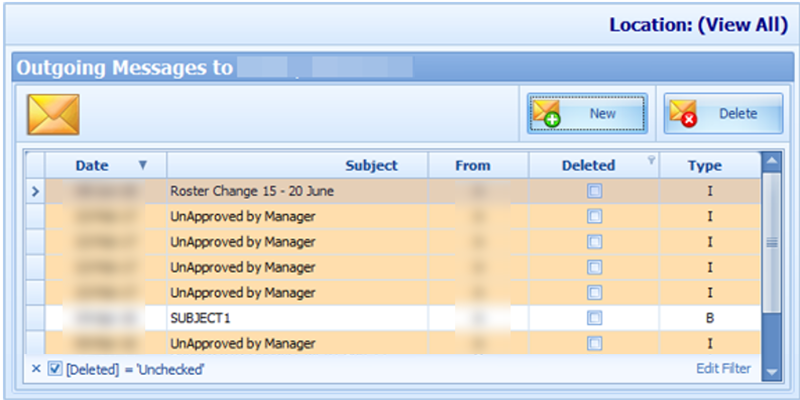
The Messages section displays all the crew messages whether it is read or unread. By default, the [Delete] filter is checked and deleted message are excluded from the list. To view the deleted messages, remove the filter.
-
I – Individual Message
-
B – Broadcast Message
Figure 5-3 Crew Messages
Creating a Message
-
At the Message section of the Crew Overview, click New or go to the Message tab and select New from the ribbon bar.
-
Enter the Subject, Priority Level and content of the message.
-
Click Send to send the message.
-
Click the Delete button to delete the selected message. You cannot delete messages created by other users, and deletion is only allowed if you are granted with privilege right #4472.
Creating a Broadcast Message
-
At the Message tab at the ribbon bar, select Broadcast.
-
Click the “+” sign at the Message To field to expand the Crew selection.
Figure 5-4 New Broadcast Message
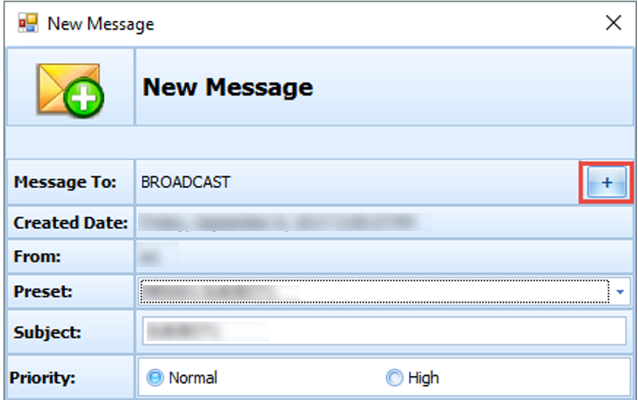
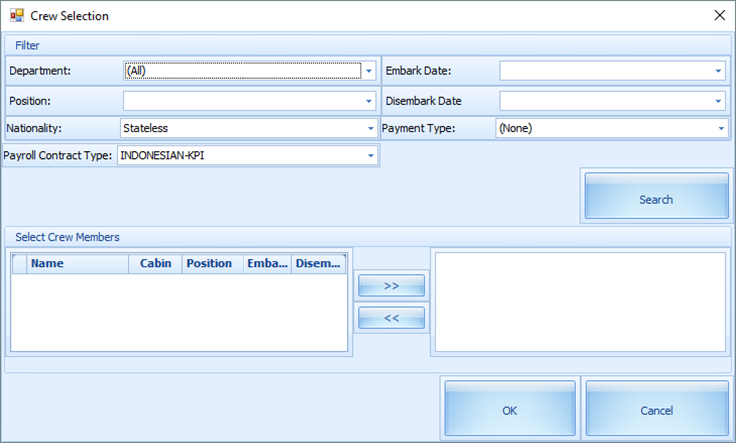
Figure 5-5 Broadcast Message Selection
-
Select the Department, Position, Embark Date, and other required information from the drop-down list, and click Search.
-
Crew matching the criteria is listed in the Select Crew Members section. Select the crew name(s) and then click the right arrow.
-
Click OK to close the window and return to the New Message window.
-
At the New Message window, you can select a Preset message or enter your own, by inserting the Subject Line and message content.
-
Click Send to broadcast the message. The messages will prompt when the Recipient logged in to the T&A Terminal.
Recalling Message Broadcasted
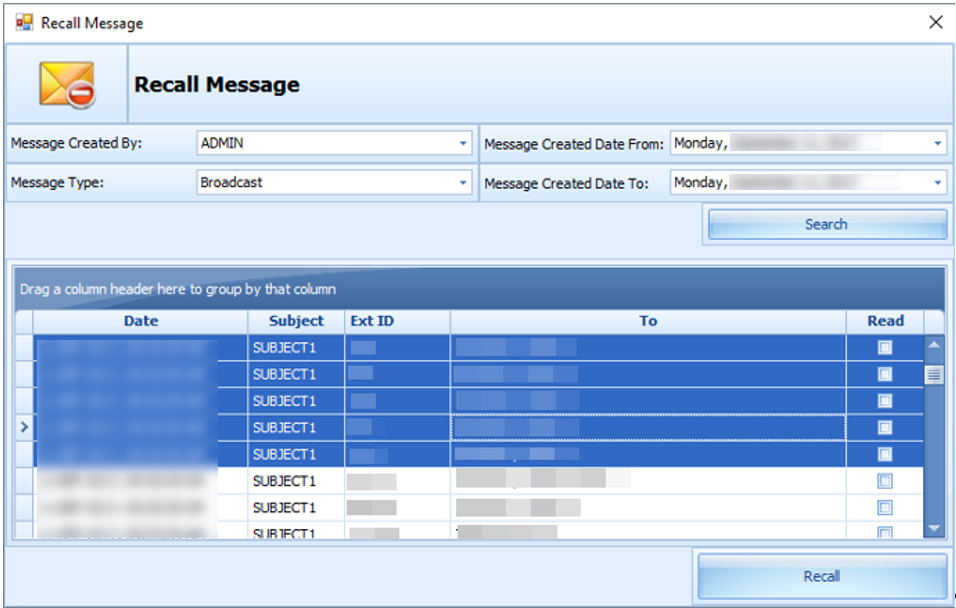
You may recall messages that are sent accidentally. However, you cannot recall messages that are read.
Figure 5-6 Recall Message Form
-
Click the Recall button at the ribbon bar.
-
At the Recall Message window, select the Message Created By, Message Type, and Message Create Date From/To from the drop-down list, and click Search.
-
Select the message(s) to recall and then click the Recall button.
-
At the confirmation prompt, click Yes to confirm the message recall.
Clock-In/Clock-Out Method in Crew Overview
The function to search for the crew members are the same as the Time Approval Method. See Time Approval Method Field Definition Table section.
Roster Schedule
The Roster Schedule function in Clock-In/Out mode is relatively similar to the Time Approval Method and has lesser fields in the grid.
For more information, see Table 5-1
Creating Roster Schedule
-
Search for the crew record.
-
Select the crew name from the Crew Members section.
-
Click the View Clock In/Out button at the Schedule tab to open the Actual Clock-In/Out Transactions window. See Clock-In/Clock-Out
-
Select Add Record and enter all required information in the Add Record window.
-
Click Save to save the information and then Close to exit the window. This adds the record to the Roster Schedule section.
Messages
The Messages function is same as the Time Approval Method. For more information, see Time Approval Method in Crew Overview
Find Resources
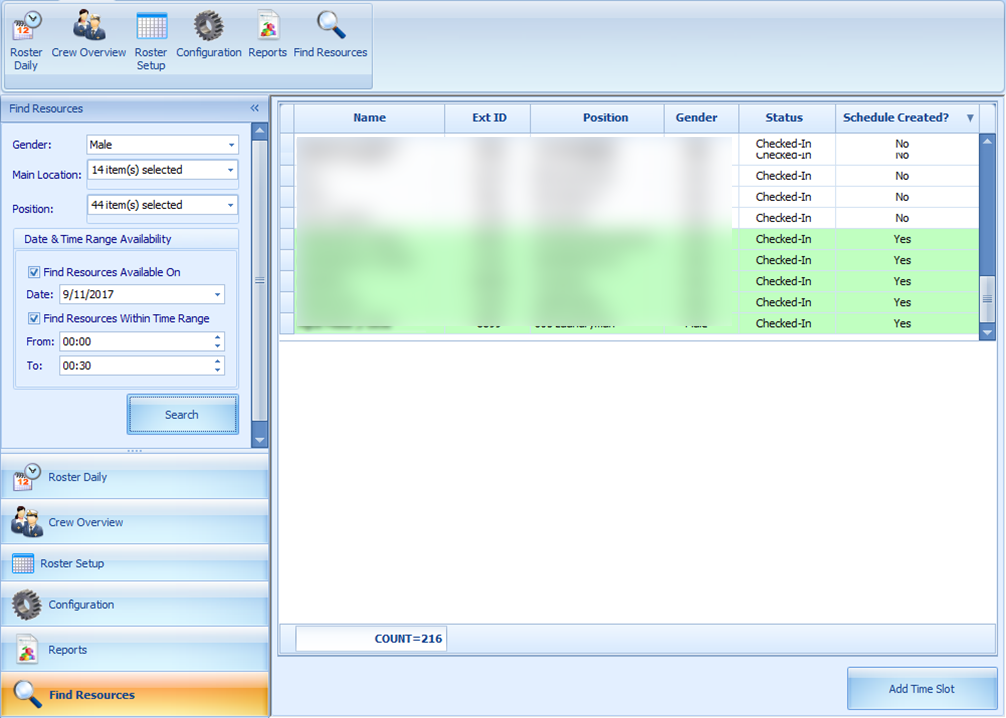
Figure 5-7 Find Resources Function
-
Click Find Resources from the ribbon bar.
-
Select the Gender, Location, Position, and the Date/Time Range Availability from the drop-down list, and click Search.
-
Results shown in the grid are non-violating ILO hours. Select the name of the crew from the result grid and then click the Add Time Slot. Note that you are only allowed to add time slot to the crew that has a schedule created.
-
At the Add Time Slot window, select the Roster Task from the drop-down list and then click OK to add.
Time Zone Change
The Ship’s clock is reset when they travel across different time zones. In order to accurately calculate the crew work hours and fulfill ILO Regulations, the time zone change must be set up. These time zones are set up in the Administration module.
-
Log in to Administration module, System Setup, Timezone Change Setup.
-
At the Timezone Change Setup window, right-click and select Add New.
-
Enter the Date, Time, Hours Zone, and Remarks in the respective field, and then click OK to save.
-
Total worked hours will recalculate automatically for rosters that falls within the time zone change when you navigate between windows.
With the time zone set up, work hours are recalculated and the differences is reflected in T&A module when the Roster Daily has a start/end time falls between the time zone changes. For example, on 13th October at 02:00 hours, the time zone changed and crew worked from 00:00 to 06:00 hours. Therefore the total worked hours shown is 8 hours, as illustrated in below figure
Figure 5-8 Roster Daily Schedule for Time Zone Change
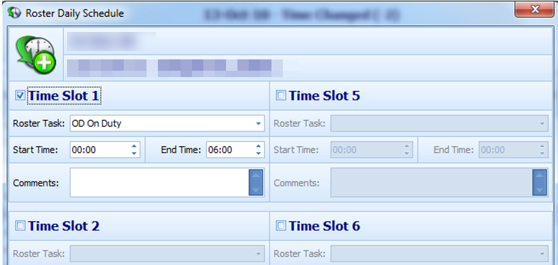
Figure 5-9 Recalculated Daily Hours in Time Zone Change
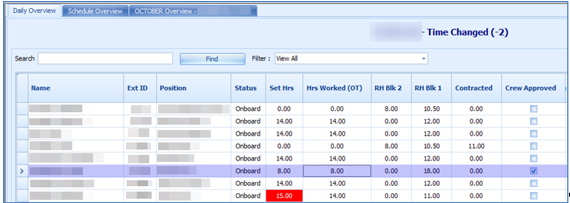
The above figure shows the recalculated “Daily Hours” of schedule that falls on a changed time zone.
At the T&A Terminal, the total hours calculated under the Approved Worked hours screen shows an 8 hours work, even though the start time is 00:00 and end time is 06:00.
OHC Timeattendancecalc
An interface was created to facilitate the calculation of total worked/rest hours separately from T&A Terminal. This interface starts and run in the background.
The recurring calculation process by X minutes is based on the value entered in Parameter, “IFC Time AttendanceCalc process every X minutes” and does not trigger a recalculation until the earlier calculation completes. At the end of the process, a log file is saves in C:\Users\Public\Documents\Oracle Hospitality Cruise\IFCTimeAttendanceCalc_yyyymmdd.txt.