6 Time and Attendance Terminal Module
The Time and Attendance Terminal (T&A Terminal) module comprises functions used by crew such as clock-in/clock-out from their daily task, approve weekly worked hours, view weekly roster, request roster change, change pin code and many more.
Parameters
See Parameters section for its usage and control.
Login to T&A Terminal
A crew can log in to the T&A Terminal by swiping the crew card or enter the crew ID, followed by a pin code. One can obtain the PIN Code from Edit Crew, Reservation details, Pin code.
-
At the T&A Terminal, swipe the crew card through the Magnetic Card Reader (MSR) attached to the terminal to log in.
-
Enter the Pin Code in the PIN Code field and then press Enter. The system does not prompt an error if the Pin Code entered is incorrect.
-
Pressing the ESC key resets the entries.
-
Alternatively, you can also enter the Crew ID in the Enter Crew ID field, followed by the Pin Code and press Enter.
-
The system prompts for a pin code to be created if the crew account does not have a pin code. Enter the Crew ID, New PIN Code and Confirm PIN Code then press Create. Use the CLR to clear the entry or BK to for backspace.
-
You are required to re-log in after the PIN Code is changed successfully.
No Pin Code Detected
The PIN Code length is configurable in Parameter “General”,”Pin Code Length”, and it prompts an error message if the PIN Code entered does not meet the requirement set in this parameter.
Crew Messages
After a successful log in and if there are unread messages, the message will show up on screen. Press Mark As Read to close and go to the next message or Delete Message to delete the current message.
Main Menu
Upon a successful log in, you will have access to functions available in the T&A Terminal. The function listed on the Main Menu may vary depending on the mode set in parameter, “Time Attendance”,”Use Clock-In/Clock-out”.
See below table for a list of functions available in each mode.
Table 6-1 T&A Terminal Functions
| Time Approval Mode | Clock-In/Clock-Out Mode |
|---|---|
|
Approved Worked Hours View My Schedule View My Messages View My Account View My Upcoming Drills Approve My Weekly Hours Change Pin More Info Logout Exit Terminal |
Clock In Clock Out Change Task Manual Clock In/Out View My Schedule View My Messages View My Account View My Upcoming Drills View My Daily Hours View Current Week Hours Approve My Daily Hours Approve My Weekly Hours Change Pin More Info Logout Exit Terminal |
T&A Terminal -Time Approval Mode
Approved Worked Hours
All crews must approve their previous day’s schedule daily, before the approval cut off time defined in parameter “Time Attendance”, “Daily Work Time Approval”. For example, the parameter value is set at 1000, which means the cut off approval time is 10:00 am daily. Therefore, when a crew who log in after 10:00am they cannot modify or approve his/her schedule.
Figure 6-1 Worked Hours Approval
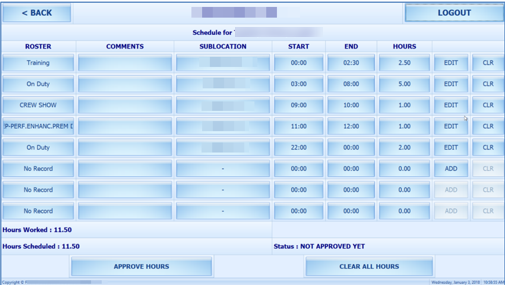
Table 6-2 Field Definition of Approved Worked Hours Screen
| Field name | Description |
|---|---|
|
Hours Worked |
Indicates the total actual worked hours for the day. |
|
Hours Scheduled |
Indicates the total hours for the day scheduled by the manager. |
|
Status |
Indicates the status of the schedule. |
-
Press the Approve worked hours to show the previous day schedule.
-
To add or edit the existing time slot, press the ADD or Edit button.
-
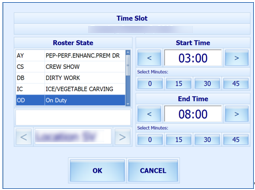
At the Time Slot screen, select a Roster State, the Start/End time and Sub-location. When selecting the time, use the left or right arrow button to decrease/increase the hours, and each slot is in 15 minutes block. You can use the arrow up/down keys on the keyboard to increment or decrement the minutes in block. Pressing any other keys will increment the time by a 15 minutes block.
Figure 6-2 Add Time Slot Window
-
Press OK to save and return to the previous screen.
-
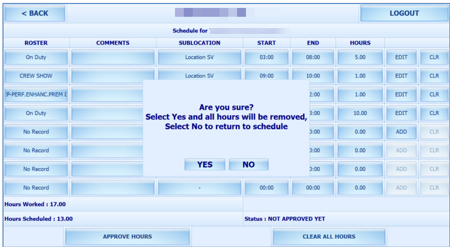
Pressing the Clear all Hours resets the daily roster.
Note:
When adding/editing the time slot through T&A Terminal:-
Overlapping of start/end time is not permitted
-
The system does not perform an ILO Compliance validation
Figure 6-3 Schedule Work Hours Window
-
-
At the Schedule Work Hours screen, press the Approve Hours to confirm or approve the worked hours.
Note:
Crew can modify the schedule prior to manager’s approval or log in before the specified work time approval. A schedule that is approved by crew can be modified by the manager at any time and not vice versa. Both the Approve Hours and Clear All Hours are dimmed after the schedule is approved by a manager.
Approve Weekly Hours
At the T&A Terminal crew are allowed to approve their weekly schedule if the parameter “Time Attendance”, “Approval Frequency is same day as server day” is set to 1. Once set, the system prompts the Weekly Schedule for your approval when you log in.
To approve the weekly schedule, press the Approve button. If a change is required, press the Change Required button to close the screen, and discuss the change with your manager.
Approving Zero Hours
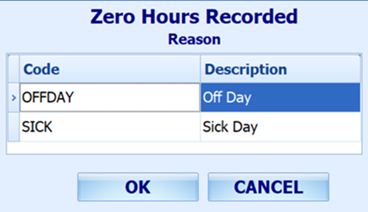
Figure 6-4 Zero Hours Reason
-
Once the Approve button is pressed and zero worked hours is detected, the system prompts an input screen for you to enter a reason.
-
Select the reason and then press the OK button to confirm.
View My Schedule
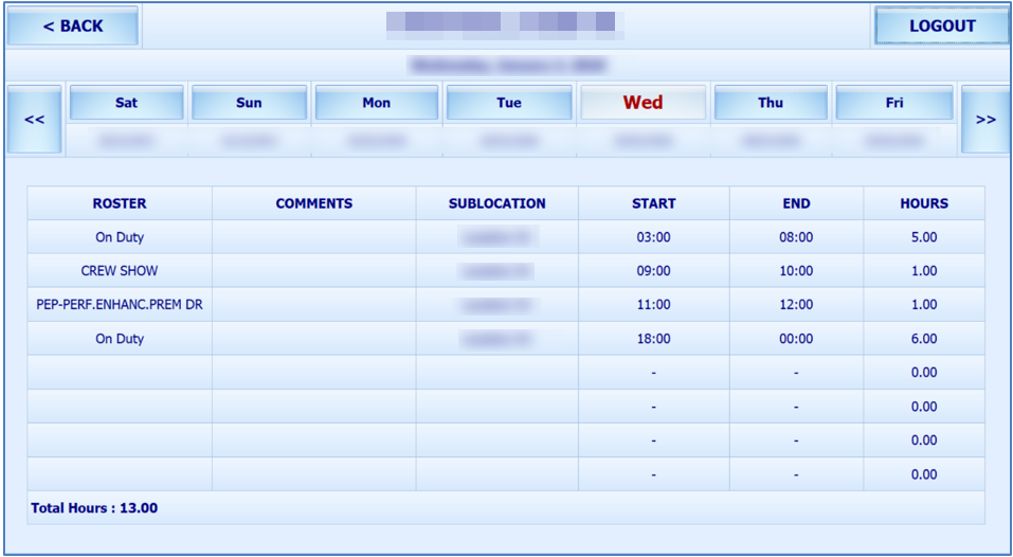
Figure 6-5 View My Schedule Window
-
Pressing the day displays the respective daily schedule.
-
Pressing the double left arrow shows the past two week’s schedule and double right arrow to view the next two week’s schedule.
View My Messages
The View My Messages displays all the crew’s messages, sorted by date in descending order. The number of days to display is set in the parameter “Time Attendance”, “Display Messages x days old at terminal”.
If the value is set to 14 days, all read/unread messages that are 14 days old is shown.
Figure 6-6 View My Message Window

-
To view the message details, select the message from the message list
-
To delete the message, press the Delete button from the message dialog box
-
To exit the Detail Message screen, press the Close button. Read messages are shown on the message grid and viewable unless they are outside the number of days defined
View My Account
View My Account enables you to view the previous or current cruise posting, and the default display is the current cruise posting.
Approve Onboard Charges
It is compulsory for crew that opt to settle their invoices through payroll deduction set in Payroll module, Crew, Edit Details, Contract Type/Pay Group/Pay Position tab to approve any onboard charges.
-
Payroll companies has “Deduct Folio” and “Invoice Payment Receiving” enabled
-
Settlement department setup is similar to Payroll Companies – Onboard Account Department
-
Crew payroll contract has “Deduct Folio” enabled
The system sends a message informing the crew of the onboard charges that requires an approval and enables the Approve button in the View My Account screen.
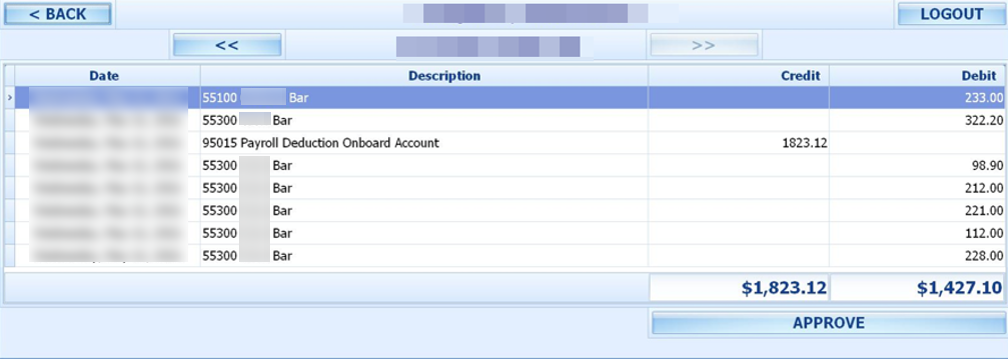
Figure 6-7 Approve Onboard Charges Window
-
From the View My Account screen, select a transaction to approve. Multiple selection is not allowed.
-
Press the Approve button. Once approved, the Approve button will change to Already Approved.
-
If there are new settlements in the crew invoice, another approval is required.
Approve My Weekly Hours
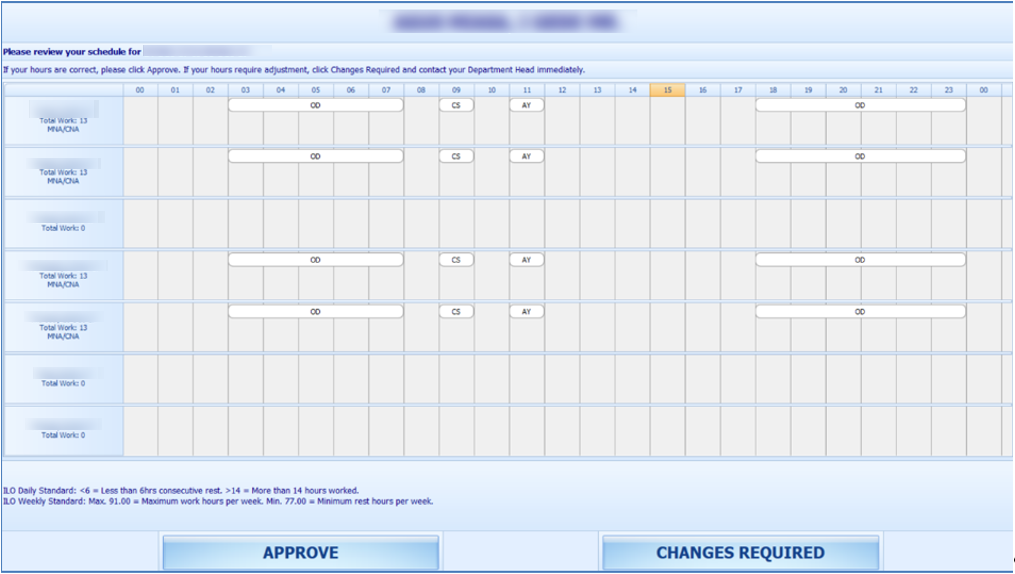
Approve My Weekly Hours enables you to approve the roster on weekly basis and the function require the following parameter: “Time Attendance”, “Approve Weekly Hours” set to 1 and “Time Attendance”, “Approval Frequency” is set to the same day as the server day. The Approve My Weekly Hours screen pops up whenever you log in to the terminal, if there are unapproved weekly hours.
Figure 6-8 Approve My Weekly Hours
-
Total Work: The total hours worked
-
Total Rest: The total rest hour block 1
-
MNA: Schedule not yet approved by Manager
-
CNA: Schedule not yet approve by Crew
-
CHG: Changes in schedules
When the Approve My Weekly Hours is pressed, the system always shows the last week’s schedule.
-
Approve: Approves the week’s schedules
-
Changes Required: Trigger a change request notification to the Department Head for the week schedule to be changed
View My Upcoming Drills
The Safety Drills assigned to you in the Safety Drill module is also viewable from the T&A Terminal. To view the drill assignment, press the View My Upcoming Drills from the menu option.
Changing PIN Code
The Change Pin Code function changes your log in PIN for the T&A Terminal access.
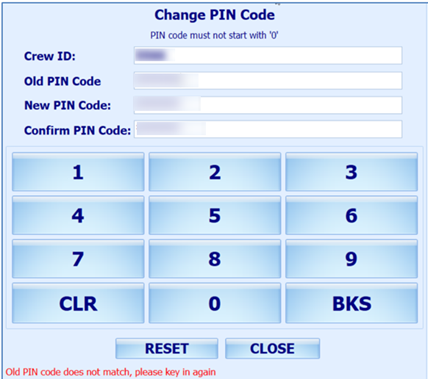
Figure 6-9 Change PIN Code
-
Press the Change PIN from the menu option.
-
Enter the required information. Use the following keys to navigate.
-
CLR: Clears the field input value
-
BKS: For backspace
-
RESET: Changes the PIN code
-
CLOSE: Cancels the PIN code change
-
-
The system prompts a PIN code change successful or a warning if,
-
The PIN code length does not match the value set in parameter “General”, “PIN Code Length”.
-
Old PIN code entered is incorrect.
-
Missing information on the required fields.
-
More Info
More Info allows you to browse the internet from this window. This function is enabled by setting the parameter value “Enable More Info” to “1”.
If the parameter is enabled, pressing the More Info button will start the Internet browser and direct you to the website defined parameter “Internet Browser Parameters”
To exit the browser, press the Close button.
Clock-In/Clock-Out Mode in T&A Terminal
The Clock In / Clock Out mode has added functionality apart from the functions listed in Time Approval mode, and it is listed below.
Clock-In
Clock In and Clock Out records the assigned task and the work hours so that employee does not violate the total hours defined by the International Labour Organization (ILO).
-
Press the Clock In button from the Main Menu to clock in.
-
The Clock In option is disabled if you have not clock-out from previous task
-
If the PAR “Use Clock In/Out” option is enabled, the Clock Out and Change Task options will be disabled
-
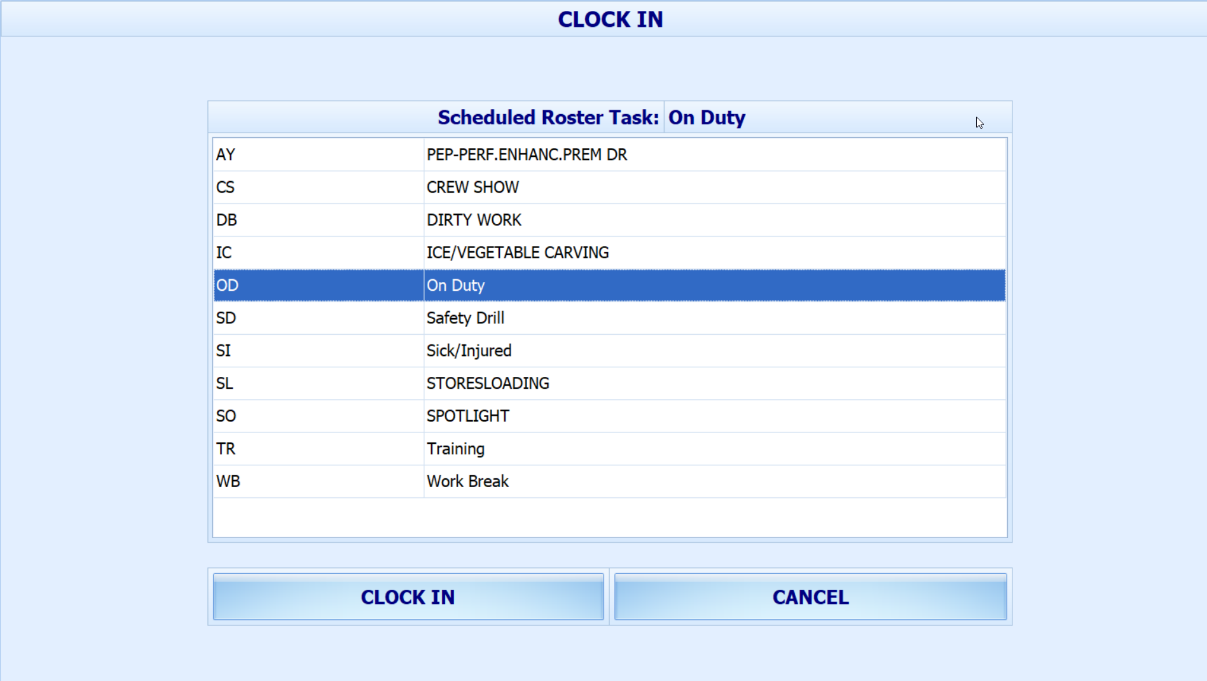
The system checks the clocked in time against the grace period defined in parameter “Grace Period After Clock In”. If the Clock In time is within the grace period, the system defaults to the Scheduled Roster Task. Otherwise, it defaults to the top roster task on the list. For example, the grace period is 15 minutes and the scheduled roster is at 12:00, and crew clock in at 12:07. The system defaults the Scheduled Roster Task as On Duty
-
-
Select the Schedule Roster Task and press Clock In. The clock in task and time are shown on the window.
Figure 6-10 Schedule Roster Task
-
Your supervisor can view this information from "View Clock-In/ Out" window in Time Attendance Module.
Clock-Out
At the end of the shift, you are required to clock out from the assigned duty.
Press the Clock Out button at the Main menu to clock out the roster schedules. The clocked out task, date, and time is automatically shown on the screen.
Change Task
The Change Task feature is enabled only when there is a clock in task. Pressing the Change Task button automatically clocks out the previous task and register the newly selected task into the system with date and time shown underneath the name.
Manual Clock-In/Out
Manual Clock In/Out allows you to manually clock in/out from the system.
-
At the Main Menu option, press the Manual Clock In/Out.
-
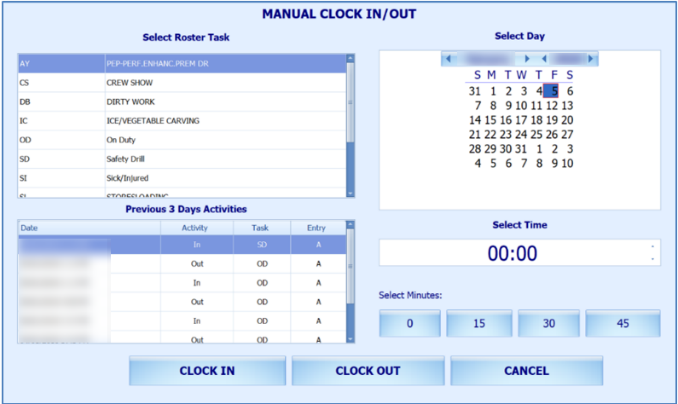
Select the Roster task, day and time.
-
Press Clock In or Clock Out to manually add the record. The past three days activities will be shown on screen.
Figure 6-11 Manual Clock-In/Out
Approve My Daily Hours
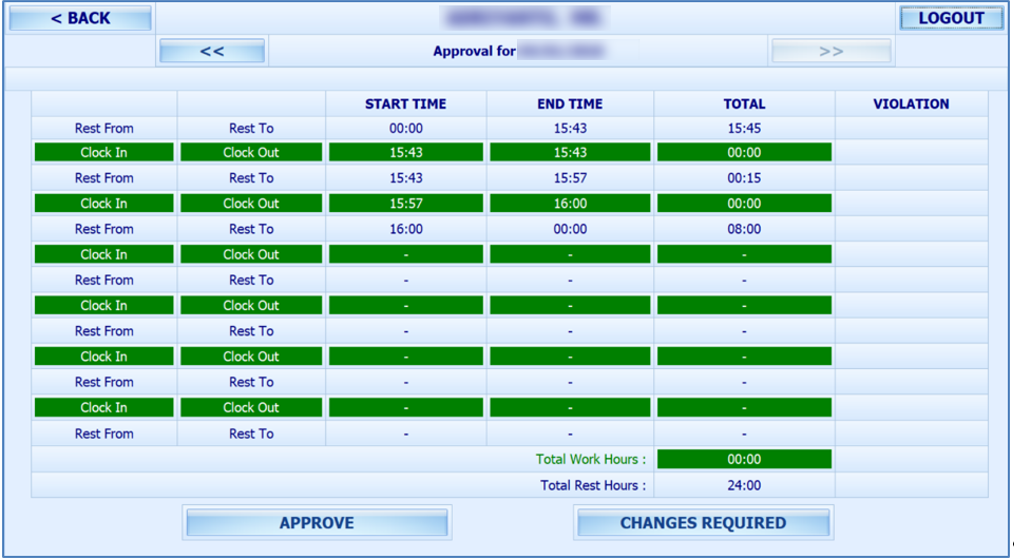
The Approve My Daily Hours allows the crew to request for a change to his/her approval status x days past the system date, depending on the days defined in the parameter “Past x Days Crew Can Request Approval Change”.
Figure 6-12 Approve My Daily Hours
View My Daily Hours
The View My Daily Hours function displays the crew’s current day’s activities and this function is enabled/disabled using parameter “View Daily Hours Clock In/Out”. The information displayed on this window is the same as Approve My Daily Hours.
View My Current Week Hours
This function displays the current week’s worked hours and is enabled/disabled by the parameter “View Current Weekly Hours Clock-In/Out”.