The Adjustment framework is a capability that is used to modify, as per business requirements, or correct issues, that have been found by various OFSAA components, in available data within FSDF. The adjustments are created when an issue and action are created. In turn, they are then used to track and report any operation that is performed on the data. All adjustments that are created must be executed through a batch.
The Data Adjustment process is illustrated in the following diagram:
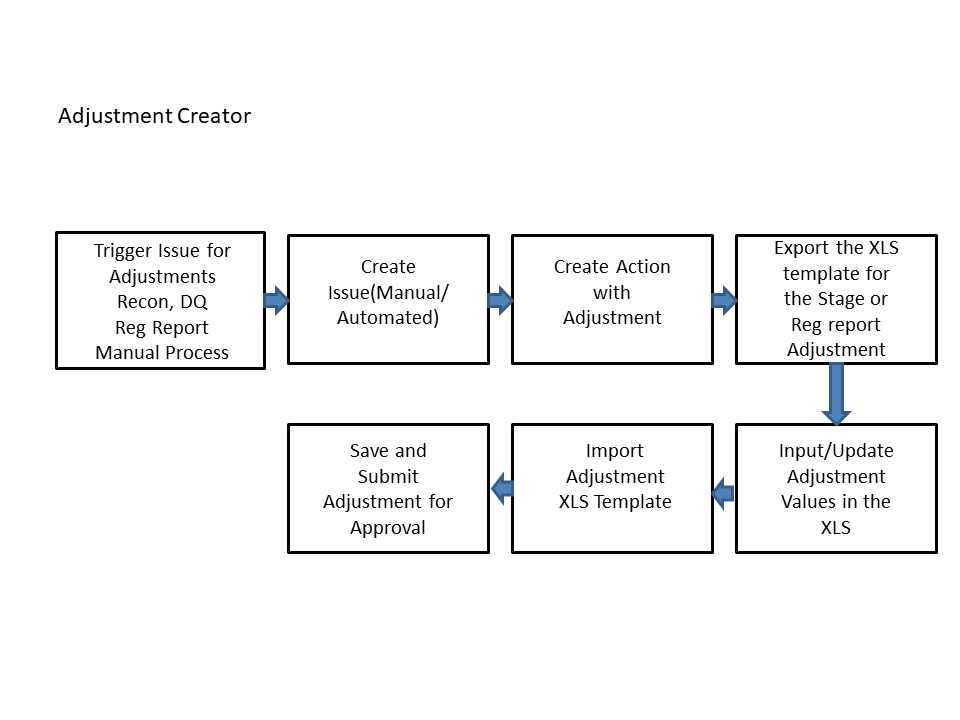
For an Adjustment Creator:
Figure 44: Data Adjustment Process
1. The issue is triggered for adjustments.
2. An issue is created.
3. An action is created with the adjustment.
4. The adjustment is configured and the template for the stage or the regulatory reporting template is exported.
5. The Excel template is updated with the required inputs.
6. The adjustment is then imported.
7. The adjustment is saved and submitted for approval to the Data Adjustment Approver.
For an Adjustment Approver:
Figure 45: Data Adjustment Process
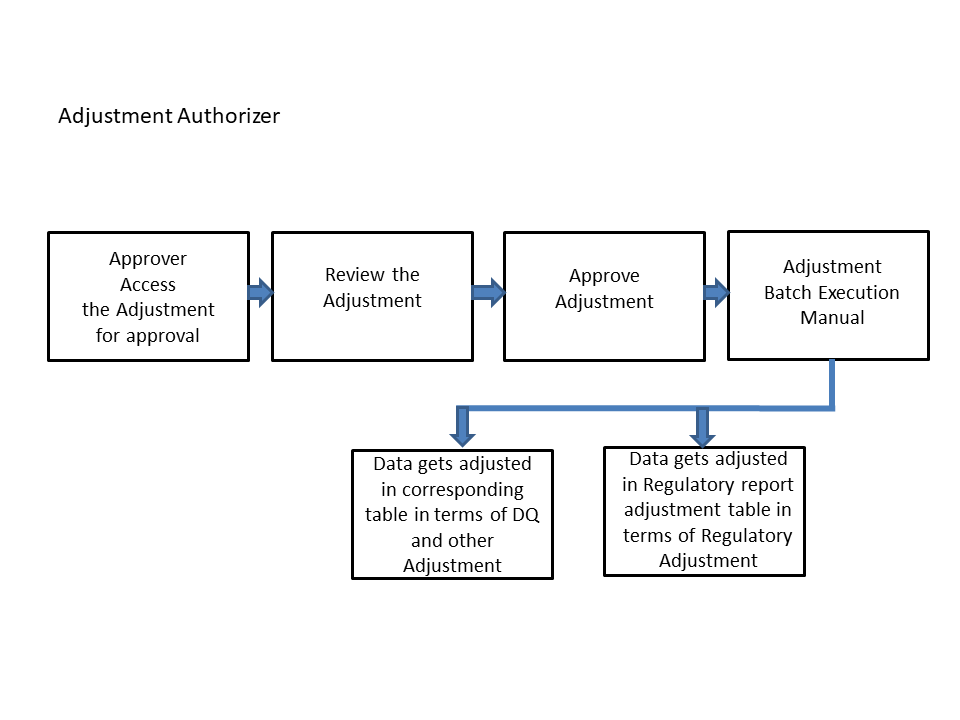
8. The data adjustment Approver accesses the saved adjustment.
9. The data adjustment is reviewed.
10. The data adjustment is approved.
11. The batch is executed manually for the data adjustment.
12. If the data adjustment type is regulatory reporting, then the data is adjusted in the regulatory report adjustment table as per the data present in the regulatory reporting data adjustment.
13. OR
14. In the case of other data adjustment types, the data is adjusted in the corresponding tables as per the data in the data adjustment.
Types of Data Adjustments
You can create an issue for various reasons; lack of data
accuracy, unavailable data, etc. Issues for these scenarios can be created
for Controls or Key Indicators. After the issue is created, appropriate
actions must be created with the associated Adjustment rules to resolve
problems in the data. The adjustment process does not modify the data
received from the source system; instead, it creates a new version of
the record that is based on the load run ID. This ensures that FSDF always
contains the original and all adjusted copies of the data for auditing
and record keeping.
The supported action types are as follows:
· Data Adjustments – DQ Errors
When a predefined Data Quality rule associated with a field in which control has breached the threshold occurs, a system-generated issue is created to highlight the data quality failure.
Reconciliation Adjustments
The adjustments to resolve reconciliation failures can be set in a system that contains the DG and Reconciliation framework within the same Infodom. When a predefined Reconciliation rule fails, a system-generated issue is created. After the issue is updated, you can create an action.
Data Adjustment – Others
These adjustments are set for known data issues for a set period than for scheduled executions or checks. An example of this scenario: a legacy source system that is unable to perform a transformation required by OFSAA due to cost or any other reasons. It is easier to adjust the data within OFSAA rather than in the source system.
· Data Adjustments – Regulatory Reporting
You can set the adjustments to perform at the level of a reporting attribute than within the staging area. This adjustment enables you to create last-mile data corrections at the MDRM level.
Others
This is used for any other online or offline action that is to be performed to resolve a specific issue. These actions are created to maintain and track all efforts made to resolve an issue. They enable you to follow an issue to its closure, for reporting purposes, etc. This action type has no impact on adjustments.
NOTE |
These adjustments are only available for existing customer accounts or MDRM codes. |
The basic roles and the groups defined in the OFS DG application for Data Adjustment are:
Table 10: User Roles
User Role |
Group Code |
Group Description |
Role Code |
Creator |
ADJCREATGRP |
Adjustment Create |
ADJCREATOR |
ADJGRPCREATOR |
Adjustment Grp Creator |
ADJGRPCREA |
|
Approver |
ADJAPPGRP |
Adjustment Approver |
ADJAPPROVE |
ADJGRPAPPROVER |
Adjustment grp appr Group |
ADJGRPAPPR |
The actions that can be executed by specific user roles in the OFS DG application for Data Adjustment are:
Table 11: Actions Performed by Users
Action Performed |
User Role |
In the automated process, an Issue is generated by the system. |
Assigned to the Issue Owner. |
Creating Action for the system-generated Issue. |
By the Issue Owner. |
Creating Data Adjustment. |
By the Action Owner. |
Submitting Data Adjustment. |
By the Action Owner (must contain the Adjustment creator role). |
Data Adjustment Approval. |
By the Issue Owner (must contain the Adjustment approver role). |
NOTE |
You must follow the sequence of steps described in the following sections. |
The Issue Owner (Action Creator) may change ownership when required. The Issue Owner creates an Action of type Data Adjustment for this system-generated Issue and assigns it to the Action Owner. As a result, in Actions, the Data Adjustment grid appears. The Action Owner (Adjustment Creator) then creates the required Data Adjustment and makes data corrections for the failed Data Quality.
The Adjustment Creator submits Data Adjustment to the Adjustment Approver (Issue Owner). After the Issue Owner approves all the Data Adjustment definitions, the Data Adjustments are grouped in a Batch and executed at the level of that Issue. After the successful execution of these Data Adjustments, the Action Owners must mark the Action progress to 100% or mark the Action as completed.
NOTE |
For Regulatory Reporting before creating a Regulatory Reporting Data Adjustment, you can execute a KI assessment. |
· Set the N_lookup_value =’Y’ against v_lookup_code=’ PRE_POST_ADJ_AUDIT_LOG’ in the table fsi_dgs_configuration. This enables the View Adjustment Details in the Issue & Action screen, where you can view the pre and post-adjustment data.
· An Action must be created for the system-generated Issues. See section, Creating an Action for details.
The Action Owner is the Data Adjustment Creator. The Actions are of type Data Adjustment. Therefore, the Data Adjustment grid appears in this section.
NOTE |
If you have selected the Action Type as Others, then the Adjustments section does not appear. |
To create a Data Adjustment, follow these steps:
15. Log in to the application as the Action Owner (Data Adjustment Creator).
16. From Financial Services Data Governance for US Regulatory Reporting window navigate to Controls.
17. Select a stage table and then click  View Controls to view the details.
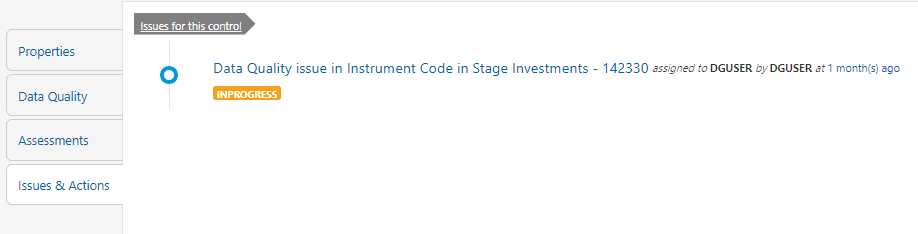
18. Click Issues & Actions.
19. In the Issues for this
control, click the required system-generated Issue ID.
The Actions section is displayed.
Figure 46: Issues & Actions
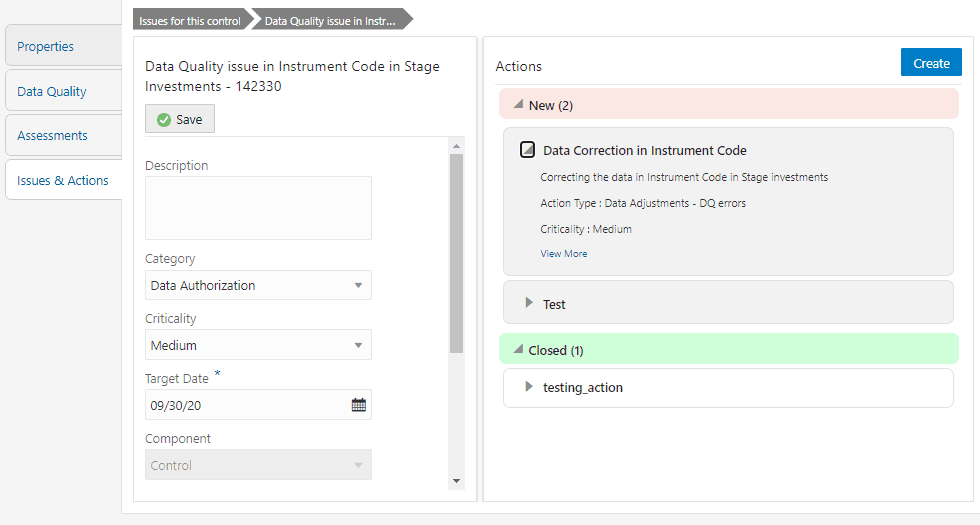
20. 
21. In the Actions, select the required issue to View
More details.
The Data Adjustments section is displayed.
Figure 47: Issues & Actions
22. 
23. In the Data Adjustments
section, click Create.
The Adjustment Rule Details window is displayed.
Figure 48: Issues & Actions
24. 
25. Depending on the type of adjustment, create a data
adjustment.
For details see, sections:
a. Create a Data Adjustment - DQ Errors based Data Adjustment
b. Create a Data Adjustment - Business based Adjustment
c. Create a Data Adjustment - Regulatory Reporting based Adjustment
To create a data adjustment for the action type Data Adjustments - Data Quality Errors, follow these steps:
26. From the Issues & Actions page, under an action created, click View More.
27. On the Data Adjustment page, click Create.
The Adjustments Rule Details window is displayed.
28. In the Adjustment Rule Details window, enter values in the Name and Description fields.
Figure 49: Issues & Actions
29. 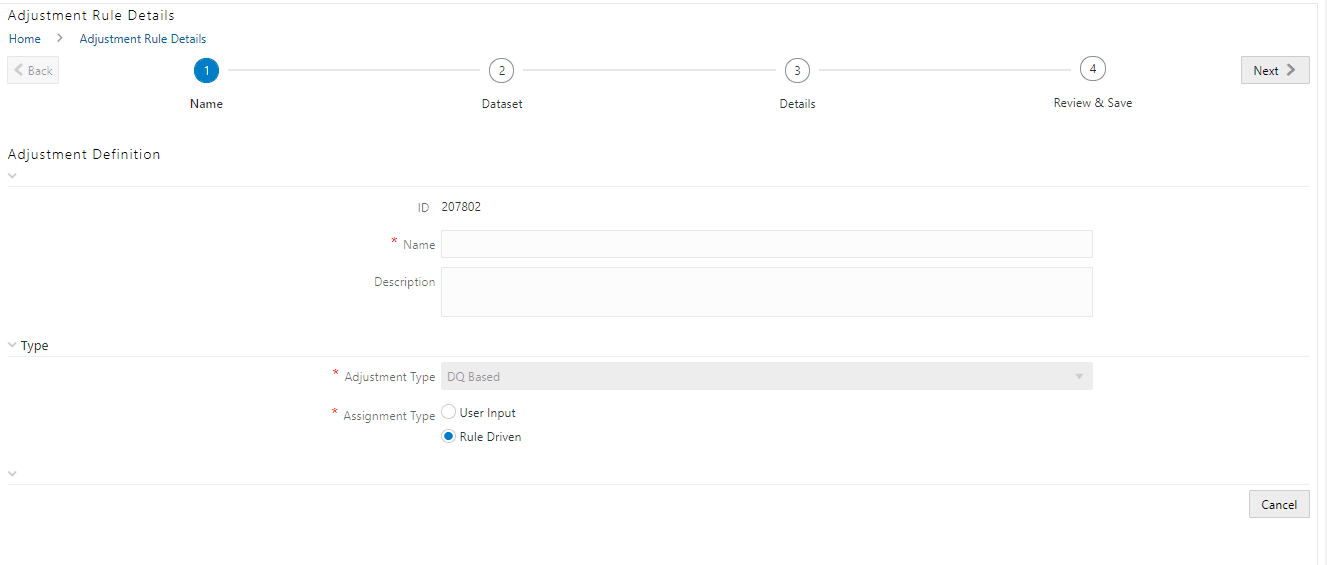
30. Select the Assignment Type as either User Input or Rule Driven.
31. For User Input:
d. In the Adjustment Entity drop-down, select a value.
e. In the Select Filter section, enter values in the following fields:
Table 12: Select Filter Fields
Field |
Description |
Filter Type |
Select a value from the drop-down box. |
Filter Attribute |
Select a value from the drop-down box. |
Hierarchy Name |
Select a value from the drop-down box. |
Hierarchy Values |
Select a value from the drop-down box. |
Hierarchy |
Select a value from the drop-down box. |
f. Click Next.
g. Select Add Expression.
h. In the Add Expression window, in the Line Item, Business Processor drop-downs, select the required values.
i. In the Expression field, enter the expression, and then select OK.
j. Click Next, and then click Save.
k. In the Manual Data section, select Export.
l. In the Export window, in the MIS Date section, select a date for which the data is available, and then click Export.
m. Save the Excel file to your system.
n. Enter values in the required rows and then save the Excel.
o. In the Manual Data section, in the ID column, select the required ID and then click Import.
p. In the Import window, attach the Excel that you added data to, and then click Upload.
q. Click Import.
r. Click Submit if you want to send the Data Adjustment for approval or click Save.
32. For Rule Driven:
s. To go to the next section, click Next or click Dataset.
t. In the Select Data Quality
dropdown box, select the required Data Quality value.
This Data Adjustment is being created for this failed Data Quality.
u. Click Next.
v. Click Add Expression.
w. In the Add Expression window, enter values in the following fields:
Table 13: Add Expression Fields
Field |
Description |
String |
Select a value from the drop-down box. |
Date and Time |
Select a value from the drop-down box. |
Aggregate |
Select a value from the drop-down box. |
Others |
Select a value from the drop-down box. |
Mathematical |
Select a value from the drop-down box. |
Concatenation |
Select a value from the drop-down box. |
Mathematical operators |
Select a value from the drop-down box. |
Others |
Select a value from the drop-down box. |
Comparison |
Select a value from the drop-down box. |
Logical Operators |
Select a value from the drop-down box. |
Expression |
Enter an expression. |
x. Click OK.
y. Click Next.
z. In the Review and Save section, click Save.
The Data Adjustment for the action has been created.
To create a data adjustment for the action type Data Adjustments - Others, perform the following steps:
33. From the Issues & Actions page, under an action created, click View More.
34. On the Data Adjustment page, click Create. The Adjustments Rule Details window is displayed.
35. In the Adjustment Rule Details window, enter values in the Name and Description fields.
Figure 50: Adjustment Rule Details
36.
37. Select the Assignment Type as either User Input or Rule Driven.
38. For User Input:
aa. In the Adjustment Entity drop-down, select the entity or table for which the adjustment must be performed.
ab. In the Select Filter section, enter values in the following fields:
Table 14: Select Filter Fields
Field |
Description |
Filter Type |
Select a value from the drop-down box. |
Filter Attribute |
Select a value from the drop-down box. |
Hierarchy Name |
Select a value from the drop-down box. |
Hierarchy Values |
Select a value from the drop-down box. |
Hierarchy |
Select a value from the drop-down box. |
ac. Click Next.
ad. Select Add Attribute.
ae. In the Add Column window, in the Target Attribute drop-down, select a value and then click OK. The target attribute displays the columns based on the selected entity.
af. Click Next, and then click Save.
ag. In the Manual Data section, select Export.
ah. In the Export window, in the MIS Date section, select a date the entity has data, and then click Export.
ai. Save the Excel file to your system.
aj. Enter values in the specific columns as per the selected target attribute, and then save the Excel.
ak. In the Manual Data section, in the ID column, select the required ID and then click Import.
al. In the Import window, attach the Excel that you added data to, and then click Upload.
am. Click Import.
an. Click Submit if you want to send the Data Adjustment for approval, or click Save.
39. For Rule Driven:
ao. To go to the next section, click Next or click Dataset.
ap. In the Adjustment Entity, Filter Type, Filter Attribute, Hierarchy Name, and Hierarchy drop-down boxes, select a value.
aq. Click Next.
ar. Click Add Expression.
as. In the Add Expression window, enter values in the following fields:
Table 15: Add Expression Fields
Field |
Description |
Column |
Select a value from the drop-down box. |
String |
Select a value from the drop-down box. |
Date and Time |
Select a value from the drop-down box. |
Aggregate |
Select a value from the drop-down box. |
Others |
Select a value from the drop-down box. |
Mathematical |
Select a value from the drop-down box. |
Concatenation |
Select a value from the drop-down box. |
Mathematical operators |
Select a value from the drop-down box. |
Others |
Select a value from the drop-down box. |
Comparison |
Select a value from the drop-down box. |
Logical Operators |
Select a value from the drop-down box. |
Expression |
Enter an expression. |
at. Click OK.
au. Click Next.
av. In the Review and Save section, click Save.
The Data Adjustment for the action has been created.
To create a data adjustment for the action type Data Adjustments - Regulatory Reporting, perform the following steps:
NOTE |
You can create a data adjustment for a regulatory reporting-based adjustment, only if the actions are in a new status. |
40. From the Issues & Actions page, under an action created, click View More.
41. In the Data Adjustment page, click Create. The Adjustments Rule Details window is displayed.
42. In the Adjustment Rule Details window, enter values in the Name and Description fields.
Figure 51: Adjustment Rule Details
43.
44. Select the Assignment Type as either User Input or Rule Driven.
45. For User Input:
aw. In the Select Report section, in the Report and Schedule drop-downs, select the required report and schedule.
ax. Click Next.
ay. In the Data Update section, select Add Line Item.
az. In the Add Line Item window, in the Line Item drop-down, select a value, and then click OK.
ba. Click Next, and then click Save.
bb. In the Manual Data section, select Export.
bc. In the Export window, in the MIS Date section, select the date for which the assessment has been performed, and then click Export.
bd. Save the Excel file to your system.
be. Enter the adjustment amount in the column N_ADJUSTED_AMT, and then save the Excel.
bf. In the Manual Data section, in the Id column, select the required ID and then click Import.
bg. In the Import window, attach the Excel that you added data to, and then click Upload.
bh. Click Import.
bi. Click Submit if you want to send the Data Adjustment for approval or click Save.
46. For Rule Driven:
bj. To go to the next section, click Next or click Dataset.
bk. In the Adjustment Entity, Report, Schedule, and Dataset drop-down boxes select a value.
bl. Click Next.
bm. Click Add Expression.
bn. In the Add Expression window, enter values in the following fields:
Table 16: Add Expression Fields
Field |
Description |
Line Item |
Select a value from the drop-down box. |
Expression Type |
Select either Business Processor or Build Expression. |
Build Processor |
Select a value from the drop-down box. This field is only available if you selected the Expression type as Build Expression. |
Measure |
Select a value from the drop-down box. This field is only available if you selected the Expression type as Business Processor. |
Business Processor |
Select a value from the drop-down box. This field is only available if you selected the Expression type as Business Processor. |
Aggregate |
Select a value from the drop-down box. This field is only available if you selected the Expression type as Business Processor. |
Comparison |
Select a value from the drop-down box. This field is only available if you selected the Expression type as Business Processor. |
Logical Operators |
Select a value from the drop-down box. This field is only available if you selected the Expression type as Business Processor. |
Others |
Select a value from the drop-down box. This field is only available if you selected the Expression type as Business Processor. |
Date and Time |
Select a value from the drop-down box. This field is only available if you selected the Expression type as Business Processor. |
Mathematical |
Select a value from the drop-down box. This field is only available if you selected the Expression type as Business Processor. |
Others |
Select a value from the drop-down box. This field is only available if you selected the Expression type as Business Processor. |
String |
Select a value from the drop-down box. This field is only available if you selected the Expression type as Business Processor. |
Mathematical operators |
Select a value from the drop-down box. This field is only available if you selected the Expression type as Business Processor. |
Concatenation |
Select a value from the drop-down box. This field is only available if you selected the Expression type as Business Processor. |
Expression |
Enter an expression. |
47. Click OK.
48. Click Next.
49. In the Review and Save section, click Save. The Data Adjustment for the action is created.
NOTE |
These steps are only applicable if your adjustment is of the User Input type. |
In the Review & Save tab, Exporting User Input Type Data Adjustment:
50. To export (download from the application) a record from the User Input type Data Adjustment, click Export.
51. In the Export window, select the MIS Date for which you are downloading the record to make the data corrections.
52. Click Export, and then
close the Export window.
An excel file is downloaded to your system.
53. In the downloaded (exported) excel file, you can make the required data corrections.
54. Save the changes made to the file.
In the Review & Save tab, Importing User Input Type Data Adjustment:
55. To import (upload to the application) the updated excel file for the User Input type Data Adjustment, select the Manual Data ID of the required record, and then click Import.
56. To search for the updated, excel file, open and attach it, click Attach.
57. To upload this, excel file, click Upload.
After a successful upload, an acknowledgment message is displayed.
58. To import the uploaded Excel file into the application, click Import.
NOTE |
After you successfully import a file, its status appears as Imported. |
59. To save this Data Adjustment record, select the checkbox against the imported record, and then click Save. A confirmation message is displayed, confirming that the adjustment details were successfully saved.
60. Click OK.
61. To submit this Data Adjustment for approval to the
Adjustment Approver, click Submit.
A confirmation message is displayed, confirming that the adjustment details
are saved successfully.
62. Click OK. The Adjustment Rules Details page automatically closes.
63. For user input, to send the imported file for approval to the Approver, you must select the checkbox against the record and then click Save.
64. In the View Adjustment Details page, click Refresh. The newly created Data Adjustment is in the Pending Approval state.
65. After you click Save, if do not submit the Data Adjustment for approval, the Status of the Data Adjustment is in the Draft state. To move the Status from Draft to Pending Approval, open the Data Adjustment, and click Submit.
To view the pre and post adjusted data, follow these steps:
66. From Financial Services Data Governance for US Regulatory Reporting window navigate to Controls.
67. Select a stage table and then click View Controls to view the details.
68. Click Issues & Actions.
The Issues Summary window is displayed.
Figure 52: Issue Summary
69. 
70. Click View Adjustment Details.
The Data Adjustment Summary window is displayed. In the Actions
window, the action that was created for the issue is displayed.
Figure 53: Data Adjustment Summary
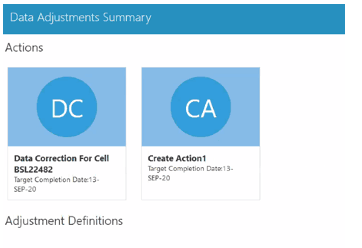
71. Click the required Action.
The adjustments that are defined for the actions are displayed.
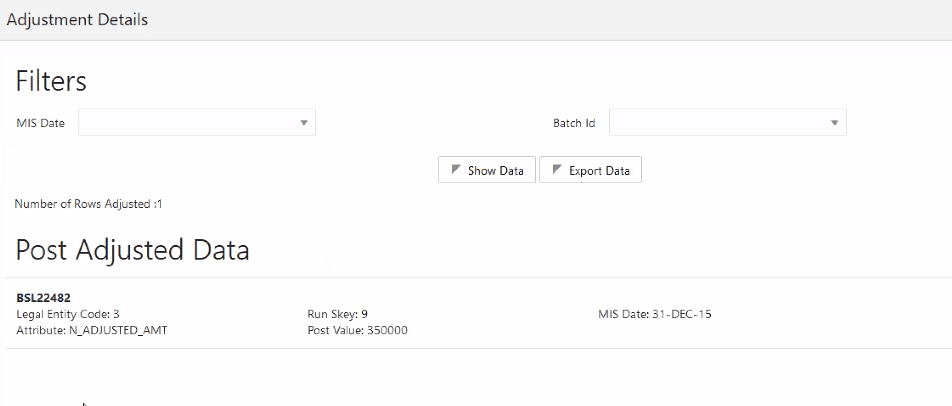
72. Click the required adjustment. The pre and post-adjusted data is displayed.
Figure 54: Adjustment Details
NOTE |
For the Data Adjustment - Regulatory Reporting, only the adjusted data appears. |
To view, and approve or reject the Data Adjustment, perform the following steps:
73. Log in to the application as the Action Owner (Data Adjustment Creator).
74. From Financial Services Data Governance for US Regulatory Reporting window, navigate to Controls.
75. Select a stage table and then click View Controls to view the details.
76. Click Issues & Actions.
77. In the Issues for this
control, click the required system-generated Issue ID.
The Actions section is displayed.
78. In the Actions section, in the ID column, click the required Action ID.
79. In the Action Details page In the Adjustments section, select the required Data Adjustment which is in the Pending Approval state.
80. To open this Data Adjustment details, click View.
81. In the Adjustment Rule Details window, click the Review & Save tab.
82. Select the Manual Data Id, and then click Download. The data correction records file uploaded to the system, by the Data Adjustment Creator, is downloaded to your system.
83. Verify the data records and in the Comments field, type the required comments.
84. To approve the Data Adjustment, in the Comment field, enter a comment, and click Approve. The Adjustment Rule Details window automatically closes.
85. In the Action Details page, in the Adjustments section, click Refresh. The status of the Data Adjustment is changed to the Approved state. In the account of Data Adjustment Creator, the state of this Data Adjustment is updated to the Approved state.
86. Or
87. To reject the Data Adjustment, in the Comment field, enter a comment and click Reject. The Adjustment Rule Details window automatically closes.
88. In the Action Details page, in the Adjustments section, click Refresh. For a rejected Data Adjustment, the state is changed to Draft.
If the Data Adjustment is rejected perform the following steps:
89. Log in to the application as the Action Owner (Data Adjustment Creator).
90. From Financial Services Data Governance for US Regulatory Reporting window navigate to Controls.
91. Select a stage table and then click View Controls to view the details.
92. Click Issues & Actions.
93. In the Issues for this
control, click the required system-generated Issue ID.
The Actions section is displayed.
94. In the Actions section, in the ID column, click the required Action ID.
95. In the Adjustment Rule Details page, in the Review & Save tab, make the required changes.
96. To save this Data Adjustment record, click Save.
A confirmation message appears, confirming that the adjustment details
are saved successfully.
97. Click OK.
98. To re-submit this Data Adjustment for approval to the Adjustment Approver, click Submit.
99. A confirmation message appears, confirming that the adjustment details have been successfully updated.
100. Click OK.
101. The Adjustment Rules Details page automatically closes.
102. Log in as a Data Adjustment Approver and approve this Data Adjustment.
After creating Data Adjustments, perform these procedures to check the Data Quality of the data corrections made during the Data Adjustment process.
Execution of Adjustments
The adjustments defined by using the steps mentioned earlier are executed through the batch. The executable DataAdjustment.sh must be executed with a list of parameters. Note that an adjustment is considered for execution for the MIS data for which the data adjustment has been done.
NOTE |
Only an issue owner can trigger the adjustment batch. |
To trigger the adjustment batch from the Issue screen, follow these steps:
103. From Financial Services Data Governance for US Regulatory Reporting window navigate to Controls.
104. Select a stage table and then click View Controls to view the details.
105. Click Issues & Actions.
The system-generated issues for this control are displayed.
106. Select an issue for which the adjustment is created
and click Run.
The Adjustment Run Parameters window is displayed.
The Issue Name is displayed as default.
107. Click  to select
the MISDATE for execution.
to select
the MISDATE for execution.
The RunSkey is automatically selected based on the MIS date.
108. Click  to
select the Legal Entity Code from the list of hierarchy.
to
select the Legal Entity Code from the list of hierarchy.
NOTE |
If the hierarchy is not displayed, resave the hierarchy HIREG004 Org Structure Entity Code. |
109. Click Execute.
This automatically creates a batch and is executed. The Batch Monitor status
displays as successful.
For all other types of adjustments, create a new Batch, perform the following steps:
110. From Financial Services Data Governance for US Regulatory Reporting window navigate to Operations and then select Batch Maintenance.
111. To create a Batch, in the Batch Name section, click
the  icon.
icon.
Figure 55: Batch Maintenance
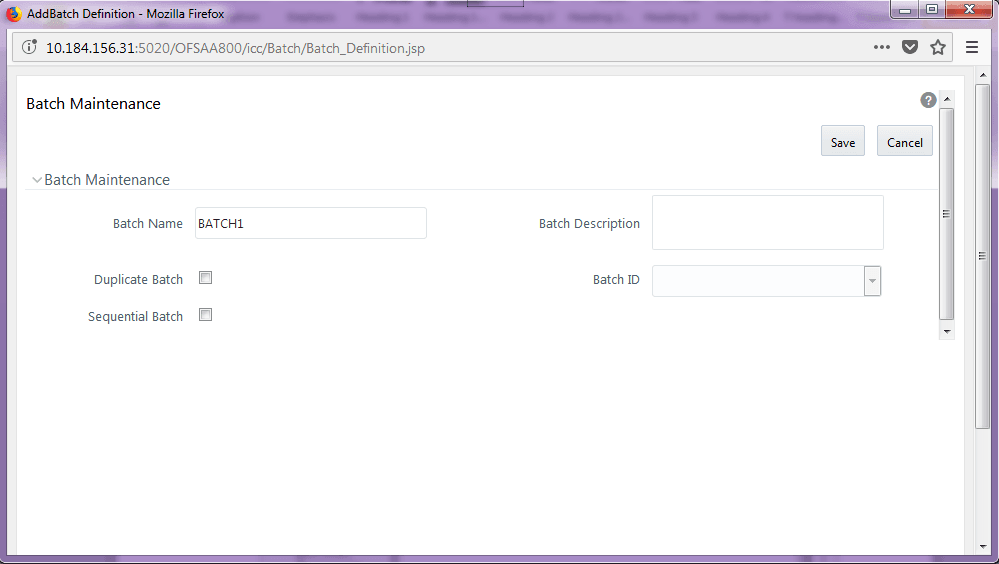
112. In the Add Batch Definition window, enter the batch name and the batch description, and then click Save.
113. In the Batch Maintenance pane, in the Batch Name section, select the Batch Name checkbox associated with the newly created batch. The Task Details section appears which lists the tasks corresponding to the selected Batch Name.
114. To add a new task to the newly created batch, click the Add icon.
115. In the Task Definition window In the Components dropdown box, select the RUN EXECUTABLE value.
116. The values are automatically generated for the Datastore Type, Datastore Name, and IP Address fields.
117. In the Executable field, enter the value DataAdjustment.sh, <ISSUE NAME>, <USER>, <RUNSKEY>, <LEGAL ENTITY>.
NOTE |
Except for the data adjustment for regulatory reporting, which will require all five values, the other data adjustments will only require values for <ISSUE NAME> and <USER>. The <RUNSKEY> and <LEGAL ENTITY> parameters can be placed as NA. |
118. For the Wait field, select either Y or N as required.
119. For the Batch Parameter field, select Y.
120. Enter the required details in all the other fields.
121. Click Save.
122. A new Task for the new Batch is created. You can run this Batch in the Batch Execution section.
To monitor the data adjustment batch through the Batch Monitor pane follows these steps:
123. From Financial Services Data Governance for US Regulatory Reporting window navigate to Operations and the select Batch Monitor.
124. The Batch Monitor pane appears on the right-hand side.
Figure 56: Batch Monitor
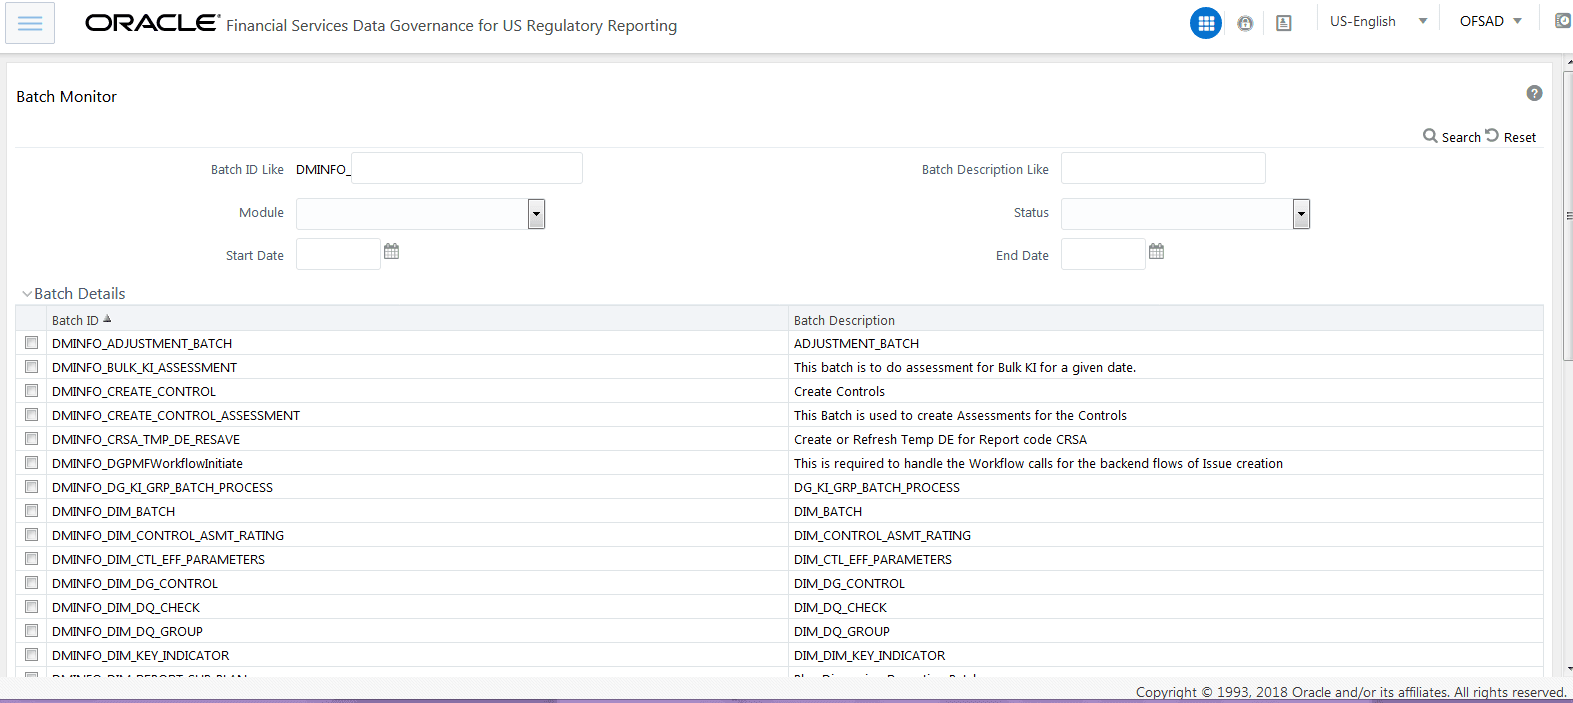
125. In the Batch Details section, select the Batch ID which was executed during the Batch Execution.
126. In the Batch, Run Details section, click the Information Date drop-down and then select the MIS Date. This is the date on which the Data Quality had failed at the staging.
127. Click the Batch Run ID dropdown box and select the required value.
128. Click the Start Monitoring icon.
129. The Batch Status, Task Details, and Event Log sections appear in addition to the existing details in the Batch Monitor pane.
130. Select any task in the Task Details section to view its Event Log details.
131. After the successful execution of the data adjustment batch, the Action Owners must mark the action progress to 100% or mark the Action as completed.
NOTE |
Based on the adjustment type, check the tables against which the adjustments have been passed. |