1 Fargo HDP 5000 Printer
The Fargo HDP 5000 printer not only prints high quality image, it also encodes information for Radio-frequency identification (RFID) and normal magnetic cards.
This document describes the installation and usage of Fargo HDP 5000 Printer.
Prerequisites, Supported Systems and Compatibility for Fargo
Prerequisites
-
Fargo HDP 5000 Software Installation CD
-
FargoPrinterSDK14.dll
-
Management.exe
-
Administration.exe
-
OMNIKEY 5121 Ethernet Driver.exe
-
CardMan_Synchronous_APR_V1_1_1_.exe
-
CT-API_V4_0_3_0.exe
Compatibility
SPMS version 20.2 or later. For customers operating on a version below 20.2, database upgrade to the recommended or latest version is required.
Printer, Driver, and Firmware Installation
An installation using the correct driver is essential for the printer to work as required. Please contact your hardware supplier to obtain the latest compatible driver.
-
Close all the running programs and insert the Software Installation CD into your PC.
-
At the HDP5000 Card Printer – Installation Wizard screen, accept the License agreement.
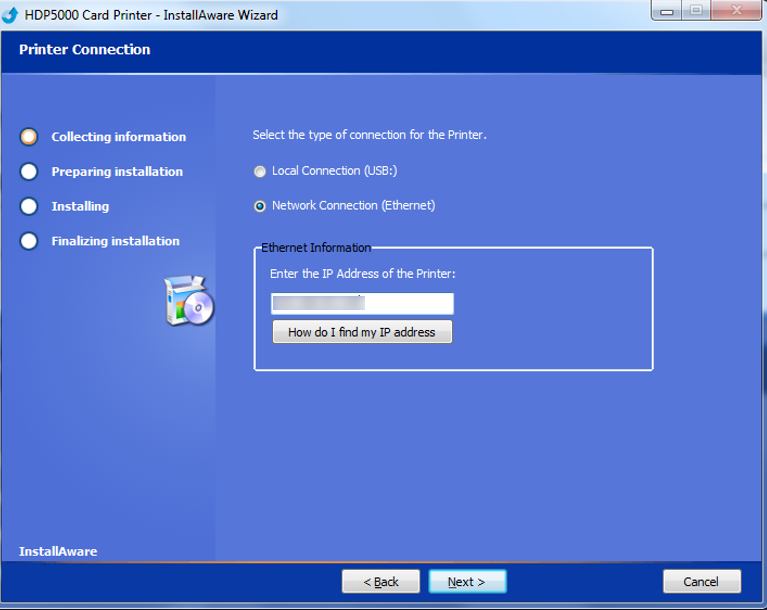
Figure 1-1 Printer Connection Type
-
At the Printer Connection screen, select the Local Connection type as Network Connection, and enter the IP Address of the printer.
-
Click Next to begin installation.
-
Reboot the PC at the end of the installation.
Installing the Firmware
-
Select FargoSDK.exe from the Software Installation CD.
-
On the License Agreement screen, read and accept the license agreement, then click Next.
-
Continue with the following topics in the order presented to complete the installation.
-
If you get an error prompt “FargoCardMove —> ActiveX Component error” when encoding the RFID Card, you must manually register the FargoPrinterSDK14.dll
Installing Ethernet Driver
-
Select OMNIKEY 5121 Ethernet Driver.exe from the Software Installation CD.
-
At the Welcome to OMNIKEY 5121 Ethernet Driver Setup screen, click Next to continue.
-
On the Ready to Install screen, click Next to proceed.
-
Continue with the following pages in the order presented to complete the installation.
-
Open the OMNIKEY 5121 Ethernet Driver folder from Windows Startup, Program Folder and select Omnikey 5121 Ethernet Encoder Utility
-
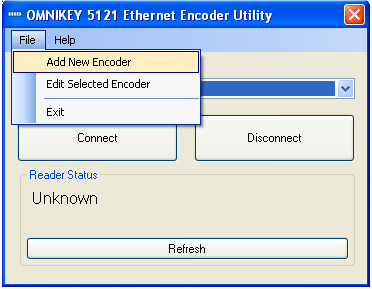
On the OMNIKEY 5121 Ethernet Encoder Utility screen, select Add New Encoder from the menu-item.
Figure 1-2 Adding New Encoder
-
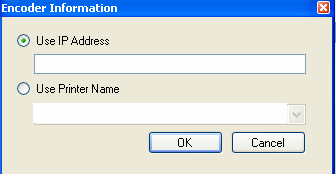
Enter the IP Address of the printer/encoder or select an installed printer instance to link the encoder and click OK to add the instance.
Figure 1-3 Encoder IP Address
-
Select the Encoder OMNIKEY 5x21 CL-0 from the drop-down list and click Connect
-
Restart the PC.
-
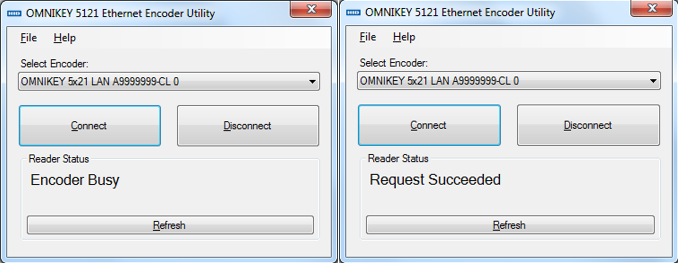
Return to the Ethernet Encoder Utility to confirm the encoder Serial Number appears in the Select Encoder field and the Reader Status is ‘Request Succeeded’.
-
The Reader Status shows “Encoder Busy” when another PC is connecting to the encoder.
Figure 1-4 Ethernet Encoder Utility Connection
Editing Encoder Information
-
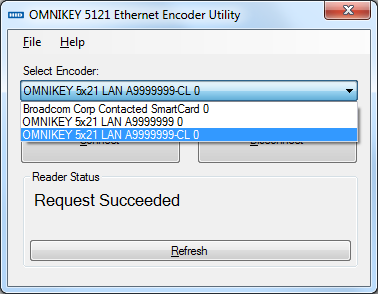
Open the Omnikey 5121 Ethernet Encoder Utility and select the Encoder from the drop-down list.
Figure 1-5 Encoder Information
-
Select Edit Selected Encoder from the menu-item.
-
Enter the new IP Address or change the printer name and then click OK to save.
Installing CardMan Synchronous API
In order to perform an RFID encoding in SPMS, an API installation is require in to obtain the Scardsyn.dll
-
Run CardMan_Synchronous_APR_V1_1_1_.exe
-
Select Setup.exe and run the installation.
-
On the Welcome to the CardMan Synchronous API Setup Program screen, click Next.
-
Select the DLL’s check box at the Component Selection window.
-
Continue with the following pages in the order presented to complete the installation.
If you get a scardsyn.dll error when performing RFID Card printing, manually copy the scardsyn.dll to the
C:\windows\system32folder.
Installing CT-API Driver
-
Run the CT-API_V4_0_3_0.exe. The program performs a reader check to ensure the appropriate PC/SC driver is installed.
-
On the Reader Check screen, click Yes to continue and follow the steps presented to complete the installation.
-
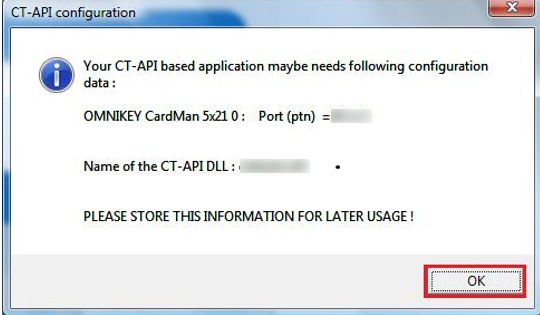
On the Save the CT-API Configuration screen, click OK to close.
Figure 1-6 CT-API Configuration
-
Restart the PC.
Printer Setup
-
Open the Devices and Printers panel of the client PC connected with the printer.
-
Click the HDP5000 printer icon, right-click and select Properties.
-
Under the Printer Properties, General tab, select Preferences.
-
In the Card tab, Orientation section, select print orientation as Landscape.
-
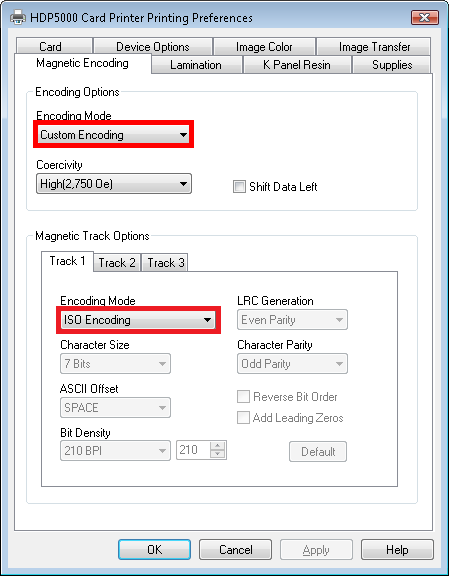
Navigate to the Magnetic Encoding tab and select Custom Encoding from the Encoding Mode drop-down list, and then select ISO Encoding in both the Track 1 and Track 2 tabs.
Figure 1-7 Printer Settings for Magnetic Stripe Card
-
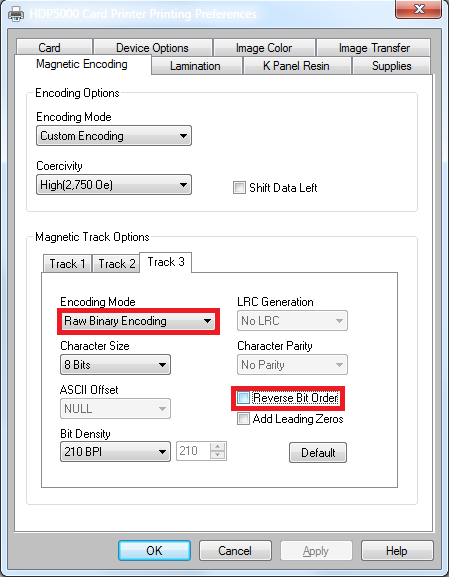
In the Track 3 tab, select Raw Binary Encoding and select the Reverse Bit Order check box.
Figure 1-8 Reverse Bit Order
-
Click OK to save the changes.
-
Repeat step 1 to 4 of the above.
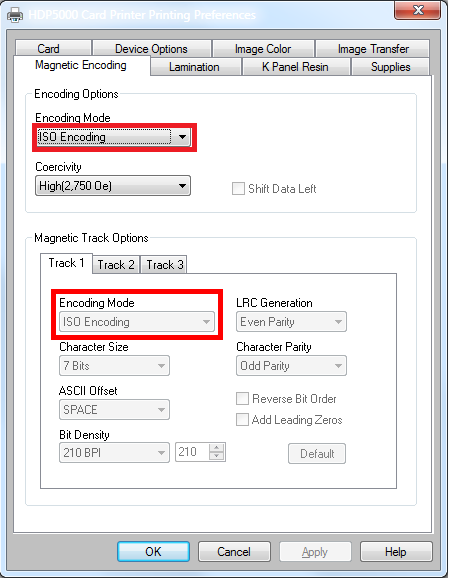
Figure 1-9 Printer Settings for RFID Card
-
Navigate to Magnetic Encoding tab and select ISO Encoding from Encoding Mode drop-down list, and select ISO Encoding in Track 1, Track 2 and Track 3 tab.
-
Click OK to save the changes.
Configuring Hardware in Management module and Report
Apart from installing the necessary drivers and setting up the printer, you also must connect and configure the printer in SPMS.
-
Launch the Management Module, and select Options from the menu item.
-
In the Options window, select the Hardware tab.
-
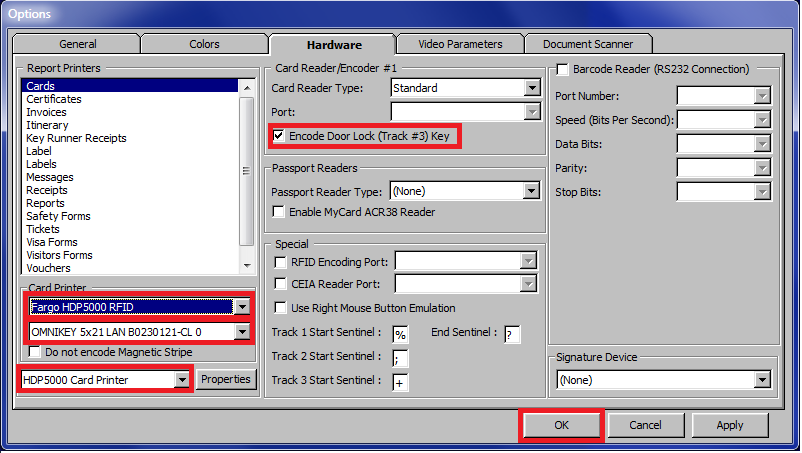
Under the Report Printers section, select Cards, and then navigate to the Card Printer combo box and select “Fargo HDP 5000” from the printer drop-down list.
Figure 1-10 Management Module Hardware Options — MagCard
-
Select Encode Door Lock (Track #3) key in the Card Reader/Encoder #1 section.
-
Click Apply to save the settings, and OK to exit.
The printer settings are also saved to OHCSettings.par under the parameter setting of the following:
[#Fidelio Cruise.Printer.Cards=#]
[#Fidelio Cruise.Printer.BoardCard=#]
-
Repeat steps 1 and 2 above.
-
In the Report Printers section, select Cards, and then navigate to the Card Printer combo boxand choose “Fargo HDP 5000” from the printer drop-down list and Smart Card as OMNIKEY 5x21 LAN B0230121–CL 0.
-
Select the Printer Name as HDP 5000 Card Printer.
-
Select Encode Door Lock (Track #3) key under Card Reader/Encoder #1 section.
-
Click Apply to save the settings, and OK to exit.
The printer settings are also saved to OHCSettings.par under the parameter setting of the following:
[#Fidelio Cruise.Printer.BoardCard=#]
[#Fidelio Cruise.Hardware.RFIDEncoder=#]
[#Fidelio Cruise.Printer.BoardCard=#]
Setting Up Report for Magnetic Stripe Card
-
Open the report template with Crystal Report program.
-
In the Formulas field of the report template, insert the formula. Please obtain from Support / Consultant for the formula statement. The modification of the formula is done in Crystal Report to facilitate the requirements by Fargo to have 14 leading zeros to insert the information into Track 3 Raw encoding for Ving Vision System verification.
-
Begin Administration module and select Systems Setup, Reports Setup from the menu-item.
-
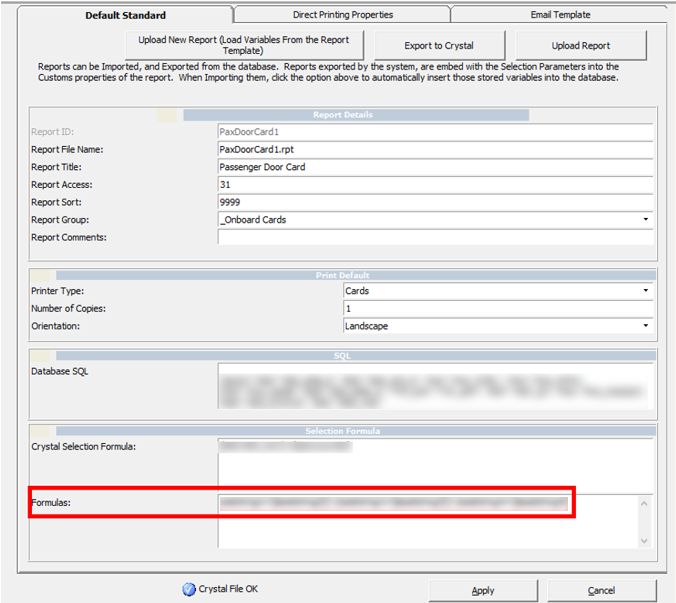
Under Current Reports List group ‘_Onboard Cards’, locate the Passenger Door Card report.
-
In the Formulas field of the report, insert the formula in Crystal Report Formulas section. Please obtain from Support / Consultant for the formula statement.
Figure 1-11 Report Setup
-
Click Apply to save the changes.