Purpose: Store Connect is a stand-alone Locate module whose screens enable store associates to process and fulfill delivery and pickup orders that are assigned to a store location by the Order Broker.
In this topic:
• How are Orders Assigned to Store Connect Locations?
• Setting Up Store Associate Users for Store Connect
• Using the Store Connect User Interface
• Store Connect Processing Flow
• When an Order is Under Review
• Consolidating Request IDs into a Single Order
• Order Aging in Store Connect
• Notifying Store Connect Locations about New Orders
• Accepting and Printing New Orders
• Pick Verification by Scanning
• Confirming Shipment of Delivery Orders
• Shipment Confirmation Screen Flows
• Canceling Items on Pickup Orders
• Store Connect Email Notifications Summary
• New Order Notification to Store Connect Location
• Shipment Confirmation to Customer
• Pickup Ready Notification to Customer
• Pickup Ready Reminder to Customer
Setting up data for Store Connect: See Setting Up Data for the Store Connect Module for information on the setup required in Locate before you can start using the Store Connect module.
Overview: When you create a Store Connect system in your organization, all locations assigned to that system are accessible to store associates for processing of delivery and pickup orders through the Store Connect user interface.
How are Orders Assigned to Store Connect Locations?
The Order Broker assigns delivery and pickup orders to locations in the Store Connect system the same way as it assigns any other delivery or store pickup orders. The Order Broker preferences and fulfillment rules apply. For example, only locations flagged as Pickup Available at the Preferences screen are eligible to fulfill pickup orders.
If an assigned Store Connect location rejects an order, the Order Broker attempts to reassign (“reshop”) the order as it does any other order.
Currently, only delivery and pickup orders are eligible for processing through Store Connect.
See the Order Broker Overview for background on order assignment.
Note: Orders assigned to Store Connect locations should include the customer’s first and last name. If an order includes only the customer’s company name, store associates cannot search for the order by name at Store Connect screens.
Setting Up Store Associate Users for Store Connect
A store associate is a distinct type of user profile, with access only to Store Connect screens. Typically, you assign each associate to a single store location in the Store Connect system, but it is possible to assign an associate to multiple store locations.
The screen you use to create a new Store Connect user supports efficient creation of multiple store associate records in a single session by clicking the Save/New button.
The only additional security option that you can assign to a Store Connect user is the authority to reject an assigned order. You can use roles to restrict this authority to managers.
Using the Store Connect User Interface
Store location login: The Store Associate can log into a single store location at a time. You can assign store associate users to any of the store locations associated with the Store Connect default system. If the associate is assigned to more than one location, a window opens at login requiring the selection of the store where the associate is currently working.
Open orders only: Only open orders assigned to the current store location are displayed on order processing screens. Also, if any of the items on the order are not currently open, these items are not displayed on order processing screens. For example:
• A pickup order includes an item that has been picked, and another item that has already been picked up by the customer. Only the picked item is displayed.
• A delivery order includes an item that has already been accepted and printed, and another item that was added to the order after initial order creation, and has not yet been submitted to the store location for processing due to the store’s polling schedule (see Notifying Store Connect Locations about New Orders). Only the accepted item is displayed.
Order search option: Store Connect also provides an order search and review option, so that the associate can research all pickup and delivery orders across the enterprise, regardless of status. Screens displaying order detail and history are available. The associate cannot process transactions through these screens.
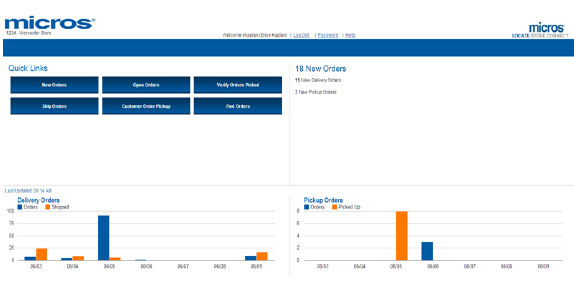
Home screen: When the associate logs into Store Connect, the home screen displays:
• your logo in the upper left corner, as specified at the General tab of the Store Connect Preferences screen
• a group of quick links, providing access to all required order processing screens
• a summary of new orders requiring processing
• bar charts summarizing order activity (new order assignment and fulfilled orders) for the past week. If the store location supports only one order type, then a pie chart also summarizes open orders by status.
Note: To enhance screen performance, order information is not refreshed once it has been loaded on a screen. As a result, once the associate opens a list screen, such as the View All Open Orders screen, the current order status and items are indicated and are not updated until the associate exits the screen or intentionally reloads it. For example, if the associate selects the View option from the View All Open Orders screen and advances to the View Order Detail screen, or if the associate selects the Ship option to ship the order, the Store Connect screens do not prohibit any activity or display any updated information, even if the originating system has added on order line or canceled the order since the View All Open Orders screen loaded.
For more information: See the Store Connect online help for a discussion of the components of the home screen.
Standard status flows: To the store associate, order status flows in Store Connect are based on the order’s Next Action rather than the description of the status in Locate. it The typical status flows for delivery and pickup orders, including the Next Action displayed to the associate, are:
• New order: The store has not yet been notified of the order, so the order is displayed on Store Connect order processing screens.
• Polled: The order is now displayed on order processing screens (see Notifying Store Connect Locations about New Orders). The Next Action is Accept & Print.
• Accepted: The associate has used the Accept & Print option (see Accepting and Printing New Orders). The Next Action is Pick.
• Picked: The associate has confirmed the order has been picked (see Pick Verification Options). The Next Action is:
• Ship for a delivery order (see Confirming Shipment of Delivery Orders)
• Pick Up for a pickup order (see Customer Order Pickup)
• Fulfilled: The associate has shipped a delivery order or the customer has picked up a pickup order. The order is no longer displayed on Store Connect order processing screens.
Additional order options: Optionally, the store associate can:
• Reject a delivery or pickup order, or an item on the order, at any stage in the process, with required authority (see Rejecting Orders)
• Reprint the packing slip for a delivery or pickup order, or an item on the order, at any stage after accepting and printing
• Reprint the pick list pull sheet for a delivery or pickup order, or an item on the order, if it has been accepted but not yet confirmed as picked
• Send a pickup-ready reminder email for a pickup order, or an item on a pickup order, if it has already been confirmed as picked
• Cancel a pickup order, or an item on the order, if it has already been confirmed as picked
Delivery order flow:

Pickup order flow:
When an order is Under Review, it is not eligible for fulfillment; however, it is eligible for all order processing prior to the fulfillment step.
Effects in Store Connect:
• Options that are still available:
• The order is still available to work with at the View New Orders screen, View All Open Orders screen, View Orders Ready for Picking screen, and Order To Be Picked screen
• The order is included in the order totals at the home screen
• The associate can generate the packing slip and the pick list pull sheet for the order
• Actions prevented in Store Connect:
• The order is not eligible for shipping or pickup
• When the associate picks a pickup order, no email notification is sent to the customer until the setting of the UNDER REVIEW indicator changes
• If it is a pickup order, the associate cannot resend an email notification to the customer
• If it is a delivery order, the Pick and Ship option is not available at the Pick Order window
How the associate can tell if an order is under review:
• The UNDER REVIEW indicator is displayed at the at the View Order Detail screen, Pick Order Detail screen, Pick Order Detail - Item screen, and Scan Items to Pick screen:
• An error window opens if the associate attempts to ship or pick up the order
• The order is not displayed at the View Orders Ready for Shipping screen or the View Pickup Ready Orders screen
If you have the Allow Split Order preference selected, and:
• If a single line on a split order is assigned to a Store Connect location, then only that line is visible in Store Connect.
• If more than one line on an order is assigned to a Store Connect location, then the store associate has the option to process the item separately. For example, an associate can reject a single item on an order and process the remaining item(s).
Earliest Next Action: The earliest Next Action for all items on the order is displayed on screens. For example, if the associate accepts and prints an individual item on a new order, the Next Action remains Accept & Print until all items have been accepted and printed.
If you do not have the Allow Split Order preference selected, the associate cannot process items on an order individually. The items appear to be grouped together, and there is no option to process an update against a single line.
Consolidating Request IDs into a Single Order
If there is more than one request ID using the same order number, order type, and carrier (ship via), assigned to the same Store Connect location for fulfillment, Store Connect presents the request IDs as a single order.
Example: A customer places an order for a backordered item, and the order is assigned to a Store Connect location fulfillment. The next day, after the first request ID has been accepted and printed in Store Connect, the customer adds an item to the order that is also backordered, and the item creates a new request ID in Locate. In Store Connect, the request IDs are presented as a single order that includes a new order line and a printed order line.
Things to note about consolidated request IDs:
• If you do not have the Allow Split Order preference selected, the associate cannot process items on a request ID individually; however, items with a different request ID can be processed separately. To the associate, there is no clear difference between consolidated request IDs and orders that cannot be split, since the request ID is not displayed in Store Connect.
• The order date is based on when the earliest request ID was created in Locate.
• Even though multiple request IDs are displayed as single orders in Store Connect, only open items and request IDs are available for processing.
• The sold-to customer can vary across request IDs. In this case, the customer from the oldest open line is displayed.
• The shipping address can vary across request IDs. In this case, the address from the oldest open line is displayed.
• The aging of orders is based on the oldest open order line. See Order Aging in Store Connect.
Store Connect screens display the age of each open order based on the oldest open order line, based on the date and time when the oldest open (uncompleted) line was created:
• delivery orders: the date and time when the oldest line still in polled, accepted, or picked status was created (that is, not yet shipped)
• pickup orders: the date and time when the oldest line still in polled or accepted status was created (that is, not yet picked/customer notified that the order is ready for pickup)
Order age hours: If the order’s age exceeds the Order Age Hours specified at the Store Connect Preferences screen, the Age on Store Connect screens is displayed in red, bold text instead of black once the order’s age exceeds this limit, indicating that the order has exceeded your service level. For example, in the image below, the Order Age Hours is set to 1 hour.

Unclaimed pickup orders: Once the number of hours specified as the Unclaimed Orders Hours at the Preferences screen has passed since the order was picked and the customer notified, the Ready for Pickup age displayed on Store Connect screens is in red, bold text instead of black, and the order is included on the View Unclaimed Pickup Orders screen. For example, in the image below, the Unclaimed Orders Hours is set to 24 hours.

For more information: See the Order Age Hours and the Unclaimed Orders Hours at the Preferences screen.
Notifying Store Connect Locations about New Orders
Polling new orders: The Store Connect system does not communicate with Locate through the web service messages used by other integrated systems, such as CWDirect or Xstore. Unlike integrated systems that use the fulfillments request and response to poll for new orders, Store Connect requires you to set up a method to make new orders available for processing through the Store Connect screen options. The method defines when to change the status of new orders to Polled, so that the orders are displayed on Store Connect screens and associates can begin processing the orders.
Email notification: Locate generates the New Order Notification to Store Connect Location email when any assigned orders are updated to polled status, using the email address specified for the store location.
Scheduling options: The main scheduling options are:
• Immediate: Make new orders available for processing as they are created.
• Time: Make new orders available for processing at defined times of the day and days of the week. A background job runs every 15 minutes to evaluate whether a specified time has passed; if so, the job updates new orders to polled.
• Minutes: Make new orders available for processing at set intervals during a defined range of hours during the day and days of the week. A background job runs every 15 minutes to evaluate whether the specified number of minutes have passed; if so, the job updates new orders to polled.
Options by order type and level: When you set up scheduling options for polling orders, you can:
• Choose different settings for pickup orders than for delivery orders. For example, you can specify to make new pickup orders available for processing throughout the business day for store locations, and make delivery orders available only at specified times.
• Choose different settings at the system, location type, and location level. For example, you need to set up a default schedule at the system level for each order type, but then you can optionally override this default for individual locations or location types.
Where do you set up scheduling options? You use the New Order Polling Schedule tab (Schedule) at the Store Connect Preferences screen to set up polling schedules. See that screen for more information.
Accepting and Printing New Orders
Overview: As new orders arrive, the associate can accept them for processing at the:
• View New Orders screen
• View All Open Orders screen
• View Order Detail screen
When the associate selects the Accept & Print option for an order, multiple orders, or a line on an order:
• The order or line’s status changes to Accepted
• The Pick List Pull Sheet is generated. The pull sheet can include both pickup and delivery orders.
• The Packing Slip is generated if the Print Pack Documents preference at the Store Connect Preferences screen is set to Order Accept or Both.
• The Next Action displayed for the accepted order or item changes to Pick.
Selecting multiple orders: The associate has the option to accept and print multiple orders at a time. The Pick List Pull Sheet includes the items on all selected orders.
Selecting individual items: The associate can also use the View Order Detail screen to accept and print individual items on the order. Only selected items are included in the generated documents and have their status updated to Polled.
Purpose: After the associate accepts and prints an order, the next step is to verify that the items on the order are picked. Pick verification:
• Confirms that the items are ready for shipment (delivery order) or pickup (pickup order)
• Generates the Packing Slip, if you have set the Print Pack Documents to Pick or Both, or if the associate selects the Print Pack Slip? option at the Pick Order window
• Changes the status from Accepted to Picked, and changes the Next Action displayed in Store Connect from Pick to Pick Up (for pickup orders) or Ship (for delivery orders)
• Generates the Pickup Ready Notification to Customer to the customer if it is a pickup order and is not Under Review, and if you have completed email preferences; see the Store Connect Email Notifications Summary
Pick verification process: The Pick Verify Method preference at the Store Connect Preferences screen supports three different pick verification flows. Each is described below.
Pick and ship option? When the associate verifies items or an order as picked, there is an option to also confirm shipment at the same time if the order is a delivery order and is not under review.
Pick verification methods:
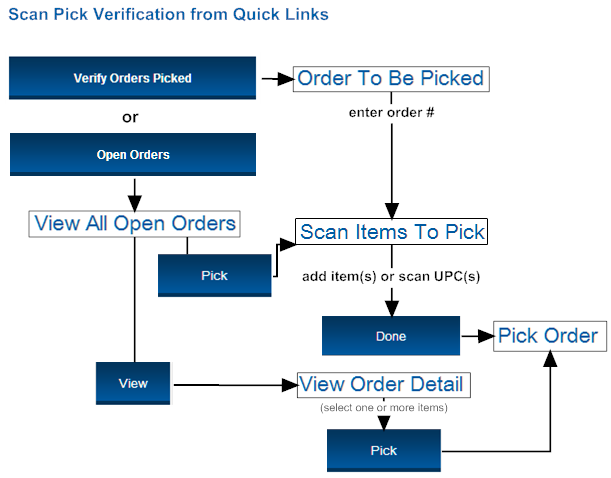
• Pick Verification by Scanning
If the Pick Verify Method preference is set to Immediate, the Verify Orders Picked link from the Store Connect Home screen takes the associate to the View Orders Ready for Picking screen, an order list screen similar to the View All Open Orders screen, except that only orders eligible for pick verification are listed.
Pick Order or Pick Item: The associate can select orders to verify as picked directly at the View Orders Ready for Picking screen by clicking Pick Order, or can click Pick Items to advance to the Pick Order Detail screen to review the order and pick any eligible items.
Pick from View All Open Orders screen: The associate can also use the View All Open Orders screen to:
• select Pick for an order to verify all eligible items as picked
• select View for an order to advance to the View Order Detail screen, and verify any eligible items as picked

If the Pick Verify Method preference is set to Immediate, the Verify Orders Picked link from the Store Connect Home screen takes the associate to the Order To Be Picked screen, where the associate needs to enter or scan a valid order number with at least one item eligible for pick verification.
Review items and pick each or all: If the order number entered at the Order To Be Picked screen is valid, the associate advances to the Pick Order Detail - Item screen to review the order and pick one or more eligible items.
Pick from View All Open Orders screen: The associate also has the option from the View All Open Orders screen to:
• select Pick for an order to advance to the Pick Order Detail - Item
• select View for an order to advance to the View Order Detail screen, to review the order and pick one or more eligible items.

If the Pick Verify Method preference is set to Scan, the Verify Orders Picked link from the Store Connect Home screen takes the associate to the Order To Be Picked screen, where the associate needs to enter or scan a valid order number with at least one item eligible for pick verification.
Scan each unit separately: If the order number entered at the Order To Be Picked screen is valid, the associate advances to the Scan Items to Pick screen, where the associate scans each picked unit separately. The Item Scan Type controls whether the associate scans by system product code or by UPC, and the Item Scan Length controls the expected length of the UPC so the screen knows when to verify the scanned code.
Setup required for UPC: You need to create records in the product_barcode table in order to have associates scan items by UPC. Each record includes:
• the numeric product_id that identifies the produce in Locate. This numeric ID is not displayed on any screens, but you can use the system_product table to match your own item numbers to the product_id.
• the barcode itself
• a barcode_type, which should be set to 1.
Contact your MICROS project manager for more information.
Pick from View All Open Orders screen: The associate can also use the View All Open Orders screen to:
• select Pick for an order to advance to the Scan Items to Pick screen
• select View for an order to advance to the View Order Detail screen, and use that screen to review the order and pick one or more items.
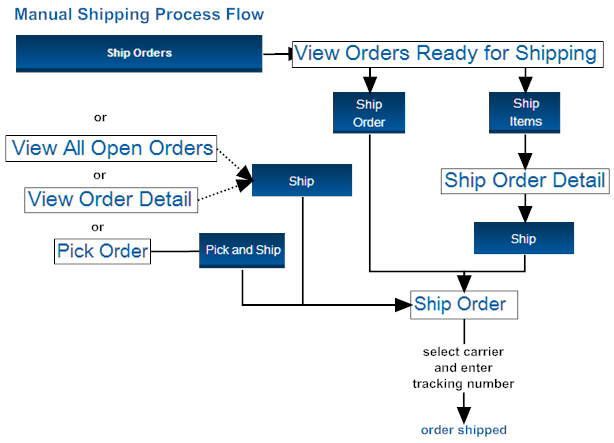
Confirming Shipment of Delivery Orders
Overview: Store Connect supports both manual shipment and shipping integration with ADSI. You use the Store Connect Preferences screen to configure shipping, and can set the shipping preference differently for each Store Connect location. An associate in a location that is configured for integrated shipping has the option to switch to manual shipping if, for example, communication is down.
Eligibility for shipment: Only delivery orders that have been picked and are not Under Review are available for shipment.
Shipment notification email: Optionally, you can use Locate to generate the Shipment Confirmation to Customer. You also use the Store Connect Preferences screen for setup.
Update fulfilled quantity: Each shipment from a Store Connect location updates the Fulfilled Quantity for the product location. Locate uses this quantity to calculate the Available to Promise quantity, and clears this quantity when you run the Store Connect Inventory Export. See Calculating the Available to Promise Quantity for a discussion of the calculation.
Shipment Confirmation Screen Flows
The screen flow for shipment varies depending on whether the associate is using manual or integrated shipping.
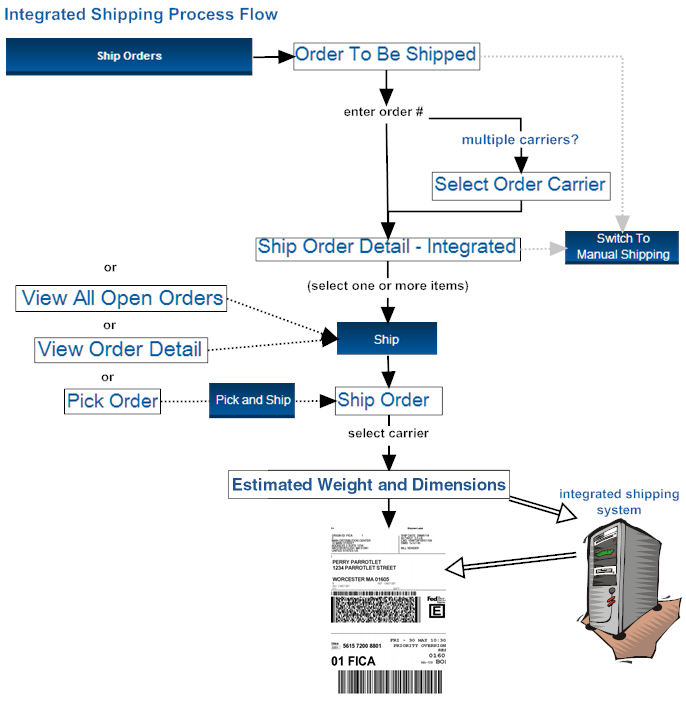
Typical screen flow for integrated shipping: When the associate selects the Ship Orders option from the home screen:
• Specify order: The associate advances to the Order to be Shipped screen, to scan or enter the order number to ship.
• Review detail: After specifying the order at the Order to be Shipped screen the Ship Order Detail - Integrated screen opens. The associate can review the items on the order and optionally select items for shipping rather than the whole order.
• Specify carrier: When the associate selects the Ship option, the Ship Order window opens for the associate to specify the carrier.
• Enter shipping weight: When the associate completes the Ship Order window, the Estimated Shipping Weight window opens for the associate to specify the shipping weight.
• Communication with ADSI: When the associate completes the Estimated Shipping Weight window, Locate communicates with ADSI, which sends the shipment information for the order.
• Print shipping label: A window opens displaying the shipping label for printing.
The associate also has the option to initiate shipping from other screens, or switch to manual shipping if needed.
Typical screen flow for manual shipping: When the associate selects the Ship Orders option from the home screen:
• Specify order: The associate advances to the View Orders Ready for Shipping screen, displaying all orders eligible for shipment:
• Ship order? The associate can select the Ship Order option to ship all open items on the order, or
• Ship items? The associate can select the Ship Items option to advance to the Ship Order Detail screen, where the associate can review the items on the order and optionally select items for shipping rather than the whole order.
• Specify carrier and enter tracking number: When the associate selects the Ship option for an order or one or more items, the Ship Order window opens for the associate to specify the carrier and enter the tracking number, if required for the carrier.
As with integrated shipping, the associate also has the option to initiate shipping from other screens.
When the customer picks up an order, the store associate can use the View Pickup Ready Orders to confirm the pickup. When an order is confirmed as picked up, its status is updated to Fulfilled, and it is removed from Store Connect screens for further processing.
The store associate can also use the Pick Up Order Detail screen to confirm that the customer picked up the entire order, or individual items on the order.
Both screens display the Ready for Pickup age, indicating the amount of time since the order was picked and the Pickup Ready Notification to Customer was eligible to be sent. If the customer hasn’t picked up the order within the number of hours specified in the Unclaimed Orders Hours preference, the Ready for Pickup age is displayed in red, bold text on the pickup screens mentioned above. These orders are also listed on the View Unclaimed Pickup Ready Orders screen.
Only pickup orders that have been picked and are not Under Review are available for the associate to work with on these screens.
Options for pickup-ready orders: The associate can:
• confirm the order or an item as picked up
• reprint the Packing Slip
• cancel an item or the order
• send the Pickup Ready Reminder to Customer
The associate can also reject a pickup order or an item at certain screens even after it is confirmed as picked.
Update fulfilled quantity: Each item or order picked up from a Store Connect location updates the Fulfilled Quantity for the product location. Locate uses this quantity to calculate the Available to Promise quantity, and clears this quantity when you run the Store Connect Inventory Export. See Calculating the Available to Promise Quantity for a discussion of the calculation.
Canceling Items on Pickup Orders
Overview: The store associate might need to cancel one or more items on a pickup order if, for example, the customer decided he didn’t want all the items after arriving at the store. The store associate can also cancel the entire order if, for example, the customer never arrives to claim the order.
When the associate cancels an order or item, the activity is recorded at the History tab of the Order screen.
Eligibility: Only pickup orders are eligible for cancellation in Store Connect, and the items’ status must be Picked. If there are items on the order in different statuses, they are not automatically canceled.
For example, the View Pickup Ready Orders screen includes orders only if they include any items whose status is Picked. If the associate cancels an order from this screen, only items on the order whose status is Picked are canceled.
Cancellation reason: The associate needs to select the reason for canceling the order(s) or item(s) when canceling. You use the Reason Codes screens to set up cancel reasons. Only reason codes with a Type of Cancel and flagged as Active are available for selection.
Overview: The store associate can reject an order, or one or more items on an order, from the store location if, for example, the requested inventory is not available, or the store is too busy.
When the associate rejects an order or item, the activity is recorded at the History tab of the Order screen.
Authority required: Reject Approval authority is required to reject an order. If the associate does not have the required authority, the Reject Approval Login window opens, so that a manager or other user with the required authority can approve the rejection. This approval is required each time the associate selects one or more items or orders for rejection. See the Role Wizard for information on assigning authority.
Note: The history of the rejection displayed at the History tab of the Order screen includes the user ID of the associate who approved the rejection, if different from the associate who selected to reject the order or item.
Rejection reason: The associate needs to select the reason for rejecting the order(s) or item(s). You use the Reason Codes screens to set up rejection reasons. Only reason codes with a Type of Reject and flagged as Active are available for selection.
Only items in the same status rejected: When the associate rejects an order, items whose status match the screen the associate is using are rejected; however, there might be other items on the order in a different status. These items aren’t rejected automatically.
For example, the View Orders Ready for Picking screen includes orders only if they include any items whose status is Accepted. If the associate rejects an order from this screen, only items on the order whose status is Accepted are rejected.
If the associate rejects an order from the View All Open Orders screen, or rejects all items displayed at the View Order Detail screen, then the entire order is rejected.
Overview: The order processing screens in Store Connect include orders and items only if they are open and assigned to the current store location, but Store Connect also provides the associate with the option to search for and review pickup and delivery orders regardless of status and assigned location.
Available information: The information available for review includes:
• Order header information, such as originating location, customer name, address, phone number, and email. Similar information is also available for the shipping address for a delivery order.
• Order totals
• Order detail, including items, quantities, prices, current status, and status date
• Item history, similar to the information displayed at the History tab of the Order screen
Order types: Only delivery and pickup orders are displayed at the order search screens.
Display-only: All the information displayed through the order search screens is display-only; however, a link to an order processing screen is provided if the displayed order includes any items that are open and are assigned to the current store location.
Store Connect Email Notifications Summary
A summary of the email notifications to store locations or the customer are described in the table below.
|
Notification Type |
Generated When: |
Setup |
|---|---|---|
|
Store Location Notifications “From” email address: From the From Email address specified at the Event Logging screen. Note: If no From Email address is specified, no emails are generated as a result of Store Connect activity. |
||
|
An order assigned to the store location changes status from New Order to Polled. See Notifying Store Connect Locations about New Orders for background. |
Polling schedule: The New Order Polling Schedule tab (Schedule) at the Store Connect Preferences screen. Template: From the New Order Email specified at the Email tab at the Store Connect Preferences screen. The base template name is NewStoreOrder Notification. Store location email address: From the Emails specified at the New Location or Edit Location screen. |
|
|
Customer Notifications “From” email address: From the Customer Service From Email address specified at the Email tab at the Store Connect Preferences screen. Logo: The logo at the top of emails to customers is from the Logo URL specified at the Email tab at the Store Connect Preferences screen. Base templates: The base templates for each email notification is listed below. Each email can include your logo. Contact your MICROS representative for information on using a custom template. |
||
|
The store associate confirms a shipment for a delivery order. |
Template: From the Shipment Notification Email specified at the Email tab at the Store Connect Preferences screen. The base template name is ShipNotif. |
|
|
The store associate verifies that the order is picked. |
Template: From the Pickup Ready Notification Email specified at the Email tab at the Store Connect Preferences screen. The base template name is PickUpReadyNotif. |
|
|
The store associate selects Resend Email at the View Pickup Orders or View Order Detail screen for an order that was already picked. |
Template: From the Pickup Ready Notification Email specified at the Email tab at the Store Connect Preferences screen. The base program is PickUpReadyNotif. |
|
New Order Notification to Store Connect Location
• Subject line: New Order Notification for Location [Location Code] - [Location Name]
• Sample contents:
[Location Name], you have New Orders to fulfill.
Setup: See Store Connect Email Notifications Summary.
Shipment Confirmation to Customer
Setup: See Store Connect Email Notifications Summary.
A separate confirmation email is generated for each shipment.
• Subject line: Your Order # [order number] Has Been Shipped
• Sample contents:

Email contents:
|
Sample email contents |
Source |
|||
|---|---|---|---|---|
|
Logo |
||||
|
Thank you for your order, VAN VOORHIS CONSULTING, JAKE VAN VOORHIS. Your order number is 13462-001. |
Customer first and last name (xom_customer table) Note: If there is no customer first and last name, then the company name is used. Order number (xom_order table) |
|||
|
Customer Information |
Customer company, first name, last name, and day time phone number (xom_customer table) |
|||
|
VAN VOORHIS CONSULTING, JAKE VAN VOORHIS 5081111111 |
||||
|
Shipping Information |
Shipping address, including: • company, first name, last name • prefix, first name, last name, suffix • address lines 1 - 4 • city, state/province, postal code, country code (xom_shipping table; from the first shipping record for the order, if there is more than one) |
|||
|
VAN VOORHIS CONSULTING, JAKE VAN VOORHIS MR JAKE VAN VOORHIS, ESQ 763 VAN VOORHIS AVENUE ADDRESS LINE 2 ADDRESS LINE 3 ADDRESS LINE 4 WORCESTER, MA 01610 USA |
||||
|
Order Summary |
System product description (system_product table) Quantity, unit price (xom_item table), extended price Only items shipped at the same time are listed |
|||
|
Item |
Quantity |
Unit Price |
Price |
|
|
.25 OZ CLOVES |
1 |
$0.95 |
$0.95 |
|
|
MARJORAM |
1 |
$9.50 |
$9.50 |
|
|
BOX OF MINTS |
1 |
$1.89 |
$1.89 |
|
|
Tracking Information |
The carrier code and the tracking number, if any, entered manually or assigned through integrated shipping (ship_via and shipping_reference from the xom_status_history table) |
|||
|
UPS: ABCDE1234567890 |
||||
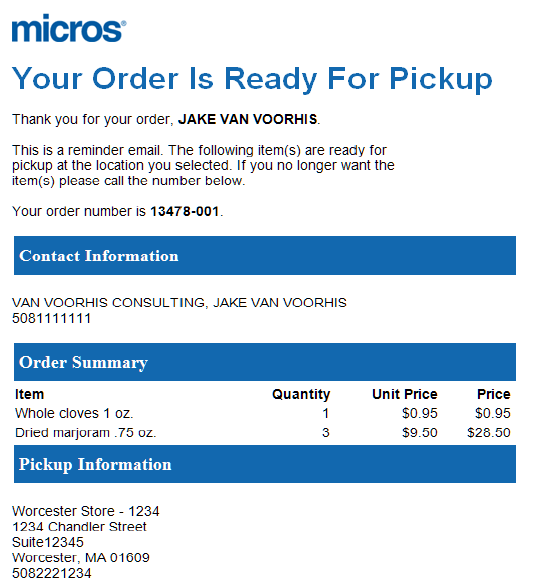
Pickup Ready Notification to Customer
Setup: See Store Connect Email Notifications Summary.
Generated when? The store associate confirms any items on a pickup order are picked, and the order is not under review. See Pick Verification Options for more information.
Note:
• The Pickup Ready Notification to Customer is generated only when a store associate picks the order through Store Connect.
• The email is not generated If the order is currently Under Review; however, Locate creates a record in the email_notification table, and when the Under Review flag is cleared, the email is eligible for generation.
Contents:
• Subject line: Your Order # [order number] Is Ready For Pickup
• Sample contents:

|
Sample email contents |
Source |
|||
|---|---|---|---|---|
|
Logo |
||||
|
Thank you for your order, JAMIE BEAMAN. The following item(s) you ordered have been processed and are ready for pickup at the location you selected. Your order number is 13542-001. |
Customer first and last name (xom_customer table) Note: If there is no customer first and last name, then the company name is used. Order number (xom_order table) |
|||
|
Customer Information |
Customer company, first name, last name, and day time phone number (xom_customer table) |
|||
|
SPROCKET HALL BAKERY, JAMIE BEAMAN 5083453456 |
||||
|
Order Summary |
System product, system product description (system_product table) Quantity, unit price (xom_item table) Only orders that are ready for pickup (status is Picked) are listed |
|||
|
Item |
Quantity |
Unit Price |
Price |
|
|
Dried marjoram 75 oz. |
1 |
$9.50 |
$19.00 |
|
|
Whole cloves 1 oz. |
2 |
$10.00 |
$10.00 |
|
|
Pickup Information |
Location name, code, street, apartment/suite, city, state/province, postal code, phone number, country code (location table) |
|||
|
Worcester Store Chandler Street - 1234 1234 Chandler Street Worcester, MA 01602 US 5082221234 |
||||
Pickup Ready Reminder to Customer
Setup: See Store Connect Email Notifications Summary.
Generated when? See Customer Order Pickup.
• Subject line: Your Order # [order number] Is Ready For Pickup
• Sample contents:
See the Pickup Ready Notification to Customer for information on the data in this email.
Purpose: The associate in Store Connect can use the pick list pull sheet to pick items needed for delivery or pickup orders.
Sample: The following table presents information in the base pick list pull sheet, generated if the Pick List Pull Sheet Form Store Connect preference is set to PULLSHEET.jasper.
Generated when? The associate selects Accept & Print or Reprint Pack List for one or more orders, or items on an order.
|
Field |
Description |
|---|---|
|
Page heading  |
|
|
store location |
The associate’s current store location. |
|
organization name |
The name of the organization. |
|
user ID |
The associate’s user ID. |
|
generated date and time |
The date and time when the associate generated the pick list pull sheet. |
|
Pull sheet summary  |
|
|
Total Orders |
The total number of separate orders to be picked. |
|
Total Items |
The total number of distinct items to be picked. |
|
Total Units |
The total number of units, for all items, to be picked. |
|
Item totals  |
|
|
Item # |
The system product code. |
|
Item Description |
|
|
Pick Quantity |
The total quantity needed to pick for all orders on the pick list pull sheet. |
|
Notes |
Space for the associate to enter notes about each item. |
|
Order details 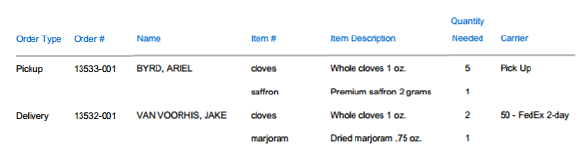 |
|
|
Order Type |
Indicates a pickup or delivery order. Order sequence: • Pickup orders are listed first, followed by delivery orders. • Delivery orders requiring express shipment are listed before other delivery orders. • Within each of these groups, orders are in sequence based on order number (lowest to highest). |
|
Order # |
The order number assigned by the originating system. |
|
Name |
The sold-to customer’s name. |
|
Item # |
The system product code. Only order lines whose Next Action is Pick (Accepted status) can be included. |
|
Item Description |
|
|
Quantity Needed |
The total quantity of the item needed for this order. |
|
Carrier |
The code and description of the carrier to deliver the order. Listed as Pick Up for a pickup order. |
Purpose: The associate in Store Connect can use the packing slip to pick items for a delivery or pickup order, and to include when shipping a delivery order, or providing the customer with the items on a pickup order.
Sample: The following table presents information from the base packing slip, generated if the Pack Slip Form Store Connect preference is set to PACKSLIP_STC.jasper.
How to generate: If the Print Pack Documents Store Connect preference is set to:
• Order Accept: Generated:
• when the associate selects Accept & Print
• optionally, if the associate selects Reprint Pack Doc
• Pick: Generated when the associate verifies the order or items as picked
• Both: Generated:
• when the associate selects Accept & Print
• optionally, when the associate selects Reprint Pack Doc
• when the associate verifies the order or items as picked
|
Field |
Description |
|---|---|
|
Header information |
|
|
Logo |
The Logo URL (packing slip) is in the upper left corner of the page, if specified; otherwise, this area is blank. |
|
Bar Code 
|
A bar code of the order number, in Code 128 format. Includes an asterisk (*) at the end, indicating to accept the entry. |
|
The shipping address for the order is below the logo. Included only for delivery orders. Includes: • first name, middle initial, last name • company name • first address line, including the apartment or suite, if any • three additional address lines, if any • city, state, zip code, and country |
|
|
SOLD TO |
The customer’s address is below the SHIP TO, if any, on the left. Includes: • first name, middle initial, last name • company name • first address line, including the apartment or suite, if any • three additional address lines, if any • city, state, zip code, and country |
|
Message |
The Delivery Pack Slip Message or PickUp Pack Slip Message, if any, is below the customer address. |
|
Additional order summary information To the right and below the order bar code.  |
|
|
Order type |
Either DELIVERY ORDER or PICKUP ORDER. |
|
Printed Date |
The current date when you generated the packing slip. |
|
Order Date |
The date when the order was created in Locate. |
|
Order Number |
The number assigned to the order by the originating system. |
|
Carrier |
The carrier specified at the order header. |
|
Express Shipping |
Indicates if the carrier for the order is flagged for express delivery. |
|
Pick Up |
Indicates if this is a pickup order. |
|
Items 
|
|
|
Item |
The system product code. Only order lines whose Next Action is Pick (Accepted status) can be included. Note: If the item code is very wide, it may be truncated. |
|
Description |
Note: If the item description is very wide, it may be truncated. |
|
Ship Qty |
Equal to the ordered quantity. |
|
Price |
No price prints for an order that is flagged as a gift. |
|
Ext. Price |
No extended price prints for an order that is flagged as a gift. |
|
Bottom of page |
|
|
Return Address |
The name and address of the organization, including: • organization name • name of your location that originated the order • first address line, including the suite, if any • three additional address lines, if any • city, state, zip code, and country |
________________________________
Copyright © 2017, Oracle and/or its affiliates. All rights reserved.
Legal Notices