Comparing ADS Projects
Data Migration Workbench enables you to compare the data in the ADS project file (source) with the data in the target database (signed on database).
The compare is always executed from the target database. First you must load the ADS project file and then execute the compare.
Starting in PeopleTools 8.57, any changes to data sets in the PSADSTRACKITEM table are tracked. When you run the compare, the compare results for tracked ADS definitions will produce results similar to the compare results in Application Designer.
Note: Tracked ADS definitions are defined in the table PSADSTRACKITEM.
To compare an ADS project:
On the target database, select .
Load the ADS project.
Click the Compare button.
Select the data sets to compare.
Optionally, set the compare options.
See Compare Options
Click the Run button.
Set your Process Scheduler options and click OK.
The process will be scheduled to run in the Process Scheduler.
Click OK again to return to the Project Definition page.
Click the Refresh icon on the Project Definition page to see the new status for the project.
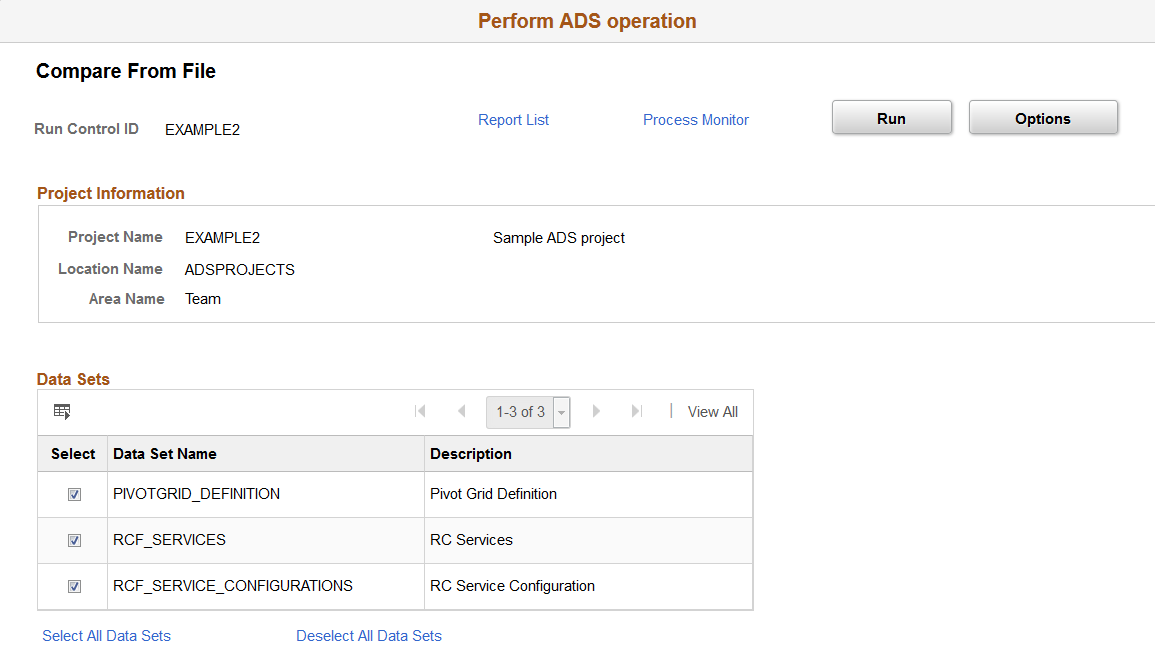
Use the Compare button on the Project Definition page to compare a project from a file.
Image: Compare From File page
This example illustrates the fields and controls on the Compare From File page. You can find definitions for the fields and controls later on this page.
|
Field or Control |
Definition |
|---|---|
| Data Sets |
By default all data sets in the project are selected. Use the links to select or deselect all data sets. Select each data set you want to compare. |
Compare Complete
When the compare is complete, the project status is updated and the compare report summary statistics are displayed.
Image: Compare Report Summary
This example illustrates the fields and controls on the Compare Report Summary. You can find definitions for the fields and controls later on this page.

To view the compare reports see Viewing Compare Reports.
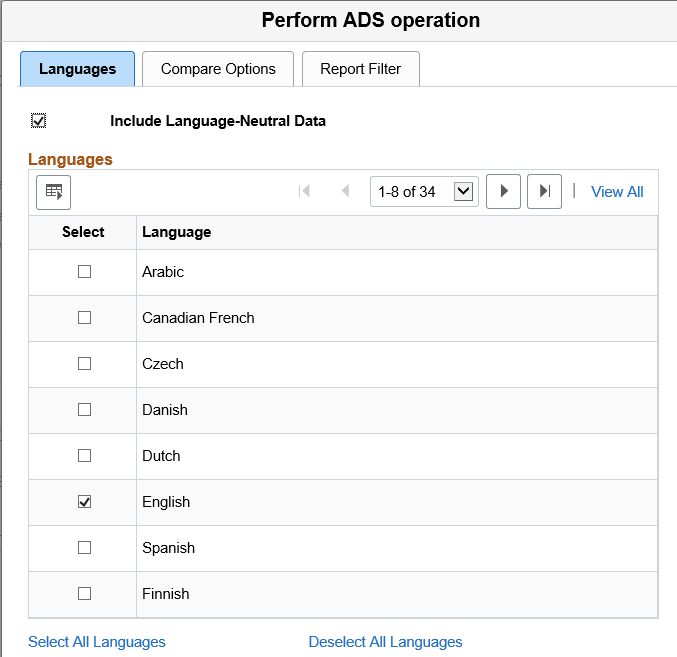
When you select the Options button, three tabs are displayed — Languages, Compare Options and Report Filter. These options are similar to the compare options available in Application Designer for Managed Objects.
Image: Languages page
This example illustrates the fields and controls on the Languages page. You can find definitions for the fields and controls later on this page.
|
Field or Control |
Definition |
|---|---|
| Include Language-Neutral Data |
By default this check box is selected. Language neutral data is data that is not translated. In an IDE project copy this is referred to as COMMON. |
| Languages |
By default all installed languages are selected. Use the links to select or deselect all languages. Select each language you want to compare. |
Note: This page applies to all data sets.
Image: Compare Options page
This example illustrates the fields and controls on the Compare Options page. You can find definitions for the fields and controls later on this page.
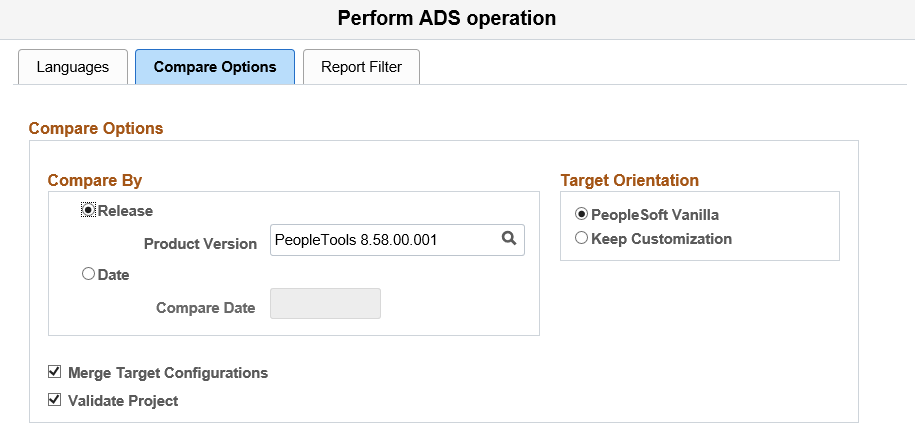
Note: The compare options Compare By and Target Orientation only apply to Tracked Data Sets .See Tracked ADS Definitions.
|
Field or Control |
Definition |
|---|---|
| Compare By |
Select Release to compare by the highest release in the target. Use the search icon to select other releases in the target. The Compare process labels definitions as Changed, *Changed (custom changed), or %Changed if they have been changed since the date and time stamp for that release level. This is the default. Select Date to have the Compare process label definitions as Changed, *Changed or %Changed if they have been changed since the date that you specify. |
| Target Orientation |
Determines how the Upgrade check boxes are set for comparing objects based on the user that last modified the object. To understand the impact of the target orientation, refer to Understanding Upgrade Action. |
| Merge Target Configurations |
If the data set includes mergeable group, this check box is selected by default. If the data set does not contain mergeable groups, this box is not selected and a message is displayed that the project does not contain any mergeable data sets. |
| Validate Project |
Select this check box if you want to validate the project when it is compared. By default the check box is selected. |
Note: The compare options Compare By and Target Orientation only apply to Tracked Data Sets .See Tracked ADS Definitions. For all other data sets, the page is display only.
Image: Report Filter page
This example illustrates the fields and controls on the Report Filter page. You can find definitions for the fields and controls later on this page.
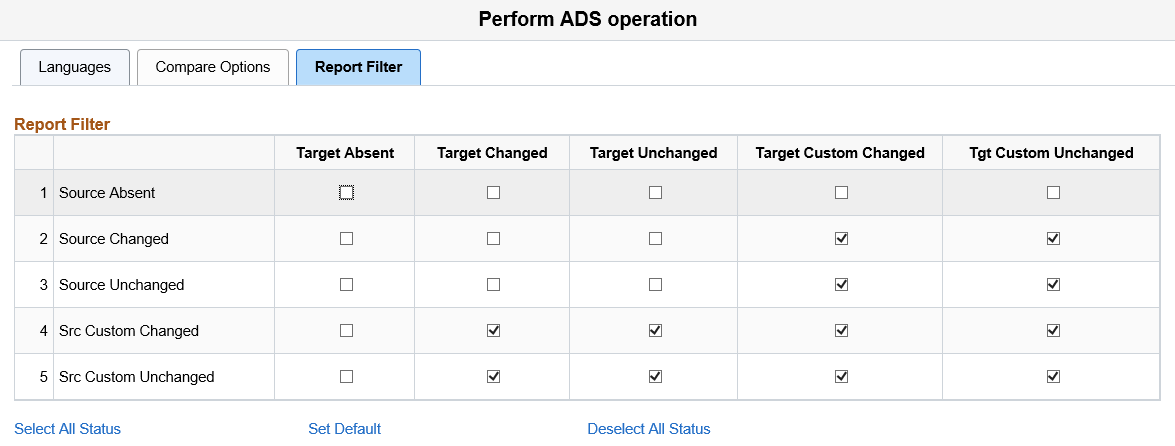
Before performing a comparison, you can select the definition status combinations with which you generate reports by using report filter options.
The default settings for report filtering show conflicting configured definitions only.
To reset your selections to the default setting, click the Default button.
To select all definition status combinations, click the Select All button.
If you don't want to generate any reports, click the Deselect All button to clear all of the check boxes