
This section provides detailed steps to install the Oracle Insurance Planner Application Pack.
Topics:
· Configure the OFS_OIP_PACK.xml File
· Configure the Schema Creator Utility
· Execute the Schema Creator Utility
· Configure the OFSAAI_InstallConfig.xml File
· Install the Oracle Insurance Planner Application Pack
You can use this checklist to have a glance at everything that you will be doing to install this application. The link provided in each step takes you to a section either within this document or to another referenced document.
Sl. No. |
Installation Activity |
|---|---|
1 |
Configure the OFS_OIP_PACK.xml file. |
2 |
Configure the OFS_OIP_SCHEMA_IN.xml file. |
3 |
Execute the Schema Creator Utility in Online, Offline, modes, and verify the log file. |
4 |
Configure the Silent.props file. |
5 |
Configure the OFSAAI_InstallConfig.xml file. |
6 |
Trigger the application installation. |
7 |
Verify the installation logs. |
The OFS_OIP_PACK.xml file contains details on the various products that are packaged in the Oracle Insurance Planner Application. This section details the various tags and parameters available in the file and the values that must be updated. Before installing the Oracle Insurance Planner Application, it is mandatory to update this file.
NOTE: Enable licenses as per your Service Level Agreement (SLA).
To configure the OFS_OIP_PACK.xml file, follow these steps:
1. Navigate to the OFS_OIP_PACK/conf directory.
2. Open the OFS_OIP_PACK.xml file in a text editor.
3. Configure the OFS_OIP_PACK.xml file as mentioned in the following table.
Tag Name or Attribute Name |
Description |
Mandatory (Y or N) |
Comments |
|---|---|---|---|
APP_PACK_ID |
Unique Application Pack Identifier |
Y |
Unique Seeded Value. Do not modify this value. |
APP_PACK_NAME |
Unique Application Pack Name |
Y |
Unique Seeded Value. Do not modify this value. |
APP_PACK_DESCRIPTION |
Unique Application Pack Description |
Y |
Unique Seeded Value. Do not modify this value. |
VERSION |
Unique release version |
Y |
Unique Seeded Value. Do not modify this value. |
APP |
Unique Application Entries |
Y |
Unique Seeded Value. Do not modify this value. |
APP_ID |
Unique Application Identifier |
Y |
Unique Seeded Value. Do not modify this value. |
APP_ID/ PREREQ |
Prerequisite Application or Product |
Y |
Unique Seeded Value. For most applications, the prerequisite that is set is OFSAAAI. For all other applications, the default Application ID is set to none. You can set it for the applications you want to install. Do not modify this value. |
APP_ID/ DEF_SEL_FLAG |
Default Selected Flag |
Y |
In all Application Packs, Infrastructure requires this value to be set to YES. Do not modify this value. |
APP_ID/ ENABLE |
Enable Application or Product |
Y |
· Default YES for Infrastructure · NO for Others Set this attribute-value to YES against every APP_ID which is licensed and must be enabled for use. NOTE: The Application or Product cannot be disabled once enabled. However, an Application or Product which is not enabled during installation can be enabled later through the Administration UI. |
APP_NAME |
Unique Application or Product Name |
Y |
Unique Seeded Value. Do not modify this value. |
APP_DESCRIPTION |
Unique Application or Product Name |
Y |
Unique Seeded Value. Do not modify this value. |
VERSION |
Unique release version |
Y |
Unique Seeded Value. Do not modify this value. |
Creating database users or schemas (RDBMS) is one of the primary steps in the complete Oracle Insurance Planner installation process. The Schema Creator utility enables you to quickly get started with the installation by creating Database User(s) or Schema(s) (RDBMS), assigning the necessary GRANT(s), creating the required entities in the schemas, and so on.
Configure and execute the schema creator utility before installing the OFSAA Application Pack.
Topics:
· Configure Schema Creator Utility for RDBMS Installation
Ensure you have the following before configuring the Schema Creator Utility:
· Oracle User ID and Password with SYSDBA privileges
· JDBC Connection URL for RAC or Non-RAC database
· The HOSTNAME or IP of the server on which OFSAA is being installed.
· It is recommended to set the PGA_AGGREGATE_LIMIT database-parameter value sufficiently when Oracle 18c or 19c is installed.
· You must add a TNS entry before the installation.
If the installation is being performed for RDBMS, provide the Pack-specific schema details in the OFS_OIP_SCHEMA_IN.xml file.
You can configure the following types of schemas:
· CONFIG: This schema holds the entities and other objects required for OFSAA setup configuration information. Only one CONFIG schema per OFSAA instance is permitted.
· ATOMIC: This schema holds the data model entities. One ATOMIC schema is attached to one Information Domain. You can have multiple ATOMIC schemas for a single OFSAA instance.
This section describes how to create database schemas, objects within schemas, and assign appropriate grants.
Specify the database schemas required for the installation in the OFS_OIP_SCHEMA_IN.xml file. Update the values of the various tags and parameters available in this file before executing the schema creator utility.
This file must be configured only if the database is RDBMS.
To configure the OFS_OIP_SCHEMA_IN.xml file, follow these steps:
1. Log in to the system as a non-root user.
2. Navigate to the OFS_OIP_PACK/schema_creator/conf directory.
3. Edit the OFS_OIP_SCHEMA_IN.xml file using a text editor.
Figure 7: Sample OFS_OIP_SCHEMA_IN.xml File
4. Configure the values as mentioned in the following table and save the file.
NOTE:
On successful execution of the utility, the passwords entered in the OFS_OIP_SCHEMA_IN.xml file are nullified.
Tag Name/Attribute Name |
Description |
Mandatory (Y/ N) |
Default Value/ Permissible Value |
Comments |
|---|---|---|---|---|
<APP_PACK_ID> |
Seeded unique ID for the OFSSAA Application Pack |
Y |
OFS_OIP_PACK |
Do not modify this value. |
<IS_TCPS> |
Enter if the TCPS configuration is required. |
Y |
Seeded, with FALSE as the default value. |
Modify this to TRUE if you require the installer to uptake the configuration. |
<JDBC_URL> |
Enter the JDBC URL. NOTE: You can enter the following JDBC URL types: 1. RAC/ NON-RAC enabled database connectivity URL. 2. TCPS RAC/ NON-RAC enabled database connectivity URL provided the <IS_TCPS> tag value is TRUE. 3. Wallet-enabled JDBC URL. |
Y |
Example: jdbc:oracle:thin:@< DBSERVER IP/ HOST/ IP>:<PORT>:<SID> or jdbc:oracle:thin:@//[HOS T][:PORT]/ SERVICE or jdbc:oracle:thin:@(DESCRI PTION=(ADDRESS_ LIST=(ADDRESS=(PROT OCOL=TCP)(HOST=[HO ST])(port=[PORT]))(ADD RESS=(PROTOCOL=TCP) (HOST=[HOST])(PORT=[ PORT]))(LOAD_ BALANCE=yes)(FAILOV ER=yes))(CONNECT_ DATA=(SERVICE_ NAME=[SERVICE]))) For example: jdbc:oracle:thin:@//dbhos t.server.com:1521/service 1 or jdbc:oracle:thin:@//dbsho st.server.com:1521/scan-1 or jdbc:oracle:thin:@(DESCRI PTION=(ADDRESS_ LIST=(ADDRESS=(PROT OCOL=TCP)(HOST=dbhost1.server.com) (port=1521))(ADDRESS=(PROTOCOL=TCP)(HOST=dbhost2.s erver.com)(PORT=1521))( LOAD_BALANCE=yes)(FAILOV ER=yes))(CONNECT_ DATA=(SERVICE_NAME=service1))) or <JDBC_URL>jdbc:oracle:thin:@(DESCRIPTION = (ADDRESS = (PROTOCOL =TCPS)(HOST = dbhost.server.com)(PORT = 2484)) (CONNECT_DATA =(SERVER = DEDICATED) (SERVICE_NAME=SERVICEID))(security=(ssl_server_cert_dn=CN=dbhost))) or jdbc:oracle:thin:/@ |
Ensure to add an entry (with SID/ SERVICE NAME) in the tnsnames.ora file on the OFSAA server. The entry must match with the SID/ SERVICE NAME used in the JDBC URL. Ensure that you have configured: 4. The correct Oracle Wallet with the credentials for stored Sys, Config, and Atomic Users. 5. The JDBC URL as follows: jdbc:oracle:thin:/@ For more information on how to configure Oracle Wallets for OFSAA Installation and Data Sources, see the OFS Analytical Applications Infrastructure Administration Guide. |
<JDBC_DRIVER> |
This driver's name is seeded by default. |
Y |
Example: oracle.jdbc.driver.OracleDriver |
Only JDBC Thin Driver is supported. Do not modify this value. |
<HOST> |
Enter the Hostname/ IP Address of the system on which you are installing the OFSAA components. |
Y |
Hostname/ IP Address |
|
<SETUPINFO>/PREFIX_SCHEMA_NAME |
Identifies whether the value specified in <SETUPINFO>/NAME attribute must be prefixed to the schema name. |
N |
YES or NO |
The default value is YES. |
<SETUPINFO>/NAME |
Enter the acronym for the type of implementation. This information is displayed on the OFSAA Home Page. On executing the schema creator utility, this value is prefixed with each schema name. For example: dev_ofsaaconf, uat_ofsaatm. |
Y |
Seeded, with REG PREFIX_SCHEMA_NAME="N as the default value. Accepts strings with a minimum length of two and a maximum of four. Example: DEV, SIT, PROD |
This name appears on the OFSAA Landing Page as "Connected To: xxxx". The schemas that are created get this prefix. For example, dev_ofsaaconf, uat_ofsaaconf, and so on. |
<PASSWORD>/ DEFAULT* |
Enter the password if you want to set a default password for all schemas. You also must set the APPLYSAME- FORALL attribute as Y to apply the default password for all the schemas. |
N |
Seeded, with oracle123 as the default value. The maximum length allowed is 30 characters. Special characters are not allowed. |
On successful execution of the utility, the entered password in the OFS_<APP PACK>_SCHEMA_IN.xml file is cleared. |
<PASSWORD>/ APPLYSAMEFORALL |
If you have entered Y in APPLYSAME- FORALL attribute and also have specified individual passwords for all the schemas, then the specified individual passwords will take precedence. |
Y |
Default N Permissible: Y or N. Enter Y if you want to apply the password specified in the DEFAULT attribute for all the schemas. If you enter as N, you must provide individual passwords for all schemas. |
Setting this attribute value is mandatory if the DEFAULT attribute is set. |
<SCHEMA>/TYPE |
The different types of schemas that are supported in this release are ATOMIC and CONFIG. By default, the schemas types are seeded based on the Application Pack. |
Y |
ATOMIC/CONFIG |
Only One CONFIG schema can exist in the file. Do not edit this attribute value. This schema identifies as the CONFIGURATION schema that holds the OFSAA setup detains and other Metadata information. Multiple ATOMIC schemas can exist in the file. |
<SCHEMA>/NAME |
The schemas’ names are seeded based on the Application Pack by default. You can edit the schema names if required. The Schema Name will have a prefix of the SETUPINFO/ NAME attribute.
|
Y |
Seeded, with OFSCONFIG as the default value. The permissible length is 15 characters and only alphanumeric characters are allowed. No special characters are allowed except underscore '_'. |
SETUPOINFO/NAME attribute value is prefixed to the schema name being created. For example, if a name is set as 'ofsaatm' and setupinfo as 'uat', then the schema being created is 'uat_ofsaatm'. . |
<SCHEMA>/PASSWORD |
Enter the password of the schema to be created. If this attribute is left blank, then the password specified in the <PASSWORD>/DEFAULT attribute is applied as the Schema Password. |
N |
The maximum length allowed is 30 characters. Special characters are not allowed. |
It is mandatory to enter the password if you have set the <PASSWORD>/ APPLYSAMEFORALL attribute as N. |
<SCHEMA>/APP_ID |
The Application ID is seeded based on the Application Pack by default. |
Y |
Unique seeded values are: OFS_AAI OFS_OIP |
Identifies the Application/ Product for which the schema is being created. Do not edit this attribute value. Do not modify this value. |
<SCHEMA>/DEFAULTTABLESPACE |
Enter the available default tablespace for DB User. If this attribute is left blank, then USERS is set as the default tablespace. |
N |
Seeded, with USERS as the default value. Permissible Any existing valid tablespace name. |
Modify this value to associate any valid tablespace with the schema. |
<SCHEMA>/TEMPTABLESPACE |
Enter the available temporary tablespace for DB User. If this attribute is left bank, TEMP is set as the default tablespace. |
N |
Seeded, with TEMP as the default value. Permissible Any existing valid temporary tablespace name. |
Modify this value to associate any valid tablespace with the schema. |
<SCHEMA>/QUOTA |
Enter the quota to be set on the DEFAULTTABLESPACE attribute for the schema/ user. Minimum: 500M or Unlimited on default Tablespace. |
N |
Permissible values are a minimum of 500M or UNLIMITED as the default value. Example: 600M/m 20G/g UNLIMITED/unlimited |
Modify this value to grant the specified quota on the mentioned tablespace to the user. |
<SCHEMA>/ INFODOM |
Enter the name of the Information Domain to associate this schema. The schema creator utility automatically derives an Information Domain Name based on the Application Pack if no value is specified for this attribute. |
N |
Seeded, with OFSINFDOM as the default value. Permissible length is 16 characters and only alphanumeric characters are allowed. No special characters are allowed. |
|
<ADV_SEC_OPTIONS>/ |
Parent tag to hold Advance Security Options. |
N |
|
Uncomment the tag and edit if you want to add security options. For example, TDE and Data Redact. For details, see the example in the comments for the <TABLESPACE>/ENCRYPT tag. |
<ADV_SEC_OPTIONS>/TDE |
Tag to enable/disable TDE. |
N |
The default is FALSE. To enable TDE, set this to TRUE. |
Ensure this tag is not commented if you have uncommented <ADV_SEC_OPTIONS> |
<ADV_SEC_OPTIONS>/DATA_REDACT |
Tag to enable/disable the Data Redaction feature. |
N |
The default is FALSE. To enable DATA_REDACT, set this to TRUE |
Ensure this tag is not commented if you have uncommented<ADV_SEC_OPTIONS> |
<TABLESPACES> |
Parent tag to hold <TABLESPACE> elements |
N |
NA |
Uncomment the tag and edit. ONLY if tablespaces are to be created as part of the installation. For details, see the example following the table. When TDE is TRUE in ADV_SEC_OPTIONS, then the <TABLESPACES> tag must be present in the XML file. |
<TABLESPACE>/NAME |
Logical Name of the tablespace to be created. |
Y |
|
Name, if specified, must be referred in the <SCHEMA DEFAULTTABLESPACE= "##NAME##"> attribute. Note the ## syntax. |
<TABLESPACE>/VALUE |
Physical Name of the tablespace to be created. |
Y |
NA |
Value, if specified, is the actual name of the TABLESPACE. |
<TABLESPACE>/DATAFILE |
Specifies the location of the data file on the server. |
Y |
NA |
Enter the absolute path of the file to be created. |
<TABLESPACE>/AUTOEXTEND |
Specifies if the tablespace must be extensible or have a hard limit. |
Y |
ON or OFF |
Set to ON to ensure that the tablespace does not run out of space when full. |
<TABLESPACE>/ENCRYPT |
Specifies if the tablespace(s) must be encrypted using TDE |
Y |
ON or OFF |
Set to ON to ensure that the tablespaces when created are encrypted using TDE. NOTE: Encryption of tablespaces requires enabling Transparent Data Encryption (TDE) on the Database Server. Example: The following snippet shows that TDE is enabled and hence the tablespace is shown with encryption ON. <ADV_SEC_OPTIONS> <OPTION NAME="TDE" VALUE="FALSE"/> <OPTION NAME="DATA_REDACT" VALUE="FALSE" /> </ADV_SEC_OPTIONS> <TABLESPACES> <TABLESPACE NAME="OFS_AAI_TBSP_1" VALUE="TS_USERS1" DATAFILE="/ scratch/ora19c/app/oracle/oradata/OFSPQA19cDB/ts_users1.dbf" SIZE="500M" AUTOEXTEND="ON" ENCRYPT="ON" /> <TABLESPACE NAME="OFS_AAI_TBSP_2" VALUE="TS_USERS2" DATAFILE="/ scratch/ora19c/app/oracle/oradata/OFSPQA19cDB/ts_users2.dbf" SIZE="500M" AUTOEXTEND="ON" ENCRYPT="ON" /> </TABLESPACES>
<SCHEMAS> <SCHEMA TYPE="CONFIG" NAME="ofsaaconf" PASSWORD="" APP_ID="OFS_AAI" DEFAULTTABLESPACE="##OFS_AAI_TBSP_1##" TEMPTABLESPACE="TEMP" QUOTA="unlimited"/> <SCHEMA TYPE="ATOMIC" NAME="ofsaaatm" PASSWORD="" APP_ID="OFS_AAAI" DEFAULTTABLESPACE="##OFS_AAI_TBSP_2##" TEMPTABLESPACE="TEMP" QUOTA="unlimited" INFODOM="OFSAAAIINFO"/> </SCHEMAS> |
Depending on the option selected, select the appropriate schema creator utility execution option.
· Execute the Schema Creator Utility in Offline Mode
· Execute the Schema Creator Utility in Online Mode
· Execute the Schema Creator Utility in TCPS Mode
· Execute the Schema Creator Utility while Installing Subsequent Applications Pack
After creating the schema, proceed to Configure the OFSAAI_InstallConfig.xml File.
In the Offline mode, the utility generates an SQL script with all the required DDLs for Users, Objects, and Grants. This script must be executed by the DBA on the appropriate database identified for OFSAA usage. If you do not have the SYSDBA privileges, you can execute the Schema Creator Utility in Offline mode and generate the script file that contains the Schemas, Objects, and Grants information. Subsequently, an SYSDBA user can execute the script file manually. To run the OFSAA Application Pack installer in Silent mode, it is mandatory to execute the schema creator utility with the -s option.
To execute the utility in Offline mode, you must have a database user with the following GRANTS (alternatively, you can also connect as a user with SYSDBA privileges):
· SELECT ON DBA_ROLES
· SELECT ON DBA_USERS
· SELECT ON DBA_DIRECTORIES
· SELECT ON DBA_TABLESPACES
· CREATE SESSION
NOTE:
Explicit Grants to the user are required. Grants assigned through Roles are not supported.
To execute the schema creator utility in the offline mode, follow these steps:
1. Log in to the system as a non-root user.
2. Navigate to the following path: OFS_OIP_PACK/schema_creator/bin.
3. Execute the osc.sh file using the following command:
./osc.sh -s -o
4. The following message is displayed:
You have chosen OFFLINE mode. Triggering the utility in OFFLINE mode will generate the script. Do you wish to proceed? (Y/y or N/n).
5. Enter Y to proceed.
6. Enter the DB Username with SELECT privileges.
7. Enter the User Password.
8. The console runs the initial validation checks and displays the following message:
You have chosen to install this Application Pack on <Name of the Atomic Schema> ATOMIC schema. Do you want to proceed? (Y or N).
9. Enter Y to start the script generation. The following message is displayed:
You have chosen to install this Application Pack on <Name of the Infodom>. Do you want to proceed? (Y or N).
On successful execution of the schema creator utility, the console displays the following status message:
Schema Creator executed successfully. Please execute scratch/ofsaaapp/OFS_OIP_PACK/schema_creator/sysdba_output_scripts.sql before proceeding with the installation.
NOTE:
Check the log files in the path OFS_OIP_PACK/schema_creator/logs. If there are any errors during the SQL script execution, reconfigure the OFS_OIP_SCHEMA_IN.xml, and repeat steps in this procedure to execute the utility. This regenerates the scripts with the correct information.
10. Navigate to the OFS_OIP_PACK/schema_creator directory.
11. Log in to SQLPLUS as a user having SYSDBA Privileges.
12. Execute the sysdba_output_scripts.sql file using the following command:
SQL>@sysdba_output_scripts.sql
Alternatively, you can copy the sysdba_output_scripts.sql file and SQLScripts directory to a remote server and execute the sysdba_output_scripts.sql file, after providing appropriate execute permissions.
13. Make a TNS entry for the new users created. For details, see Add the TNS entries in TNSNAMES.ORA file section.
NOTE:
See the sysdba_output_scripts.log file for execution status. If there are any errors, contact My Oracle Support. If there are no errors in the execution, the log file is empty.
As a result of this task, the OFS_OIP_SCHEMA_OUTPUT.XML file is generated. Do not modify this file.
After creating the schema, proceed to Configure the OFSAAI_InstallConfig.xml File section.
In Online mode, the utility connects to the database and executes the DDLs for Users, Objects, and Grants. If you have SYSDBA privileges you can execute the Schema Creator Utility in Online mode and thereby create the Users, Objects, and Grants during the execution process. To execute the utility in the Online mode, you must connect as <User> AS SYSDBA.
If you want to run the OFSAA Application Pack Installer in Online mode, it is mandatory to execute the schema creator utility with the -s option.
To execute the utility with the -s option in online mode, follow these steps:
1. Edit the file OFS_OIP_PACK/schema_creator/conf/OFS_OIP_SCHEMA_IN.xml in a text editor. See Configure the OFS_OIP_SCHEMA_IN.xml File section for values to modify in the XML file.
2. Execute the utility with -s option. For Example: ./osc.sh -s
3. Make a TNS entry for the new users created. For details, seeAdd the TNS entries in TNSNAMES.ORA file.
4. The following message is displayed:
You have chosen ONLINE mode. Triggering the utility in ONLINE mode will execute the DDLs directly on the Database. Do you wish to proceed? (Y/y or N/n).
5. Enter Y to proceed.
6. The following message is displayed:
You have chosen to install this application pack on INFODOM “<INFODOM_NAME>”. Do you wish to proceed? (Y/y or N/n).
7. Enter Y to proceed.
8. After Schema creation is successful, proceed to Configure the OFSAAI_InstallConfig.xml File.
As a result of this task is the OFS_OIP_SCHEMA_OUTPUT.XML file is generated. Do not modify this file.
If you intend to run the OFS Insurance Accounting Application Pack Installer in TCPS mode, it is mandatory to execute the schema creator utility with the -s option and in online mode.
Prerequisite:
Configure the Oracle Wallet with trusted certificates between the DB Server with TCPS configured and the DBClient to enable communication through the SSL protocol.
NOTE:
You can also use Oracle Wallet to support OFSAA for storing Config and Atomic Schema credentials. To add OFSAA Config and Atomic Schema credentials to Oracle Wallet, see the OFS Analytical Applications Infrastructure Administration Guide.
For example, all the database utilities such as sqlplus, tnsping, and sqlldr must work between the Client and the Server.
To execute the utility, follow these steps:
1. Edit the file OFS_OIP_PACK/schema_creator/conf/OFS_OIP_SCHEMA_IN.xml in the text editor. See the tables in the Configure the OFS_OIP_SCHEMA_IN.xml File section for values to modify in the XML file.
2. Execute the utility with -s option.
./osc.sh -s TCPS <WALLET_HOME>
For example: $ ./osc.sh -s TCPS /scratch/oraofss/wallet
Figure 8: Schema Creation in the TCPS Mode
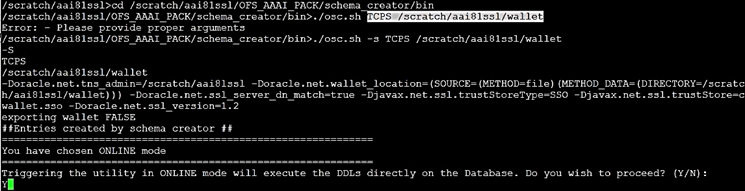
3. The following message is displayed:
Triggering the utility in ONLINE mode will execute the DDLS directly on the Database. Do you wish to proceed? (Y/y or N/n).
4. Enter Y to proceed.
5. The following message is displayed:
You have chosen to install this application pack on “<ATOMIC_SCHEMA_NAME>” ATOMIC schema. Do you wish to proceed? (Y/y or N/n).
Figure 9: Schema Creation in the TCPS Mode – Install on Atomic Schema

6. Enter Y to proceed.
Figure 10: Schema Creation in the TCPS Mode
The result of this task is that the OFS_OIP_SCHEMA_OUTPUT.XML file is generated. Do not modify this file.
7. After Schema creation is successful, proceed to Configure the OFSAAI_InstallConfig.xml File section.
When executing the schema creator utility during the installation of a subsequent Applications Pack, you can choose to install the pack either on the same Information Domain and the same Atomic Schema of the existing application pack or on a new Information Domain and the same Atomic Schema of the existing application pack. You can execute the schema creator utility either in Online or Offline mode.
The following is an example of executing the schema creator utility while installing Oracle Insurance Planner over an existing Application Pack in an offline mode:
1. Edit the file OFS_OIP_PACK/schema_creator/conf/OFS_OIP_SCHEMA_IN.xml in a text editor. See the Configure the OFS_OIP_SCHEMA_IN.xml File section for values you must modify in the XML file.
2. Execute the utility with -s option. For Example: ./osc.sh –s -o
After successful schema creation, execute the sysdba_output_scripts.sql file
NOTE:
You must use the same config schema user name as the previous application pack.
3. The utility identifies the application packs that are already installed on the current OFSAA setup and displays the following on the console:
§ Atomic schema of the existing application pack
§ Information Domain Name of the existing pack
§ List of installed application packs
4. Enter Y or y to start the schema creation.
5. If you enter N or n, the list of Atomic Users is displayed.
6. Select the Atomic User on which you want to install the application pack.
7. Make a TNS entry for the new users created. For details, see Add the TNS entries in TNSNAMES.ORA file section.
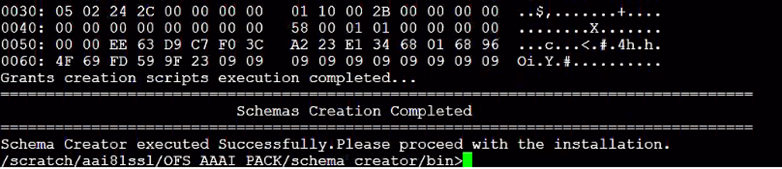
On successful execution of schema creator utility, the console displays the following status message:
Success. Please proceed with the installation.
NOTE:
1. See the log file in the OFS_OIP_PACK/schema_creator/logs directory for the execution status.
2. See the log file sysdba_output_scripts.log for the execution status if executed in offline mode. The log will be empty if there are no errors in the execution.
3. If there are any errors, contact My Oracle Support.
To configure the OFS_InstallConfig.xml file, follow these steps:
1. Navigate to the OFS_OIP_PACK/OFS_AAI/conf/ directory.
2. Open the OFSAAI_InstallConfig.xml file in a text editor.
3. Configure the OFSAAI_InstallConfig.xml file as mentioned in the following table.
You must manually set the InteractionVariable parameter values as mentioned in the table. If a value is not applicable, enter NA. Ensure that the value is not entered as NULL.
InteractionVariable Name |
Significance and Expected Value |
Mandatory |
|---|---|---|
<Layer name="GENERAL"> |
||
InteractionGroup name=”WebServerType” |
||
WEBAPPSERVERTYPE |
Identifies the web application server on which the OFSAA Infrastructure web components are deployed. Set the following numeric value depending on the type of web application server: · Apache Tomcat = 1 · IBM WebSphere Application Server = 2 · Oracle WebLogic Server = 3 For example, <InteractionVariable name="WEBAPPSERVERTYPE">3</InteractionVari able> |
Yes |
InteractionGroup name=”OFSAA Infrastructure Server Details” |
||
DBSERVER_IP |
Identifies the hostname or IP address of the system on which the Database Engine is hosted. NOTE: For RAC Database, the value must be NA. For example, <InteractionVariable name="DBSERVER_ IP">14.15.16.17</InteractionVariable> or <InteractionVariable name="DBSERVER_ IP">dbhost.server.com</InteractionVariable> |
Yes |
InteractionGroup name=”Database Details” |
||
ORACLE_SID/SERVICE_NAME |
Identifies the Oracle DB Instance SID or SERVICE_NAME Note: The Oracle_SID value must be the same as it is mentioned in JDBC_URL. For example, <InteractionVariable name="ORACLE_SID/SERVICE_ NAME">ofsaser</InteractionVariable> |
Yes |
ABS_DRIVER_PATH |
Identifies the directory where the JDBC driver (ojdbc<version>.jar) exists. This is typically the $ORACLE_HOME/jdbc/lib directory. For example, <InteractionVariable name="ABS_DRIVER_ PATH">">/oradata6/revwb7/ oracle </InteractionVariable> NOTE: See Hardware and Software Requirements to identify the correct ojdbc<version>.jar file version to be copied. |
Yes |
InteractionGroup name=”OLAP Detail” |
||
OLAP_SERVER_ IMPLEMENTATION |
Identifies whether the OFSAA Infrastructure OLAP component must be configured. It depends on whether you intend to use the OLAP feature. The following numeric value must be set depending on the choice: · YES: 1 · NO: 0 NOTE: If the value for OLAP_SERVER_IMPLEMENTATION is set to 1, the installer checks if the following environment variables are set in the .profile file: · ARBORPATH · HYPERION_HOME · ESSBASEPATH |
No |
InteractionGroup name=”SFTP Details” |
||
SFTP_ENABLE |
Identifies if the SFTP (Secure File Transfer Protocol) feature is to be enabled. The following numeric value must be set depending on the choice: · SFTP: 1 · FTP: 0 |
Yes |
NOTE: The default value for SFTP_ENABLE is 1, which signifies that SFTP is used. Oracle recommends using SFTP instead of FTP because SFTP is more secure. However, you can ignore this recommendation and use FTP by setting SFTP_ENABLE to 0. You can change this selection later from the OFSAAI administration interface. Set SFTP_ENABLE to -1 to configure ftpshare and weblocal path as a local path mounted for the OFSAAI server. |
||
FILE_TRANSFER_PORT |
Identifies the port used for the file transfer service. The default value specified is 22 (SFTP). Specify the value like 21 or any other PORT value if the value for SFTP_ENABLE is 0. For example, <InteractionVariable name="FILE_TRANSFER_ PORT">21</InteractionVariable> |
Yes |
InteractionGroup name=”Locale Detail” |
||
LOCALE |
Identifies the locale information to be used during the installation. This release of the OFSAA Infrastructure supports only US English. For example, <InteractionVariable name="LOCALE">en_US</InteractionVariable> |
Yes |
InteractionGroup name=”OFSAA Infrastructure Communicating ports" NOTE: The following ports are used internally by the various OFSAA Infrastructure services. The default values mentioned are set in the installation. If you intend to specify a different value, update the parameter value accordingly, ensure that the port value is in the range 1025 to 65535, and the respective port is enabled. |
||
JAVAPORT |
9999 |
Yes |
NATIVEPORT |
6666 |
Yes |
AGENTPORT |
6510 |
Yes |
ICCPORT |
6507 |
Yes |
ICCNATIVEPORT |
6509 |
Yes |
OLAPPORT |
10101 |
Yes |
MSGPORT |
6501 |
Yes |
ROUTERPORT |
6500 |
Yes |
AMPORT |
6505 |
Yes |
InteractionGroup name="Web Details" NOTE: If the value for HTTPS_ENABLE is set to 1, ensure that you have a valid certificate available from a trusted CA and it is configured on your web application server. |
||
HTTPS_ENABLE |
Identifies whether the UI must be accessed using HTTP or HTTPS scheme. The default value is set to 0. The numeric value must be set depending on the following options: · YES: 1 · NO: 0 For example, <InteractionVariable name="HTTPS_ENABLE">0</InteractionVariable> |
Yes |
WEB_SERVER_IP |
Identifies the HTTP Server IP/ Hostname or Web application server IP/ Hostname, to be used to access the UI. This IP is typically the HTTP Server IP. If a separate HTTP Server is not available, then the value must be Web application server IP/Hostname. For example, <InteractionVariable name="WEB_SERVER_ IP">10.11.12.13</InteractionVariable> or <InteractionVariable name="WEB_SERVER_ IP">myweb.server.com</InteractionVariable> |
Yes |
WEB_SERVER_PORT |
· Identifies the Web Server Port, which is typically 80 for non-SSL if the HTTPS_ENABLE variable is 0 and 443 for SSL if the HTTPS_ENABLE variable is 1. If a separate HTTP Server exists, the port value must be the value configured for the Web Server. For example, <InteractionVariable name="WEB_ SERVER_PORT">80</InteractionVariable> |
No |
CONTEXT_NAME |
Identifies the web application context name which is used to build the URL to access the OFSAA application. You can identify the context name from the following URL format: <scheme>://<host>:<port>/<context-name>/ login.jsp The following is an example: https://myweb:443/ofsaadev/login.jsp For example, <InteractionVariable name="CONTEXT_ NAME">ofsaadev</InteractionVariable> |
Yes |
WEBAPP_CONTEXT_PATH |
Identifies the absolute path of the exploded EAR file on the web application server. · For Tomcat, specify the Tomcat directory path till /webapps. For example, /oradata6/ revwb7/tomcat/webapps/. · For WebSphere, specify the WebSphere path as <WebSphere profile directory>/installedApps/<NodeCellName>. · For example, / data2/test//WebSphere/AppServer/profiles/<Profile_Name>/installedApps/aiximfNode01Cell, where aix-imf is the Hostname. · For WebLogic, specify the WebLogic home directory path. For example, /<WebLogic home directory path>/bea/wlserver_10.3 |
Yes |
WEB_LOCAL_PATH |
Identifies the absolute path to any directory on the web application server that can hold temporary files, which are uploaded as part of the usage of the application. Set this in the FTPSHARE location. NOTE: During a clustered deployment, ensure that this path and the directory are the same on all the nodes. |
Yes |
InteractionGroup name="Weblogic Setup Details” |
||
WEBLOGIC_DOMAIN_HOME |
Identifies the WebLogic Domain Home. For example, <InteractionVariable name="WEBLOGIC_DOMAIN_HOME">/home/weblogic/bea/user_ projects/ domains/mydomain</InteractionVariable> |
Yes. Specify the value only if WEBAPPSERVERTYPE is set as 3 (WebLogic) |
InteractionGroup name="OFSAAI FTP Details” |
||
OFSAAI_FTPSHARE_PATH |
Identifies the absolute path of the directory that is identified as the file system stage area. NOTE: The directory must exist on the same system on which the OFSAA Infrastructure is being installed (can be on a separate mount). The user mentioned in this parameter in the following example must have Read, Write, and Execute (RWX) permission on the directory. For example, <InteractionVariable name=" OFSAAI_FTPSHARE_PATH ">">/oradata6/revwb7/ftpshare</ InteractionVariable> |
Yes |
OFSAAI_SFTP_USER_ID |
The user mentioned in this parameter must have Read, Write, and Execute (RWX) permission on the directory. |
Yes |
OFSAAI_SFTP_PRIVATE_KEY |
Identifies the SFTP private key for OFSAAI. For example, <InteractionVariable name="OFSAAI_SFTP_PRIVATE_KEY">/home/ofsaapp/.ssh/id_rsa</InteractionVariable> By default, the value is NA, which indicates that, for authentication, you are prompted to enter the password for the user <OFSAAI_SFTP_USER_ ID>. For more information on how to generate an SFTP Private key, see the Set Up SFTP Private Key section. |
No |
OFSAAI_SFTP_PASSPHRASE |
Identifies the passphrase for the SFTP private key for OFSAAI. For example, InteractionVariable name="OFSAAI_SFTP_PASSPHRASE">enter a pass phrase here</InteractionVariable> By default, the value is NA. If the OFSAAI_SFTP_PRIVATE_KEY value is given and the OFSAAI_SFTP_PASSPHRASE value is NA, then the passphrase is identified as empty. |
No |
Log in to OFSAA UNIX user using the Putty tool, where you plan for installation and generate a pair of authentication keys using the ssh-keygen command. If required, set a passphrase. Otherwise, the OFSAAI_SFTP_PASSPHRASE tag must be set to NA.
To generate a private key, enter the commands as shown:
ssh-keygen -t rsa
Generating public/private rsa key pair.
Enter file in which to save the key (/home/ofsaapp/.ssh/id_rsa):
Created directory '/home/ofsaapp/.ssh'.
Enter passphrase (empty for no passphrase):
Enter the same passphrase again:
Your identification has been saved in /home/ofsaapp/.ssh/id_rsa.
Your public key has been saved in /home/ofsaapp/.ssh/id_rsa.pub.
The key fingerprint is:
3e:4f:05:79:3a:9f:96:7c:3b:ad:e9:58:37:bc:37:e4
ofsaapp@OFSASERVER:~> cat /home/ofsaapp/.ssh/id_rsa.pub >> /home/ofsaapp/.ssh/authorized_keys
Ensure the following permissions exist for the given directories:
· permissions of .ssh must be 700
· permissions of .ssh/authorized_keys must be 640
· permission of .ssh/id_rsa must be 400
· Permission of UNIX User created must be 755
ATTENTION:
Before you begin the installation, configure and execute the following files:
1. Configure the OS File System Settings and Environment Settings in the .profile File
2. Configure OFS_OIP_PACK.xml File
3. Configure OFS_OIP_SCHEMA_IN.xml
4. Configure the OFSAAI_InstallConfig.xml File (Do not configure this file if an installation of OFSAAI 8.1 already exists.)
5. Execute the Schema Creator Utility
NOTE:
· For enabling the Right to be Forgotten, see the Right to be Forgotten.
· For enabling Data Redaction, see the Data Redaction section. For more details, see the Data Redaction section, under Data Security and Data Privacy chapter in the OFS Analytical Applications Infrastructure Administration Guide.
To install the Oracle Insurance Planner Application Pack, follow these steps:
1. Log in to the system as a non-root user.
2. Identify a directory for installation and set the same in the user .profile file as follows:
FIC_HOME=<OFSAA Installation Directory>
export FIC_HOME
3. Execute the user .profile file.
4. Navigate to the OFS_OIP_PACK directory.
5. Execute the schema creator utility with the –s option.
6. Navigate to the path OFS_OIP_PACK/conf/OFS_OIP_PACK.xml, and check if the enable tag for OFS_AAI and OFS OIP is set to YES.
7. Rename the OFS_OIP_PACK/appsLibConfig/conf/Silent.Template file to OFS_OIP_PACK/appsLibConfig/conf/Silent.props.
8. Installation is achieved through the properties file (Silent.props) that must be updated with proper values, before attempting to install using silent mode. Edit the parameters in the Silent.props file and specify the parameters as per the requirements.
The following table lists all the properties that must be specified:
Property Name |
Description of Property |
Permissible values |
Comments |
|---|---|---|---|
LOG_MODE |
Specify Log Mode |
1 = Debug Mode 0 = General Mode [Passwords will not be printed in the log file] |
Password will be printed in the log file. The default value is 0. |
APPFTP_LOG_PATH |
Specify
the Infodom Maintenance log path (to be created) for the new Infodom. |
User Input |
|
DBFTP_LOG_PATH |
Specify
the Infodom Maintenance log path (to be created) for the new Infodom. |
User Input |
|
UPLOAD_MODEL |
Specify whether you want to perform Model Upload. |
0
= If you have already performed Model Upload and want to skip
the model upload process. |
The default value is 1. |
MODEL_TYPE |
Specify whether you want to use the released data model or customized data model for the model upload process. |
0
= If you want to upload the released data model. |
The default value is 0. |
DATAMODEL
|
Specify
the path (DM_DIRECTORY) and file (DATAMODEL) name for the customized
data model. |
User Input |
|
SEGMENT_1_CODE |
Specify the OIP Segment Code. |
OIP809SEG |
The default value is OIP809SEG. |
OBI_HOST |
Specify the Host Name of the OBIEE Server |
User Input |
This field should NOT be left blank. If OBIEE is not configured at the moment, ensure that you provide a dummy value in this field |
OBI_PORT |
Specify the Port Number of the OBIEE Server |
User Input |
This field should NOT be left blank. If OBIEE is not configured at the moment, ensure that you provide a dummy value in this field. |
OBI_CONTEXT |
Specify the Context Name of the OBIEE Server |
User Input |
This field should NOT be left blank. If OBIEE is not configured at the moment, ensure that you provide a dummy value in this field. |
ETL_APPSRC_TYPE |
Specify if you want to create a new ETL App/Src pair or use an existing one. |
0
= If you want to create a new ETL app/src pair. |
The default value is 1. |
ETL_SRC_1_DESC |
ETL Staging source description. |
Describe the ETL Src. Mandatory if you want to create a new ETL Src if you have specified ETL_APPSRC_TYPE= 1. |
The default value is Staging. |
ETL_SRC_2_DESC |
ETL Processing source description. |
Describe the ETL Src. Mandatory if you want to create a new ETL Src if you have specified ETL_APPSRC_TYPE= 1. |
The default value is Processing. |
ETL_SRC_1_NAME |
ETL Staging source name. |
User Input |
The default value is Staging. Specify the ETL Source Name into ETL Area Definitions to be deployed. |
ETL_SRC_2_NAME |
ETL Processing source name. |
User Input |
The default value is Processing. Specify the ETL Source Name into ETL Area Definitions to be deployed. |
NOTE:
Do not install new packs in the same segment if the preinstalled applications use the Run Management functionality of OFSAAI.
9. Enter the following command in the console to execute the application pack installer with the Silent option.
./setup.sh SILENT
10. The installer proceeds with Pre-Installation Checks.
11. Enter the OFSAA Processing Tier FTP or SFTP password value and proceed, when prompted in the command prompt.
Console Prompts |
User Inputs |
|---|---|
Please enter OFSAA Processing Tier FTP or SFTP password |
Enter the password to access the processing tier in the application server. NOTE: If the prompt reads as follows, enter the username and password for accessing the product Staging or Metadata Repository FTPSHARE: · Kerberos username [user] · Kerberos password for user |
12. The process displays the OFSAA License. Enter Y and proceed.
13. The installer installs the AAI application.
14. After the platform is installed, the Oracle Insurance Planner installation begins.
15. After Data Model Upload is complete, verify the installation logs in the log directories mentioned in the Verify the Log File Information section.
16. After successful OIP pack installation, the WAR file is generated and all the servers are verified and the installation complete message is displayed.
17. The OFSAA Infrastructure installation performs a post-install health check automatically on the successful installation of the product.
18. On completion of the installation, verify the installation log files mentioned in the Verify the Log File Information section.
NOTE:
· Perform steps mentioned in the Post-Installation section.
· Ensure that the OFS_OIP_PACK installer directory with its contents is preserved, for enabling additional products in the future.
See the following logs files for more information:
· See the log files in the locations, for Oracle Insurance Planner installation.
· See the log file (or files) in the OFS_OIP_PACK/OFS_AAI/logs/ directory for the Infrastructure installation log.
· See the logfile located at the $FIC_HOME directory for the Infrastructure installation log.
· See the pack_install.log file in the OFS_OIP_PACK/logs directory.
NOTE:
If you are installing on the Cloud infrastructure, refer to the section Updating the Config Schema Editing.