2 System Configurations
Below are the changes introduced for the Norwegian Fiscal Enhancements in order to meet the requirements specified by the Norwegian Tax Authority.
Company Details
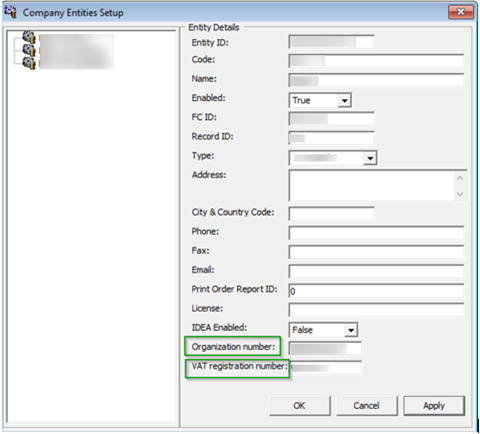
You must set up the Company entities for the company information to be shown on the report.
Figure 2-1 Company Entities Setup
-
Log in to the Administration module and select Administration, System Setup.
-
Select Company Entities Setup and enter the value for two new entities as follows:
-
Organization number: Organization number from Register Centre or other relevant government authority.
-
VAT registration number: The Company’s Value Added Tax (VAT) number. This is the unique number from the Register Centre.
-
Printer Configuration
A printer set-up is needed to print the required receipts such as Sales Receipt, Delivery Receipt, and Return Receipts.
-
From the Management module, Options, select the Hardware menu.
-
Select Report Printers as Receipts and select the printer from the drop-down list.
-
Click Apply to save and exit the configuration screen.
Predefined Code Mapping
In the Norwegian E-Journal Report, it is necessary to display the standard predefined code instead of a system code, for example, the standard predefined code for VAT rate and main department. Therefore, code mapping between the standard predefined code and the system code is required. The Predefined Code Mapping button is enabled when the PAR Use Norwegian Fiscal Requirements is enabled, and you have the authorization to access this function.
To map the standard predefined code to the system code, log in to the Administration module and click the Administration, System Codes button, and then click the Predefined Code Mapping at the top of the menu.
Standard Predefined Code 04 — Article Group/Department Codes
Figure 2-2 Sample Predefined Article Group
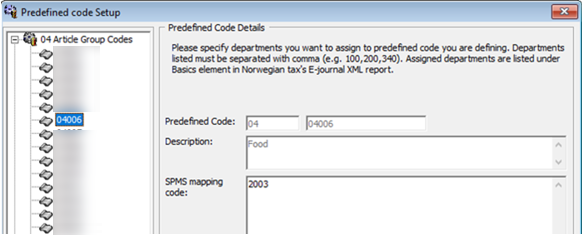
This code is used to configure the system debit department code. In the screen example above (Figure 2–2), the system debit department code 2003 for food is mapped to standard predefined code 04 and predefined ID 04006.
The report displays this standard predefined code in <basicType> and <predefinedBasicID> under <basics> element.
Standard Predefined Code 11 – Transaction Codes
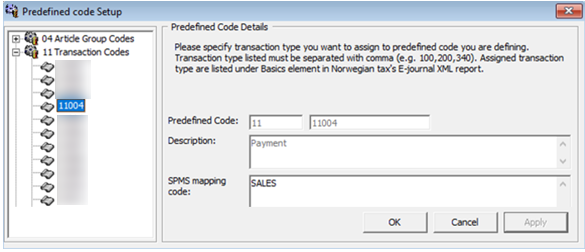
This code is used to configure the system transaction code. The payment transaction code SALES is mapped to the standard predefined code 11 and predefined ID 11004 as shown in figure 2–3 figure below.
Figure 2-3 Sample Predefined Transaction Codes
There are two categories of transaction code in the system:
Transaction code for Point-of-Sales (POS) record. This appears in <lineType> under <ctLine> element on the report. There are five types of transaction codes for POS record. You must follow the exact system transaction code per the following and configure it into the user interface to avoid unmapped data and incorrect information being displayed.
-
POST (add posting)
-
SALES (payment)
-
REFUND (return payment)
-
DIS (discount)
-
VOID (void posting)
Transaction code for receipt type. This appears in <transType> under the <cashtransaction> element on the report. There are four types of transaction codes for receipt type. You must follow the exact system transaction code shown below to configure it into the user interface.
-
SALES (Sales Receipt)
-
RETURN (Return Receipt)
-
PROFORMA (Pro Forma Receipt)
-
DELIVERY (Delivery Receipt)
Standard Predefined Code 12 — Payment Codes
Figure 2-4 Sample Predefined Payment Codes
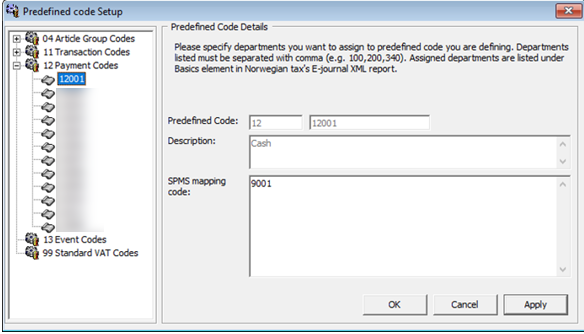
This code is used to configure the system credit department code or payment code. In the example above, the credit department code 9001 for cash is mapped to standard predefined code 12 and predefined ID 12001.
This appears in <basicType> and <predefinedBasicID> under <basics> element on the report.
Standard Predefined Code 13 — Event Codes
Figure 2-5 Sample Predefined Event Codes
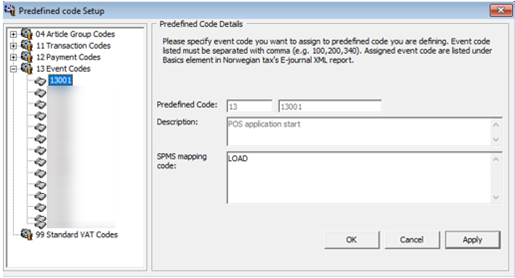
This code is used to configure system event code. In the below example, the system event code LOAD for application starting is mapped to standard predefined code 13 and predefined ID 13001.
This appears in <event> under <cashregister> element on the report.
Standard Predefined Code 99 – Standard VAT Codes
Figure 2-6 Sample Predefined VAT Codes
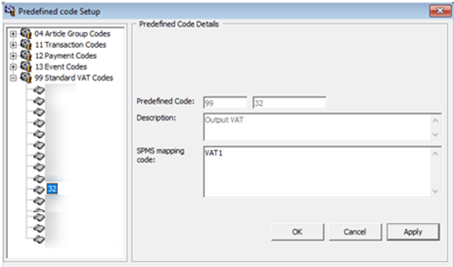
This code is used to configure system VAT code. In example above, the system VAT code VAT1 is mapped to standard predefined code 99 and predefined ID 32.
This is displayed in <standardVatCode> under <vatCodeDetails> element on report.
Key Pair Management for Digital Signature
The Norwegian Tax Authority mandates that sales transactions must be digitally signed. The Norwegian Tax Authority has chosen the cryptographic function: RSA-SHA1-1024, based on asymmetric encryption where a key pair of a private key and a public key is required.
To perform key management, the key pair can be self-generated and self-signed. This means the key pair can be generated from any machine and anywhere. The public key submitted to the Norwegian Tax Authority signifies the valid key pair recognized by the Norwegian Tax Authority. For each Cruise Operator, one key pair is sufficient regardless of the number of the Sales Registers is used. The Cruise Operator is FULLY responsible for the generation and management of the key pairs.
For Norwegian Tax Authority audit purpose, the Cruise Operator is responsible in submitting the key pair of the public key used in digital signing. When the key expires or breached, the Cruise Operator must re-generate a new key pair and update the new key pair in SPMS. The new public key shall be resubmitted to the Norwegian Tax Authority.
See Digital Certificate Requirement.
Creating Self-signed Certificate
-
Using the OpenSSL libraries.
-
Using the MakeCert.exe tool distributed in the Windows SDK.
-
Using the PowerShell pkiclient cmdlet.
Open SSL
The OpenSSL method is recommended if you work with multiple platforms (Linux, Mac, Windows, etc.). OpenSSL can be installed on most of the operating systems OS.
Download and install the OpenSSL toolkit from: https://www.openssl.org/.
MakeCert
This method is recommended if the target machine is Windows 10 and Windows Server 2012. Download and install the Windows 10 SDK from https://developer.microsoft.com/en-us/windows/downloads/sdk-archive.
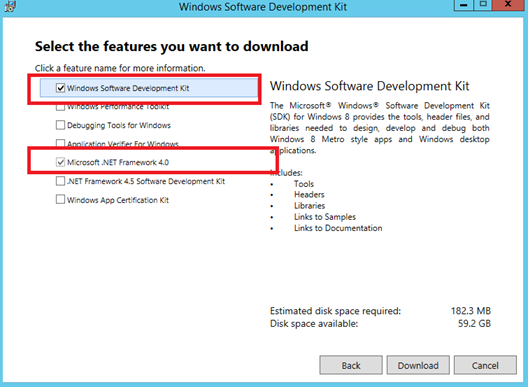
Start the installation and select the option as shown in below figure.
Figure 2-7 Windows Software Development Kit Options
This example creates a self-signed certificate for the purpose of digital signing that would be stored in the Windows Certificate Store “cert: \LocalMachine\My”. Right-click the Command prompt and select to run in Administrator mode, and run the command below.
cd "C:\Program Files (x86)\Windows Kits\8.0\bin\x86"
MakeCert -a <name> -len 1024 -n "CN=< CERTIFICATE NAME>" -pe -r -sky Signature -sr LocalMachine -ss My
<CERTIFICATE NAME>.
-
The "-pe" option allows the private key to be exportable. You need this as the key pair will be used by each Sales Register.
-
The "-r" option creates a self-signed certificate.
-
The "-sky Signature" option indicates that this key pair is meant for digital signing.
-
The "-sr LocalMachine" option makes the Windows store the key pair under the
HKEY_LOCAL_MACHINEregistry location certificate store. -
The "-ss My" option is the name of the certificate store that stores the generated certificate that contains the key pair.
PowerShell New SelfSigned Certificate cmdlet
This method is recommended if the target machine is Windows 10 and Windows Server 2016. The function and storage of the certificate for this tool is similar to MakeCert. Right-click the PowerShell prompt and select Run in Administrator mode, and then run the command below.
New-SelfSignedCertificate -CertStoreLocation "cert:\LocalMachine\My" -Subject <"Certificate Name"> -HashAlgorithm SHA1 -KeyAlgorithm RSA -KeyLength 1024 -KeyExportPolicy Exportable -KeySpec Signature -KeyUsage CertSign -Type CodeSigningCert -NotAfter $([datetime]::now.AddYears(5))
Export Self-signed Certificate
After generating the digital signing certificate, you will need to distribute the certificate to whichever machine performs the digital signing task. As the certificate contains a private key, you must provide a password to secure the file after the certificate is exported to the local file system. You are responsible in safeguarding the certificate along with the password used to lock it. The steps below will guide you on how to export the digital signing certificate to a password secured PFX file.
-
At the Search Windows prompt, type in Manage computer certificates to open the "certlm" console.
-
At the tree view on the left panel, expand the Personal folder under "Certificates - Local Computer, and then click the Certificates folder.
-
At the Certificates folder, look for the certificate issued to "Cruise Digital Signature" on the right panel.
Figure 2-8 Certificates Repository on Local Computer

-
Double-click to open the certificate and ensure it contains the private key. You should see the golden key icon with this message: "You have a private key that corresponds to this certificate" under the General tab.
-
Right-click the certificate on the right panel. You will see a prompt.
-
Select All Tasks, and then click Export to launch the Certificate Export Wizard.
-
Click the Next button to continue.
-
At the Export Private Key screen, select the Yes, export the private key radio button option, and click the Next button.
-
Key in a password to secure and prevent users from opening the PFX certificate.
Important:
The Cruise Operator is responsible in remembering the password used. -
Select the location of the file to export and click the Next button again.
-
Click the Finish button and now, you should have the PFX certificate located in the export location selected.
Import Key Pair
Before you import the key pair, ensure that you have a PFX certificate available on the machine and the certificate password. To import, follow the steps below.
-
Repeat steps 1 – 2 of Export Self-signed Certificate.
-
Right-click the Certificate folder and select All Tasks, then Import... to start the Certificate Import Wizard.
-
Click the Next button to continue.
-
At the File to Import screen, browse to the location of the PFX file to import and click the Next button again.
-
Key in the password to unlock the PFX certificate. Do not select the "Mark this key as exportable." option. This is to ensure maximum confidentiality.
-
Click the Next button and then click the Finish button. Now, you should have the key pair saved in the Windows certificate store.
Managing the Key Version in SPMS
Although the key pair is stored in the Windows certificate store, SPMS must manage the key version. Every new key pair used in SPMS will be recorded in the KEY table of the SPMS schema.
-
Log in to the OHC Tools module.
-
At the ribbon bar, click the Update Cert ThumbPrint.
-
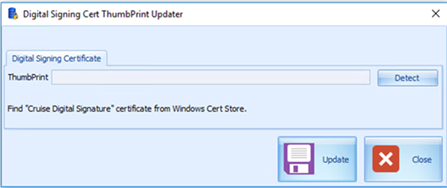
At the Digital Signing Certificate window, click Detect for the program to look up the certificate name
“< CERTIFICATE NAME>”and obtain the ThumbPrint of the public key.Figure 2-9 Digital Signing Cert Thumbprint Updater
-
Click Update to store the key in the KEY table.
Export Public Key
The Norwegian Tax Authority requires the public key to audit the digitally signed sales transactions. As a requirement, the Cruise Operator must be able to provide the public key in the form of base64 encoded X.509 certificate.
-
Repeat steps 1 – 7 of Export Self-signed Certificate.
-
Select the “No, do not export the private key” radio button and then, click the Next button.
-
Select the "Base-64 encoded X.509 (.CER)" radio button and then, click the Next button.
-
Select the location of the file to export and the click Next button again.
-
Click the Finish button. Now, you should have the CER certificate located in the export location selected.
With the base64 encoded CER certificate, you can now submit the public key to the Norwegian Tax Authority.