3 Setting Up Roster Template
The Roster Setup is comprised of Schedule Templates, Activation, Maintenance, Location and Non-Scheduled. The function in Roster Template is comprised of three parts: Team Assignments to Crew, Roster Template and Scheduling, and Schedule Validation.
To access these functions, click the Roster Setup at the ribbon bar.
Roster Template and Scheduling
Before you can schedule task(s) to a crew and to ease future scheduling, we recommend that you create a schedule template for each sub-location.
Schedule Templates
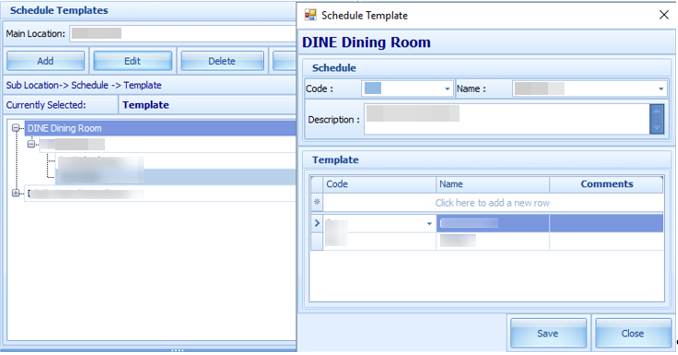
Figure 3-1 Schedule Templates
-
In the Roster Setup window, select Roster Template & Scheduling.
-
In the Schedule Templates section, select the Main Location from the drop-down list.
-
Click Add to open the Schedule Template window.
-
In the Schedule section, insert the Code, Name, and Description.
-
In the Template section, click the blank space under the header to add the schedule cruise day by inserting the Code, Name, and Comments.
-
Click Save to create the cruise type and days.
-
To edit the cruise day/type, select the line item and click the Edit button.
Copying Cruise Type by Sub-Location
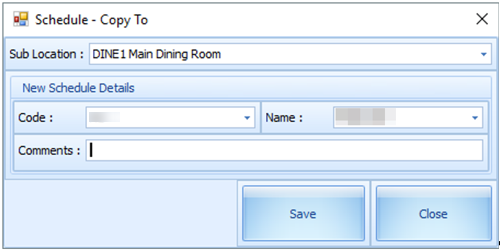
Figure 3-2 Copy Cruise Schedule
-
Select the Cruise Type and click the Copy button.
-
In the Schedule-Copy To window, select the destination Sub-Location, Code, and Name from the drop-down list.
-
Click Save to complete the process.
Copy Cruise Day by Sub-Location
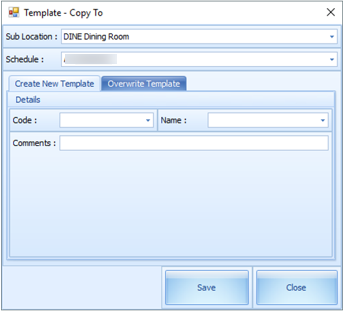
Figure 3-3 Schedule Template Copy To
-
Select a Cruise day to copy and then click the Copy button.
-
In the Template-Copy To window, select the Sub-Location and Schedule from the drop-down list.
-
Under the Create New Template tab, enter the Code, Name and Comments and click Save. The new template is copied to the same Sub Location.
Overwrite Template of the Same Schedule
-
Select a Cruise day to copy and click the Copy button.
-
In the Template-Copy To window, select the Sub-Location and Schedule from the drop-down list.
-
Navigate to the Overwrite Template tab, select an existing cruise day to overwrite, and click Save.
Schedule Maintenance Templates
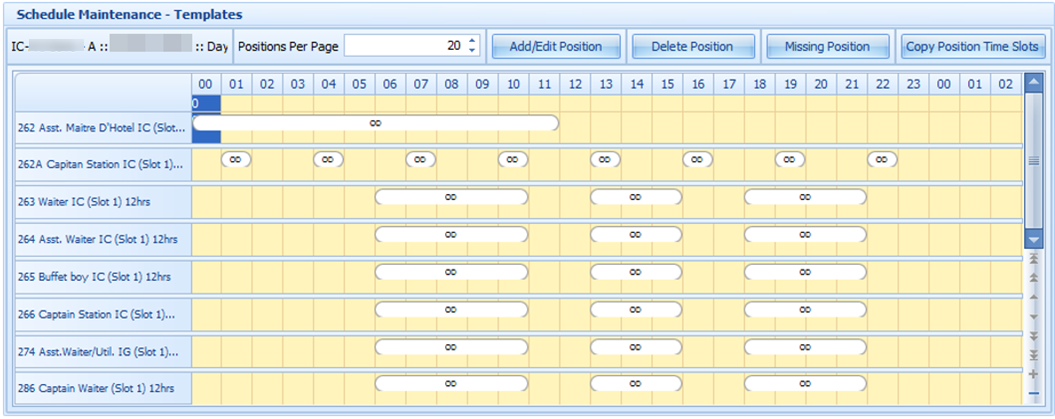
Figure 3-4 Schedule Maintenance Template
-
Select a cruise day from Schedule Templates, then click the Add/Edit Position button.
-
In the Schedule Maintenance window, select the Position and then the Slot from the drop-down list, and Team, if any. You can also add a slot by selecting a Position. To insert a required slot, click Add Slot and click Save.
-
The slot number is unique for each position and there are 26 available slots.
-
Click Save and Close to exit.
-
Each of the crew member should have an individual slot for the position. For example, if the position of Assistant Cook requires 10 crew members to be on duty, then 10 slots must be created for this position.
-
Click the Save button in Schedule Maintenance window to assign the position(s) for the cruise day. The defined positions will populate in the grid as shown in Figure 3-4.
Deleting a Position from Cruise Day
-
To delete, select a time slot and click Delete Position.
-
If the message prompts “Are you sure you want to delete the selected position” click Yes to proceed or No to return to the previous window.
-
You can also click the Add/ Edit Position button, select a row any row to delete, and press the Delete key on your keyboard.
Creating Time Slots for Position
-
In the Schedule Maintenance-Templates grid, select the required time slots for the position, and right-click to display the options or double-click the grid to open the Time Slot window.
-
Select a Roster Task Code and enter the Start/End Time.
-
Click the OK button to save the time slot. The time slots saved are reflected in the grid.
Deleting Position Time Slots
-
Select the time slot from the grid, right-click and select Delete or press the Delete key on your keyboard.
-
To delete all time slots, right-click on an empty area of the time slot grid to open the Roster Task Options, and select Delete All Time Slots.
Copying Position Time Slots
-
Click the Copy Position Time Slots from the Schedule Maintenance-Templates window.
-
Select the position on the left pane to copy and select the checkbox on the right.
-
Click Save to copy the time slots.
Schedule Activation Template
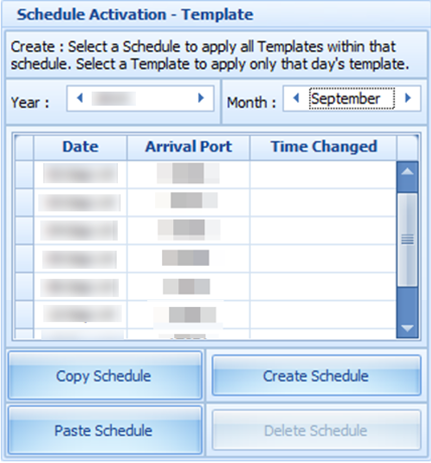
The Schedule Activation Template enables you to assign a schedule template to the days listed of the selected the month.
Figure 3-5 Schedule Activation Template
Creating Schedules by Cruise Type
-
Select the Cruise type from the Schedule Template section.
-
Select the start date from Schedule Activation-Template and then click Create Schedule. For example, the cruise type has eight cruise days and by selecting 01 April 2017 as a start date for the schedules, it then creates 01 April 2017 as cruise day one, 02 April 2017 as cruise day two, 03 April 2017 as cruise day three and so on.
-
At the confirmation prompt, read the statement before proceeding. Click Yes to remove the existing schedule from the date(s). The list of the crew with schedules is listed under the Scheduled section. The Crew Schedule creates the checked-in status by crew first, sorted by name, and followed by the crew with expected status.
Creating Schedule by Cruise Day
-
At the Schedule Activation-Template section, select the date and click Create Schedule.
-
At the confirmation prompt, click Yes to create the cruise day schedule. After the schedule is created, a list of crew created with the schedules is listed in the Scheduled section.
Note:
This will remove existing schedule, if any.
Scheduled and Non-Scheduled
The Scheduled section lists the crew names with schedules, according to the selected date and sub-location, with the slot number of the assigned schedule template in the Slot column.
Selecting a crew and clicking the Delete crew from Schedule removes the crew schedule from the selected date and sub-location, and places the crew in the NON-SCHEDULED section. Crew scheduled at a different sub-location of the selected date will not be shown here but in the NON-SCHEDULED section instead.
-
Select a crew name and click the Add Crew to Schedule to add the crew to the selected date and sub-location.
-
In the Selection window, select the Position and Slot from the drop-down list. The position time and crew's position must match the selection in order to create the schedule successfully.
-
You can schedule multiple crews provided the position and time slot are the same.
-
Click OK to continue. Crew schedule created manually has a zero time slot.
Team Assignments to Crew
The crew names that match the positions in the roster templates are listed in the Team Assignments to Crew window.
Figure 3-6 Schedule Validations
-
In the Roster Setup window, select the Team Assignments to Crew.
-
In the Team Assignment window, select a Sub-Location or leave as default.
-
Under the crew name, select a team from the Assign Team To Crew drop-down list. There are 26 teams available for assignment.
-
Click the Save button to save the team assignments.
Note:
Only crew that has a team assigned to them can create a schedule from a template defined within the same team.
Schedule Validation
-
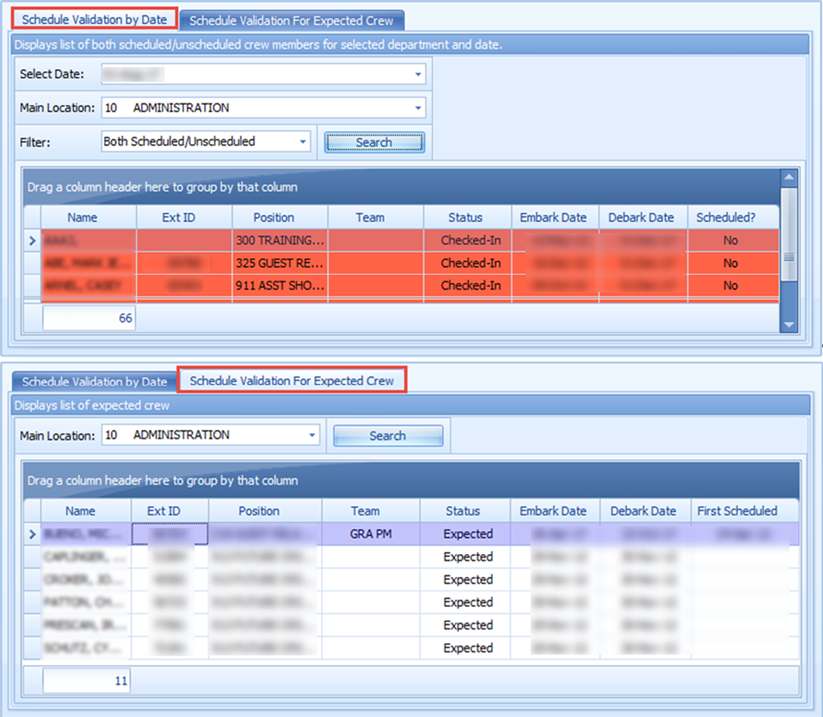
Schedule Validation by Date: Displays lists of both scheduled/unscheduled tasks by Date and Main Location.
-
Schedule Validation for Expected Crew: Displays a list of the expected crew with schedule assignment by Main Location.
-
In the Roster Setup window, select Schedule Validation.
-
Select the appropriate tab and the options from the drop-down list.
-
Click Search to display the list of crew matching the selection.