4 Setting Up SilverWhere Web Server
Before you proceed, it is important to know where you intend to set up the SilverWhere Secure and SWMobile, the SilverWhere Authentication, and the SilverWhere SWReservation Web Services.
The SilverWhere Secure Web Service must be reachable by all SilverWhere Application Clients and SilverWhere Web Services as it manages the database user credentials, which will require an established SilverWhere database connection. The SilverWhere Secure Web Service must be able to connect to the SilverWhere database as it will need to verify the database connection before it can store the database user credentials.
The below topics describes the recommended installation path, combining the Secure Web Service with the SWMobile Web Service on one machine.
SilverWhere Web Services Prerequisites
-
Microsoft Internet Information Services (IIS) is installed on the target machine
-
IIS v6 with Management Compatibility Services
-
-
Minimum Internet Explorer 8.0 is installed on the target machine
-
Microsoft .NET Framework 4.8 features are enabled on the target machine.
-
Minimum Oracle 12c Database client with ODAC is installed on the target machine. See Oracle Database Client and ODAC Installation.
-
-
SilverWhere 9.1 release package is downloaded and available in the target machine. Refer to the SilverWhere Installation File for download instructions.
-
Disable TLS 1.0 and TLS 1.1, and enable TLS 1.2. See Security Guide for more information.
SilverWhere Web Services Installation Steps
The SilverWhere Secure Web Service was developed to manage login credentials and encryption keys. It is comparable to a password management application.
The SilverWhere SWMobile Web Service was developed for the SWMobile application to manage the access of the mobile clients to the SilverWhere database.
The SilverWhere Authentication Web Service was developed for the SWMobile application to authenticate the token in order to access the SilverWhere database.
The SilverWhere SWReservation Web Service was developed for Third-Party vendors to integrate with SilverWhere and allow dining bookings via a website, onboard app, etc.
Follow the steps below to setup the SilverWhere Web Services:
Secure Sockets Layer (SSL) digital certificate
The use of digital certificates is common in today’s service-oriented architecture. A digital certificate is especially important in the identification of a system. It is similar to using a government issued identification document to identify an individual. From the SilverWhere context, the digital certificate is required to identify the SilverWhere web services. This is to prevent an unscrupulous party from impersonating SilverWhere web services and stealing sensitive information from SilverWhere. It is recommended that the Digital Certificate used to identify SilverWhere web services is acquired from a recognized and valid Certification Authority.
You must install the Secure Sockets Layer (SSL) digital certificate as this is required on an IIS Web Server for HTTPS communication to web services. Secure Sockets Layer (SSL) usage on SilverWhere Security Server is mandatory. Self-signed certificates should be used only if the customer fails to provide a certificate from a Certificate Authority (CA). Refer to the Microsoft product documentation library at https://support.microsoft.com/en-sg/help/324069/how-to-set-up-an-https-service-in-iis for information about the installation of secure certificates.
The responsibility of acquiring a valid Digital Certificate lies solely with the user. The process does not differ much between different Certification Authorities.
-
You will need to identify the trusted Certification Authority (CS) that you intend to buy the Digital Certificate from.
-
Through the CA online purchase portal, you can easily provide the information such as the URL, the purpose of the certificate, and the necessary information to acquire a Digital Certificate.
-
Alternatively, you can generate a Certificate Signing Request and send it to the CA to be signed.
-
Regardless of the differences, the purpose remains the same, which is to acquire a Secure Sockets Layer (SSL) compliant digital certificate for the SilverWhere web services from a recognized and valid Certification Authority.
The act of generating a self-signed Digital Certificate to identify the SilverWhere web services is not recommended for the production environment. It increases the risk of an unscrupulous party impersonating the SilverWhere web services to steal sensitive information. However, it is still possible for SilverWhere web services to use a self-signed certificate despite the increased security risk, which means you would have to agree to bear the consequences.
Install using the Setup.exe
In order to install the SilverWhere Web Services on the target machine, follow the instructions listed below:
-
On your target machine, open the IIS Manager, click on Sites and then choose the Default Web Site
-
On the right side in the IIS, right click on Bindings…
-
On the Site Bindings window, click on Add… to open the Add Site Binding window
-
Choose https as Binding Type and select the SSL certificate imported previously
-
Click on OK to complete the process
-
On the Site Bindings window, select the http entry and click on Remove
-
Click on Yes to complete the process, and then click Close
-
From the downloaded SilverWhere Installation File package, browse to the
\OHC SilverWhere 9.1 Web Services Setupfolder and run the setup.exe with ‘Run as administrator’ privilege -
At the SilverWhere Web Service Installer Welcome window, click the Next button to navigate to the next screen
-
Select the web service(s) you want to install on the machine
-
SW Secure and Mobile Web Service
-
SW Reservation Web Service
-
SW Authentication Web Service
-
-
Click the Next button to navigate to the next screen and confirm the installation process by clicking on Install
-
The installation process is shown in the Status window. Upon completion of the installation process, click the Finish button to close the InstallShield Wizard
-
Open the IIS Manager, and click on Application Pools on the left side, and choose the Application Pool created in the previous step (Step 8-12)
-
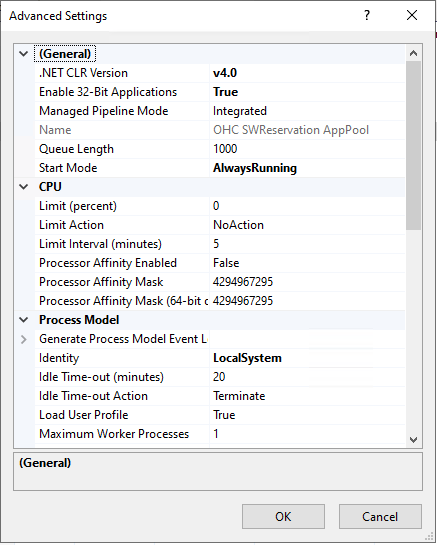
Click on Advanced Settings to edit the Application Pool and set the Start Mode to AlwaysRunning. Repeat that for all newly created application pools
Figure 4-1 Application Pool Advanced Setting window

-
Click on OK to complete the process.
-
Click on Sites and choose the Web Site created previously (steps 8 to 12)
-
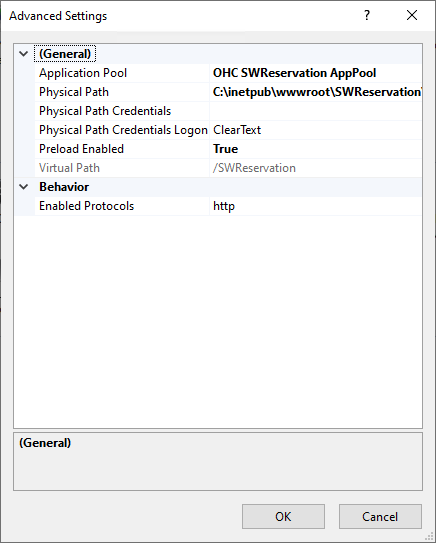
Click on Advanced Settings to edit the Site. Ensure the Preload Enabled is set to True
Figure 4-2 Web Site Advanced Settings

-
Click OK to continue
Setting up SilverWhere Secure and Mobile Web Service
In order to configure the SilverWhere Secure and Mobile Web Service on the target machine, follow the instructions listed below:
-
Follow steps 1 to 15 of Setting up SilverWhere Web Services in order to install the web service
-
Expand the Sites folder on the left panel of the IIS Manager, then navigate to the converted application and double click on Default Document
-
Select MMSFunctions.asmx and move it to the top of the list
-
You will need to set up the SilverWhere Web Services Database connection. This step is required so that the web services know which Database TNS it should connect to. You can do so by editing the web.config file
-
Navigate to the web.config file for SilverWhere Secure and SWMobile Web Service at
C:\inetpub\wwwroot\SWWeb -
Under the
<appSettings>section, set the SilverWhere Secure Login Information<appSettings> <add key="SecureLogin" value="FULLDEVICENAME_or_IPWEBSERVICE/SWWeb"/> </appSettings>For example:<appSettings> <add key="SecureLogin" value="FULLDEVICENAME/SWWeb"/> </appSettings> -
Under the
<appSettings>section, set the SilverWhere Authentication web service information.<appSettings> <add key="DefaultServer" value="addDefaultServer" /> <add key="AuthService" value="FULLDEVICENAME_or_IPWEBSERVICE/SWAUTHENTICATION" /> </appSettings>For example:<appSettings> <add key="DefaultServer" value="UserID" /> <add key="AuthService" value="FULLDEVICENAME/SWAuthentication" /> </appSettings> -
Under the
<connectionStrings>section, set the Database Server Address and the Database TNS name (SID).For example:<connectionStrings> <add name="MmsiDbConnection" connectionString="Data source=(DESCRIPTION = (ADDRESS = (PROTOCOL = TCP)(HOST = FULLDEVICENAME)(PORT = 1521))(CONNECT_DATA =(SID = AddSSID)));User ID=bkstg_dining;"/> </connectionStrings> -
Restart the SilverWhere Secure and SWMobile Web Service. You can do this from the IIS Manager
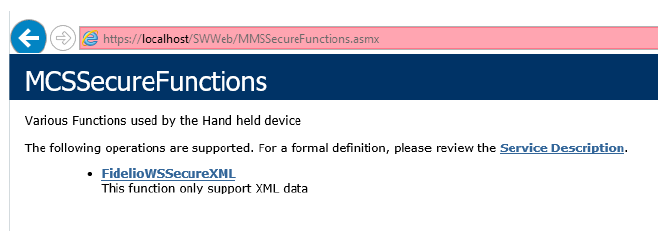
To confirm whether the SilverWhere Secure and SWMobile Web Service is running properly,
-
Launch a web browser
-
Type in the URL https://localhost/SWWeb/MMSSecureFunctions.asmx
-
Press Enter
Figure 4-3 SilverWhere Secure and SWMobile Web Service page hosted on the SilverWhere Web Service Server

Note:
It is important to know that successful hosting of the SilverWhere Secure and SWMobile Web Service does not guarantee a successful SilverWhere database connection, which is required for the SilverWhere operation. Therefore, it is important to configure the SilverWhere Secure and SWMobile Web Service connection to the SilverWhere Database in the SilverWhere Secure Tools client.
Connection to the SilverWhere Database is only possible when the Database TNS Connection for SilverWhere Secure and SWMobile Web Service is properly setup and with the correct SilverWhere Database password. The password is stored in a protected OHCSWSecurity.par file on SilverWhere Web Service Server in \Users\Public\Public Documents\Oracle Hospitality Cruise directory.
Setting up SWAuthentication web service
In order to configure the SilverWhere Authentication web service on the target machine, follow the instructions listed below:
-
Follow steps 1 to 15 of Setting up SilverWhere Web Services in order to install the web service
-
You will need to set up the SilverWhere Authentication web services Database connection. This step is required so that the web services know which Database TNS it should connect to. You can do so by editing the web.config file
-
Navigate to the web.config file for SilverWhere Authentication web service at
C:\inetpub\wwwroot\SWAuthentication -
Under the
<appSettings>section, set the SilverWhere Secure Login Information (URL)For example:<appSettings> <add key="SecureLogin" value="FULLDEVICENAME/SWWeb"/> </appSettings>
-
Under the
<connectionStrings>section, set the Database TNS name (SID).For example:<connectionStrings> <add name="MmsiDbConnection" connectionString="Data Source=addSID;User Id=bkstg_dining;" /> </connectionStrings> -
Restart the SilverWhere Authentication web service. You can do this from the IIS Manager
Setting up SWReservation Web Service
In order to configure the SWReservation Web Service on the target machine, follow the instructions listed below:
-
Follow steps 1 to 15 of Setting up SilverWhere Web Services in order to install the web service
-
Navigate to the
C:\inetpub\wwwroot/SWReservationfolder and create a copy of the web.config file in order to change the database information at a later stage -
Edit the original web.config file to define the SilverWhere database server name
<SOURCE>, User ID<DBUSER>and password <PASSWORD> under <connectionStrings>For example:<connectionStrings> <add name="DBConnection" connectionString="provider=OraOLEDB.Oracle.1;DATA SOURCE=AddSID;USER ID=bkstg_dining;PASSWORD=AddPWD;"/> </connectionStrings> -
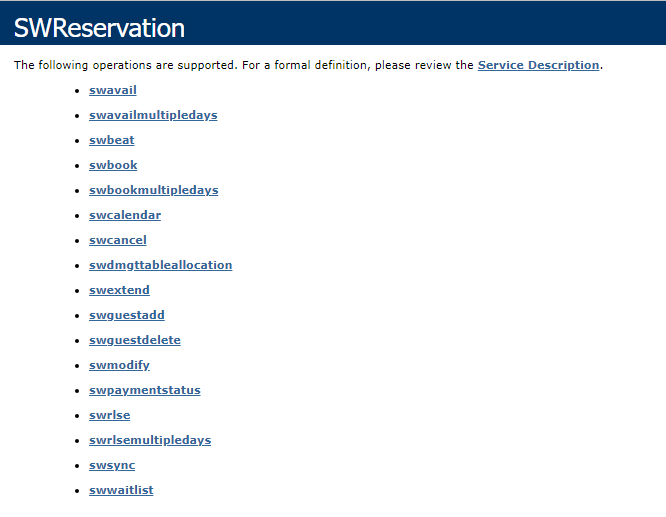
To verify if the SWReservation Web Service is running properly, click on Browse in the IIS Manager to launch the web browser. The SilverWhere SWReservation Web Service is hosted correctly if the below page is shown:
Figure 4-4 SWReservation Web Services page hosted on SilverWhere Web Service Server

-
Configure the below settings of the SWReservation Web Service in the SWPARAM.XML:
-
RESERVE: The reserve availability that should be subtracted from total availability when determining if a reservation is possible or not. Reserve fields range from 1 to 5 and can be combined in the parameter. For example “13” would indicate that the booking service was not allowed to use Reserve1 or Reserve3. RESERVE fields must be setup as per LOOK UP SETUP – RESERVE
-
MINUTES: Enter the number of minutes the SWReservation Web Service shall wait before cancelling TEMP reservation automatically. The default value is 90 minutes
-
CURRENT: Not in use.
-
CUTOFF: Enter the time, in military format with no colons (e.g. 1500), after which dining reservations cannot be made for today via the SWASR Web Service. The default value is 1500
-
CHECKOPEN: Not in use
-
FUTURERES: Not in use
-
ALPHAPAX: Not in use. Indicates that the PAXALPHA_ID and not the numeric Passes the PASSENGER ID to the SWReservation Web Service.
-
SHIPSORACLE: Not in use
-
LOCTRANSACTIONS: Enable to log the web service transactions into the BKSTG_DINING.SERVICE_HISTORY database table
-
VIPRESERVE: Enter the RESERVE field that’s being used for passengers with VIP status. RESERVE fields must be setup as per
LOOK UP SETUP – RESERVE -
ENABLEBOOKINGRESTRICTIONS: Enable to restrict multiple bookings on the same product for the same day
-
ENABLEPRODUCTGROUPRESTRICTIONS: Enable to restrict multiple bookings on the same product group for the same day
-
TIMEOUT: Enter the database connection timeout in minutes. The default value is 30
-
DATBASEID: Enter the ship database ID. Use ID 99 for the headquarter database
-
FLEXDININGENABLED: Enable to search for Flex Table on availability
-
MULTITABLEENABLED: Enable to search for multi-table on availability
For example:<RESERVE>23</RESERVE> <SHIP /> <MINUTES>90</MINUTES> <CURRENT>Y</CURRENT> <CUTOFF>1500</CUTOFF> <CHECKOPEN>N</CHECKOPEN> <FUTURERES>N</FUTURERES> <ALPHAPAX>N</ALPHAPAX> <SHIPSORACLE></SHIPSORACLE> <LOGTRASACTIONS>Y</LOGTRASACTIONS> <VIPRESERVE>1</VIPRESERVE> <ENABLEBOOKINGRESTICTIONS>Y</ENABLEBOOKINGRESTICTIONS> <ENABLEPRODUCTGROUPRESTRICTIONS>N</ENABLEPRODUCTGROUPRESTRICTIONS> <TIMEOUT>30</TIMEOUT> <DATABASEID>10</DATABASEID> <FLEXDININGENABLED>N</FLEXDININGENABLED> <MULTITTABLEENABLED>Y</MULTITTABLEENABLED>
-