Creating Project or Shell Level Cash Flow Curves
There are multiple ways to create a cash flow curve or worksheet.
- You can create a cash flow curve manually.
- You can create a cash flow curve from a template.
- You can also create a cash flow curve by coping an existing cash flow curve.
- You can also create a Summary Cash Flow curve. See Creating a Summary Cash Flow Curve.
Cash flow curves require a data source which your administrator can create in the Standards & Libraries module (Company Workspace > Admin mode). For details, refer to the Unifier Modules Setup Administration Guide.
Notes:
- You must have permission to access and configure cash flows.
- To prevent incorrect reporting in the cash flow and associated curves, do not create a project without a cost sheet. Currently, you can create a Project/Shell Detail level cash flow in which the Actuals curve properties receives data from the Cost Sheet Columns through a shell template even though the cost sheet is not defined in the destination shell. You must manually update the Actuals curve properties after the cost sheet is created.
To change the order of the Cash Flow curves, on the cash flow worksheet graph:
- Go to the Cash Flow log and select the cash flow.
- Open the gear menu ( ) for the selected cash flow and select Properties to open the Cash Flow Properties window.
- On the right pane, hover over the Drag to order icon (
 ) for the curve that you want to move, right-click the icon and hold.
 - Move the curve to where you want it to be displayed on the cash flow worksheet graph and release the hold.
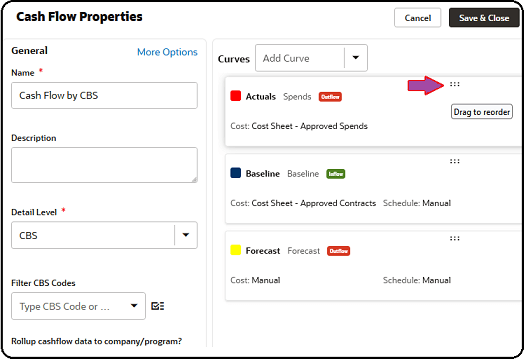
Note: Changing the curves order in the Cash Flow Properties window will also change the curve order in the All Curves tab of the cash flow worksheet.
The following sections describe the basics of how to create a project or shell level cash flow curve worksheet.
See Also
In This Section
Last Published Friday, May 1, 2026