Setting Up Flexible Job Creation Processes
To set up job creation processes, use the Job Creation Process (HRS_JCP_DEFN) component.
|
Page Name |
Definition Name |
Usage |
|---|---|---|
|
HRS_JCP_DEFN |
Set up a process that controls which job opening fields are visible to users with different recruiting roles types. |
|
|
Configure Field Visibility Page (The page name is Modify Field Visibility when you access existing settings.) |
HRS_JCP_FLD_CONFIG |
Define detailed field visibility settings for a single recruiting role type. |
A robust set of job opening fields is important for defining job characteristics and qualifications, but users who do not need to interact with all of the available fields can be overwhelmed or confused by seeing a lot of extra fields that are not relevant to them at this point. The job creation process enables you to configure which job opening fields are visible to which recruiting roles during the job creation process. This configuration allows managers to focus on the information that they are responsible for without being distracted or confused by fields that a recruiter will complete. When the job opening is no longer in draft status, all users including managers can view the complete job opening data.
Note: The job creation process should not be considered a security tool. Fields that are hidden from specified users during the job creation process become visible when the job is no longer in draft status. Also, fields are hidden only from users with specified roles, and a user with a role that is not specifically configured can always see all job opening fields.
Example of the Job Creation Process
The following illustrations show how a job creation can simplify a hiring manager’s experience when the manager must enter a limited amount of data in a draft job opening.
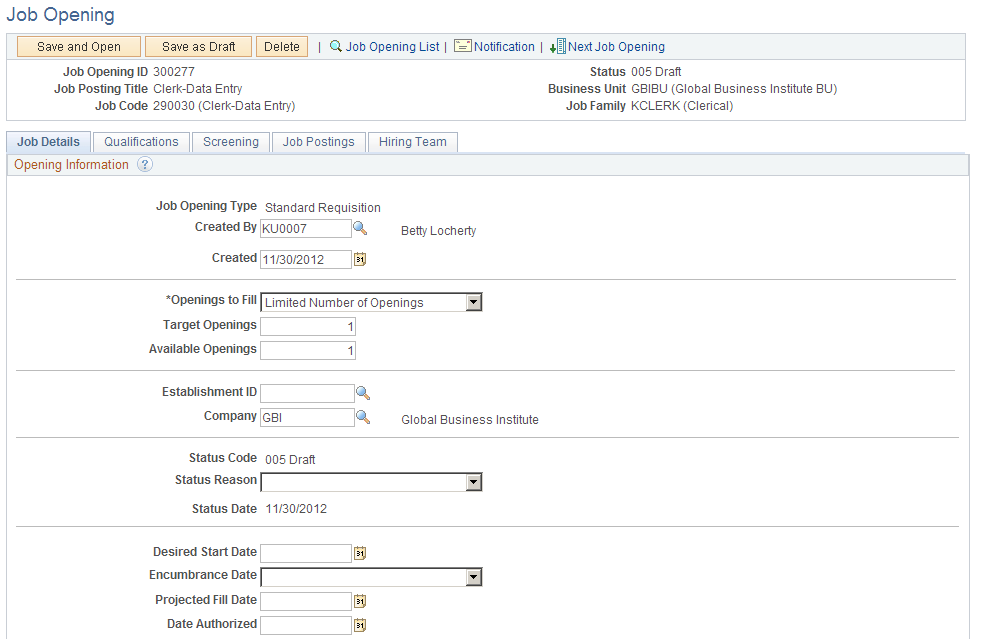
This example shows the first few fields of a draft job opening as a hiring manager would see it without the benefit of a flexible job creation process. Many more fields appear after the ones shown here.
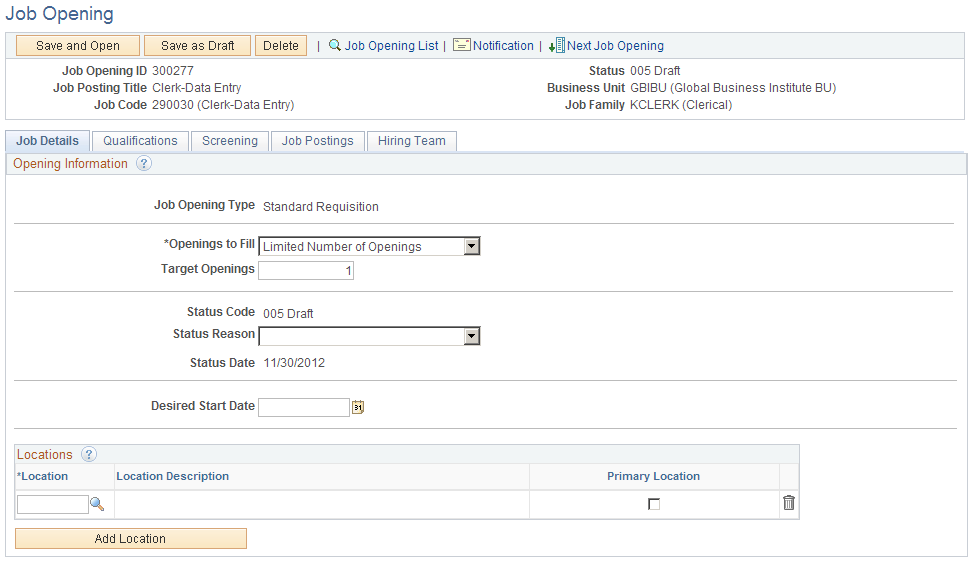
This example shows a draft job opening as a hiring manager would see it when the flexible job creation process shows hiring managers a small subset of the job opening fields. Note that the flexible recruiting process does not hide tabs even when the user cannot see any fields on a tab.
Use the Job Creation Process page (HRS_JCP_DEFN) to set up a process that controls which job opening fields are visible to users with different recruiting roles.
Navigation:
This example illustrates the Job Creation Process page.
Field or Control |
Description |
|---|---|
Status and Status Date |
Indicate whether the definition is Active or Inactive, and enter the date that the status was assigned. Only active definitions are available for selection in flexible process templates. (However, an inactive job creation process is still used by any flexible process templates that it is already associated with.) |
Field Visibility of Recruiting Roles
Field or Control |
Description |
|---|---|
Priority |
Enter a priority to control which role’s settings to use when a person has more than one recruiting role type. Lower numbers have higher priority. For example, if you give the Recruiter role priority 1, and you give the Hiring Manager priority 2, then a user who has both roles will use the settings associated with the Recruiter role. |
Recruiting Role Type |
Create a row for each recruiting role type that you will associate with field visibility settings. Recruiting role types are functional groups of PeopleTools roles such as Recruiters and Hiring Manages. Use the Recruiting Roles Page to choose which PeopleTools roles belong to each recruiting role type. The drop-down list box shows only recruiting role types that are associated with at least one PeopleTools role. The list does not include the Recruitment Administrator role type because administrators are never subject to flexible process restrictions. Users without any of the roles you specify will not be subject to flexible process restrictions. For example, if you create a row for hiring managers so that they see only a subset of job opening fields, but you do not create a row for recruiters, then recruiters who are not also hiring managers will see all of the job opening fields. If you want recruiters who are also hiring managers to see all fields, you should also create a row for the recruiter role type. |
Configure Field Visibility and Modify Field Visibility |
Click this link to access the page where you configure field visibility for a recruiting role type. For recruiting role types that do not yet have field visibility settings, the link text and the page name are Configure Field Visibility. After you save field visibility settings, the link text and the page name are Modify Field Visibility. |
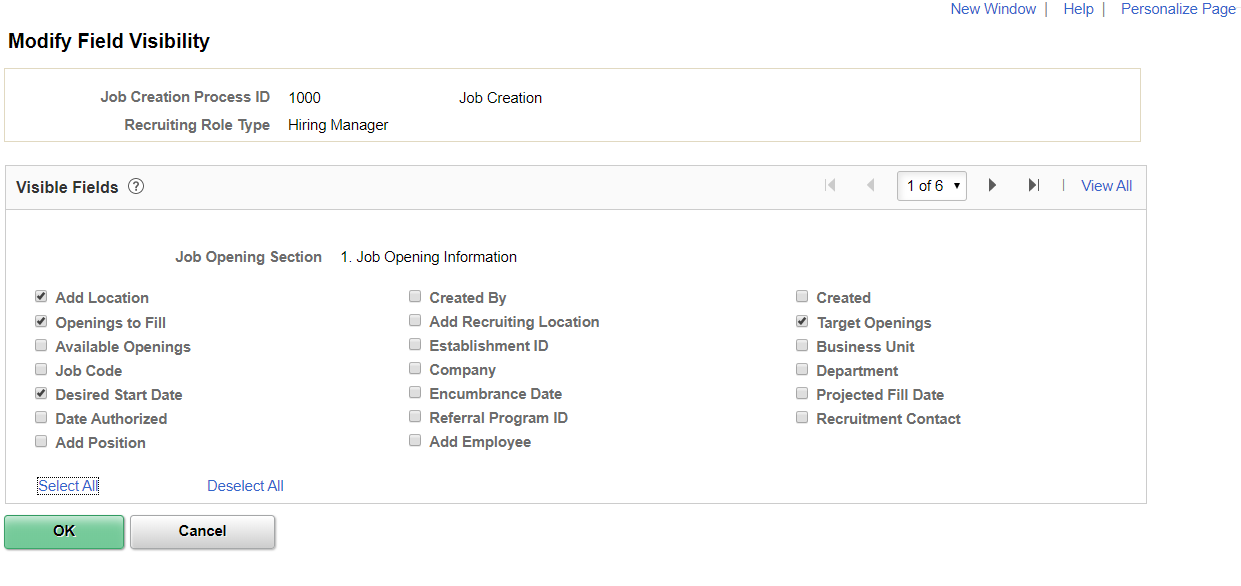
Use the Configure Field Visibility page (HRS_JCP_FLD_CONFIG) to define detailed field visibility settings for a single recruiting role type.
Navigation:
On the Job Creation Process page, click the Configure Field Visibility link for a role type that has not yet been configured, or click the Modify Field Visibility link for a role type that was previously configured.
This is the first of three examples illustrating the Configure Field Visibility page.
When you access this page, you initially see only the first of six group of fields. You can scroll through the groups, or, to expand the page so that all sections are visible (as in these examples), click the View All link.
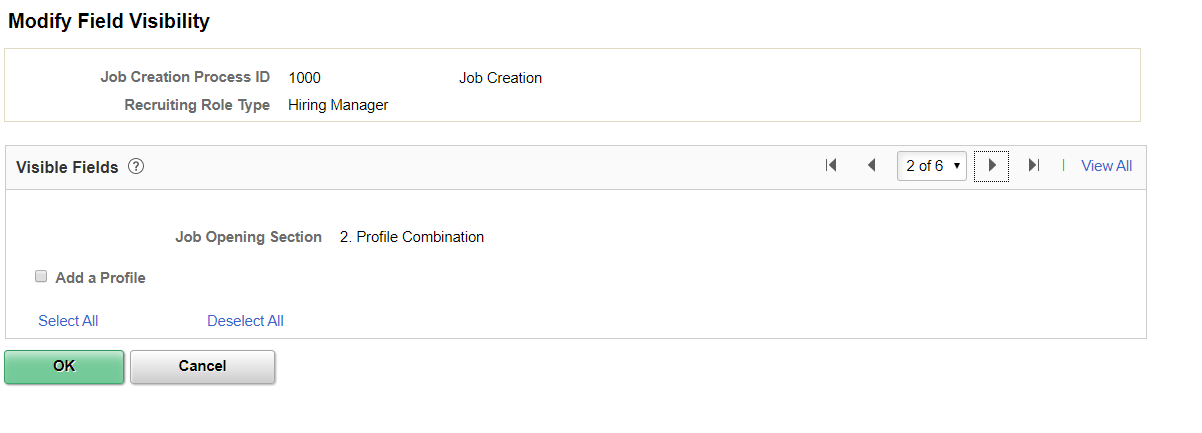
This is the second of three examples illustrating the Configure Field Visibility page.
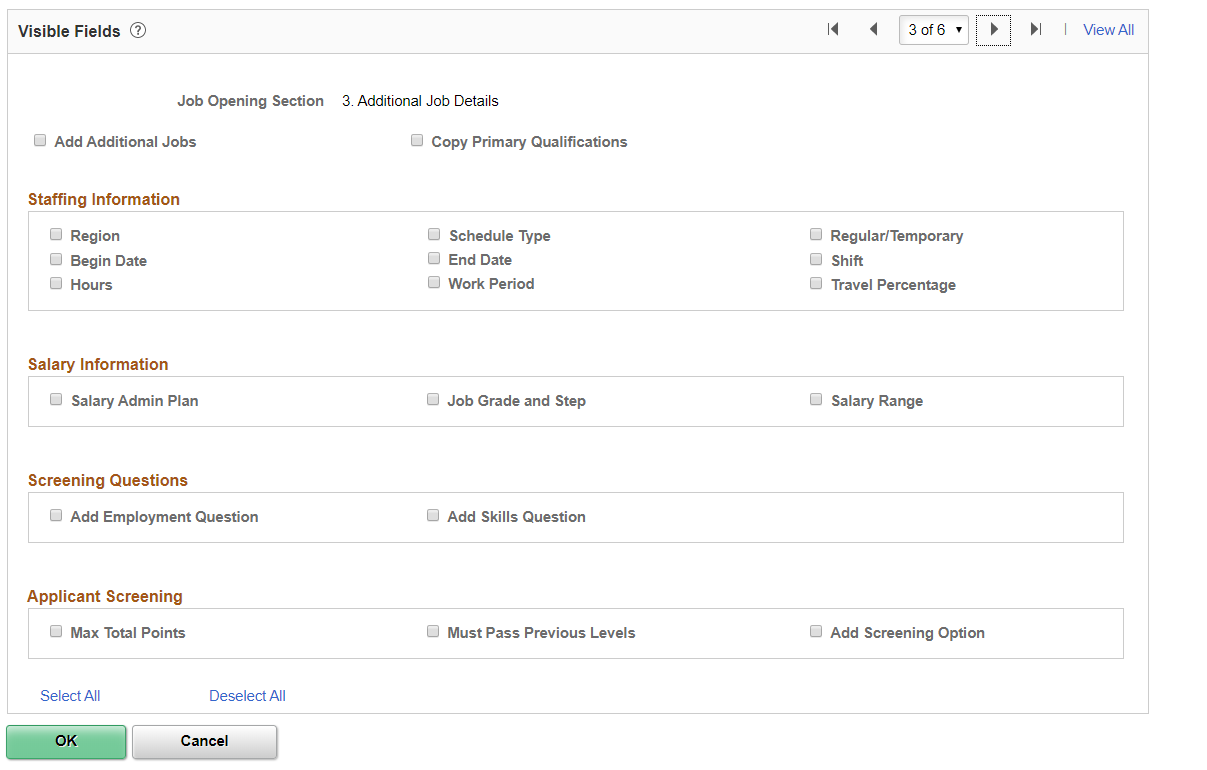
This is the third of three examples illustrating the Configure Field Visibility page.
Note: (USF) Additional fields are available for configuration in a US Federal system.
This page includes six sections, each with check boxes that represent fields or grids for a particular area of the Create Job Opening page. Select a check box to make the field or grid available to users with the specified recruiting role type.
Note: A Job Opening template that controls which sections appear in the job opening. If a section is not included in the job opening, then the fields in that section will not appear, regardless of how the flexible job creation process is defined.
Understanding Field Visibility for Grids
The Configure Field Visibility page uses a single check box to represent grids on the Create Job Opening page. The labels for these check boxes include the word Add before the grid name. When you make a grid available, users can add and delete grid rows, and they can access any related detail page to modify the detail data.
For example, the Competencies grid is represented by the Add Competencies check box. Selecting that check box enables users with the specified role type to interact fully with the Competencies grid. Users can add competencies to the job opening and remove competencies from the job opening. They can also click the links for a single competency to access the Add Competency page and modify information about the competency.
Job Opening Sections
Field or Control |
Description |
|---|---|
Section 1: Job Opening Information |
This section includes fields and grids from the Opening Information group box on the Create Job Opening page. This section does not include check boxes for certain fields, including:
Note: If you display the Business Unit, Job Code, and Department fields and the Recruiting Locations grid, uses can make changes that affect which flexible process template governs the job opening. However, the system does not apply the new template until the next time the Job Opening page is opened. |
Section 2: Profile Combination |
This section has a single check box that controls access to the Profile Combination grid, which displays the profiles whose content items were copied into the job opening. |
Section 3: Additional Job Details |
This section includes check boxes to control the fields and grids from the Staffing Information, Salary Information, Screening Questions, and Applicant Screening group boxes on the job opening page. These check boxes have the following specialized processing:
If the Allow Multiple Jobs/Positions option is activated in the Recruiting Installation component, this section also includes two additional check boxes:
|
Section 4: Additional Profile Details |
This section includes check boxes for the profile content types that are available for use in job openings. For more information about profile content types, refer to Configuring Profiles for Recruiting |
Section 5: Assignments |
This section includes check boxes for the hiring team grids in the job opening. For example, the Add Recruiter and Add Hiring Manager check boxes control access to the Recruiters and Hiring Mangers grids. There are separate check boxes for controlling access to the buttons that enable users to add entire teams to these grids. For example, the Add Recruiter Team check box controls the availability of the Add Recruiter Team button on the job opening |
Section 6: Job Postings |
This section has a single check box that controls access to the Job Postings grid in the job opening. |