Implementing Data Permission Security
To implement data permission security, use the Security Installation Settings component (SCRTY_INSTALL), the Security Sets component (SCRTY_SET_TBL), the Security Access Type component (SCRTY_TYPE2_TBL), the Group Registration component (SCRTY_GB_REGISTER), and the Matrix Team Registration component (SCRTY_MX_REGISTER).
These topics discuss several ways to implement data permission security.
|
Page Name |
Definition Name |
Usage |
|---|---|---|
|
SCRTY_INSTALL |
Choose the HCM security settings for your installation. |
|
|
SCRTY_SET_TBL |
Review existing security sets and the security access types you've attached to them. |
|
|
SCRTY_SJT_UPD |
Define the data groups that can be updated by the SJT Refresh process. |
|
|
SCRTY_TYPE2_TBL |
Enable or modify existing security access types or create new ones. |
|
|
SCRTY_TYPE2_SQL |
Enter the SQL statements for the new security types. |
|
|
SCRTY_GB_REGISTER |
Register groups from the Group Build feature that you want to use for row level security. |
|
|
SCRTY_MX_REGISTER |
Register a matrix team that you want to use for row level security. |
|
|
SCRTY_GB_REFRESH |
Refresh security-related groups that were created using the Group Build feature. |
|
|
SCRTY_MX_REFRESH |
Refresh security-related matrix teams. |
The Security Installation Settings page enables you to select actions that, when used on the Work Location page (JOB_DATA1), trigger the SavePostChange PeopleCode to create a future-dated row in SJT_PERSON.
The system normally secures data using the current transaction security data. Only users with data permission access to the transaction security data on the current row can access the person's data
When you include future-dated transaction security data rows the system uses both the current data and the future-dated values to secure the data. This gives users with data permission access to the transaction security data on the current row and users with data permission access to the transaction security data on the future-dated row access to the person.
The system only creates future-dated security rows in SJT_PERSON when you:
Select one or more actions on the Security Installation Settings page.
Enable future-dated rows for the security access type.
Note: This enables you to use future-dated security with some types but not others.
Create and save a future-dated row in a component that uses the JOB record using one of the actions you selected on the Security Installation Settings page.
If you have selected the action of Transfer in the Actions that trigger Future Dated Security Rows grid, then when you create a future-dated Job Data row with the action of Transfer for a person, the system will add a row to the SJT_PERSON with the transaction data from the new row. Users with data permission to the future-dated transaction security data will have access to the person's data.
Note: Only component security views use future-dated security rows.
For example, as of January 1, 2005 Kenny Wong works in department 42000. Starting July 1, 2006 he will transfer to department 44000. On April 15, 2006, in anticipation of the transfer, the HR administrator enters a future-dated job data row for the transfer.
Julie Sparrow manages department 42000 and Barry Deere manages department 44000 and each has data permission to the people in their departments.
As of April 15, 2006 Kenny Wong has the following two job data rows:
|
Effective Date |
Action |
Department |
|---|---|---|
|
January 1, 2005 |
Hire |
42000 |
|
July 1, 2006 |
Transfer |
44000 |
The data permission depends on if you are using future-dated security for that security access type and if you have selected the action of Transfer on the Security Installation Settings page:
If you have not selected it:
The SavePostChange PeopleCode does not update SJT_PERSON with the new department information from the future-dated row because it is not yet effective.
Note: When the transfer row does become effective, the Nightly SJT Update process updates SJT_PERSON, overwriting the old row with the new row.
Julie can access Kenny's data until June 30, 2006 and Barry can access it starting July 1, 2006.
If you have selected it:
The SavePostChange PeopleCode creates a new row in SJT_PERSON with the future-dated transaction security data. The system identifies this row as future-dated.
Note: When the transfer row becomes effective, the Nightly SJT Update process updates SJT_PERSON, removing the old row and making the future-dated row current.
Note: Search views that don't use future-dated security will not use the future security row when enforcing data permission.
Julie can access Kenny's data until June 30, 2006 and Barry can access it starting April 15, 2006.
Without special job security options, the system creates a single transaction security data row for each unique combination of ID and employment record number. When you use special job security options, the system creates additional rows in SJT_PERSON with different security key values to enable access to rows to which a permission list would normally not have access.
For example, if you are securing data by department and have enabled people with access to the home job data record to view the host job data record but are not allowing people with access to the host job data record to view the home job data record, the system will create the following three rows of data in SJT_PERSON (only the relevant columns are shown) for a person whose home job data record (employee record number 0) is in department 25000 and whose host job data record (record number 1) is in department 20000:
|
Key 1 |
Key 2 |
Empl ID |
Empl Record |
Home/Host |
Intl. Type |
|---|---|---|---|---|---|
|
SHARE |
25000 |
K0G019 |
0 |
Home |
|
|
SHARE |
25000 |
K0G019 |
1 |
Host |
Home-Host |
|
SHARE |
20000 |
K0G019 |
1 |
Host |
The system creates the row marked Home-Host to grant the special job security option. By creating a row for the host record with the department value of the home record, people with data permission to the home record can access the host record.
The system works the same way for the other special security options, creating an additional row and inserting the key values that enable the access.
Use the Security Installation Settings page (SCRTY_INSTALL) to choose the HCM security settings for your installation.
Navigation:
This example illustrates the fields and controls on the Security Installation Settings page. You can find definitions for the fields and controls later on this page.
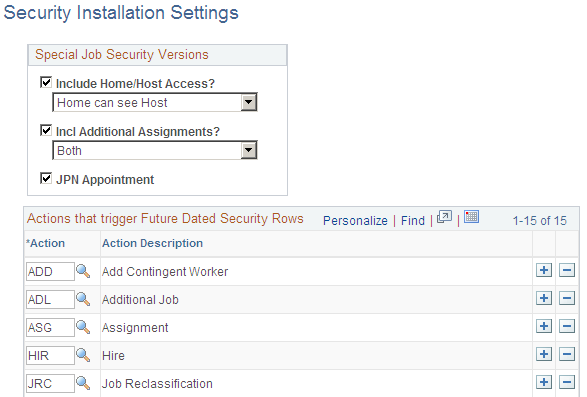
Special Job Security Versions
The options you select here will be available for your installation but will not be enabled unless you select them again for the security access types you are using. This enables you to use the security versions for some security access types and not others.
Field or Control |
Description |
|---|---|
Include Home/Host Access? |
This option is for tracking global assignments. When an employee is on assignment they have a host record and a home record. Select one of the following options:
If you do not select Include Home/Host Access? then regular data permission rules apply. |
Incl. Additional Assignments? |
This option is for workers with additional assignments added using the Job Data Concurrent component (JOB_DATA_CONCUR). When a worker has an additional assignment, they have a controlling employee or contingent worker instance with an active job data record and an additional assignment job data record. Select one of the following options:
If you do not select Incl. Additional Assignments? then regular data permission rules apply. |
JPN Appointment |
(JPN) Select so that users who have access to the additional appointment of a worker can access the main appointment record for that worker. The system assigns some additional assignments (Kenmu) to a particular EmplID and record called a main appointment, the job you can access through the Job Data pages. If you do not select JPN Appointment? then regular data permission rules apply. See Setting Up Security for Tracking Additional Appointments. |
Actions that trigger Future-Dated Security Rows
Select the actions that will trigger the SavePostChange PeopleCode in the components using the JOB record to create a future-dated security row in SJT_PERSON when they are used in a future-dated row in the Job Data pages. The system will not create security rows for future-dated rows with actions other than those listed here.
To create future-dated rows, you need to select the Include Future Dates check box on the Security Type Table. This enables you to use future-dated security for some security access types and not others.
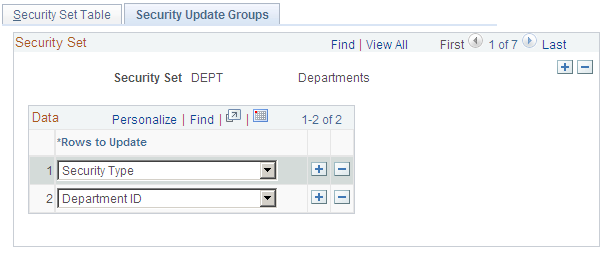
Use the Security Set Table page (SCRTY_SET_TBL) to review existing security sets and the security access types you've attached to them.
Navigation:
This example illustrates the fields and controls on the Security Set Table page. You can find definitions for the fields and controls later on this page.

Field or Control |
Description |
|---|---|
Object Owner ID |
Security sets with a PeopleSoft Object Owner ID are system data and not available for modification on this page. You can still modify the Security Update Groups of delivered security sets. |
Transaction Sec Join Table |
The security join table that stores the transaction data for this security set. Note: If you are creating a new security set, you must have created this table in Application Designer before creating the security set. Creating a new security set requires modification of the system. Please refer to the Security technical brief on My Oracle Support for directions. |
SJT Temp Table (for AE process) |
The temporary record used for PeopleSoft Application Engine. It is a copy of the transaction security join table and also contains the Application Engine process fields. This table updates the transaction security join field using the Application Engine process. |
SQLID for Value Field List |
The list of fields (not including the key fields) that are in the transaction security join table. |
Generate SQL |
Click to generate the SQL and SQLID for the value field list. |
Security Access Types for this Set
The system lists the security access types for this security set and indicates which ones are enabled. Enable or disable security access types on the Security Type Table page.
Use the Security Update Groups page (SCRTY_SJT_UPD) to define the data groups that can be updated by the SJT Refresh process.
Navigation:
This example illustrates the fields and controls on the Security Update Groups page. You can find definitions for the fields and controls later on this page.
Select which refresh options to make available when updating the security set using the SJT Refresh process. The system makes the options you select here available for this security set on the Refresh SJT page, enabling you to select portions of the security join table to update.
For example, you could refresh all the rows for external instructors by selecting the refresh option Person of Interest Type and the POI Type External Instructors.
Use the Security Type Table page (SCRTY_TYPE2_TBL) to enable or modify existing security access types or create new ones.
Navigation:
This example illustrates the fields and controls on the Security Type Table page. You can find definitions for the fields and controls later on this page.
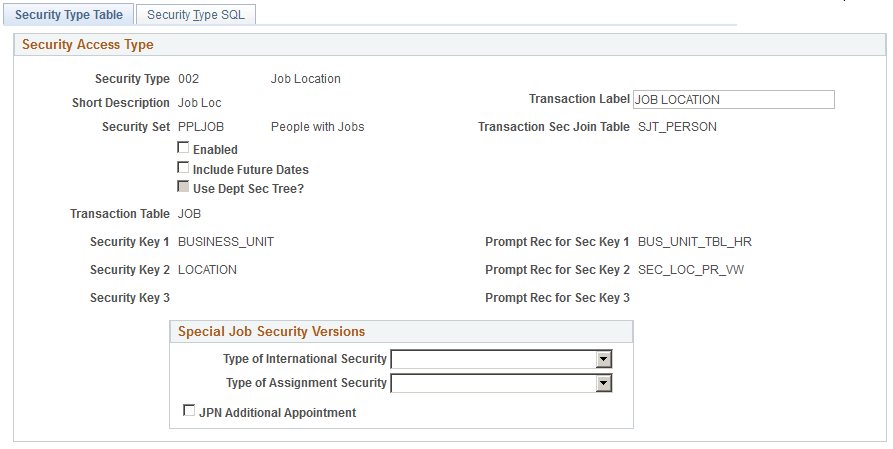
You can enable more than one security access types for a security set and you can assign data permission access to a permission list using more than one access type.
Note: PeopleSoft has delivered the most asked for security access types and you should not need to create new types. Enable or disable the types your installation requires.
Please refer to the Security technical brief on My Oracle Support for directions on how to create new security types.
Note: The more security access types you enable and options you use, the more rows of data the system stores in the security join tables. This affects system performance. PeopleSoft advises you to enable only the security types and options required to manage your data permission needs.
Field or Control |
Description |
|---|---|
Security Type |
The system automatically numbers new security types. |
Transaction Label |
Enter a field label. The system will display this label on a transaction page when the security access type is used as a field to gather data. For example, if you are using fields in addition to POI type to control access to the data of POIs without jobs, the system will use the label you enter here on the Add a POI Type page and Edit POI Relationship page to prompt for security transaction values. |
Security Set and Transaction Sec Join Table |
The security set whose data you are securing and the security join table associated with the security set. |
Enabled |
Select to enable the security type. |
Include Future Dates |
Select to enable the security join tables to store future-dated security rows for this type. The system will only update the security join tables with the future-dated rows that have the actions you selected on the Security Installation Settings page. |
Use Dept Sec Tree? (use department security tree?) |
Select if this security type uses the department security tree. You can only create department security trees for departments and can only grant data permission based on department security trees to row security permission lists. |
Transaction Table |
The transaction table that stores the field or fields that will control security for this type. |
Special Job Security Versions |
If you enable special job security versions on the Security Installation Settings page, enable the options for this security access type. |
Security Key 1, Prompt Rec for Sec Key 1 (prompt record for security key 1), Security Key 2, Prompt Rec for Sec Key 2 (prompt record for security key 2), Security Key 3. and Prompt Rec for Sec Key 3 (prompt record for security key 3) |
Define the security data fields for this type. The fields need to be on the Transaction Table record. The prompt record is the record the prompt field values come from when you are assigning values to a permission list. You must select all the records and fields necessary to make a unique qualification here. For example, to select a location (key 2), you first need to select a business unit (key 1). The prompt record for the BUSINESS_UNIT field is BUS_UNIT_TBL_HR and the prompt record for the LOCATION field is LOCATION_TBL. |
Refreshing the Transaction Security Join Tables
You should refresh the transaction security join tables whenever you:
Enable or disable a security access type.
Enable or disable a future-dated security for an enabled security access type.
Change the special job security versions for an enabled security access type.
Use the Security Type SQL page (SCRTY_TYPE2_SQL) to enter the SQL statements for the new security types.
Navigation:
This example illustrates the fields and controls on the Security Type SQL page (1 of 3). You can find definitions for the fields and controls later on this page.
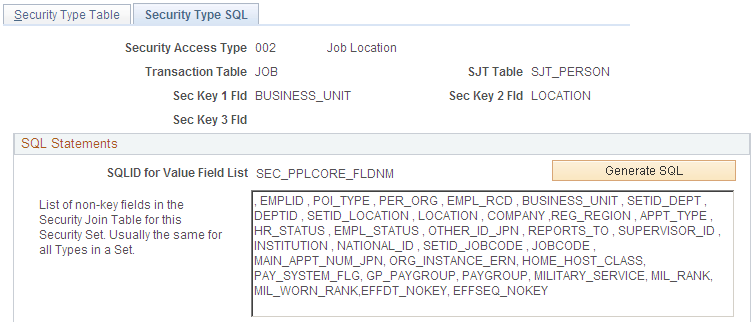
This example illustrates the fields and controls on the Security Type SQL page (2 of 3). You can find definitions for the fields and controls later on this page.

This example illustrates the fields and controls on the Security Type SQL page (3 of 3). You can find definitions for the fields and controls later on this page.
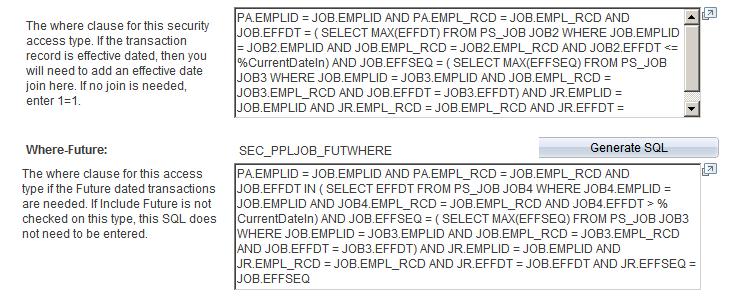
The Application Engine uses the SQL fragments on this page to build the update and insert statements to update the transaction security join table.
You can use any SQLID but when you click the Generate SQL buttons, the system generates unique IDs based on the security set and/or type.
Warning! This page should only be used by users with a strong understanding of SQL joins and the table relationships.
Use the Group Registration page (SCRTY_GB_REGISTER) to register groups from the Group Build feature that you want to use for row level security.
Navigation:
This example illustrates the fields and controls on the Group Registration page.
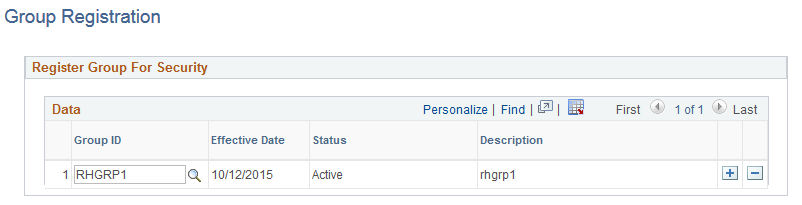
Field or Control |
Description |
|---|---|
Group ID |
Select those groups that were created using the Group Build framework that you want to register as part of row level security. For more information on the Group Build feature, see Understanding Group Build. |
Use the Matrix Team Registration page (SCRTY_MX_REGISTER) to register a matrix team that you want to use for row level security.
Navigation:
This example illustrates the fields and controls on the Matrix Team Registration page.

Field or Control |
Description |
|---|---|
Matrix Id |
Select those matrix teams that were created using the Matrix Team Page that you want to register as part of row level security. |
Use the Refresh Groups page (SCRTY_GB_REFRESH) to refresh security-related groups that were created using the Group Build feature.
Navigation:
This example illustrates the fields and controls on the Refresh Groups page.
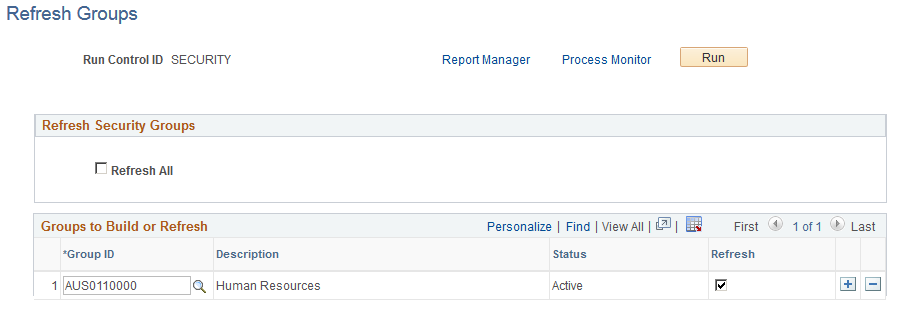
After a group is registered, use the Refresh Groups run control page, which allows either refreshing or creating of content for all registered groups (Refresh All) or for individually selected groups, to run the Refresh Groups (SCRTY_GB_REF) process. This process runs the Group Build framework and populates the Security Group Results (SCRTY_GBRES_TBL) transaction table that is used in security access. The process will also remove any inactive groups that are identified on this page. Groups that are future dated will not be picked up by this process.
Note: You need to run the process from the Refresh Transaction SJT tables component to pick up the information stored in the Group Results (SCRTY_GBRES_TBL) transaction table.
Field or Control |
Description |
|---|---|
Refresh All |
Select this option to refresh or generate new content for all active registered security related groups. Any inactive registered groups will be removed from the security results table. To register a group for security purposes, see the Group Registration Page. |
Group ID |
Select from those groups that were registered on the Group Registration Page. |
Status |
Indicates if this group is active or inactive. The Security Group Build Refresh process generates new content and updates the Security Results table for active groups and removes content for inactive groups listed on this page. |
Refresh |
Select to refresh (add, update, or remove) specific rows of group data. The process will use the selected data to update the Group Results (SCRTY_GBRES_TBL) transaction table accordingly. The system will process only those rows that are selected, unless the Refresh All option is selected and then all rows will be processed. |
Note: When the Access Type Group Build (045) is enabled, the security sync AE program will pick up and generate entries in SJT_PERSON for all employees found in the associated group table. To enable an Access Type, see Security Type Table Page.
Use the Refresh Security Matrix Teams page (SCRTY_MX_REFRESH) to refresh security-related matrix teams.
Navigation:
This example illustrates the fields and controls on the Refresh Matrix Teams page.
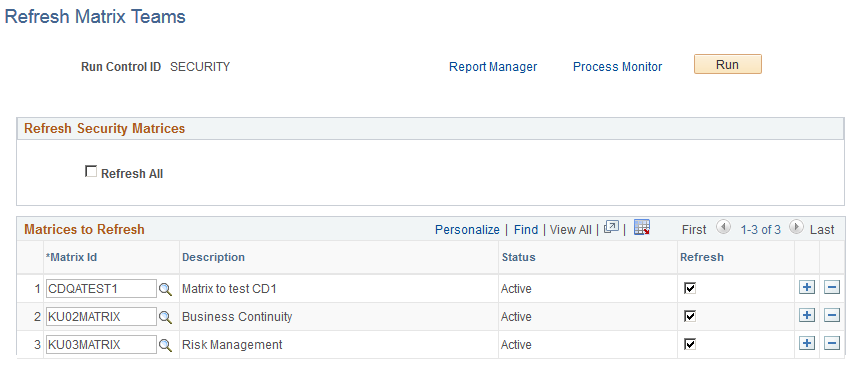
After a matrix team is registered, use the Refresh Matrix Teams run control page, which allows either refreshing or creating of content for all registered matrix teams (Refresh All) or for individually selected matrix teams, to run the Refresh Matrix Teams (SCRTY_MX_REF) process. This process populates the security Matrix Team Results (SCRTY_MXRES_TBL) transaction table that is used in security access. The process will also remove any inactive matrix teams that are identified on this page. Matrix Teams that are future dated will not be picked up by this process.
Note: You need to run the process from the Refresh Transaction SJT tables component to pick up the information stored in the Matrix Team Results (SCRTY_MXRES_TBL) transaction table.
Field or Control |
Description |
|---|---|
Refresh All |
Select this option to refresh or generate new content for all active registered security related matrix teams. Any inactive registered matrix teams will be removed from the security results table. To register a team for security purposes, see the Matrix Team Registration Page. |
Matrix Id |
Select from those matrix teams that were registered on the Matrix Team Registration Page. |
Status |
Indicates if this matrix team is active or inactive. The Security Matrix Team Refresh process generates new content and updates the security Matrix Team Results table for active matrix teams and removes content for inactive matrix teams listed on this page. |
Refresh |
Select to refresh (add, update, or remove) specific rows of matrix team data. The process will use the selected data to update the Matrix Team Results (SCRTY_MXRES_TBL) transaction table accordingly. The system will process only those rows that are selected, unless the Refresh All option is selected and then all rows will be processed. |
Note: When the Access Type Matrix Team (046) is enabled, the security sync AE program will pick up and generate entries in SJT_PERSON for all employees found in the associated matrix team table. To enable an Access Type, see Security Type Table Page.