Using Smart HR Templates and Transactions
These topics provide an overview of Smart HR templates, list prerequisites, and discuss how to enter data using Smart HR transactions.
|
Page Name |
Definition Name |
Usage |
|---|---|---|
|
HR_TBH_EULIST |
Select a template or person to process a Smart HR transaction. |
|
|
HR_TBH_ADD |
Enter transaction details, such as the persons's job effective date, to start the Smart HR transaction process for a person. |
|
|
HR_TBH_DATA |
Enter employee information details for the person’s transaction. The page will display the tabs and fields defined by the template you selected for this person. |
|
|
HR_TBH_SRMATCH |
Identify if a person match is found in the system. When saving and submitting the person to the database, if a match is found on the person's name or national ID, this page displays and allows you to select an existing person in the database or continue with the transaction. |
|
|
HR_TBH_ACTION |
Select an action if a matching person with an inactive status is found in the database. |
|
|
Confirmation Page Further Processing Required Page |
HR_TBH_CONFIRM |
Displays information about the transaction status after performing a Smart HR transaction. |
|
HR_TBH_STATUS |
View the status of a Smart HR transaction for those transactions with a pending, cancelled, or processed status. |
|
|
HR_TBH_MANAGE_TXN |
View Smart HR transactions (hire and non-hire transactions) that are either in draft status, require HR review prior to committing to the database, encountered errors upon saving and require a HR administrator's review to complete the transaction, or to display a list showing all transactions with these statuses. |
|
|
HR_TBH_HIREDET |
View the transaction details entered during a Smart HR transaction and complete the process. |
|
|
HR_MANAGE_HIRES |
View a list of hires that have gone through either the recruiting process or persons hired through the Smart HR transaction process. |
|
|
HR_TBH_HIREDET |
View hire details entered during a Smart HR hire transaction and complete the hire process. |
|
|
Manage Transaction Details - Transaction Errors Detail Page Manage Hire Details - Transaction Errors Detail Page |
HR_TBH_ERRORS |
View the errors that occur during the save of the transaction. |
|
Manage Transaction Details - Possible Person Matches Page Manage Hire Details - Possible Person Matches Page |
HR_TBH_HIRESM |
Determine if a person in the Search Match process matches the person for which you are performing a transaction. |
The Smart HR process, or template-based transactions, enables you to expedite the hiring of individuals. Using a template-driven approach, it offers a way to streamline repetitive data entry by reducing the current data entry process through the Personal Data and Job Data pages.
There are three types of users that will facilitate Smart HR transactions:
The template administrator creates various templates for use by the end users.
The end user enters data for persons being added to the database. The amount of data an end user enters is dependant on the types of templates created. Security determines which templates the end user can access.
The human resources administrator (HR administrator) determines at the template level whether the end user's data will automatically update the HR system, or if it requires an HR administrator to review it first. Also, the HR administrator is sent any errors that occur when the end user saves a person's data to the database for completion.
This table summarizes the pages used by each type of user:
|
Template Administrator |
End User |
HR Administrator |
|---|---|---|
|
|
|
Note: This topic focuses on the records the end user and HR administrator use in the Smart HR transaction process. Template setup by the template administrator is discussed in other topics.
See Setting Up Smart HR Templates.
To start the Smart HR transaction process, select a pre-configured template. This template will display a simple entry page or multiple data entry pages, depending upon how it was set up. The fields on this page may also be hidden or values will be provided by defaulted, based on how the template was set up by the template administrator. After the transaction data is entered it can be either saved directly to the HR system, reviewed by an human resources administrator, or saved for later.
When templates are created by the template administrator, the template status is set to Test (T). After the template is tested and ready for use, the status will need to be changed to Active (A). When you are searching for templates to use in the Smart HR transaction process, the only templates that are available are those with a status of Active (A). End users will only be able to see templates for which they have row-level security access.
When the data is submitted for processing, the appropriate service-oriented architecture (SOA) or component interface (CI) will be called to process the actual transaction. If an error occurs during processing, a line item will be added to the Manage Smart HR Transactions component. If it is for a hire transaction it will also be added to the Manage Hires component. From these pages, a human resources administrator is able to review the data, make corrections, resubmit for processing, or cancel the transaction. The human resources administer is able to do this by accessing the transaction template as a whole, or though the Personal Data, the Job Data, and the Person Profile components. What the administrator accesses depends on the type of transaction that was performed. He or she can complete the transaction but can also modify the data entered by the end user, as needed, prior to committing the changes to the database.
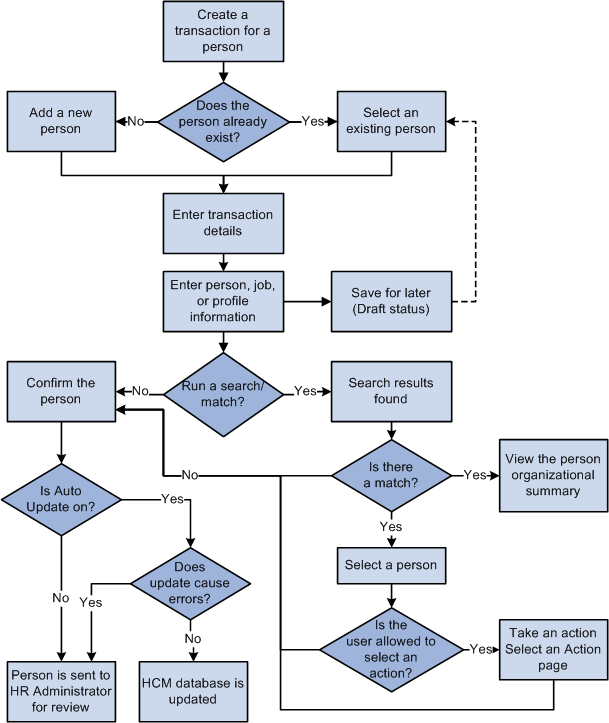
Smart HR (Template-Based Transaction) Process Flow
When hiring or updating a person’s personal, job, or profile data using the Smart HR feature, you will use the following pages:
Smart HR Transactions.
Enter Transaction Details.
Enter Transaction Information.
Person Match Found.
Select an Action.
Confirmation.
Transaction Status.
This diagram illustrates the Smart HR process, during which the user performs a transaction using the Smart HR Transactions or Smart HR for Managers components. Here the user, enters transaction details, such as person, job, and profile information, may determine if this person matches another person already in the system, and confirms the transaction data. Depending on the template definition, the confirmed information will either update the database directly, or it will be routed to an HR administrator for review.
Smart HR Transactions
The Transactions in Progress grid on the Smart HR Transactions page displays the people who are in draft status within the Smart HR transaction process. The list of people is filtered based on the operator ID of the person accessing the page. The page will show only the entries that the end user has previously entered using their operator ID. On this page you can delete a person which will delete the person's information.
Enter Transaction Details
On the Enter Transaction Details page, enter basic information for the transaction. On this page you may be required to enter information such as the:
Person ID.
Job effective date.
Job action.
Action reason code.
Name and address formats.
Note: Depending on how the template administrator has set up the template configuration this information will be display only, visible and editable, or hidden.
Also, for informational purposes, this page will display such information as the:
Template name.
Country.
Organizational relationship, which is the type of person for which you are performing a transaction, such as employee or contingent worker.
Template category.
Enter Transaction Information
The Enter Transaction Information page is where you will enter name details, home and mailing address details, National ID, and job details. The number of sections and fields on this page are dependent on how the template chosen has been configured by the template administrator.
Person Match Found
The Person Match Found page displays the possible person matches. The match parameters are set up by the template administrator. If a match is found, select the person from the list and the EmplID is carried forward in the transaction. If no match is found, you can continue with the transaction by clicking the Not a Match - Continue with Hire button. The Not a Match - Continue with Hire button is not available for non-hire or non-rehire transactions; an employee must be in the system for these types of transactions.
Select an Action
The Select an Action page displays only if a match is found during the search and you are allowed to take some action (defined at the template level). If the user is not allowed to take any action, the page will not display and a transaction request for the person is sent to the HR administrator.
Confirmation
The Confirmation page displays if the user has successfully saved the data to the system. There are four different messages displayed on the conformation page based on the template level set up and the security access of the user's operator ID. The confirmation page will display one of the following four messages:
Save Confirmation. The system displays this message if the user has access to save the person to the database and a Person ID is generated.
Save for Later Confirmation. The system displays this message if the person entered is saved in draft status and a Person ID is not generated.
Submit Confirmation. The system displays this message if the user has access to enter the data but not save it to the database. The person in the transaction is submitted to Human Resources for final processing.
Further Processing Required. The system displays this message if errors were encountered while trying to save to the database. The person's transaction information is then sent to human resources to complete the transaction.
When the data has been confirmed it is stored in the staging tables HR_TBH_HDR and HR_TBH_DATA. The HR_TBH_HDR table stores the high-level information, which includes a unique sequence number representing the transaction ID, the template ID, the operator ID of the user who entered the data, the status representing various stages of the transaction, and the transaction date. The HR_TBH_DATA table stores the record name, field name, and value of the Record/Field with the unique transaction ID. This table is a child of the HR_TBH_HDR table.
The status field on the HR_TBH_HDR may have one of the values displayed in the table below:
|
Status |
Definition |
Scenario |
|---|---|---|
|
DFRT |
Draft |
The user has begun to enter data but saved to continue later. |
|
SBMT |
Submitted |
The user entered all required data based on the template configuration. |
|
ACTR |
Action Required |
The user decided to send the transaction request to the HR administrator to review or complete the rest of the information. |
|
EROR |
Error |
The user encountered some error while saving the data in to the system. |
|
HIRE |
Hired/Added |
Once the HR administrator completes the hire process by adding person and job information into the system, the status of the row will change to Hire/Added. |
|
COMP |
Completed |
Once the row is deleted by the user, the status of the row will change to Completed. |
Error Transaction
The Error Transaction page is displayed when the template administrator is testing the template and the test is unsuccessful. This page is also available to the HR administrator on the Manage Transaction Details and Manage Hire Details pages. This page will display the template used, the transaction causing the error, the transaction ID, and the start date. It will also give a description of the error found.
Transaction Status
The Transaction Status page displays the persons being processed by the Smart HR transaction process and their status. The list is filtered based on the operator ID of the user. Also, the user has the option of deleting a row.
Note: This page does not show people in draft status. You can only view those individuals currently being processed by the HR department, view those who have been cancelled by the HR department, and those whose transactions have been successfully entered. You can remove people with the transaction status of Cancelled and Processed .
Smart HR templates provide a configurable, template-driven approach, where you can define default data for various sections in the transaction process, such as for a hire or to update a persons personal, job, or profile data. You will be able to create templates to meet different user needs by configuring the template to hide or display specific fields. This allows your Human Resources department to decentralize the HR hire or update transaction processes out to line managers or human resource representatives in the field.
Prior to performing a Smart HR transaction, a template administrator must set up the templates. The administrator must be a person who is very familiar with the hiring process. When creating a template, the administrator is responsible for determining:
Logical groups of fields, which will be the sections to include on the template.
The sequence of sections and fields within sections.
Default values for fields.
Which fields will be hidden, display-only, or enterable.
Whether data entered by the end user can be directly submitted for processing or will need to be reviewed by a human resource administrator.
Sections and fields used within templates are delivered as system data. These delivered sections can be modified within your templates to suit your organization's needs. These sections are located in the Template Section component A list of delivered Smart HR template sections are located in the Setting Up the Administer Workforce Business Process, Setting Up Smart HR Templates topic in this documentation.
The labels of the fields on the template sections typically reflect the actual field labels. However, the template administrator can create a text catalog entry for those fields in which they want to change the label.
When the templates are created, the template administrator will assign a transaction type and category to each template. These are used for row-level security of the template. This security will restrict end user access to the template. Also, PeopleTools permission lists and roles are used for security purposes.
When templates are similar, the template administrator can clone an existing template to eliminate duplicate entry.
Use the Smart HR Transactions page (HR_TBH_EULIST) to select a template or person to process a Smart HR transaction.
Navigation:
This example illustrates the fields and controls on the Smart HR Transactions page. You can find definitions for the fields and controls later on this page.
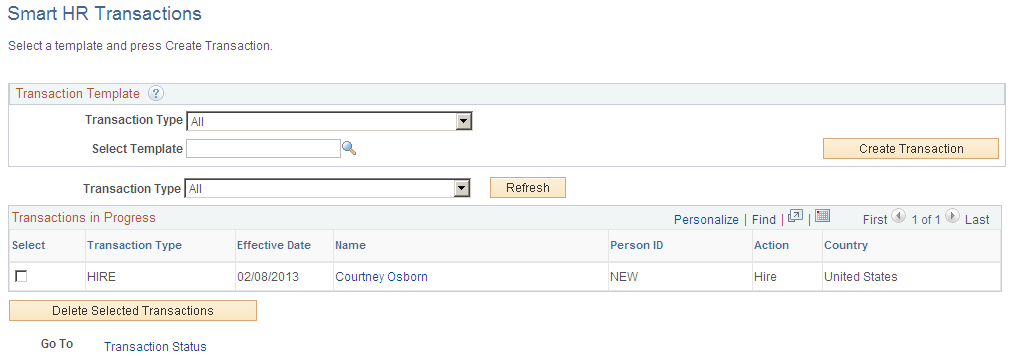
Start or complete a Smart HR transaction. Click the Transaction Status link at the bottom of the page to access the Transaction Status page and view transactions pending HR processing, have been cancelled by HR, or people who have had Smart HR transactions performed in the system.
Transaction Template
Select a template and click the Create Transaction button to start a transaction using the Smart HR process. The templates available for selection are those set up by the template administrator. You can narrow the search for a template by selecting a transaction type prior to searching for a template. Transaction types define if a transaction template is for a hire or rehire, a job update, a job and person data update, a profile update, and so on.
Transactions in Progress
Displays the transactions that are in Draft status. You can only view those people you have added through the Smart HR Transactions or Smart HR for Managers pages but selected to save for later. The person will remain in Draft status until you submit the person, send them to HR for completion, or delete them by selecting the row and clicking the Delete Selected Transactions button.
Use the Enter Transaction Details page (HR_TBH_ADD) to enter transaction details, such as the persons's job effective date, to start the Smart HR transaction process for a person.
Navigation:
Select a template from the Select Template field on the Smart HR Transactions page and click Create Transaction.
Select a name link from the Name field on the Smart HR Transactions page.
This example illustrates the fields and controls on the Enter Transaction Details page. You can find definitions for the fields and controls later on this page.
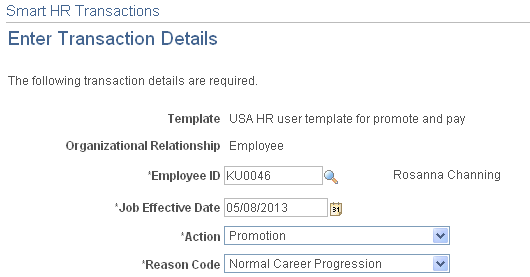
Note: The fields you view or update vary depending on the template set up.
Enter transaction details to start the transaction process. Once the values on this page are entered, click Continue to access the Enter Transaction Information page.
Possible fields that may be visible or editable are Template ID, Organizational Relationship, Country, Category, EmplID, Job Effective Date, Action, Reason, Name Format, and Address Format. See the Smart HR Template Creation - Smart HR Template Creation - Configuration Page, Search Page Configuration (Fields) topic for more information.
Field or Control |
Description |
|---|---|
Employee ID |
(Hire/rehire transactions) The value of NEW may appear if it has been set as the default value in the template definition. If you are hiring an individual to the organization for the first time and no data resides in the system for the person, accept the default. An employee ID will be assigned when the transaction is submitted successfully and a person record is created. Otherwise, enter or look up the employee ID. For rehire transactions no row-level security exists, and all persons in the system are available for selection. This is also the case for managers using the Smart HR for Managers pages for rehiring a person, as the person may not have previously reported to that manager. (Non-hire transactions) For non-hire transactions, row-level security is implemented for HR administrators. Only the persons to whom the user has security access are available. A valid employee ID must be entered to move forward. For managers using a non-hire transaction, the Find a Person link appears instead of the Employee ID lookup field. |
Find a Person |
(Non-hire transactions) For a manager using the Smart HR Template for a non-hire transaction, a Find Person link appears instead of the Employee ID field. Clicking the link displays a list of employees who report to that manager. The manager must click the link to select the appropriate employee for the transaction from the list of direct reports. Note: Direct Reports UI determines which employees are available. See Configuring Direct Reports Functionality. When you select the employee, the Enter Transaction Details page appears with the person’s ID as employee ID, and the Employee ID field is display only. |
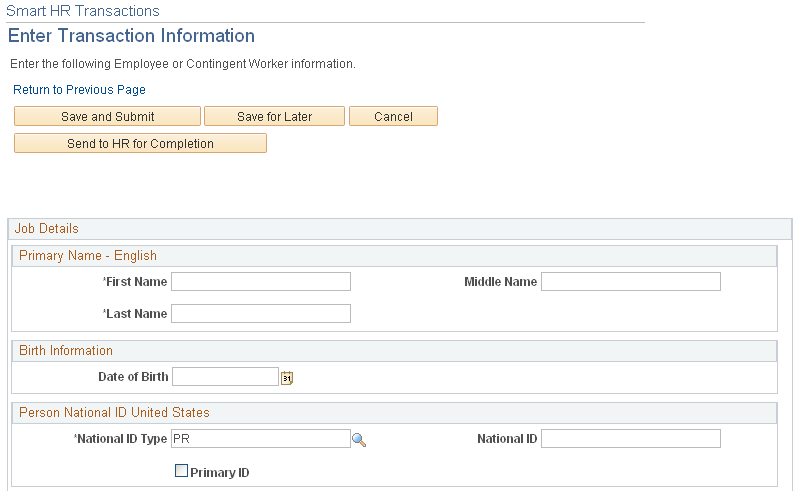
Use the Enter Transaction Information page (HR_TBH_DATA) to enter employee information details for the person’s transaction.
Navigation:
Click Continue on the Enter Transaction Details page.
This example illustrates an example of the Enter Transaction Information page (1 of 2). You can find definitions for the fields and controls later on this page, which varies according to the template you select.
This example illustrates an example of the Enter Transaction Information page (2 of 2). You can find definitions for the fields and controls later on this page, which varies according to the template you select.
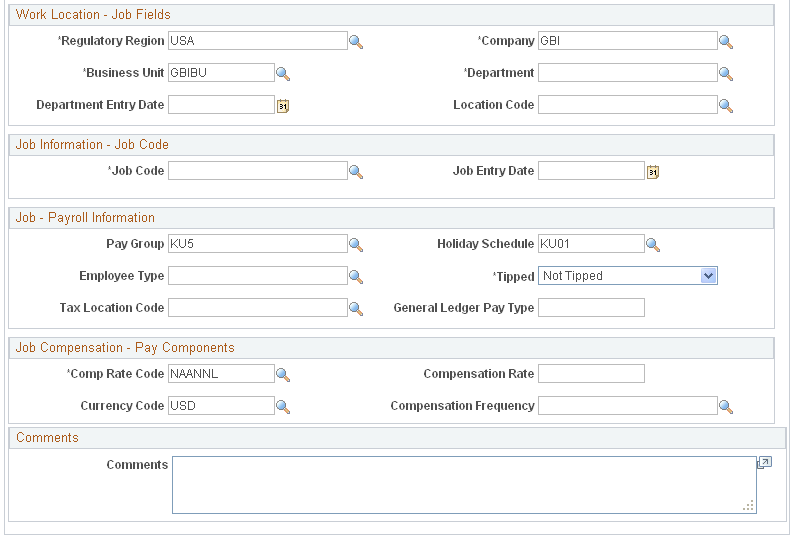
Fields appear based on the template selected. Job data appears based on the EmplID selected.
Enter the employee’s name, and enter or edit other required data. This data will be used complete the transaction.
Completing a Smart HR Transaction
Once all data is entered, you may be presented with these options:
Save and Submit – Click this button to save and submit the information for the person to the database.
If Search Match is enabled for this template, the system will run the Search/Match process and display the Person Match Found Page if a match is found.
Note: For templates with a transaction type where the Person/Job Data Indicator field value is not equal to Hire/Rehire, the person must already be in the system.
If no match is found, an error message appears stating that the personal information does not match a person in the system and to either edit the transaction details or send to HR for completion.
When the Automatic Database Updates check box is selected for the template and the transaction is saved successfully, the transaction updates the database and all information entered is updated in the appropriate tables. When ACA eligibility is associated with a hire template, the hire is saved successfully, and the regulatory region associated with the new employee is associated with the country code USA, then the transaction will update the system and HR will raise the ACAEligibility event.
When the Automatic Database Updates and the Show Update Contracts Link check boxes are selected on the template and the transaction is saved successfully, the system will display the Update Contracts link, which enables users with security permission to the contract pages to enter contract information for a person.
If Automatic Database Updates is not selected on the template definition (and no matching person was found for a hire or rehire template), the Submit Confirmation page will appear stating that the transaction is being forwarded to HR for further processing.
Save for Later – Click this button to place the transaction in draft status. Depending on the security access granted the end user, he or she can access the person later to complete the transaction, or the transaction can be completed by the HR representative.
Submit to HR for Completion – Click this button to submit the person's information to HR for review, completion, or submission by the HR administrator.
Cancel – Click this button to return to the initial Smart HR Transaction page and no data is saved.
Note: The save options will vary depending on the template setup and the end user's security access. For example, if the end user is not allowed to save and submit data to the database, the template administrator will set up the template so all hires will have to be saved for later or submitted to HR for completion.
(USF) U.S. Federal Specific Considerations
Note: The PeopleSoft application delivers the U.S. Federal Hire/Rehire template transaction type for Federal users. Federal customers use the PAR processing components, where the personal data and job data are in the same component and both sets of data will always be updated from the template. Therefore, the application does not deliver a template transaction type for Federal users where the person job data indicator is set to update job only or update person only.
In cases of U.S. Federal implementations, when the end user selects Save and Submit for a transaction, the following will occur:
When Automatic Database Updates is selected.
The employee goes to the first step in the PAR approval process. The data is not sent directly to Personal Data and Job Data.
When Automatic Database Updates is deselected.
The request will go to the Manage Transactions page to await HR action. When the HR administrator saves the person (in the HR Processing USF component), the data will go to the first step in the PAR approval process, not directly to Personal Data and Job Data.
There are two exceptions to this rule:
When Federal customers add contingent workers they do not go through the PAR approval process, instead they go directly to Personal Data and Job Data.
If the template administrator defaults the PAR Status field to Processed by Human Resources when setting up the template, then the data will be sent on to Personal Data and Job Data as part of the processing Federal Hire component interface.
Use the Person Match Found page (HR_TBH_SRMATCH) to complete a transaction when a person match is found. When saving and submitting the person to the database, if a match is found on the person's name or national ID, this page displays and allows you to select an existing person in the database or continue with the transaction.
Navigation:
Click Save and Submit on the Enter Transaction Information page.
This example illustrates the fields and controls on the Person Match Found page. You can find definitions for the fields and controls later on this page.
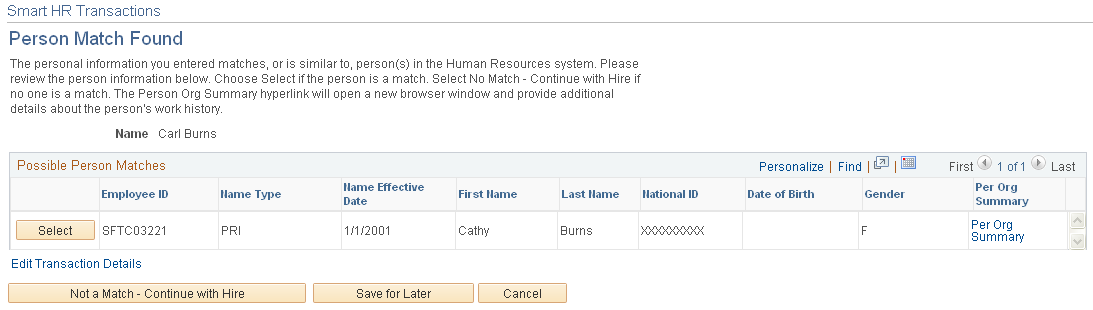
This page appears only if Search Match is enabled for the template and a match is found on the person involved in the transaction.
Field or Control |
Description |
|---|---|
Select |
If a match is found, the end user can select one of the existing people to continue with the transaction. The system considers the following scenarios when processing the transaction:
|
Per Org Summary |
Click this link to open the Person Organizational Summary page in a new window to view more details about this person. This can be useful in deciding whether this transaction should be treated as a new hire, if this should be treated as a concurrent job for an existing person, or if this is a rehire or update of someone already in the database. |
Not a Match - Continue with Hire |
Click this button if none of the search results are a match. Note: This button is not available for non-hire or non-rehire transactions. These types of transactions require that a person be in the system. |
Save for Later |
Click this button to save this person in draft status and come back at a later time to decide whether the person is a match or not. |
Cancel |
Click this button to cancel this process. You will lose all data previously entered and the system will return you to the initial Smart HR Transactions page. |
Send to HR for Completion |
Click this button to submit this transaction to HR for completion. |
Enter Transaction Details |
Select to have the system return you to the Enter Transaction Details page of the Smart HR template and view or modify your data. |
Use the Select an Action page (HR_TBH_ACTION) to select an action if a matching person is found in the database.
Navigation:
Click the Select button on the Person Match Found page (for a person with an inactive status).
This example illustrates the fields and controls on the Select an Action page. You can find definitions for the fields and controls later on this page.
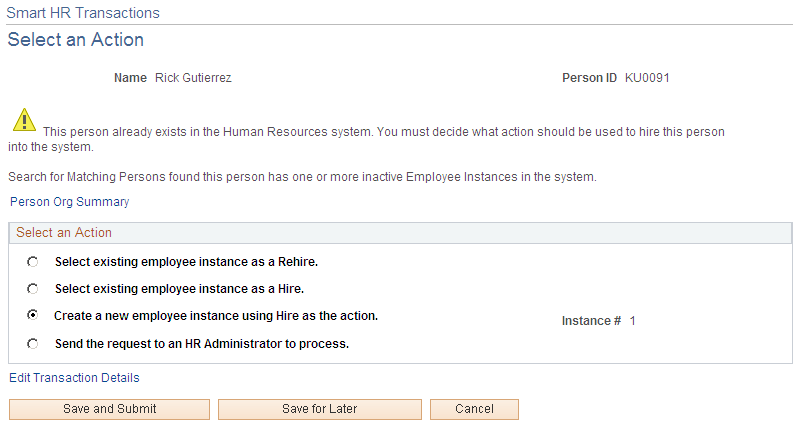
This page is only available for templates with a transaction type where the Person/Job Data Indicator field value is equal to Hire/Rehire.
Note: The options on this page vary depending upon how the rules are set up for the template on the Smart HR Template Creation - Person Rules Page.
Search Match for Hire or Rehire Transactions
When no active organizational instance is found and the template administrator has set up the template to enable the end user to decide what action to take, options may include:
Select existing employee instance as a Rehire or Select existing employee instance as a Hire.
The system will default to the lowest employment instance. The end user has the option to select a different employee instance, if applicable. When an employee instance is selected, the system always defaults to the controlling instance employee record number behind the scenes.
Create a new employee instance using Hire as the action.
The action will always default to HIR (Hire) for employee templates and ADD (Add Contingent Worker) for contingent worker templates. The employee instance and employee record number is automatically calculated behind the scenes.
Send the request to an HR Administrator to process.
When the end user does not get to decide what action to take, the template administrator must decide at the template level the options to take.
If only one inactive employment instance is found for the selected person when the Search Match process is run, the template administrator must decide between the following actions:
Restart Employment Instance as a Rehire.
Restart Employment Instance as a Hire.
Create a New Employment Instance using Hire as the Action.
Send the Request to an HR Administrator to Process.
When more than one inactive employment instance is found for the selected person when the Search Match process is run, the template administrator can chose from with of these option to have the system perform:
Create a New Employment Instance using Hire as the Action.
Send the request to an HR Administrator to process.
Note: When an active person is selected from the search results, the hire request will always be sent to HR to complete the process.
Use the Transaction Status page (HR_TBH_STATUS) to view the status of a Smart HR transaction for those with a pending, cancelled, or processed status.
Navigation:
Click the Transaction Status link on the Smart HR Transactions page.
This example illustrates the fields and controls on the Transaction Status page. You can find definitions for the fields and controls later on this page.
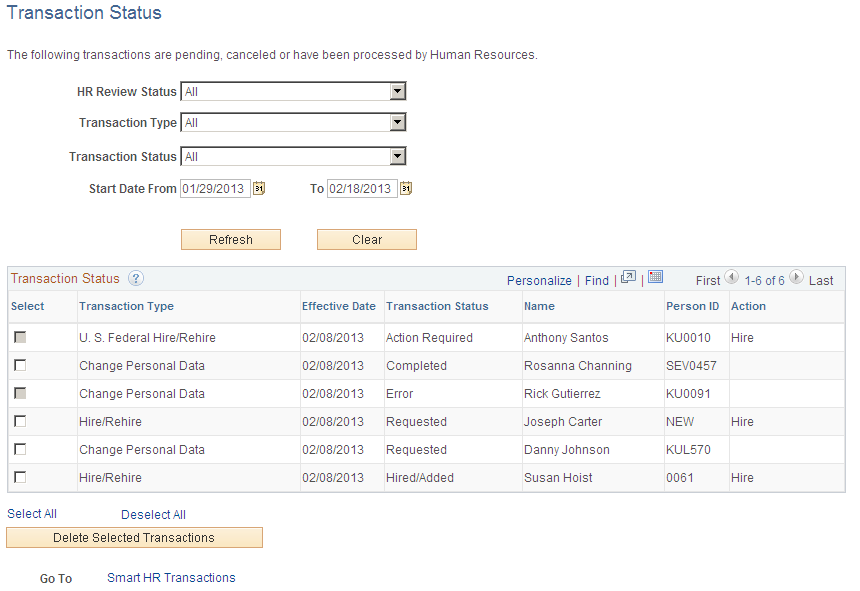
View the status of Smart HR Template transactions. The end user will be able to view only the persons he or she have entered in the system.
Use the Manage Transactions page (HR_TBH_MANAGE_TXN) to view the Smart HR transactions that are either in draft status, require HR review prior to committing to the database, encountered errors upon saving and require a HR administrator's review to complete the transaction, or to display a list showing all transactions with these statuses.
Navigation:
This example illustrates the fields and controls on the Manage Transactions page. You can find definitions for the fields and controls later on this page.
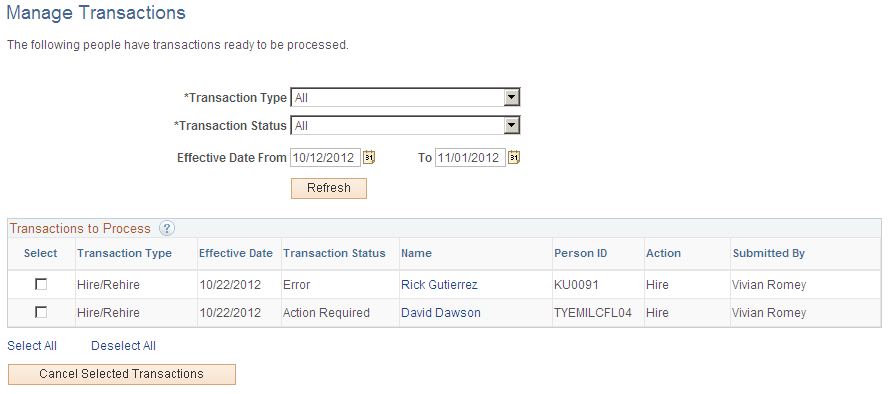
The page will display, by default, all transactions with the previously mentioned statuses with effective dates in the previous 10 days as well as next 10 days. Use the Transaction Type and Effective Date From and To fields to narrow your search for a transaction.
When a Smart HR template for a transaction does not allow automatic database updates by the user, the transactions are available on this page with the status of Requested.
To review, update, and save a transaction to the HR system, select a person’s name link in the Transactions to Process grid. This will open the Manage Transaction Details page to enable you to complete the transaction.
Use the Manage Transaction Details page (HR_TBH_HIREDET) to view details entered during a Smart HR transaction and complete the process.
Navigation:
Click the name link for a person on the Manage Transactions page.
This example illustrates the fields and controls on the Manage Transaction Details page. You can find definitions for the fields and controls later on this page.
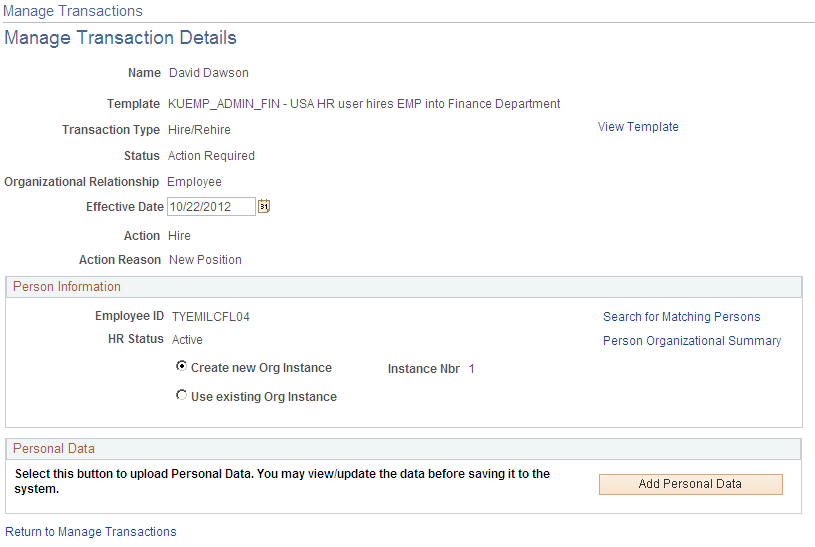
Use this page to change the transaction date, perform a search for matching persons, or select the appropriate buttons or links to complete the Smart HR transaction.
This table lists some examples of some of the buttons and links that are available based on status:
|
Status |
Available Button or Link |
Description |
|---|---|---|
|
Requested |
Open Template Add Person (button) |
Automatic updates is off. The person has not been added to the system. |
|
Requested |
View/Edit Person (link) Add Job (button) |
Automatic updates is off. Personal information has been added to Personal Data. The person still needs to be added to Job Data. |
|
Requested |
Add Profile (button) |
Automatic updates is off. The profile data has not been added to the system. |
|
Draft |
View/Edit Job Data (link) Add Profile Data (button) |
Job information has been added to Job Data. The profile data still needs to be added to Person Profile. |
|
Action Required |
Add Person (button) |
Automatic updates is on. This person was submitted to HR for completion. |
|
Action Required |
View/Edit Person (link) Add Job (button) |
Automatic updates is on. This person was submitted to HR for completion and personal data has been added. The job information has not been added. |
|
Action Required |
View/Edit Person (link) View/Edit Job (link) Update Profile Data (button) |
Automatic updates is on. Personal data and job data has been updated. The profile information has not been added. |
|
Error |
View Errors (link) Add Person (button) |
Automatic updates is on. An error occurred when attempting to save the record to Personal Data. |
|
Error |
View Errors (link) Add Person (button) Add Job (button) |
Automatic updates is on. The person has been added to Personal Data. An error occurred when attempting to save the record to Job. |
Note: (USF) When the database is federalized, only the Add Person/Job appears, which will update HR Processing USF. Depending on the PAR Status, Personal Data and Job Data may also be automatically updated. For example, if the PAR Status is Processed on the template, Personal Data and Job Data will be automatically updated when the Add Person/Job button is selected and the information is saved. However, if the PAR Status is Requested on the template, only the HR Processing USF page will be updated and the request will need to go through the standard PAR approval process. If applicable, U.S. Federal customers will also see the View Errors button on the Manage Transaction Details Page.
Field or Control |
Description |
|---|---|
View Template |
Select this link to view the entire template for this transaction. This link is available when some of the core components have been updated for a transaction and therefore the Open Template button is now longer available on the page. This link opens the template transaction in view mode. In order to update a core component, use the other buttons and links located later on the page. |
View Errors |
Click this link to open the Manage Transaction Details - Transaction Errors Detail page that displays error details and messages. |
Person Information
Field or Control |
Description |
|---|---|
Search for Matching Persons |
Select this link to see if there are matching persons in the system. |
Person Organizational Summary |
Select this link to open the Person Organizational Summary page if a person ID exists. |
When the person has all inactive records, determine whether to create a new organizational instance when the record is added to Job or to use an existing organizational instance.
When a person has one or more active records in the system, the system enables you to create a new assignment.
Field or Control |
Description |
|---|---|
Create new Org Instance (create new organizational instance) and Instance Nbr (instance number) |
Select to create a new organizational instance for a person. The system provides the next available instance number by default. These fields are available for the HIR and ADD job actions. |
Use existing Org Instance and Instance Nbr |
Select to specify the organizational instance and number that should be used to add a job for a person in the system. When a person exists in the system and you select to use an existing organizational instance, the page displays the Use Existing Assignment and Create New Assignment fields. Select from the available values in the Instance Nbr field. These fields are available for the HIR, REH, ADD, and RNW job actions. |
When you select to use an existing org instance, you are presented with the following options:
Field or Control |
Description |
|---|---|
Use Existing Assignment, Empl Record, and Action |
Select to use an employee assignment that already exists in the system. Select from the available employment record numbers and actions. These fields are available for the HIR, REH, ADD, and RNW job actions. |
Create New Assignment and Empl Record |
Select to have the system create a new assignment for the hire of a person that already has a job record in the system. The system provides the next available employment record number by default. These fields are available for the HIR and ADD job actions. |
Complete Transaction
Field or Control |
Description |
|---|---|
Open Template |
Select this button to access the Manage Transaction component and view the template transaction pages in its entirety. This enables you to view, modify, and complete all details and sections of the template. This button is only visible when none of the template data has been saved in any of the transaction’s core components. When a portion of the transaction has been completed, such as updates to Personal Data, the Open Template button is hidden. Use the other group boxes on the page to access the appropriate core component and add content. When the Open Template button is hidden, the View Template link appears near the top of the page. You can use this link to view the template in its entirety, but the view is display only. |
Additional Group Boxes that May Appear on the Page
The page may display various other group boxes depending on what data is being added or updated in the system. The template transaction type associated with the template defines which components will be updated during the transaction process. Each component will be associated with a different group box on this page. Some group boxes may not appear until after another task has been completed. For example, if you are hiring a person, you must add personal data before adding job data. Therefore the page will display the Add Personal Data button but not the Add Job Data button until after you have completed the personal data content. See Smart HR Transaction Type - Components Page
The group boxes, field labels, buttons, and link text for this section will vary and are defined on the Template Transaction Type - Transaction Component Details Page.
Select the appropriate link to view additional information specific to a component.
Select the appropriate button to open either the Personal Data, Job Data, or Personal Profile pages and view and update the corresponding data.
Use the Manage Hire Details page (HR_TBH_HIREDET) to view job details entered during a Smart HR hire and complete the hire process.
Navigation:
Click the name link for a person whose Source value is Smart HR Transactions on the Manage Hires page.
This example illustrates the fields and controls on the Manage Hire Details page. You can find definitions for the fields and controls later on this page.
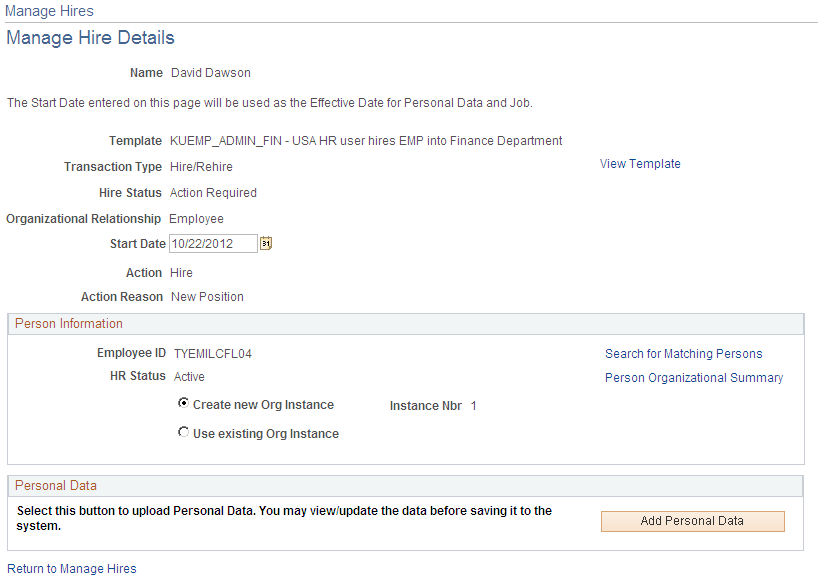
Use this page to change the start date, perform a search for matching persons, or select the appropriate buttons or links to complete the transaction.
Note: The system displays this page slightly different for Smart HR Transactions source type than it does for the Recruiting source type. The Manage Hire Details page for a Smart HR Transactions hire displays the buttons and links in the various sections that are come upon the Smart HR transaction template. This page works like the Manage Transaction Details Page.
For more information on the fields on this page, see Manage Hires Detail Page.