Reporting Incidents as Employees
This topic discusses how to report health and safety incidents as employees.
Note: You must be a member of the Health and Safety EE Fluid (Health and Safety EE Fluid) role to access the Health and Safety self-service transaction in Fluid and report incidents as an employee.
|
Page Name |
Definition Name |
Usage |
|---|---|---|
|
HC_HS_REPORT_INCIDENT_FL_GBL |
Access the Report Incident - My Incidents page and create or view incidents in a guided process. |
|
|
HS_INCDT_START_FL |
Create, update or delete incidents as employees. |
|
|
AGC_INFO_FL |
Review the message prepared by your organization about the incident reporting process. |
|
|
ESIGN_FL |
Review and agree to the terms and conditions before reporting incidents. |
|
|
HS_SS_INCDRPT1_FL |
Enter incident details. |
|
|
HS_SS_INCDRPT2_FL |
Specify injury or illness details for incidents. |
|
|
HS_SS_INCDRPT3_FL |
Add individuals that are associated with incidents. |
|
|
HS_SS_ATTACH_FL |
Upload related documents, such as medical certificates or pictures showing the injury, for incidents. |
|
|
HS_SS_INCDVIEW_FL |
Review incident summary before submission. |
|
|
HS_SS_INCDVIEW_FL |
Review incident details. |
Use the Report Incident tile (HC_HS_REPORT_INCIDENT_FL_GBL) to access the Report Incident - My Incidents page and create or view incidents in a guided process.
Navigation:
Access the Employee Self Service home page, or any fluid home page to which the tile has been added.
This example illustrates the Report Incident tile.

Note: For employees who do not have the Fluid Dashboard - Employee HS user role, they can use the Health and Safety Tile to report incidents.
For more information, refer to the Delivered User Roles section in Working with Health and Safety Activities as Employees Using Fluid.
The employee can view the incident status highlight on the tile. If the employee has incidents in different statuses, the status with the highest priority order will be displayed, as shown in this list:
Action Required: Displayed when an incident is pushed back to the employee (the highest priority).
In Progress: Displayed when an incident has been created and saved, but not submitted.
Submitted: Displayed when an incident has been submitted and is pending administrator approval.
<number> Incidents: Displayed when all of the employee’s incidents have been approved (approval used) or sent to the administrator for review (no approval used).
No information is displayed if the employee has not reported any incidents.
Use the Report Incident - My Incidents page (HS_INCDT_START_FL) to create, update or delete incidents as employees.
Navigation:
Click the Report Incident tile.
This example illustrates the fields and controls on the Report Incident - My Incidents page.
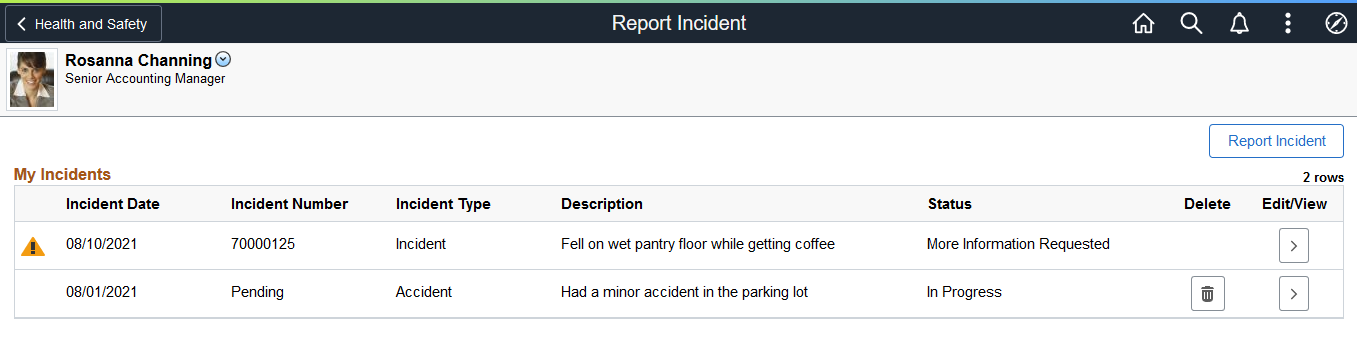
The Report Incident - My Incidents page displays a list of incidents you created. You can edit incidents that are saved or sent back to you for more information, delete saved incidents, or report new ones.
Field or Control |
Description |
|---|---|
Report Incident |
Click to report a new incident for yourself. On the modal page (HS_INCDT_START_SCF) that appears, select the type of incident you want to create. Based on the incident type setup, the system displays incident types that match the regulatory region of the employee and are available for incident reporting in Self Service. As delivered, the incident type setup is applicable to all regulatory regions. |
My Incidents
Field or Control |
Description |
|---|---|

(Action Required) |
Indicates that the incident (status: More Information Requested) is pushed back by the administrator for more update. Access the Review and Submit page to view approver’s comments and update the incident before submitting again. |
Incident Date |
Displays the date when the incident occurred. |
Incident Number |
Displays the number of the corresponding submitted incident. If the incident is saved but not yet submitted, the word Pending is displayed instead. |
Incident Type |
Displays the incident type. The availability of an incident type is determined by its incident type configuration. Possible values include: Accident Contamination Dangerous Occurrence Environmental Exposure Hazardous Condition Illness Incident Industrial Accident Industrial Accident (Official) Injury Near Miss Safety Violation Unsafe Practice Vehicle/Equipment Accident |
Description |
Displays the incident description. |
Status |
Displays the incident’s current status. Values are: In Progress: the incident has been created for update, and not yet submitted. More Information Requested: the incident has been pushed back by the administrator. Received: the incident has been submitted (no approval used), or approved (approval used). Submitted: the incident has been submitted and is pending approval. |
Delete |
Click to delete the corresponding incident. You can only delete incidents that are currently In Progress. |
Edit/View |
Click to open the corresponding incident for edit. |
Employees report workplace health and safety incidents using the Report Incident activity guide. The left panel of the guided process displays steps for entering incident information and subsequent illness or injury details, adding people of interest, inserting related attachments, and reviewing incident summary before submitting an incident.
This topic includes discussion for all steps that come with the delivered Health and Safety (HSINCD1) template. The template contains these steps:
Report Incident (a mandatory step in the process)
Injury/Illness
People Connected
Attachments
Review and Submit (a mandatory step in the process)
The Health and Safety (HANDS) category delivers additional steps that can be added to its associated templates. They are:
Acknowledgement, which captures acknowledgment information from employees when they report incidents.
If implementers decide to use the Acknowledgement step in their processes, Oracle recommends adding it at the beginning of the process as a required step, and making subsequent steps dependent on the Acknowledgement step.
Information Only, which can be used as a welcome step to provide getting started information about the incident reporting process.
Functional implementers have the option to reorganize or remove steps in the template configuration, or create additional templates, to support their incident reporting processes. For example, if acknowledgement is required when employees report incidents for a particular incident type, the implementer can create a new template by cloning from the Health and Safety template, add the Acknowledgement step to the new template, and select the new template to use for that incident type on the Configure Incident Types Page.
To edit the verbiage and other configuration settings used on the Acknowledgement step, use the HS1 acknowledgement ID on the Acknowledgement Configuration page. Administrators can also track employee acknowledgements using the Acknowledgement Framework. For more information, see Setting Up the Acknowledgement Framework.
This example illustrates the layout for the Report Incident pages for a medium form factor device.
This example illustrates the layout of the Report Incident pages on a small form factor device. In the first image, the left panel is hidden. In the second image, the left panel is exposed.
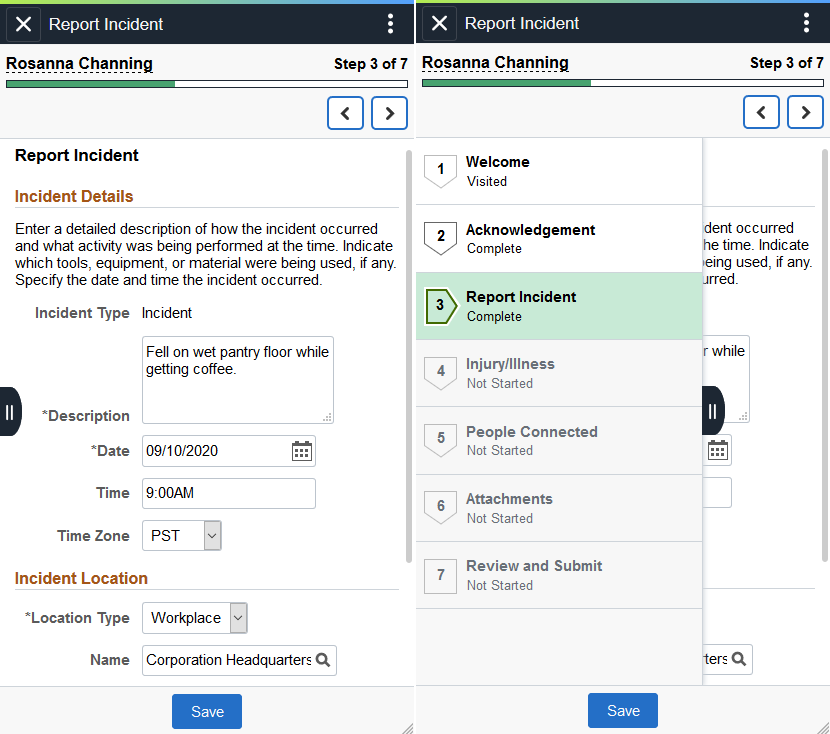
Page Banner
The top of PeopleSoft pages is called the page banner.
On most pages, users see the component title and the standard set of banner icon buttons.
Field or Control |
Description |
|---|---|
Exit |
Click to exit the Report Incident activity guide and return to the Report Incident - My Incidents Page. |
Header (Sub-Banner)
A gray area under the main page banner displays contextual information that is specific to the Report Incident activity guide, including the person’s name, image, and action buttons.
Field or Control |
Description |
|---|---|
Previous or Next |
Click to navigate to the previous or next step of the Report Incident activity guide. |
Save |
Click to save the data of the current step at any time. |
Submit |
Click to send the incident for approval (if approval is enabled) or review (if approval is not enabled). This button appears in the last step of the Report Incident activity guide on the Report Incident - Review and Submit Page. |
Left Panel
The left panel lists the steps that are included in the Report Incident activity guide. When you open an activity guide, the system displays the current step you are on and highlights it in the left panel. In addition to using the Previous and Next buttons to navigate between steps, you can select the desired step to access in the left panel as well.
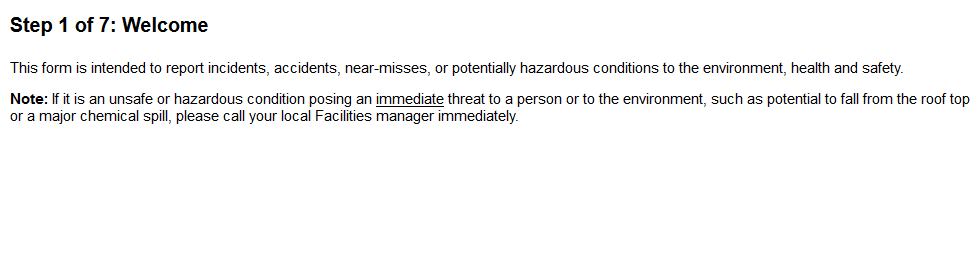
Use the Report Incident - Welcome page (AGC_INFO_FL) to review the message prepared by your organization about the incident reporting process.
This example illustrates the fields and controls on the Report Incident - Welcome page.
Note: Employees must be members of the AG Composer User role to access this page.
The Welcome step (Information Only step) is not part of the system-delivered template, but can be added to the template to provide employees information about the guided process before they proceed. Text and content in the Welcome step can be updated from the Information Only step in the template setup on the Configure Page Text Page.
Use the Report Incident - Acknowledgement page (ESIGN_FL) to review and agree to the terms and conditions before reporting incidents.
This example illustrates the fields and controls on the Report Incident - Acknowledgement page.

Note: Employees must be members of the Acknowledgement User role to access this page.
The Acknowledgement step is not part of the system-delivered template, but can be added to the template for employees to acknowledge terms and conditions before they enter any sensitive information in incidents.
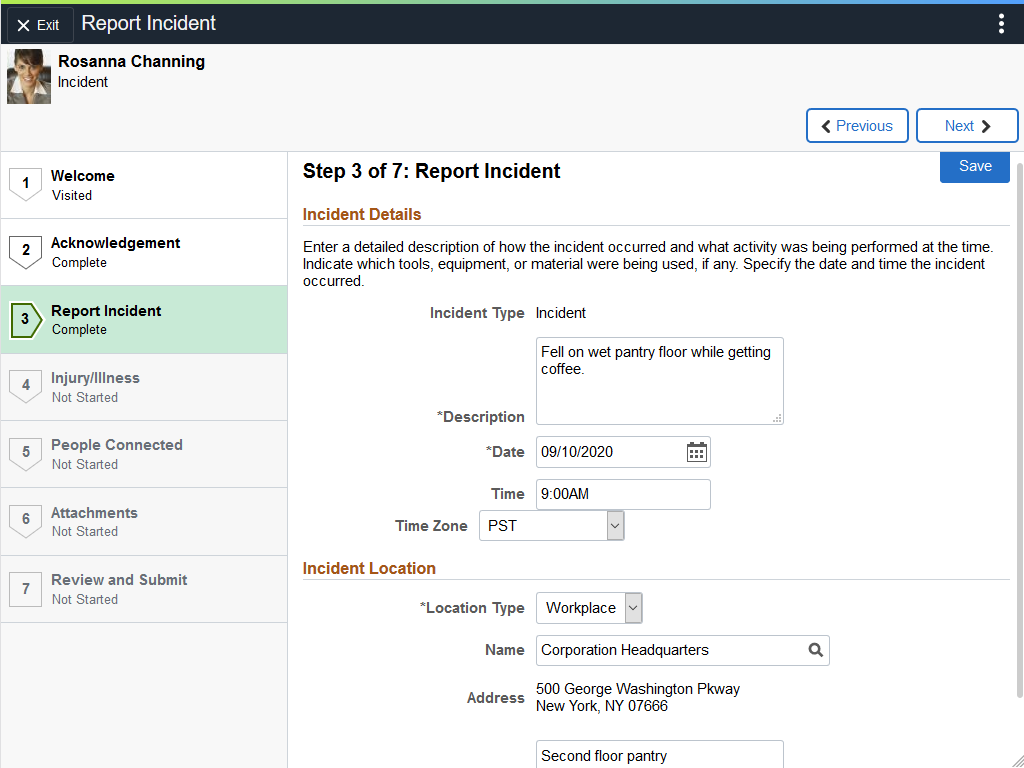
Use the Incident page (HS_SS_INCDRPT1_FL) to enter incident details.
Navigation:
Select the Incident step from the Report Incident activity guide navigation, or use the Next and Previous buttons to navigate to the page.
This example illustrates the fields and controls on the Report Incident - Report Incident page.
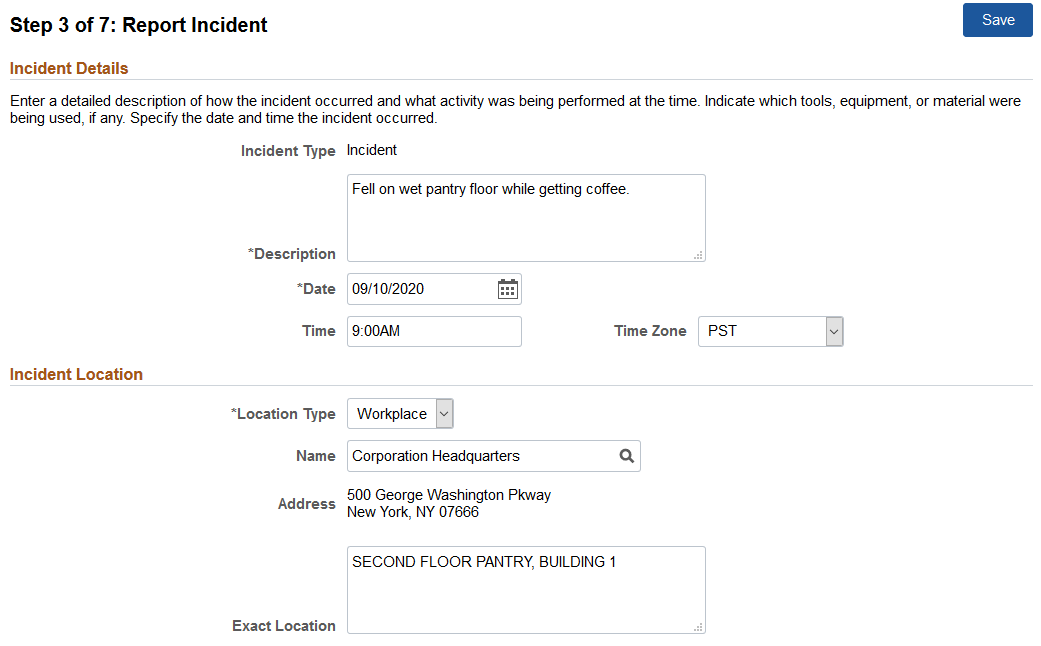
Incident Details
Field or Control |
Description |
|---|---|
Incident Type |
Displays the type of incident selected previously. |
Description |
(Required) Describe the incident in detail. |
Date |
Specify the date when the incident occurred. By default, it is set as today’s date. |
Time and Time Zone |
Specify the time and time zone when the incident occurred. By default, your local time zone (which is specified on the My Preferences page) is displayed. |
Incident Location
Field or Control |
Description |
|---|---|
Location Type |
(Required) Select the type of location where the incident occurred. Values are: Offsite Workplace |
Add Address |
Click to enter the address of the incident location. This button appears if Offsite is selected. |
Name |
Select the workplace location where the incident occurred. The system sets your location in job data as the default value. This field appears if Workplace is selected. Locations are defined using the Location component. See Also Understanding Locations. |
Address |
Displays the specified incident location address. |
Exact Location |
Enter information to identify exactly where the incident occurred. For example, if you fell on a slippery floor in the pantry, enter something like “Second floor pantry, Building 1”. |
Use the Report Incident - Injury/Illness page (HS_SS_INCDRPT2_FL) to specify injury or illness details for incidents.
Navigation:
Select the Injury/Illness step from the Report Incident activity guide navigation, or use the Next and Previous buttons to navigate to the page.
This example illustrates the fields and controls on the Report Incident - Injury/Illness page.
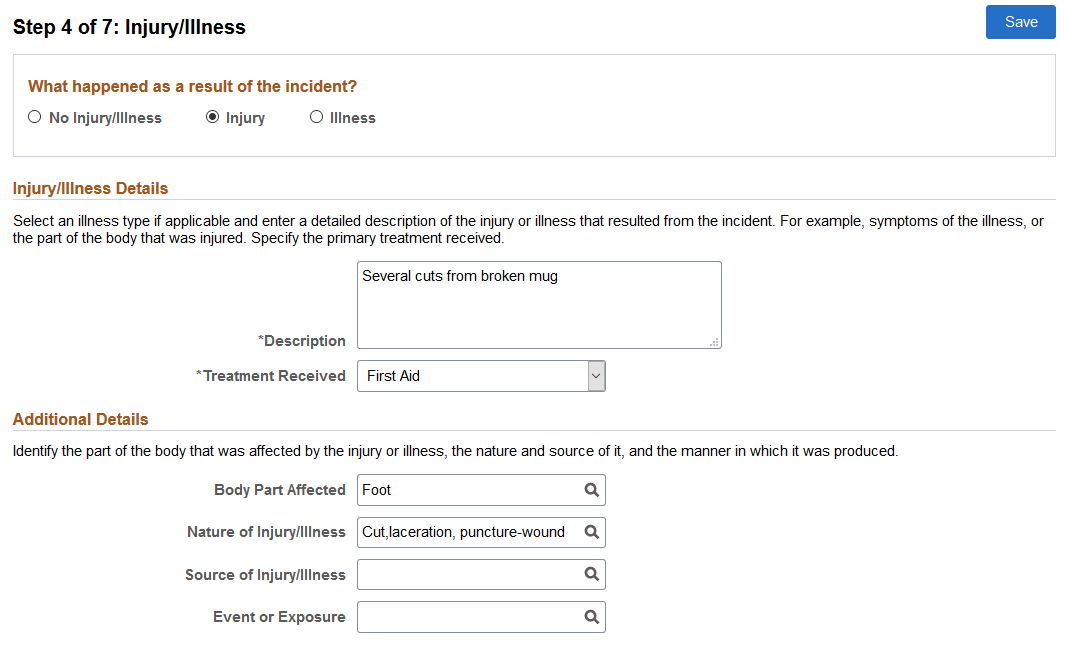
What happened as a result of the incident?
Indicate if the incident results in an injury, an illness, or neither. The system refreshes this page based on your selection.
If you select No Injury/Illness, the rest of the page becomes blank.
Injury/Illness Details
Field or Control |
Description |
|---|---|
Illness |
Select an applicable illness type. This field is applicable to illnesses only. |
Description |
(Required) Describe the injury or illness in detail. |
Treatment Received |
(Required) Select the primary type of treatment received as a result of the incident. |
Additional Details
Use this section to specify morel details for your injury or illness.
Field or Control |
Description |
|---|---|
Body Part Affected |
Select the primary body part directly affected by the injury or illness. Body parts are defined using the Body Part Table or Body Parts (BODY_PART_TABLE) component. |
Nature of Injury/Illness |
Select the primary physical characteristics of the injury or illness, for example, puncture wound, concussion, or contact dermatitis. Natures of Injury are defined using the Nature Of Injury Table or Nature Of Injury (INJURY_NATURE_TBL) component. |
Source of Injury/Illness |
Select the primary object, equipment or factor responsible for the injury or illness, for example, powered hand tools, excessive noise, or radiating equipment. Sources of Injury are defined using the Source Of Injury Table or Source Of Injury (INJURY_SOURCE_TBL) component. |
Event or Exposure |
Select the primary manner in which the injury or illness was produced, for example, struck by flying objects, or contact with electric current. Events or exposures are defined using the Accident Type Table or Accident Types (ACCIDENT_TYPE_TBL) component. |
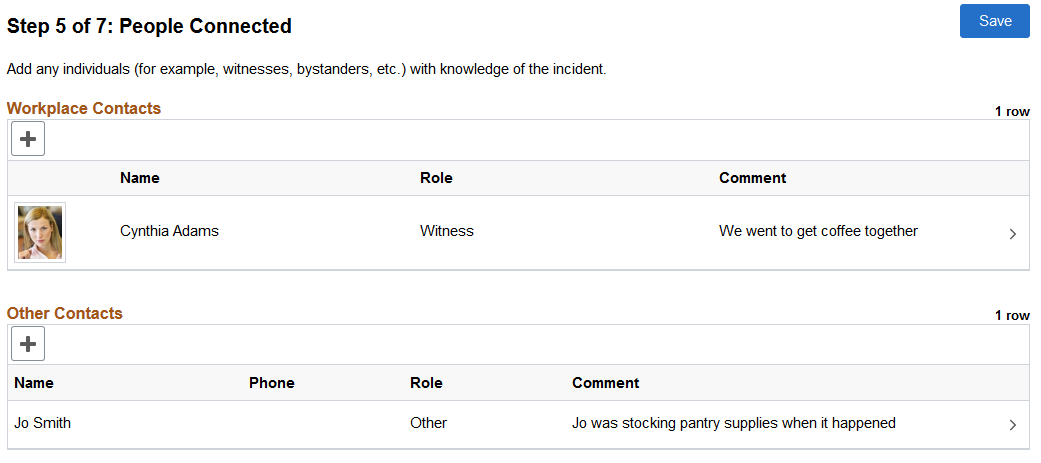
Use the Report Incident - People Connected page (HS_SS_INCDRPT3_FL) to add individuals that are associated with incidents.
Navigation:
Select the PeopleSoft Connected step from the Report Incident activity guide navigation, or use the Next and Previous buttons to navigate to the page.
This example illustrates the fields and controls on the Report Incident - People Connected page.
Field or Control |
Description |
|---|---|
Add Workplace Contact |
Click to add an individual from the system (employee, person of interest, contingent worker, and so on) who is connected to the incident. On the modal page (HS_SS_PPL_EMP_SCF) that appears, select an individual, the role in the incident, and add a comment (if applicable). |
Add Other Contact |
Click to add a person (not available in the system) who is related to the incident and maybe able to share information. On the modal page that appears, enter the person’s name, the role in the incident, and add a comment (if applicable). The system stores these individuals as non-employees. |
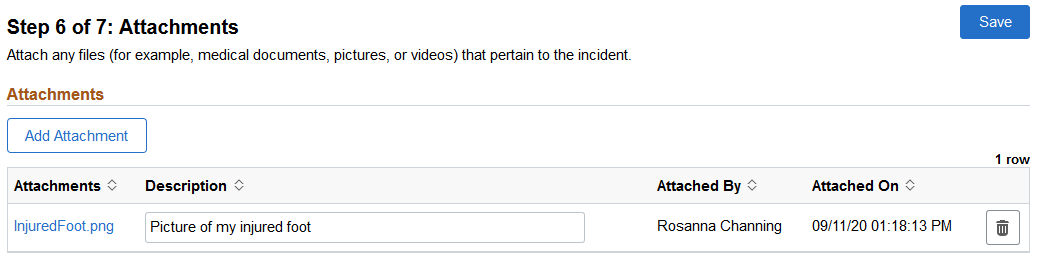
Use the Report Incident - Attachments page (HS_SS_ATTACH_FL) to upload related documents, such as medical certificates or pictures showing the injury, for incidents.
Navigation:
Select the Attachments step from the Report Incident activity guide navigation, or use the Next and Previous buttons to navigate to the page.
This example illustrates the fields and controls on the Report Incident - Attachments page.
Use the Report Incident - Review and Submit page (HS_SS_INCDVIEW_FL) to review incident summary before submission.
Navigation:
Select the Review and Submit step from the Report Incident activity guide navigation, or use the Next and Previous buttons to navigate to the page.
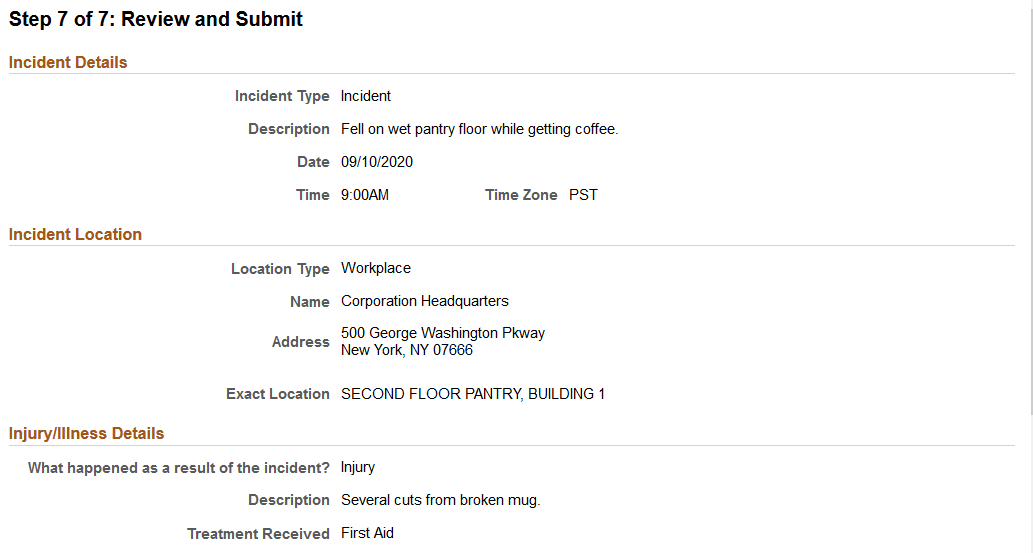
This example illustrates the fields and controls on the Report Incident - Review and Submit page (1 of 2).
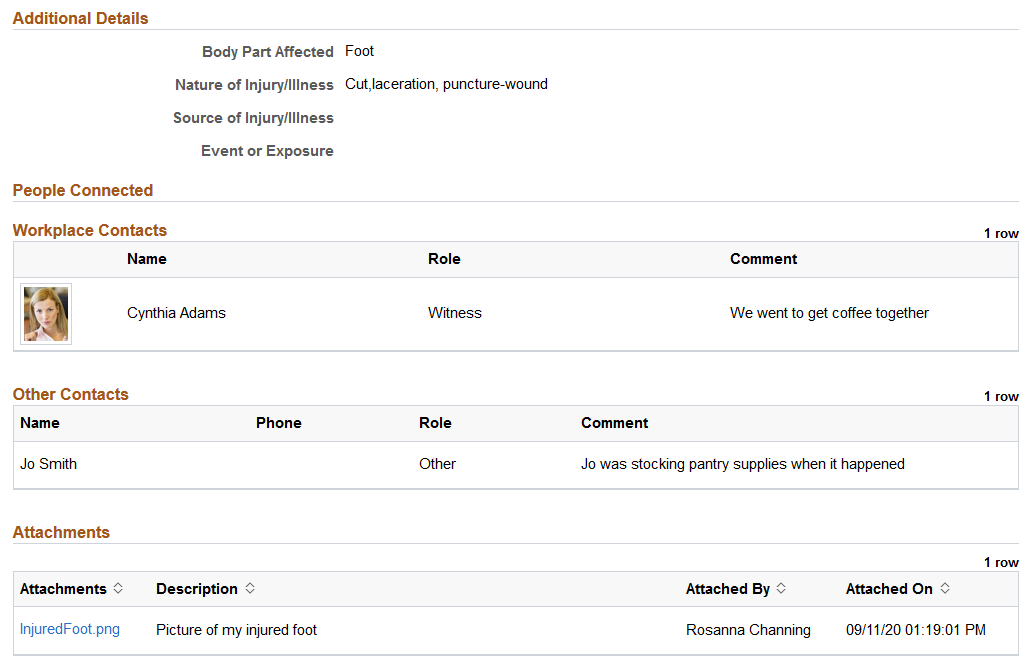
This example illustrates the fields and controls on the Report Incident - Review and Submit page (2 of 2).
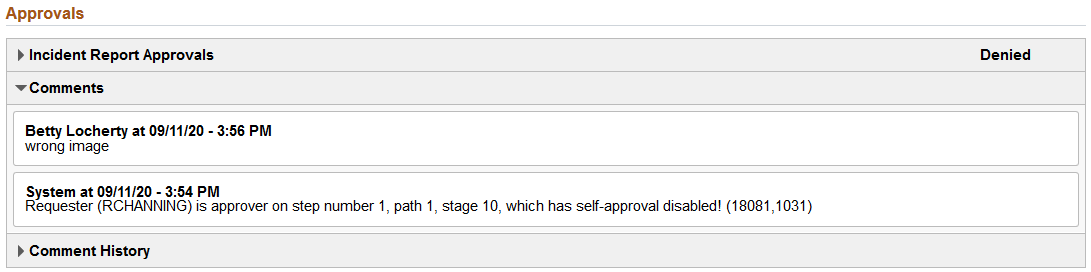
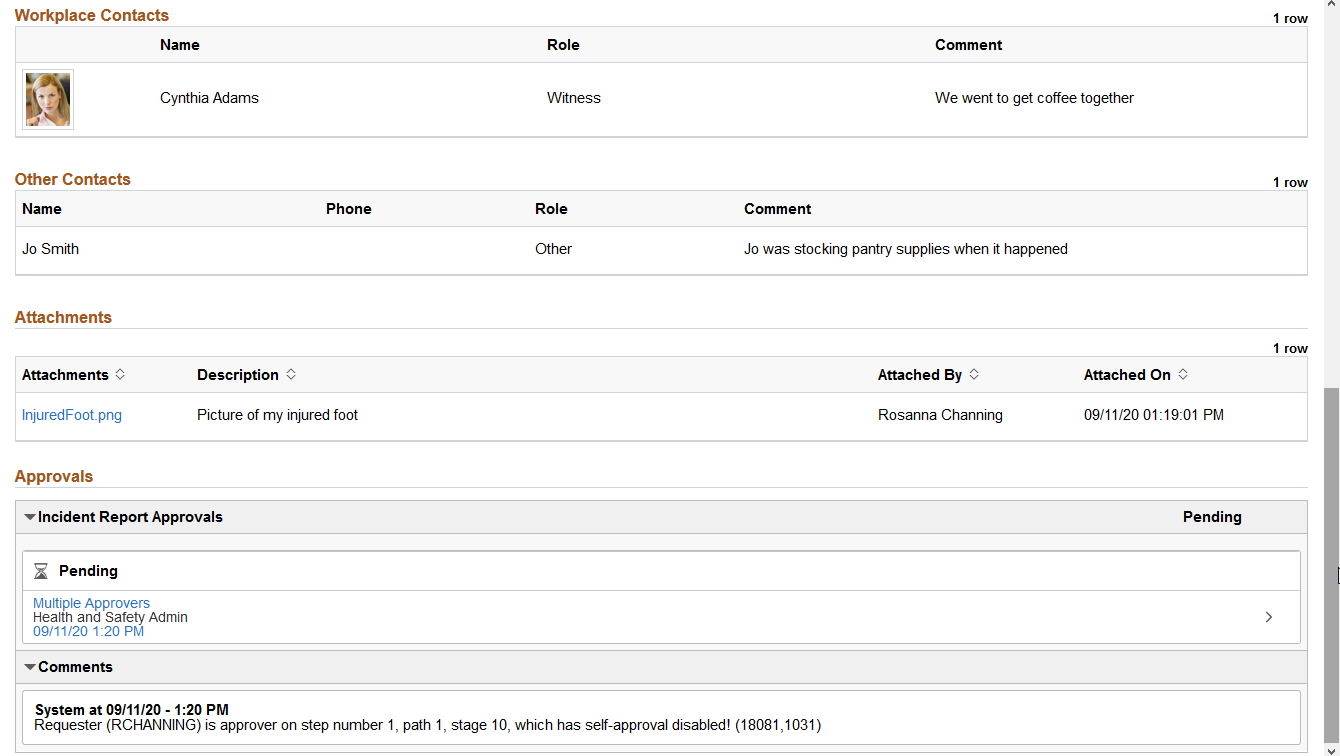
This example illustrates the fields and controls on the Report Incident - Review and Submit page (3 of 3).
Review the information you entered for the incident. Click the Submit button in the header area to send the incident to administrators for approval or review.
Approvals
When you open an incident that is sent back to you for more update, the system displays this page with the Approvals section. You can review the approver’s comments available in this section, and take the action needed before resubmitting the incident for approval.
Note: When the approver pushes back an entry (incident in this case), the status of the approval request is set to Denied. This is a status used in the Approval Workflow Engine (AWE), and does not apply to the transaction of the entry that has been pushed back.
Use the View Incident page (HS_SS_INCDVIEW_FL) to review incident details.
Navigation:
Click to view a submitted incident on the Report Incident - My Incidents Page.
Click the View Incident Details link on the Pending Approvals - Incident Report Page.
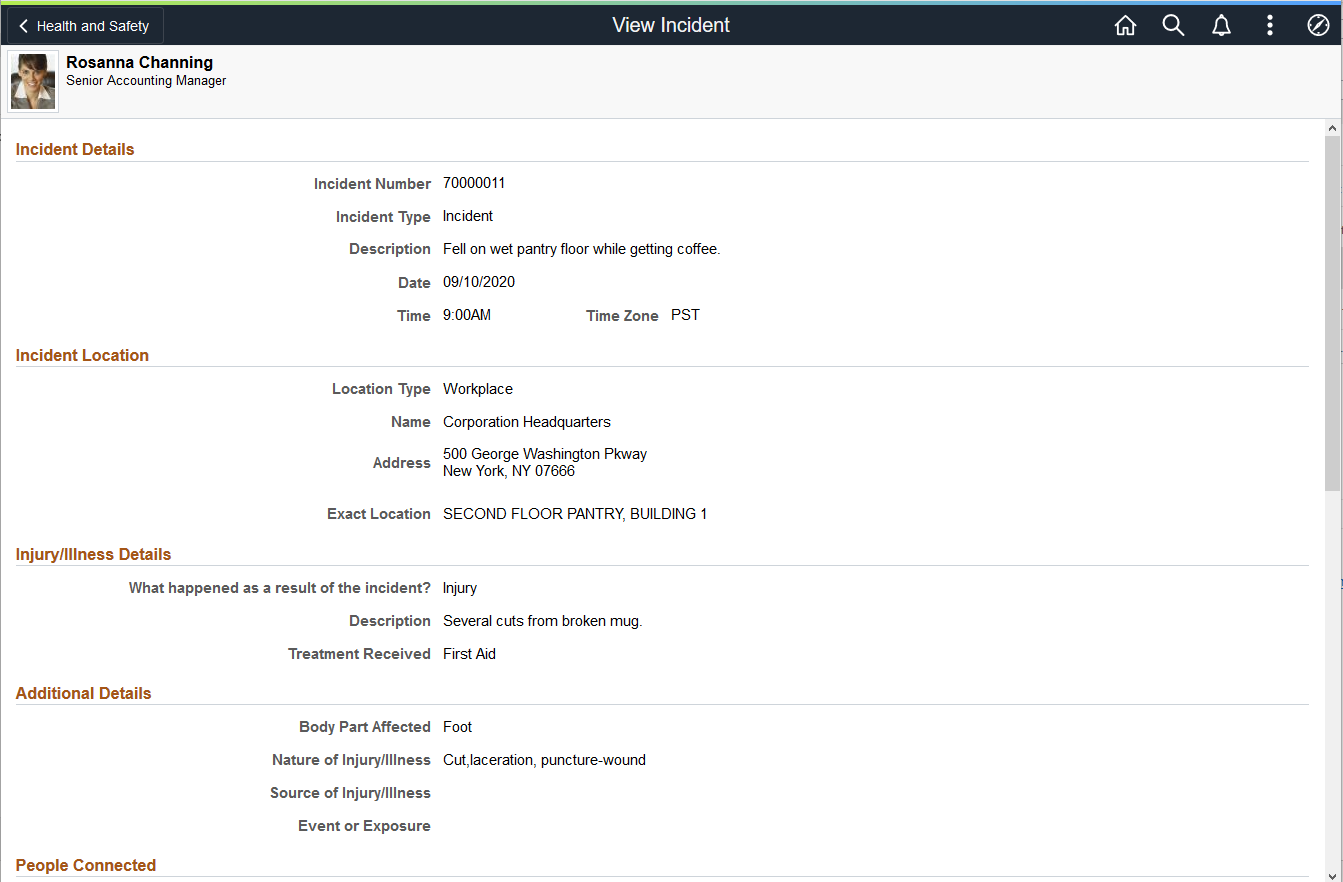
This example illustrates the fields and controls on the View Incident page (1 of 2).
This example illustrates the fields and controls on the View Incident page (2 of 2).
The layout of the View Incident page is the same as the Report Incident - Review and Submit Page.
The Approvals section appears if the type of the incident being viewed uses AWE approval in the reporting process.