Defining Pay Groups
To set up pay groups, use the Pay Group Table (PAYGROUP_TABLE) component.
|
Page Name |
Definition Name |
Usage |
|---|---|---|
|
PAYGROUP_TABLE1 |
Define a pay group and its basic characteristics. |
|
|
Pay Group Table - Process Control Page |
PAYGROUP_TABLE2 |
Set process controls and establish default employee types. See Process Control Page. |
|
Pay Group Table - Calc Parameters Page (Pay Group table - calculation parameters) |
PAYGROUP_TABLE3 |
Further define payroll processing parameters for pay groups. |
|
Education and Government Additional Earnings Codes Page |
PAYGROUP_TBL3_HP_SEC |
Access additional earnings codes for education and government. |
|
FLSA Period Definition Page (Fair Labor Standards Act period definition) |
FLSA_PERIOD_SBPNL |
(USA) Specify the FLSA period that applies to this pay group and other FLSA calculation parameters. You must select the FLSA Required check box on the Calc Parameters page to activate the button to access this page. |
|
PAYGROUP_TABLE4 |
Specify the proration rules and paysheet options for each pay group that you establish. |
|
|
PAYGROUP_TABLE5 |
Specify the order in which you want paychecks to be sorted and to select address and delivery options. |
|
|
PAYGROUP_TABLE6 |
Define print sequence options. |
|
|
PAYGROUP_TABLE7 |
Define other report parameters for pay groups. |
|
|
PAYGROUP_TABLE8 |
Specify the bank from which employees are to be paid. Establish tips processing for tipped employees within the pay group. |
|
|
PAYGROUP_TABLE9 |
Define which time and labor elements are loaded into paysheets for the pay group. |
|
|
Pay Group Report Page |
PRCSRUNCNTL |
Generate PAY711 that lists pay groups, effective dates, and processing characteristics from the Pay Group table. |
Use the Pay Group Table - Paysheets page (PAYGROUP_TABLE4) to specify the proration rules and paysheet options for each pay group that you establish.
Navigation:
Select the Pages 4 - 6 link (at the bottom).
Access the Paysheets page.
This example illustrates the fields and controls on the Pay Group Table - Paysheets page.
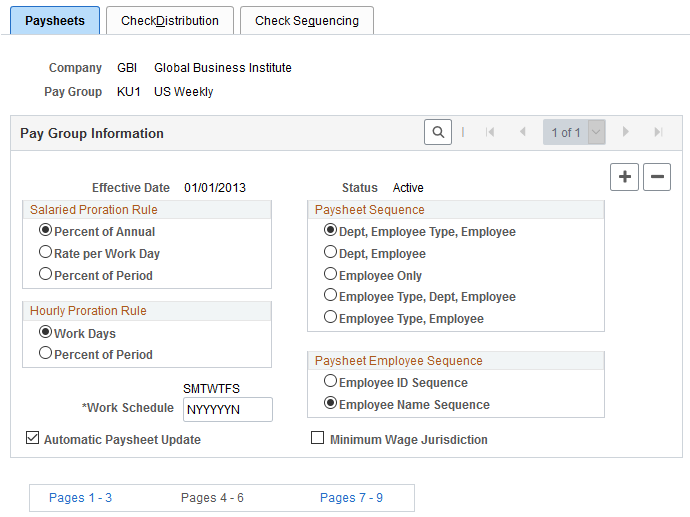
Note: If you defined an earnings distribution type for the employee on the Job Earnings Distribution page, the system uses the percent of period calculation method regardless of which salaried or hourly proration rule you select on this page.
Salaried Proration Rule
This group box enables you to define how earnings and hours are prorated during paysheet creation for salaried employees eligible for partial pay.
Note: For exception (salaried) hourly employees (those employees who receive a specified amount for the period) use the hourly proration rules.
See Proration Rules.
Hourly Proration Rule
This group box enables you to define how earnings and hours are prorated during paysheet creation for hourly and exception hourly employees eligible for partial pay.
See Proration Rules.
Paysheet Sequence
Use this group box to instruct the system how to sort online and printed paysheets. Depending on the option that you select, the paysheet process forces a page break any time it finds a new sequencing code.
Field or Control |
Description |
|---|---|
Dept, Employee Type, Employee (department, employee type, employee) |
Select this option to insert page breaks after each different employee type and department. |
Dept, Employee (department, employee) |
Select this option to insert page breaks after each different department. |
Employee Only |
Select this option to insert page breaks based on the number of paylines it can accommodate. |
Employee Type, Dept, Employee (employee type, department, employee) |
Select this option to insert page breaks after each different department and employee type. |
Employee Type, Employee |
Select this option to insert page breaks after each different employee type. |
Paysheet Employee Sequence
Use this group box to instruct the system to sort paysheets by employee ID or by employee name sequence. You have 10 sorting options. The online and hardcopy reports vary, depending on how you choose to sequence them.
Additional Page Elements
Field or Control |
Description |
|---|---|
Work Schedule |
Define the work schedule that the system uses when prorating partial pay. Enter a Y (yes) or an N (no) under the initial of each day to specify the days that are included in the normal work schedule for this pay group. The field is seven characters long, one character for each day of the week, starting with Sunday. The system uses these indicators to determine the number of work days per year and the number of work days per week. If the normal work schedule for the pay group is Monday through Friday, enter NYYYYYN. |
Automatic Paysheet Update |
Select this check box to compare paysheet records to Job data. If the system finds discrepancies between the two records, it automatically updates the paysheet from the Job record information before calculating pay, if you have the Automatic Paysheet Update option selected. For example, assume that you run paysheets on July 10. You then receive the late paperwork on Jan's salary change, which should have gone into effect on July 1. If you selected the Automatic Paysheet Update check box, during pay calculation the system accesses the new salary information from the Job data and updates Jan's payline to reflect the new pay rate. |
Minimum Wage Jurisdiction |
Select this check box to enable the use of jurisdiction
minimum wage rates in payroll calculations.
This field appears when the Minimum Wage Jurisdiction field is selected on the Payroll for NA Installation Page. |
Use the Pay Group Table - Check Distribution page (PAYGROUP_TABLE5) to specify the order in which you want paychecks to be sorted and to select address and delivery options.
Navigation:
Select the Pages 4 - 6 link.
Access the Check Distribution page.
This example illustrates the fields and controls on the Pay Group Table - Check Distribution page.
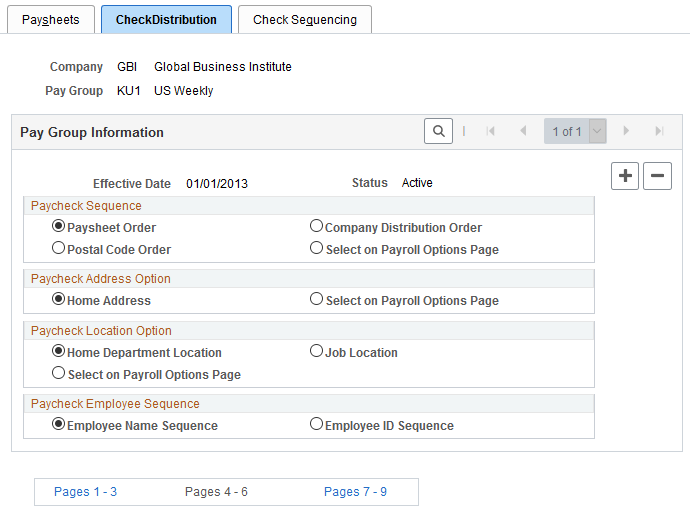
Paycheck Sequence
Use this group box to select a sort order for the checks. The system prints checks according to the various sequencing options in the Pay Group table in off-cycle and on-cycle modes. Check sequencing occurs during the Pay Confirmation COBOL SQL process (PSPCNFRM). Because the system confirms one off-cycle paysheet page at a time, it sorts off-cycle checks within each paysheet page. For example, if you confirm off-cycle paysheet pages 1−5 in a single confirmation run, and each page contains ten checks, each page is sorted individually: You end up with five individually sorted groups of ten checks each, not one group of fifty checks sorted as a whole.
Field or Control |
Description |
|---|---|
Paysheet Order |
Select this option to sort checks in the same order as paysheets. This is the system default, and is the most efficient and fastest sort order. |
Postal Code Order |
Select this option to sort checks by postal code. Use the postal code from the Paycheck Address option. Note that this sort option applies to U.S. zip codes as well as Canadian and other international postal codes. |
Company Distribution Order |
Select this option to sort checks according to the print check sequence, which you define on the Pay Group Table - Check Sequencing page. |
Select on Payroll Options Page |
Select this option to sort checks by company distribution or postal code sequence based on the paycheck delivery option that you select on the Payroll Options 1 page and the Payroll Options 2 page. |
Paycheck Address Option
Use this group box to select which address you want to appear on the employee payroll checks. When you print paychecks for employees, the system always prints an address on the check, no matter which paycheck sequence option you select.
Field or Control |
Description |
|---|---|
Home Address |
Select this option to print the employee's home address, as entered on the Personal Information pages under the Workforce Administration menu. |
Select on Payroll Options Page |
Select this option to print the address according to the paycheck location option selected on the Payroll Options 1 page. This option enables you to override the default address at the employee level. |
Paycheck Location Option
Use this group box to specify the location to use to sort checks when you use location as a sort option for company distribution.
Field or Control |
Description |
|---|---|
Home Department Location |
Select this option to sort checks by home department location. |
Select on Payroll Options Page |
Select this option to sort checks using the Payroll Options 1 and Payroll Options 2 pages. Enter the appropriate location at the employee level. |
Job Location |
Select this option to sort checks by job location. |
Paycheck Employee Sequence
Field or Control |
Description |
|---|---|
Employee Name Sequence |
Select this option to sort checks by employee name. |
Employee ID Sequence |
Select this option to sort checks by employee ID. |
Use the Pay Group Table - Check Sequencing page (PAYGROUP_TABLE6) to define print sequence options.
Navigation:
Select the Pages 4 - 6 link.
Access the Check Sequencing page.
This example illustrates the fields and controls on the Pay Group Table - Check Sequencing page.
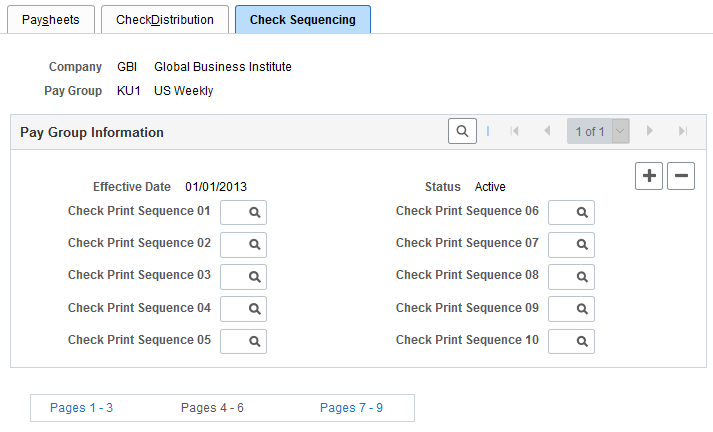
Pay Group Information
Use this group box to define print sequence options. For example, to sort checks by location, shift within location, and employee ID/name (based on whether you select Employee ID Sequence or Employee Name Sequence in the Paycheck Employee Sequence group box on the Pay Group Table - Check Distribution page) within shift, you enter three sort criteria on this page:
|
Print Sequence |
Field Value |
Description |
|---|---|---|
|
Prt Seq 01 |
L |
Location |
|
Prt Seq 02 |
S |
Shift |
|
Prt Seq 03 |
E |
Employee |
Field or Control |
Description |
|---|---|
Check Print Sequence 01 − 10 |
If you selected the company distribution order option as the paycheck sequence on the Pay Group Table - Check Distribution page, you must select a check print sequence here: Department ID (D), Employee ID or Name (E), FLSA Status (F), Location (L), Mail Drop (M), Shift (S), Employee Type (T), and Supervisor ID (U). |
Use the Pay Group Table - Report Parameters page (PAYGROUP_TABLE7) to define other report parameters for pay groups.
Navigation:
Select the Pages 7- 9 link.
Access the Report Parameters page.
This example illustrates the fields and controls on the Pay Group Table - Report Parameters page.
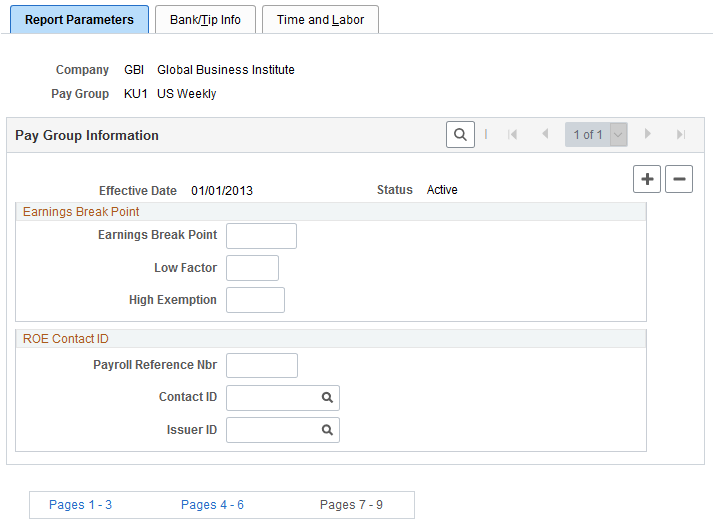
(E&G) Earnings Break Point
Use this group box only if the pay group includes employees who belong to the California Public Employees' Retirement System (PERS). If you have no California-based public employees participating in PERS, leave these fields blank.
If you participate in PERS, the information on these fields is used during benefit calculation, if you've set up the PERS plan in the Retirement Plan page to be coordinated with the Federal Insurance Contributions Act (FICA). The Old Age Survivor and Disability Insurance (OASDI) Modification Data fields correspond to the fields on the OASDI Modification Chart.
Suppose 400 USD is the break point for calculating employee earnings reported monthly. According to the OASDI Modification Chart, if earnings are:
Less than 400 USD, earnings are recalculated as:
Earnings × 2/3 × Rate.
Greater than 400 USD, earnings are recalculated using the OASDI formula:
(Earnings - 133.33 USD) × Rate.
To set up this data for a pay group with a monthly pay frequency, enter 400 in the Earnings Break Point field, 0.6667 in the Low Factor field, and 133.33 in the High Exemption field.
Field or Control |
Description |
|---|---|
Earnings Break Point |
Enter a dollar amount at which earnings below the break point are treated differently from earnings above the break point. |
Low Factor |
Enter a value to represent the factor that is used in the calculation to modify earnings that fall below the break point. |
High Exemption |
Enter a value to represent the factor that is used to modify earnings that exceed the break point. |
(CAN) ROE Contact ID
If you run Canadian payrolls and produce Record of Employment (ROE) forms, you must enter the appropriate reference and contact information in this group box.
Field or Control |
Description |
|---|---|
Payroll Reference # (payroll reference number) |
Enter a reference number to help you locate employees. This is an internal payroll reference number. |
Contact ID |
Select a value representing the employee ID of the person who should respond to any internal questions regarding ROE's. |
Issuer ID |
Select a value representing the employee ID of the person who issued the ROE. |
Use the Pay Group Table - Bank/Tip Info page (PAYGROUP_TABLE8) to specify the bank from which employees are to be paid.
Establish tips processing for tipped employees within the pay group.
Navigation:
Select the Pages 7- 9 link.
Access the Bank/Tip Info page.
This example illustrates the fields and controls on the Pay Group Table - Bank/Tip Info page.
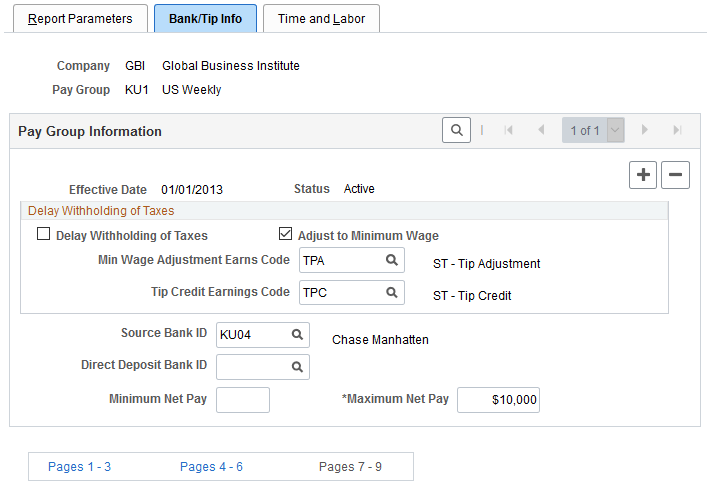
(USA) Delay Withholding of Taxes
Field or Control |
Description |
|---|---|
Delay Withholding of Taxes |
Select this check box if you do not want to withhold taxes until tipped employees have reported tips equaling the month-to-date tips withholding threshold established on the Federal/State Tax Table - Special Tax Amounts page. |
Adjust to Minimum Wage (adjustment to minimum wage) |
This check box is selected by default, so that the system adjusts tips for the pay group to minimum wage. If you have an agreement with the Internal Revenue Service, you can deselect this check box. If this check box is selected, you must select a minimum wage adjustment earnings code in the Min Wage Adjustment Earns Code field. |
Min Wage Adjustment Earns Code (minimum wage adjustment earnings code) |
Select the earnings code to be used for adjusting a tipped employee's earnings up to minimum wage when reported tips plus earnings do not equal the required minimum wage. The default values come from the Company table but you can override the Company table values here. |
Tip Credit Earnings Code |
Select the earnings code to be used for tips credit. The default values come from the Company table but you can override the Company table values here. Note: Tips processing covers tip allocation, tip credit, and tip establishment mainly in the hospitality industry, but it can be used for any tipped employee population. |
Additional Page Elements
Field or Control |
Description |
|---|---|
Source Bank ID |
Select a source bank ID to indicate the bank from which employees in this pay group are to be paid. The source bank identifies the transit number, bank account number, check and advice form, and other information necessary to create checks and direct deposit entries for employees. If you leave the Direct Deposit Bank ID field blank, the system uses the source bank ID that you enter here for both checks and direct deposit. If you enter a source bank ID in the Direct Deposit Bank ID field, then the system uses the value in the Source Bank ID field for check processing only. |
Direct Deposit Bank ID |
To pay direct deposit from a different bank and account than checks, enter a source bank ID here to identify the bank and account for direct deposit transmittals. If you use the same bank and account for both checks and direct deposit, leave this field blank |
Minimum Net Pay and Maximum Net Pay |
Enter the minimum and maximum dollar amounts (net) that any given check may be issued for within the selected pay group. |