Using the PeopleSoft Fluid User Interface to Work with Time and Labor as an Administrator
This topic discusses how administrators use the PeopleSoft Fluid User Interface to perform absence-related transactions.
For general information about fluid pages in PeopleSoft HCM, see Understanding PeopleSoft Fluid User Interface Homepages
|
Page Name |
Definition Name |
Usage |
|---|---|---|
|
HC_TL_ADM_DASHBOARD_FL (this is the cref for the tile) |
Select to access the landing page containing Reported Time Audit, Time and Labor WorkCenter and Reported Time Insight tiles. |
|
|
TL_AUD_RPTTIME_FL |
Access the page to view current reported punch and elapsed time. |
|
|
TL_WC_APP_FL |
Access various business processes to complete day-to-day work and commonly performed tasks. |
|
|
HC_TL_RPTD_TIME_DBRD_FL (this is the cref for the tile) |
Select to access Reported Time Insight dashboard. |
|
|
HC_TL_RPTD_TIME_DBRD_FL |
Select to view different visualizations in Time and Labor Reported Time Insight dashboard. |
|
|
HC_TL_EMPLDATA_M_FL_GBL (this is the cref for the tile) |
Search and manage Time Reporter data for the administrators using fluid pages. |
The Administrators use the Time and Labor tile to access the dashboard collection of tiles for Reported Time Audit, Time and Labor WorkCenter and Reported Time Insight.
Navigation:
Select Fluid Home under the main menu. On the page that appears, select Workforce Administrator. The Time and Labor tile is available on the Workforce Administrator landing page.
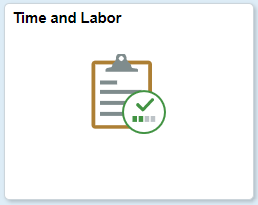
This example illustrates the Time and Labor tile.
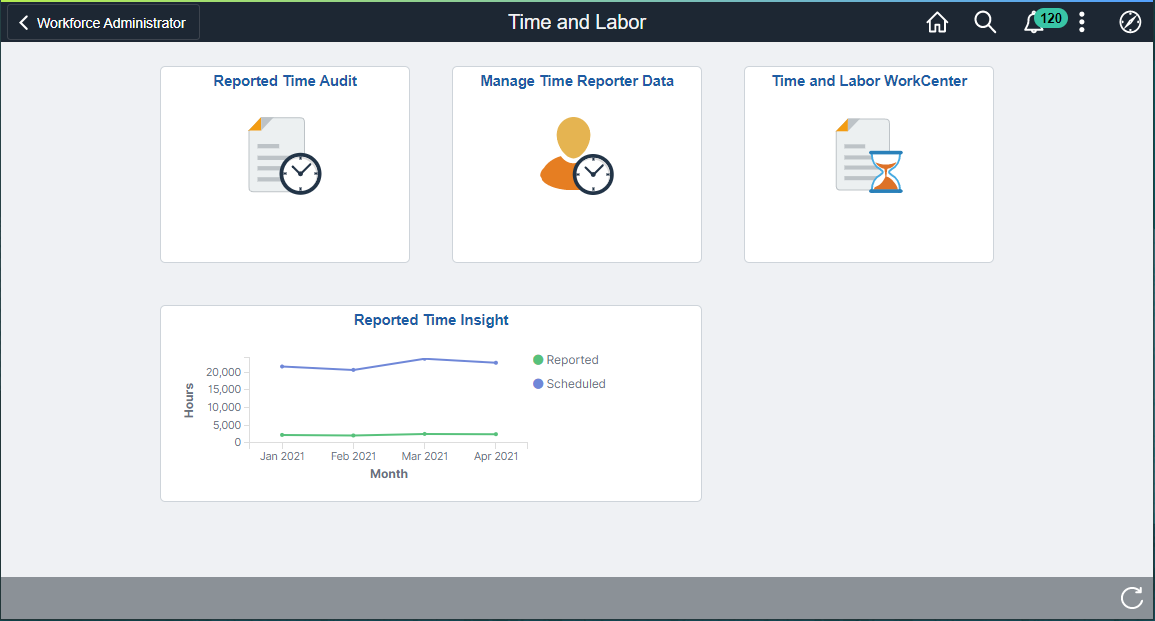
Click the Time and Labor tile to access the secondary homepage containing collection of tiles for Report Time Audit, Time and Labor WorkCenter and Reported Time Insight.
This example illustrates the fields and controls on the Secondary Page for Time and Labor.
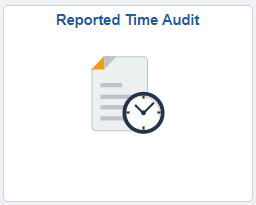
Use Reported Time Audit tile to access the Reported Time Audit Page.
This example illustrates the fields and controls on the Reported Time Audit Tile.
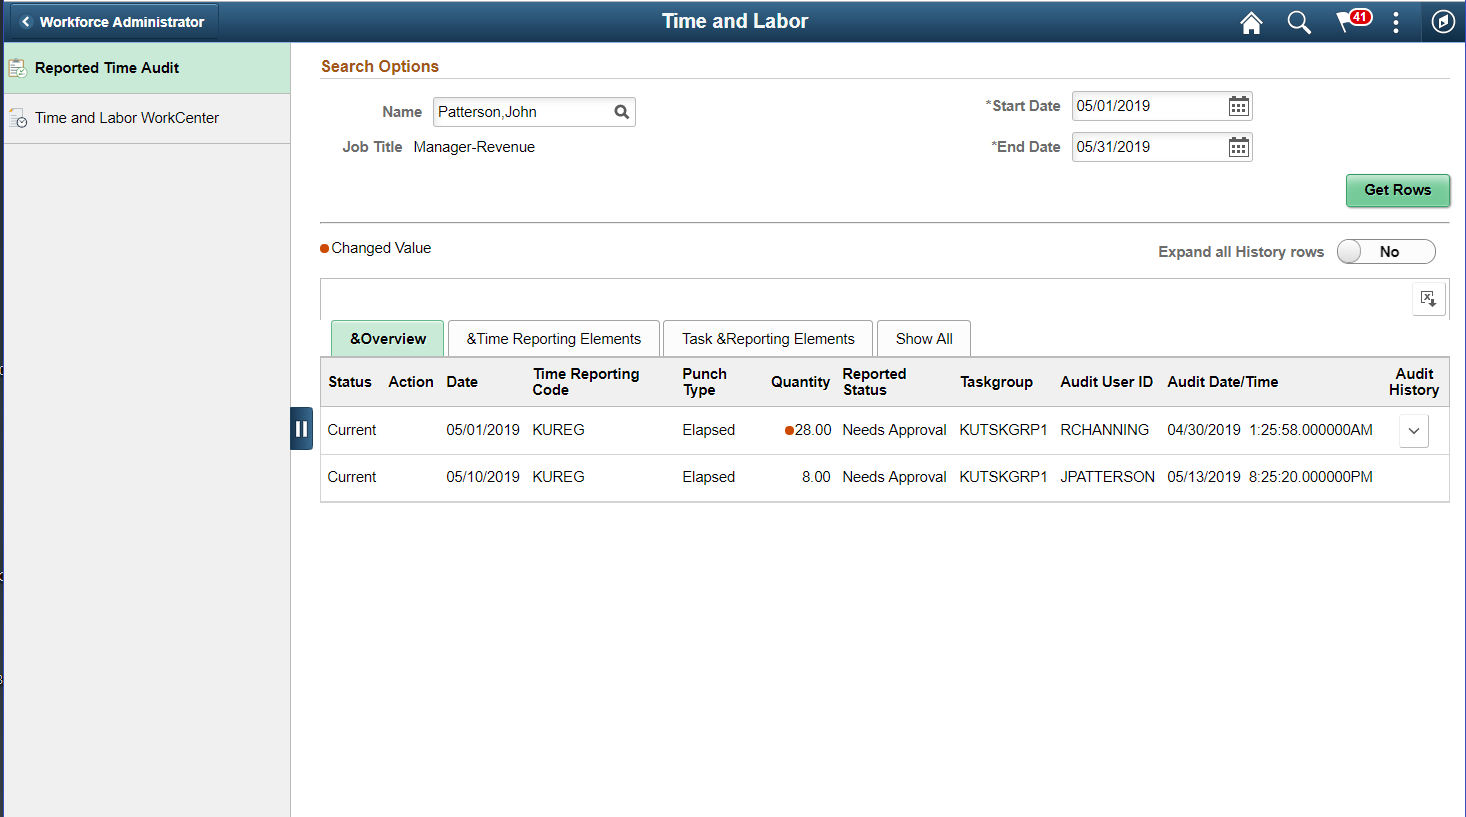
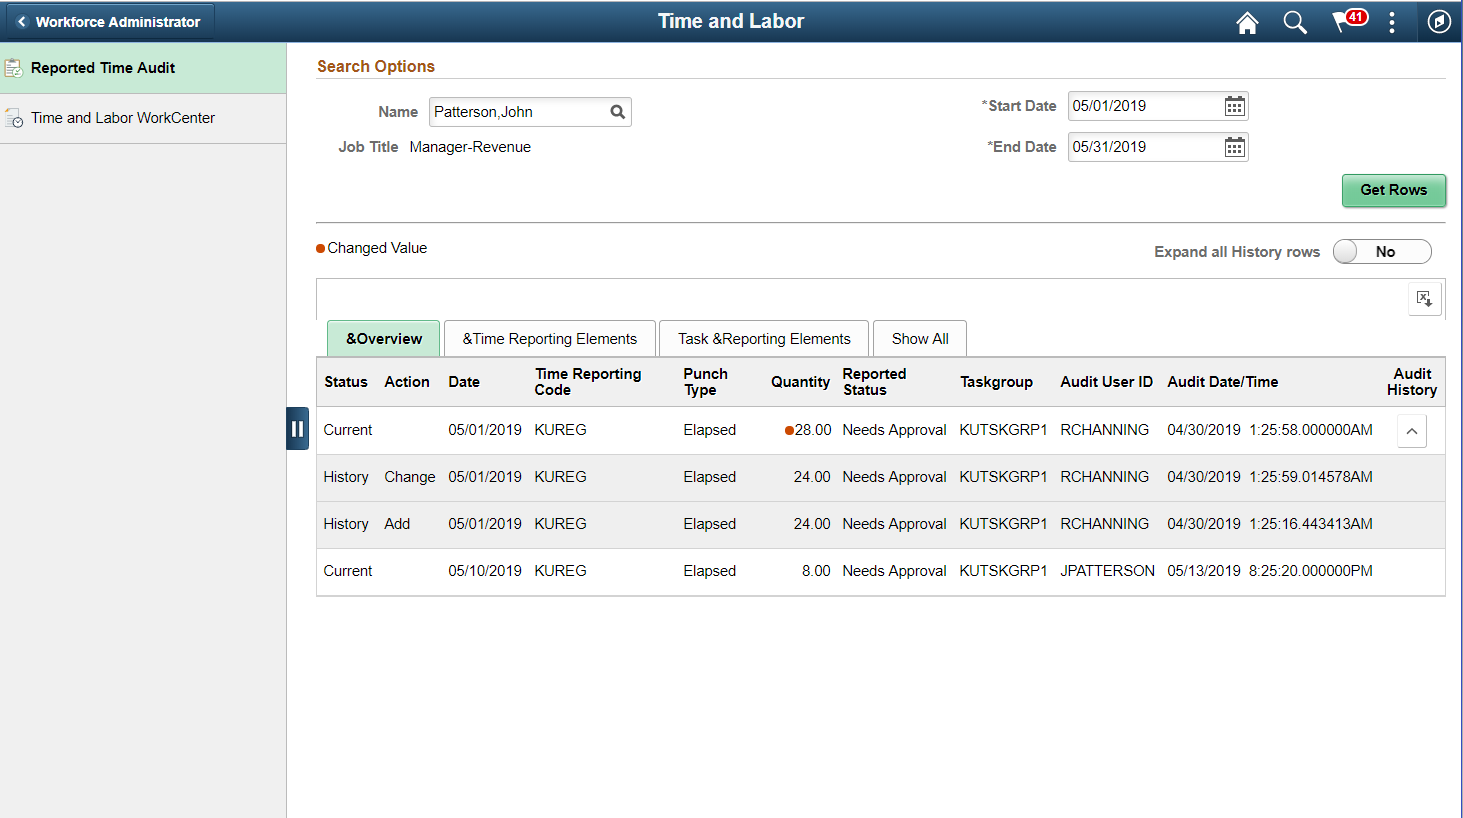
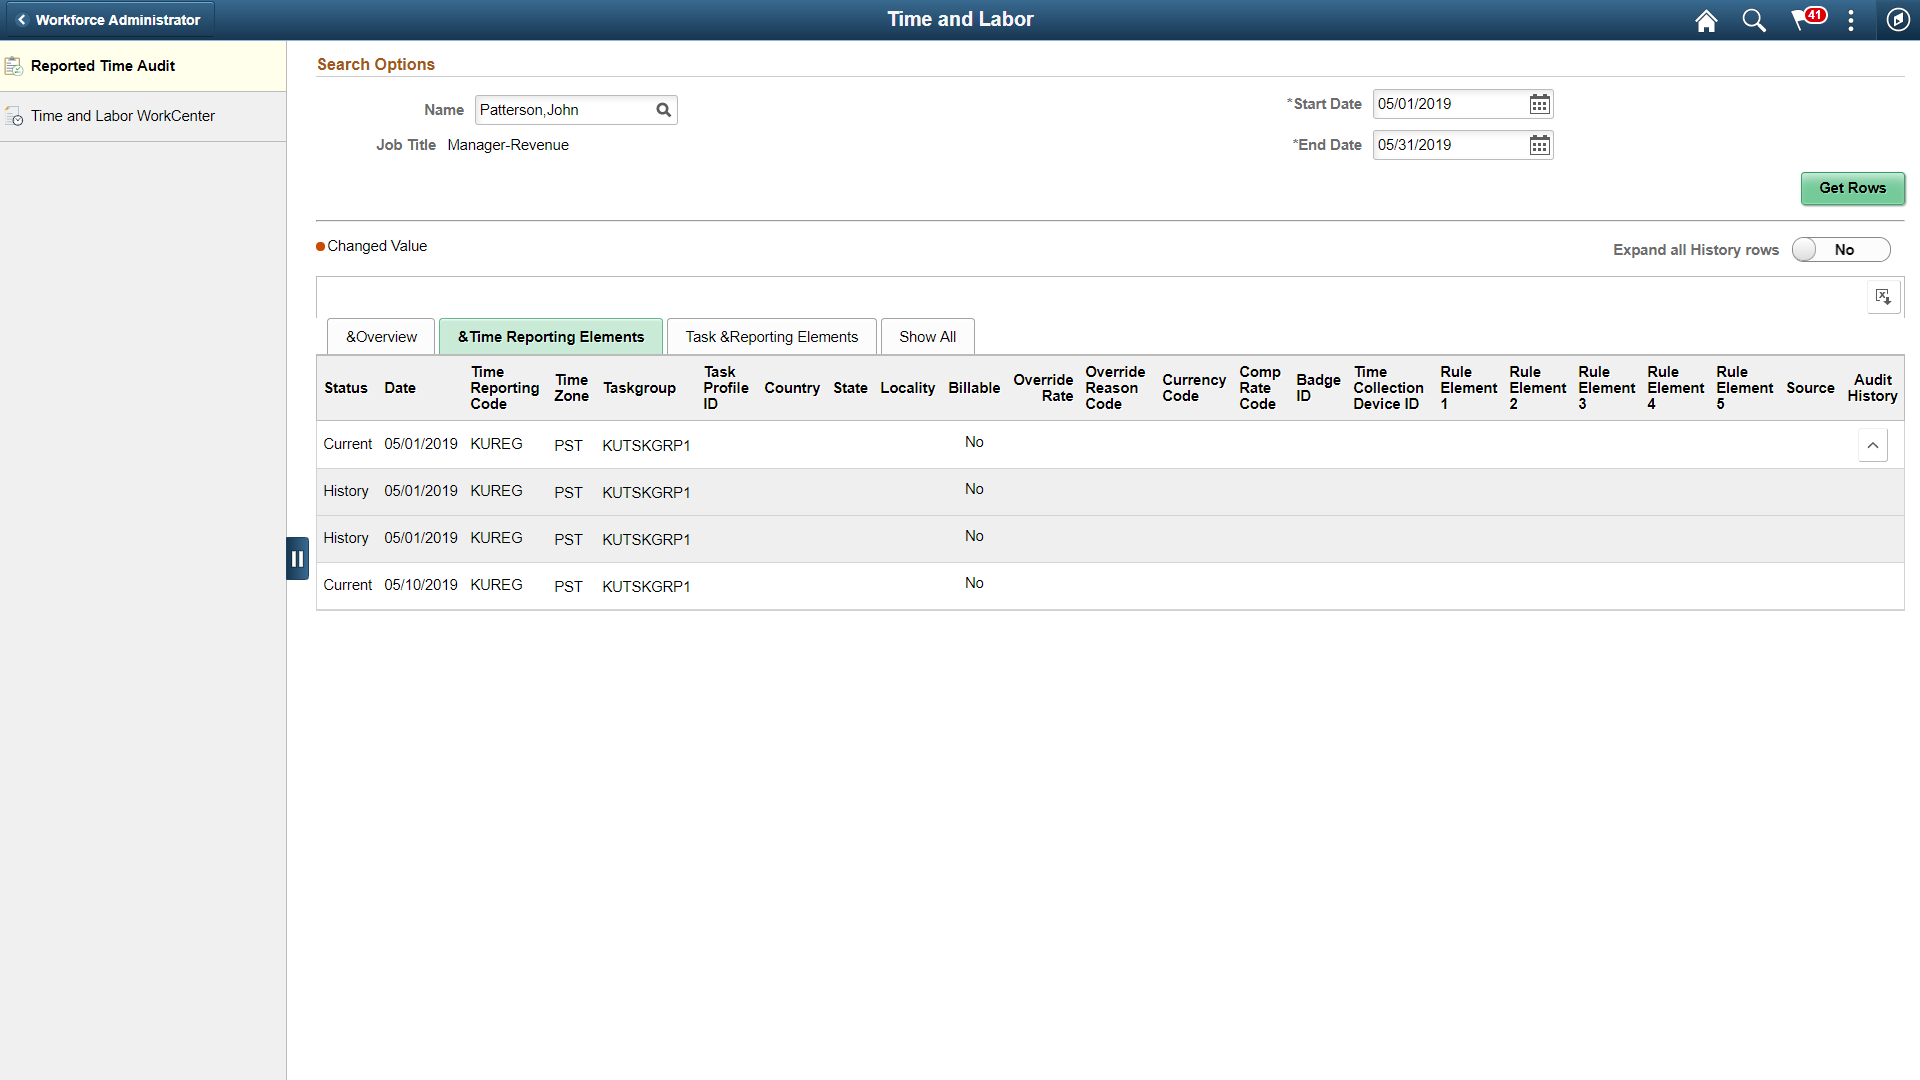
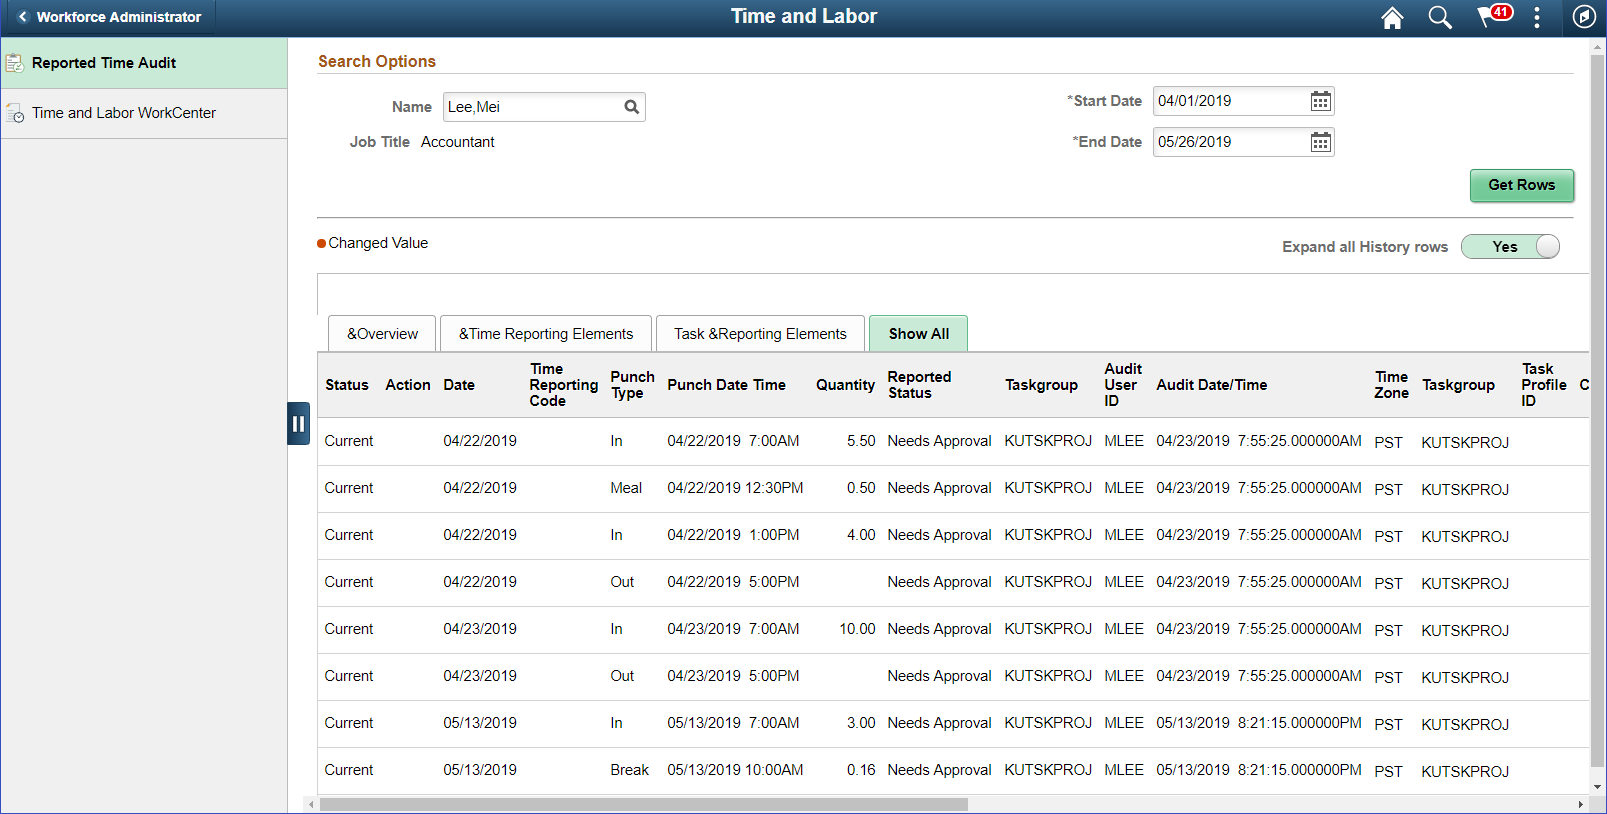
Use the Reported Time Audit page ( TL_AUD_RPTTIME_FL) to view current reported punch and elapsed time.
Navigation:
Click the Time and Labor tile on the Workforce Administrator fluid home page
The default landing page is Reported Time Audit selected on the left panel.
The following video provides an overview of the Reported Time Audit page:
Video: Image Highlights, PeopleSoft HCM Update Image 31: Reported Time Audit page
This example illustrates the Reported Time Audit Page for Elapsed Time Reporter.
This example illustrates the Reported Time Audit Page for Elapsed Time Reporter with history expanded.
This example illustrates the Reported Time Audit Page for Punch Time Reporter.
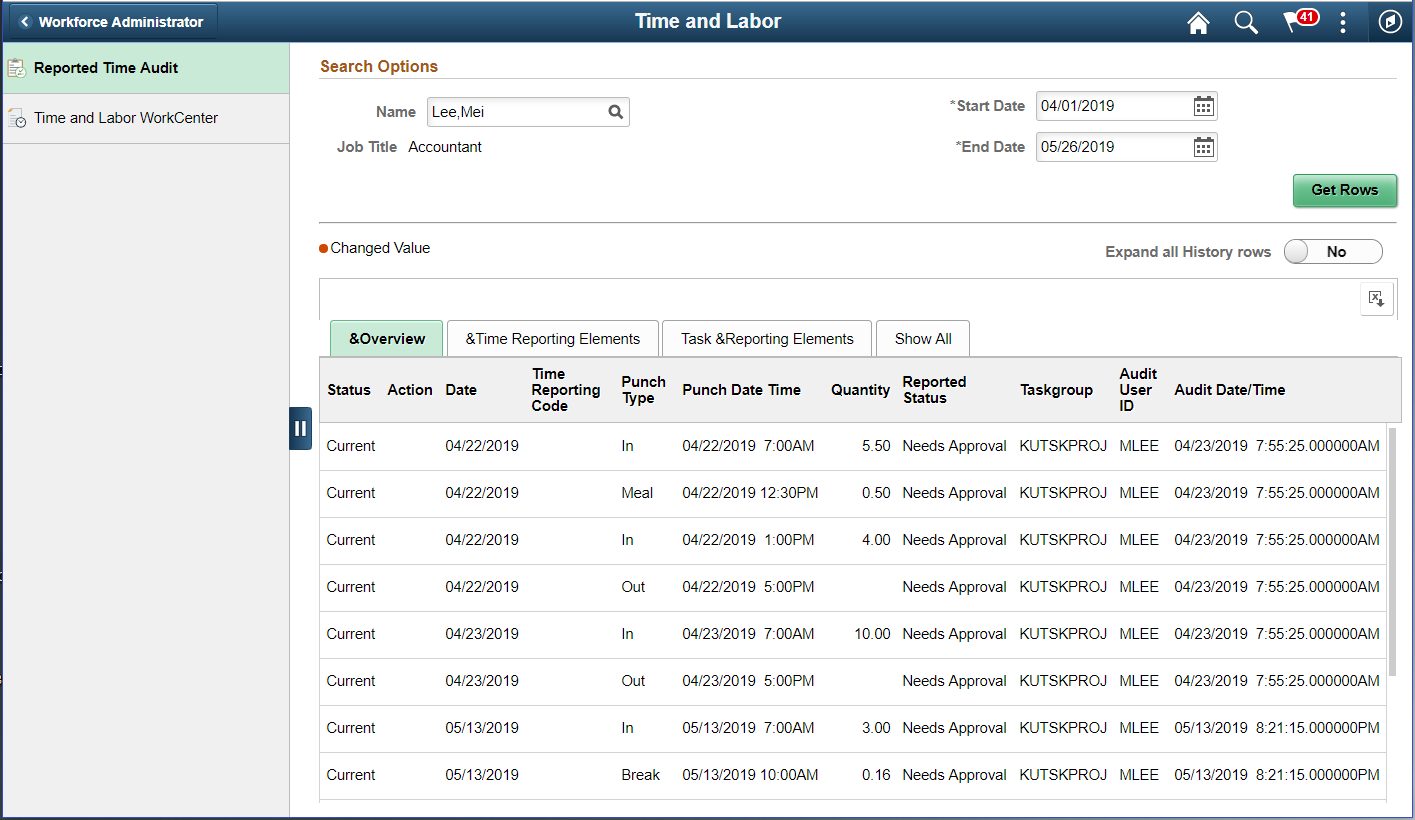
Search Options
|
Field or Control |
Description |
|---|---|
|
Name |
Search the employee with Empl ID, First Name or last Name. |
|
Start Date and End Date |
Enter the start and end date for the time you want to view. The system populates the fields with the data for all time reported from the start to the end date. |
|
|
Click after you enter the start and end dates. The system retrieves the data for all the current reported time between the start and end dates. |
|
|
Select the button Yes or No to see the audit history. |
|
|
Select to download the information in the form of a datasheet. |
|
Time Reporting Code |
Displays the Time Reporting Code for the reported time that has a status of either Current or Delete. |
|
Quantity |
Displays the quantity for the Time Reporting Code for elapsed reported time or the duration for matched punches for punch reported time. |
|
Audit Date/Time |
Displays Audit date and time. |
|
Audit History |
Click to see details of changes made to the time. If the time is current and no changes were made, you cannot edit this field. If the link is available, then changes have occurred to the time; select to view them. |


This example illustrates the fields and controls on the Reported Time Audit Page_Time Reporting Elements for Elapsed.
This example illustrates the fields and controls on the Reported Time Audit Page_Time Reporting Element for Punch.
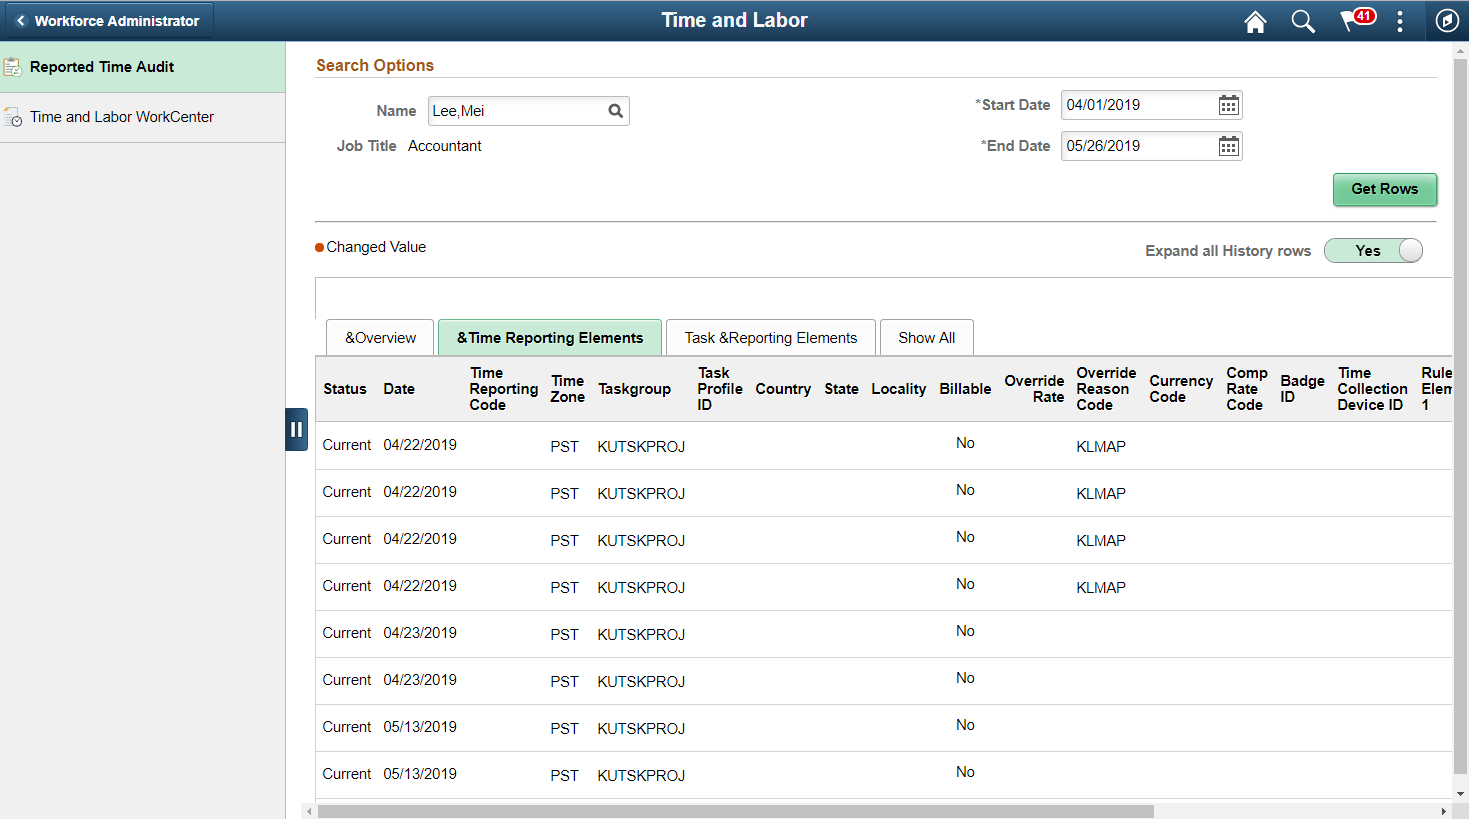
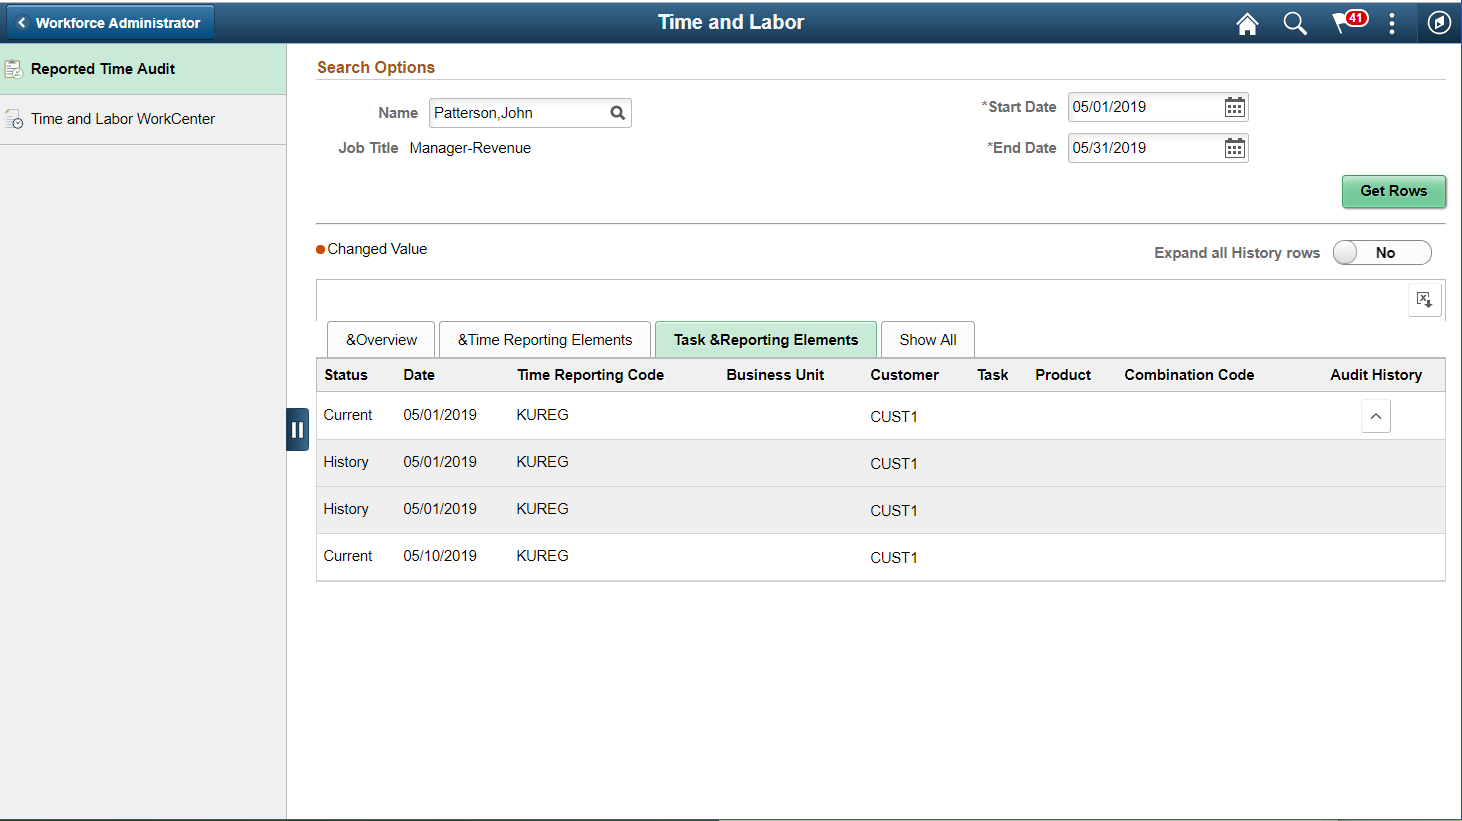
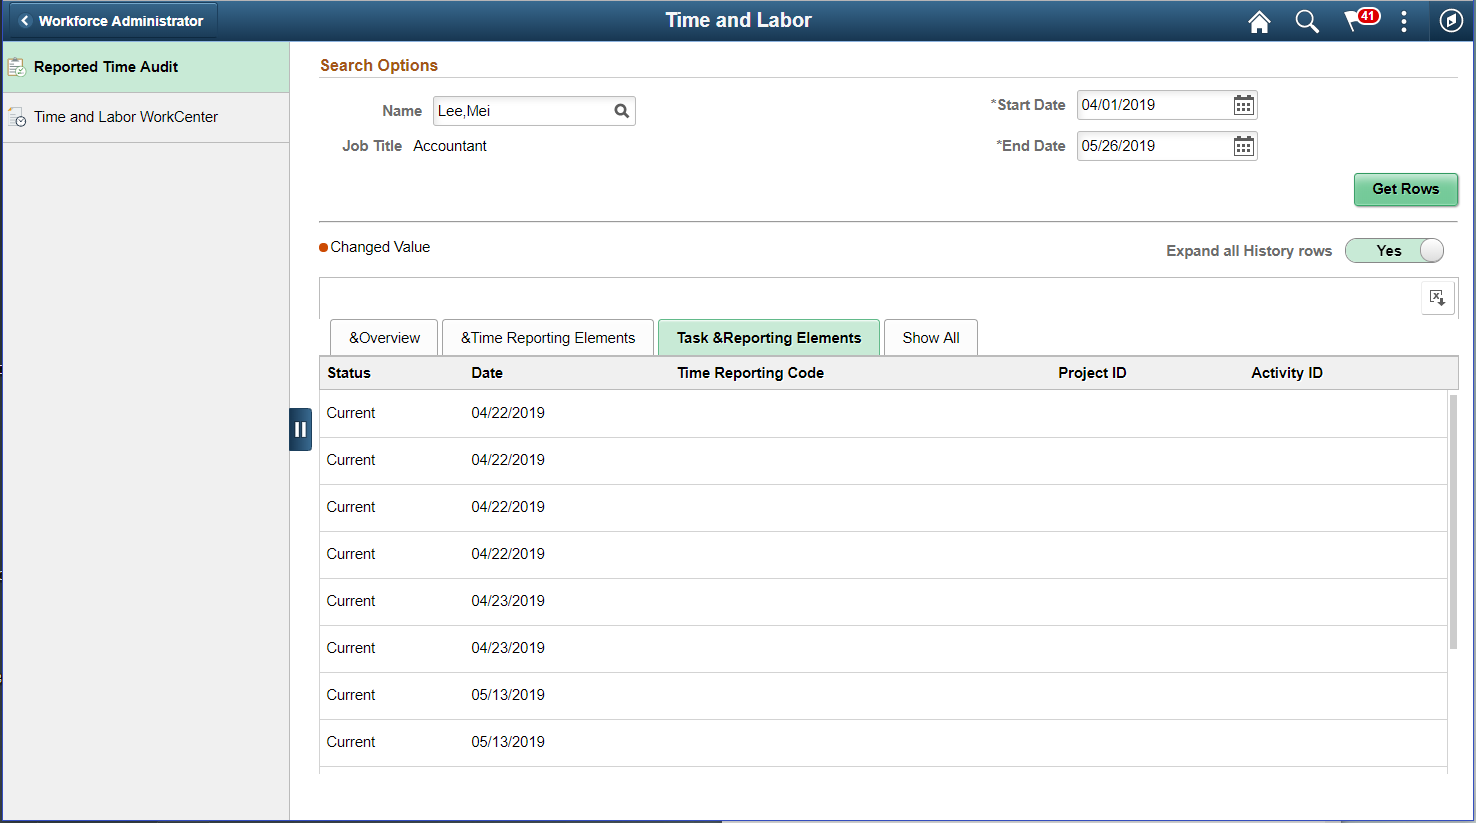
This example illustrates the fields and controls on the Reported Time Audit Page_Task and Reporting Elements for Elapsed.
This example illustrates the fields and controls on the Reported Time Audit Page_Time Reporting Elements for Punch.
This example illustrates the fields and controls on the Reported Time Audit Page_Show All for Elapsed.
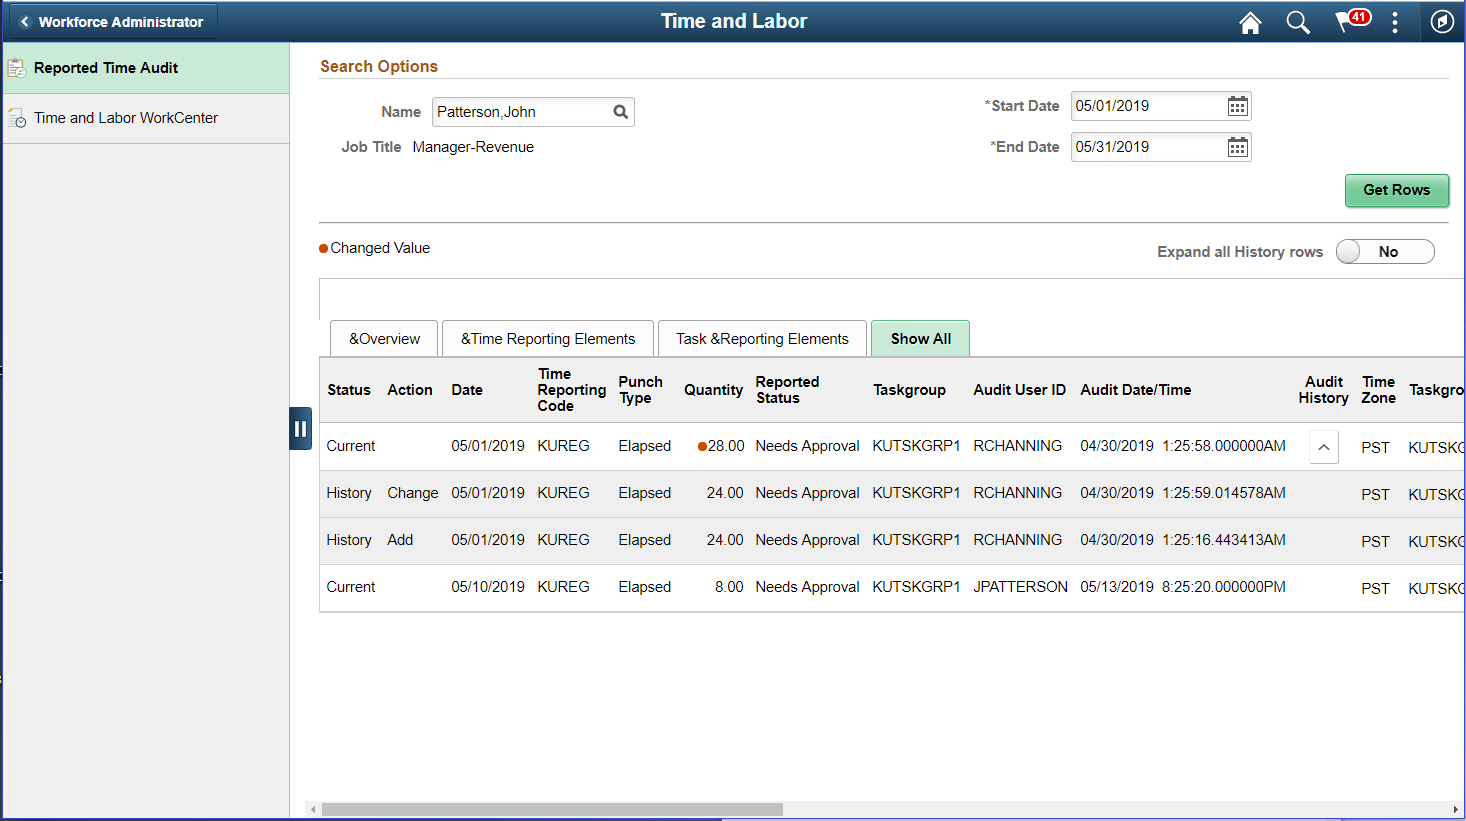
This example illustrates the fields and controls on the Reported Time Audit Page_Show All for Punch.
Use the Time and Labor WorkCenter tile to access Time and Labor WorkCenter Page.
This example illustrates the fields and controls on the Time and Labor WorkCenter tile.
The Time and labor Fluid WorkCenter is divided into four main sections – My Work, Links, Queries, and
Reports/Processes. You can expand each sections by clicking those sections.
For more information on how to use Classic Time and Labor WorkCenter, refer Using the Time and Labor WorkCenter
The following video provides an overview of Time and Labor WorkCenter:
Video: PeopleSoft Benefits/Time and Labor Fluid WorkCenters
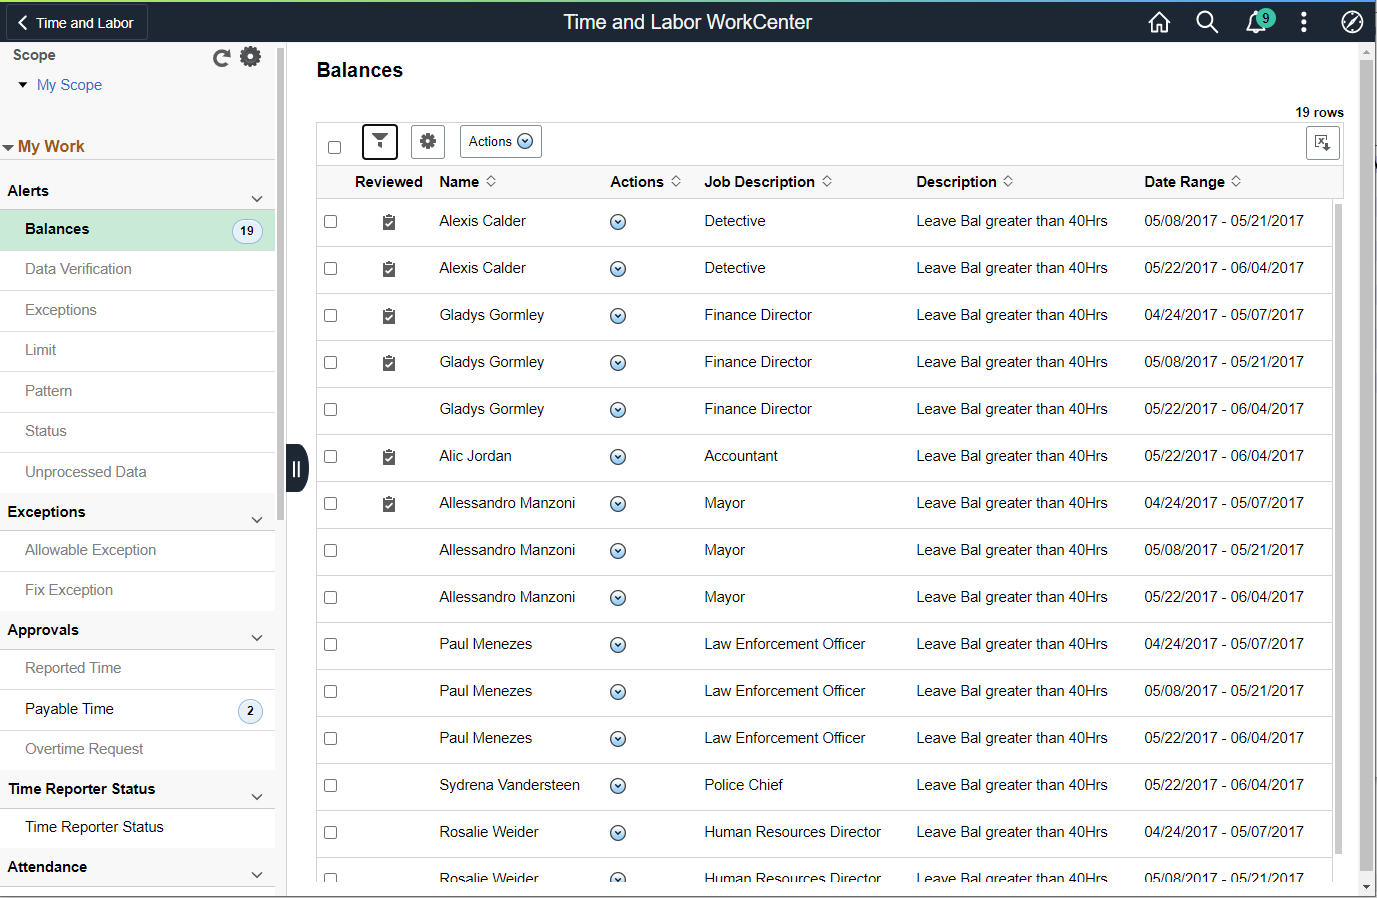
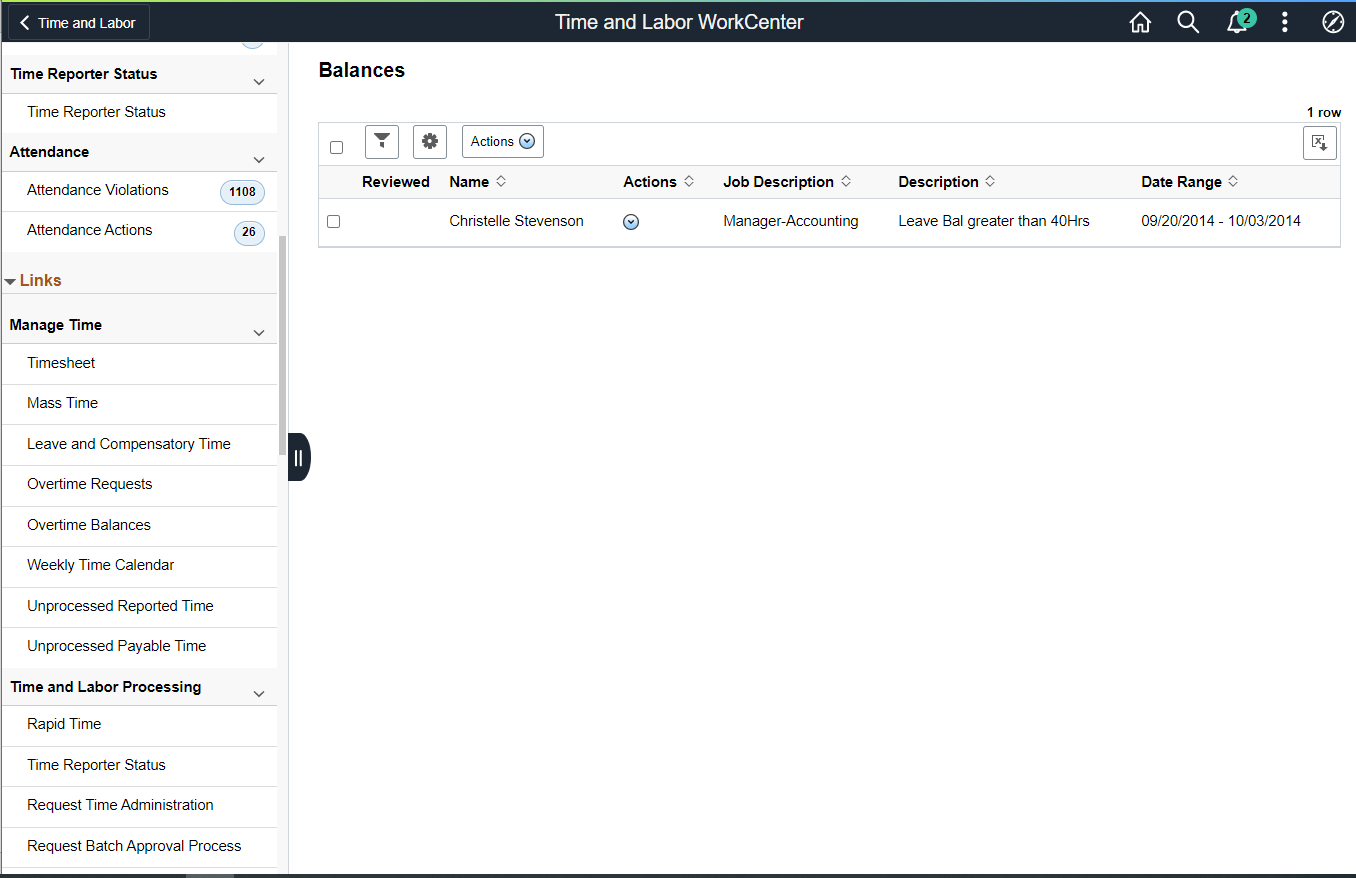
This example illustrates the fields and controls on the Time and Labor WorkCenter Page.
This example illustrates the fields and controls on the Time and Labor WorkCenter (2_2) Page.
Users can personalize display options and add links to their own WorkCenter for maximum efficiency. For more information, see Setting Up and Personalizing PeopleSoft Fluid WorkCenters.
Conditional Navigation for Time and Labor WorkCenter
When administrators access the Time and Labor WorkCenter, they are taken to either the Fluid or non-Fluid version of the component depending on the user role. This behavior is known as conditional navigation.
If administrators are members of the Time and Labor Fluid WorkCenter user role, they are given access to the Fluid Time and Labor WorkCenter. Administrators without this role access the non-Fluid version of the WorkCenter on the Using the Time and Labor WorkCenter.
The WorkCenter page is divided into two sections: the navigation panel on the left and the transaction panel on the right.
Left Panel
The navigational panel on the left contains group boxes with links to specific transactions, menu components and other contents. These group boxes are:
My Work: This group box contains six collapsible sections, Alerts, Exceptions, Approvals, Time Reporter Status, Attendance, and Unprocessed Time. For more information, see Understanding the My Work Group Box.
Links: For more information, see Understanding the Links Group Box.
Queries: For more information, see Configure Pagelets – Queries Page.
Reports/Processes: For more information, see Configure Pagelets – Reports/Processes Page.
|
Field or Control |
Description |
|---|---|
|
Scope |
Scope determines the data to be displayed in the WorkCenter. Note: If you have configured any additional scope, it will also be listed under the My Scope option. For more information on how to configure a new scope, see Configure Scope Page. |
|
|
Click to refresh the content area to display either the first page that appears when you first access the WorkCenter, or the starting page if it is specified in your personalization. |
|
|
Click to access these personalization options:
|


This example illustrates the fields and controls on the Personalize Scope Page. You can find definitions for the fields and controls later on this page.
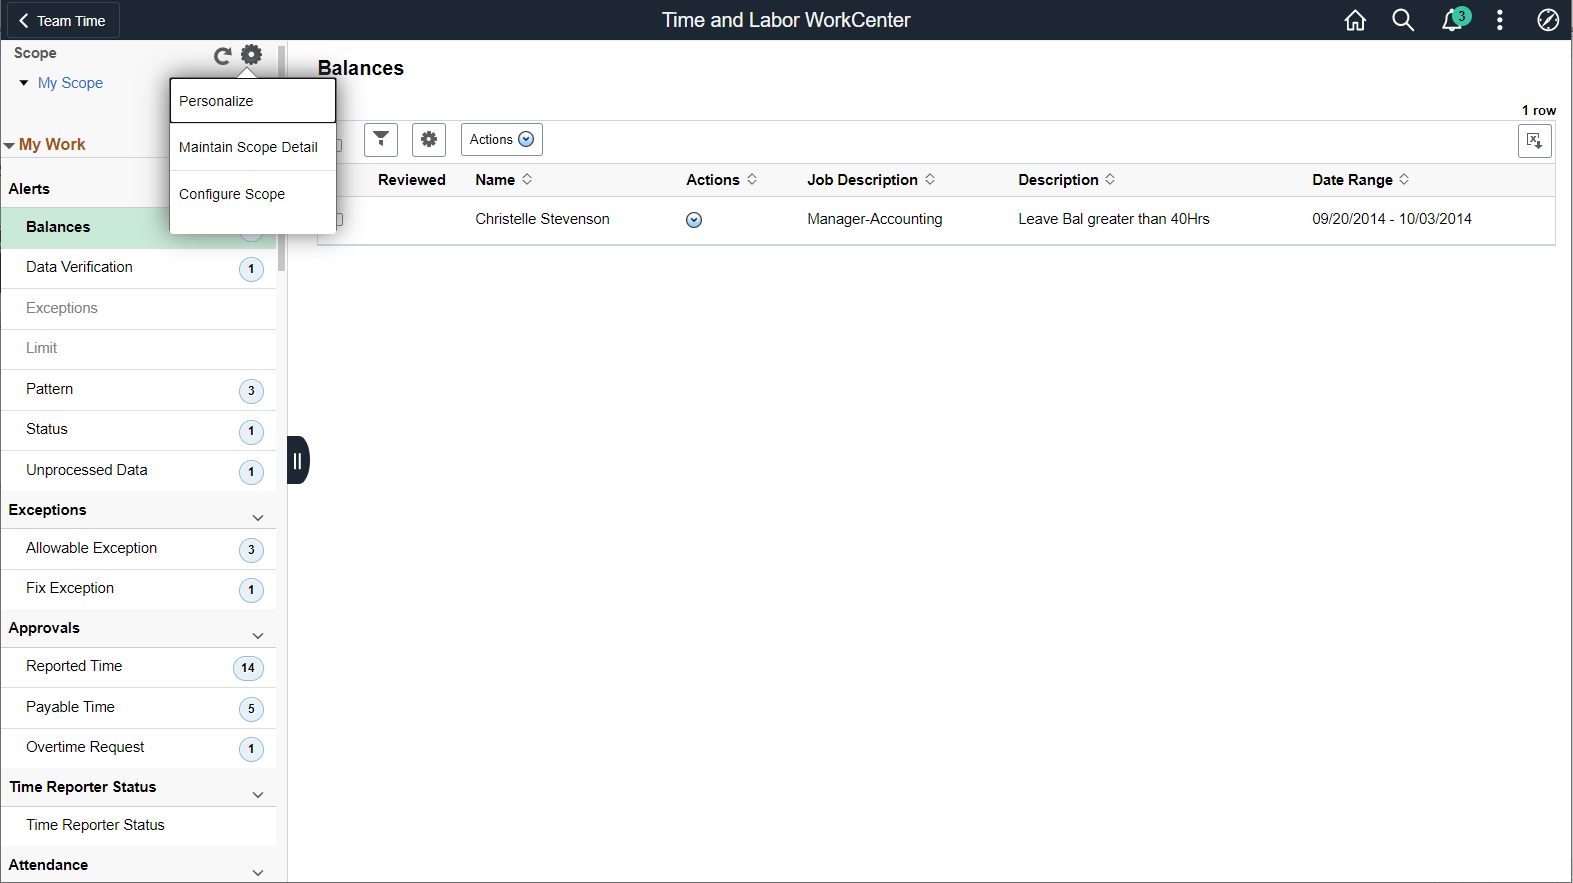
This example illustrates the sample personalized output for one of the My work items.
The modal for Personalized output provides an option to select the options to display on output.
Right Panel
The transaction panel on the right is where the selected transaction result or component (work item) is displayed.
By default, My Work item appears when you first access the Time and Labor WorkCenter.
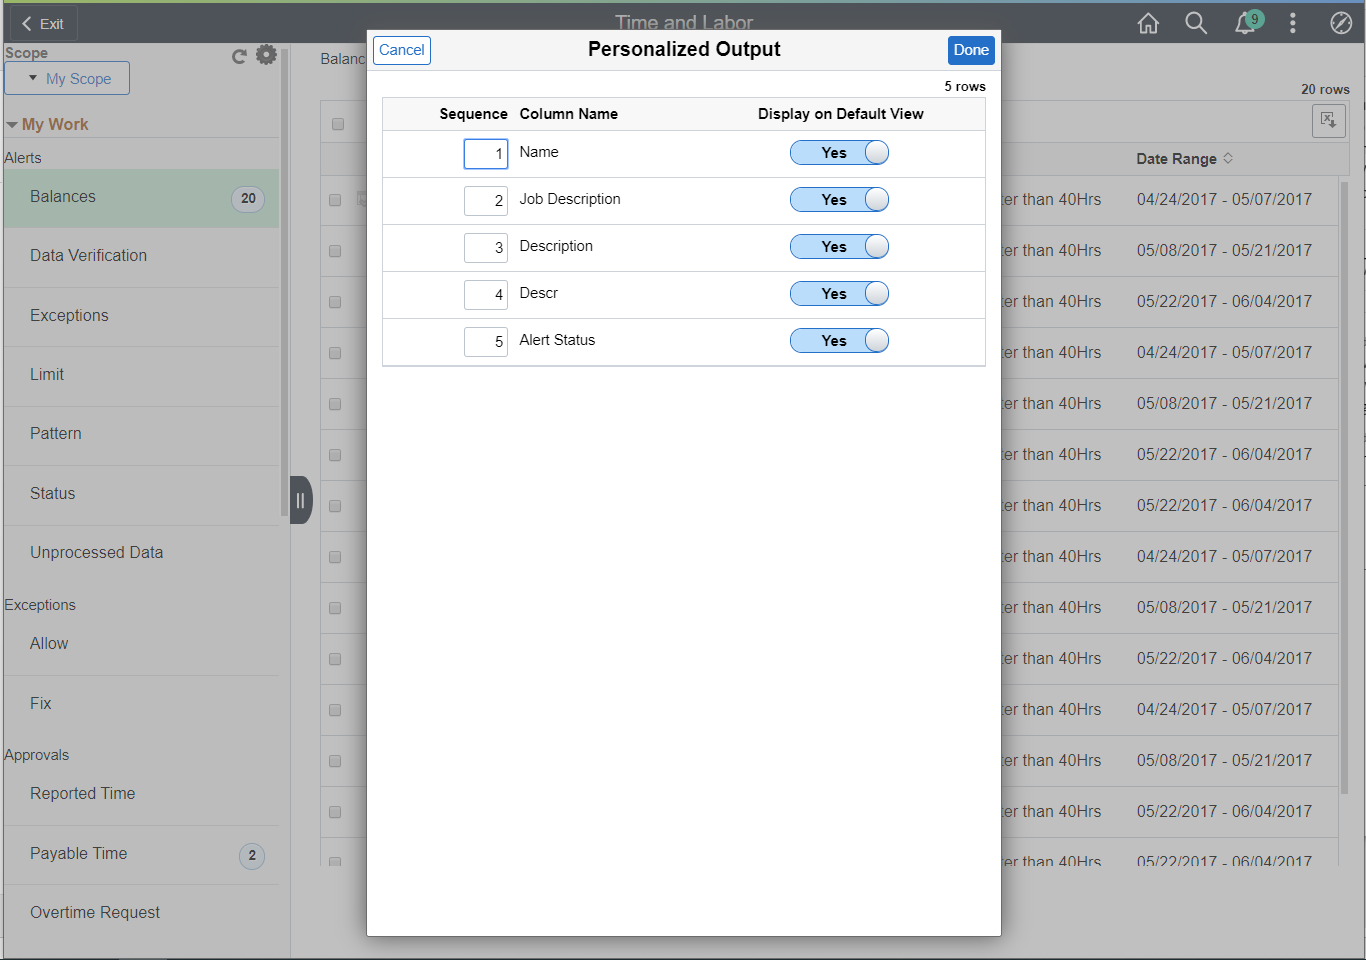
You can filter and personalize the output based on your requirements. Use the Refine Filter Criteria page to select one or more criteria to narrow the search result. The Filter icon appears green when filters have been applied to search. Use the Personalized Output page to modify the position of columns and to select the columns to be displayed as default for each work item. For more information, see Personalize Page (Fluid).
You can also filter and personalize the output based on your requirements. For more information, see Setting Up and Personalizing PeopleSoft Fluid WorkCenters.
Use the Maintain Scope Detail (EOWC_EDITVIEWLK_FL) page to define the scope for My Work items.
This example illustrates the fields and controls on the Maintain Scope Detail Page. You can find definitions for the fields and controls later on this page.
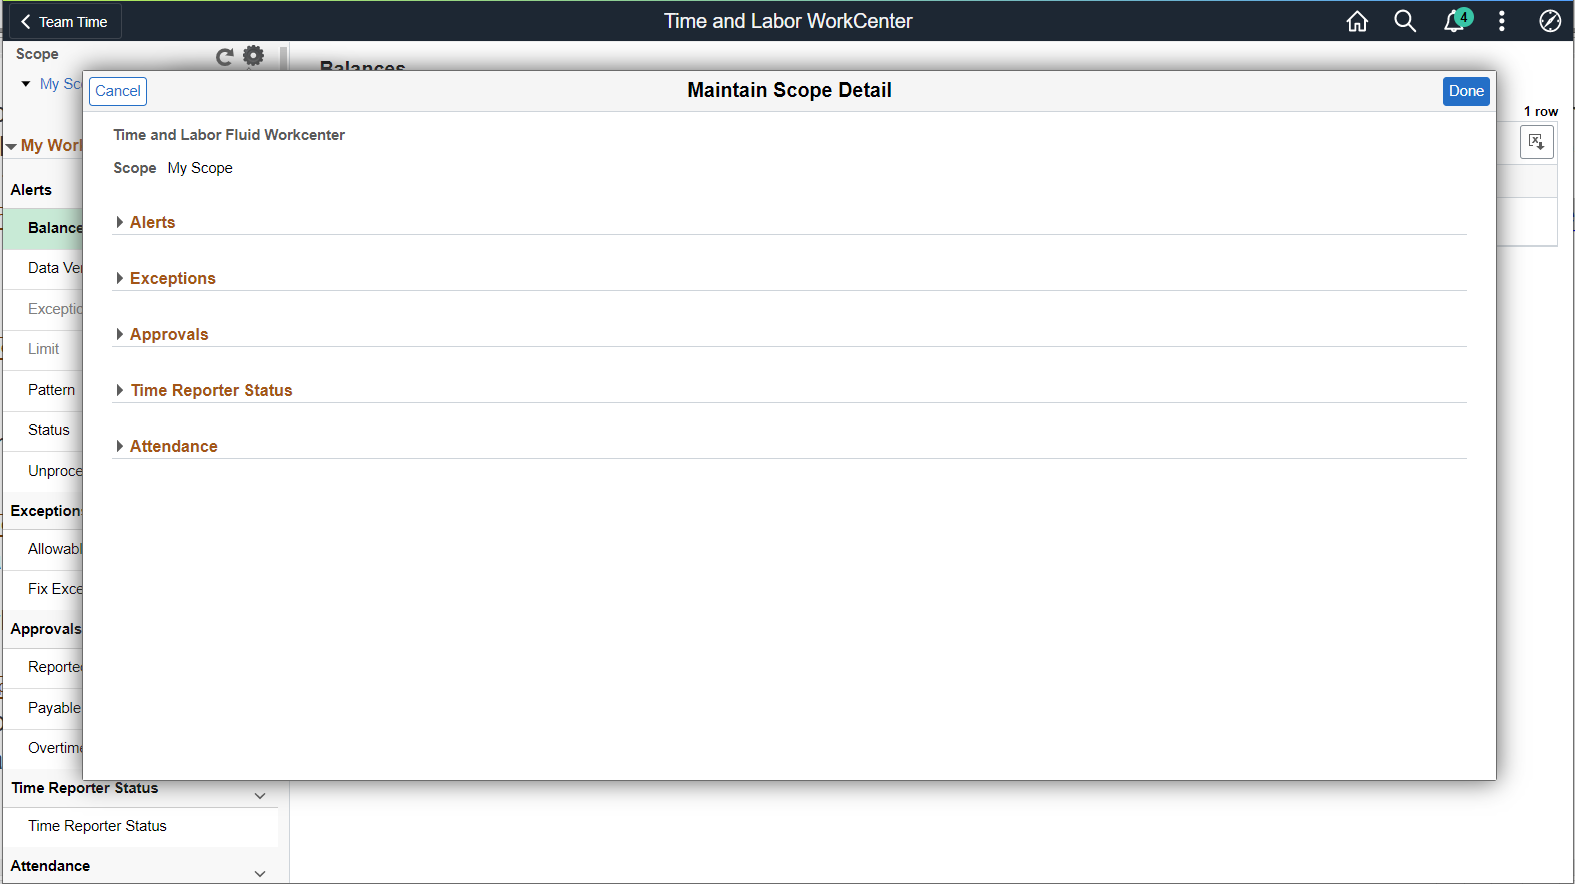
You can define the scope of alerts with Link Label, Description and Edit Filters. The Edit Filters enables you to define the scope values like date ranges.
The My Work group box provides Time and Labor work item links for alerts and exceptions in these group sections:
Alerts
Exceptions
Approvals
Time Reporter Status
Attendance
Note: The Work item links are grayed out if no data is available for display.
Alerts
There are seven types of alerts available: Balances, Data Verification, Exceptions, Limit, Pattern, Status and Unprocessed Data.
For more details, refer Alert Type_Balances Page
Exceptions
Fix Exception Page
Approvals
These are Reported Time Approvals Page, Payable Time page and Overtime Request time page in Time and Labor Fluid WorkCenter.
Reported Time Status
Attendance
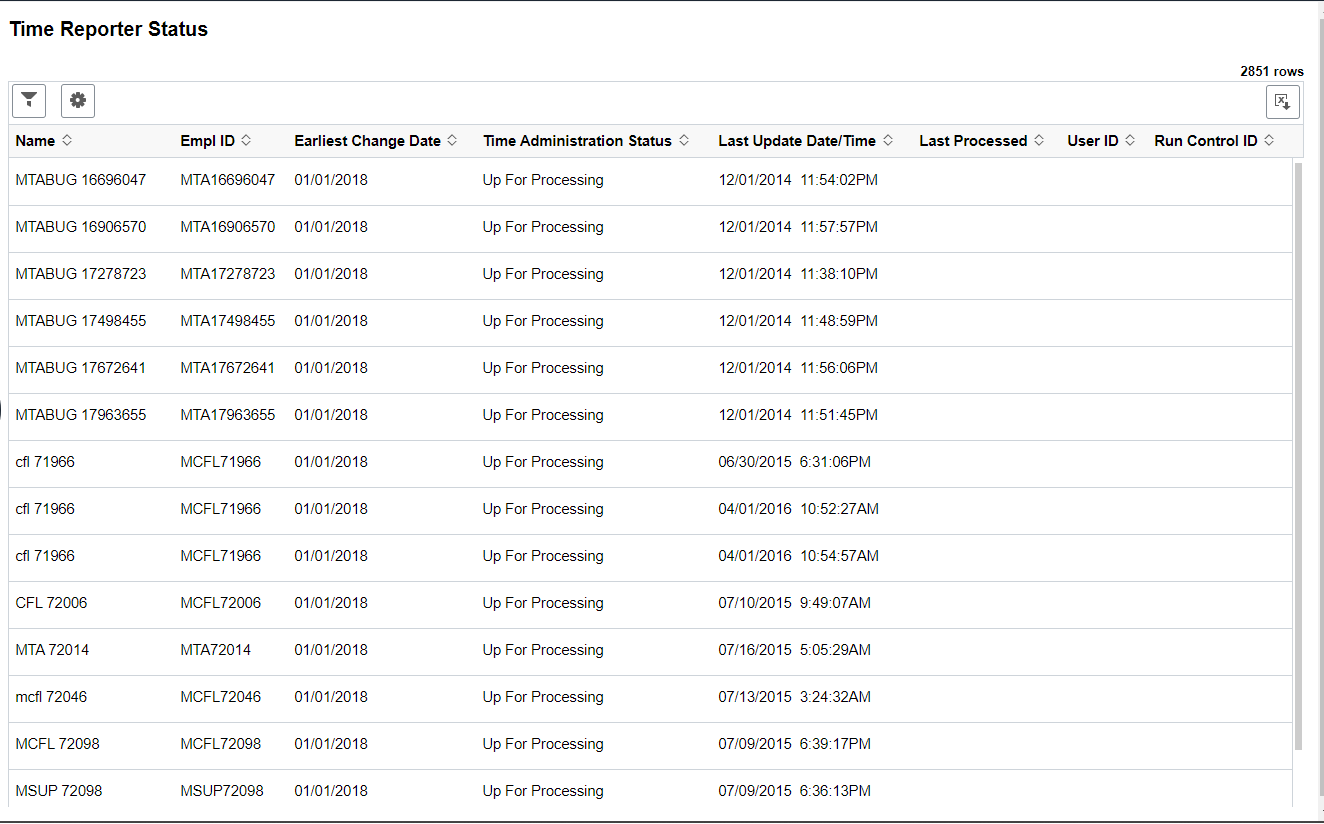
Use Reported Time Status page to view the Time administration status of the employees.
This example illustrates the fields and controls on the Reported Time Status page.
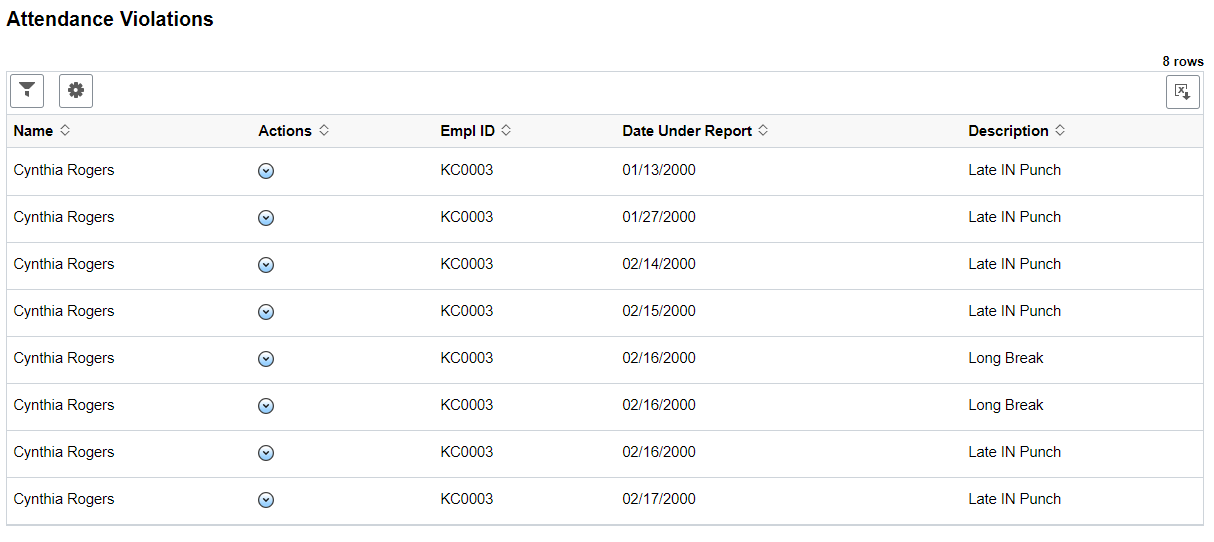
Use the Attendance Violations page (HWC_RSLT_FL) to view the list of employees with Attendance Violations.
Navigation:
Click the Attendance Violations link under Attendance in the My Work group box of the Time and Labor WorkCenter.
This example illustrates the Attendance Violations Page.
This example illustrates the fields and controls on the Attendance Violation Page_Related Actions. You can find definitions for the fields and controls later on this page.
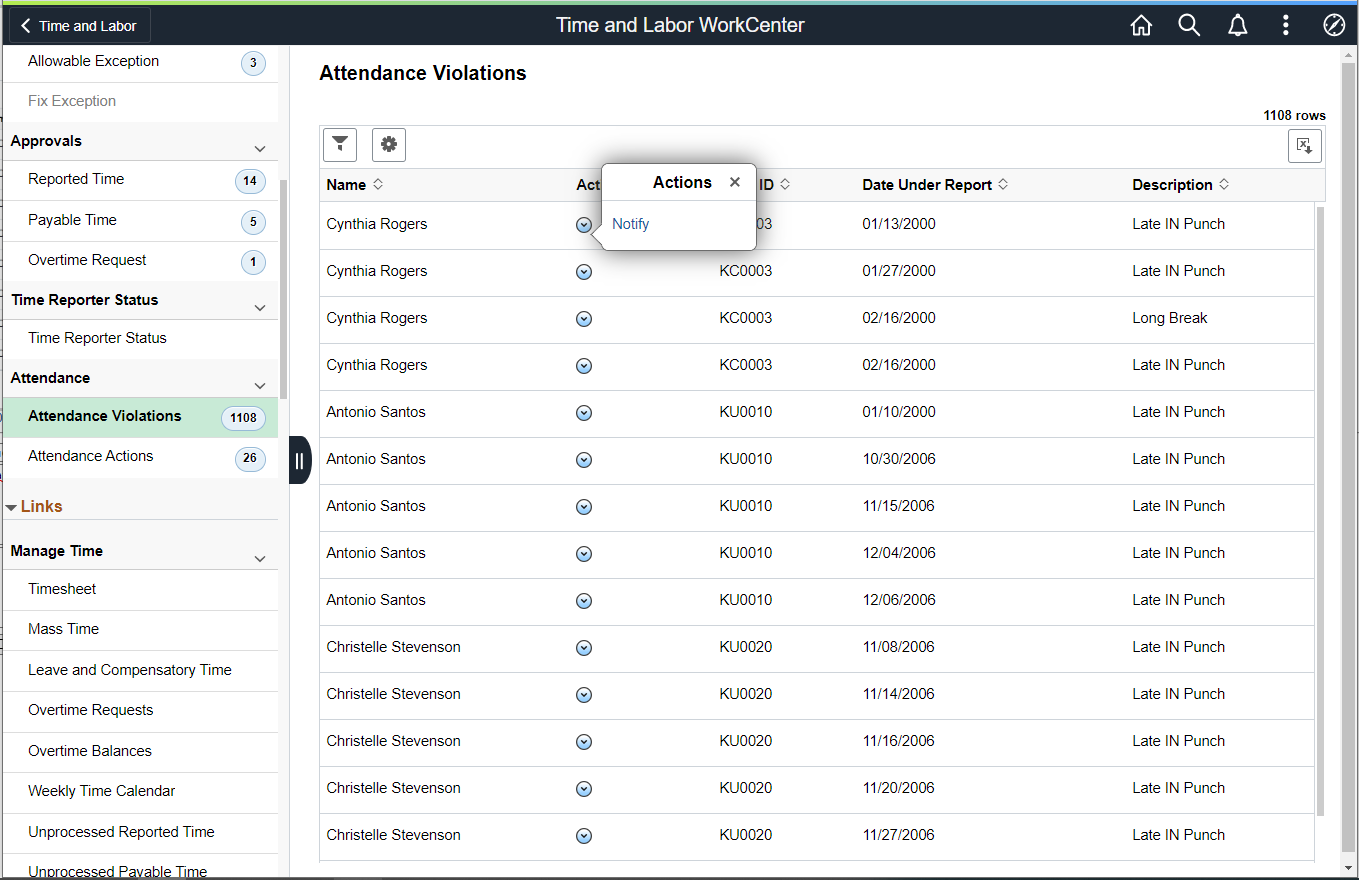
You can select the related action on the right panel to select Notify.
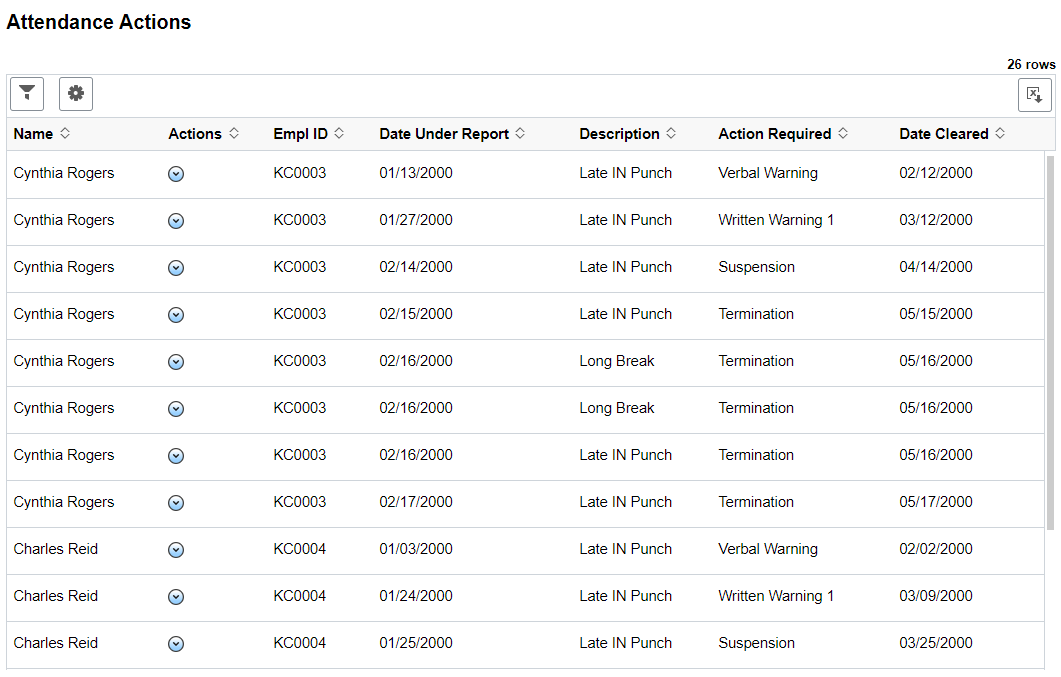
Use the Attendance Actions page (HWC_RSLT_FL) to view the list of employees whose time requires attendance actions.
Navigation:
Click the Attendance Actions link under Attendance in the My Work group box of the Time and Labor WorkCenter.
This example illustrates the Attendance Actions page.
This example illustrates the fields and controls on the Attendance Actions Page_Related Action. You can find definitions for the fields and controls later on this page.
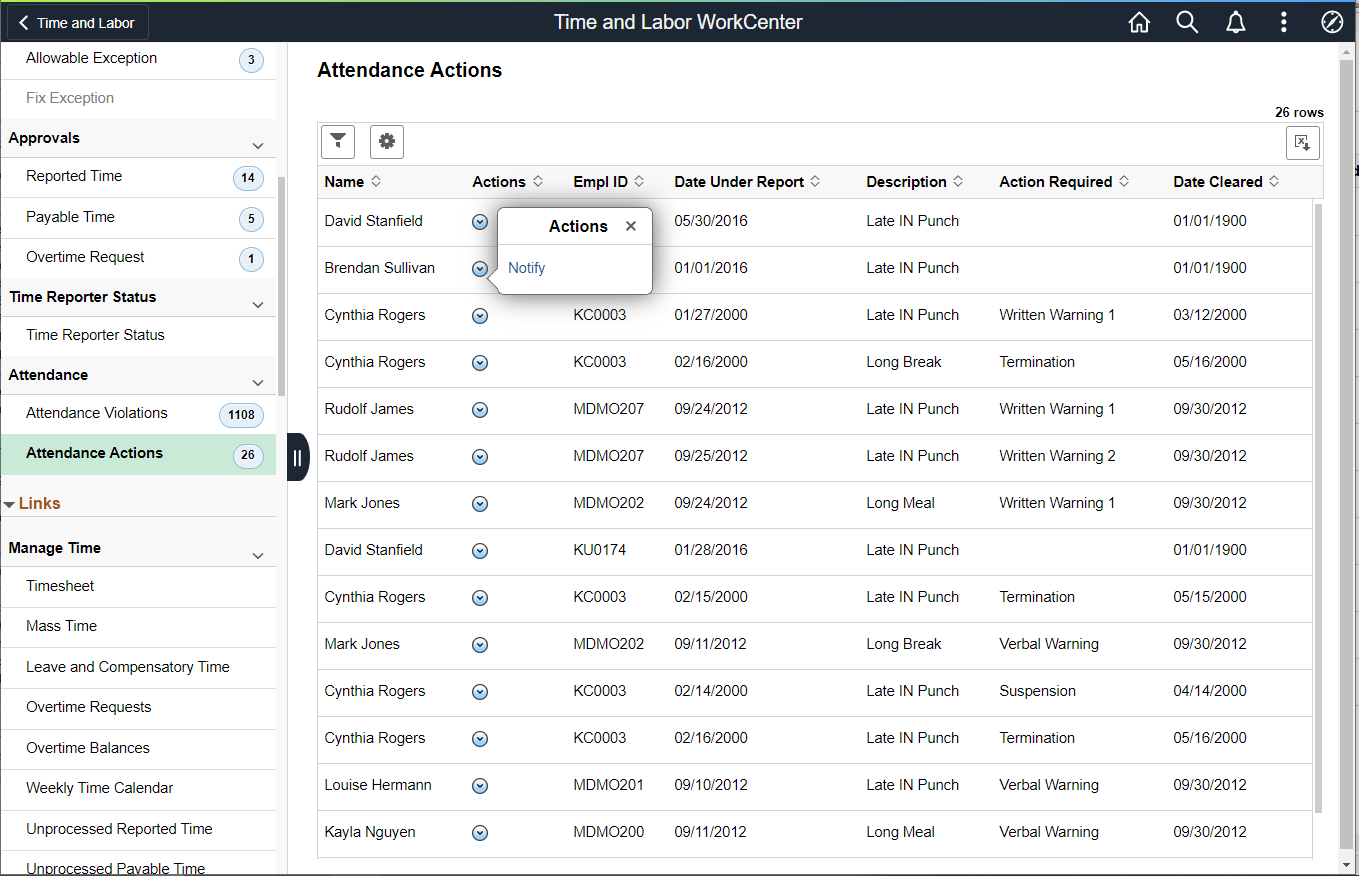
You can select the related action on the right panel to select Notify.
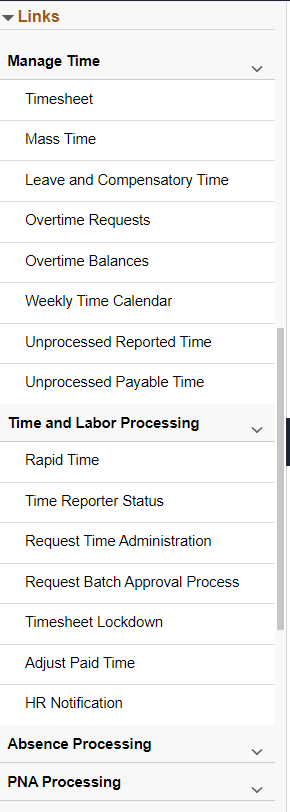
The Links group box provides access to the key components that are required to complete Time and Labor transactions.
This example illustrates the fields and controls on the Link Group Box.
The system administrators can manage links and configuration options for the Queries Group Box on the Configure Pagelets – Queries Page
The Queries group box contains the Query Manager link. Select to search for existing queries or create one to use.
This example illustrates the Queries Group Box.
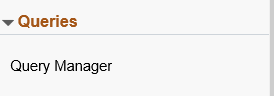
The system administrators can manage links and configuration options for the Queries Group Box on the Configure Pagelets – Queries Page.
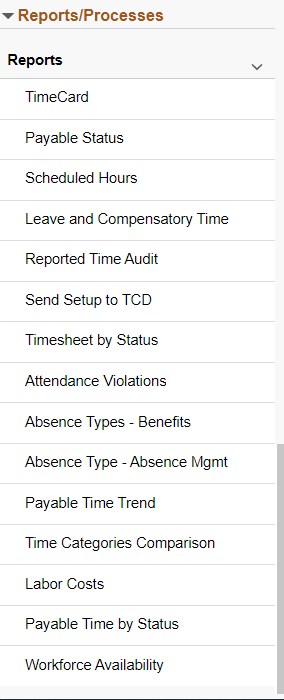
The Reports/Processes group box provides access to the Workforce Availability analytics and reports.
This example illustrates the fields and controls on the Reports/Processes Group Box.
The administrators or managers can use the Reported Time Insight tile to access the Reported Time Insight dashboard using PeopleSoft Insights for Time and Labor.
This example illustrates the Reported Time Insight tile.
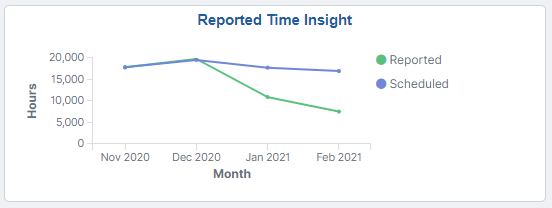
The Reported Time Insight tile depicts the reported to scheduled time ratio for the last 4 months. The last 4 months is the rolling month indicates that if the current month is March 2021, then the visualization depicts for December 2020, January 2021 and February 2021.
Based on user privileges, administrators and managers can access the visualizations delivered on the Reported Time Insight dashboard.
Note: These insights will consider only positive time reporters and excludes all exception time reporters.
The reported time data is the data submitted by employee, manager or administrator. The Reported Time Insight dashboard is built on the PeopleSoft Insights platform, which relies on an underlying analytics engine and search engine. Reported Time data that is visible on the dashboard comes from the HC_TL_GBL_TIMESHEET_SCHED_FULL search index and HC_TL_GBL_TIMESHEET_SCHEDULE search definition.
For information on Insights, see PeopleTools Search Technology, “Monitoring PeopleSoft Search Framework and Opensearch” and “Working with Insights Dashboards for PeopleSoft Application Data” documentation.
These videos provide an overview of the Insights feature:
Video: Insights with PeopleSoft
Video: PeopleSoft HCM Insights
Deploying the Reported Time Insight Analytics
Before administrators can access the Reported Time data in Insights, the following steps should be performed:
Deploy the search definition HC_TL_GBL_TIMESHEET_SCHEDULE and search HC_TL_GBL_TIMESHEET_FULL (Reported Time data) index.
(
Build the HC_TL_GBL_TIMESHEET_FULL search index.
()
Note: The HC_TL_GBL_TIMESHEET_FULL search index process the data only for past 550 days (~ 1.5 years).
Deploy the Reported Time Insight Tile and Reported Time Insight dashboard.
()
Note: The full index must be run before the dashboard can be deployed.
Assign TL Manager Fluid roles to administrators to managers and TL Administrator Fluid roles to administrators to access and view Reported Time Insight Analytics visualizations.
Note: Run the full index first time.
If there are changes to reported time, then the incremental index automatically takes care of those which includes new data, delete and update.
Note: The Schedules (HC_TL_GBL_TIMESHEET_SCHEDULE and HC_TL_GBL_TIMESHEET) search indexes support real time indexing (RTI) with PeopleTools version 8.59.09 or higher. When enabled, RTI allows real-time updates to the indexed data to provide searches using the latest information.For more information about Real Time Indexing, refer to PeopleTools Search Technology, “Administering Real Time Indexing."
The Time administrators and managers can use the Reported Time Insight dashboard to view several interactive visualizations based on the time reporting data specified for a date range for the selected group of employees.
The visualizations are used in the following ways:
Identify if the employees follow the schedule.
View if non-standard reporting codes are being used.
Compare the top time reporting code with other codes.
Identify the months people are taking more vacation, or sick leave.
Determine the heaviest web servers load due to more time submissions.
This video provides an overview of the Time and Labor Insights feature:
Video: Image Highlights, PeopleSoft HCM Update Image 38: Reported Time Insight Dashboard
This example illustrates the fields and controls on the Reported Time Insight dashboard. You can find definitions for the fields and controls later on this page.
The visualizations are presented in different visual represented to best present data. There are different types of analytics which include:
Actual Time Submission
Actual Vs Scheduled Time
Reported Time by Code
Reported Time Trend
Top Time Reporting Codes
Note: With any visualization, you can pause over an item to view the percentage or number counts, as desired.
Common Element and Controls
Note: Filtering options apply to all visualizations, which allows administrators to drill down on all the charts at once.
|
Field or Control |
Description |
|---|---|
|
Open in Insights |
This link appears only for users with role TL Administrator Fluid and TL Manager Fluid. |
|
Filters
search field |
Enter criteria to filter data on the visualizations. You can add filters in a number of ways:
|
|
|
Click to select a different time period for the analytics. You can enter it manually, or choose from commonly used date ranges provided by the system or from the recently used selections. When a new period is selected, all visualizations are refreshed automatically to reflect that change. If you have selected a commonly used date range, for example, This month, or Week to date, click the Show dates link to view the approximate date period in relation to the current date. For example, the current date is November 1 and the selected date range is Year to date. Clicking the Show dates link displays ~ 10 months ago —> now, which indicates that the selected date range started from approximately 10 months ago and ends on the current date. |
 Change all filters icon, Change all filters icon
(Change all filters), and
Change all filters icon, Change all filters icon
(Change all filters), and  Calendar icon Calendar icon (Calendar) or Show
dates
Calendar icon Calendar icon (Calendar) or Show
datesAdditional Filters
This example illustrates the fields and controls on the Additional Filters. You can find definitions for the fields and controls later on this page.

Note: The default filters that populates are data for the last five years.
Additional Filters allows you select filters in the areas:
Department
Business Unit
Location
Actual Time Submission Visualization
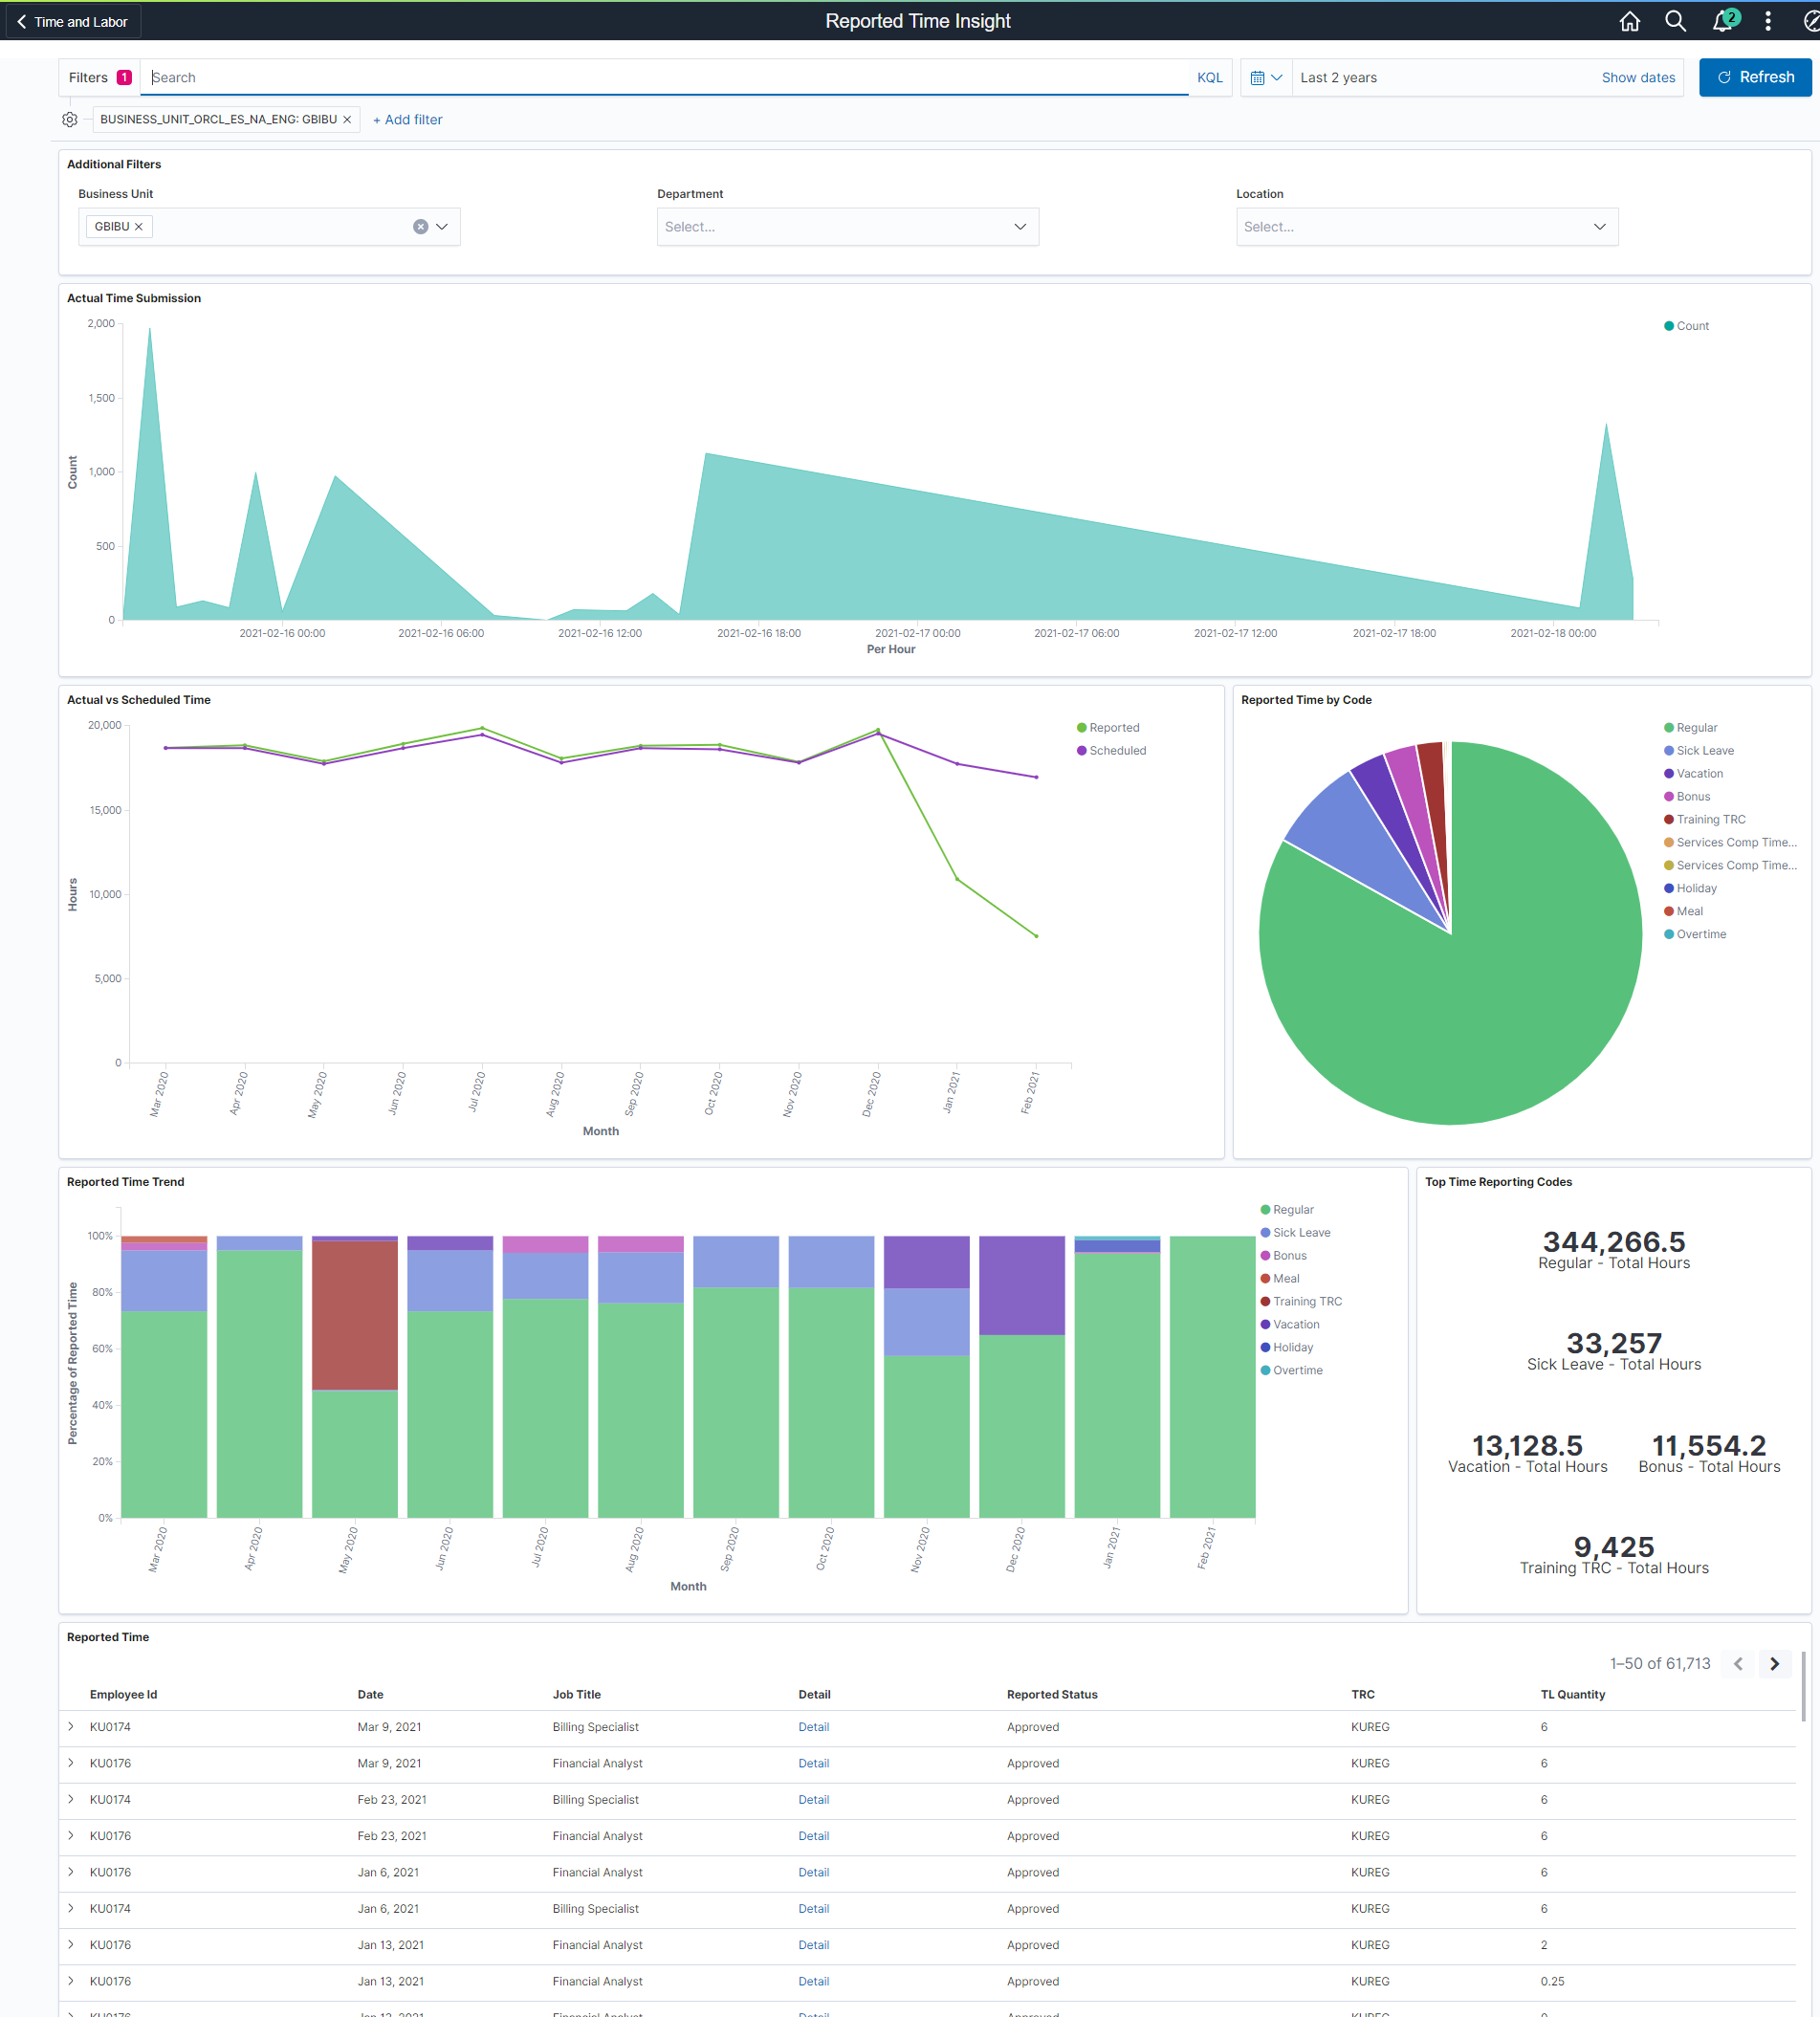
Use the Actual Time Submission visualization to view the submitted count of time with respect to the hours. It shows instantly the time is submitted.
This example illustrates the fields and controls on the Actual Time Submission.
This will only display the data for the last seven days rolling period.
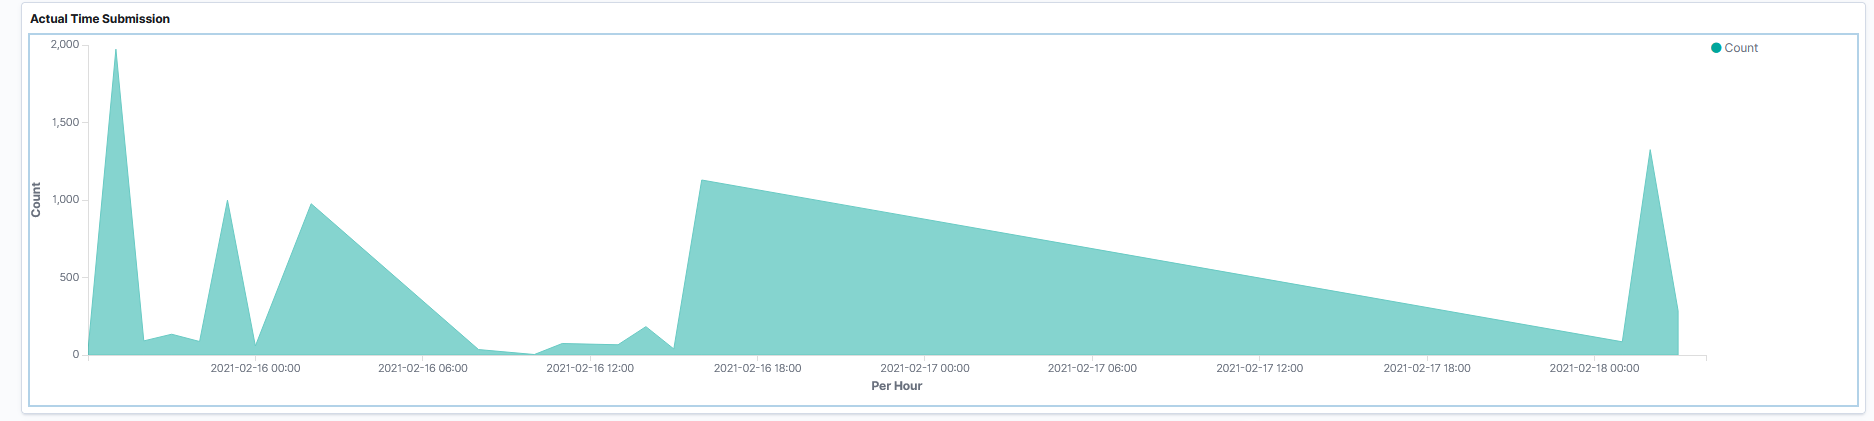
Actual Vs Scheduled Time Visualization
Use Actual Vs Schedule Time visualization to view the trend of reported and scheduled time and identify if employees follow the schedule.
You can compare actual hours worked to scheduled number of hours for reported and scheduled time.
This example illustrates the fields and controls on the Actual Vs Scheduled Time.
The legends represent the Reported and Scheduled Time in different colour. This displays the data for last one year rolling period which include last completed month and do not include data from the current running month.
Note: As a pre-requisite for fetching scheduled data, the scheduled search index needs to be built.
Reported Time by Code
Use the Reported Time by Code to view the analytics for reported time distributed to different time reporting codes.
This example illustrates the fields and controls on the Reported Time by Code.

You can hover the mouse at any place on the pie chart to view the information of Time Reporting Code.
Note: The above mentioned visualization have a filter to restrict the results to the top ten values.
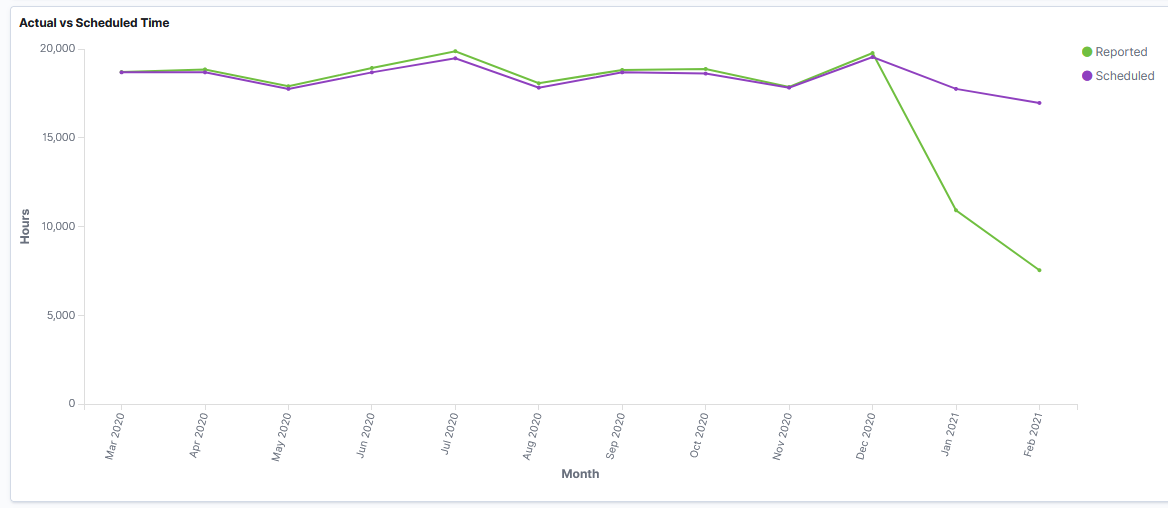
Reported Time Trend Visualization
Use Reported Time Trend visualization to view the trend of percentage of Reported Time by the time reporting code by month.
This example illustrates the fields and controls on the Reported Time Trend.
The time reporting code distributions display in different colours as you chose it from the legends. The data loaded is for the last 12 months.
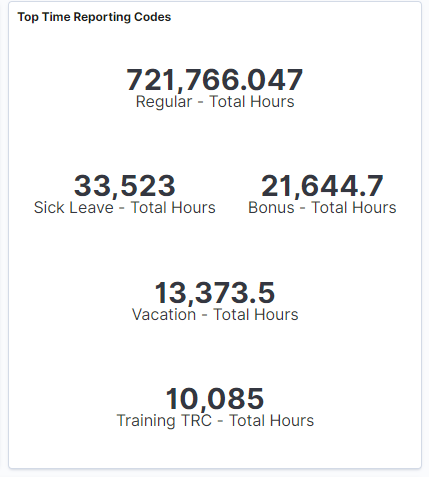
Top Time Reporting Codes
Use Top Time Reporting Codes visualizations to overall hours reported by employees.
This example illustrates the fields and controls on the Top Time Reporting Codes.
Reported Time Details
Use Reported Time details grid to view the employee details and related information.
This example illustrates the fields and controls on the Reported Time Details. You can find definitions for the fields and controls later on this page.
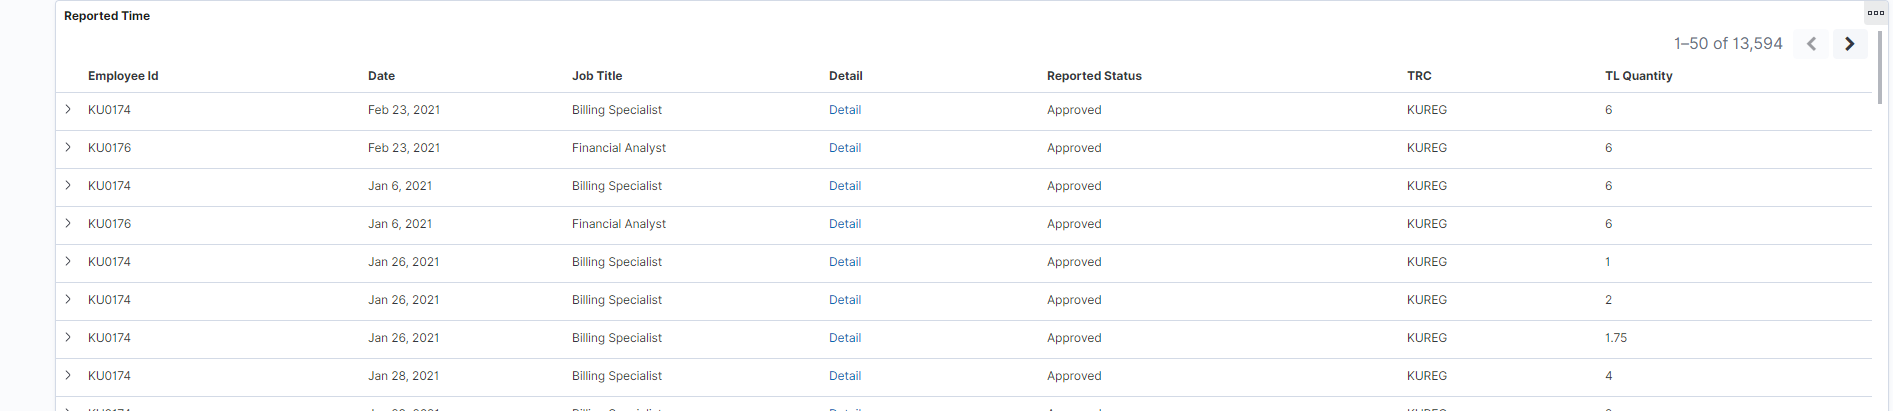
Reported Time details is the list of information which is presented based on user needs. This is customizable according to the need of the user.