3 Upgrade Planning
Caution:
For vSTP-related deployments, it is not allowed to do any adding/updating/deleting of configuration until the upgrade is completed on all sites and accepted.Note:
Be aware that once the upgrade starts and OAM level servers are on different releases than different sites, OAM level provisioning data is not replicated to sites that have not been upgraded. After the upgrade is completed, replication from OAM level server is restored and upgraded servers start receiving provisioning data.
Refer to Automated Site Upgrade section for details and limitations/solutions while planning upgrade cycles.There are some limitations with upgrading the DC server in a C-level server group that are upgraded in a group of servers, for example, DA-MP, vSTP MP(s). While manually upgrading, ensure the DC server is not upgraded in the first upgrade cycle of the C-Level servers in its server group. Identify the DC server using Appendix N and Identify the DC server. In all cases, regardless of the number of cycles used to upgrade the DA-MP/vSTP server group, the DA-MP leader/vSTP MP leader should be the last server upgraded. By upgrading the MP leader last, the number of leader changes is minimized during the upgrade.
You can access the DA-MP leader by navigating to the Diameter Maintenance, then DA-MPs, and then Peer DA-MP Status active SOAM, where MP Leader = Yes. Also, check for the MP leader on the vSTP. This is done on the active SOAM CLI.
- From the MMI command using the REST Client for the vSTP configuration. Navigate to Main Menu, then MMI Guide to access the user guide.
- Use the /vstp/mpleader MO. The result is the host name of the MP leader server.
Note:
If the Alarm 31149 - DB Late Write Nonactive appears on the screen, ignore it. This alarm does not have any effect on functionality.3.1 Data Required for Upgrade
- Target-release application ISO image file or target-release application media
- The capability to log into the network OAM servers with administrator privileges
- User logins, passwords, IP addresses, and other administration information. For more details, see Table 3-1
- VPN access to the customer’s network is required if that is the only method to log in to the OAM servers.
Note:
All logins into the DSR NOAM servers are made using the external management VIP unless otherwise stated.3.1.1 Application ISO Image File
DSR-8.6.0.7.0_96.34.0.isoNote:
Before the execution of this upgrade procedure, it is assumed that the DSR ISO image file has already been delivered to the customer’s premises. The ISO image file must reside on the local workstation used to perform the upgrade, and any user performing the upgrade must have access to the ISO image file. If the user performing the upgrade is at a remote location, it is assumed the ISO file is already available before starting the upgrade procedure.The ISO is deployed as part of the pre-upgrade activities in Table 4-1.
3.1.2 Logins, Passwords, and Server IP Addresses
Table 3-1 Logins, Passwords, and Server IP Addresses
| Item | Description |
|---|---|
| Target Release | Target DSR Upgrade Release |
| Credentials | GUI Admin Username |
| GUI Admin Password | |
| DSR admusr Password | |
| DSR Root Password | |
| VPN Access Details | Customer VPN Information (if needed) |
| NOAM | XMI VIP address |
| NOAM 1 XMI IP Address | |
| NOAM 2 XMI IP Address | |
| SOAM | XMI VIP address |
| SOAM 1 XMI IP Address ( Site 1) | |
| SOAM 2 XMI IP Address (Site 1) | |
| PCA (DSR) Spare System OAM&P server – Site 1 Spare in Site 2, XMI IP Address | |
| SOAM 1 XMI IP Address ( Site 2) | |
| SOAM 2 XMI IP Address ( Site 2) | |
| PCA (DSR) Spare System OAM&P server – Site 2 Spare in Site 1, XMI IP Address | |
| Binding SBR Server Groups | Binding SBR SR1 Server Group Servers (Site 1) |
| Binding SBR SR2 Server Group Servers (Site 1) | |
| Binding SBR SR3 Server Group Servers (Site 1) | |
| Binding SBR SR4 Server Group Servers (Site 1) | |
| PCA MP Server Group | PCA MP Server Group Servers (Site 1) |
| PCA MP Server Group Servers (Site 1) | |
| IPFE Server Groups(For PDRA) | PCA IPFE A1 Server Group Server (Site 1) |
| PCA IPFE A 2 Server Group Server (Site 1) | |
| PCA IPFE B 1 Server Group Server (Site 1) | |
| PCA IPFE B 2 Server Group Server (Site 1) | |
| Binding SBR Server Groups | Binding SBR SR1 Server Group Servers (Site 2) |
| Binding SBR SR2 Server Group Servers (Site 2) | |
| Binding SBR SR3 Server Group Servers (Site 2) | |
| Binding SBR SR4 Server Group Servers (Site 2) | |
| PCA MP Server Group | PCA MP Server Group Servers (Site 2) |
| IPFE Server Groups (For PCA) | |
| PCA IPFE A2 Server Group Server (Site 2) | |
| PCA IPFE B 1 Server Group Server (Site 2) | |
| PCA IPFE B 2 Server Group Server (Site 2) | |
| vSTP MP Server Group | vSTP MP server(s) |
| Software | Target Release Number |
| ISO Image (.iso) file name | |
|
Misc |
Miscellaneous additional data |
3.1.2.1 Expired Password Workaround Procedure
3.1.2.1.1 Inhibit Password Aging
- An upgrade is in progress.
- The NOAMs have been upgraded, but one or more sites have not been upgraded.
- A login password has expired on a non-upgraded site.
Once the workaround is enacted, no passwords expire at that site. Remove the workaround once the site is upgraded.
3.1.2.1.2 Enable Password Aging
Active SOAM CLI: SSH to Active SOAM Server. Re-enable Password Aging.
3.1.2.1.3 Password Reset
Active NOAM CLI: SSH to Active NOAM Server. Reset the Password
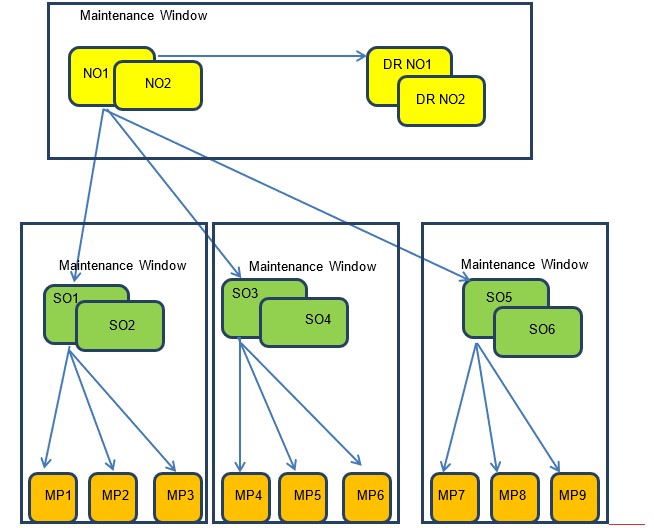
3.2 Upgrade Maintenance Windows
Figure 3-1 Upgrade Maintenance Windows for 3-Tier Upgrade

Note:
Mated SOAM sites must be upgraded in separate maintenance windows.3.2.1 Calculating Maintenance Windows
You can calculate the number of maintenance windows required for DSR setup and upgrade using the Maintenance Window Analysis Tool. For more information, see Maintenance Window Analysis Tool . It takes setup details as input from the user and accordingly calculates the number of maintenance windows required for upgrade. The spreadsheet also specifies in detail which servers need to be upgraded in which maintenance window. Complete DSR upgrade maintenance window details and timings can be found in Maintenance Window Analysis Tool.
3.3 Site Upgrade Methodology
- Auto Site Upgrade
- Auto Server Group Upgrade
- Manual Upgrade
Figure 3-2 Select Site Upgrade Methodology

Again, Auto Server Group Upgrade is not for all customers or all configurations. The manual upgrade method gives maximum control to the customer and can be used for all configurations. The users can utilize a combination of upgrade methods to upgrade a given site to maximize efficiency with customer peace of mind. The following table is a checklist for determining which upgrade method meets the needs of the customer while ensuring compatibility with the DSR configuration. Upon completion of the checklist, a recommended upgrade method is identified.
Table 3-2 Traffic Analysis Checklist
| Criteria | Yes/No | Notes | |
|---|---|---|---|
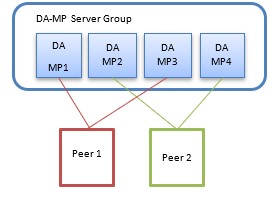
| 1 | Do any of the site’s DA-MPs have fixed diameter
connections to any peer node, similar to this depiction? |
Automated Site Upgrade and Automated Server Group Upgrade, by default, do not consider fixed peer connections when selecting servers to upgrade. It is possible that all DA-MPs servicing a given peer (such as DA-MPs 1 and 3) could be upgraded simultaneously, thereby isolating the peer. For this reason, analyze the generic upgrade plan generated by the Automated Site Upgrade and Auto Server Group Upgrade carefully to ensure all DA-MPs servicing a given peer are not upgraded simultaneously. If the generic plan has the DA-MPs upgrading simultaneously, you must rearrange the upgrade and/or add cycles as necessary to develop a suitable plan. If yes, proceed to Rearrange Automated Site Upgrade Cycles to rearrange or add cycles for ASU or proceed to step 7 for a manual upgrade. If no, continue with step 2. |
|
| 2 |
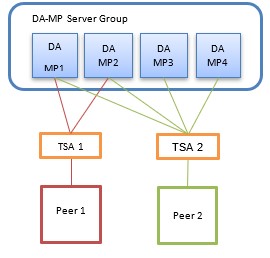
If peer nodes are configured via IPFE TSAs, are there any TSAs that are not distributed across all DA-MPs, similar to this depiction?  |
Automated Site Upgrade and Automated Server Group Upgrade, by default, do not consider non-uniformly distributed TSAs when selecting servers to upgrade. It is possible that all DA-MPs servicing a given TSA (such as DA-MPs 1 and 2) could be upgraded simultaneously, thereby isolating the peer. For this reason, analyze the generic upgrade plan generated by the Automated Site Upgrade and Auto Server Group Upgrade carefully to ensure all DA-MPs servicing a given TSA are not upgraded simultaneously. If the generic plan has the DA-MPs upgrading simultaneously, you must rearrange the upgrade and/or add cycles as necessary to develop a suitable plan. If yes, proceed to Rearrange Automated Site Upgrade Cycles to rearrange or add cycles for ASU or proceed to step 7 for a manual upgrade. If no, continue with step 3. |
|
| 3 |
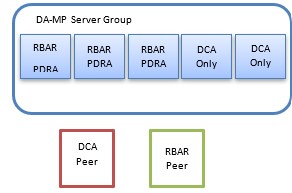
Do any of the site’s DA-MPs have specialized distribution of DSR features, similar to this depiction?  |
Automated Site Upgrade and Automated Server Group Upgrade, by default, do not consider non-uniform distribution of features when selecting servers to upgrade. It is possible that all DA-MPs hosting a given feature (such as DCA) could be upgraded simultaneously, thereby eliminating service functionality. For this reason, analyze the generic upgrade plan generated by the Automated Site Upgrade and Auto Server Group Upgrade carefully to ensure all DA-MPs hosting a given feature are not upgraded simultaneously. If the generic plan has the DA-MPs upgrading simultaneously, you must rearrange the upgrade and/or add cycles as necessary to develop a suitable plan. If yes, proceed to Rearrange Automated Site Upgrade Cycles to rearrange or add cycles for ASU or proceed to step 7 for manual upgrade. If no, continue with step 4. | |
| 4 | Automated Site Upgrade is a candidate for this system. Automated Site Upgrade supports 50% minimum server availability by default. A general option allows availability percentage settings of 66% or 75%. Is 50%, 66%, or 75% server availability during upgrade acceptable to the customer? |
In general, a higher minimum availability setting increases the time required to upgrade a site. On the other hand, a lower minimum availability may reduce operational redundancy during the upgrade. If none of the minimum availability options are acceptable, Automated Site Upgrade should not be used to upgrade the site. If yes, continue with step 6. If no, proceed to step 7. |
|
| 5 | Is the customer comfortable with minimum user intervention (that is, user input) during the upgrade? | Once initiated, Automated Site Upgrade requires no additional user input to complete the upgrade. User control is limited to canceling the site upgrade task. If yes, Automated Site Upgrade is the recommended upgrade method. If no, proceed to step 7. | |
| 6 | Automated Server Group Upgrade is a candidate for this system. Is the customer comfortable with the level of control afforded by the Automated Server Group upgrade? | Auto Server Group upgrade allows the user to initiate the upgrade of each server group, while the individual servers within the server group upgrade automatically. If yes, Auto Server Group upgrade is the recommended upgrade method. If no, proceed to step 7. | |
| 7 | A manual upgrade affords the maximum level of control
over upgrade sequencing. With this method, the upgrade of each server is
individually initiated, allowing the user to control the level of
parallelism and speed of the upgrade.
Note: A site upgrade can include a combination of Automated Server Group upgrade and manual upgrades to improve efficiency. For example, SBRs can be upgraded with Automated Server Group upgrade, while the DA-MPs may be upgraded manually to control the order of upgrade for traffic continuity. |
A manual upgrade is the recommended upgrade method. |
3.3.1 DA-MP Upgrade Planning
Note:
If complete site upgrade is selected with 0% availability, then DA-MP upgrade planning is not required.Table 3-3 is an aid to laying out the sequence of the DA-MP upgrades, taking into consideration configuration and traffic continuity. This worksheet must be completed by the customer and provided to Oracle if Oracle personnel are performing the upgrade. It is highly recommended that the worksheet be completed for customer-driven upgrades as well.
Customers need to perform an analysis of the diameter application and connection configurations to assess any potential traffic loss due to the DA-MP upgrade. Complete the worksheet, specifying the order in which the DA-MPs will be upgraded, and which MPs, if any, can be upgraded in parallel.
The worksheet is divided into four upgrade Cycles. Each cycle represents an upgrade period during which one or more servers are upgraded. Distributing the DA-MPs servers over two or more cycles, takes advantage of parallels, thereby reducing the time required to upgrade the entire server group. To achieve 50% server availability, half of host names would be listed in Cycle 1 while the other half would be listed in Cycle 2, requiring two upgrade cycles. Similarly, 75% availability can be achieved by spreading the host name over all four cycles.
In all cases, regardless of the number of cycles used to upgrade the DA-MP/vSTP server group, the DA-MP leader/vSTP MP leader should be the last server upgraded. By upgrading the MP leader last, the number of leader changes is minimized during the upgrade.
- Navigate to Main Menu, then MMI Guide to access the MMI user.
- Use the the /vstp/mpleader MO to obtain the host name of the MP Leader server.
Note:
If needed, the users can upgrade DA-MPs serially, in which case, all host names would be listed in cycle 1. List the DA-MPs in the order in which they will be upgraded.Table 3-3 DA-MP Upgrade Worksheet
| Host Names | ||||
|---|---|---|---|---|
| Upgrade Cycle 1 or Serial Upgrade | ||||
| Upgrade Cycle 2 | ||||
| Upgrade Cycle 3 | ||||
| Upgrade Cycle 4 | ||||
3.3.2 Pre-upgrade Validation
Note:
This procedure resolves the inter-connectivity issue between the old-DC and non-DC MP at the time of upgrade for the BUG 27428669.3.3.3 Maintenance Window 1 for NOAM Site Upgrades
In the first maintenance window, the NOAM servers are upgraded .
|
Maintenance Window 1 (NOAM Sites) Date: Note: You can view the form in DSR NOAM GUI by clicking Configuration, then Network Elements. |
Record the Site NE Name of the DSR NOAM to be upgraded during Maintenance Window 1 in the space provided below. Verify if the upgrade is completed for the following servers: DR Standby NOAM (Guest): DR Active NOAM (Guest): Primary Standby NOAM (Guest): Primary Active NOAM (Guest): |
3.3.4 Maintenance Window 2 for SOAM Site Upgrades and Rest of the Servers
During Maintenance Window 2, all servers associated with the first SOAM site are upgraded. All servers associated with the second SOAM site are upgraded during Maintenance Window 3. For DSRs configured with multiple mated-pair sites, or DSRs having multiple, distinct sites (for example, georedundant PCA installations), copy and use the following form for the subsequent SOAM site upgrades.
Caution:
It is recommended that mated-pair SOAM sites are not upgraded in the same Maintenance Window.| Maintenance Window | Steps |
|---|---|
| SOAM Sites
Date: |
Standby SOAM (Guest): Active SOAM (Guest): |
| DA-MP 1:
DA-MP 2: DA-MP 3: DA-MP 4: DA-MP 5: DA-MP 6: DA-MP 7: DA-MP 8: DA-MP 9: DA-MP 10: DA-MP 11: DA-MP 12: DA-MP 13: DA-MP 14: DA-MP 15: DA-MP 16: |
|
| IPFE1:
IPFE 2: IPFE 3: IPFE 4: |
|
|
Binding Server Group 1 Standby SBR: Active SBR: Spare SBR 1 (Mate): Spare SBR2 (Mate): (If equipped) Binding Server Group 2 Standby SBR: Active SBR: Spare SBR 1 (Mate): Spare SBR2 (Mate): (If equipped) Binding Server Group 3 Standby SBR: Active SBR: Spare SBR 1 (Mate): Spare SBR2 (Mate): (If equipped) Binding Server Group 4 Standby SBR: Active SBR: Spare SBR 1 (Mate): Spare SBR2 (Mate): (If equipped) Binding Server Group 5Standby SBR: Active SBR: Spare SBR 1 (Mate): Spare SBR2 (Mate): (If equipped) Binding Server Group 6 Standby SBR: Active SBR: Spare SBR 1 (Mate): Spare SBR2 (Mate): (If equipped) Binding Server Group 7 Standby SBR: Active SBR: Spare SBR 1 (Mate): Spare SBR2 (Mate): (If equipped) Binding Server Group 8 Standby SBR: Active SBR: Spare SBR 1 (Mate): Spare SBR2 (Mate): (If equipped) |
|
| Session Server Group 1
Standby SBR: Active SBR: Spare SBR1 ( Mate): Spare SBR2 ( Mate): (If equipped) Session Server Group 2 Standby SBR: Active SBR: Spare SBR1 ( Mate): Spare SBR2 ( Mate): (If equipped) Session Server Group 3Standby SBR: Active SBR: Spare SBR1 ( Mate): Spare SBR2 ( Mate): (If equipped) Session Server Group 4Standby SBR: Active SBR: Spare SBR1 ( Mate): Spare SBR2 ( Mate): (If equipped) Session Server Group 5Standby SBR: Active SBR: Spare SBR1 ( Mate): Spare SBR2 ( Mate): (If equipped) Session Server Group 6Standby SBR: Active SBR: Spare SBR1 ( Mate): Spare SBR2 ( Mate): (If equipped) Session Server Group 7Standby SBR: Active SBR: Spare SBR1 ( Mate): Spare SBR2 ( Mate): (If equipped) Session Server Group 8Standby SBR: Active SBR: Spare SBR1 ( Mate): Spare SBR2 ( Mate): (If equipped) |
|
|
vSTP MP Server Group vSTP MP(s): (If equipped) |
3.3.5 IDIH Preupgrade
If IDIH is a component of a Network Element, it should be upgraded only after DSR is upgraded. However, note that certain compatibility limitations may exist while the two components (DSR and IDIH) are not on the compatible release. The IDIH upgrade procedures are provided in IDIH Upgrade at a Site and may be performed at any time after adding the Mediation and Application OVAs as described in IDIH Upgrade Preparation.