Creating Manual Payments
To set up your auto-numbering for manual payments, use the Auto Numbering component (AUTO_NUM_PNL).
|
Page Name |
Definition Name |
Usage |
|---|---|---|
|
AUTO_NUM_PNL |
Define automatic numbering specifications for manual payments using the Manual Payment Creation component. |
|
|
AP_MAN_SEL |
Enter criteria to build the manual payment worksheet. |
|
|
AP_MAN_ENTRY |
Enter manual payment information. |
|
|
AP_MAN_APPLY |
Apply scheduled vouchers to the manual payment. |
|
|
APD_DELETE_WS |
Delete manual payment worksheets. |
Use the Auto Numbering page (AUTO_NUM_PNL) to define automatic numbering specifications for manual payments using the Manual Payment Creation component.
Navigation:
Field or Control |
Description |
|---|---|
Number Type |
Create a number type to automatically increment the manual payment worksheet ID for the creation of manual payments. This worksheet number is shared with manual draft payment worksheets. |
Use the Manual Pay Selection (manual payment selection) page (AP_MAN_SEL) to enter criteria to build the manual payment worksheet.
Navigation:
This example illustrates the fields and controls on the Manual Pay Selection page. You can find definitions for the fields and controls later on this page.

Enter the bank code and account information.
Field or Control |
Description |
|---|---|
Remit SetID, Remit Supplier and Supplier Location |
Enter the SetID, remit supplier ID, and supplier location for the supplier to whom you remit the manual payment. When you build the worksheet, the system returns eligible scheduled payments with the same supplier information. Note: If financial sanctions validation is enabled and the supplier has a financial sanctions status of Review or Blocked, the system displays a warning message that the supplier selected is currently under financial sanctions review. The system does not allow you to create a manual payment for this supplier. |
Payment Currency |
Enter a currency for the manual payment. |
Match Currency |
Select if you want the system to return scheduled payments with the same payment currency. If you do not select this option, the system returns all eligible scheduled payments for the remit supplier, regardless of their payment currency and converts them to the selected supplier's currency. |
Withholding Calculated |
Select for the manual payment worksheet functionality to only return those vouchers for the remit supplier that have had withholding calculated (meaning, those vouchers for which withholding has been calculated at voucher posting time and have been posted). If this check box is not selected, all vouchers for the remit supplier are available on the manual payment worksheet excluding all paid payment schedules and vouchers that are set to have withholding calculated at voucher posting and have not yet been posted. The Withholding tab on the Manual Pay Worksheet - Apply Voucher page displays whether the voucher is withholding applicable and whether withholding has been calculated. |
You can use the fields in the Optional Criteria group box to limit the vouchers that the system returns. For example, you can limit the search to vouchers with the same pay to bank or to vouchers with specific scheduled pay dates.
Field or Control |
Description |
|---|---|
Pay to Bank Number |
Enter a supplier bank number for the system to return eligible vouchers whose schedule payments have the same supplier pay to bank. |
Scheduled Pay From Date and Scheduled Pay To Date |
Use these fields to limit the search to eligible vouchers whose scheduled pay dates falls within given date range. |
When you click the Build Worksheet button, the system uses the information entered here to return a list of eligible voucher scheduled payments that you can apply to the manual payment. Once a worksheet is built, you can remove it using the Delete Payment Worksheet page.
Note: If financial sanctions validation is enabled, the system validates the supplier against financial sanctions lists (for example, the SDN list) upon clicking the Build Worksheet button. The system updates the supplier's financial sanctions status on the Supplier Information component (VNDR_ID). The system does not allow you to build a worksheet for a supplier with a financial sanctions status of Review or Blocked. However, if financial sanctions validation is enabled at the bank level and you no longer validate for a particular supplier's bank, the system may allow you to create a manual payment worksheet for a supplier with a financial sanctions status of Review.
See Understanding Financial Sanctions Validation.
Note: Only scheduled voucher payments that are regular vouchers, registered vouchers, reversal vouchers, third-party vouchers, or adjustment vouchers are returned for application to manual payments.
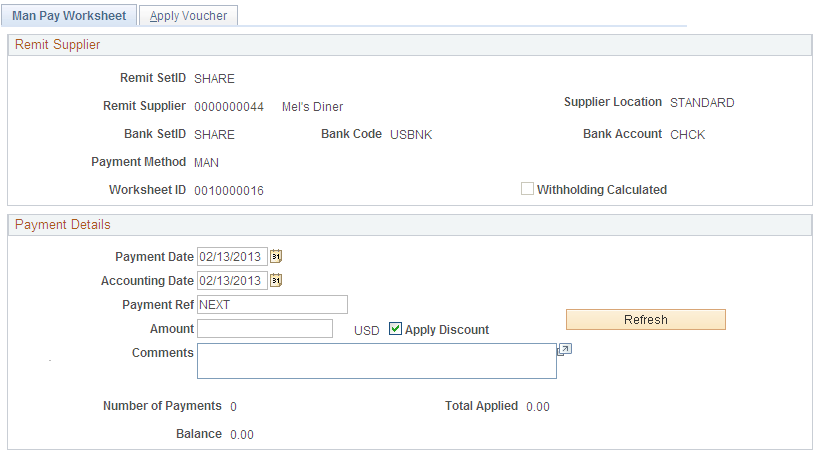
Use the Man Pay Worksheet (manual payment worksheet) page (AP_MAN_ENTRY) to enter manual payment information.
Navigation:
Click the Build Worksheet button on the Manual Pay Selection page
This example illustrates the fields and controls on the Man Pay Worksheet page. You can find definitions for the fields and controls later on this page.
Field or Control |
Description |
|---|---|
Payment Date |
Enter the actual payment date, for example, the date that you wrote the manual check. |
Document Sequencing |
Click this link to access document sequencing information. This link only appears if document sequencing is enabled. The document type and journal type are viewable at any time, but the document sequence number and document sequence date are updated only when the payment is created in PAYMENT_TBL. |
Accounting Date |
Displays the posting date. You can override this value. |
Payment Ref (payment reference) |
Defaults to NEXT and the system generates a new number at save time based on the next sequential number in the bank account. You can manually override this entry with a numeric value. The system validates it at save time. |
Amount |
Enter the manual payment amount. |
Apply Discount |
Select for the system to check the discount date against the creation date of the manual payment. If the scheduled payment for the voucher qualifies for the discount, the Paid Amount field on the Apply Voucher page displays the discount amount for the scheduled payment instead of the gross amount. |
Refresh |
Click to calculate the total applied and balance amounts, check for discount situations and update the voucher list on the Apply Voucher page. |
Number of Payments |
Displays the number of scheduled payments currently applied to this manual payment. |
Total Applied |
Displays the total amount of the scheduled payments currently applied to this manual payment. |
Balance |
Displays the difference between the manual payment amount and the total amount of the applied scheduled payments. Note: The manual payment is only created in the PAYMENT_TBL when the balance is 0.00, that is, when the payment is fully applied to scheduled payments. Otherwise, only the manual payment worksheet is saved. |
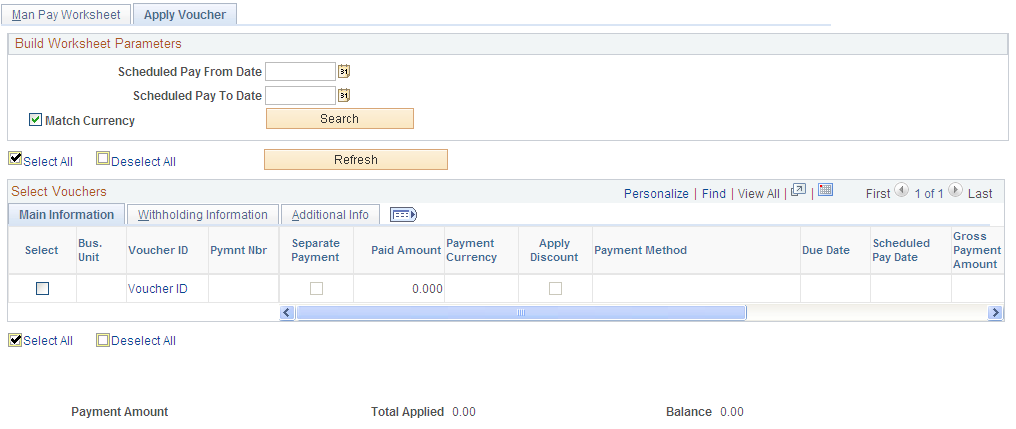
Use the Apply Voucher page (AP_MAN_APPLY) to apply scheduled vouchers to the manual payment.
Navigation:
Click the Build Worksheet button on the Manual Pay Selection page.
This example illustrates the fields and controls on the Apply Voucher page. You can find definitions for the fields and controls later on this page.
Note: Multiple views of this page are available by clicking the tabs in the scroll area.
Common Page Information
Field or Control |
Description |
|---|---|
Scheduled Pay From Date, Scheduled Pay To Date, and Match Currency |
These fields have the same functionality as on the Manual Pay Selection page. Use them to further limit the vouchers that appear based on the payment date range and currency of the payment. |
Payment Amount |
Displays the payment amount currently entered on the Man Pay Worksheet page. |
Total Applied |
Displays the total amount of the scheduled payments currently applied to this manual payment. |
Balance |
Displays the difference between the manual payment amount and the total amount of the applied scheduled payments. Note: The manual payment is only created in the PAYMENT_TBL when the balance is 0.00, that is, when the payment is fully applied to voucher scheduled payments. Otherwise, only the manual payment worksheet is saved. |
Main Information Tab
Select the Main Information tab.
Field or Control |
Description |
|---|---|
Select |
Select this check box to individually select scheduled payments and then click the Refresh button to apply the manual payment and recalculate the total applied and balance amounts. Once you select the scheduled payments, they are placed on hold even if you do not fully apply and create the manual payment. Click the Search button in the Build Worksheet Parameters group box to take them off hold. |
Bus Unit (business unit) |
Displays the business unit of the selected payments. |
Voucher ID |
Displays the voucher ID of the selected payments. Click any of the voucher IDs listed to access the Voucher Inquiry page for that voucher. |
Pymnt Nbr (payment number) |
Displays the number of the scheduled payment. If there are multiple scheduled payments for a voucher, they each have a unique payment number. |
Separate Payment |
Indicates the option you selected on the Payments page in the Voucher component. You can select a scheduled payment that has Separate Payment enabled. However, you cannot select any other scheduled payments along with this one. The system displays an error message if you try to do this. |
Paid Amount |
Displays the actual payment amount and currency of the scheduled payment; this can be either the gross or discount amount. Note: If you selected the Apply Discounts check box on the Manual Payment Worksheet page, and if the scheduled payment is eligible for the discount, this field displays the discount amount instead of the gross amount. |
Apply Discount |
Indicates whether or not you selected the Apply Discounts check box on the Manual Payment Worksheet page. |
Payment Method |
Displays the payment method for the scheduled payment. |
Due Date |
Displays the net due date of the scheduled payment. |
Scheduled Pay Date |
Displays the scheduled due date of the scheduled payment. |
Gross Payment Amount |
Displays the gross amount of the scheduled payment. |
Transaction Currency |
Displays the transaction currency of the scheduled payment. |
Discount |
Displays the discount amount of the scheduled payment. |
Discount Due Date |
Displays the discount due date of the scheduled payment. |
Withholding Information Tab
Select the Withholding Information tab.
In addition to the select, business unit, voucher number, and payment number fields, this tab displays:
Field or Control |
Description |
|---|---|
Withholding Applicable |
Displays whether or not a voucher is withholding applicable. |
Withholding Calculated |
Displays whether or not a voucher has had withholding calculated, for example at voucher post. If you select a voucher which is withholding applicable but has not had withholding calculated, the system does not physically withhold for the voucher. Instead it creates withhold transactions based on the amount paid or amount subject to withholding for reporting purposes only. In other words the voucher is treated as 0% withholdable. This ensures that the paid amount is reported for withholding. Note: For suppliers that require physical withholding, a withholding amount is not withheld. |
Additional Information Tab
Select the Additional Information tab.
In addition to the select, business unit, voucher number, and payment number fields, this tab displays:
Field or Control |
Description |
|---|---|
Bank and Account |
Displays the bank and type of bank account from which the scheduled payment is being created. |
Pay to Bank Number |
Displays the remit supplier's bank number, if you entered one on the Manual Pay Selection page. |
Bank Account # (bank account number) |
Displays the bank account number. |
IBAN |
Displays the international bank account number (IBAN) in addition to the local, domestic bank account number when the country has been set up to display the IBAN on the IBAN Formats page. |
Do Not Mix BU (do not mix business unit) |
Select to restrict your voucher selection to only those vouchers with the same PeopleSoft Payables business unit as the payment that you are creating. |
Use the Delete Payment Worksheet page (APD_DELETE_WS) to delete manual payment worksheets.
Navigation:
This example illustrates the fields and controls on the Delete Payment Worksheet page. You can find definitions for the fields and controls later on this page.

Enter the criteria to display selected payments.
Note: Manual payments will not be available for deletion if the payment has already been fully applied to a voucher. You must first cancel the payment before you can delete the payment.
Main Information Tab
Select the Main Information tab.
Field or Control |
Description |
|---|---|
Select |
Select this check box to individually select manual payments and then click the Delete button to delete the manual payment. |
Displays the bank information, remit supplier, and payment amount associated with the manual payments.
Additional Information Tab
Select the Additional Information tab.
Displays the worksheet and payment date information.