Journaling Payments Directly to the General Ledger
|
Page Name |
Definition Name |
Usage |
|---|---|---|
|
Regular Deposit - Payments Page |
PAYMENT_DATA2 |
Provide detailed information for each payment in a regular deposit and flag payments for direct journaling. See Selecting Payments for Direct Journaling. See the Regular Deposit - Payments Page for more information. |
|
AR_DJ_COPY |
Create direct journal copies. |
|
|
PAYMENT_MISC_DST |
Create or change accounting entries for payments that are to be journaled directly. |
|
|
PAYMENT_MISC_DST_I |
Review directly journaled payments that have been marked Complete. Also, change the Complete status to Incomplete. You can run the Budget Processor process to budget-check direct journal payments. |
|
|
TAS and BETC Details Page |
AR_TAS_MISC_SEC |
(USF) Review transaction classification details used for federal reporting. See Direct Journal Payments - Accounting Entries Page for more information. |
|
UNPOST_DIRJNL |
Unpost payments that have been directly journaled. |
Payments that do not correspond to items can bypass the cash application process. Such payments are often called miscellaneous cash receipts or non-AR cash. In the PeopleSoft system, they are referred to as directly journaled payments because you can create accounting entries for them without applying them to any item.
If you create a regular deposit and journal the cash directly to the general ledger and need to reverse the journal entry, you can enter a negative payment in the Regular Deposit component (PAYMENT_ENTRY) and then journal that payment to the general ledger.
You can also unpost the directly journaled payment using the Unpost Direct Journals component (UNPOST_MISC_PAY), and then journal the positive payment to the general ledger.
This documentation discusses how to:
Select payments for direct journaling.
Create or correct accounting entries for direct journal payments.
Review and modify accounting entries for direct journal payments.
Integrate with PeopleSoft Project Costing.
Field or Control |
Description |
|---|---|
|
Click the Budget Check icon to run the Budget Processor Application Engine process (FS_BP). |
|
Click the Budget Check Options icon to bypass a budget-checking error. |
|
Click the Document Sequencing icon to enter document-sequencing information. |
 (Budget Check)
 (Budget Check Options)
 (Document Sequencing)
Use the Regular Deposit - Payments page (PAYMENT_DATA2) to provide detailed information for each payment in a regular deposit and flag payments for direct journaling.
Navigation:
Field or Control |
Description |
|---|---|
Journal Directly |
Select to create direct journal payments only for the payment. |
Customer ID |
Enter a customer ID to associate the direct journal payment with a customer. If you enter a customer ID, you can inquire on the direct journal payment by using a customer ID. Note: This field is available only if you selected the Track Direct Journal Customer check box on the Installation Options - Receivables page. The payment does not update the customer balance. |
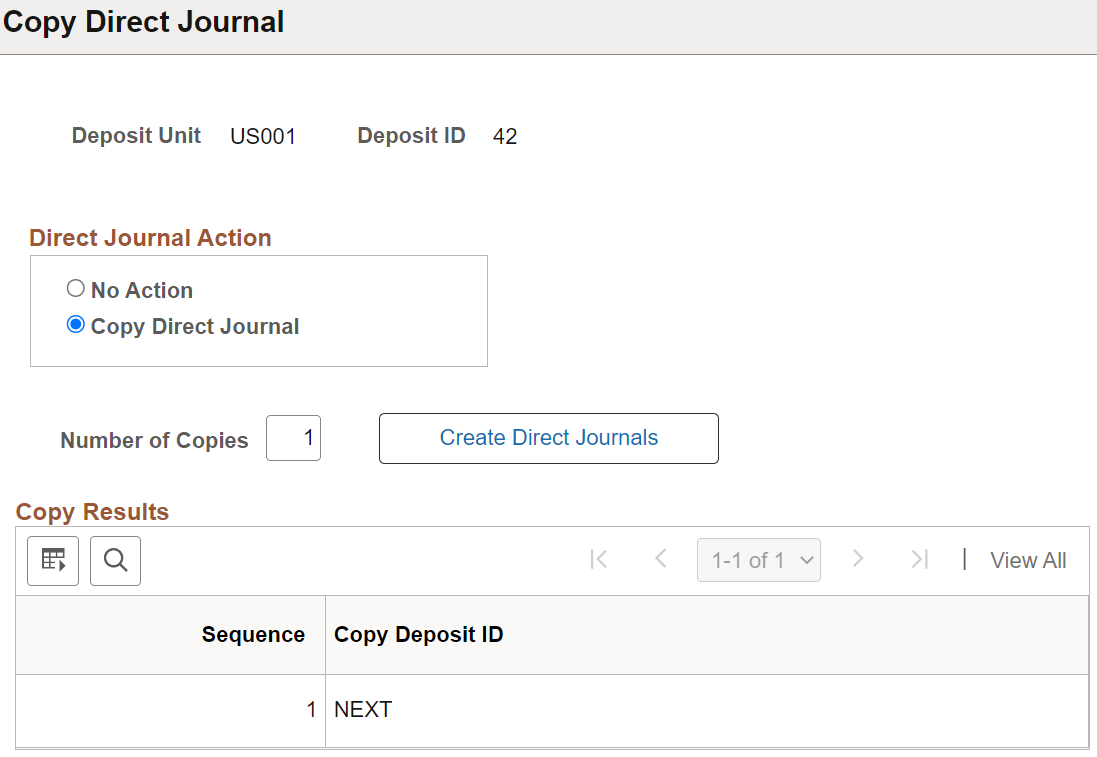
Use the Copy Direct Journal page (AR_DJ_COPY) to copy a direct journal. User needs to have permission lists EPAR0000 and EPAR4000 to access the Copy Direct Journal page.
The criteria for the eligible copy from direct journal are the following:
All the payments in the deposit must be Direct Journal payment.
The deposit does not contain unposted Direct Journal.
Deposit status is balanced.
Navigation:
This example illustrates the fields and controls on the Copy Direct Journal page. You can find definitions for the fields and controls later on this page.
|
Field or Control |
Description |
|---|---|
|
Direct Journal Action |
Select an action from the following available options:
|
|
Number of Copies |
Enter the number of copies required. Default value is 1 and the maximum number allowed is 99. |
|
Create Direct Journals |
Click to populate the Copy Results grid with number of rows based on the specified number of copies. Click Save to create the new Deposit ID based on the last Deposit ID value of the deposit BU on the Receivable Option page. |
|
Go to Direct Journal Acctg Entries |
Click to access the Direct Journal Accounting Entries page for the new Deposit ID. The link is enabled only when you click the Save button. |
If copy from deposit contains more than one direct journal payments, then all the payments in the deposit are copied over. The copied direct journal deposit/ payment accounting date will be the current date.
When you copy a completed Direct Journal, the copied Direct Journal is reset to the state it was before being marked as completed.
The following table data from the existing Direct Journal deposit/payment is copied to the new deposit/payment(s).
DEPOSIT_CONTROL
PAYMENT
PAY_MISC_DST
PAYMENT_ID_CUST (When Track Direct Journal Customer is selected on the AR installation, or Use Direct Journal Reference is selected on the Receivables Option page).
PAYMNET_ID_ITEM (When Use Direct Journal Reference is selected on the Receivables Option page).
Use the Direct Journal Payments - Accounting Entries page (PAYMENT_MISC_DST) to create or change accounting entries for payments that are to be journaled directly.
If you use the Commitment Control option, use it to run the Budget Processor process.
Navigation:
This example illustrates the fields and controls on the Direct Journal Payments - Accounting Entries page. You can find definitions for the fields and controls later on this page.

Field or Control |
Description |
|---|---|
|
Click the Create icon to create the cash line for a direct journal payment. |
|
Click the Delete icon to delete journal lines. |
Inbound IPAC |
Select this check box if you want to be able to select this transaction for inbound IPAC processing. This field is displayed only if the IPAC check box is selected in the AR installation options and the customer is identified as a federal customer. Deselect this check box if the transaction was incorrectly selected for inbound IPAC processing. |
TAS and BETC Details |
Click to review the Treasury Account Symbol and BETC code on the TAS and BETC Details page (AR_TAS_MISC_SEC). See (USF) Reclassifying Receivables Accounting Entries, Direct Journal Accounting Entries, and Open Items for more information. The TAS and BETC values are available on the distribution lines by selecting the CTA check box on the Installation Options - Receivables Page. The TAS and BETC are derived using the Fund Code value on the accounting line. The Fund Code is a required field when the agency is a GWA Reporter for Receivables, and you must enter a Fund Code on the accounting lines. To view the TAS and BETC values, click the TAS and BETC Details link in the Distribution Lines grid on each accounting line. For CTA processing, Entry Events should be set up as required for Receivables. The system defaults the BETC based on the TAS value only when there is just one BETC code defined for Collections. When more than one collection BETC is defined, you select the BETC code from a dynamic prompt based on the TAS code. |
 (Create)
 (Delete)
This section discusses how to:
Create accounting entries.
Budget-check the entries.
Resolve budget-checking errors.
Creating Accounting Entries
To create accounting entries:
Enter ChartField values for the revenue line.
Note: If you set up speed types for ChartFields, click the Speed Type button and select a speed type code. The system automatically supplies the General Ledger ChartField values defined by the speed type.
In the Line Amount field, enter the credit amount for the revenue account.
Note: If you are journaling a negative payment, enter a debit amount.
Click the Create button to create the line that records the cash.
The system supplies the ChartField values using either the AR - Cash or DIT - Cash ChartFields that you defined for the bank account on the External Accounts page. It uses the DIT - AR ChartFields only if you selected the Dep in Transit (deposit in transit) check box for the bank account.
Project ChartFields other than Project Id, such as Business Unit PC, Activity Id, and more, are inherited to the offsetting cash accounting line if the inheritance option for Project Id is set to Always Inherit. If the inheritance option for Project Id is set to Do Not Inherit, then these Project ChartFields will not be inherited.
The system calls the Centralized Inter/IntraUnit Application Engine process (IU_PROCESSOR) to create intraunit accounting entries if you enabled ChartField balancing for the ledger group and interunit accounting entries, and if you are journaling the cash to a different business unit than the deposit business unit.
Note: After you create the cash line, you cannot change the ChartField values or amounts. To change this information, click the Delete button. The system deletes the cash line and makes the revenue ChartField values available to edit.
(Optional) If you enabled the Entry Event feature, enter the Entry Event code used to generate supplemental accounting entries.
(Optional) If you enabled the Document-Sequencing feature for the PeopleSoft General Ledger business unit, click the Document Sequencing button for each line to enter document-sequencing information.
After you enter all of the accounting lines and they are in balance, select the Complete check box.
Verify the edit status on the ChartFields tab.
The status can be:
Field or Control
Description
Not Edited
You have not saved the entries.
Errors
You saved the entries, but the system did not create them because they are in error.
Complete
You created valid accounting entries.
A single error message displays for a direct journal payment if at least one payment distribution line has a ChartField combo edit error. This message instructs the user to refer to the ChartField Combo Error tab for further details about the error.
The ChartField Combo Error tab displays in the Distribution Lines grid. This tab identifies the specific fields and combination group that was used to compare against the distribution line with the error. If there are no errors, this tab does not appear.
Correct the error and select the Complete check box again. If you receive a combination edit error, you must either change the ChartField combination or modify the combination edit rules. If you receive a ChartField configuration editing error message after you mark the entries complete, you must correct the error before you save the direct journal. If you receive a warning message, you can save the direct journal without making corrections.
Note: If you must change the accounting entries after you save them and before you run the Journal Generator process, deselect the Complete check box on the Directly Journalled Payments page. Then return to the Accounting Entries page to change the entries.
Budget-Checking the Entries
If you enabled the Commitment Control feature for PeopleSoft Receivables and for the business unit, run the Budget Processor process after the accounting entries are complete. The process checks the control budget entries, updates the revenue estimate budget, and creates the commitment control journal lines.
The direct journal payments cannot be budget checked until the accounting entries are marked complete and have not received a combo edit error. The Budget Check button on the this page does not display if a combo edit error occurs when the user selects the Complete check box. The Budget Check button is displayed if the entries are marked complete and there are no errors (combo edit errors, entries out of balance errors, and so on). Also, if you encounter a combo edit error and run the budget processor from the Budget Processor page for direct journals, the process does not pick up the transaction until the combo edit error has been corrected.
To budget-check the entries:
Click the Budget Check button to run the Budget Processor process.
The system displays a warning message if transactions passed budget checking but receive a warning status.
Note: You can also run the Budget Processor process for direct journal payments from the Directly Journalled Payments page or from the Budget Processor page.
When the Budget Processor process is complete, verify the budget status for the entire payment and also for each line on the Budget tab.
The status can be:
Field or Control
Description
Error
The entry failed to pass budget checking.
Not Chk'd (not checked)
The Budget Processor process has not processed the entry.
Valid
The entry passed budget checking and the process created the journal line in the ledger.
Warning
The Budget Processor process issued a warning, which indicates that the control budget did not have sufficient funds. However, it passed budget checking because the commitment control option for the control budget is set to Tracking w/ Budget (tracking with budget) or Tracking w/o Budget (tracking without budget) on the Control Budget Options page. The control budget might also be over the budget amount, but under the tolerance amount. This warning applies only to individual lines.
The default budget date is the accounting date for the current transaction. You can change the budget date, but Oracle recommends that you do not.
Resolving Budget-Checking Errors
Transactions typically fail the budget-checking process because the amount of the source transactions exceeds the amount in the control budget. If this occurs, you have two options:
Increase the revenue estimate budget amount.
Flag the direct payment journal to bypass budget checking.
An entry could also fail because you provided a revenue account that is not in the revenue estimate budget.
To resolve budget-checking errors:
Do one of the following procedures:
To bypass budget checking for entries in error, click the Budget Check Options button to open the Commitment Control page.
Then select the Override Transaction check box and Save the page.
You must have authority to override budget checking.
If you entered an invalid revenue account, delete the accounting entries and enter them again using a different revenue account.
Run the Budget Processor process again.
Note: Be sure and Save the page before running the Budget Processor process again so that so that Journal Generator will pick up the direct journal.
Use the Directly Journalled Payments page (PAYMENT_MISC_DST_I) to review directly journaled payments that have been marked Complete.
Also, change the Complete status to Incomplete. You can run the Budget Processor process to budget-check direct journal payments.
Navigation:
This example illustrates the fields and controls on the Directly Journalled Payments page. You can find definitions for the fields and controls later on this page.
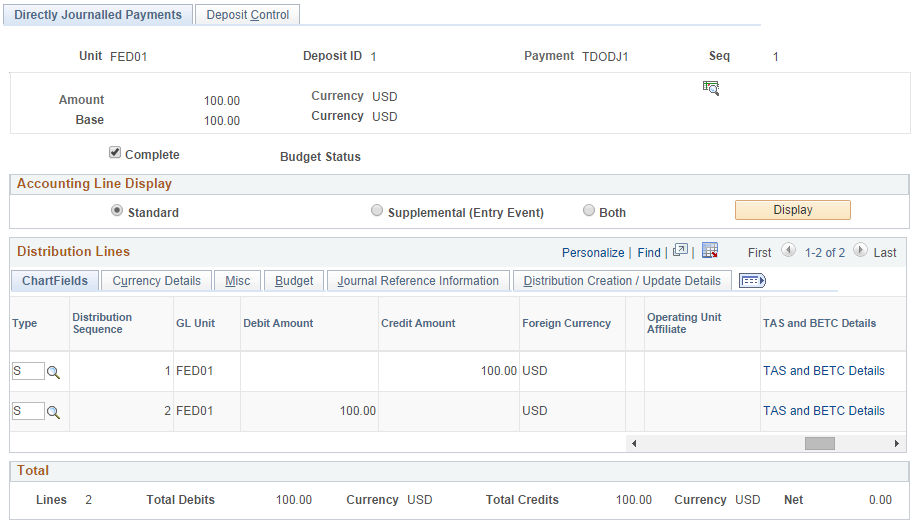
This page is similar to the Accounting Entries page in the Pending Items component.
If you have not run the Budget Processor process and you have enabled commitment control for PeopleSoft Receivables and the business unit, you can run it from this page and review the results.
If a budget entry fails because you provided a revenue account that is not in the revenue estimate budget, you need to delete the accounting entries and enter them again using a different revenue account.
Field or Control |
Description |
|---|---|
Complete |
Deselect to delete and change the accounting entries for the payment. Then access the Accounting Entries page to make the changes. Important! If you deselect the Complete check box and commitment control records exist for this direct journal, they will be deleted. The system will only delete commitment control exception records, because at this point you can only deselect the check box for transactions that have not been budget checked or have failed budget checking. |
Accounting Line Display |
Specify the types of accounting entries that should appear, and then click Display. Values are Standard, Supplemental (Entry Event), and Both. Supplemental accounting entries are available only if you entered an entry event code on the Accounting Entries page. |
Type |
Indicates the type of accounting entries: S for Standard. E for Supplemental. |
Credit Amount and Debit Amount |
If the system displays the debits and credits separately, the Credit Amount and Debit Amount fields display the amounts in the base currency of the business unit. If you selected the Display Separate Debit/Credit in Subsystem check box on the Operator Preferences - Overall page, the debit amount or the credit amount and currency appear for each accounting line. Otherwise, the Line Amount field appears for each line. |
TAS and BETC Details |
Click to review the Treasury Account Symbol and BETC code on the TAS and BETC Details page (AR_TAS_MISC_SEC). See (USF) Reclassifying Receivables Accounting Entries, Direct Journal Accounting Entries, and Open Items for more information. |
Use the Unpost Direct Journal Page (UNPOST_DIRJNL) to unpost payments that have been directly journaled.
Navigation:
This example illustrates the fields and controls on the Unpost Direct Journal page.
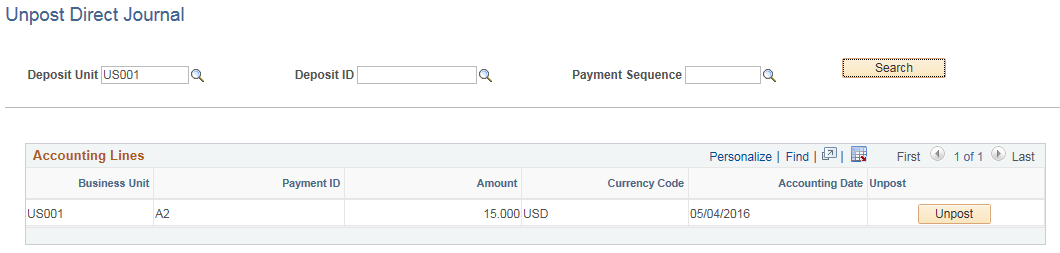
Search for direct journals that have already been posted, by deposit unit, deposit ID, and payment sequence. The results appear in the Accounting Lines grid.
Field or Control |
Description |
|---|---|
Unpost |
Click this button to create a new unpost activity and new distribution lines for each item that is unposted. You can then create a new deposit and select the option to journal the payment directly. |
To unpost a direct journal payment:
On the Unpost Direct Journal page, enter search parameters and click the Search button.
The results show deposits for which a direct journal has been posted.
Click the Unpost button for the payment you would like to unpost.
On the Direct Journal Review secondary page, check the budget status. The budget status must be Valid or the entries must be balanced. The Budget Check icon is only visible if Commitment Control is enabled for Receivables and the business unit.
Click OK to unpost the direct journal payment and create a positive payment.
If you want to post the new deposit to the general ledger, run the Journal Generator process.
Note: When you unpost a direct journal payment, the payment status changes to ‘Unposted DJ’ and the deposit becomes unavailable.
When you enter a Direct Journal in PeopleSoft Receivables and create the accounting entries, the system marks the direct journal as ready to distribute to PeopleSoft Project Costing. It does this by setting the PC_DISTRIB_STATUS field in the Miscellaneous Payments table (PS_PAY_MISC_DST) to N (none).
When you run the Revenue Adjustments Application Engine process (PC_AR_TO_PC) in PeopleSoft Project Costing, the process copies this information from PeopleSoft Receivables into PeopleSoft Project Costing and updates the Miscellaneous Payments table to D (done). The PC_AR_TO_PC process will only pick up direct journals that have been marked complete and have a valid budget header status, if commitment control is applicable for that transaction. It will not pick up InterUnit or IntraUnit accounting lines.
On the direct journal create accounting entries page, use the prompt on the Analysis Type field to select a valid analysis type for direct journals. Valid analysis groups and analysis types must be set up in Project Costing ().