Setting Up General Information Tables
To set up general information tables, use the following components:
Event Category (FO_EVENT_CATEGORY)
Manage Teams (FO_SVC_GROUP_PG)
Replace Group Team Member (FO_TEAM_REPLACE_PG)
Process Group Team Member (RUN_TEAM_REP_PG)
Billing Calculation (FO_JOB_BILLING)
Job Titles (FO_JOBTITLE)
Event Types (FO_EVENT_TYPE)
Contact Type Codes (CONTACT_TYPE_CODE)
Contact Events (FO_EVENT_CONT_TYPE)
Process Events (FO_EVENTS_PROC)
Event Lists (FO_EVENT_LIST)
Form Items (TEMPLATE_ITEM_TBL)
Forms (FO_TEMPLATE_TABLE)
Email Templates (FO_EMAIL_TMPL)
Affiliate Suppliers (AFFL_VENDOR)
Order Priority (RS_SO_PRIORITY)
Resource Priorities (FO_RSRC_PRIORTY)
Salutation Table (SALUTATION_TABLE)
Attachments (ATTACHMENT_TBL)
Auto Numbering (AUTO_NUM_PNL)
Auto Numbering by Installation (AUTO_NUM_INSTALL)
Qualification Profile (RS_RESRC_TEMPLT)
Task Categories (RS_TASK_TYPE)
Test Configuration Details (FO_TEST_CFG_DTL)
Sales Data Ranges (FO_SALES_DATA)
Search Criteria Configuration (FO_SRCH_CRIT_CFG)
Source Records (FO_SC_SRC_RCDS_SEC)
Mass Change Types (FO_MC_TYPE)
Contract Rates Non Compliance Reasons (FO_MCR_REASON)
You can use the pages described in this topic to set up the tables and processing rules that PeopleSoft Staffing Front Office will employ to process information entered into the Order, Applicant, Employee, Customer, and Assignment components.
This topic discusses how to set up general information tables.
|
Page Name |
Definition Name |
Usage |
|---|---|---|
|
FO_EVENT_CATEGORY |
Define event categories. |
|
|
FO_SVC_GROUP_PG |
Create teams and add users to the team. |
|
|
FO_TEAM_REPLACE_PG |
Specify the outgoing user ID and their replacement user ID, along with the date the change is effective. Also displays a history of processed replacements. |
|
|
RUN_TEAM_REP_PG |
Process team member replacements. The AppEngine process changes only the Service Operators and teams and Event Assignments records. It will not update events that have already been assigned to team members. |
|
|
FO_JOB_BILLING |
Define default values for pay grades and the margin rates at which an order is profitable. |
|
|
FO_JOBTITLE |
Define job title codes. |
|
|
Contact Type Code |
CONTACT_TYPE_CODE |
|
|
FO_EVENT_CONT_TYPE |
Define a list of marketing events in which you want to include the contacts. |
|
|
FO_EVENTS_PROC |
Define process events that contain one or more sub-events. |
|
|
FO_EVENT_CAT_CMP |
Define event categories which are used as filters on the Review Agenda/History page. |
|
|
FO_EVENT_TYPE |
Define events for the agenda, history, recruiting funnel, and event group functions. |
|
|
FO_EVENT_LIST |
Define which events and their sequence for each event list. |
|
|
TEMPLATE_ITEM_TBL |
Define items that will appear on your forms. |
|
|
FO_TEMPLATE_TABLE |
Group form items into a form. |
|
|
FO_EMAIL_TMPL |
Create email templates to be used to send mail from pages in the application. |
|
|
FO_ROLE_TEMPL |
Assign different templates to a role on this page. |
|
|
AFFL_VENDOR |
Define affiliate suppliers that you might use to fill orders for temporary work if all of your resources are busy on assignments. This component should only be used by customers who have PeopleSoft Staffing Front Office without PeopleSoft Pay/Bill Management. |
|
|
Supplier Phone Information Page |
VENDOR_PHONE_SEC |
Enter phone information for affiliate suppliers. |
|
RS_SO_PRIORITY |
Define the relative priority of orders. |
|
|
FO_RSRC_PRIORTY |
Define the relative priority of resources. |
|
|
Salutation Table |
SALUTATION_TABLE |
Define the salutations or greetings that you want to use in your system. |
|
ATTACHMENT_TBL |
Define the types of attachments that you want the system to accept. |
|
|
AUTO_NUM_PNL |
Define automatic numbering specifications for customers, contacts and affiliate suppliers. |
|
|
Auto Num Install (Auto Number Install) |
AUTO_NUM_INSTALL |
Set up automatic numbering specifications by installation for agenda, history, and applicant IDs. |
|
RS_RESRC_TEMPLT |
Create or update qualification profiles for personal use. |
|
|
RS_TASK_TYPE |
Create task categories. At least one task category needs to be created for staffing assignments if you configure the Staffing Installation options to populate the Resource Calendar when assignments are created. |
|
|
FO_TEST_CFG_DTL |
Create test configuration details. The test configuration details enable users to do combination searches in PeopleMatch and PeopleSearch by specifying both a test ID and a test score as part of the search criteria. |
|
|
FO_SALES_DATA |
Create sales data ranges for use in defining customers. |
|
|
FO_SRCH_CRIT_CFG |
Identify search criteria for assignment mass rate changes. |
|
|
FO_SC_SRC_RCDS_SEC |
Define source records for the search criteria configuration. |
|
|
FO_MC_TYPE |
Define mass change types. |
|
|
Contract Rates Non-compliance Reasons |
FO_MCR_REASON |
Define reasons for not using the rates determined by a customer's master contract. |
|
Pending Applicant Template |
FO_PNDG_TEMP_PG |
Create pending applicant templates. |
|
Hot List Categories |
FO_APLHT_SETUP_PG |
Define categories for the Hot List pagelets. Users can also define categories on the Staffing - User Preferences page. |
Use the Manage Teams page (FO_SVC_GROUP_PG) to add user IDs to teams and assign events to each team member.
Navigation:
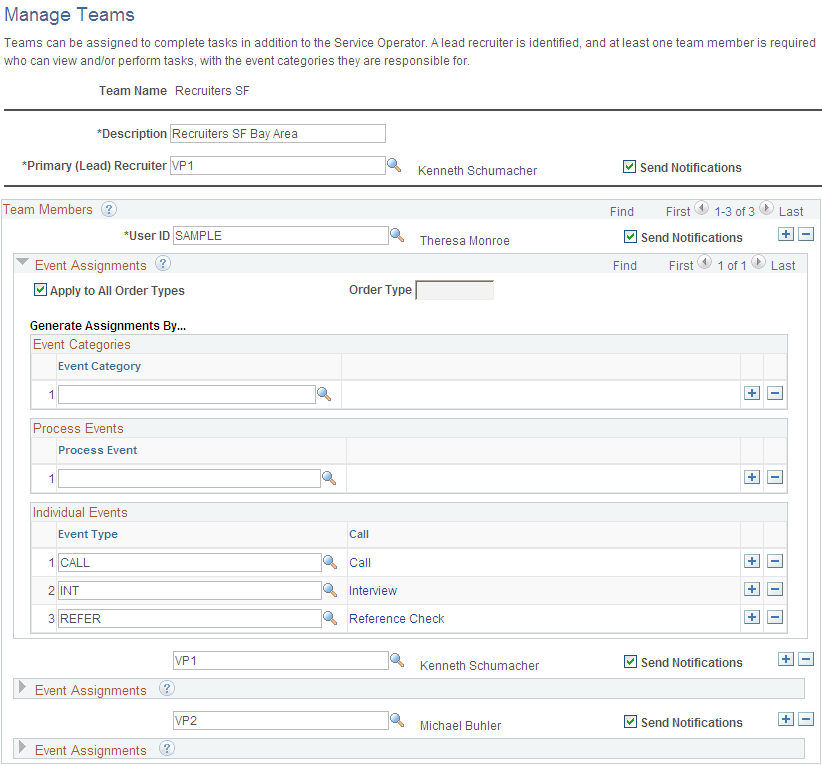
This example illustrates the fields and controls on the Manage Teams Page. You can find definitions for the fields and controls later on this page.
Field or Control |
Description |
|---|---|
Primary (Lead) Recruiter |
Enter the user ID of the team leader. This is a required field. The Primary (Lead) Recruiter can also be in the Team Members grid, even though they are marked as primary, then they can also be assigned responsibility to specific event categories, process events, and individual events. |
Team Members
Field or Control |
Description |
|---|---|
User ID |
Enter the ID for each team member. |
Apply to All Order Types |
Select this check box, to apply the data entered in the level 1 scroll. If cleared, multiple rows for multiple order types are allowed. Note: Each customer can be assigned one or more order types. Each customer order type can be associated with an event list. This means that each customer could have many different event lists available, if they are assigned to many order types. |
Order Type |
If you do not select the Apply to All Order Types check box, you can select individual order types to apply to this user ID. |
Generate Assignments By |
You can enter event data for each team member: Event Categories: Group of events. Event category is the highest level. All events under this category are assigned to individual team members, no matter if it is and individual event or a process event. Process Events: Group of events that typically usually must be performed in order to consider the process complete. It is the second level. All events belonging to a process event are assigned to individual team members. Individual Events: Single events. It is the lowest level. Note: Process Events override Categories; Individual Events override Categories, and Process Events override Individual Events. If a Process Event is assigned to a team member, then this assignment overrides any Category assignment. Example: Team member1 is assigned to Category 1 and Team Member2 is assigned Process Event1. If Process Event1 falls under category 1, Events automatically created for Process Event1 will be assigned to team member2. If an Individual Event is assigned to a team member, then this assignment overrides any category assignment . Example: Team member1 is assigned category 1 and team member2 is assigned Event1. If Event1 falls under category1, Events automatically created for Event1 will be assigned to team member2. If both, a Process Event and an Individual Event (within that process event) are assigned to two different team members, then the Process Event overrides Individual event, if in same event list. Example: Team member1 is assigned Process Event1 (which event 2 is a sub-event of), and team member2 is assigned event 2. Events automatically created for Process Event1 will be assigned to team member1. If any data is missing such that the system cannot determine who is assigned this task, the system will assign it to the Primary (Lead) Recruiter as the default. |
Note: When the system creates task assignments and assigns users to those tasks, if any data is missing such that the system cannot determine who is assigned to this task, the system only displays the task in theTeam Agenda Pagelet and no one will be assigned to it.
Use the Replace Team Members page (FO_TEAM_REPLACE_PG) to specify an outgoing used ID and their replacement user ID, along with the date that the change is effective. Also displays a history of processed replacements.
Navigation:
This example illustrates the fields and controls on the Replace Team Members page.

Pending Tab
Specify the outgoing user ID and their replacement user ID, along with the date to commit the change.
Completed Tab
After rows in the Pending tab are processed by the Process Team Member Replacements AppEngine program, the rows will appear in this tab. This tab retains a history of replaced user ID’s unless you elect to delete the history.
Field or Control |
Description |
|---|---|
Delete History |
Select this check box for each row you want to delete from this page. Once saved, the next time the AppEngine process is run to process new replacements; any rows marked for deletion are deleted from this record. |
Use the Process Team Replacements page (RUN_TEAM_REP_PG) to process the team member replacements specified on the Replace Team Members Page.
Navigation:
This Application Engine FO_REPLACE_AE processes team member replacements and applies changes to only the team member and event assignment records. It does not update events that have already been assigned to team members.
To update events that have already been assigned to team members, use the Review Agenda/History Page, and use the Change Assigned To field in the Available Actions for Selected Items section.
Use the Billing Calculation page (FO_JOB_BILLING) to define default values for pay grades and the margin rates at which an order is profitable.
Navigation:
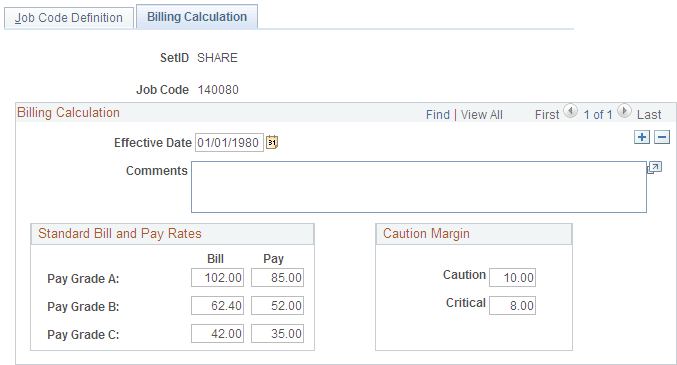
This example illustrates the fields and controls on the Billing Calculation page. You can find definitions for the fields and controls later on this page.
Billing Calculation
Field or Control |
Description |
|---|---|
Effective Date and Comments |
Enter the date that the job code rates and margins are effective and any comments. Note: This effective date is independent of the effective date for the job code on the Job Code Definition page. |
Standard Bill and Pay Rates
Field or Control |
Description |
|---|---|
Bill and Pay |
Enter values for the pay grades that will display on the Orders - Billing page. You can use this information to determine the appropriate rates. |
Standard Margins
Field or Control |
Description |
|---|---|
Caution and Critical |
Enter the margin percentages at which an order is not profitable. The system uses this entry for a calculation in the Order and Assignment components. Color-coded symbols signal the profitability of the order. A margin that falls below the specified caution margin displays a yellow symbol; a margin that falls below the critical margin displays a red symbol. |
Use the Job Category and Related Titles page (FO_JOBTITLE) to define job title codes.
Navigation:
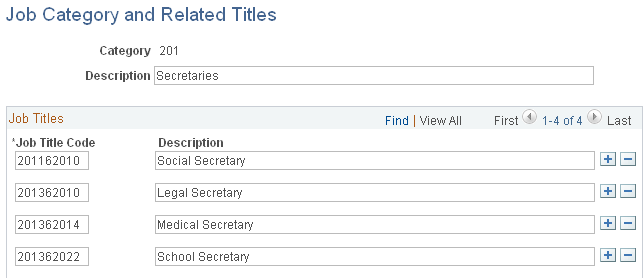
This example illustrates the fields and controls on the Job Category and Related Titles page. You can find definitions for the fields and controls later on this page.
Field or Control |
Description |
|---|---|
Category |
Displays a three-character job title category. |
Job Title Code and Description |
Enter a unique code for the job title and enter a description. |
Use the Event Categories page (FO_EVENT_CATEGORY) to define event categories. Multiple event types can be assigned to event categories. Event categories are used as filters on the Review Agenda/History page and define which events are displayed on the My Agenda pagelet.
Navigation:
This example illustrates the fields and controls on the Event Categories Page. You can find definitions for the fields and controls later on this page.

Field or Control |
Description |
|---|---|
Sequence number |
This field is no longer used and will be removed in a future release. |
Use the Event Types page (FO_EVENT_TYPE) to define events for the agenda, history, recruiting funnel, and event group functions.
Navigation:
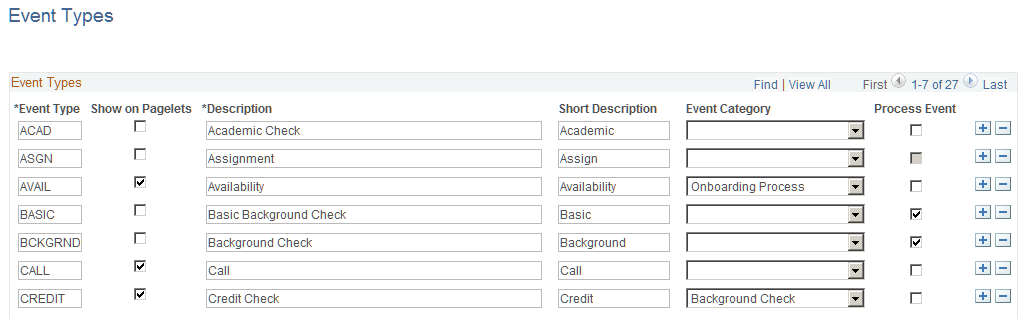
This example illustrates the fields and controls on the Event Types Page. You can find definitions for the fields and controls later on this page.
Field or Control |
Description |
|---|---|
Event Type and Description |
Enter a unique code to identify an event type, and then enter a description. |
Show on Pagelets |
Select to indicate that the event type should appear on Agenda pagelets. |
Event Category |
Select an event category to be associated to each event type. More than one event type can be associated with an event category. This is an optional step. |
Process Event |
Select to indicate that this event type is part of a process. When this check box is selected, the sub-events below the process event inherit the category that is assigned to the process event, regardless of whether the individual event is assigned to a different category in this grid. This mean that the process event category overrides the individual event category. |
Warning! You can modify or add event types to this list. However, do not change the following events: CALL, OFFER, and FALL.
Use the Process Events page (FO_EVENTS_PROC) to set up the events within a process event.
Navigation:
This example illustrates the fields and controls on the Process Events page. You can find definitions for the fields and controls later on this page.
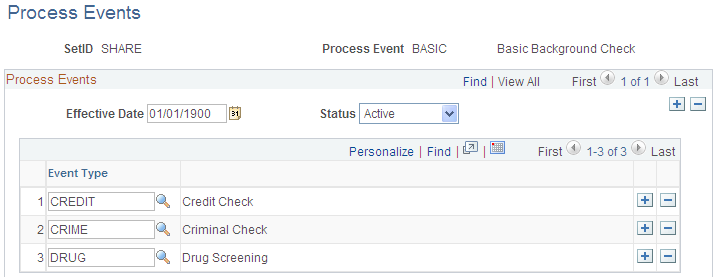
Both the process event and the related sub-events need to be pre-defined on the Event Type page and have the Process Event check box selected. The sub-events cannot be defined as process events.
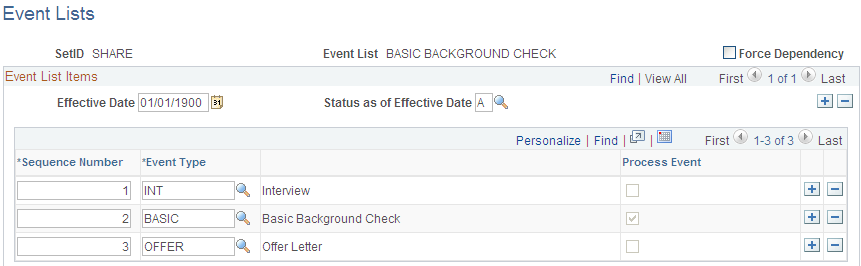
Use the Event Lists page (FO_EVENT_LIST) to set up a series of events that must occur during the application and hiring process. The lists can be effective dated and activated or inactivated. Also, you can force the sequence of the events so that each event cannot be attempted until the previous event is completed.
Navigation:
This example illustrates the fields and controls on the Event Lists page. You can find definitions for the fields and controls later on this page.
Field or Control |
Description |
|---|---|
Force Dependency |
Indicates that the previous event, in the event list, must be completed before a candidate can proceed to the next event. Note: This value may be set at the event level, at the customer event list, or at the order level. There is a hierarchy beginning with the event level. The value will be carried over to the customer event list. The value at the customer event list level will be carried over to the order level. You can overwrite the value defaulted from the previous level in the hierarchy. |
Status as of Effective Date |
Select either A (active) or I (inactive). |
Sequence Number |
Enter the sequence number for this event type. This sequence number is the criteria used by the Force Dependency functionality. |
Event Type |
Select an event type to be used with this event list. Note: The assignment and the hire event types (examples “ASGN” and “HIRE”) provide additional functionality. When used within the Candidate Summary page on the Recruiting Funnel, the assignment event type can automatically bring up the Assignment Header page. The hire event type can automatically bring up Applicant – Contact Information page. |
Process Event |
Identifies if this is a process event and is always read only. The system derives the value from the event type setup. |
Use the Contact Events page (FO_EVENT_CONT_TYPE) to define a list of marketing events in which you want to include the contacts.
Navigation:
Field or Control |
Description |
|---|---|
Event Contact Type |
Enter the name of the contact event. |
Contact Event Frequency |
Enter how often the event takes place, such as QUARTERLY or MONTHLY. |
Use the Form Item page (TEMPLATE_ITEM_TBL) to define items that will appear on your forms.
Navigation:
In Field Name, enter a description of the type of data you are capturing. This description can be questions or field names that will appear on the form entry pages.
Use the Form page (FO_TEMPLATE_TABLE) to group form items into a form.
Navigation:
Field or Control |
Description |
|---|---|
Effective Date |
Enter the date the form is effective. |
Status as of Effective Date |
Select the status of the form: Active or Inactive. |
Description |
Enter the name of the form. |
Sequence Number |
Enter a number to determine the order in which the form items will appear. Form items appear from the lowest to the highest number. |
Form Item |
Select the form item that you want to appear on the form. |
Use the Public Email Template page (FO_EMAIL_TMPL) to create email templates to be used to send mail from pages in the application.
Navigation:
This example illustrates the fields and controls on the Public Email Template Page. You can find definitions for the fields and controls later on this page.

Users can define email templates using a token to reference data from any field in the Component Interface (CI) except as stated below. The system will replace the reference data with the embedded variables when users click the Apply button on the Compose Mail page.
The following two cases are the exceptions:
Email Candidate or Propose Candidate button (Search Results grid) on the PeopleMatch page
Since the data in the Search Results grid on the PeopleMatch page are not saved to the database, the CI cannot extract the data (Candidate Name, Candidate email address, and Candidate resume attach ID) that belong to this grid. To resolve this problem, the system passes the Candidate email address or Candidate Name and Candidate resume attach ID from the Order component to the Compose Mail component. The system administrator defines the email template using a token to reference data from any field in the CI and the variables %CandidateEmailAddr, %CandidateName, and %Attach. These variables reference data that are passed from the Order Component. The system will replace the reference data with the embedded variables when users click the Apply button on the Compose Mail page.
Email Candidate or Propose Candidate button (Search Results grid or Considering grid) on the PeopleSearch page.
The search record for this component is INSTALLATION. The INSTALLATION table does not have any keys. The CI requires using the key values in the search record to retrieve the data. To resolve this problem, the system will pass the Candidate email address or Candidate Name and Candidate resume attach ID from the PeopleSearch component to the Compose Mail component. The system administrator defines the Email Template using the variables %CandidateEmailAddr, %CandidateName, and %Attach. These variables reference data that are passed from the PeopleSearch component. The system will replace the reference data with the embedded variables when users click the Apply button on the Compose Mail page.
The system allows for the creation of public and private templates.
Field or Control |
Description |
|---|---|
Template ID |
The system uses autonumbering to assign a unique ID upon saving the page. |
Status |
The default value is Active. |
Description |
Enter a description for the template. |
Template Access |
Indicate whether this template is public or private. Private templates can only be used by the user creating the template. Public templates can be used by anyone with access to the Send Email page. |
From |
Enter the address originating the email. |
To |
Enter destination email addresses. |
CC |
Copy email addresses. |
BCC |
Enter blind copy email addresses. |
Subject |
Enter an email subject. |
Message Text |
Enter the body of the email. |
Attachment |
Enter email attachments. |
Component Name |
Enter the name of the component to which the template is applicable. |
Component Interface Name |
Enter the name of the CI used to extract the data from the calling component. |
Token ID |
Links to a bind reference in the email template. |
Occurs Level |
Component level in which the value to be extracted resides. |
Primary Record |
Primary record name in the rowset. |
Record Name |
Record definition containing the value to be extracted. |
Field Name |
Field within the record that contains the value to be extracted. |
Save As |
Click this button to save the template with a new name. |
The following tables lists system variables that can be used in place of tokens. For some variables, such as %CandidateEmailAddr, the use of variables is required since the information is not contained in the component.
|
Variable |
Replacement Value |
|---|---|
|
%Date |
The current system date. |
|
%EmailAddress |
The email address of the current user. |
|
%SystemEmailAddress |
A generic email address used to send anonymous emails. |
|
%Time |
The current system time. |
|
%UserDescription |
The description (if any) listed for the current user. |
|
%Signature |
The value of the Email Signature field (OPR_DEF_TBL_FO.FO_EMAIL_SIGNATURE) from the User Preferences – Staffing page for the current user. |
|
%CandidateEmailAddr(p) or %CandidateEmailAddr(all, separator) |
The email address of the candidate. Use this variable to define an Email Template for the Email Candidate (Search Results) button on the PeopleMatch or PeopleSearch page, or the Email Candidate (Considering) button on the PeopleSearch page. |
|
%CandidateName(p) or %CandidateName(all, separator) |
The name of the candidate. Use this variable to define an Email Template for the propose Candidate (Search Results) button on the PeopleMatch or PeopleSearch page, or the Propose Candidate (Considering) button on the PeopleSearch page. |
|
%Attach(p) or %Attach(all, separator) |
The resume attachment ID of the candidate. Use this variable to define an Email Template for the propose Candidate (Search Results) button on the PeopleMatch or PeopleSearch page, or the Propose Candidate (Considering) button on the PeopleSearch page. |
|
%n |
%n where n is the token number in the template definition. |
|
%n(p) |
%n(p) Where p is the row number. 0 is used for all rows. |
|
%n(all, separator) |
%n(all, ";") List all values in the scroll separated by a semi colon. |
Use the Roles and Email Templates page (FO_ROLE_TEMPL) to assign different templates to a role on this page.
Navigation:
This example illustrates the fields and controls on the Roles and Email Templates page. You can find definitions for the fields and controls later on this page.
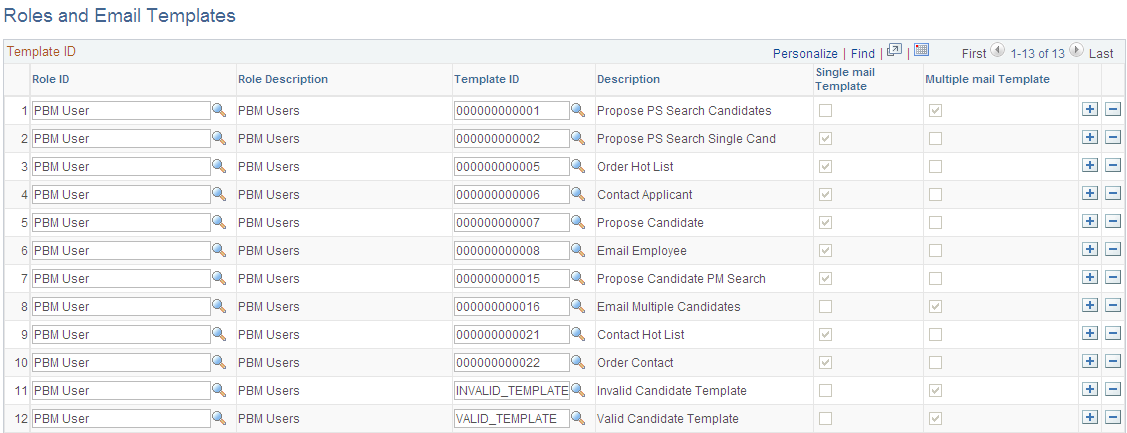
You can define a role ID to multiple templates. Select either Single mail Template or Multiple mail Template.
Use the Supplier page (AFFL_VENDOR) to define affiliate suppliers that you might use to fill orders for temporary work if all of your resources are busy on assignments.
This component should only be used by customers who have PeopleSoft Staffing Front Office without PeopleSoft Pay/Bill Management.
Navigation:
Note: If you have PeopleSoft Pay/Bill Management installed along with PeopleSoft Staffing Front Office, it is recommended that you do not make this page accessible to general users.
Field or Control |
Description |
|---|---|
Name |
Enter the supplier name. |
Federal ID |
Enter the federal tax ID of the supplier. |
Website URL |
Enter a link to the supplier's website. |
|
Click the URL button to connect to the supplier website entered to the left of the button. If you are adding a new affiliate supplier, you may have to save the page before using the URL button. |
Contact Name |
Enter the name of the contact at the supplier. |
Email ID |
Enter the contact's email address. |
|
Click the Send Email button to send an email. If you are adding a new affiliate supplier, you may have to save the page before using the Send Email button. |
Country |
Select the country where the supplier is located. Note: The system displays the address fields based on the country you select. Enter the address information after you enter the country. |
Telephone |
Click this link to enter the supplier's phone numbers. |


Use the Order Priority page (RS_SO_PRIORITY) to define the relative priority of orders.
Navigation:
Field or Control |
Description |
|---|---|
Sequence Number |
Enter a value to indicate the relative priority of orders. |
Description |
Enter a description of the priority. |
Use the Resource Priority page (FO_RSRC_PRIORTY) to define the relative priority of resources.
Navigation:
Field or Control |
Description |
|---|---|
Priority Sequence Number and Description |
Enter a value to indicate the relative priority of resources. Enter a Description as well. |
Use the Qualification Profile page (RS_RESRC_TEMPLT) to create or update qualification profiles for personal use.
Navigation:
Profile Description
Field or Control |
Description |
|---|---|
Description |
Enter a description for this profile. |
Comments |
Enter any comments to accompany the profile. |
This qualification profile is for my personal use only. Do not make this profile visible to any other users. |
Select this check box to prevent other users from being able to view your profile. |
Profile Competencies
Field or Control |
Description |
|---|---|
Competency |
Enter a competency you want the resource to possess, their Proficiency at it, its relative Importance, and the preferred Years of Work Experience you would like the resource to have using the particular competency. |
Profile Accomplishments
Select the accomplishments you want the resource to have achieved.
Field or Control |
Description |
|---|---|
Degrees |
Enter Accomplishment, Major Code, and Importance. |
Languages |
For each language, select the appropriate desired efficiency that the resource Speak, Read, and Write, and the overall Importance of their language skill. |
Licenses |
Enter theAccomplishment, Country, State, and Importance. |
Memberships |
Enter the Accomplishment and Importance. |
Use the Task Categories page (RS_TASK_TYPE) to create task categories.
At least one task category needs to be created for staffing assignments if you configure the Staffing Installation options to populate the Resource Calendar when assignments are created.
Navigation:
You must configure at least one task category and select the Use for Assignment check box. This category must be the same as the Default Task Category specified on the Staffing Installation page.
Note: The Map Time Reporting Codes group box is only to be used for PeopleSoft Resource Management, not for PeopleSoft Staffing Front Office.
Resource Schedule Categories
Field or Control |
Description |
|---|---|
Task Description |
Enter a description of the task category. |
Use for Assignment |
Select this check box if you want the system to use the task category for assignments. |
Comments |
Enter any comments relevant to the task category. |
Flexibility and Reserved Status Flexibility |
Enter a decimal value between 0 and 1 to indicate the relative possibility that a task in this task category can be moved or rescheduled. |
Map Time Reporting Codes
Field or Control |
Description |
|---|---|
SetID |
Enter the SetID to which you want to map the time reporting code. This field is used only by PeopleSoft Resource Management. It is not used by PeopleSoft Staffing Front Office. |
Time Reporting Code |
Enter the code to map to the SetID. This field is used only by PeopleSoft Resource Management. It is not used by PeopleSoft Staffing Front Office. |
Use the Test Configuration Details page (FO_TEST_CFG_DTL) to create test configuration details.
The test configuration details enable users to do combination searches in PeopleMatch and PeopleSearch by specifying both a test ID and a test score as part of the search criteria.
Navigation:
Field or Control |
Description |
|---|---|
Test ID |
Enter the ID of the test you selected. |
Pass/Fail |
Select to indicate the test result is measured through a simple pass or fail assessment. |
Range |
Select to indicate that the test results are measured via a numeric score. In the From and To fields, enter a range to define the acceptable scores for the test. |
Use the Sales Data Ranges page (FO_SALES_DATA) to create sales data ranges for use in defining customers.
Navigation:
This example illustrates the fields and controls on the Front Office Sales Data Ranges Page. You can find definitions for the fields and controls later on this page.
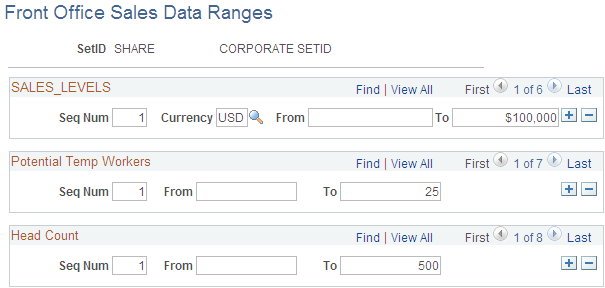
Sales Levels
Enter a range of values to use for possible sales level ranges of customers. Captures the level of sales in terms of possible revenue that will be generated by this location.
Potential Temp Workers
Enter a range of values to use for possible potential numbers of workers the customer will use at this location.
Head Count
Enter a range of values to use for possible company and location head count ranges.
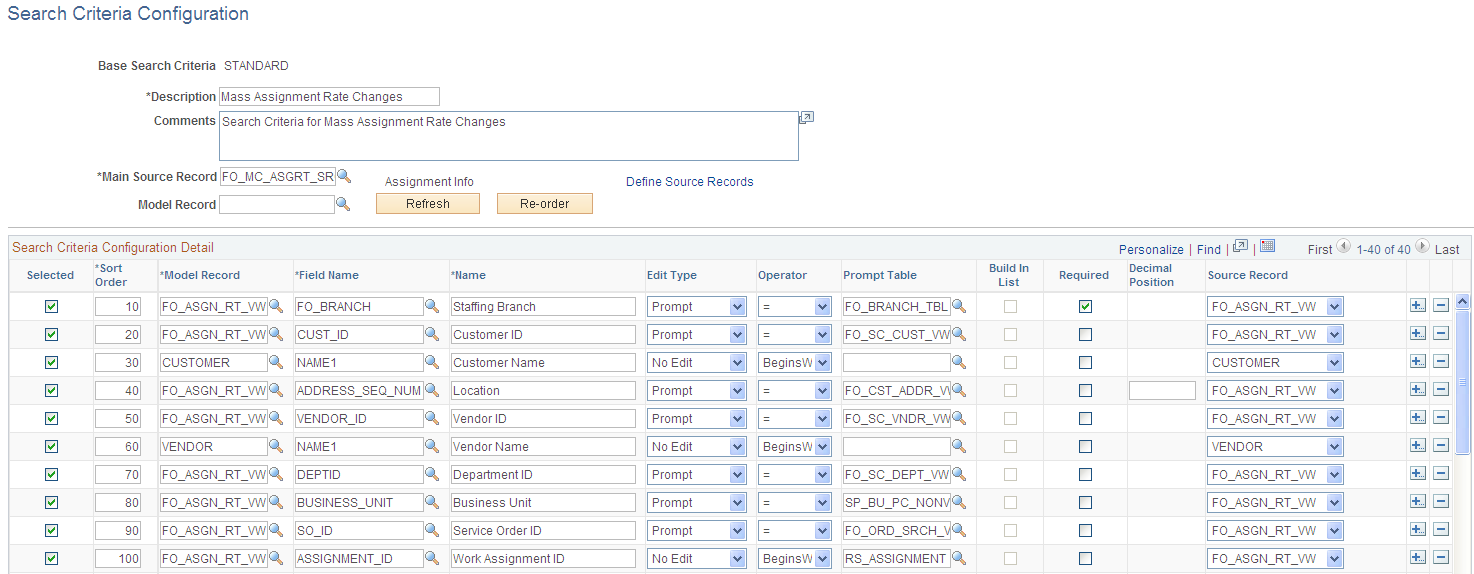
Use the Search Criteria Configuration page (FO_SRCH_CRIT_CFG) to identify search criteria for assignment mass rate changes.
Navigation:
This example illustrates the fields and controls on the Search Criteria Configuration. You can find definitions for the fields and controls later on this page.
Field or Control |
Description |
|---|---|
Main Source Record |
Identifies the record that will be used as the base when building the SQL to retrieve the impacted rows of data according to the search criteria. The SQL will retrieve distinct records for the main source record primary key. |
Define Source Records |
Click this link to access the Define Source Records page. |
Model Record |
This field is used as a template and can store details of the search criteria items such as Name, EditType, or Prompt Table. |
Refresh |
Re-builds the Search Criteria Configuration Detail grid with the fields of the model record. |
Re-order |
Click this button to re-order the grid. The grid will be sorted by Selected then by Sort Order. The Sort Order fields will be updated starting from 10 and will increase by 10 for each item. |
Search Criteria Configuration Detail
Field or Control |
Description |
|---|---|
Selected |
Select to identify whether the search criteria item is to be part of the initial search criteria or not. |
Sort Order |
Defines the order in which the items will be displayed in the search criteria. |
Model Record |
Enter the model record. Name, EditType and Prompt Table values default from information defined in the record definition of the model record and field name. |
Field Name |
Enter the field name of the search criteria items.Name, EditType and Prompt Table values default from information defined in the record definition of the model record and field name. |
Name |
Enter a name to define what will be displayed for the search criteria item wherever it is displayed in the system. |
Edit Type |
Identifies the type of information that is available for the item. Options are:
|
Operator |
Defines the default comparison operator for the search criteria item. Options are: Begins With, Contains, =, Not =, IsBlank, IsNotBlank, Between, In, Not In, >, >=, <, <=. The options available depend on the value selected in the Edit Type field. |
Prompt Table |
Identifies a prompt table for the search criteria. This is only available if the criterion is of type STRING, or NUMBER and Edit Type is NoEdit or Prompt. |
Build In List |
Indicates whether to present a prompt to the users in order to view all options and build in list criterion. This is only available if the Edit Type is Translate. |
Required |
Indicates if the criterion is a mandatory criterion. |
Decimal Position |
If the criterion is Number, this field specifies the number of decimal positions to be displayed. |
Source Record |
Defines the source record that the criterion refers to when building the SQL that is generated for the search criteria. Each search criteria item must exist in the source record. |
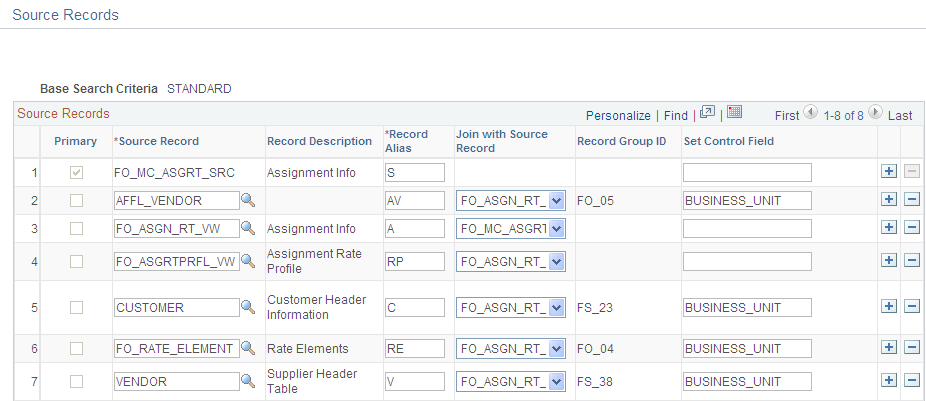
Use the Source Records page (FO_SC_SRC_RCDS_SEC) to define source records for the search criteria configuration.
Navigation:
Click the Define Source Records link on the Search Criteria Configuration page.
This example illustrates the fields and controls on the Source Records page. You can find definitions for the fields and controls later on this page.
Field or Control |
Description |
|---|---|
Primary |
Indicates the main source record. This value is automatically set when user enters the Main Source Record on the Search Criteria Configuration page. |
Source Record |
Mandatory field that specifies a source record to be used in the search criteria. It will be part of the FROM statement of the SQL that will be generated for the search criteria. |
Record Alias |
Relates the source record to an alias in the FROM statement of the SQL that will be generated for the search criteria. All source records must have a unique record alias. |
Join with Source Record |
Identifies the record that this source record will join with in the WHERE statement of the SQL that will be generated for the search criteria. All source records, except the main source record, must have the join information defined. |
Record Group ID |
If the source record has SETID in its primary key, this field will store the record group ID that this record belongs to. Otherwise, it will be blank. This is a display only field. |
Set Control Field |
If the source record has SETID in its primary key, this field will store the value that will be used to get the SETID for the set of data to be retrieved in the SQL that will be generated for the search criteria. This value will default from the record definition of the source record. |
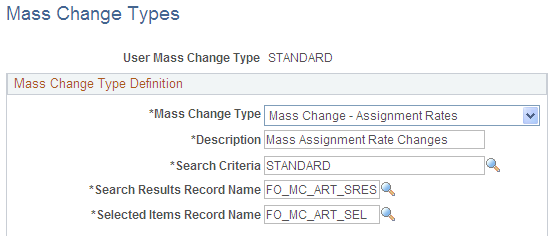
Use the Mass Change Types page (FO_MC_TYPE) to define mass change types.
Navigation:
This example illustrates the fields and controls on the Mass Change Types page. You can find definitions for the fields and controls later on this page.
Field or Control |
Description |
|---|---|
Mass Change Type |
Defines the type of mass change this user mass change type relates to. |
Search Criteria |
Identifies the base search criteria that all mass changes requests created under this user mass change type will use. |
Search Results Record Name |
Specifies the record to be used in the search results. For Mass Assignment Rate Changes the Search Results Record Name must be FO_MC_ART_SRES. |
Selected Items Record Name |
Specifies the record to be used for the selected items. For Mass Assignment Rate Changes the Selected Items Record Name must be FO_MC_ART_SEL. |