Setting Up Shifts, Schedule Patterns and Periods, Shops, and Crews
To set up shifts, shops, and crews use the:
Define Shifts (RS_SHIFT_DETAIL) component.
Schedule Patterns and Periods (WM_SCHED_PERIOD) component.
Define Shop (WM_SHOP_DEFN) component.
Define Crew (WM_CREW_DEFN) component.
Crew Rescheduling Reason Codes (WM_CSREASON_CD) component.
This section provides an overview of shop and crew management and discusses how to set up operating hours for a shift, define schedule pattern, define and generate schedule periods, define shop information, define and maintain resources for a shop, define and maintain craft rates for a shop, define and maintain tool rates for a shop, set up service groups for a shop, define inventory commit and reservation rules for work order types, set up timesheet defaults, set up a crew, and set up crew rescheduling reason codes.
|
Page Name |
Definition Name |
Usage |
|---|---|---|
|
RS_SHIFT_PG |
Enables a user to create a shift and assign operating hours to it. |
|
|
WM_SCHED_PATTERN |
Set up schedule patterns associate them with periods to use for crews. determine crew assignments. |
|
|
WM_SCHED_PERIOD |
Define the number of schedule periods that fall within a given date range based on the selected schedule pattern. |
|
|
WM_SHOP_DEFN |
Define shop header data and any default values for this shop. |
|
|
Distribution Defaulting Setup for Shop Page |
WM_SHOP_DIST_SEC |
Set up default ChartField distribution values to display when this shop is selected for a work order. |
|
WM_SHOP_RES |
Assign the schedulers, resources, and crews to a shop. |
|
|
WM_SHOP_CRFT_RATE |
Add one or more rows consisting of crafts and their associated rates to a shop. |
|
|
WM_SHOP_TOOL_RATE |
Add one or more rows consisting of asset classifications for tools derived from the Asset Repository and the associated tool rates to a shop. |
|
|
WM_SHOP_SRVC_GRP |
Add one or more service groups to associate with this shop. |
|
|
WM_SHOP_TYPE |
Define Inventory commit and reservation rules combinations for one or more work order types. |
|
|
WM_SHOP_DFLTS |
Set up timesheet default values to use for the Work Order Completion component time entries. |
|
|
WM_CREW_DEFN |
Add one or more employees to a crew. |
|
|
WM_CSREASON_CD |
Set up reasons for rescheduling crews. |
The shop supervisor's goal is to ensure the accurate inventorying and easy deployment of labor resources (technicians), who are needed to complete work order assignments. Before users can set up shops and assign resources to shops, they must set up crafts and the labor resource requirements that are listed in the previous sections.
Shifts Overview
You can set up a shift for a resource or for a shop. When you set up a shift for a shop, it defines the operating hours for the shop. When you set up shifts for resources, the shift is listed in the resource's profile next to an assigned shop. When the resource works for the shop identified in their profile, the shift in their profile applies when assigning the resource to a work order task.
You can set up default work days for all resources, along with standard work hours and a standard start time in the Resource Setup - Common Installation Options page. You can modify this information in a resource's profile. The default work days, standard hours per work day, and standard start time are used to display the resource's daily calendar. For example, when you view a resource's calendar, the default work days, standard hours per work day, and standard start time are used to create the daily calendar for the resource, regardless of whether the resource has been assigned a shop and a shift. You select a shift for a shop to establish a relationship between resources and weekly shifts.
When the daily calendar is opened, it displays the time slots as per the installation table such as 8:00 am – 5:00 pm, even if a shift was assigned to a resource. You have the option to view any time slots for a specific day by selecting the start and end time edit boxes.
Schedule Pattern and Periods
To perform crew scheduling of work order tasks, you first must define one or more schedule patterns and assign a pattern to the crew. The crew can have different schedule patterns assigned with different effective dates. The available types of schedule patterns are days, weekly, biweekly, and monthly. Based on the type of schedule pattern, a specified period start date and optionally days in period that you select, the system generates the number of periods desired and marks the current schedule period based on the system date when a period contains the current system date. Once the periods are generated you can enter a date range to display a specific group of periods. You can leave the date range blank and display prior periods. Once the schedule pattern and periods are created, you can associate a schedule pattern with each crew on the Crew Definition page. The schedule pattern and periods that are assigned to each crew are used to assist in determining a crew's capacity to participate in work order tasks. The scheduler adjusts the capacity based on personal knowledge of the crew on each period.
A schedule pattern and its associated schedule periods are set up by SetID. The system looks at the current system date to determine the current schedule period. If you generate schedule periods for a schedule pattern using a future date as the Period Start Range Date, the system will not identify the current period on the Schedule Periods page until the actual date rolls around on the system calendar. For example, if the Period Start Range Date is 01/01/2008 using a monthly schedule pattern, and you generate 12 periods, then the system will not mark the period of 01/01/2008 — 01/31/2008 as the current period until the current system date falls within the range of 01/01/2008 and 01/31/2008. The system will roll forward the current period as the system calendar progresses. Based on the previous example, when the system date becomes 02/01/2008, the system will move the current date mark forward to the 02/01/2008 — 02/29/2008 period in the period schedule.
You can make changes to the pattern description, period start date, number of periods, and the number of days in a period until a crew is assigned to the pattern and a crew capacity plan is established, which locks the existing periods. Once the periods are locked, you can add additional periods by entering the number of periods to extend from the last period on the schedule pattern.
Important! It is important to understand that the schedule periods, which are generated on the Schedule Periods page are based on the Period Start Date and the number of periods entered on the on the Schedule Periods page of the component. The current period is determined by the current system date.
Shop Setup and Management
You can associate a single shop with only one work order business unit; however, a single work order business unit may have multiple shops within it. You can assign a single shop to only one location; however, the same location may house multiple shops. The data set up in a shop affects and controls many parts of a work order. You must identify a shop when you create a work order. You can specify a shop in the work order business unit, which becomes the default shop value when you create a work order using that business unit. You can override this value in the work order with another shop. You set up six pages of shop details that can affect and control the work order, which include the:
Shop Information page.
This is an effective dated page, which means if you indicate that the page is active, that the options you select or enter on this page remain active from that date forward or until you decide to change the effective date and the data on the page. This enables you to track the shop history. You identify a shift that determines the operating hours of the shop. You also indicate whether you intend to use crew scheduling for work orders associated with this shop.
You can assign ChartField values at the shop level, which override the default ChartFields in the work order that are based on the ChartField distribution template. The shop is the lowest defaulting level for ChartFields. This means that if a work order is created for a specific shop and you set up a ChartField distribution at the shop level, and create a work order using that shop, then the shop's ChartField distribution will override any ChartFields that are first populated by the work order distribution template. Labor, tools, and inventory only have one default distribution row, which means that the distribution values in the shop will override the values in each row. However, PeopleSoft Purchasing may have more than one default distribution row. In this case the ChartField values defined for the shop distribution will override the same fields in each of the PeopleSoft Purchasing distribution rows. For example, if Dept. 1000 is defined at the shop level, then department 1000 will be the default value on all of the PeopleSoft Purchasing distribution rows. In this case, you may have to modify these ChartField values at the work order level.
The major purpose of this page is to establish default values for the work order at the shop level. Default values typically follow the standard PeopleSoft default hierarchy by looking at the lowest level first, then the shop level, then the work order business unit level. For example, you can select whether you want workflow approval or preapproved to apply to a work order by specifying values as the work order business unit level, the shop level, and the work order type level. Based on this setup, you select Default for work order type CM, and select Workflow Approval for Shop A, and select Pre-Approved for work order business unit US001. When you create a work order using US001, Shop A, and CM, the system will look first at the work order type value of Default and move on to the shop level value of Workflow Approval and apply that value to the work order, which means the work order must go through the approval process. However, if you had selected Default at both the shop level and the work order type level, then the system would have applied Pre-Approved as the condition for approval in the work order.
Record Estimates
You can indicate that you want to be able to record labor, tools usage, and inventory estimates in the work order when you create a work order for a specific shop, or you can select Default at the shop level and apply the your selections in the work order business unit.
Schedule Resource
You can indicate that you want to be able to schedule labor, tools, and inventory resources based on your selections for a specific shop, or select Default at the shop level and apply your selections in the work order business unit to a work order.
Inventory Commit/Reservation
You can set up Inventory commit and reservation rules at the work order business unit level, the shop header level, and on the Type page of the shop. The default hierarchy for the Commit/Reservation rule is shop/type, shop header, work order business unit. For example, if a value exists at the Shop/Type level for a commit and/or reservation rule, then when you create a work order using the combination of a specific business unit, shop, and shop/type, then the values set up for the shop/type are used.
Update Resource Calendar
If a resource completes work ahead of schedule, selecting the Update Calendar option enables you to update the resource's calendar at the work order task level to free the resource to work on other tasks. You can select Default at the shop level and use the value selected at the work order business unit level.
Overbooking Resources
You can select a check box to indicate that a user can manually intervene to overbook resources for a work order created with this shop. If you do not select this check box, the system automatically allows overbooking of all resources for work orders created with this shop.
Chargeback
If chargebacks are allowed, you can indicate that you want PeopleSoft Project Costing to calculate chargebacks at the work order business unit level, the shop level, or the work order type level. You must activate chargebacks on the Activity - Organization page in PeopleSoft Project Costing for the options in the work order business unit, the shop, and the work order type level to apply. If chargeback is set up in PeopleSoft Maintenance Management and PeopleSoft Project Costing, when you create a work order, the system looks for a value for the work order type specified for the work order, if Default is selected, it then looks for a value for the shop specified in the work order and applies that value to the work order. If the shop value is Default, the system looks at the value in work order business unit and uses it.
See Understanding Integration with PeopleSoft Maintenance Management.
PeopleSoft Project Costing
You can indicate the PeopleSoft Project Costing rate options for work orders created with this shop or use the options selected in the work order business unit. You can select either a rate plan, which consist of more than one rate set or you can select a specific rate set.
Labor Rates
You can specify the labor cost and bill rates for work orders created with this shop. You can also specify labor rates for each craft on the Craft Rates page of the Shop component. If you specify labor rates at the craft level and you enter the business unit, shop, and craft in the work order, then the craft labor rates serve as the default value in the work order. The system looks at the craft level, then the shop header level, and finally the business unit for the default values.
Enable Workflow Approval
You indicate that you want to enable workflow approval at the business unit level, the shop level, or the work order type level. The system looks first at the work order type level, then at the shop level, and finally at the work order business unit level.
Note: Refer to the example in the introduction to these options.
Resources page.
You can select the schedulers, whom you want to perform scheduling for any work orders created with this shop. You assign them each Scheduler Codes and select one as the primary scheduler. This makes it easy to change schedulers of work order tasks. You just change the scheduler's code in the shop and eliminate having to change the scheduler on every work order task to which they were the scheduler was assigned.
Once you create a resource, you can access the Manage Profile component and associate the resource with one or more crafts on the Craft page, and assign the employee to one or more shops on the Shop page. This resource is automatically added to the Resources page of the assigned shop. You can access the Manage Profile page directly from the Resources page in the shop for each resource. When you create a work order and schedule a resource, the resource must be associated with the shop used in the work order.
The Resources page also lists any crews assigned to this shop. You can assign a specific crew to only one shop; however, a shop can have multiple crews assigned to it. You can split the time between a resource, who is assigned to more than one crew.
Craft Rates page.
You can set up labor cost and bill rates by craft, which will override any labor rates specified for the shop or the business unit as the default value when you select on of the crafts listed here in the work order task.
Tool Rates page.
You can specify tool cost and bill rate for tools used for a work order task at the shop level. This is also where you apply these rates based at the asset subtype level. If you do not specify these rates at the shop level, then the rates defined at the asset subtype level are applied to the work order.
Service Group page.
You can identify the types of services a shop can provide through the selection of one or more service groups.
Type page.
You can specify combinations of Inventory commit and reservations rules for each work order type within the shop.
Timesheet Defaults page.
You set up the Timesheet prefix, which will be used when you stage the timesheet entries in the Work Order Completion component.
Crew Setup
PeopleSoft Maintenance Management enables you to schedule crews for a work order tasks. You indicate on the Shop Information page that you intend to schedule crews for work orders. Before you set up your crews, you set up your shops, because you must associate each crew with a shop. You can select one crew associated with a shop as the primary crew. The selected primary crew will be used to determine the default crew in the work order task. After you create a crew, the crew name displays on the Define Shop - Resources page. Only resources that you identified for a shop can be added to the shop's crew. You must select a schedule pattern for each crew if crew scheduling is performed by the shop. Once a schedule pattern is assigned to a crew and a crew capacity plan is defined, it is locked. However, you can continue to add additional periods to that schedule pattern. Effective dating is applied to the selected crew pattern and the selected resources. If you indicate that a crew is inactive, this removes the crew from the Resources page of its assigned shop. When a resource is added to a crew, the default craft value is the resource's primary craft. You can select another craft from a list of crafts associated with the resource as the primary craft for the resource. You can identify only one resource as the leader of the crew. A crew may have multiple resources and one resource can belong to multiple crews assigned to the same shop or different shops. You enter a capacity percentage to allocate a crew resource to more than one crew.
|
Crew Resource |
Shop/Crew/ Capacity % |
|---|---|
|
Joe Jones - Electrician |
|
|
Estelle Parsons - Carpenter |
|
You will not receive an error if the total capacity percentage for a resource assigned to more than one crew is less than 100%. You will receive a warning message if the total capacity percentage for a resource assigned to more than one crew is greater than 100%.
Effective dating for each crew enables you to track changes to the schedule pattern, any addition and removal of resources assigned to the crew, and whether a crew is active or inactive as of a specific date. When adding a new effective dated row on the Define Crew page, the system ensures that there is no crew capacity with a period end date that is greater than or equal to the specified effective date. This prevents overlapping crew capacity plans.
Crew Rescheduling Reason Codes
You define as many of these codes as are necessary to establish the reasons why you may be rescheduling a crew. When you reschedule a crew on the Crew Scheduling Workbench, you can select the reason for the rescheduling.
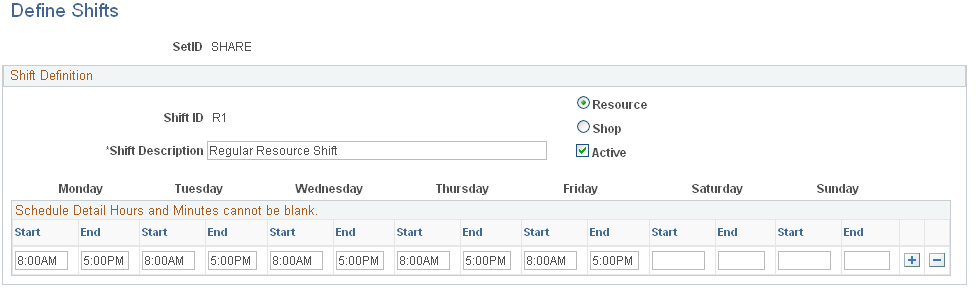
Use the Define Shifts page (RS_SHIFT_PG) to enables a user to create a shift and assign operating hours to it.
Navigation:
Click the Define Shop Operating Hours link on the Shop Information page.
This example illustrates the fields and controls on the Define Shifts page. You can find definitions for the fields and controls later on this page.
Field or Control |
Description |
|---|---|
Shift ID |
Enter a shift ID to which you want to assign operating hours. |
Resource and Shop |
Click the Resource option to indicate that this shift applies to an individual resource, or click the Shop option if this shift applies to a shop. |
Active |
Select this check box to indicate that is shift is currently active for any shops or resources that you associated with it. |
Start and End |
Enter the start and ending times for each shift based on the day of the week. You can add additional rows if there a multiple shifts in a day. Note: You can enter more than one row of weekly start and end dates for a shift. |
Use the Schedule Pattern page (WM_SCHED_PATTERN) to set up schedule patterns associate them with periods to use for crews.
determine crew assignments.
Navigation:
Set Up Financials/Supply Chain, Product Related, Maintenance Management, Setup, Schedule Pattern
This example illustrates the fields and controls on the Schedule Pattern page. You can find definitions for the fields and controls later on this page.

Field or Control |
Description |
|---|---|
SetID |
Enter a SetID to either find an existing Schedule Pattern value or add a new Schedule Pattern value. |
Schedule Pattern |
Enter a short name for the schedule pattern that you want to set up, such as BIWK. |
Description |
Enter a long description of the pattern, such as 14 day period. |
Pattern Type |
Select one of these pattern types:
|
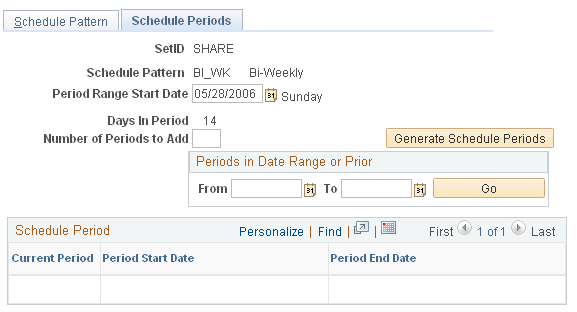
Use the Schedule Periods page (WM_SCHED_PERIOD) to define the number of schedule periods that fall within a given date range based on the selected schedule pattern.
Navigation:
Select the Schedule Periods tab.
This example illustrates the fields and controls on the Schedule Periods page. You can find definitions for the fields and controls later on this page.
Field or Control |
Description |
|---|---|
Period Range Start Date and To |
Select the start date of the period range for which you want to generate schedule periods. The system generates the To date (period end date) based on the schedule pattern you selected and the number of periods you that you indicate you want to add. |
Number of Periods to Add |
Enter the number of periods you want to generate. Based on the Biweekly pattern, for example, you can enter 10 periods. When you click the Generate Schedule Periods button, the system lists 10 biweekly periods. |
Generate Schedule Periods |
Click this button and the system generates the number of periods that you entered and enters the final date of the period in the To field of the date period range. |
Periods in Date Range or Prior |
Select the from date and the to date and select the Go button to display periods within the date range. When the from date is left blank, the system returns all periods starting on or prior to the to date. When the to date is left blank, the system returns all periods starting on or after the from date. When both fields are left blank, the system returns all existing periods in this pattern. After the periods display, you can click the Back to Current/Future Periods button to redisplay the current and future periods in your original date range. |
Current Period |
A green dot indicates the current schedule period based on the current system date that falls within a generated period. If none of the periods fits this criteria, a current period indicator will not appear on the page. |
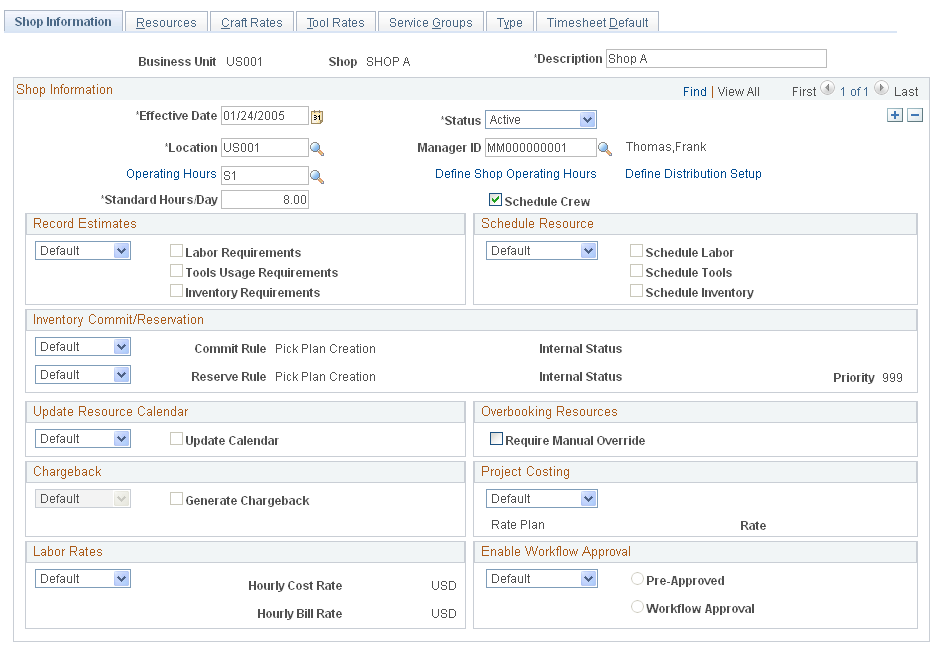
Use the Shop Information page (WM_SHOP_DEFN) to define shop header data and any default values for this shop.
Navigation:
This example illustrates the fields and controls on the Shop Information page. You can find definitions for the fields and controls later on this page.
Field or Control |
Description |
|---|---|
Shop |
Enter a shop ID on the Add a New Value page. Note: A specific shop can be assigned to only one business unit; however, a business unit may be associated with many different shops. |
Effective Date and Status |
Enter an effective date for the data in this Shop Information group box and indicate whether it is Active or Inactive. These are required fields. Note: You can maintain a history of changes in shop information data for this shop by one or more pages of values and changing the effective dates and statuses for the information entered on each page. |
Location |
Select the location of this shop. This is a required field. |
Manager ID |
Select the employee ID of the manager that you want to assign to this shop. The shop manager must be created as a resource in Maintenance Management. |
Operating Hours |
Select a shift value that contains the appropriate operating hours for this shop. This is a required field. Note: Click the Operating Hours link to view the operating hours for the selected shift. |
Define Shop Operating Hours |
Click this link to access the Define Shifts page to set up a new shift for this shop. |
Define Distribution Setup |
Click this link to access the Distribution Defaulting Setup for Shop page, to set up ChartField distributions to use to distribute and track costs for this shop. These default values display in the work order task when assigning and scheduling resources associated with this shop. Note: ChartFields defined at the shop level supplement the defaulting values entered in the Distribution templates. |
Standard Hours/Day |
Enter the standard hours that this shop is open each day. This is used to calculate the adjusted crew capacity in days. |
Schedule Crew |
Select this check box if your organization intends to schedule crews defined within this shop. |
Record Estimates
This group box determines whether you want to record estimates based on labor, tools usage, and inventory requirements specified in the work order task based on the default values in the work order business unit or the values you select here in the shop. Select Default to indicate that you want to use the default options selected in the business unit to apply to this shop, or select Specify if you want to specify the options listed in this group box to apply when this shop is used to create a work order and then select the labor, tools usage, and inventory requirement estimates that you want to record.
Schedule Resource
This group box determines whether you want to schedule labor, tools, and inventory resources for work order tasks based on the specifications at the work order business unit level or values that you select here in the shop. Select Default to indicate that you want to use the default options selected in the business unit to apply to this shop, or select Specify if you want to enable users to schedule labor, tools, and inventory in any work orders created for this shop.
Inventory Commit/Reservation
To commit and reserve parts in PeopleSoft Inventory, you can select a combination of Inventory commit and reservation rules at either the work order business unit level or here at the shop level. Select Default to use the commit and reservation rule combination that you set up at the work order business unit level or select Specify to select a commit and/or reservation rule combination to apply when this shop is used to create a work order. You can also set these rules up for one or more work order types defined within the shop on the Type page.
Update Resource Calendar
Select Default to indicate that you want to use the Update Resource Calendar default value in the work order business unit, or select Specify and either select the Update Calendar check box or deselect it for this shop. If selected and a resource completes the work ahead of schedule, this option allows the resource's schedule to be freed up for new work assignments. This setting applies to both labor and tools for schedule update.
Overbooking Resources
Field or Control |
Description |
|---|---|
Require Manual Overrides |
Select this check box to enable a scheduler to manually overbook a labor resource associated with this shop. If this check box is deselected, then the system automatically overbooks the labor resources whenever an assignment conflict occurs. |
Chargeback
Select Default to indicate that you want to use the Generate Chargebacks default options set up in the work order business unit for this shop. Select Specify and either select the Generate Chargebacks check box or deselect it depending on what you want to do for work orders created using this shop. Selecting this field enables users to charge the costs generated for any work orders associated with this shop back to another organization within the enterprise.
PC Template (Project Costing Template)
Select Default to indicate that you want to use the PeopleSoft Project Costing default rate set setting in the work order business unit for this shop. Select Specify and select the PeopleSoft Project Costing default rate plan, which contains more than one rate set, or rate set along with the accompanying rate that you want to use when you create a work order using this shop. This value is a Rate template defined in PeopleSoft Project Costing that can be used as a default value for chargebacks.
Labor Rates
Select Default to use the hourly cost rate and billing rate that are set up in the work order business unit for this shop. Select Specify and enter the hourly cost rate and billing rate that you want to apply to the work order task for a work order created with this shop.
Important! The labor cost and bill rates specified on the Shop Information page are independent of the resource. For example, if work order Task 1 requires an electrician and the work order is created for SHOP1, then the labor rate for the electrician for SHOP1 is derived first from the shop's craft rate. If the electrician's rate is found in the SHOP1 craft rates record, then that rate is applied to the work order task. If the labor and bill rates are not specified for a craft and they are specified for a specific shop, then the system applies the shop rates for the work orders created with this shop. Otherwise, the system gets the rates from the labor cost and bill rates specified in the work order business unit.
Enable Workflow Approval
Select Default to apply the workflow approval settings in the work order business unit or work order type (depending on the default hierarchy selected in the work order business unit) to this shop. Select Specify and indicate whether work orders created for this shop are preapproved or require workflow approval.
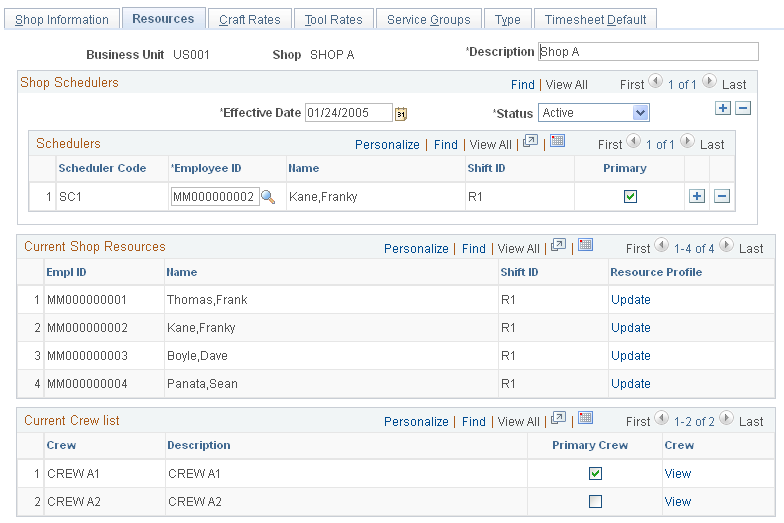
Use the Resources page (WM_SHOP_RES) to assign the schedulers, resources, and crews to a shop.
Navigation:
This example illustrates the fields and controls on the Define Shop - Resources page. You can find definitions for the fields and controls later on this page.
Field or Control |
Description |
|---|---|
Effective Date and Status |
Select an effective date and status for the setup of the schedulers in this grid. You can create more than one grid with different effective dates and statuses and keep a history of these changes. |
Scheduler Code |
Enter a user-defined code to represent the scheduler assigned to this shop. The code that you enter here is unique to the scheduler in this shop and displays in the work order instead of the scheduler's employee ID. If the employee, who is assigned as a scheduler for this shop is no longer available, then you just have to change the employee ID of the scheduler in the shop, instead of changing it in every work order. |
Employee ID |
Select the employee ID to identify this scheduler, which results in the display of the scheduler's name and shift ID. |
Primary |
Select this check box to indicate that one of the schedulers listed is the primary scheduler. Note: You can assign more than one scheduler to a shop; however, you can identify only one scheduler as the primary scheduler. |
Current Shop Resources
You associate a resource with a shop in the resource's profile using Manage Profiles. Each resource that you assign to a shop automatically displays on this page. This page only displays currently active resources. If you assign a crew to a shop, each resource that comprises the crew must appear in this Resources grid. You can click the Update link to access the resource's profile from this page.
Current Crew List
When you set up a crew, you must associate it with a shop, which is automatically added to this crew list. This page only displays currently active crews for the shop. You can only identify one of the crews as the Primary Crew. The primary crew displays as the default crew in the work order task. You can click the Crew link to view the setup of the crew.
Use the Craft Rates page (WM_SHOP_CRFT_RATE) to add one or more rows consisting of crafts and their associated rates to a shop.
Navigation:
This example illustrates the fields and controls on the Define Shop - Craft Rates page. You can find definitions for the fields and controls later on this page.

Set up one or more crafts and their associated hourly cost and hourly bill rates to use for chargeback calculations for this shop.
You can specify a labor cost and bill rate at the work order business unit level to display as default values for work order task labor resources. You can override these business unit rates on the Shop Definition page. When a work order is created for the shop, the default values from work order task labor cost and bill rates in the shop are derived from the work order business unit unless you specified the shop labor rates at the shop level or cost and bill rates for a specific craft at the shop level. If you specify the rates here at the craft level, then the system applies these rates to the work order task. The labor cost and bill rates specified on the Shop Information page are independent of an individual resource. For example, if a work order task #1 requires an electrician and SHOP1 is associated with the work order, then the labor rates for an electrician assigned to SHOP1 is derived first from the labor rates set up for a craft in the shop's Craft Rates page. If a rate is set up for an electrician rate in the Craft Rates page, then the work order task uses this rate. If the rate is not set up for the craft in the shop, the system derives the rate if the labor cost and bill rates are set up in the shop, or, if not, it derives rates specified in the business unit.
The currency code for both the shop and tool rates is always the base currency specified in the work order business unit and cannot be modified.
Use the Tool Rates page (WM_SHOP_TOOL_RATE) to add one or more rows consisting of asset classifications for tools derived from the Asset Repository and the associated tool rates to a shop.
Navigation:
This example illustrates the fields and controls on the Define Shop - Tool Rates page. You can find definitions for the fields and controls later on this page.
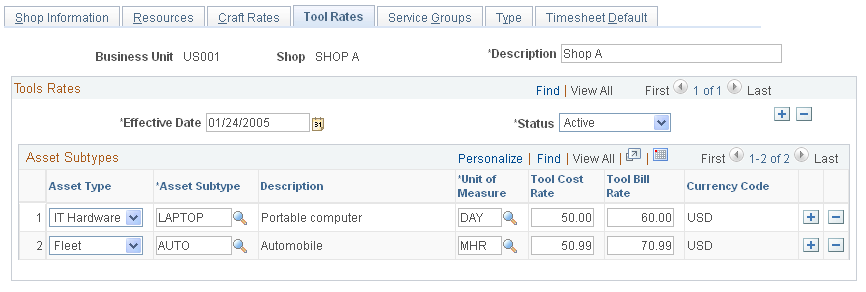
Add and describe the asset types and asset subtypes that this shop uses as tools and their associated cost rate and bill rates. You can define tool cost and bill rates at the shop level and the asset subtype level. If you do not define tool rates at the shop level, the system uses the rates defined at the asset subtype level. If the rates from the asset subtype level are in a different currency, the rates are converted to the base currency specified in the work order business unit.
Use the Service Groups page (WM_SHOP_SRVC_GRP) to add one or more service groups to associate with this shop.
Navigation:
This example illustrates the fields and controls on the Define Shop - Service Groups page. You can find definitions for the fields and controls later on this page.
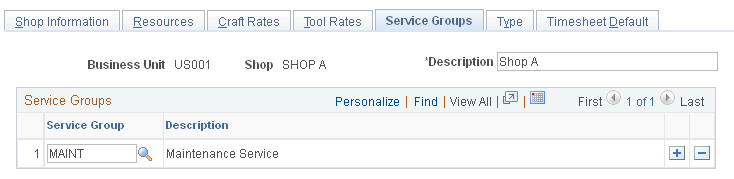
You must select at least one service group for a shop. You can add more service groups if desired. Some shops can provide multiple services. For example, a shop may be able to handle fleet and plant equipment, but not IT support. When you select a service group for a work order, then you can only select a shop for the work order from the shops that have the selected service group set up in their Service Groups page.
Use the Type page (WM_SHOP_TYPE) to define Inventory commit and reservation rules combinations for one or more work order types.
Navigation:
Set Up Financials/Supply Chain, Product Related, Maintenance Management, Resources, Define Shop, select the Type tab.
This example illustrates the fields and controls on the Define Shop - Type page. You can find definitions for the fields and controls later on this page.

Field or Control |
Description |
|---|---|
Work Order Type |
Select a user-defined work order type in which to apply commit and reservation rules. The work order type values delivered in the system data include:
See Setting Up PeopleSoft Maintenance Management Work Order Parameters. |
Inventory Commit/Reservation |
Select a value of Default or Specify. When you select Default, any work order created with this shop and work order type applies the commit and reservation rules to the work order task based on commit and reservation rule setup selections on the Shop Information page or on the Integrations page of the work order business unit. When you select Default, the system displays the values that were specified in one of these two pages. When you select Specify, any work order created with this shop and work order type applies the commit and/or reservation rules that you specify on this page to the work order task. |
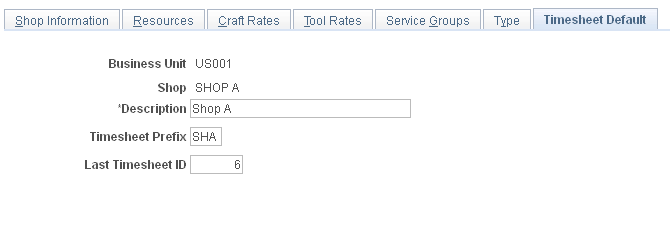
Use the TimeSheet Default page (WM_SHOP_DFLTS) to set up timesheet default values to use for the Work Order Completion component time entries.
Navigation:
Set Up Financials/Supply Chain, Product Related, Maintenance Management, Resources, Define Shop, click the Timesheet Default tab.
This example illustrates the fields and controls on the Define Shop - Timesheet Defaults page. You can find definitions for the fields and controls later on this page.
Field or Control |
Description |
|---|---|
Timesheet Prefix |
Enter the prefix associated with the last timesheet generated. This prefix is used when the timesheet entries are sent from the Work Order Completion component to the Staging Tables for Project Costing. For example, if the prefix used for your timesheets is ABC and the last time sheet ID is 1234, then the next timesheet ID generated from the Work Order Completion component will be ABC1235. |
Last Timesheet ID |
Enter the number of the last timesheet entered for this shop |
Use the Define Crew page (WM_CREW_DEFN) to add one or more employees to a crew.
Navigation:
This example illustrates the fields and controls on the Define Crew page. You can find definitions for the fields and controls later on this page.

Field or Control |
Description |
|---|---|
Shop |
Select the shop to which you want to assign this crew on the Add a New Value page. Note: A single crew can be assigned to only one shop; however, a shop may have many different crews assigned to it. |
Crew Name |
Enter a crew name on the Add a New Value page. Note: Each individual crew can be associated with only one business unit; however, a business unit may be associated with many different crews. |
Primary Crew |
Select this check box to indicate that this is the primary crew for the shop. You can assign multiple crews to a shop, but you can only identify one of those crews as the primary crew. The primary crew serves as the default crew in the work order task. |
Effective Date and Status |
Enter an effective date and status. You can track the changes in these crews based on changes in effective date and status. You can create more than one page with different effective dates and statuses. To create a crew capacity plan, the crew must have a current effective date that corresponds with the available schedule periods. |
Schedule Pattern |
Select the schedule pattern to associate with this crew. |
Add Resources |
Click to view Shop Resources page and select one or more resources to be member(s) of the crew at one time. |
Crew Resources
Add each resource that you want to assign to the crew in the Crew Resources grid. You must set up each resource that you assign to a shop's crew in the Resources page of the Shop component.
Field or Control |
Description |
|---|---|
Employee ID |
Select the employees (resources) that you want to assign to this crew. All employees assigned to a crew must be created as resources in Maintenance Management and must be active resources of the shop as of the effective date. |
Primary Craft |
Select the craft in which each crew member primarily works. The primary craft is used to generate a crew capacity plan based on resources assigned to this crew. You can override this primary craft when you create a crew capacity plan. |
Capacity % (capacity percent) |
Enter the percentage of resource's capacity to allocate to this crew. This enables a crew scheduler to share a labor resource's time between two or more crews. |
Use the Crew Rescheduling Reason Codes page (WM_CSREASON_CD) to set up reasons for rescheduling crews.
Navigation:
Set Up Financials and Supply Chain, Product Related, Maintenance Management, Setup, Crew Rescheduling Reason Codes
This example illustrates the fields and controls on the Crew Rescheduling Reason Codes. You can find definitions for the fields and controls later on this page.

Field or Control |
Description |
|---|---|
SetID |
Enter or select the SetID that you want to use with these reason codes on the Add a New Value tab. |
Reason Code |
Create reason code of 10 characters or less that briefly describes the reason for the crew rescheduling. |
Description and Short Description |
Enter a long description that provides a more thorough description of the code, and enter a short description. |