Setting Up and Maintaining Preventive Maintenance Schedules
To set up a preventive maintenance schedule for an asset, use the Schedule (WM_PM_SCHD) component.
To set up a preventive maintenance schedule for a loop, use the Loop Schedule (WM_PM_LOOP_SCHD) component.
To set up a preventive maintenance schedule for a location, use the Location Schedule (WM_PM_LOC_SCHD) component.
To copy a preventive maintenance schedule, use the Copy Schedule (WM_PM_SCHD_CPY) component.
To maintain preventive maintenance schedules, use the PM Workbench (WM_PM_SCHD_WRKB) component.
This section provides overviews of preventive maintenance schedules, meter ranges and condition-based maintenance preventive maintenance work orders, and projected meter readings and discusses how to create a preventive maintenance schedule, set up advanced options for a preventive maintenance schedule, link a primary PM schedule to secondary PM schedules, copy a PM Schedule, perform a PM Mass Schedule Update, and use the Preventive Maintenance Schedule Workbench.
|
Page Name |
Definition Name |
Usage |
|---|---|---|
|
WM_PM_SCHD_PG1 |
Define the date-based and meter-based rules for the Preventive Maintenance Process to use in determining the next due date upon which to generate a preventive maintenance work order. |
|
|
WM_PM_SCHD_PG2 |
Define work order header specifications, which are optional, that the Preventive Maintenance Process uses when it creates a work order and also define blackout periods to apply to the scheduling rules that are set up on the General Options page. |
|
|
WM_PM_SCHD_CPY |
Copy data from an existing PM Schedule to a new PM Schedule. |
|
|
WM_PM_SCHD_LINK |
Link secondary schedules to a primary schedule. |
|
|
WM_PM_SCHD_WKBC |
Maintain an asset's preventive maintenance schedules. |
|
|
Meter Readings History Page |
WM_PM_SCHD_WKBC |
Review the date, time, and readings for a specific meter type. |
|
Meter Readings Details Page |
AM_MTR_RD_HID |
View details about the meter reading history for an asset including the date and time, source, operator ID, and daily average. |
|
WM_PM_SCH_UPD_RUN1 |
Enter search criteria to search for PM schedules on which to run the Mass Update process. |
|
|
PM Schedule Mass Update – Update Page |
WM_PM_SCH_UPD_RUN1 |
Select the information on the schedules that you want to update and run the PM Mass Schedule Update (WM_PMSCH_UPD) process, which updates each of the selected schedules. |
You set up preventive maintenance schedules to enable the Preventive Maintenance Process to automatically generate work orders to use for servicing or maintaining one or more assets or a location at specified times and service intervals. A service interval refers to the frequency with which the maintenance types are performed. These intervals, which are specifically defined in the schedule, can be either date-based or meter-based. You associate a work order job template with a schedule. The job template lists the work order task templates (steps) that contain the resource requirements and attachments that must be completed once the work order is generated. You can also define the work order header information and the project and activity to associate with the preventive maintenance work order that the Preventive Maintenance Process generates. Each preventive maintenance schedule that you set up is unique. You can set up a preventive maintenance schedule for:
A single asset.
A preventive maintenance loop (group of assets).
A specific location.
This type of schedule is used for a task that is not associated with an asset, such as scheduling the routine cleaning of the shop floor.
You set up preventive maintenance schedules and associate them with a work order business unit and a maintenance type that is defined in PeopleSoft Asset Management.
Note: As of PeopleSoft Maintenance Management, you can create two PM schedules with the same asset and the same maintenance type.
If the schedule is defined for:
A single asset, you must also associate it with an Asset Management business unit and an asset ID.
A preventive maintenance loop, you must also associate it with a loop ID.
A location, you must also associate it with a location code.
Note: You can associate a maintenance type with an asset's subtype in PeopleSoft Maintenance Management.
Date-based and Meter-based Rules
A schedule for an asset can incorporate both date-based and meter-based rules. In this case, the Preventive Maintenance Process looks first at the date-based rules, and if the target date is less than or equal to the current date, then the process creates a work order and ignores any meter-based rules. If, as of the current date, neither the date-based nor meter-based rules are due and the estimated meter usage is not defined, the Preventive Maintenance Process will not generate the work order until either a date-based due date or a meter-based due date comes up. However, if you set up the estimated meter usage, the system generates a work order with an estimated maintenance date.
Secondary Schedules Linkage to Primary Schedules
You can link related secondary schedules to a primary schedule for a single asset, asset loop, or a location on the PM Linking page of the primary schedule. Primary and secondary schedules are determined by the maintenance type that you assign to the schedule, as well as the schedule's description. When the PM process runs, it schedules and generates preventive maintenance work orders for the maintenance of the asset, asset loop, or location identified in the primary schedule, as well as the maintenance of one or more secondary schedules that are linked to this primary schedule and have the same due date. This synchronization reduces equipment downtime and lessens the possibility of performing unnecessary maintenance.
Work Order Business Units and Maintenance Types
You assign a work order business unit to each PM Schedule. This is the business unit that the Preventive Maintenance Process uses to create work orders and the business unit for which the work is performed.
You can assign a schedule ID to a PM Schedule, or you can set up a PM Schedule without a schedule ID and when you save the schedule the system automatically generates a schedule ID for you. You associate each schedule with a maintenance type that you set up in PeopleSoft Asset Management. Maintenance types are user-defined and are used to divide service maintenance procedures into specific categories. You can set up as many maintenance types as you need. However, you must also set up maintenance types, which you defined in PeopleSoft Asset Management, in PeopleSoft Maintenance Management to associate each maintenance type with an asset type and asset subtype. Each preventive maintenance schedule is categorized by the type of maintenance that is being performed. For example, you can set up maintenance types as major, minor, rebuild, tune-up, 3000 mile service, 6000 mile service, and more. You also must specify either the asset, preventive maintenance loop, or location that you want to schedule for this type of maintenance.
If your organization plans on linking primary and secondary PM regular, loop, and location schedules, you will want to set up maintenance types in PeopleSoft Asset Management to categorize your schedules according to the level of maintenance to be performed. For example:
Your organization could set up the following Maintenance Types in the system for asset type - fleet vehicle, asset subtype - auto:
Major
Minor 1
Minor 2
Minor 3
Next you associate these maintenance types with specific preventive maintenance schedules:
|
PM Schedule ID |
Maintenance Type |
Asset Type and Subtype |
Maintenance Type Description |
|---|---|---|---|
|
001 |
Major |
Fleet/Auto |
Perform required major service every 30,000 miles. |
|
002 |
Minor 1 |
Fleet/Auto |
Rotate Tires every 500 miles. |
|
003 |
Minor 2 |
Fleet/Auto |
Change oil and oil filter every 1000 miles. |
|
004 |
Minor 3 |
Fleet/Auto |
Check brake fluid every 1000 miles. |
Based on this setup, you can link the secondary schedules (002, 003, and 004) to the primary PM Schedule (001) by selecting them on the PM Linking page of the primary PM Schedule. You can click an Edit link to view and edit each secondary schedule.
When you define the default asset classifications in a loop, you must specify, at a minimum, the asset type and subtype. When you set up a loop schedule for this type of loop, the maintenance type that you select must be associated with the same asset type and asset subtype as the default asset type and subtype in the loop.
However, when you set up a schedule for an asset that is not associated with an asset subtype or for a location, which involves no asset, the system looks at the maintenance types that are set up in PeopleSoft Asset Management and bypasses the ones that are associated with an asset type and asset subtype in PeopleSoft Maintenance Management.
This table shows how the work order business unit is mapped to the maintenance type and asset business unit for preventive maintenance schedules:
|
PM Schedule Type |
WO Business Unit |
AM Business Unit |
Maintenance Type |
|---|---|---|---|
|
Single Asset |
Required to create PM Schedule |
Required to create PM Schedule |
Required to create PM Schedule |
|
PM Loop |
Required to create PM Loop Schedule |
Assigned to each asset within the PM Loop definition. |
Required to create PM Loop Schedule |
|
Location |
Required to create PM Location Schedule |
Not used |
Required to create PM Location Schedule |
Note: The work order business unit should use the same sets of data as the job template uses, which includes record groups FS_18 (items), RS_02 (labor), and AM_05 (tools).
See Associate Maintenance Type With Asset Subtype Page.
Basis Date
The Basis Date for PM Schedule is established on the Schedule- General Options page. The PM projection and PM processes use this date to determine the base date for generating the first preventive maintenance work order cycle. The only instance the basis date is not used for a schedule is when you enter a specific date for the maintenance to occur. Once the first preventive maintenance work order is created, the basis date becomes unavailable for selection, but can be viewed for informational purposes. The next scheduled due date for all subsequent preventive maintenance work orders is determined using the required start date, or, depending on the schedule options selected, the completion date associated with the previously generated preventive maintenance work order.
Effective Dating
Effective dating enables you to change the content for a PM Schedule over time and track the changes. For example, you can change to a new date-based or meter-based rule, change the job template, select a different scheduling option, and change work order header and PeopleSoft Project Costing tracking information.
Work Order Job Templates
The Preventive Maintenance Process generates work orders with the requirement details that are specified in the work order task templates that are associated with the work order job templates. The Preventive Maintenance Process places demand on PeopleSoft Inventory for the inventory item requirements if the commitment rule that is defined in the work order business unit is either based on the parts list or a status change. If it is based on a status change, the default PM work order status must be the same as the status that is specified in the commit rules set up in the work order business unit, shop, or shop/type. If either of these commit rules apply, then the Preventive Maintenance Process also generates an Inventory Schedule for the work order. You receive an error when you save the PM Schedule online (and not in batch mode) if some of the inventory items defined in the underlying task templates that are associated with the job template in the schedule are not available because they are associated with a different Inventory business unit than the Inventory business unit that is specified in the work order business unit. You can still correct the template or you can manually include a valid item in the work order schedule after it is generated by the Preventive Maintenance Process.
If the work order job template has more than one effective date associated with it, the Preventive Maintenance Process uses the effective date in the job template, which is closest to the required start date.
For example, if the processing date is September 8, 2004, and the effective dates in the work order job template are August 8, 2004 and January 1, 2004, the Preventive Maintenance Process applies the template that is dated August 8, 2004 to the work order because it is the date that is closest to the run date of September 8, 2004.
Override Options – Generate One Time
You can select or unselect this check box on the schedule. If you select this check box, the Preventive Maintenance Process creates a work order and disregards any date-based or meter-based rules that are set up in the schedule only once. The process also removes the check mark from this option (changes it to off) so that the process generates a work order and considers the date and meter rules the next time you run it. If you want the process to generate another work order that disregards the date and meter rules, then you must access the Schedule page and select this option again.
A condition-based alert is issued because a meter reading for an asset exceeds the meter reading range set up in the PM Schedule. This causes the automatic selection of the Override Options — Generate One Time check box on the schedule, which causes the Preventive Maintenance Process to generate a work order.
See Understanding Meter Ranges and Condition-Based Preventive Maintenance Work Orders.
Threshold Percentage
The threshold percentage is used for calculating the next maintenance due date for date-based, fixed meter, and meter-based rules. It is not used for calculating the next maintenance due date for specific date and projected meter rules. When a schedule has both fixed meter rules and date-based rules and the threshold percentage is used to calculate the preventive maintenance start date, then the Preventive Maintenance Process applies the threshold percentage to rules that have a target date closest to the current date.
For example, a date-based schedule for a vehicle's maintenance is monthly and the meter (odometer) interval is every 1000 miles. The system keeps track of the percent due date-based and meter-based figures for reporting purposes. If you enter a threshold percentage in the schedule's General Options page, the Preventive Maintenance Process creates a work order if the calculated percent due for either the date-based or meter-based readings is more than or equal to the threshold percentage. In this example, if you entered a threshold percentage of 70, and the percentage of the next maintenance due for the date-based reading is 65 and the percentage of the next maintenance due for the meter-based reading is 70, then the Preventive Maintenance Process creates a work order based on the meter-based reading.
Lead Days
Users can generate a preventive maintenance work order with a future due date by entering a specific number of lead days in the Lead Days field on the PM Schedule. This information also displays on the Preventive Maintenance Schedule Workbench. The Preventive Maintenance process ensures that the current date plus the number of lead days is equal to or greater than the calculated due date for the preventive maintenance work order and then creates the work order. If the lead days entered do not trigger the creation of a work order, the threshold percentage, if applicable, will generate the work order.
Note: Lead days are based on a 7 day per week calendar instead of a business calendar.
Scheduling Options
Different options are available for generating work orders based on both date-based and fixed-meter preventive maintenance schedules, which include:
Generate the new work order only when the prior is complete.
The Preventive Maintenance Process generates the next preventive maintenance work order for the selected asset, loop, or location only after the previously generated work order's status is marked complete.
Note: The process generates only one work order at a time for the PM Schedule. You must mark the PM work order complete before the process can generate another work order.
Always generate work orders based on the PM Schedule.
The Preventive Maintenance Process generates the next scheduled preventive maintenance work order even if the status of the most recently generated preventive maintenance work order is a status other than complete. The Preventive Maintenance Process continues to generate a work order for the next scheduled maintenance. A good example is when users set up a schedule to perform maintenance on a fleet of cars monthly and they are unable to complete the work before the next due date. This means that the first work order has a status of open. When the next due date comes up, the Preventive Maintenance Process creates a new work order with a status of open. Even if you change the status of the generated work order to complete, canceled, or open, the selected status does not affect the generation of the next preventive maintenance work order. This is important for organizations that need a method to keep track of every scheduled maintenance, even if the maintenance was not able to be performed.
Generate a work order if the prior work order's status is complete. If the prior work order's status is not complete, update the PM Log to identify that the scheduled work order will be fulfilled by the prior work order.
In this case, if you do not change the status of the current open work order to complete, then on the next maintenance due date, the Preventive Maintenance Process generates the next preventive maintenance audit record, which points to the open work order. The process continues creating audit records when the next due date or meter reading is due. Each audit record provides a method of tracking preventive maintenance work which was included as part of an existing work order.
Generate one time.
In this case, the Preventive Maintenance Process generates a preventive or scheduled maintenance work order only once. This option is often used for equipment that is under warranty to generate a final inspection of the asset before its warranty expires. The schedule type that you can select for this scheduling option is either None, which is used when a schedule applies only meter-based rules, or Specific Date.
Note: Scheduling options do not apply to projected meter rules.
Next Maintenance Due Calculations Using Date-Based Schedules
You can create scheduling rules based on dates or time periods. The Preventive Maintenance Process uses these rules to determine when the next maintenance is due by comparing the last performed maintenance date to the current date. If the number of days between the last performed maintenance date and the current date matches the calculated interval that is defined by the date-based rules, then the Preventive Maintenance Process generates a work order.
After you select a scheduling option, if the scheduling is date-based, you must select the type of maintenance schedule (Schedule Type) that you want the Preventive Maintenance Process to use to generate work orders. The schedule types include:
Daily
Selecting this option means that you want to schedule the maintenance based on intervals of a specific number of days. For example, if you want the floor cleaned in the shop every two days, you enter an interval number of 2, which means that the Preventive Maintenance Process creates a preventive maintenance work order for this task every two days.
If you select Generate the new work order only when the prior is complete as the scheduling option, then you can select the From Last PM Completion check box, which enables the system to use the completion date in the previous work order for calculating the next maintenance due date. If you do not select this check box, then the system uses the start date that is specified in the previous work order for calculating the next maintenance due date.
Note: For the start date that appears in the work order header, the Preventive Maintenance Process compares the calculated start date against a predefined calendar that you can optionally select in the PM Options page of the work order business unit. The process searches forward to ensure that the actual start date of the preventive maintenance work order falls on the next available working day. The Preventive Maintenance Process does not validate the start date if you do not select a calendar in the work order business unit.
Monthly by Date
You enter the number of months between each maintenance as the number of intervals and the date of the month in which you want the Preventive Maintenance Process to create a work order for the maintenance. The Preventive Maintenance Process uses a 360-day year (twelve 30-day months) in the calculations.
Note: For the start date that appears in the work order header, the Preventive Maintenance Process compares the calculated start date against a predefined calendar that you can optionally select in the PM Options page of the work order business unit. The process searches forward to ensure that the actual start date of the preventive maintenance work order falls on the next available working day. The Preventive Maintenance Process does not validate the start date if you do not select a calendar in the work order business unit.
Monthly by Day
You enter the number of months between each maintenance as the number of intervals, the week of the month, and the day of the week in the month in which you want the Preventive Maintenance Process to create a work order for the maintenance. The Preventive Maintenance Process uses a 360-day year (twelve 30-day months) in the calculations.
None
You select this option when you want to use only meter-based schedules to determine the dates for the Preventive Maintenance Process to create a work order for the maintenance.
Weekly by Day
Enter the number of weeks between each maintenance as the number of intervals and select the day of the week in which you want the Preventive Maintenance Process to create a work order for the maintenance.
The Preventive Maintenance Process takes into account the threshold percentage that you indicate in the schedule's General Options page, as well as any blackout periods that you indicate in the schedule's Advanced Options page when it creates a preventive maintenance work order. In addition, the system calculates the percentage due for both date-based and fixed meter rules. The system compares these rules to the threshold percentage to determine the number of days before the actual next maintenance due date that the Preventive Maintenance Process should generate a work order.
The formula for calculating the percentage due for date-based rules is
Note: The last maintenance date depends on your selection of a scheduling option and scheduling type. For example, if you selected the scheduling option Generate the new work order only when the prior is Complete and select the From the last PM completion check box, then the date on which you changed the work order to complete is the date used here. If you selected any of the remaining date-based schedule types (except for None), the system uses the start date in the header of the last work order.
For example, if the last maintenance date was March 1, 2005, the current date is March 20, 2005, and the scheduled interval is 30 days, applying the formula 100 × 20 ÷ 30 = 66.7 percent due means that 66.7 percent of the scheduled maintenance period has passed before the next scheduled maintenance due date.
If this is the first cycle for the scheduled maintenance, then the formula is:
For example, if the basis date in the schedule is January 1, 2005 and the current date is January 25 and the cycle is every 30 days, then the percent due is 100 × 25 ÷ 30 = 80.3%.
The scheduling option that you select affects the fields that appear for the selected schedule type. This table describes the fields that appear in the Date-based Schedule group box when you select a specific schedule type after selecting a specific scheduling option:
|
Scheduling Option / Schedule Type |
Daily |
Monthly by Date |
Monthly by Day |
Weekly by Day |
Specific Date |
|---|---|---|---|---|---|
|
Generate the new work order only when the prior is complete. |
Field: Interval (days) Check box: From Last PM Completion |
Fields: Interval (days) Date of Month |
Fields: Interval (month(s)) Week of the Month Day of the Week |
Fields: Interval (week(s)) Day of the Week |
NA |
|
Always generate work orders based on the PM Schedule. |
Fields: Interval (days) |
Same as above. |
Same as above. |
Same as above. |
NA |
|
Generate work order if the prior is complete. If prior work order is not complete, update the PM Log to identify that the scheduled work order will be fulfilled by the prior work order. |
Same as above. |
Same as above. |
Same as above. |
Same as above. |
NA |
|
Generate one time only. |
NA |
NA |
NA |
NA |
Field: Schedule Date |
Next Maintenance Due Calculations - Meter-based Schedules: Basic (Fixed) Meter Readings
The Preventive Maintenance Process calculates the next maintenance due date and generates a work order based on the meter rules that are defined in the General Options page of the preventive maintenance schedule. You define the fixed meter rules on the Basic tab of the grid by selecting a meter type and entering the intervals for the meter readings. The Preventive Maintenance Process uses increasing and decreasing meter types. The start date in the work order header is considered the current date. The system determines when the next maintenance is due and when to create a work order by comparing the current equipment meter reading to the next maintenance due reading, which is the last meter reading plus the interval that is defined in the preventive maintenance schedule. If the asset has multiple meters associated with it, all meter intervals that are reached first cause the Preventive Maintenance Process to trigger the automatic creation of a work order.
For example, if the last maintenance for a car was performed when its odometer reading was 7000 miles, and the meter interval specified to indicate that the next maintenance due in the preventive maintenance schedule is 1000 miles, then the Preventive Maintenance Process creates the next preventive maintenance work order when the odometer of the car reaches 8000 miles. An odometer is an example of an increasing meter type.
If you enter a threshold percentage amount, the Preventive Maintenance Process takes that number into account, as well as any specified blackout periods, when it creates a work order. For blackout periods, this means that if a meter reading interval is every 1000 miles, and the interval is reached during a blackout period, then the process does not create a work order. In addition, the Preventive Maintenance Process will not create a work order if the threshold percentage is equal to or less than the calculated percentage during a blackout period.
Once meter readings are entered in PeopleSoft Asset Management for the asset, the Preventive Maintenance Process uses the accumulated reading in the asset's Meter Reading History to determine the next maintenance due date.
The formula that the Preventive Maintenance Process uses to determine the next maintenance due date for preventive maintenance is based on an increasing meter type. The formula is
Next Meter Reading = Last PM Work Order Meter Reading + Meter Interval
Important! The Last PM Work Order Meter Reading value is used only for a PM Schedule in which you selected either the Generate the new work order only when the prior is Complete, Always generate work orders based on the PM Schedule, or Generate work order if the prior is Complete scheduling option.
If the prior work order is not complete, the process updates the Preventive Maintenance Process log to indicate that the scheduled work order will be fulfilled by the prior work order. In this case, the Preventive Maintenance Process uses the previously calculated meter reading. Thus, you do not have to enter the last work order reading.
If this is the first preventive maintenance cycle, which means that no last preventive maintenance meter reading exists, the Preventive Maintenance Process uses zero as the lower limit reading in the formula:
Next Meter Reading = zero + Meter Interval
For example, if the lower limit for the odometer is set at 0 miles, and your maintenance interval is every 1000 miles, then the next service is based on a odometer reading of 1000 miles.
A good example of how decreasing meters are used involves the measurement of the thickness of tire tread for tires that are attached to an earth mover. The tread of these expensive tires decreases over time. Each meter reading captures the current thickness of each tire's tread. Once the reading falls below a specified value, the Preventive Maintenance Process generates a preventive maintenance work order. This is an example of how using a decreasing meter can serve as an elementary method for performing condition-based monitoring for assets that wear down or deteriorate over time. It is much more useful for this type of meter to trigger the preventive maintenance of an asset, rather than tying the reading to the tire's accumulated mileage, because an earth mover that travels over coarse gravel can wear down the tire treads much faster than an earth mover that travels on soft dirt, even if the miles traveled in the soft dirt are greater.
The formula that the Preventive Maintenance Process uses to determine the next maintenance based on a decreasing meter type is the same as the formula for increasing meters, because it uses the accumulated reading from the Meter Reading table, which is increasing and positive for both increasing and decreasing meter types. Only positive numbers can be entered for the meter interval value in the PM Schedule for both increasing and decreasing meter types.
Because these are fixed meter readings, the Preventive Maintenance Process also accounts for the threshold percentage. For example, if the threshold percentage is 80 percent, the Preventive Maintenance Process creates a work order when the calculated percentage due based on a defined meter interval reaches 80 percent. If more than one meter interval is listed, the system uses the percentage closest to the threshold percentage. The formula for calculating the percentage due is:
Percent Due = 100 × Current Reading − Previous Work Order Reading ÷ Meter Interval
For example, if the current odometer reading is 7700 miles, the previous reading was 7000 miles and the meter interval is 1000 miles, then 100 × 7700 – 7000 ÷ 1000 = 70 percent due.
If the threshold percentage is equal to or greater than 80 percent, then the system creates a work order when the calculated percentage based on the meter reading reaches 80 percent.
You can associate an asset with a meter type that has a tolerance range defined. You add this meter type to the Basic grid in the preventive maintenance schedule. When the meter reading falls outside this tolerance, PeopleSoft Asset Management sends a message to the in PeopleSoft Maintenance Management, which states: "Out of tolerance readings will enforce the creating of a preventive maintenance work order. Do you want to proceed?" If the user answers yes, then the system selects the Override Options – Generate one time check box in every preventive maintenance schedule that has that asset and meter type defined. The Preventive Maintenance Schedule Workbench on the CBM Alert tab is updated with the schedule ID, the override options, and the CBM source, which is the system that issued the alert. When the Preventive Maintenance Process runs, work orders are created for these preventive maintenance schedules.
Projected meter readings are useful for calculating the next maintenance due as long as they are accurate. Projected meter readings can be used for:
Maintenance that is performed by outside organizations.
In this situation, the Preventive Maintenance Process generates a preventive maintenance work order with a start date in the near future to determine the equipment downtime and the work start date to avoid conflicts with the outside organization's external resources.
Planning purposes.
The maintenance planner can gain efficiency and reduce costs and prevent maintenance delays by projecting when and how often the future preventive maintenance needs to be performed.
You select the way you want the Preventive Maintenance Projection process to project the next maintenance due in the schedule's Meter-based Schedules – Advanced grid. You select from two overall methods for estimating or projecting the next maintenance due:
Average from Asset.
Sampling.
Three different types of sampling methods are available.
Days.
Readings.
Cycles.
Note: Scheduling options do not apply to projected meters, which means that the status of the previous work order does not affect the creation of the next work order. For projected meters, the next work order will be generated when the status of the previous work order is changed to complete.
The objective of both the Average from Asset and the Sampling methods is to project the next maintenance due date for an asset. The difference between Average from Asset, Sampling Days, and Sampling Readings methods is based on the way the average reading per day is obtained or calculated. Once the average reading per day is calculated, average from asset, sampling days, and sample readings all use the same formula to calculate the number of days until the projected next maintenance is due.
The following table presents both examples and guidelines for using each projection method.
|
Method |
Guidelines |
Example |
|---|---|---|
|
Average from Asset |
|
A delivery truck that is used for a regular, fixed route. The odometer is logged daily. |
|
Sampling – Days |
|
A service truck that is used for a fixed geographical area and has variable service calls per day. The odometer is logged weekly. |
|
Sampling – Readings |
|
A rescue vehicle that responds to a large variety of calls in a multitude of geographical areas. The odometer is logged after each call. |
|
Sampling – Cycles |
|
A rescue vehicle. The odometer is logged monthly. |
See Understanding Asset Meters.
Determining Average Meter Reading Measured Per Day for Average from Asset, Sampling Days, and Sampling Readings
Before the Preventive Maintenance Process can apply the formulas described previously, the system has to determine the average meter reading measured per day for the average from asset, sampling days, and sampling readings methods.
Important! For example, if the meter type is an odometer, the average meter reading per day is equal to the average number of miles that accumulate each day based on daily odometer readings.
The Average from Asset method uses the actual average daily meter reading in the Asset Meter table as its average meter reading per day figure.
The Sampling Days method and the Sampling Readings method are very similar in the way they determine the average meter reading per day value. The difference between the two methods is the way the sample size is determined based on the readings in the Meter Reading History table. This is an example of the data that is contained in the PeopleSoft Asset Management Meter Reading History table for a particular asset's odometer meter:
|
Meter Reading Date |
Current Meter Reading in Miles |
|---|---|
|
April 30, 2004 |
10000 |
|
April 15, 2004 |
8000 |
|
April 1, 2004 |
7800 |
|
March 21, 2004 |
5000 |
|
March 11, 2004 |
3000 |
|
February 2, 2004 |
2500 |
|
February 1, 2004 |
1000 |
Sampling Days Method
The sample size that is used in this method is based on the actual number of days that you want the system to count back based on the dates that the meter readings were taken in the Meter Reading History table from the current date.
For example, if you enter a sample size of 60 days in the schedule and today's date is May 4, 2004, the system counts back 60 days from May 4, 2004 to the first reading date, which is March 11, 2004. The last reading date in the Meter Reading History table is April 30, 2004. If you calculate the number of days between March 11, 2004 and April 30, 2004, 50 days are between these readings.
To calculate the average number of miles per day based on sampling days, the system uses this formula:
(Last meter reading – First meter reading) ÷ The total number of days between the meter readings = Average miles or meter reading value per day.
Continuing with our example using the Sampling Days method, the last meter reading was on April 30, 2004 and was 10,000 miles. The first meter reading was on March 11, 2004 and was 3000 miles. There are 50 days between the meter readings. Based on this information, you apply the formula (10,000 miles – 3,000 miles) ÷ 50 days = 140 miles per day (average miles or meter reading value per day).
Sampling Readings Method
The sample size that is used in this method is based on the number of readings in the table, not days, that you want the system to count back from the current date.
For example, if you enter a sample size in the schedule of three readings and if today's date is May 4, 2004, then the first reading date is March 21, 2004 and the last reading date is April 30, 2004.
Note: The number of sample readings is based on counting the last reading date and the reading date prior to the first reading date in the Meter Reading History table, which means April 30, 2004, April 15, 2004, and April 1, 2004. The total number of days between March 21, 2004 and April 30, 2004 meter readings is 40 days.
Continuing with our example using sampling readings, the last meter reading was April 30, 2004 and was 10,000 miles. The first meter reading based on a sample reading size of 3 was March 21, 2004 and was 5000 miles. There are 40 days between the meter readings. Based on this information, you apply the formula (10,000 miles – 5,000 miles) ÷ 40 days = 125 miles per day (average miles or meter reading value per day).
Calculating the Next Maintenance Due Date for the Average from Asset, Sampling Days, and Sampling Readings Methods
Once the system calculates the average meter reading value per day for each meter-based method, it can apply the results of these calculations (from either the Average from Asset calculation, the Sampling Days calculation, or the Sampling Readings calculation) to the following formulas to determine the next maintenance due date.
The formula that is used by the Preventive Maintenance Process is based on the values that you select in the schedule's Projected From field, which are:
Last PM Completion Date
This is the date when the last preventive maintenance work order was marked complete.
Current System Date
This is the next date that the Preventive Maintenance Process will be run to generate a work order.
The formula for increasing meters if you selected a Projected From value of Last PM Completion Date is:
Meter Interval ÷ Average Meter Reading per Day = Number of days from the completion of the last preventive maintenance work order to the next preventive maintenance due date.
For example, if the meter interval is 2000 miles and the average meter reading per day is 140 miles per day, then 2000 ÷ 140 = 14 days. This means that the next maintenance due date is 14 days from the work order completion date.
If you selected the Projected From value of Current System Date, the formula for increasing meters is:
(Reading from the date that the last preventive maintenance work order was completed + Meter Interval defined in the PM Schedule) – Current Meter Reading ÷ Average Meter Reading per Day
For example, to determine the days due based on our Sampling Days example:
You select the Last PM value in the schedule. The last date that you changed the status of the preventive maintenance work order to complete was April 30, 2004, and the meter reading was 10,000 miles. The interval value that you entered for this odometer in the schedule was 2,000 miles. The current meter reading is 11,000 miles.
(10,000 miles + 2,000 miles) – 11,000 miles ÷ 140 miles per day = 7 days
Therefore, the projected maintenance due date is seven days from the last date that the Preventive Maintenance Process was run. For example, if the run date was May 1, then the next maintenance due date would be seven days from May 1, 2004, or specifically May 8, 2004.
The formula for decreasing meters is the same as it is for increasing meters because the process uses the accumulated meter reading from the Meter Reading table, which is increasing and positive for decreasing meters. The intervals must always be positive.
Important! Remember that these formulas apply exactly the same for the sampling readings and average from asset methods. The only difference is that you must use the average meter reading per day value in the formula based on the method that you choose in the Meter-based Schedules Advance grid.
Sampling Cycles Method
Sampling cycles are based on the percentage due and are projected only from the last date that you ran the Preventive Maintenance Process. The system first calculates the percentage that the maintenance is due. Next, the process calculates the number of days it took to get to that percentage. This number of days is then used to determine how many days it takes to reach 100 percent.
The formula that is used for increasing meters is:
Percentage of the preventive maintenance due for an asset = 100 × (Current Meter Reading – Meter Reading from the last completed PM work order) ÷ Meter Reading Interval
For example, the current meter reading for a truck is 10000 miles, and the meter reading for last preventive maintenance work order performed for an oil change was 7500 miles, and the interval defined for changing the oil is 5000 miles. Then the maintenance due percentage is 100 × (10000 – 7500) ÷ 5000 = 50%.
To calculate the number of days that it took to reach this percentage (50 percent):
Days = Current Date – Last PM WO Complete Date
Continuing with the example, if it took 30 days to reach 50 percent, then it would take 30 more days for the preventive maintenance to be 100 percent due.
The formula that is used to calculate the number of days left to reach the maintenance date is:
Number of days left = 30 days × (100 – 50) ÷ 50 = 30 days.
Note: If a last PM WO completion date is not available (for first cycles), the system uses the Basis Date that is defined in the schedule, which can be the same date as the date that the asset was acquired or put in service, if applicable. If no meter reading is available from the last maintenance completed (for first cycles), the system uses zero as the lower limit. This also applies to the Average from Asset, Sampling Days, and Sampling Readings projected data.
This page enables you to define default values for the work order header. Values that you enter in this page override values that are set up elsewhere, such as the work order business unit. The default shop that you specify determines whether the preventive maintenance work orders that are generated require crew scheduling.
PeopleSoft Project Costing Data
You can set up PeopleSoft Project Costing data for a preventive maintenance work order here, or else the system will create the work order with the default project ID and generate an activity ID. When you save a PM Schedule, the system verifies that a default project exists.
If this preventive maintenance work order is associated with a Project Costing-managed project, then you can select both the project ID and the activity ID. Only one project activity is associated with all the work order tasks that are performed for a preventive maintenance work order.
If the preventive maintenance work order is associated with a work order-managed project, then you can select the project ID and the activity is generated automatically when the Preventive Maintenance Process creates the work order. If you leave both of these fields blank in the schedule for a work order-managed project, the Preventive Maintenance Process assigns the project ID and the activity ID based on the work order business unit, work order type, and service group values that you entered in the schedule.
When you access the Preventive Maintenance Schedule Workbench, the Project tab has a field that indicates whether the project that is associated with a preventive maintenance work order is associated with a Project Costing-managed project or a work order-managed project.
Duration Multiple for Loop Schedules
This field appears only in the Advanced Option page of the Loop Schedule component. You can use this field to increase the preventive maintenance work order duration by multiplying the value of this field by the value of the duration field in the work order job template.
For example, if a loop has three similar assets, and the associated job template has one or more sequential tasks (100 percent dependent) that total 8 hours, then if:
You want the system to perform a parallel operation on the assets, you do not enter any multiple and the duration in the work order header is 8 hours.
You want the system to perform a sequential operation on the assets, then you enter a multiple of 3, which is multiplied times 8 hours, which means the duration in the header is 24 hours.
Blackout Periods
You can specify blackout periods on the PM Schedule Advanced Options page. Blackout periods are periods when the selected asset is unavailable for maintenance. For example, seasonal assets, such as snow-plowing equipment, may not be available for routine maintenance until the snow season ends. These periods are used in the calculation of the next maintenance due dates for all date-based and meter-based schedules, except for schedules using a specific date. If the next maintenance due date falls within a specified range of blackout dates, the Preventive Maintenance Process will not, under any circumstances, generate a work order.
After setting up maintenance types and associating them with primary and secondary schedules, you access a primary preventive maintenance schedule for a single asset, loop schedule, or location schedule, select the PM Linking tab, and associate this primary schedule with one or more secondary schedules. Assign an effective date and status to the list of secondary schedules that you associate with the primary schedule so that you can track any changes you make to this setup. You can link multiple secondary PM schedules with a single primary schedule, as well as link a single secondary schedule to multiple primary schedules. However, you cannot select a primary PM schedule as a secondary schedule and link it to another primary PM schedule.
You add the secondary schedules to a Secondary Schedules grid. Select either the Days Tolerance or the Linking by Cycle linking method for each secondary schedule, as well as a linking action, which determines whether the Preventive Maintenance process will generate one or more work orders for the linked schedules.
Linking Actions
Whether you select the linking method Days Tolerance or Linking by Cycle, you must select a linking action on the Secondary Schedules - General tab to determine whether the Preventive Maintenance process will generate a single work order or multiple work orders based on the linked schedules. The linking actions are:
Merge
The Preventive Maintenance process will merge secondary schedule tasks with the primary schedule tasks in a single work order.
Separate
The Preventive Maintenance process will create separate work order for the primary and secondary schedules with the same due date. The system will not reserve duplicate parts assigned to tasks on the primary and the secondary schedules.
Suppress
The Preventive Maintenance process lists only the primary schedule tasks in the work order and suppresses the secondary tasks. No work order will be created for the secondary schedule tasks. However, the system creates a PM record transaction for the secondary schedule, which points to the work order created for the primary schedule.
Days Tolerance Linking Method
You select the days tolerance linking method to indicate when the system can link the primary and selected secondary preventive maintenance schedules based on a specified difference in the dates. Selecting the Days Tolerance method also displays a Days Tolerance field, where you enter the number of days tolerated (allowed) between the date on the primary PM schedule and the date on the secondary PM schedule.
The Preventive Maintenance process looks at the schedule dates and tolerance, and schedules the maintenance for the primary PM schedule and the secondary PM schedule at the same time. For example, you indicate that the Days Tolerance for the secondary PM schedule is 5, the maintenance for the primary PM schedule is currently due, and the maintenance for the selected secondary PM schedule is due in 5 days. When the Preventive Maintenance process runs, it will link the primary PM schedule to this secondary PM schedule and generate one work order or individual work orders at the same time based on the maintenance date for the primary PM schedule and the linking action selected.
When a black out period is in place and the linking method is days tolerance, the system will not link a secondary schedule with a primary schedule if the primary schedule's due date or the secondary schedule's due date falls within the black out period. The system validates the secondary schedule's due date against the defined secondary schedule's black out dates, and the primary schedule's due date against the defined primary schedule's black out dates.
Linking by Cycle Method
You select linking by cycle as the linking method and the Preventive Maintenance process will link the selected secondary schedules to the primary schedule based on cycles, which are determined by meter reading intervals or date intervals. The linking of a secondary schedule to a primary schedule depends on the number of times the secondary schedule's cycle occurs within the primary schedule's cycle. When you select the linking by cycle method on the Secondary Schedules - General tab, a Cycle tab appears, which enables you to select an interval type of meter or day.
When you select meter as the interval type, a Meter Type field appears, where you can select the type of meter to apply to the schedule. Only meter types that are common to the meters identified on the linked primary and secondary schedules are available for selection. In addition, the meter interval for the primary PM schedule appears along with the meter interval for the secondary PM schedule, as well as the current occurrence number, the total number of occurrences, and the current cycle number. The meter interval for the primary PM schedule should always be larger than the meter interval for the secondary PM schedule. For example, the meter interval on the primary PM schedule is every 30,000 miles and the meter interval on the secondary PM schedule is every 500 miles.
If you select Day as the interval type on the Cycle tab, the primary interval, the primary schedule type (which determines whether the due date occurs daily, weekly, or monthly), the secondary interval, the secondary schedule type, the current occurrence number, the total number of occurrences, and the current cycle number appear on the grid. For the interval type value, the primary interval should always be greater than the secondary interval. For example, the primary schedule's interval is every 12 months and the secondary schedule's interval is every three months.
Every time the Preventive Maintenance process schedules the next maintenance for a linked secondary PM schedule, it adds one to the Current Occurrence field on the Cycle tab. This field value changes to zero when the current occurrence field reaches the total number of occurrences per cycle. The system calculates the total number of occurrences per cycle by dividing the interval of the primary PM schedule by the interval of the linked secondary PM schedule. For example, if the interval for a primary PM schedule is 30,000 miles and the interval for a linked secondary PM schedule is 7500 miles, then the occurrences per cycle is equal to 4. The system also resets the current cycle, which is updated by the Preventive Maintenance process each time a cycle is completed and the primary and secondary PM schedule's maintenances are linked.
When the black out period is in place and the linking method is cycle, the system will not link the primary and secondary schedules if either the secondary schedule's due date or the primary schedule's due date is within the black out period. When the secondary schedule's due date is within the blackout period, the system will add one to the Current Occurrence field. If the current occurrences reach the total occurrences within a cycle, the Preventive Maintenance process creates a work order for the primary schedule and not the secondary schedule.
Preventive Maintenance and Projection Processing of Linked PM Schedules
You can run the Preventive Maintenance process to generate work orders for linked primary and secondary schedules. You can also run the Preventive Maintenance Projection process to generate work orders and projected due dates for linked primary and secondary schedules.
Linking and the Preventive Maintenance Process
When you run the Preventive Maintenance process, the process links primary and secondary maintenances as long as the linking criteria is met based on the days tolerance or cycle occurrences. The process:
Generates maintenance schedules with the same due date in a single work order, which combines both the primary and secondary tasks.
Generates maintenance schedules with the same due date in a single work order, which contains only primary work order tasks and suppresses secondary tasks.
Generates maintenance schedules with the same due date into multiple work orders, one containing primary schedule tasks, and one or more work orders containing secondary schedule tasks.
Records linking information along with the PM log to enable the tracking of linked maintenances.
Updates the occurrences field for the PM linking cycle in the PM schedule component.
Once preventive maintenance primary and secondary schedules are set up and saved, they are listed on the Preventive Maintenance Schedule Workbench. Users can click a link to edit each schedule. Once the Preventive Maintenance process runs and generates work orders with linked schedules and the PM log is generated, the PM Inquiry component indicates that the schedules have been linked.
Note: If you create two separate primary schedules with the same asset and linked them to the same secondary schedule with the same asset and both schedules have the same calculated due date, when the Preventive Maintenance process runs, it will check for duplicate linkage and only link the secondary schedule to the first primary schedule being processed.
Linking and the Preventive Maintenance Projection Process
The Preventive Maintenance Projection Process links all primary and secondary schedules as they occur. For example, based on the setup of a primary PM schedule and secondary PM schedule, one major service is performed for every three minor services performed. When the PM Projection process runs, it generates nine projections for the minor services and links the major service with the 3rd, 6th, and 9th minor services.
When maintenance is scheduled using Preventive Maintenance or the PM Projection process and there are secondary schedules defined with the days tolerance method, the system compares the calculated due date for the primary schedule to the due date for the secondary schedule. If the due dates are the same, or if the difference between the due dates is a number of days less than or equal to the days tolerance defined in the setup, the process will link the maintenances. The primary due date can be a number of days earlier or later than the secondary due date as long as the number of days is within the days tolerance. If these criteria are not met, the process does not link the maintenances.
Note: The Preventive Maintenance Projection process updates the Preventive Maintenance Projection Summary component, which lists primary PM schedules and indicates if they are linked. The Preventive Maintenance Projection Detail component displays a list of secondary PM schedules that are linked to a primary PM schedule. The Preventive Maintenance Projection process also creates a PM log, which is used for tracking linked maintenances.
Linking Exceptions
When the Preventive Maintenance and Projection processes encounter linking exceptions, users can access an Exceptions page to review the linked transactions. The system sends a email to the scheduler indicating that an exception has occurred and sends the exception to a worklist. You can also view the exceptions based on the process instance using the PM Exception component (Maintenance Management, Preventive Maintenance, PM Exception.)
For example, If the Preventive Maintenance process already scheduled the preventive maintenance for the secondary schedule's maintenance prior to the due date for the primary schedule's maintenance, and the work order status is not complete, closed or canceled, the process will generate an exception and notify the scheduler through an e-mail, which contains a link to the Exceptions page. The user reviews the exception transactions and decides upon an appropriate action. If cancelling the work order is the best solution, the user can click a link on the Exceptions page to access the Work Order Workbench and perform a mass cancellation for all of the listed work orders.
Important! The Scenarios for PeopleSoft Maintenance Management Troubleshooting contains several examples in the Processing PM Linked Schedules section.
Use this feature to copy the PM Schedule for similar individual assets to expedite the schedule that is set up for newly acquired assets. You define one PM Schedule and copy or clone this PM Schedule for multiple assets. When you select the asset ID that is associated with the schedule that you want to copy in the Copy From section, the date in the AM Business Unit, Asset Field, and Asset Type fields appears in the Copy To search criteria. Values may appear in additional fields depending on the asset ID that you select in the Copy From section. The system searches for and lists all of the assets that fall within the search criteria. You select the target asset to which you want to copy the Copy From asset's schedule.
When you copy schedules from one asset to another asset, the system will copy all PM linking definitions. The system will also copy any specified lead days. Copy Schedule automatically copies any linking and lead days information for all applicable schedules.
You can perform a mass update to PM (preventive maintenance) schedules that fall under a specified business unit and any additional search criteria that you select. A list of PM schedules appear based on your search criteria. You select the schedules that you want to update, and select the values that you want to update for these selected schedules on the Update page. The PM Schedule Mass Update process can update the:
PM Schedule.
PM Blackout Period Schedule.
PM Meter Schedule
PM Linking.
To perform a mass update, you must select a business unit on the Search page. You can also narrow your search by selecting criteria from these group boxes:
Scheduling Option.
Date-based Schedule.
Meter-based Schedule.
Advanced Options.
Blackout Period.
PM Linking.
When you click the Search button, a list of PM schedules matching your search criteria appears. You select the PM schedules that you want to update and click the Save button to save the search and update the selected PM schedules on the Update page.
You can select these options on the Update page:
Search options.
Scheduling options
Date-based Schedule options
Meter-based Schedule options.
Advanced options.
Blackout Period options.
PM Linking options.
The values that you select will be updated on each of the selected schedules when you run the PM Schedule Mass Update (WM_PMSCH_UPD) process. This process uses the current date as the effective date. The system automatically creates a new effective revision if it does not already exist. If a revision exists, the system updates the revision. When a new revision is created, the system copies the current version, and then applies the requested update.
The PM Workbench enables you to review all of the active preventive maintenance schedules that you created for a specific asset. Three different methods are available to search existing PM Schedules, which include:
Searching for the asset identified in a PM Schedule.
You must enter the Asset Management business unit under which the asset was set up and select the asset ID.
Searching for the asset location that is identified in a PM Schedule.
You must enter the Asset Management business unit, the location of the asset that is associated with the PM Schedule.
Searching for the work location, which is where the preventive maintenance work will be performed.
This search option is useful for searching for location schedules that are not associated with an asset. You must enter the work order business unit that is associated with each schedule and the location where the work will be performed.
Once you perform the search, a list of PM Schedules appears on the workbench. You can click the Edit link to access any of the listed schedules. The workbench tabs include:
PM Schedule Info
This tab enables users to click a link and edit a specific PM Schedule. Users can review on the workbench a description, the maintenance type that is associated with each schedule, whether a meter is used, whether any blackout periods exist, whether this schedule is linked to another schedule, a threshold percentage, and the basis date of each schedule listed.
PM Loop Info
This tab enables users to access and edit any PM loop schedules that are listed. Users can also review the PM loop definition that was used to create the PM Loop Schedule.
Work Order Info
This tab enables users to review the work order business unit, job template, shop, work type, service group, priority code, service group, approval status, internal status, and work order description that is associated with each schedule.
Date Options
This tab enables users to review each schedule type, any intervals, the week (if applicable), the date of the month (if applicable), the day (if applicable), and whether the next maintenance due date is calculated from the completion date of the last preventive maintenance work order.
Scheduling Option
This tab enables users to review the scheduling option that is selected for each preventive maintenance schedule.
Project
This tab enables users to review the PC business unit, project, and activity that are associated with each of the PM Schedules in the list. A WO managed column is also available, which indicates whether the project that is associated with the schedule is a work order-managed project.
CBM Alert
This tab enables users to review the override options, which indicate whether the system should override selected scheduling options and generate a work order, and the CBM source, which is the monitoring system that initiated the alert, for conditional-based maintenance work orders.
Last Reviewed
This tab enables users to review when and who last reviewed each PM Schedule that is listed.
You can also review any meters that were used to determine the next maintenance due date for the selected asset. This grid displays whether the meter is an increasing or decreasing meter, the unit of measure that is used for the readings, the calculation method that is used, and whether the next due date will be projected from the completion date of the last preventive maintenance work order, the system date, or neither. You can click a link to access the Meter Readings History for the meter and asset. You can click another link to access a Meter Readings Trend Chart for a listed meter, which displays the meter readings over a series of meter reading dates and times.
Use the PM Schedule - General Options page (WM_PM_SCHD_PG1) to define the date-based and meter-based rules for the Preventive Maintenance Process to use in determining the next due date upon which to generate a preventive maintenance work order.
Navigation:
This example illustrates the fields and controls on the PM Schedule - General Options page. You can find definitions for the fields and controls later on this page.

Field or Control |
Description |
|---|---|
Maintenance Loop link |
Click the link to view and edit the details of PM Loop. |
Description |
Define the purpose of the preventive maintenance work order and describe, briefly, the scheduling rules and intervals being defined in this schedule. |
Maintenance Type |
Change the PM schedule maintenance type if needed. Save it. |
Basis Date |
Enter a PM schedule basis date, which is used to calculate the Due Date. Enter the basis date that you want the Preventive Maintenance Process to use as the base date for the first cycle of generating a preventive maintenance work order. For example, this date is often the installed or in-service date of the asset. The only time that this date is not used for a schedule is when you enter a specific date for the maintenance to occur. If you do not enter a Basis Date, the date is calculated automatically using the Due Date. The calculation occurs once you save the page. Note: If you do not enter a due date, you must enter a basis date. This field is unavailable for selection in the PM Schedule after the first work order is generated. |
Due Date |
Enter a due date to calculate the preventive maintenance schedule basis date, when a basis date is not provided. If you do not enter a Due Date, the date is calculated automatically using the Basis Date. The calculation occurs once you save the page. Note: If you do not enter a due date, you must enter a basis date. This field is unavailable for selection in the PM Schedule after the first work order is generated. |
View History |
Click the View History link to access the PM Schedule History details. Any changes made to the PM Schedule is automatically recorded when you save the PM schedule. The details include a description of the PM Schedule update, date and time the PM schedule component was last updated, and the name of the person who updated the schedule. The PM Schedule, PM Loop Schedule, and PM Location Schedule components display the View History link. When you create a PM or update a field, the Description changes accordingly. Based on the field changes, the PM Schedule History displays any of the following descriptions:
If you update a field or multiple fields, other than those listed above, the history description is displayed as PM Schedule Component Updated. |
Asset Details |
Click this link to view the Asset Information Page, which provides additional details about the asset, such as asset type, asset subtype, asset status, and retire date. |
Status |
Displays the status of the PM schedule. The PM schedule status will be Inactive till the schedule is approved. The status will be Active after the schedule approval. |
WO Job Template (work order job template) |
Select a work order job template to define the job steps, requirements, and associated data to apply to the work order that is generated by the Preventive Maintenance Process. This template is used unless an overriding template is specified in the preventive maintenance loop definition. |
Job Template link |
Click the link to view and edit the details of the Work Order Job Template |
Override options - Generate one time |
Select to enable the Preventive Maintenance Process to bypass any scheduling rules and force the creation of a work order in the next run of the PM Process. The system deselects this check box after the work order is created. This check box is automatically selected when PeopleSoft Asset Management issues a CBM alert based on a meter reading exceeding its range tolerance for the schedule's asset. The Preventive Maintenance Process looks at this check box and generates a condition-based maintenance work order. |
Scheduling Option |
Select the method that you want to use to schedule this preventive maintenance work order:
|
Threshold % (threshold percent) |
Enter a value to instruct the system to force the due date for the preventive maintenance work to occur earlier than the scheduled date based on the percentage that is entered here. Note: You should set the threshold below 100 percent, especially when a long lead time is required to acquire materials, services, and tools that are required to perform the scheduled maintenance that is associated with the PM Schedule. |
Lead Days |
Enter the number of days from the current system date that you want the Preventive Maintenance process to generate a preventive maintenance work order with a future due date. The Preventive Maintenance process ensures that the current date plus the number of lead days is equal to or greater than the calculated due date for the preventive maintenance work order and then creates the work order. |
Approval Status |
Displays the approval status of the schedule. The status will be Initial when a new PM schedule is created. |
Approval History |
Click the Approval History link to view the Approval Preview page. |
Calendar |
Select a calendar for the PM schedule. The PM process will use the calendar setup defined in the Maintenance Management BU definition if the calendar option in the PM schedule is left blank. |
Approval Preview |
Click the Approval Preview button to display the page which holds the PM schedule identifying information, as well as the Approval Map and the Submit for Approval button. The Approval Preview button is displayed when a new or updated PM schedule is saved. |
Submit for Approval |
Click the Submit for Approval button to route the PM schedule to the Compliance Manager. The user will be shown the Approval Preview page, with the Approval map updated to show where the request is within the system. The Submit for Approval button is displayed when a new or updated PM schedule is saved. |
Cancel Approval |
Click the Cancel Approval button to cancel the approval process and display the Approval Preview page. The Cancel Approval button is displayed only when the Approval Status is Pending Approval. |
Note: A preventative maintenance schedule would require approval only in the case of a hazardous asset. The approval process will be enabled only on for hazardous assets.
Date-based Schedule
Field or Control |
Description |
|---|---|
Schedule Type |
Select the type of date-based schedule for the Preventive Maintenance Process to use to generate a preventive maintenance work order. These values vary depending on the scheduling option that you choose.
|
Examples
The table below list scenarios to better understand the behavior of preventive maintenance and projection processes based on the Use Business Day option in the Work Order Definition setup.
|
PM Schedule Type |
Scenario |
Use Business Day |
Normal Business Days |
Interval |
Number of non-business days |
Last Schedule date |
Process Calculation |
Resulting Due Date |
|---|---|---|---|---|---|---|---|---|
|
Daily |
I |
Disabled |
Monday to Friday |
15 days |
4 |
August 18th, 2014 |
Last Schedule date + PM schedule interval |
September 2nd, 2014 |
|
Daily |
II |
Enabled |
Monday to Friday |
15 days |
4 |
August 18th, 2014 |
Last Schedule date + PM schedule interval + number of non-business days |
September 8th, 2014 Note: September 6th being a Saturday is skipped. |
Navigation:
Scenario I
If the PM schedule has an interval of 15 days, you can run the preventive maintenance and projection processes to calculate the due date.
This example illustrates the fields and controls on the Business Calendar page. You can set up non-business days here.
For more information about business calendars, see Defining Business Calendars
Scenario II
If the PM schedule has an interval of 15 days plus 4 non-business days, when the Use Business Day option is selected, you can run the preventive maintenance and projection processes for the daily schedule to calculate the due date.
This example illustrates the fields and controls on the PM Options page. You can schedule the next business day here in the event of a non-business day in the system.

For more information about Preventive Maintenance, see PM Options Page
Meter-based Schedules – Basic
Select the Basic tab.
Field or Control |
Description |
|---|---|
Meter Type |
Select a type of meter, which is set up in PeopleSoft Asset Management. The default description and the UOM (unit of measure) that are defined for the selected meter type appear. |
Interval |
Enter the specific increasing or decreasing amount that you want the meter to measure, which the system uses to calculate the next maintenance due date. For example, if the asset is a vehicle and the meter is an odometer, enter the number of miles that needs to accumulate before the Preventive Maintenance Process creates a preventive maintenance work order for the vehicle that requires servicing. The Interval field does not appear for meter types that use a meter range, such as a battery. When this type of meter is out of range, PeopleSoft Asset Management sets the Override Options – Generate one time check box to yes (selected). When the Preventive Maintenance Process runs, it generates a condition-based maintenance work order that is based on the alert. Note: You must always enter a positive value for either increasing or decreasing meter measurements. |
Last Reading |
Enter the last PM accumulated meter reading. This field appears on the PM Schedule and Loop Schedule pages when a PM schedule has just been created and no work orders have been generated based on this schedule. The last PM accumulated meter reading must be a valid reading from the Meter Reading page in PeopleSoft Asset Management. See "Entering Meter Readings" section in the documentation PeopleSoft Asset Management |
Meter-based Schedules- Advanced: Estimate Meter Usage is Average from Asset
Select the Meter-based Schedules - Advanced tab. The values in this grid change based on the value that you select for Estimate Meter Usage.
Field or Control |
Description |
|---|---|
Estimate Meter Usage |
Select Average from Asset. The Preventive Maintenance Process and the Preventive Maintenance Projection process both calculate and project the next maintenance due date using the average meter reading from the PeopleSoft Asset Management meter table. Selecting this value displays these Projected From options:
Select Sampling to determine the next maintenance due date based on one of three methods. The fields that appear when you select this option are described in the next section. Note: If you select None for the Estimate Meter Usage value, the Preventive Maintenance Process generates a preventive maintenance work order based on the interval amount that is indicated in the Basic grid. For example, if you specify an interval of 2000 miles between vehicle services, the system generates a preventive maintenance work order every time its odometer increases by 2000 miles from its last preventive maintenance service. |
Meter-based Schedules- Advanced: Estimate Meter Usage is Sampling
Select the Meter-based Schedules – Advanced tab and select Sampling in the Estimated Meter Usage field to display the following options:
Field or Control |
Description |
|---|---|
Sampling Method |
Select one of the methods in the list. Sampling methods are used to calculate averages based on an asset's meter-reading history to determine the next preventive maintenance due date. The sampling methods include:
|
Use the PM Schedule - Advanced Options page (WM_PM_SCHD_PG2) to define work order header specifications, which are optional, that the Preventive Maintenance Process uses when it creates a work order and also define blackout periods to apply to the scheduling rules that are set up on the General Options page.
Navigation:
Select the Advanced Options tab.
This example illustrates the fields and controls on the PM Schedule Advanced Options page. You can find definitions for the fields and controls later on this page.
Field or Control |
Description |
|---|---|
Update Last Reviewed |
Click to update the date and time in the preventive maintenance schedule and indicate that the preventive maintenance schedule has been reviewed. The value that is shown in the field can then be used to determine when the schedule was last reviewed and who reviewed it. The date, time, and user ID appear in the Last Reviewed field. |
Service Group, Work Type, Shop, and Priority Code |
Specify the default values for the preventive maintenance work order header. The work order Business Unit field acts as the set control field for the Service Group, Work Type, Priority Code, and Task Status fields. Note: The Preventive Maintenance Process uses the work order business unit, job template, and preventive maintenance schedule as the hierarchy for retrieving default values for the preventive maintenance work order. |
Task Status |
Select a task status to apply to the work order. This status must be the same at every level of the work order. Specifying a status at this level overrides the status that is set up in the work order business unit. |
Crew and Empl ID |
The Crew and Employee ID fields for a PM schedule can override the Shop Scheduler and Crew Leader criteria that you defined on the Auto Assignment & Dispatch page. If you enter the Employee ID, the Crew field become blank and disabled. Similarly, if you enter the Crew ID, the Employee ID field become blank and disabled. When you run a PM process, it will consider the PM Schedule employee ID instead of the employee ID that you specified on the Auto Assignment & Dispatch page. The concept is applicable for the Crew field as well. |
Approval |
Select whether this work order is Pre-Approved or requires Workflow Approval. When you select a value in this field, it overrides whatever value is set up in the work order business unit, the shop, or the work type. |
Description |
Enter the description of this preventive maintenance that you want to appear in the work order. This is a required field in the work order. |
PC Business Unit (Project Costing business unit) |
Displays a default value based on the specification in the work order business unit. |
Project ID and Activity ID |
Enter values for both of these fields if the preventive maintenance work orders that are generated by the Preventive Maintenance Process based on this schedule are associated with a Project Costing-managed project. If the preventive maintenance work orders that are generated by the Preventive Maintenance Process based on this schedule are associated with a work order-managed project, perform one of the following activities:
|
Work Order Duration Multiplier |
The system displays this field only in the Loop Schedule - Advanced Options page. The default value is 1. The Preventive Maintenance Process calculates the duration for a preventive maintenance work order based on the value residing in the Duration field that is defined for an asset in the associated work order job template. |
Repeat Years |
Specify the number of years for which you want to create blackout periods and specify the start date and end date for the blackout period that you want to repeat. |
Populate |
Click to add the successive blackout period rows to the Blackout Period grid based on the number of repeat years and start and end dates that you entered. |
Blackout Periods
Blackout periods are often used for seasonal assets, such as snow-plowing equipment. The Preventive Maintenance Process does not generate preventive maintenance work orders during the blackout periods that are specified in this schedule.
Note: These periods are taken into consideration for date-based schedules (except for specified dates) and all types of meter-based schedules.
Field or Control |
Description |
|---|---|
Start Date |
Specify the start date for each blackout period that you add. |
End Date |
Specify the end date for each blackout period that you add. |
Blackout Method |
Select a blackout method. The available options are:
|
On hold |
Select this check box for blackouts with uncertain end dates. When this check box is selected and the calculated due date is greater than or equal to the blackout start date, the PM process will not generate the work order. You can deselect this check box and generate the work order once you know the end date for the blackout. |
Use the PM Linking page (WM_PM_SCHD_LINK) to link secondary schedules to a primary schedule.
Navigation:
Maintenance Management, Preventive Maintenance, PM Schedule Management Setup, click the PM Linking tab.
This example illustrates the fields and controls on the PM Linking page. You can find definitions for the fields and controls later on this page.

Field or Control |
Description |
|---|---|
Asset Details |
Click link to access the Asset Information page, which lists characteristics and pertinent information about the asset. You can modify the asset's description on this page. |
PM Linking
Field or Control |
Description |
|---|---|
Effective Date |
Enter the date from which the setup of these secondary schedules with this primary schedule is effective. You can change this effective date when you change the secondary schedule setup by clicking the plus icon. This enables you to track changes to this page. Note: In case a major maintenance is due but minor is not due yet (This can happen when you enter a WO meter reading for the minor WO greater than the meter interval), the system generates the major WO and not link them. The next time the PM process is run with the minor due, and the occurrences per cycle is reached, then the system links maintenances with WO creation. If the previous major WO is still in process the system creates a PM Exception so you can take proper action. |
Status |
Select active or inactive to identify the status of this PM Linking secondary schedule setup. |
Sequence |
Enter a sequence number for the primary schedule if you selected Merge as the linking action. The numbers entered in this field will define the order of the primary and secondary job template for the Preventive Maintenance process to use when it creates work orders and merges primary tasks and secondary tasks. If you selected either Separate or Suppress as the linking action, you can leave the sequence value blank. For example: The selected linking action is Merge and the:
When the Preventive Maintenance process creates the tasks in the work order, the MAJOR tasks are first, followed by MINORB tasks, and then MINORA tasks.
Note: The work order header fields are always populated with the primary schedule information regardless of the sequence number value entered for the primary schedule. Any duplicate tasks between schedules are deleted. If MAJOR has one of its tasks in common with MINORA, the Preventive Maintenance process will keep only one of the tasks. |
Parent/Child |
Select this check box to create PM work orders with a parent/child relationship for multiple levels. The parent PM schedule due date will determine when the work orders are created for the child PM. You can also create child PM schedules with its own scheduling options and intervals independent of the parent PM schedule. |
Secondary Schedules
You select the secondary schedules that you want to add to this primary schedule using the General and Cycle tabs.
Select the General tab.
Field or Control |
Description |
|---|---|
Edit |
Click this link to access the selected secondary schedule. If you have not selected a secondary schedule, you can click this link to access the PM Schedule Search Results page and select a secondary schedule from the list of schedules in the Search Results. |
Sequence |
Enter a sequence number for each secondary schedule if you selected Merge as the linking action. The numbers entered in this field will define the order of the primary and secondary job template for the Preventive Maintenance process to use when it creates work orders and merges primary tasks and secondary tasks. Note: If you selected either Separate or Suppress as the linking action, you can leave these values blank. See Example in PM Linking subtopic. |
Schedule ID |
Enter a Schedule ID or click the search icon and select a secondary schedule to associate with this primary schedule. |
Description |
Displays the description of the selected secondary schedule. |
Linking Method |
Select one of these linking methods:
|
Linking Action |
Select one of these values:
|
Days Tolerance |
Enter the number days between the calculated due date of the primary schedule and the calculated due date of the selected secondary schedule. For example:
|
Linking by Cycle
When you select the Linking by Cycle as the Linking Method on the General tab, only the Linking Action field appears on the tab and a Cycle tab appears next to the General tab.
You select the linking action that defines whether the Preventive Maintenance process creates one or multiple work orders as described previously. This field works the same for both the Days Tolerance and Linking by Cycle methods.
Once you select the Linking by Cycle method and the linking action, select the Cycle tab.
Field or Control |
Description |
|---|---|
Interval Type |
Select either:
|
Primary Interval |
Displays the interval entered for the primary PM schedule on the General Options page. This value must always be greater than any secondary intervals. This field is display-only. You must access the General Options page to modify this value. If you selected Day as the interval type, this field displays the number of days that you entered in the Interval field on the General Options page. If you selected Meter as the interval type, theMeter Type field appears. You select the meter type, such as Hours, and the primary interval hours set up on the General Options page for the primary schedule and the secondary schedule display in their appropriate fields. |
Schedule Type |
Displays the schedule type for the primary schedule, which appears on the General Options page of the Schedule component. This field only appears if the selected interval type is Day. You can only change this value by accessing the Schedule Type field on the General Options page of the primary schedule. |
Secondary Interval |
Displays the date interval set up on the General Options page for a secondary schedule. This value must always be smaller than the primary schedule interval. This field should is display-only. You can click the Edit link and update the secondary schedule in the General Options page. |
Schedule Type |
Displays the schedule type for the secondary schedule, which appears on the General Options page of the Schedule component. This field only appears if the selected interval type is Day You can change this field by clicking the Edit link for each secondary schedule listed in the Secondary Schedules grid. |
Current Occurrence |
The Preventive Maintenance process adds 1 to this field every time it schedules the next maintenance for a secondary schedule. When this field gets to the total number of occurrences per cycle and the primary schedule is also due, the system updates this field with zero. This is always a display only field. |
Occurrences per Cycle |
Displays the number of secondary intervals that occur within a primary interval. The system calculates this figure using the formula: primary interval / secondary interval = occurrences per cycle. For date intervals, the interval is converted to days. A cycle should have at least two occurrences. Whenever a secondary schedule's interval is changed and it is defined in the linking definition using the cycle method, the system validates the occurrences per cycle field with the new interval value. Example of the calculation for occurrences per cycle based on meters:
Example of the calculation for occurrences per cycle based on days:
|
Current Cycle |
Displays current maintenance cycle for the linking the primary schedule to this secondary schedule. Once the Preventive Maintenance process runs and links the primary schedule maintenance with the secondary schedule maintenance for each of the occurrences per cycle, then the cycle is considered complete and the system updates the value in this Current Cycle field. For example: If the current cycle value is 1, the occurrences per cycle are 4and the current occurrence is also 4, the current cycle value will change to 2 after the Preventive Maintenance process runs and links the secondary schedule maintenance with the primary schedule maintenance. |
Use the Copy PM Schedule page (WM_PM_SCHD_CPY) to copy data from an existing PM Schedule to a new PM Schedule.
Navigation:
This example illustrates the fields and controls on the Copy PM Schedule page. You can find definitions for the fields and controls later on this page.

Field or Control |
Description |
|---|---|
Search |
Click to display a list of assets in the Search Results grid based on the criteria that you set up in the Copy To group box. |
Copy |
Select the target assets from the Search Results group box to which you want to copy the selected copy from asset's schedule. Once the schedule is copied to the selected assets, then you can review and modify the new schedules of the assets by selecting |
Copy From
Select the Asset Management business unit that is associated with the asset PM Schedule from which you want to copy. When you select the asset ID that is associated with the schedule from which you want to copy, the AM business unit and the asset type values appear in the fields in the Copy To group box of the page. Additional field values may also appear depending on the asset ID that you select in the Copy From group box on the page. The system automatically copies any linking and lead days information for all applicable schedules.
Note: The only assets that appear in the list are assets that are associated with a PM Schedule.
Copy To
Field or Control |
Description |
|---|---|
AM Business Unit (Asset Management business unit) |
Select a business unit to narrow the search for the target assets to which you want to copy the preventive maintenance schedule. When you select an asset ID in the Copy From group box, the AM Business Unit and Asset Type values appear in this Copy To group box. Note: You can override or delete the values from all of the asset characteristic fields except for Asset Type. |
From (asset identifier) and To (asset identifier) |
Enter a range of asset IDs, serial IDs, tag numbers, or vehicle identification numbers (VIN). The field names that appear are based on the value that you select for the Asset Field. If you select Don't Show for the Asset Field value, then these fields do not appear at all. Once you set up the Copy To and Copy From criteria, when you click the Search button, schedules that match the criteria appear on the page and the Copy button is enabled. If no schedules appear, then there are not schedules available to match the criteria you selected. You should modify your criteria or select another asset. Once schedules appear on the page, you can select the schedules you want to copy and click the Copy button. A message appears indicating that PM schedules for the number of schedules that you selected were created. When search for PM schedules on the PM Schedule search page, these new schedules should be listed. Note: Since a maintenance type is associated with an asset subtype during setup and should not be changed, the Asset Subtype field on this page is inaccessible to avoid selecting an incorrect value for the maintenance type. |
Use the PM Schedule Mass Update – Search page (WM_PM_SCH_UPD_RUN1) to enter search criteria to search for PM schedules on which to run the Mass Update process.
Navigation:
Maintenance Management, Preventive Maintenance, PM Schedule Management Setup, PM Schedule Mass Update, Search tab
Field or Control |
Description |
|---|---|
Run Control ID |
Select or add a run control ID on the PM Schedule Mass Update Find an Existing Value or Add a New Value search pages. |
Search |
Click this button after selecting any of the options in each of the group boxes listed below that you want to use to narrow your search criteria for schedules for which you want to perform a PM Mass Schedule Update. After clicking this button, a list of PM schedules appears on the page. You select the schedules from the list for which you want to perform a PM Mass Schedule Update and click the Save button. Once the selected schedules are saved, you can click the Update tab. |
Search Options
Field or Control |
Description |
|---|---|
Business Unit |
You are required to enter a business unit to search for schedules to update. |
Search Field |
You can optionally select one of these values to narrow your search for schedules to update:
|
Remaining Fields in Group Box |
The rest of the fields on this page are self-explanatory and appear on other schedule page. |
Scheduling Options
Select one of these scheduling options to narrow your search for schedules that you want to update. These options appear on the Schedule - General Options page (Maintenance Management, Preventive Maintenance, PM Schedule Management Setup, Schedule, General Options page).
Date-based Option
Field or Control |
Description |
|---|---|
Schedule Type |
The schedule type values appear on the Schedule-General Options page (Maintenance Management, Preventive Maintenance, PM Schedule Management Setup, Schedule, General Options page.) |
Meter-based Option
Field or Control |
Description |
|---|---|
Meter Type |
Select a meter type to narrow your search for schedules for which you want to perform a PM Mass Schedule Update. |
Advanced Options
Select any advanced options to narrow your search for schedules for which you want to perform a PM Mass Schedule Update.
Blackout Period
Enter the dates of any blackout periods to narrow your search for schedules for which you want to perform a PM Mass Schedule Update.
PM Linking
Select any secondary schedules that are linked to this primary schedule to narrow your search for schedules for which you want to perform a PM Mass Schedule Update.
See PM Schedule Linking.
Use the PM Schedule Mass Update – Update page (WM_PM_SCH_UPD_RUN1) to select the information on the schedules that you want to update and run the PM Mass Schedule Update (WM_PMSCH_UPD) process, which updates each of the selected schedules.
Navigation:
Maintenance Management, Preventive Maintenance, PM Schedule Management Setup, PM Schedule Mass Update, Update
This example illustrates the fields and controls on the PM Schedule Mass Update - Update page. You can find definitions for the fields and controls later on this page.
Important! You cannot access the Update tab until you search for PM schedules to update and save the Search page.
The values that you selected on the Search page appear on the Update page. You can override or select different values before you click the Run button.
Field or Control |
Description |
|---|---|
Last Run On: |
Displays the date that the PM Schedule Mass Update process was last run. |
Run |
Click this button to run the PM Schedule Mass Update (WM_PMSCH_UPD) process. When you run this process, the system uses the current date as the effective date. The system automatically creates a new effective revision if it does not already exist. If a revision exists, the system updates the revision. When a new revision is created, the system copies the current version, and then applies the requested update |
Use the Preventive Maintenance Schedule Workbench page (WM_PM_SCHD_WKBC) to maintain an asset's preventive maintenance schedules.
Navigation:
This example illustrates the fields and controls on the Preventive Maintenance Schedule Workbench Page. You can find definitions for the fields and controls later on this page.

This example illustrates the fields and controls on the Preventive Maintenance Schedule Workbench Page (2 of 3). You can find definitions for the fields and controls later on this page.
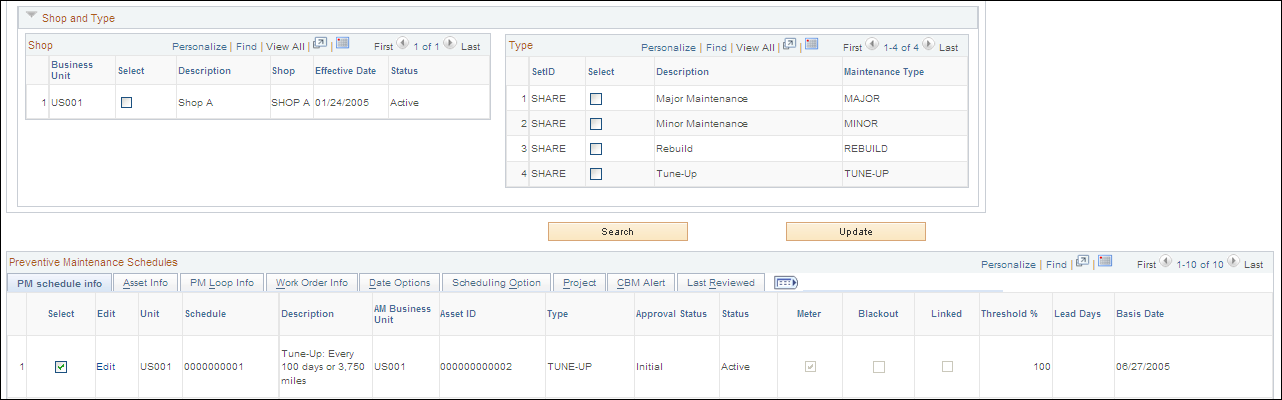
This example illustrates the fields and controls on the Preventive Maintenance Schedule Workbench Page (3 of 3). You can find definitions for the fields and controls later on this page.

Field or Control |
Description |
|---|---|
|
|
Approval Status |
Select the desired approval status from the following options:
|
Description |
Enter the description for the search. |
Schedule |
Select the desired PM schedule for the search. |
Loop ID |
Select the desired maintenance loop ID for the search |
Status |
Select from the various statuses available |
Schedule Type |
Select the type of schedule from the options:
|
Work Location |
Select one or more work locations from the list, to view the associated PM schedules. |
Asset Information
Field or Control |
Description |
|---|---|
AM Business Unit |
Select the desired Asset Management business unit for the PM schedules. |
Tag Number |
Select the desired tag number for the AM business unit. |
Serial ID |
Select the serial ID for the AM business unit. |
Asset Location |
Select from the various asset locations based on the location ID. |
Area ID |
Select the required area ID from the list. |
Asset ID |
Select the required asset identification from the list. |
Asset Type |
Select the type of asset from the available options:
|
Subtype |
Select the asset sub type based on the types of asset selected. |
Mfg ID |
Select the manufacturing ID for the AM business unit. |
Model |
Select the model of AM business unit. |
Asset Description |
Enter any relevant description for the asset. |
Asset Criticality |
Select the criticality of the asset from the following options:
|
Shop and Type |
Select one or more shops, and type of shop from the list, to view the associated PM schedules. |
PM Schedule Info
Click the Edit link to access and update the associated PM Schedule. This tab contains a check box, which indicates whether the schedule has linking setup information.
PM Loop Info
Click the View link to access the PM Loop Find an Existing Value page and select a maintenance loop to review.
CBM Alert
If this asset is associated with a meter that has a range tolerance, and the meter reading for the asset exceeds the tolerance limit, then a condition-based maintenance alert is sent from PeopleSoft Asset Management to PeopleSoft Maintenance Management. PeopleSoft Asset Management automatically selects the override option in the schedule to enable the Preventive Maintenance Process to generate a condition-based maintenance work order.
Meter and Meter Readings History
This grid appears if one or more meters are associated with an asset. Click the View link to view the Meter Reading History information in PeopleSoft Asset Management.
Blackout Periods
If you set up blackout periods for a schedule, they appear as part of the PM Schedule Workbench if you select the check boxes for the schedules in the list that have the Blackout check box selected.