Running the Pro Forma, Finalization, Print, and Reprint Processes
This topic discusses how to running the Pro Forma, Finalization, Print, and Reprint Processes.
The topic also provides examples of the pro forma function, the Finalize and Print job, and Reprint processes.
Important! When printing, you must select a job on the Process Scheduler Request page that will generate the type of invoice that you selected during bill entry, or the invoices will not print. For example, if you select Landscape as the invoice form on the Standard Billing - Header - Info 1 page, you must run a job containing the SQR landscape process (BIIVCLN) from the Process Scheduler Request page. In this example, an appropriate job would be Print Invoice w/SQR.
Note: For best performance, complete the From Business Unit and To Business Unit fields on the Generate Invoices run control pages when possible.
Field or Control |
Description |
|---|---|
Currency Shown on Load GL Report(currency shown on load general ledger report) |
Select to print the Load GL report in transaction or base currency. This option is available when you use the Single Action Invoice page. |
EDI Invoice Options |
Select the EDI setting. Options are:
This setting affects only bills for which you define the bill-to media as EDI on the Standard - Address Info page, allowing you to override the invoice setting. |
Electronic Invoice Options |
Select the Electronic invoice setting. Options are:
|
Email Notification Options |
Select the Email setting. Options are:
This setting affects only bills for which you define the bill-to media as Email Notification on the Standard - Address Info page, allowing you to override the invoice setting. |
Email Invoice Options |
Select the Email setting. Options are:
This setting affects only bills for which you define the bill-to media as Email Invoice As Attachment on the Standard - Address Info page, allowing you to override the invoice setting. To email the supporting documentation along with the invoice, you need to select either Email Only or Email and Print option. |
From Due Date and To Due Date |
Enter a date range to search for invoices with an associated due date that falls within the specified date range values. The dates that you enter are inclusive. Note: If you define a due date range, you must define a value for both the From Due Date and To Due Date fields. |
From Business Unit and To Business Unit |
Only invoices from business units between those in the From Business Unit and To Business Unit fields (inclusive) will be processed. Leave this field blank to process invoices from all business units. Enter the same business unit in both the From Business Unit and To Business Unit fields to process invoices from a single business unit. The From and To Business Unit option applies to Finalize and Print only. |
From Invoice Date and To Invoice Date |
Enter a date range to search for invoices with an associated invoice date that falls within the specified date range values. The dates that you enter are inclusive. Note: If you define an invoice date range, you must define a value for both the From Invoice Date and the To Invoice Date fields. |
Include Attached Bills |
Select to include attached invoices in the selection criteria. Use this feature when you want to reprint an attached invoice without reprinting the entire consolidated invoice. Do not select this field if you want to filter out attached invoices from the selection criteria. |
Include Open Items Only |
Select to include in the search criteria invoices that have an associated open item in PeopleSoft Receivables. This option is not available if you have not installed PeopleSoft Receivables. You can use this option with the other selection criteria on the Reprint Invoices page to identify past-due items. For example, to reprint open invoices due in a previous month, select the Include Open Items Only option, enter the first day of that month in the From Due Date field, and enter the last day of that month in the To Due Date field. Note: To reprint an invoice that is associated with an open item, a record must exist in PeopleSoft Receivables with an open status for the corresponding invoice. Invoices in the Pending Items table that have not been loaded to PeopleSoft Receivables are not available for reprint. |
Language |
The language in which you want the field labels and report headings of the reports to print. The field values appear as you enter them. The system determines which bill line description to use when printing invoices. It uses the bill line fields (IDENTIFIER, IDENTIFIER_TBL, and LANG_DESCR_OVR) in combination with the specified/recipient's run control fields to print bill line descriptions in the correct language. |
Print Only Unprinted Invoices |
Select to have the system retrieve only invoices in the range with the status INV that have not yet been printed. If this option is deselected, the system prints all INV bills in the range selected, including those that have been printed before. The system determines which invoices have been printed before because it marks them as printed or extracted and selects the Invoice Printed check box on the Bill Summary Info page. |
Summarization Options |
Select the print setting for summarized invoices. Options are:
This setting affects only bills that contain one or more lines having summarization templates. The appropriate invoice processes for generating the summarized and standard invoice forms must be run. For example, both the BISLSUM and BIIVCLN processes must be run to print both summarized and detail SQR (Structured Query Report) landscape invoices. |
Use Current Effective Address |
Select if you want reprinted invoices to include the current effective-dated bill-to address for the customer. If you do not select this option, the reprinted invoices include the customer address that is active for the bill's invoice date. Select when the customer has recently changed addresses and the reprinted bill is sent to the new address. This option appears only when you are reprinting invoices or pro forma invoices. |
|
Page Name |
Definition Name |
Usage |
|---|---|---|
|
RUN_BI_PRNTIVC |
Establish parameters for printing or reprinting pro forma invoices or actual invoices. |
|
|
Bills To Be Processed Page |
BI_BILL_LIST_SBP |
View all the bills in the range selection. The bills reflect the options that you define on the main page. Depending on how you access the page, some fields may not appear. |
|
RUN_BI_PRNTIVC |
Define parameters for printing or reprinting an invoice. |
|
|
Validation Errors Page (Finalize and Print, and Single Action Invoice) |
BI_RUN_CTL_VAL_SBP |
Displays validation errors for invoices selected in run control parameters. |
|
RUN_BI_PROFORM_OPT |
Define parameters for printing or reprinting a pro forma invoice. |
Use the Pro Forma, Finalize and Print, Reprint Invoices page (RUN_BI_PRNTIVC) to establish parameters for printing or reprinting pro forma invoices or actual invoices.
Navigation:
Define the run control parameters. The system selects only bills with the status of non-INV (noninvoiced) and non-FNL (nonfinalized) for running pro formas.
Alternatively, you can click the Generate Pro Forma Invoice button in standard billing or bill summary component pages.
Use the Pro Forma, Finalize and Print, Reprint Invoices page (RUN_BI_PRNTIVC) to establish parameters for printing or reprinting pro forma invoices or actual invoices.
Navigation:
Define the run control parameters. The system selects only bills with the status RDY for running the Finalize and Print job. For invoices that are subject to the invoice approval process, the system selects only those invoices that have been approved.
Alternatively, you can click the Generate Invoice button in standard billing or bill summary component pages. When you initiate the Finalize and Print job using this button, the system checks the setting of the Job Run Opt control on the User Preferences page for Billing. If the setting is Print/Load, the Currency Conversion, Preload, Load AR, and Load GL processes will be run in addition to the finalization, extract, and printing processes.
During the printing process, any invoices that are marked for delivery with Email Invoice as Attachment will be emailed. Also, if an invoice image is to be retained, the image will be produced as a PDF and attached to the invoice header at printing time. Both the email and the invoice image attachment processing are performed by the BI_XMLPBURST program that is run with the printing jobs.
To understand the Validate button, see Validation Errors Page (Finalize and Print, and Single Action Invoice)
Use the Validation Errors page (BI_RUN_CTL_VAL_SBP) to verify inactive and invalid data from the bill header and distribution lines as well as combination edit rule errors.
Navigation:
From the Finalize and Print or the Single Action Invoice pages, select the Validate button.
This example illustrates the fields and controls on the Validation Errors page.
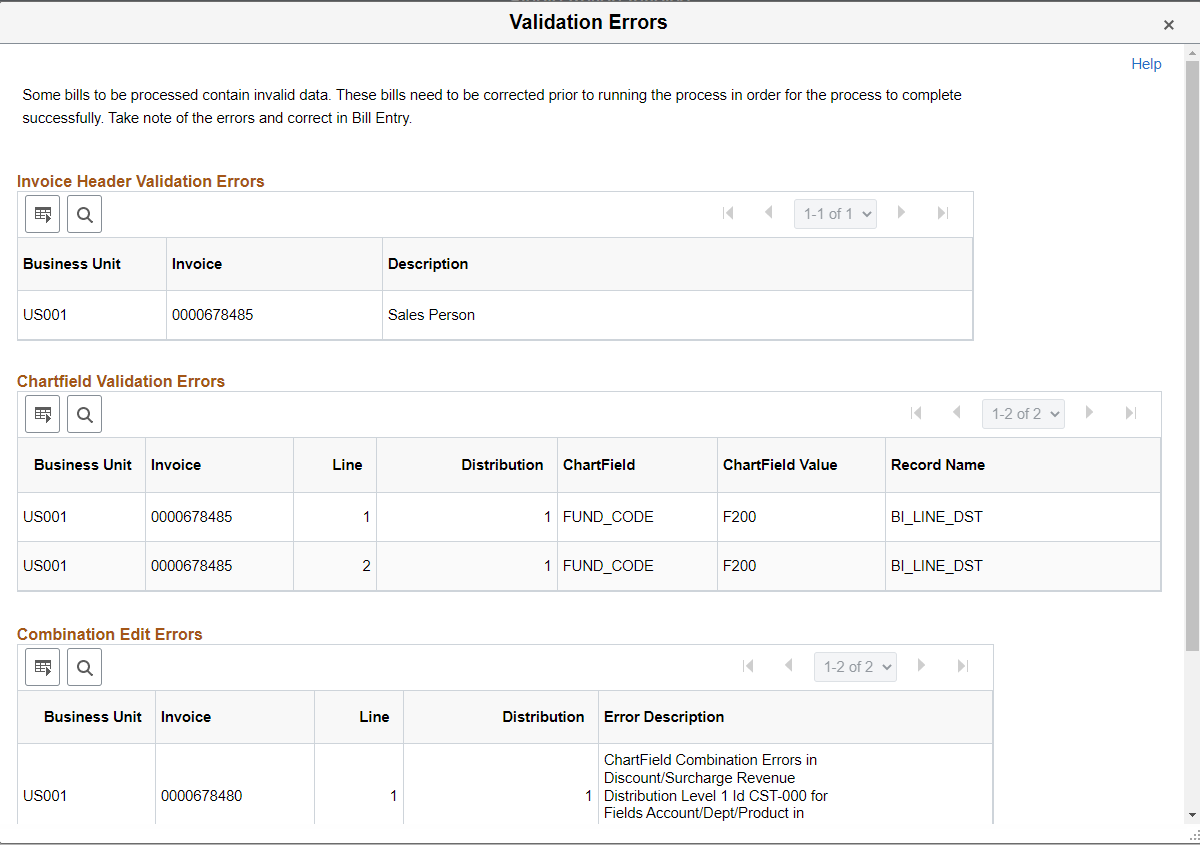
When selecting the Validate button, the Validation process verifies that the header data is valid and that all ChartFields entered are active. If inactive or invalid data is found, the system displays the Validation Errors page.
In addition, combination edits are performed by calling application engine job BICOMBO1. If combination edit errors are found, the system displays them on the Validation errors page.
Validation steps:
When you select the Validate button, but before running the process, the system checks to see how many bills and bill lines are selected.
If more than 50 bills, or 100 lines are selected, the system displays a message to allow you to cancel the process. This is due to the amount of time it may take to run the process. If you want to reduce the number or bills or lines, select Cancel and change your run parameters.
If less than 50 bills, or 100 lines are selected, the system continues to step 2.
The system runs the Validation process:
If validation errors exist, the Validation Errors page appears
You must go back to the Bill Entry page to correct the invalid data.
If all data is valid, the system displays a message saying, "No invalid data was found."
The following grids only appear when an error is found in that area:
The Invoice Header Validation Errors grid displays inactive data. See Understanding Validations for the data that is validated on the bill header.
The ChartField Validation Errors grid displays invalid ChartField data from Distribution Lines. See Understanding Validations for the ChartFields that are not validated.
The Combination Edit Errors grid displays combination edit errors. These errors are actually the combination edit rules that are in error.
The Error Description column displays the combination edit rule that is in error.
Use the Pro Forma, Finalize and Print, Reprint Invoices page (RUN_BI_PRNTIVC) to establish parameters for printing or reprinting pro forma invoices or actual invoices.
Navigation:
When you use this page to reprint an invoice, the invoice looks like the original and does not go through the finalization process again. The system selects only bills with the status of INV that have already been printed. These parameters are the same for reprints, as if you were running the original invoices.
Note: When you reprint an invoice, you can select current addressing information for the invoice as an alternative to the addressing information that was in effect at the time of invoicing. Invoices that are marked for Email Invoice as Attachment delivery, can be emailed again from the reprint component.
Note: Reprint functionality is not supported for invoices from PeopleSoft Grants when a value is defined on the bill header for the Letter of Credit ID (LC_ID) field and the Letter of Credit Document ID (LOC_DOC_ID) field.
Note: To reprint an attached invoice without reprinting an entire consolidated invoice, select the Include Attached Bills option on the Reprint Invoices page. Do not select this field if you want to filter out attached invoices from the selection criteria.
Note: While fully paid invoices are not printed during the finalization and print process, they can be reprinted if a copy of the invoice is needed.
With PeopleSoft Billing, invoicing is not limited to a single business unit. You can finalize and print bills from multiple business units and multiple range selections, all in a single run. For example, you can invoice all bills added on or after a certain date within multiple business units. You can invoice all bills for a certain customer within multiple business units. You can further qualify the selection of an invoice run by bill type or bill source. You can invoice all bill types or bill sources within multiple business units. In addition, you can leave the business unit option blank and invoice all bills for a particular customer, for a particular bill type or source, or for many other range selections.
The following examples demonstrate how you can take advantage of this flexibility. These examples use the Finalize and Print page.
Example: Processing a Single Invoice Range Selection for Two Business Units
Suppose that you want to process all bills for one customer in two business units. You need to set up two occurrences, one for each business unit that you want to process.
To process a single invoice range selection for two business units:
Enter the first business unit.
Select Cust ID (customer identification) in the Range Selection group box.
Enter a customer ID in the Customer field.
Insert a row to set up the second occurrence.
Click the insert row button.
Enter the second business unit.
Note: If the two business units are consecutive, you can also use the To Business Unit and From Business Unit fields on a single row.
Select Cust ID in the Range Selection group box.
In the Customer field, enter the same customer ID as in step 2.
Click the Bills To Be Processed button to access the Bills To Be Processed page, where you can view a summary of the bill or group of bills in the range selection to be processed.
Click Run.
The Process Scheduler Request page appears.
Select the appropriate billing process on the Process Scheduler Request page:
Select the Finalize and Print job (BIJOB01) to run several processes at once. If you run the listed processes individually, you must run them one at a time and in the correct order.
Click OK to run the selected process.
Example: Processing Multiple Invoice Range Selections for the Same Business Unit
Suppose that you want to invoice a range of bills in a single business unit and bills from PeopleSoft Order Management in the same business unit. You need to set up several occurrences, one for each range selection that you want to process.
To process multiple invoice range selections for the same business unit:
Enter a business unit.
Select Invoice ID in the Range Selection group box.
Enter the invoice range in the From Invoice and To Invoice fields.
Click Save.
Insert a row to set up the second occurrence.
Click the insert row button.
Enter a business unit.
Select Bill Source in the Range Selection group box.
Enter PS-OM (for PeopleSoft Order Management) in the Source field.
If an invoice falls within more than one range selection, then the system processes it with the defaults from the first range selection that contains the invoice.
Click the Bills To Be Processed button to access the Bills To Be Processed page, where you can view a summary of the bill or group of bills in the range selection to be processed.
Click Run.
The Process Scheduler Request page appears.
Select the appropriate billing process on the Process Scheduler Request page.
Select the Finalize and Print job (BIJOB0) to run several processes at once. If you run the listed processes individually, you must run them one at a time and in the correct order.
Click OK to run the selected process.
Example: Processing a Range of Bills for All Business Units
Suppose that you want to invoice all bills entered since December 1, 1997, regardless of the business unit.
To process a range of bills for all business units:
Select Date in the Range Selection group box.
Leave the Business Unit fields blank.
Enter 12-01-97 in the Bills Added On or After field.
Because you have not specified business units, the system invoices all bills in this date range for all business units.
Click the Bills To Be Processed button to access the Bills To Be Processed page, where you can view a summary of the bill or group of bills in the range selection to be processed.
Click Run.
The Process Scheduler Request page appears.
Select the appropriate billing process on the Process Scheduler Request page.
Select the Finalize and Print job (BIJOB01) to run several processes at once. If you run the listed processes individually, you must run them one at a time and in the correct order.
Click OK to run the selected process.
Example: Processing Invoices with the System Date as the Invoice Date
Suppose that you are scheduling invoices to run at the end of the month for the next six months.
To use the current system date at the time of processing as the invoice date:
Select Processing Date in the Invoice Date Option group box.
This command ensures that the current system date at the time of processing is used as the default invoice date for the bills in this run control.
Select Bill Cycle in the Range Selection group box.
Enter MTH-END as the cycle ID.
Click the Bills To Be Processed button to access the Bills To Be Processed page, where you can view a summary of the bill or group of bills in the range selection to be processed.
Click Run.
The Process Scheduler Request page appears.
Select Server in the Run Location group box, and select the appropriate server from the list box.
Select a date and time for the run control.
Schedule the run control on the last day of every month in the Run Date/Time group box.
When the bills in the run control are processed, the invoice date is automatically set to the last day of the month. You do not have to update the invoice date on the run control each month. If you entered an invoice date on the bill itself (on the Bill Header page), that date appears on the invoice. If you left this field blank, then the system uses the system date as the invoice date.
Select the appropriate billing process on the Process Scheduler Request page:
Select the Finalize and Print job (BIJOB01) to run several processes at once. If you run the listed processes individually, you must run them one at a time and in the correct order.
Click OK to run the selected process.