Creating and Managing Order Sheets
eProcurement Administrators can create order sheets for different GL business units at the Set ID level and authorize requesters to the order sheets. To create order sheets and access them, an eProcurement administrator must be assigned to the Permission List EPPV6500. To use any new order sheet component, it must be registered as a menu on the Permission Lists page.
You can navigate to the Personalize Homepage, and add the Administer Order Sheets tile to the required home page, if it does not display even after you are assigned to the Permission List.
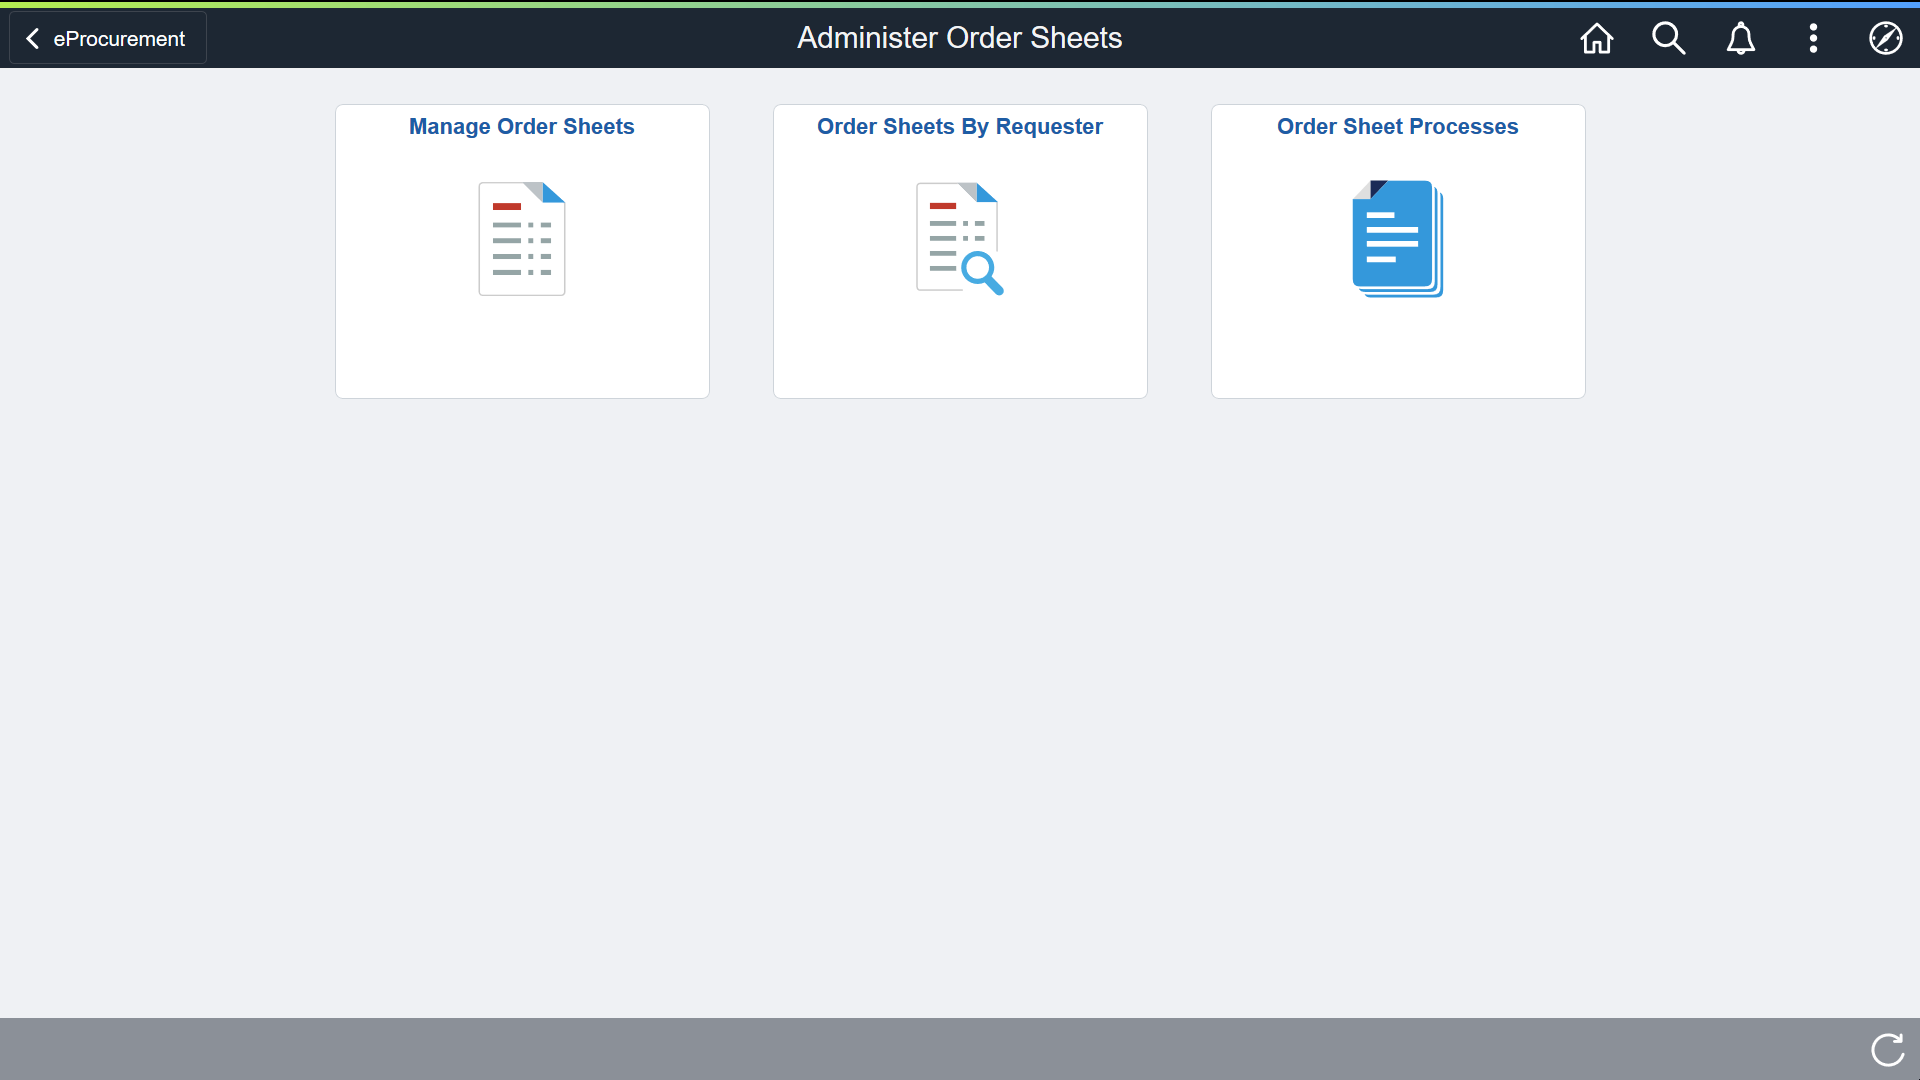
Use the Administer Order Sheets tile to access the Manage Order Sheets, Order Sheets By Requester, and Order Sheet Processes tiles for creating and managing order sheets.
This example illustrates the fields and controls on the Administer Order Sheets Tiles.
|
Page Name |
Definition Name |
Usage |
|---|---|---|
|
PV_OS_MANAGE_FL |
To create order sheets and search for existing order sheets. |
|
|
PV_OS_CREATE_FL |
To create order sheets at the Set ID level for authorized GL business units. |
|
|
PV_OS_DISTRIB_SCF |
To create order sheets with one or more distribution lines. |
|
|
PV_OS_MASS_SCF |
To mass update multiple order sheet item details at the same time. |
|
|
PV_OS_CREATE_FL |
To search for existing order sheets, edit the details, and perform related actions. |
|
|
PV_OS_SECURITY_FL |
To authorize requesters to the created order sheet. |
|
|
PV_OS_SEC_ADD_SCF |
To select requesters authorized to the GL business unit and assign them to the order sheets. |
|
|
PV_OS_INQUIRY_FL |
To search for order sheets by the authorized requesters. |
|
|
Navigation Collection |
To run mass update and mass validate processes. |
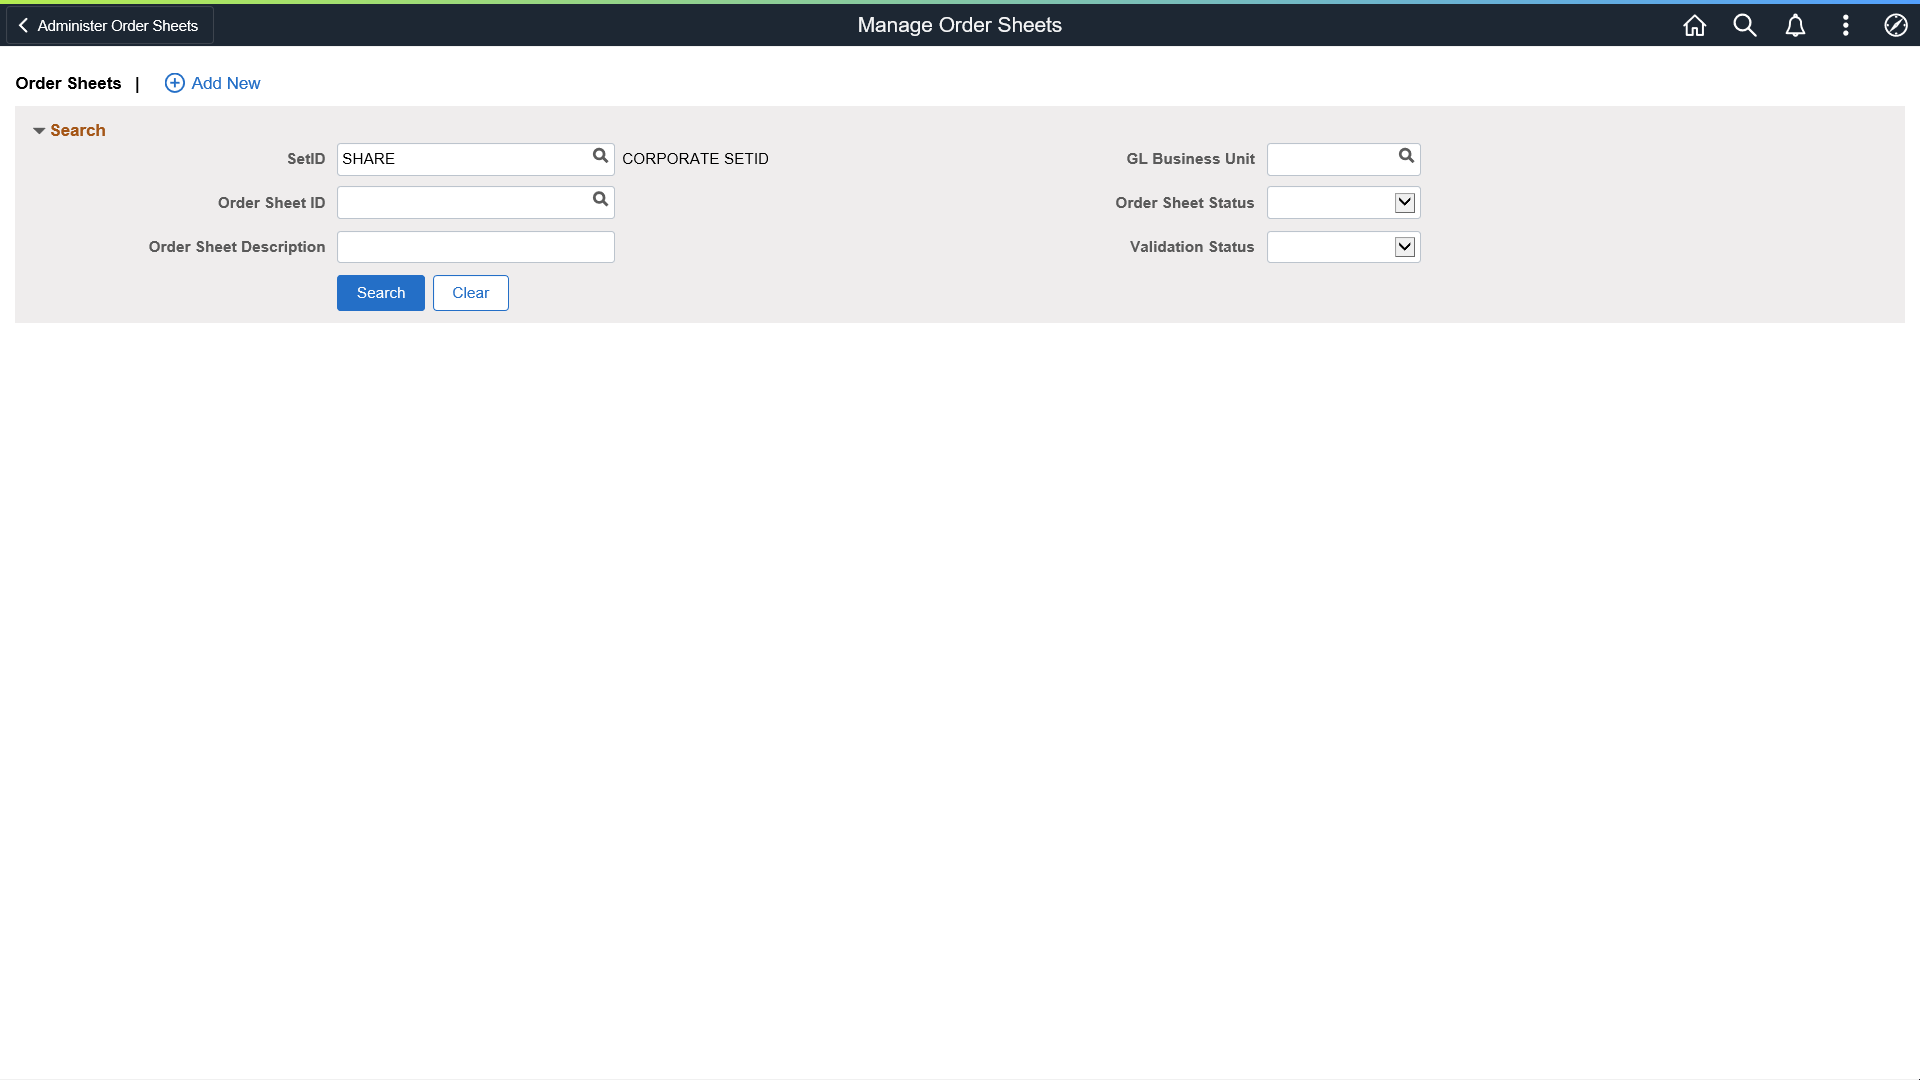
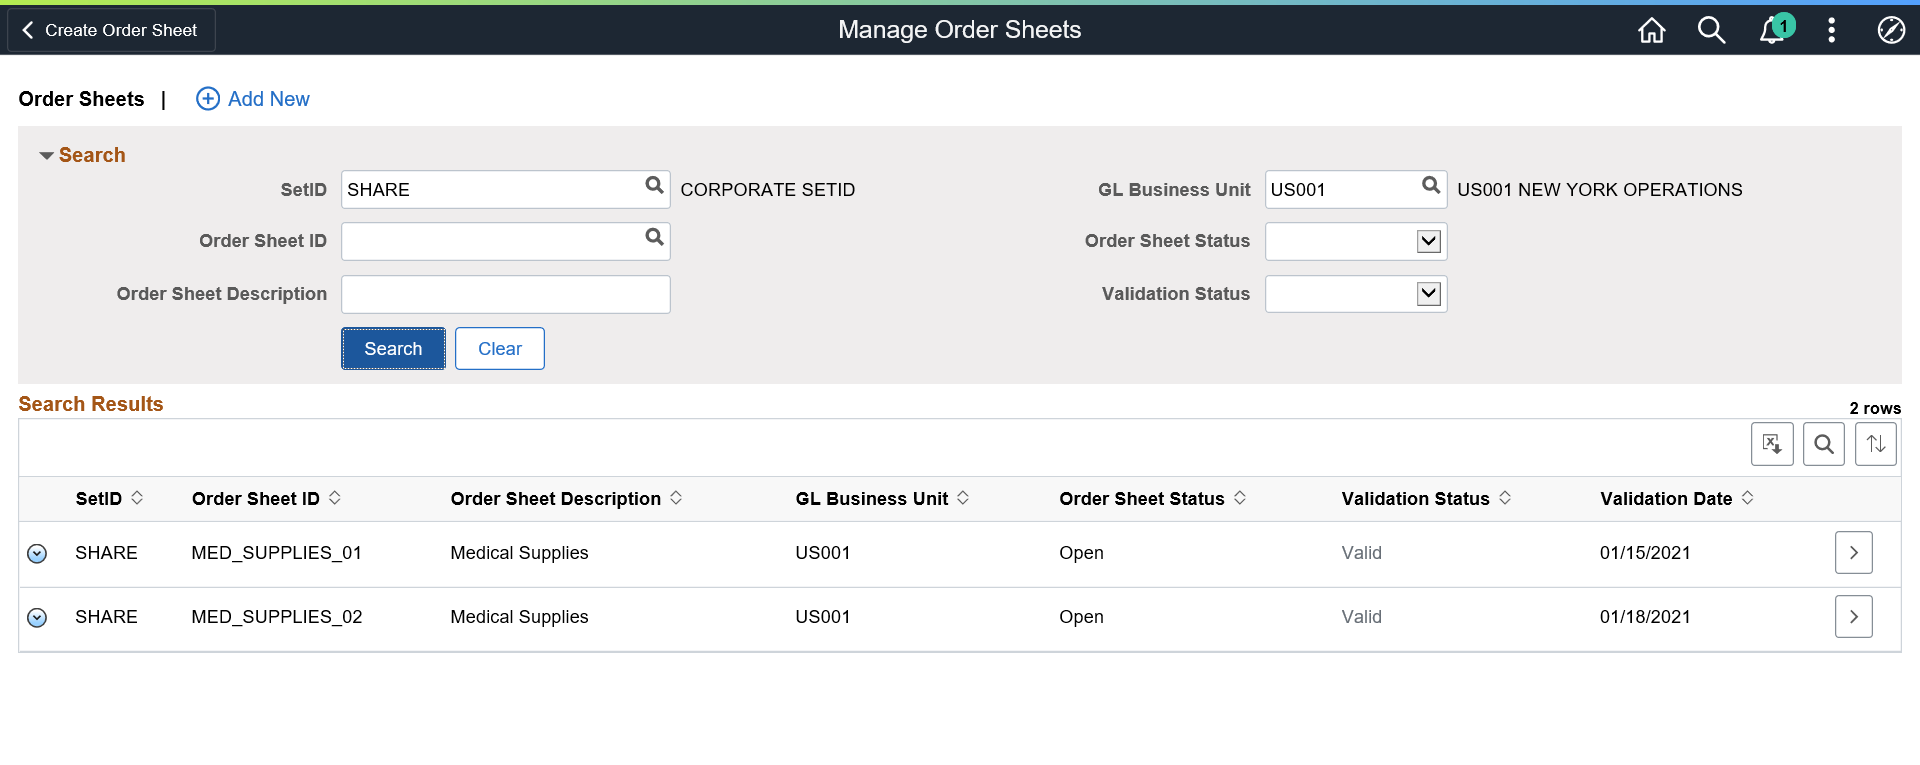
Use the Manage Order Sheets page (PV_OS_MANAGE_FL) to search for existing order sheets and to create order sheets at the Set ID level for the authorized GL business units.
Navigation:
This example illustrates the fields and controls on the Manage Order Sheets Page. You can find definitions for the fields and controls later on this page.
Field or Control |
Description |
|---|---|
Add New |
Click this link to add new order sheets. For more information on creating a new order sheet, see Create Order Sheet Page. |
Search |
Click the Search button after entering the required search criteria. The results display existing order sheets. |
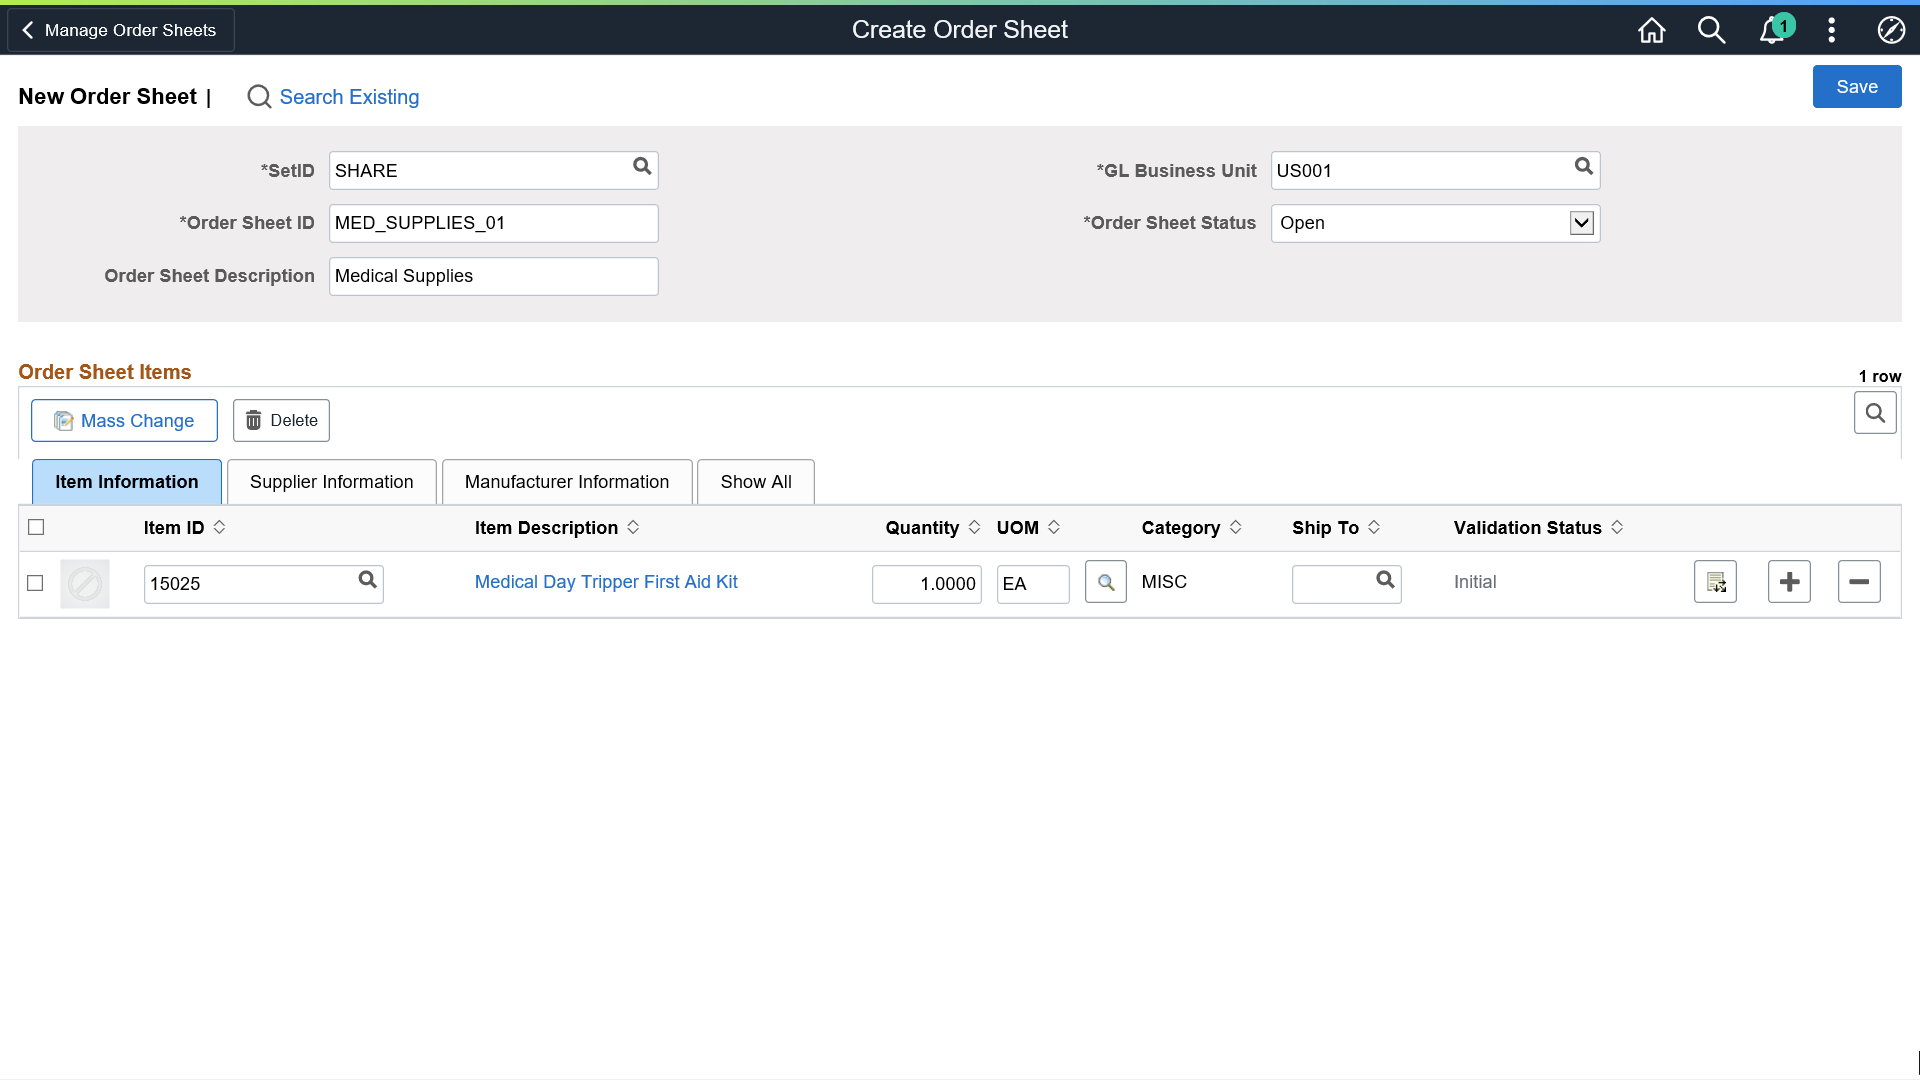
Use the Create Order Sheet page (PV_OS_CREATE_FL) to create order sheets at the Set ID level for the authorized GL business units.
Navigation:
Click the Add New button on the Manage Order Sheets page.
This example illustrates the fields and controls on the Create Order Sheet Page. You can find definitions for the fields and controls later on this page.
Field or Control |
Description |
|---|---|
Set ID |
Select the Set ID. It is a mandatory field. |
Order Sheet ID |
Enter a unique order sheet ID. |
Order Sheet Description |
Enter an order sheet description. |
GL Business Unit |
Select the GL business unit. The prompt lists all the business units according to the Set ID. |
Order Sheet Status |
Select the order sheet status from the options available: Active, Inactive, Open. By default, the order sheet status is Open. Note: The status of an order sheet must be Active to be used while creating a requisition. When the order sheet is completely defined and requesters are authorized to it, set the status to Active so that it will be available to the designated requesters while creating requisitions. |
Next, you can enter the item, supplier, and manufacturer details. As you select an item, the tabs automatically populate values (except Ship To) based on the inventory item definition and purchase item attributes.
Item information Tab
Field or Control |
Description |
|---|---|
Item ID |
Enter or select inventory items. You can add as many rows as you wish. The prompt lists items based on the Set ID. Note: An order sheet does not allow you to add an item more than once. |
Item Description |
Displays a short item description. The item description appears as a hyperlink. Click this link to view more details about the item. |
Quantity |
Displays the default item quantity. You can modify the value, if required. |
UOM |
Displays the supplier item UOM by default. You can modify the value, if required. To change the UOM of an order sheet line, click the prompt and select the required UOM. The prompt lists valid supplier and item UOMs. The current selection is highlighted. If the Supplier item UOM is not available, the system accepts the item UOM automatically. |
Category |
Displays the item category already defined. |
Ship To |
Enter the location to ship the items. The prompt displays all the available locations based on the Ship To Set ID. |
Validation Status |
Displays the Initial status by default. Other possible statuses are Valid and Error. If the status is Error, you can click the Error hyperlink to navigate to the Show Validation Errors page and view the details. The page displays a brief description of issues to different lines. |
|
Click this icon to navigate to the Accounting Information page, where you can enter the accounting information for the distribution lines. |
 Add Distribution Lines
Supplier Information Tab
Field or Control |
Description |
|---|---|
Supplier ID |
Displays the supplier ID defaulted from the purchase item attributes. You can modify the value or leave the field blank. |
Supplier Name |
Displays the supplier name defaulted from the purchase item attributes. |
Supplier Location |
Displays the supplier location defaulted from the purchase item attributes. You can modify the value or leave the field blank. |
Supplier Item ID |
Displays the supplier item ID defaulted from the purchase item attributes. |
Manufacturer Information Tab
Field or Control |
Description |
|---|---|
Manufacturer ID |
Displays the manufacturer ID based on the supplier information. This field reflects any modification to the supplier details. |
Manufacturer Item ID |
Displays the manufacturer item ID based on the supplier information. This field reflects any modification to the supplier details. |
UPN Type |
Displays the UPN type from the Manufacturer UPN table. |
UPN ID |
Displays the UPN ID from the Manufacturer UPN table. |
Click the Save button to save the order sheet. When you save an order sheet, the system validates all the line items and their accounting lines. The validation status changes from Initial to Valid.
As part of validation, the system validates:
Whether the item is active or not.
The Item Vendor setup is valid or not.
The UOM exists in the Inventory UOM table and the Item Vendor UOM table.
The ChartField combinations.
If any issues occur, the status changes to Error. Click the Error link to view more details. The Show Validation Errors page displays the error description for each order sheet line. You must manually fix the errors on the Edit Order Sheet page or use the mass change option.
Upon saving, the Set ID, Order Sheet ID, and GL Business Unit fields become disabled. The administrator can change the header status to Active if the order sheet is ready for requisition.
Use the Accounting Information page (PV_OS_DISTRIB_SCF) to create order sheets with one or more distribution lines.
Navigation:
Select the Add Distribution Lines icon on the Create Order Sheet page.
This example illustrates the fields and controls on the Accounting Information Page.

All accounting lines are quantity and percentage based.
Note: If you have selected the Edit ChartField Combinations check box on the Fluid installation Settings page, you cannot save the order sheets with invalid ChartField combinations. An error message will be displayed asking you to correct invalid combinations.
Use the Mass Change page (PV_OS_MASS_SCF) to mass update multiple order sheet item details at the same time.
Navigation:
Click the Mass Change button on the Create Order Sheet page.
This example illustrates the fields and controls on the Mass Change Page.
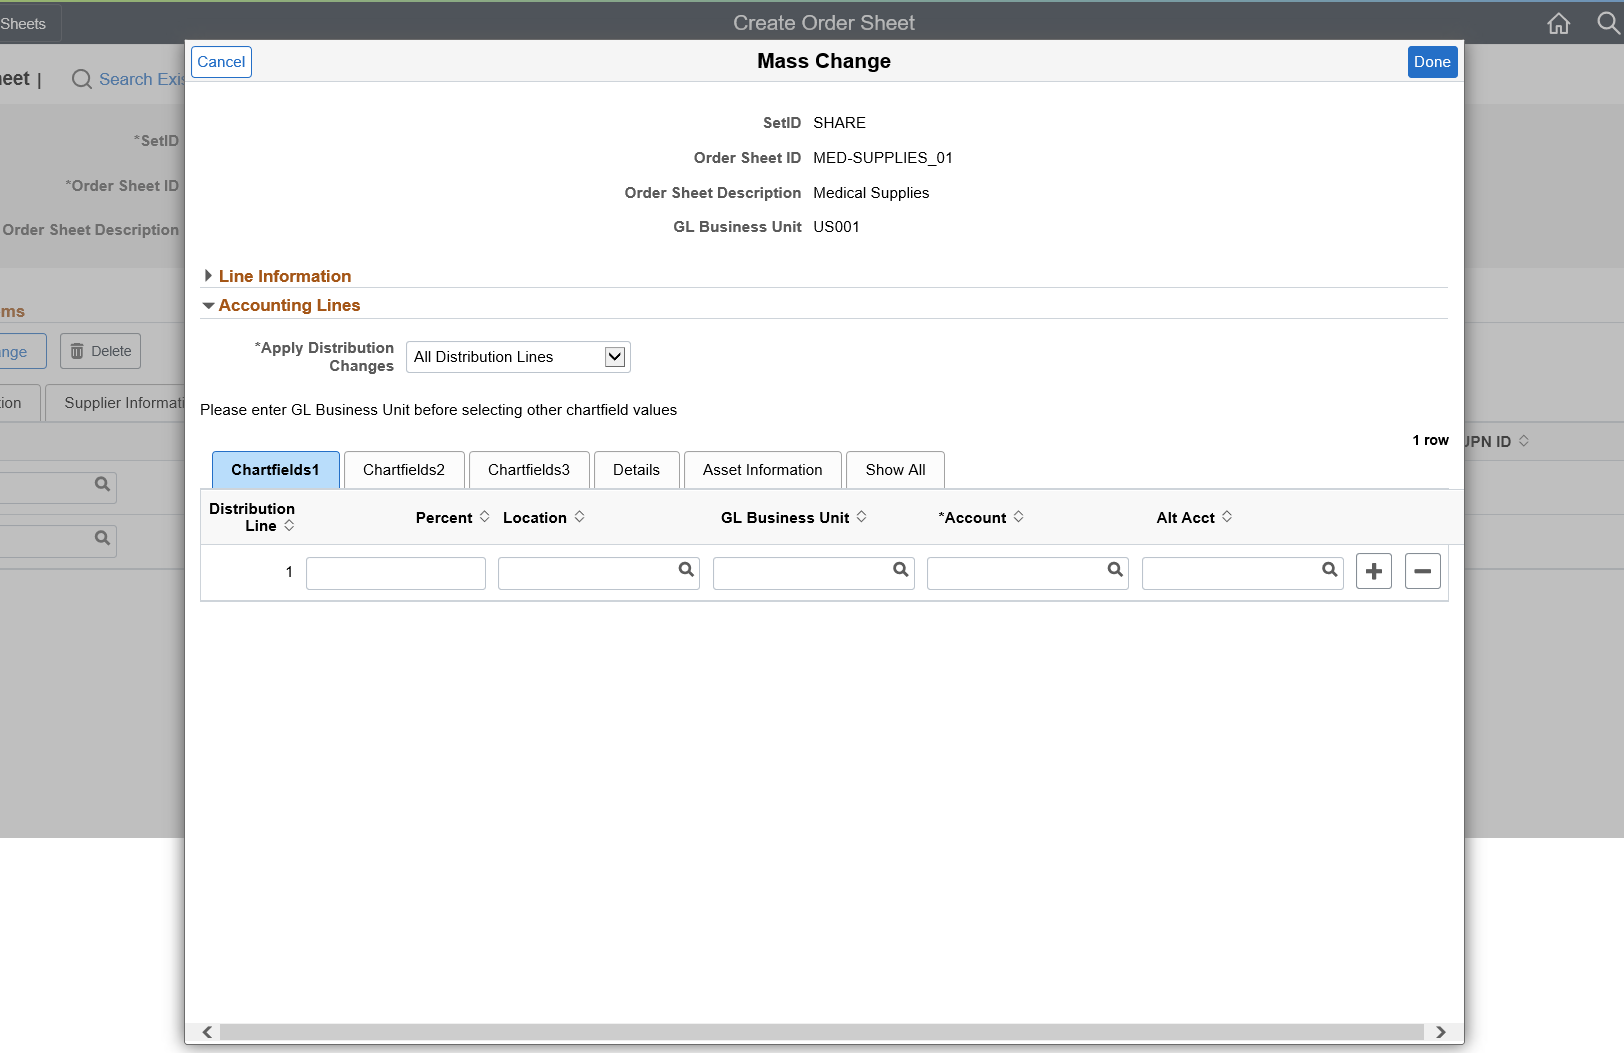
Make the required changes and click the Done button to save your changes.
For more information on mass change, see Edit Lines/Shipping/Accounting for Selected Lines Page.
Use the Manage Order Sheet- Search Results page (PV_OS_CREATE_FL) to search for the existing order sheets, edit the details, and perform related actions.
Navigation:
. Search for existing order sheets.
This example illustrates the fields and controls on the Manage Order Sheets - Search Results Page. You can find definitions for the fields and controls later on this page.
Field or Control |
Description |
|---|---|
|
Select this icon to perform the following actions:
|
|
Select this icon to navigate to the Edit Order Sheet page, where you can modify the item details. |
 Related Actions
  Edit
EditUse the Authorize Order Sheet page (PV_OS_SECURITY_FL) to authorize requesters to the created order sheets. You can authorize multiple requesters to an order sheet. The GL business unit that a requester can access is determined by the GL Business Unit value specified on the Requester Setup page - ChartFields grid.
Navigation:
Click the Related Actions icon on the Manage Order Sheet page and select Authorize.
This example illustrates the fields and controls on the Authorize Order Sheet Page.
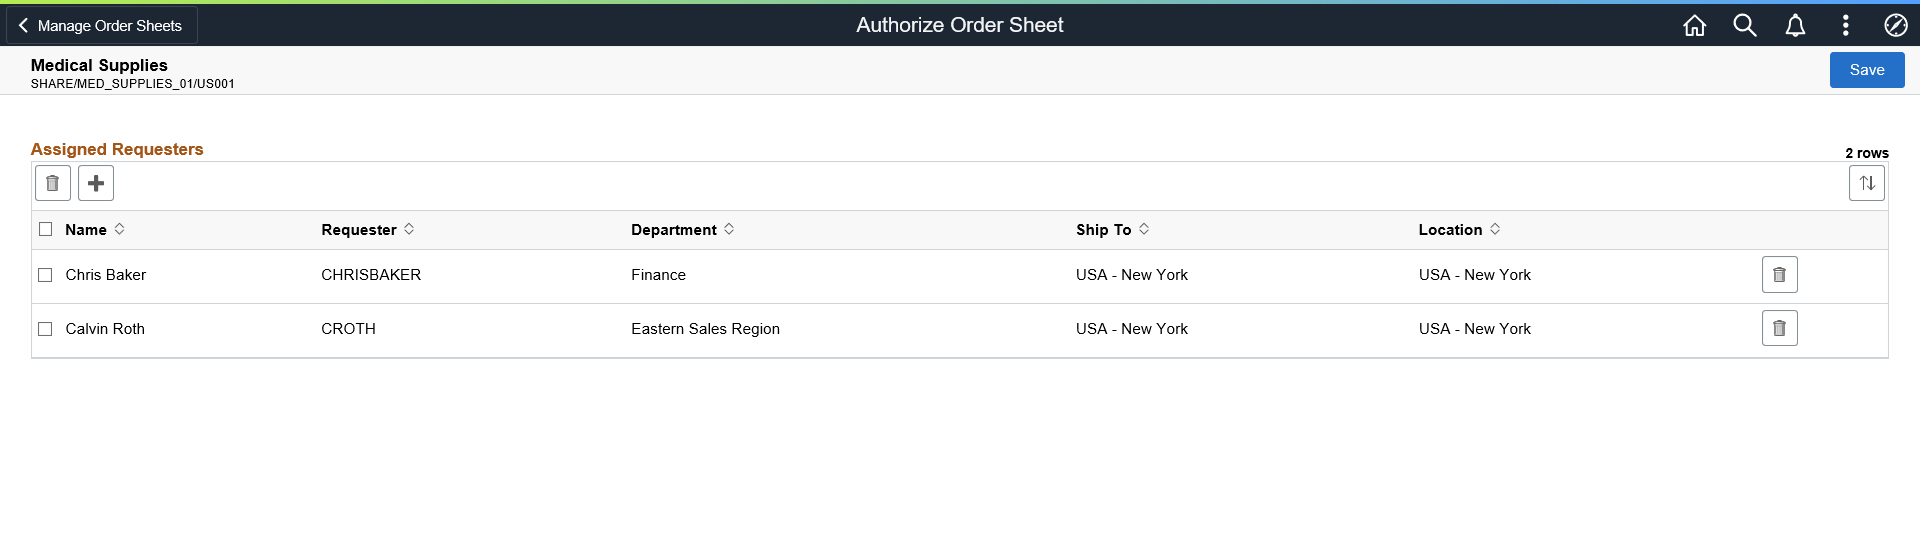
The page displays the list of assigned requesters, if any. The page header displays the Order Sheet Description, Set ID, Order Sheet ID, and GL Business Unit.
You can authorize new requesters to the order sheet and delete existing requesters.
Use the Add Requesters page (PV_OS_SEC_ADD_SCF) to search for requesters authorized to the GL business unit and assign them to the order sheets.
Navigation:
Click the Add button on the Authorize Order Sheet page.
This example illustrates the fields and controls on the Add Requesters Page.
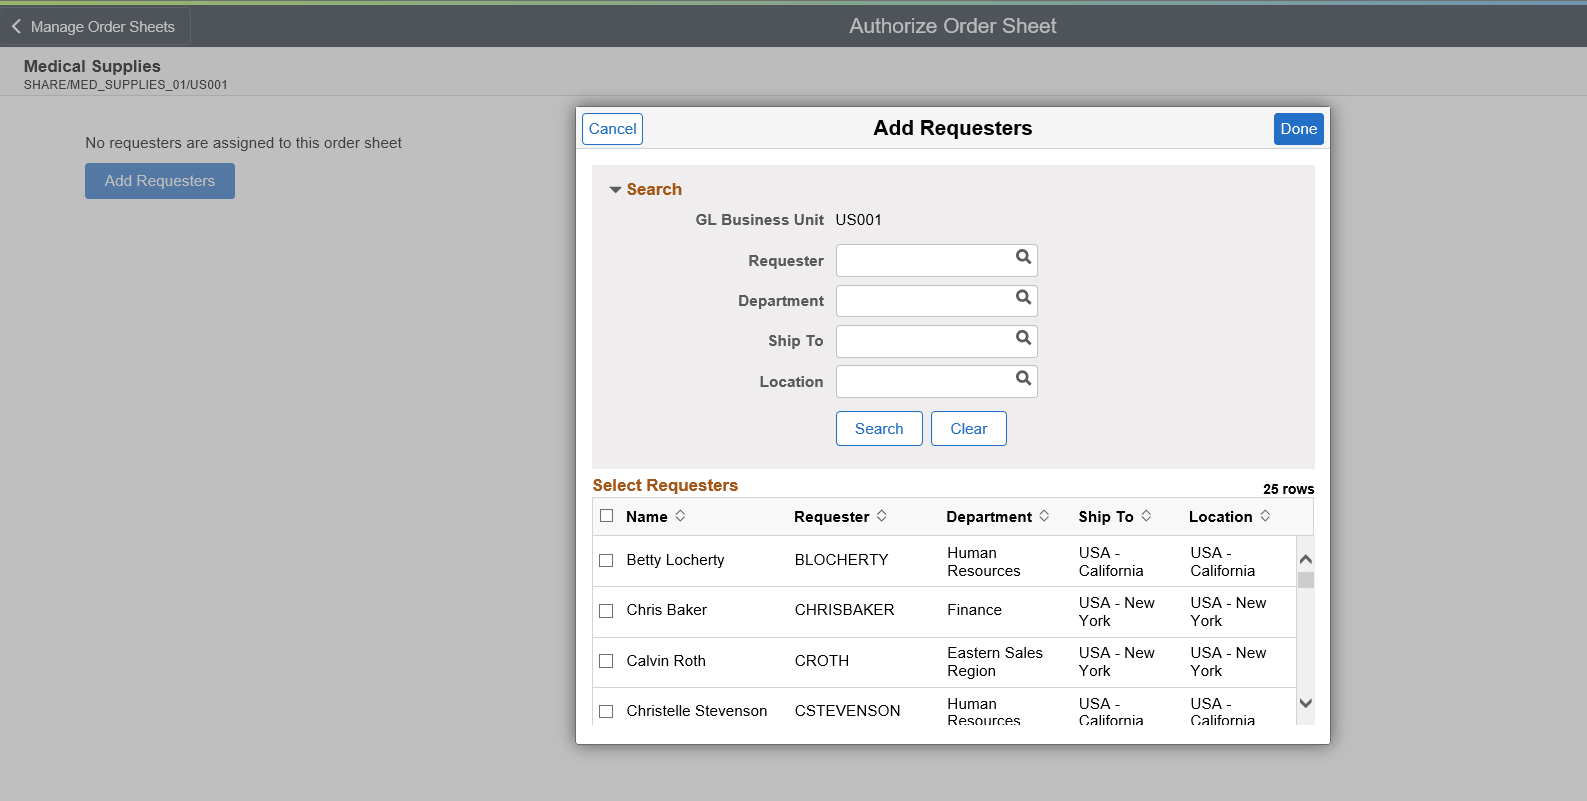
The search results display all the requesters associated to the GL business unit. It does not include those who are already authorized to the order sheet. The administrator can select one or more requesters. After selecting the requesters, click the Done button. On the Authorize Order Sheet page, click Save to finalize your selection.
Note: The Requester Setup page determines if a requester is associated with the particular GL business unit. To authorize a requester to order sheets for more than one GL business units, you must change the default settings on the Requester Setup page.
For more information about the Requester Setup page, see Requester Setup Page.
Use the Order Sheets by Requester page (PV_OS_INQUIRY_FL) to search for order sheets by the authorized requesters. The search results include all the order sheets that belong to the assigned GL business unit and that are authorized to the particular requester.
Navigation:
This example illustrates the fields and controls on the Order Sheets by Requester Page.
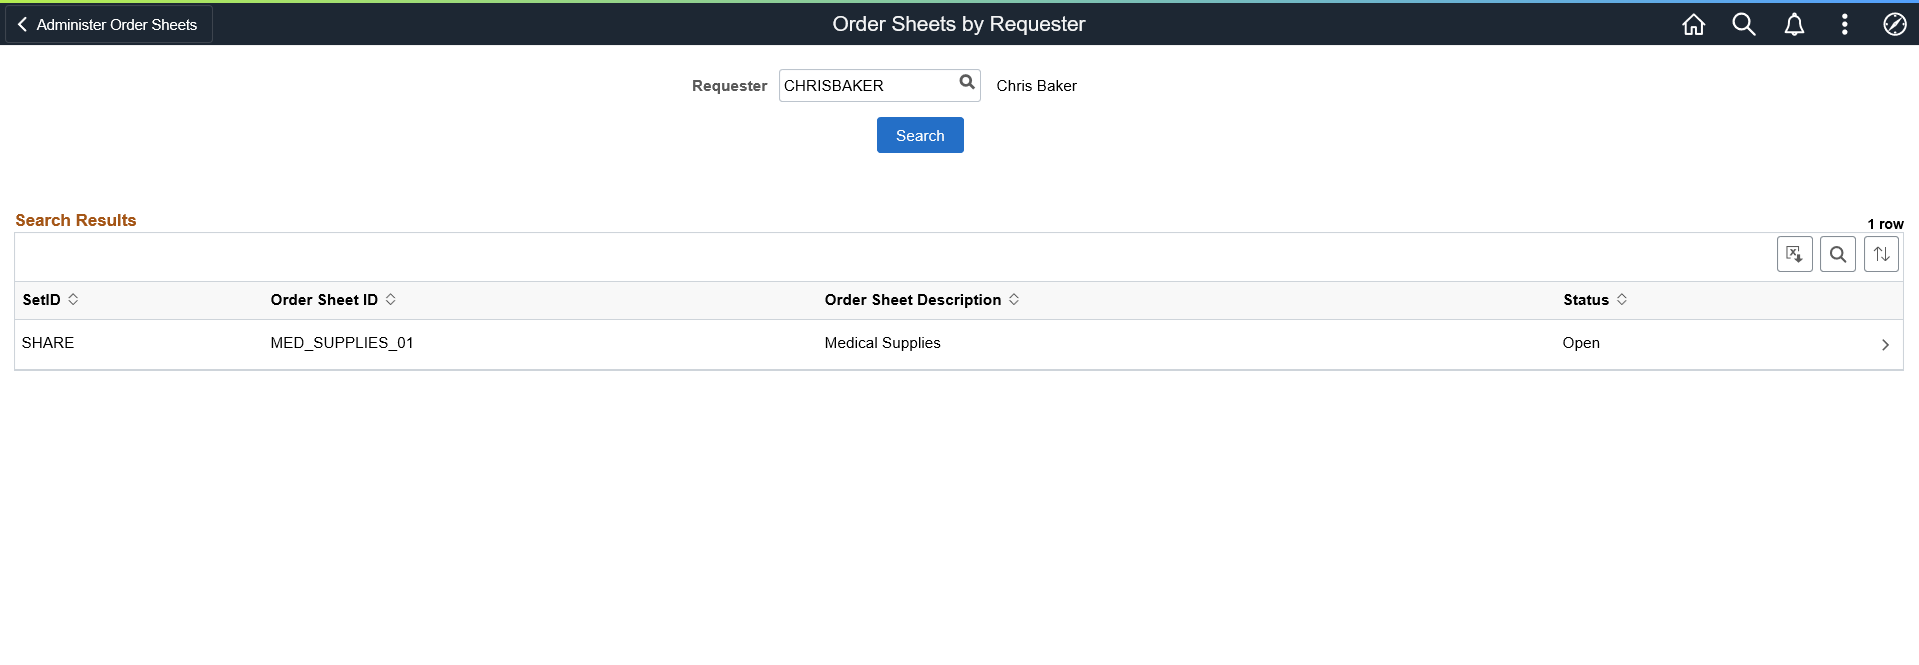
On this page, you can view the Set ID, Order Sheet ID, Order Sheet Description, and Status. To view more information about an order sheet, click its Details icon.
Use the Order Sheet Processes page (Navigation Collection) to run Mass Update and Mass Validate processes.
Navigation:
This example illustrates the fields and controls on the Order Sheets Processes - Mass Update Page. You can find definitions for the fields and controls later on this page.
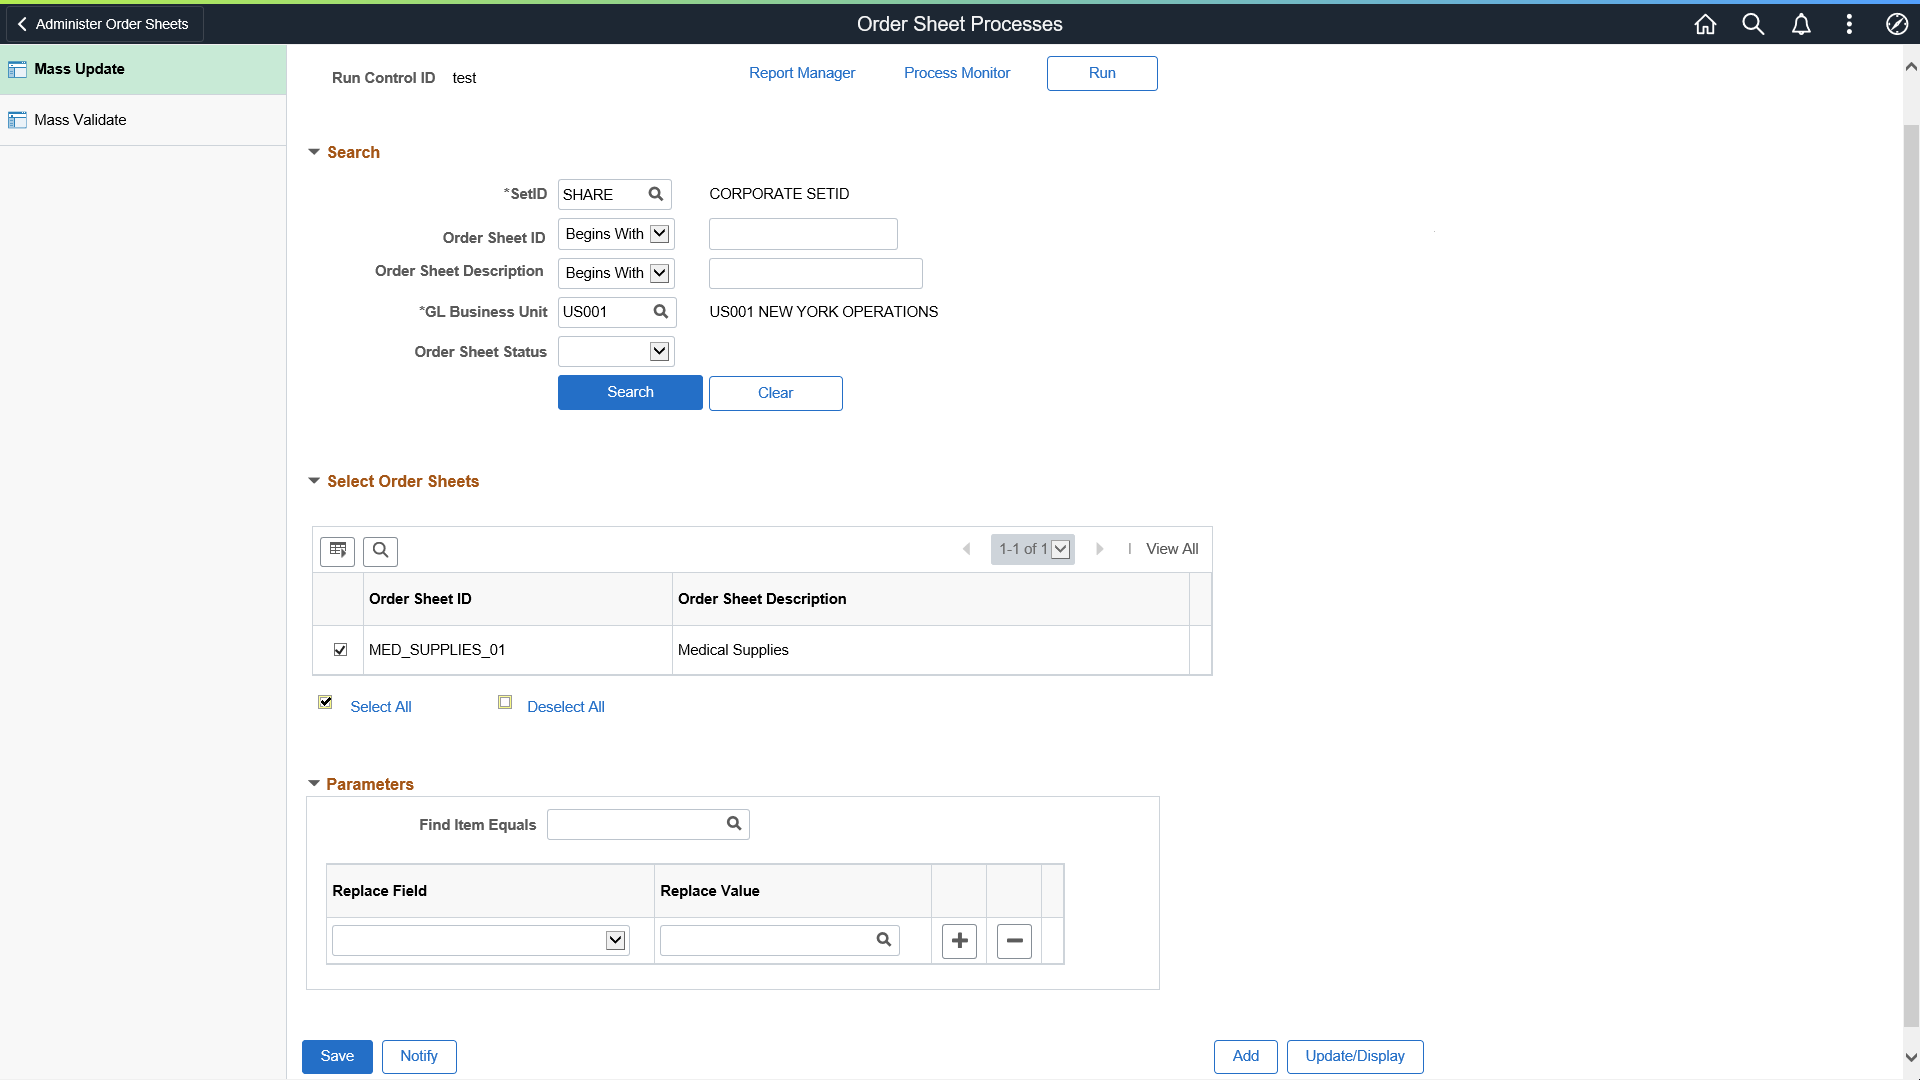
To run a new mass update process, add or select a Run Control ID. Enter the required search criteria and search for the required order sheet.
Field or Control |
Description |
|---|---|
Find Item Equals |
Enter or select the required item. |
Replace Field |
Select the field to be replaced in the order sheet from the drop-down list. Values are:
|
Replace Value |
Select the new value. You can add more items to be replaced. The same Replace Field value cannot be selected more than once. Note: Be cautious when using the Mass Update option. The Replace Value must meet the requirements for the selected Replace field. |
Click the Run button to run the mass update process. In the Process Scheduler Request window, click OK to continue. Check the process monitor to view the change report that shows all the order sheets and the lines that have changed.
This example illustrates the fields and controls on the Order Sheets Processes - Mass Validate Page.

You must select at least one order sheet to run the Mass Validate process. Then, click the Run button to run the mass validate process. In the Process Scheduler Request window, click OK to continue. Check the process monitor to view the change report that shows all the order sheets that have been mass validated.