Setting Up Putaway Defaults and Rules
You specify putaway processing defaults and directed putaway rules using the Setup Putaway (PTWY_SETUP_INV) component. The processing defaults that you specified on the Setup Putaway page govern whether the Load Staged Items process validates item data, the material storage location that you should use for RMA putaway transactions, and the default values for the Putaway Plan report.
To define item putaway rules and rule priorities, use the Setup Item Putaway (PTWY_IT_SETUP_INV) component.
On the Directed Putaway Rules page, you can enable directed putaway for the business unit and prioritize up to six different putaway rules. (You can modify these rules for specific items on the Setup Item Putaway page.) Each rule defines a type of material storage location: default locations, fixed picking locations, empty locations, locations containing existing items, randomly selected locations, or storage containers. For each rule, specify additional criteria to determine the best material storage locations for the business practices. When the system calls the Directed Putaway function from online pages or by application processes, it attempts to find material storage locations that meet the highest priority rule. If it does not find locations, the function attempts to find a material storage location that meets the second priority rule, then the third rule, and so forth.
If you do not enable directed putaway and establish putaway rules on the Directed Putaway Rules page, all system processes that move materials to putaway material storage locations select the default putaway location that you defined for each item, regardless of the available capacity of the location or its zone assignment. You can specify alternate material storage locations on the Review Plan and Alternate Plan pages. If there are exceptions to the putaway plan, you can modify system-selected material storage locations on the Stockroom Feedback page.
The following exceptions exist:
If the business unit is a VMI business unit, putaway rules and directed putaway can not be set up.
If the incoming receipt has been pegged, the stock is placed in the pegging location for that item, if the demand associated to this pegged supply is within the lead days range, or the stock is placed in the default putaway location if outside of the range.
If the item uses cross docking and open demand exists, then the system applies the putaway quantity to the cross docking location before using the directed putaway rules or the default putaway location. For cross docking purposes, the quantity can be split between locations even if the putaway rules do not specify the split quantity option.
|
Page Name |
Definition Name |
Usage |
|---|---|---|
|
DEFAULT_LOC_INV |
Assign or update default putaway locations for an item. |
|
|
PTWY_SETUP_INV |
Define default putaway information for a business unit. |
|
|
PTWY_RULE_INV |
Define putaway rules and rule priorities for a business unit. |
|
|
PTWY_ITEM_RULE_INV |
Establish putaway rules and rule priorities for items in the business unit. |
The rules and rule options defined on the Directed Putaway Rules page and Setup Item Putaway page govern which material storage locations the Directed Putaway function returns for a particular putaway transaction quantity. The options for the Putaway Rule field are:
Term |
Definition |
|---|---|
Default Location |
The system suggests the default material storage location that you defined for the item on the Default Putaway Locations page. |
Fixed Picking |
The system suggests the fixed picking location that you defined for the item on the Fixed Picking Locations page. |
Empty |
The system suggests an empty material storage location. Only matching locations with item quantity balances that are equal to zero are eligible. The system checks for zero quantity in the physical location (PHYSICAL_INV.qty=0) and pending putaways into that location (STAGED_ITEM_INV.qty=0). |
Find Existing Item |
The system suggests a material storage location that already contains a quantity of the item. |
Random |
The system suggests the first eligible material storage location it finds that matches the options that you defined for the rule. |
Containers |
The system suggests a storage container from the set of available storage containers that meet the options that you defined for the rule. The Directed Putaway function suggests containers only, if you select this rule. For items that require container storage, either select this rule or enter the container ID manually during online putaway transactions. |
For each rule, you can activate the following options:
Term |
Definition |
|---|---|
Default Rule |
Specifies the putaway rule to use when no eligible material storage locations meet capacity requirements. If no valid locations are available for the transaction quantity, a message appears. You must select one default rule for each set of rules that you define. |
Split Quantity |
Specifies whether the putaway transaction quantity can be divided among multiple material storage locations. This option is only available for business units that implement the Capacity Checking feature. If you do not select this option, the Directed Putaway function only returns locations that can hold the entire transaction quantity. For cross docking purposes, you can split the quantity between locations even if the putaway rule does not specify this option. |
Mix Staged Dates and Lots |
Specifies whether you can store the transaction quantity in locations that contain items with different lots or staged dates than the transaction quantity. Select this option only if the business rules permit storage of different stage dates and lots of an item in one location. The mix staged dates and lots selection will have impact on the way storage locations are displayed, based on item putaway set up. |
Maximum Capacity Available |
Specifies that material storage locations with the most available capacity should be evaluated as potential putaway locations first. This option is only available for business units that implement the Capacity Checking feature. With this option, the Directed Putaway function sorts the matching material storage locations by available capacity and assigns the transaction quantity to those having the most capacity first. Selecting this option results in the smallest number of suggested putaway locations, even if you permit splitting of transaction quantities. |
Minimum Capacity Available |
Specifies that the system should evaluate the material storage locations that have the least available capacity first. This option is only available for business units that implement the Capacity Checking feature. With this option, the Directed Putaway function sorts the matching material storage locations by available capacity and assigns the transaction quantity to those having the least capacity first. Select this option if the business rules prioritize maximum capacity utilization above putaway transaction efficiency. If you permit splitting of putaway transaction quantities, the system suggests multiple material storage locations (thus requiring multiple putaway transactions). |
Check Zone |
Specifies that only material storage locations belonging to putaway zones associated with the item should be considered. This option is only available for business units that implement putaway zones. If you select this option, the Directed Putaway function only looks for matching material storage locations in the putaway zones associated with the item on the Assign Zones page, using the defined priority for each zone. |
Use the Default Putaway Locations page (DEFAULT_LOC_INV) to assign or update default putaway locations for an item.
Navigation:
To define default putaway locations for an item, use the Default Putaway Locations (DEFAULT_LOCATION) component. Use the Default Putaway Locations component interface to load data into the tables for this component.
This example illustrates the fields and controls on the Default Putaway Locations page. You can find definitions for the fields and controls later on this page.
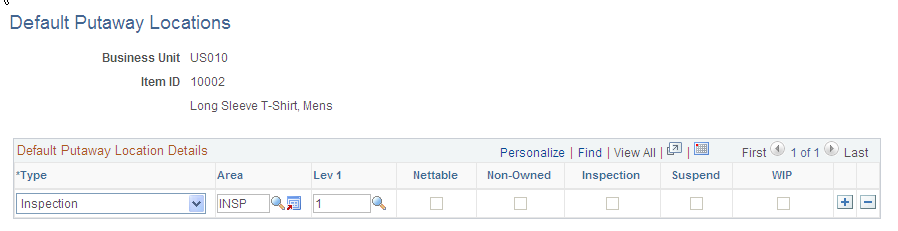
When you usually store an item in the same location, you can improve the efficiency of the putaway processing by defining a default putaway location for the item on the Default Putaway Locations page. If you are not using directed putaway for the business unit then the default putaway location is used for every putaway. If you are using directed putaway, you can select the putaway rule, Default Location, to use the default putaway location. Putaway rules are defined for the business unit level on the Setup Putaway component, and for the item level on the Setup Item Putaway page.
Depending upon the type of item with which you are working, you can select multiple default putaway locations. Here are a couple of examples:
For items that require inspection, define a default inspection location.
Because PeopleSoft Inventory only inspects items received from PeopleSoft Purchasing, you can also specify a second location to use when receiving these items from other sources. (You cannot, however, select an inspection location as the default for items that do not require inspection.)
For both owned and non-owned items, you can select an owned default location and a non-owned default location.
For items that are cross docked, you can establish material storage locations for both owned and non-owned stock putaways (Owned Cross Dock and Non-Owned Cross Dock types).
The system then uses these cross dock locations to pick stock and fulfill orders. If you do not define cross dock material storage locations for cross docked items, then the system uses the cross dock locations that you defined at the business unit level on the Default Cross Dock Locations page. You cannot select an existing pegging location or an inspection location to be a cross dock location.
For items that are pegged, you can establish material storage locations for both owned and non-owned stock putaways (Owned Peg and Non-Owned Peg types).
The system then uses these pegged locations to putaway pegged supply (receipts) and pick stock to fulfill the order that this supply was pegged to. If you do not define pegged material storage locations for this item, then the system uses the Default Pegging Putaway Location Details page that you defined at the business unit level. You cannot select an existing cross dock location or inspection location to be a pegged location.
To define putaway defaults at the business unit level, use the Putaway Setup (PTWY_SETUP_INV) component.
Use the Setup Putaway page (PTWY_SETUP_INV) to define default putaway information for a business unit.
Navigation:
This example illustrates the fields and controls on the Setup Putaway page. You can find definitions for the fields and controls later on this page.
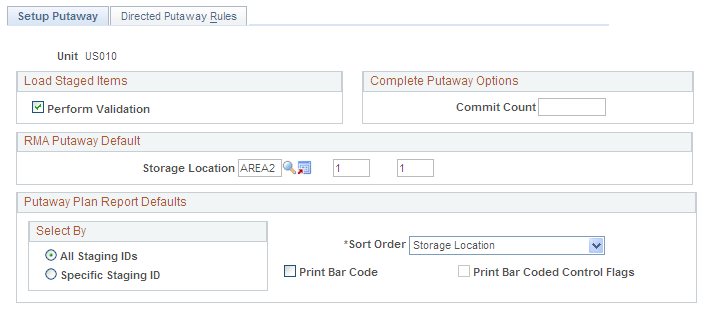
Load Staged Items
Field or Control |
Description |
|---|---|
Perform Validation |
Select to validate the staging data during the Load Staged Items process. If there is invalid data for the items that are loaded, the errors appear on the Correct Staged Errors page. Note: PeopleSoft recommends selecting this option to prevent storage of invalid information in PeopleSoft Inventory tables. |
Complete Putaway Options
Field or Control |
Description |
|---|---|
Commit Count |
Enter a value that is used during the Complete Putaway process (INPPPTWY). This value indicates the number of items to be processed before issuing a commit statement. |
RMA Putaway Default
An RMA default material storage location is useful if you have a Material Review Board that reviews and tests returned stock to see whether it can be put into inventory or whether it should be scrapped. Inspection locations are for items received from a vendor that require inspection. Customer returns do not go through the same inspection process.
Field or Control |
Description |
|---|---|
Storage Location |
Enter the default material storage location that you want to use for returned items received through the InterUnit and RMA Receiving page. |
Storage Location Search |
Click the Storage Location Search button to access the Storage Location Search page. |
Putaway Plan Report Defaults
These values become the defaults on the Putaway Plan page that you use to generate the putaway report.
Field or Control |
Description |
|---|---|
Sort Order |
Select how the items included in the Putaway Plan report should be sorted. Values are: Item ID: By item ID, in ascending order. The full sort order is item ID, lot ID, serial ID, storage area, and storage levels 1, 2, 3, and 4. Receiver ID: By receiver ID, in ascending order. The full sort order is receiver ID and receiver line. Storage Location: By material storage location, sorted alphabetically by storage area name. The full sort order is storage area, storage levels 1, 2, 3, and 4, item ID, lot ID, serial ID. |
Print Bar Code |
Select to print 128-formatted bar codes on the Putaway Plan report. These codes, which consist of the Putaway Plan number, the line number, and the four optional bar code scanning control flags, can be scanned during the Complete Putaway process. The Putaway Plan number on the report header is bar coded, and a single bar code appears for each detail line on the report. The format for the bar code printed for each detail line is LSDAH:99999, where: L = Lot ID Control Flag S = Serial ID Control Flag D = Staged Date Control Flag A = Actual Cost Control Flag H = Shipping Serial ID Control Flag : = Constant 99999 = Line Number |
Print Bar Coded Control Flags |
Select to attach the item's control flags to the bar code that is printed on each line of the Putaway Plan report. The bar-coded control flags enable the electronic data collection system to prompt for the lot ID, serial ID, staged date, or receiver ID and line number immediately after the user scans the bar-coded line number field. The option to print these flags is for cases in which the Putaway Plan number and the line number bar code are scanned by a wedge directly into the online Inventory Putaway transaction page. You do not need to prompt for the detailed item information. Note: PeopleSoft Inventory delivers printer settings for all SQR output to a generic line printer. However, when printing bar coded information on reports on a PCL printer (HP Laser Jet), you must first define the printer type accordingly. You may do this by changing the printer type settings delivered in SETENV.SQC from LINEPRINTER to HPLASERJET. |
Note: PeopleSoft SCM applications do not support the printing of bar codes from processes running on OS390 servers. You should run your SQRs that print barcodes on a process scheduler server that is running on a non-OS390 operation system.
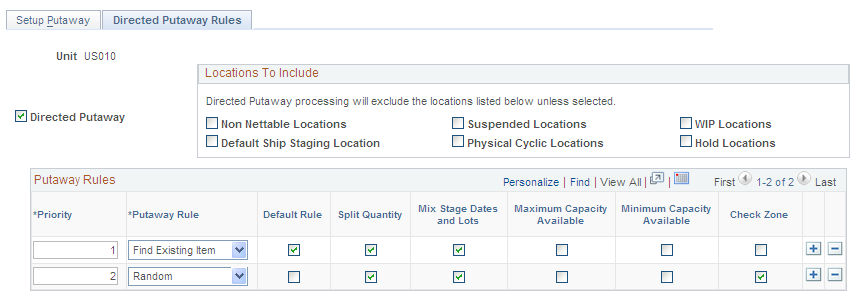
Use the Directed Putaway Rules page (PTWY_RULE_INV) to define putaway rules and rule priorities for a business unit.
Navigation:
This example illustrates the fields and controls on the Directed Putaway Rules page. You can find definitions for the fields and controls later on this page.
Field or Control |
Description |
|---|---|
Directed Putaway |
Select to enable directed putaway algorithms for the business unit. All putaway transactions call the Directed Putaway function to select optimal putaway locations for the transaction quantity, based on the putaway rules that you defined for the item or the business unit. If you do not select this option, putaway transactions suggest the material storage location that you established for the item on the Default Putaway Locations page. |
Locations to Include |
Select the material storage locations that should be included in the directed putaway processing. |
Priority |
Enter a rule priority and select the rule options that meet the needs of the business unit. The priority of the first row automatically appears as 1. For each row that you add, the default priority value increases by 1. You can override the default values. |
Putaway Rule |
Select putaway rules for the business unit by inserting up to six rows (one for each available putaway rule). |
Default Rule |
Indicate which of the defined rules is the default. The system initially selects this check box for the first rule that you define. |
Use the Setup Item Putaway page (PTWY_ITEM_RULE_INV) to establish putaway rules and rule priorities for items in the business unit.
Navigation:
This example illustrates the fields and controls on the Setup Item Putaway page. You can find definitions for the fields and controls later on this page.

Field or Control |
Description |
|---|---|
Copy |
Click this button to copy the business unit's putaway rules (established on the Directed Putaway Rules page) to the item level. The copy overrides any existing rules for the item. You can modify the rules, as necessary, for a specific item. |