Defining Vendor Rebate Agreements
To define vendor rebate agreements, use the Rebate Agreement component (VRBT_AGREEMENT).
This section discusses how to Define Vendor Rebate Agreements
|
Page Name |
Definition Name |
Usage |
|---|---|---|
|
VRBT_HDR |
Define the overall rebate agreement information for the rebate agreement. |
|
|
Rebate Agreement - Copy Rebate Agreement Page |
VRBT_COPY_SEC |
Copy an existing rebate agreement to a new rebate agreement. |
|
Supplier Search Page |
Supplier_LOOKUP_SEC |
Search for the supplier that you want to associate with the rebate agreement. |
|
Rebate Agreement - Specify Supplier Locations Page |
VRBT_VNDR_LOC |
Define the Supplier Locations that apply to the rebate agreement. If you specify Supplier locations, then the rebate agreement is applicable to purchase orders that are created for the specific Supplier location. If Supplier locations are not defined for the rebate agreement, then the rebate agreement is applicable to purchase orders irrespective of the Supplier locations. |
|
Rebate Agreement - Rebate Comments Page |
VRBT_COMMENTS |
Define rebate agreement comments. |
|
Rebate Agreement - Rebate Activity Page |
VRBT_ACTIVITY |
Enter activities and the due dates that are associated with the rebate agreement. Also, you can mark when those activities have been completed. |
|
Rebate Agreement - Supplier Primary Contact Info Page |
VBRT_CNTCTPHNSEC |
Review the Supplier's primary contacts address and other contact information, such as telephone number and pager number. |
|
Rebate Agreement - Activity Log Page |
PO_MAINT_POP |
Review the activity log for this rebate agreement. This page displays the user ID and the date of the individual who entered, modified, and approved the rebate agreement. |
|
Rebate Agreement - Item Search Page |
PO_ITEM_SEARCH_SP |
Search for items that you want to apply to the rebate agreement. |
|
Category Search Page |
CAT_SEARCH_SEC |
Search for categories that you want to apply to the rebate agreement. |
|
Rebate Agreement - Item Category Exceptions Page |
VRBT_CAT_EXCPTN |
Define items within a category that do not apply to this rebate agreement. |
|
VRBT_OPTIONS |
Define general and settlement rebate options that pertain to the rebate agreement. |
|
|
Rebate Agreement - Eligible PO Business Units Page |
VRBT_BU |
Define eligible purchase order business units for the rebate agreement. This page is available if the rebate agreement is not specified as a corporate agreement. |
|
VRBT_HDR_VAT |
Update value added tax details for the rebate agreement. The Header VAT link is available only if the PeopleSoft General Ledger business unit that is associated with the PeopleSoft Payables business unit is a VAT entity. |
|
|
Rebate Agreement - Receivables ChartFields Page |
VRBT_AR_DIST |
Review and override the ChartFields that are associated with PeopleSoft Receivables business unit that is associated with the rebate agreement. The system populates by default the ChartFields from the AR Distribution Code that is defined for the PeopleSoft Receivables business unit. The PeopleSoft Receivables ChartFields are required if the settlement method for the rebate agreement is anything but Adjustment Voucher. |
|
VRBT_RULES |
Define the different rebate rules that apply to this rebate agreement. |
|
|
Rebate Agreement - Rebate Types Explained Page |
VRBT_RULE_INFO |
Displays text explaining the five different types of rebates with examples, namely Standard or Stepped, Retrospective, Flat, Growth Bonus, and Market Contribution. |
|
Rebate Agreement - Distributions for Rebate Rule Page |
VRBT_RULE_DIST |
Define the ChartField distributions for each rebate rule. |
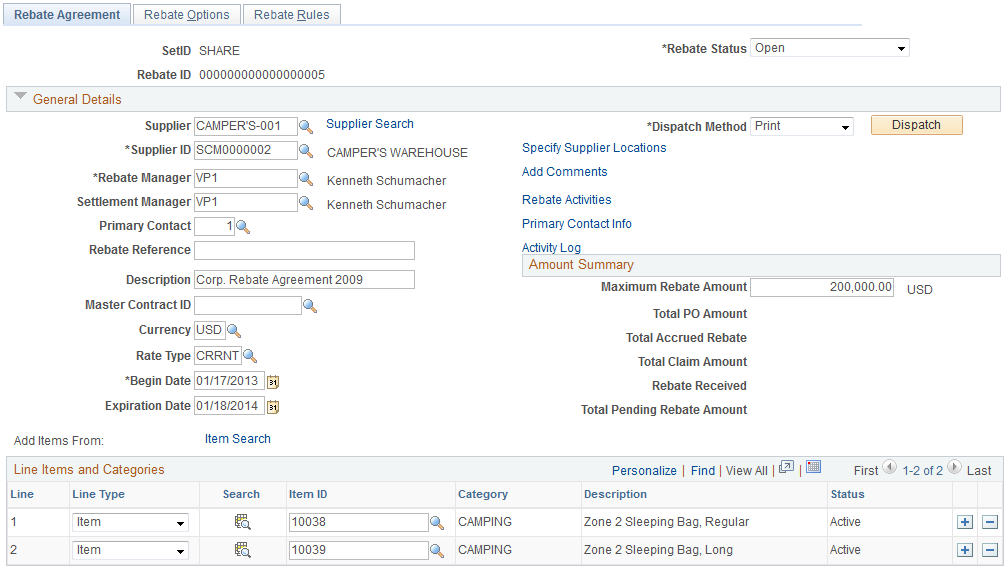
Use the Rebate Agreement - Rebate Agreement page (VRBT_HDR) to define the overall rebate agreement information for the rebate agreement.
Navigation:
This example illustrates the fields and controls on the Rebate Agreement - Rebate Agreement page. You can find definitions for the fields and controls later on this page.
Field or Control |
Description |
|---|---|
Rebate Status |
This field appears by default from the User Preferences - Procurement: Rebate Authorizations page. When you are defining a rebate agreement, the initial default value is either Open or Approved. Select the overall rebate agreement status. Values are:
|
Copy From Existing Rebate Agreement |
Click this link to access the Rebate Agreement - Copy Rebate Agreement page. Use this page to copy an existing rebate agreement to the new rebate agreement. Note: This link appears only in Add mode. |
General Details
Field or Control |
Description |
|---|---|
Rebate Manager |
Select the rebate manager for this rebate agreement. Rebate managers are users who are specified with the rebate manager role. |
Settlement Manager |
Select the settlement manager for this rebate agreement. |
Master Contract ID |
Select the contract to associate with this rebate agreement. |
Begin Date |
Select the start date for this rebate agreement. The current date appears by default for the begin date. Note: You cannot change the begin date to be after the purchase order date. |
Expiration Date |
Select the end date for this rebate agreement. Note: You cannot change the expiration date to be before the purchase order date. |
Dispatch Method |
Select the dispatch method for the rebate agreement. Values are:
|
Dispatch |
Click this button to dispatch the supplier agreement. The rebate agreement must be approved before you can dispatch it. When you click the button, the system automatically performs the Rebate Dispatch & Email multiprocess job (VRBTDISP). |
Specify Supplier Locations |
Click to access the Rebate Agreement - Specify Supplier Locations page. Use this page to specify specific Supplier locations where the rebate agreement ID can be applied when you are creating a purchase order. For example, suppose you have a supplier ABC and they have three locations: Location 1, Location 2, and Location 3. You have created a specific rebate agreement ID with this supplier that is applicable only if the purchase order is ordered from Location 2 and Location 3. In this situation, when ordering from Location 1, they are not eligible for the rebate agreement. Specifying Supplier locations is optional. If you do not specify Supplier locations, then the rebate agreement ID can be applied to all the Supplier locations from the specified supplier. |
Add Comments |
Click to access the Rebate Comments page where you can view and add comments about the rebate. |
Rebate Activities |
Click to access the Rebate Activity page where you can view and update activities associated with the rebate. You can enter activities and the due dates and mark when those activities have been completed. |
Primary Contact Info(primary contact information) |
Select to access the Supplier Primary Contact Info page where you can review the supplier's primary contacts address and other contact information, such as telephone number and pager number. |
Activity Log |
Click to access the Activity Log page where you can review the activity log for this rebate agreement. The page displays the user ID and the date of the individual who entered, modified, and approved the rebate agreement. |
Amount Summary
Field or Control |
Description |
|---|---|
Maximum Rebate Amount |
Enter a value if a maximum rebate amount is available for this rebate agreement. This value is expressed in the rebate agreement currency. |
Total PO Amount (total purchase order amount) |
Displays the total purchase order amount in the rebate agreement currency. This is the sum of all merchandise amounts per purchase order line that are associated with this rebate agreement. |
Total Accrued Rebate |
Displays the total accrued amount for this rebate agreement. |
Total Claim Amount |
Displays the total claim amount for this rebate agreement. |
Rebate Received |
Displays the total claim amount that was collected from the supplier for this rebate agreement. |
Total Pending Rebate Amount |
Displays the difference between the total accrued rebate and the total claim amount for the rebate agreement (the accrued rebate portion that has not been claimed yet). |
Line Items and Categories
Field or Control |
Description |
|---|---|
Add Items From |
Click the Item Search link to access the Rebate Agreement - Item Search page. Use this page to add multiple items at once to the rebate agreement. |
Line |
Displays the line number of the rebate agreement. The rebate agreement line indicates which item or item categories are applied to the vendor rebate agreement. Note: This applies only if the vendor rebate agreement is not a corporate agreement. |
Line Type |
Select the type of line that you are adding to the rebate agreement. Values are:
|
|
Click to search for either item IDs or categories. If you select a line type of Category, click this button to access the Category Search page. Use this page to search for categories. If you select a line type of Item, click this button to access the Rebate Agreement - Item Search page. Use this page to search for items. |
Exception |
Click this link to access the Rebate Agreement - Item Category Exceptions page. Use this page to identify the items in the category that you want to exclude from the rebate agreement. The Exception link appears only when you select a line type of Category. |
 (search)
Use the Rebate Agreement - Rebate Options page (VRBT_OPTIONS) to define general and settlement rebate options that pertain to the rebate agreement.
Navigation:
This example illustrates the fields and controls on the Rebate Agreement - Rebate Options page. You can find definitions for the fields and controls later on this page.
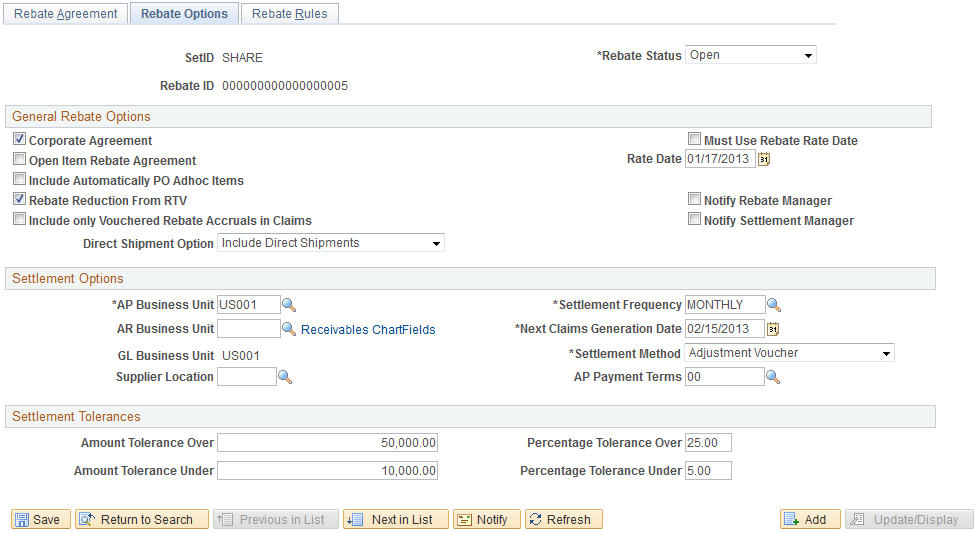
General Rebate Options
Field or Control |
Description |
|---|---|
Corporate Agreement |
Select this check box if this rebate agreement can be used by all business units. This check box appears selected by default. If the check box is clear, then you need to specify at least one eligible PO business unit. |
Open Item Rebate Agreement |
Select this check box if the rebate agreement is open to all items. If you select this check box, you are not able to enter items or categories for the rebate agreement on the Rebate Agreement - Rebate Agreement page. |
Include Automatically PO Adhoc Items (include automatically purchase order ad hoc items) |
Select this check box if you want to include description-only items for the rebate agreement. If the check box is clear, the rebate agreement won't be automatically associated to the purchase order lines with description-only items. |
Rebate Reduction From RTV (rebate reduction from return to vendor) |
Select this check box if you want to generate accruals upon return to vendor shipments for the purchase orders that are associated with this rebate agreement. Accruals on RTV transactions will have a negative rebate amount. |
Include Only Vouchered Rebate Accruals in Claims |
Select this check box if you want the Generate Vendor Rebate Claims process to include only the rebate accruals with a transaction status of Vouchered. |
Direct Shipment Option |
Select the direct shipment option. This option is used to determine the rebate agreement that is assigned to a purchase order when the purchase order is created. Values are:
|
Must Use Rebate Rate Date |
Select this check box if you want the system to use the rate date of the rebate agreement for the currency conversion. After you select this check box, select the rate date in the Rate Date field. |
Notify Rebate Manager |
Select this check box if you want to notify the Rebate Manager by email, worklist, or both when a new claim is generated. |
Notify Settlement Manager |
Select this check box if you want to notify the Settlement Manager by email, worklist, or both when a claim is settled through the Claims Management Workbench. |
Settlement Options
Field or Control |
Description |
|---|---|
AP Business Unit (PeopleSoft Payables business unit) |
Select the PeopleSoft Payables business unit to use for the rebate agreements settlement. |
AR Business Unit (PeopleSoft Receivables business unit) |
Select the PeopleSoft Receivables business unit if the settlement method for the rebate agreement is anything but Adjustment Voucher. |
GL Business Unit (PeopleSoft General Ledger business unit) |
The PeopleSoft General Ledger business unit that is associated with the PeopleSoft Payables business unit appears. |
Supplier Location |
Select the Supplier location to apply to adjustment vouchers that are created for a claim settlement. Specifying a Supplier location is optional. This Supplier location will be passed to PeopleSoft Payables through the voucher staging process. Specifying a Supplier location can be useful if you want to handle a specific Supplier location for rebate differently than the normal ordering Supplier location. |
Settlement Frequency |
Select the frequency of the rebate agreement settlement. The schedule IDs that you define on the Maintain Purchase Order - Schedules page are used for the settlement frequency. For example, settlement frequency can be yearly, quarterly, monthly, and so on. |
Next Claims Generation Date |
Displays the next claim generation date. The system calculates the date based on the rebate agreement begin date and settlement frequency that is selected. You can override this date. For example, assume that a rebate agreement is being entered on February 1, 2004 (current system date) with a begin date of January 1, 2004 and an expiration date of December 31, 2004 with a settlement method of quarterly. Assume that the schedule is defined as quarterly with a day of the month equal to one for the schedule ID. In this case, the next claims generation date calculated would be April 1, 2004. |
Settlement Method |
Select the settlement method for the rebate agreement. Values are Adjustment Voucher, Check, Credit Memo, Direct Debit, Draft, and Electronic Funds Transfer. |
AR Payment Terms (PeopleSoft Receivables payment terms) or AP Payment Terms (PeopleSoft Payables Payment Terms) |
Depending on the settlement method that you select, you will select either AR Payment Terms or AP Payment Terms. The system uses this field for the payment due days calculation. |
Settlement Tolerances
Field or Control |
Description |
|---|---|
Amount Tolerance Over and Amount Tolerance Under |
These fields appear by default from the values that are defined on the Set Controls - Contracts page. |
Percentage Tolerance Over and Percentage Tolerance Under |
These fields appear by default from the values that are defined on the Set Controls - Contracts page. |
Use the Rebate Agreement - Rebate Agreement Value Added Tax page (VRBT_HDR_VAT) to update value added tax details for the rebate agreement.
Navigation:
Click the Header VAT link on the Rebate Agreement - Rebate Options page.
Expanding and Collapsing Sections
To manage the VAT data more efficiently, you can expand and collapse sections on this VAT page making management of the information on this page easier.
Field or Control |
Description |
|---|---|
Expand All Sections |
Click this button to scroll to and access every section on the page. You can also expand one or more sections by clicking the arrow next to the section's name. |
Collapse All Sections |
Click this button to collapse all sections displaying only the header information. If you expand one or more sections, you can click the arrow next to the name of the section to collapse the section. |
Physical Nature
Field or Control |
Description |
|---|---|
Physical Nature |
Indicates whether an object is a good or a service. Many countries are required to report the sale and purchase of goods separately from services. The default comes from the supplier location in the Settlement Options if specified, or the default supplier location or Goods value if not specified on the supplier location. |
VAT Locations
Field or Control |
Description |
|---|---|
Ship From Country |
Displays the Supplier's ship from location country. In the case of transactions involving goods or freight service transactions, this is used to determine the VAT treatment. |
Ship From State |
If the ship to country is defined as tracking VAT by state or province, this field displays the Supplier's ship from location state. In the case of transactions involving goods or freight service transactions, this is used to determine the VAT treatment. |
Ship To Country |
Displays the ship to location country. In the case of transactions involving goods or freight service transactions, this determines the VAT treatment. |
Ship To State |
If the ship to country is defined as tracking VAT by state or province, this field displays the ship to location state. In the case of transactions involving goods or freight service transactions, this is used to determine the VAT treatment. |
VAT Defaults
Field or Control |
Description |
|---|---|
Reporting Country |
Displays the country for which this VAT will be reported. This is the VAT entity VAT registration country and determines many of the VAT defaults. |
Defaulting State |
If the reporting country requires that VAT be tracked by state or province, this field displays the state within the reporting country that is used to retrieve values from the VAT Defaults table. |
Supplier's Registration Country and Supplier's Registration ID |
Displays the registration country and ID of the supplier. |
Exception Type |
Displays the exception that is granted to the VAT entity. Values are: None, Exonerated, or Suspended. This value is specified on the VAT entity registration. |
Certificate ID |
If applicable, displays the ID of the VAT exception certificate that may have been issued to the VAT entity. |
Calculate at Gross or Net |
Indicates how VAT is calculated. Values are: Gross: The system calculates VAT before it applies any early payment discounts. Net: The system calculates VAT after it deducts early payment discounts. If two percentage discounts exist, the system uses the larger of the two when it calculates VAT. The system does not use discount amounts, only discount percentages. The default value comes from the VAT entity driver. |
Recalculate at Payment |
Select this check box to enable the recalculation of VAT at payment time to allow for any early payment discounts, if you are calculating VAT at gross. This causes the system to adjust the VAT amount at the time of payment if the discount has been taken. This is set on the VAT entity driver in the VAT defaults table. |
Declaration Point |
Appears for a good or service when you want VAT transaction information to be recognized for reporting purposes. Values are:
This value may be set at several levels in the VAT hierarchy: VAT entity registration, business unit options, supplier, or supplier location. |
Rounding Rule |
Displays the VAT rounding rule. The value comes from the VAT country, VAT entity, supplier, or supplier location drivers. Values are: Nat Rnd (natural round): Amounts are rounded normally (up or down) to the precision that is specified for the currency code. For example, for a currency that is defined with two decimal places, 157.4659 would round up to 157.47, but 157.4649 would round down to 157.46. Down (round down): Amounts are rounded down. For example, for a currency that is defined with two decimal places, 157.4699 would round down to 157.46. Up (round up): Amounts are rounded up with a rounding precision to one additional decimal place. For example, for a currency that is defined with 2 decimal places, 157.4659 would round up to 157.47, but 157.4609 would round down to 157.46. |
Use Type |
Determines the split between recoverable (taxable) and nonrecoverable (nontaxable) VAT. For the Canadian public sector, the use type also determines the rebate of the nonrecoverable VAT. VAT rebates are calculated based on statutory rebate rates that are established for each public service body. The value comes from the VAT defaulting hierarchy, from the supplier location, supplier, or purchasing options. |
Include Freight |
If this option is selected, the system includes any freight amounts in the VAT basis by calculating VAT on the merchandise amount plus any freight amount. This option is available only for exclusive VAT calculation. The value comes from the VAT entity registration driver. |
Include Miscellaneous |
If this option is selected, the system includes any miscellaneous charge amounts in the VAT basis by calculating VAT on the merchandise amount, plus any miscellaneous charge amount. This option is available only for exclusive VAT calculation. The value comes from the VAT entity registration driver. |
Treatment |
Displays the VAT treatment. VAT treatment is determined by a complex set of algorithms. Values are:
Within PeopleSoft, detail VAT treatment values on the transaction lines are used for applying the precise defaults that are applicable to the transaction lines. The treatment is determined based the rules that are applicable to the transaction. |
Applicability |
Displays the VAT status. Applicability is determined by an algorithm that makes use of the Applicable field in the VAT defaults table, the value of which may be set at almost every level in the PeopleSoft Purchasing VAT defaulting hierarchy. Values are:
|
VAT Code |
Displays the VAT code that defines the rate at which VAT is calculated for this schedule. The default value comes from the VAT country, purchase order options, supplier, or supplier location levels in the PeopleSoft Purchasing VAT defaulting hierarchy. |
Record Output VAT |
Select this check box to enter vouchers in which VAT is not included on the invoice but is payable to the VAT authority rather than the supplier. In this case, you account for both input and output VAT for the purchase. This is the case for an Intra-EU Acquisition or when you must account for output VAT on a service that is supplied by a foreign supplier. This is also referred to as self-assessing for VAT. The value comes from an algorithm that uses the treatment and applicability to retrieve the applicable value from the PeopleSoft-delivered VAT system setup data. |
Transaction Type |
Displays the code that categorizes and classifies this transaction for VAT reporting and accounting. The default value comes from the VAT entity registration, purchase order options, supplier, or supplier location levels in the PeopleSoft Purchasing VAT defaulting hierarchy. |
Adjust/Reset VAT Defaults
Any changes that you make to fields on this page may affect VAT defaults on this page. For accuracy and consistency, use the following fields to adjust affected VAT defaults or to reset all VAT defaults. Adjusting or resetting VAT defaults affects only fields that are within the VAT Defaults group box.
Field or Control |
Description |
|---|---|
Adjust Affected VAT Defaults |
Click this button to have the system adjust the VAT defaults that are affected by the changes. All changes that you have made to VAT defaults on this page that affect other VAT defaults on this page will be retained. Click the i button to list the fields that are to be adjusted. Note: You should always click the Adjust Affected VAT Defaults button after changing any defaults on the VAT page. |
Levels |
Enables you to specify the levels to reset when you click the Reset All VAT Defaults button. Values are: All lower levels: Resets all VAT defaults at lower levels for this page. This and all lower levels: Resets all VAT defaults on this page and at any lower levels of this page. This level only: Resets all VAT defaults on this page. |
Reset All VAT Defaults |
Click this button to have the system reset the VAT defaults based on the Levels value that you selected. Any changes that you previously made to VAT defaults will be lost. Note: Reset completely redetermines the VAT defaults. This does not necessarily mean they are reset to their original values. For example, the user may not have changed any VAT default values, but if a VAT driver field changes, you can click Reset All VAT Defaults to redetermine all defaults based on the new driver value. |
Note: The system captures all the VAT information for VAT processing to take advantage of the PeopleSoft Global Options even though some of the information may not be relevant to Vendor Rebates.
Use the Rebate Agreement - Rebate Rules page (VRBT_RULES) to define the different rebate rules that apply to this rebate agreement.
Navigation:
This example illustrates the fields and controls on the Rebate Agreement - Rebate Rules page. You can find definitions for the fields and controls later on this page.
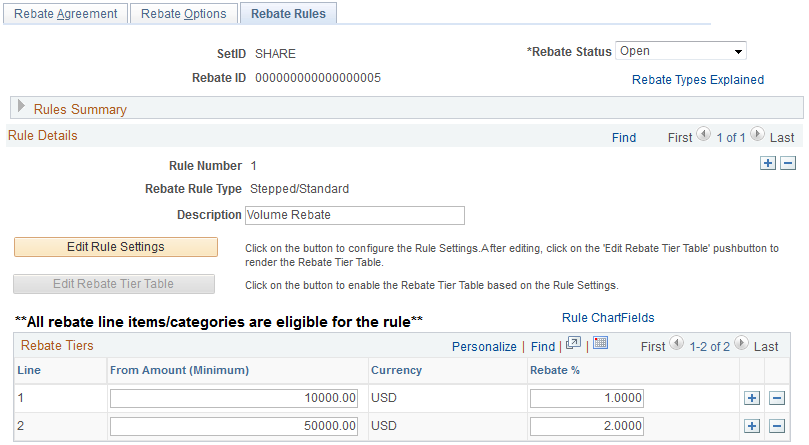
Rules Summary
The fields in this group box display all the rebate rules that currently exist for this rebate agreement. This is a quick way to view a summary of the rebate rules that are associated with the rebate agreement.
Stepped or Standard Rule Type
To define a stepped or standard rule type:
Select Stepped/Standard in the Rebate Rule Type field.
(Optional) Enter a description for the rule using the Description field.
Configure the rule settings.
The field selections that you make in the Configure Rule section of the page determine how the fields in the Rebate Tiers group box will appear.
Select a tier basis for the rule using the Tier Basis field. Values are Amount and Quantity. Quantity appears by default.
If you select amount, amount fields appear in the Rebate Tiers group box.
If you select quantity, quantity fields appear in the Rebate Tiers group box. Also, you will need to select a unit of measure that is associated with the quantity in the UOM field.
Select a tiers in terms of setting for the rule using the Tiers in Terms Of field. Values are From (Minimum) and To (Maximum). From (Minimum) appears by default.
If you select From (Minimum), a From column appears in the Rebate Tiers group box.
If you select To (Maximum), a To column appears in the Rebate Tiers group box.
Select how the rebate is to be calculated for this rebate rule using the Rebate Calculated As field. Values are Amount and Percentage.
For stepped/standard rules, the rebate is always calculated as a percentage. Amount is not a valid selection for this rebate rule type.
Click the Edit Rebate Tier Table button.
When you click this button, the fields in the Rebate Tiers group box are configured to match the rule settings that you choose previously. Also, the configure rule fields are no longer available for entry.
Enter the terms of the rebate using the fields in the Rebate Tiers group box.
Enter the From or To quantities or amounts. If you are working with quantities, the UOM field appears. If you are working with amounts, the Currency field appears.
Enter the rebate percentage for each rebate rule line using the Rebate % field.
(Optional) Edit the rule setting fields.
If you have found that you need to change the fields that appear in the Rebate Tiers group box. Click the Edit Rule Settings button.
Select the new field values for the rule settings.
Click the Edit Rebate Tier Table button.
Enter the new values for the rebate rule.
Enter rule distributions using the Rebate Agreement - Distributions for Rebate Rule page.
Click the Rule ChartFields link.
The rule ChartFields will appear by default from the Accounting Template, but you can override it. The Generate Vendor Rebate Claims process will retrieve and create claim distribution lines with the ChartFields from here. Then the claim distribution lines will be passed to PeopleSoft Payables or PeopleSoft Receivables when the claim is settled.
Save the rebate rule by clicking the Save button.
Flat Amount Rule Type
To define a flat amount rule type:
Select Flat Amount in the Rebate Rule Type field.
(Optional) Enter a description for the rule using the Description field.
Configure the rule settings.
The field selections that you make in the Configure Rule section of the page determine how the fields in the Rebate Tiers group box will appear.
Select a tier basis for the rule using the Tier Basis field. Values are: Amount and Quantity. Quantity appears by default.
If you select amount, amount fields appear in the Rebate Tiers group box.
If you select quantity, quantity fields appear in the Rebate Tiers group box. Also, you will need to select a unit of measure associated with the quantity in the UOM field.
Select a tiers in terms of setting for the rule using the Tiers in Terms Of field. Values are From (Minimum) and To (Maximum). From (Minimum) appears by default.
If you select From (Minimum), a From column appears in the Rebate Tiers group box.
If you select To (Maximum), a To column appears in the Rebate Tiers group box.
Click the Edit Rebate Tier Table button.
When you click this button, the fields in the Rebate Tiers group box are configured to match the rule settings that you chose previously. Also, the configure rule fields are no longer available for entry.
Enter the terms of the rebate using the fields in the Rebate Tiers group box.
Enter the From or To quantities or amounts. If you are working with quantities, the UOM field appears. If you are working with amounts, the Currency field appears.
Click the Prorate check box to prorate the flat rebate amount.
For example, you define a rule for the purchase amount from 0 to 10,000 USD with the rebate being 100 USD. If the purchase amount is 6,000 USD and the prorate check box on the tier is clear, then the rebate amount is 100 USD. If the prorate check box is selected, then the rebate amount is 60 USD.
Enter the flat rebate amount for each rebate rule line using the Rebate Amount field.
(Optional) Edit the rule setting fields.
If you have found that you need to change the fields that appear in the Rebate Tiers group box. Click the Edit Rule Settings button.
Select the new field values for the rule settings.
Click the Edit Rebate Tier Table button.
Enter the new values for the rebate rule.
Enter rule distributions using the Rebate Agreement - Distributions for Rebate Rule page.
Click the Rule ChartFields link.
The rule ChartFields will appear by default from the Accounting Template, but you can override it. The Generate Vendor Rebate Claims process will retrieve and create claim distribution lines with the ChartFields from here. Then the claim distribution lines will be passed to PeopleSoft Payables or PeopleSoft Receivables when the claim is settled.
Save the rebate rule by clicking the Save button.
Growth Bonus Rule Type
To define a growth bonus rule type:
Select Growth Bonus in the Rebate Rule Typefield.
(Optional) Enter a description for the rule using the Description field.
Configure the rule settings.
The field selections that you make in the Configure Rule section of the page determine how the fields in the Rebate Tiers group box will appear.
Select a tier basis for the rule using the Tier Basis field. Values are Amount and Quantity. Quantity appears by default.
If you select amount, amount fields appear in the Rebate Tiers group box.
If you select quantity, quantity fields appear in the Rebate Tiers group box. Also, you will need to select a unit of measure that is associated with the quantity in the UOM field.
Select a tiers in terms of setting for the rule using the Tiers in Terms Of field. Values are From (Minimum) and To (Maximum). From (Minimum) appears by default.
If you select From (Minimum), a From column appears in the Rebate Tiers group box.
If you select To (Maximum), a To column appears in the Rebate Tiers group box.
Select how the rebate is to be calculated for this rebate rule using the Rebate Calculated As field. Values are Amount and Percentage.
Click the Edit Rebate Tier Table button.
When you click this button, the fields in the Rebate Tiers group box are configured to match the rule settings that you chose previously. Also, the configure rule fields are no longer available for entry.
Enter the items or categories to associate with the growth bonus rule type using the Eligible Items and Categories for Growth Bonus group box.
Select a line type using the Line Type field. Values are Item and Category.
If you select Item as a line type, then select an item ID and enter a rebate basis amount using the Basis Amount field.
If you select Category as a line type, then select a category and enter a rebate basis amount using the Basis Amount field.
If you select item or category as the line type and quantity as the tier basis, then enter an item ID or a category and enter a rebate basis amount as well as a rebate basis quantity.
Enter the terms of the rebate using the fields in the Rebate Tiers group box.
Enter the From or To quantities or amounts. If you are working with quantities, the UOM field appears. If you are working with amounts, the Currency field appears.
Enter the rebate percentage for each rebate rule line using the Rebate % field.
(Optional) Edit the rule setting fields.
If you have found that you need to change the fields that appear in the Rebate Tiers group box, click the Edit Rule Settings button.
Select the new field values for the rule settings.
Click the Edit Rebate Tier Table button.
Enter the new values for the rebate rule.
Enter rule distributions using the Rebate Agreement - Distributions for Rebate Rule page.
Click the Rule ChartFields link.
The rule ChartFields will appear by default from the Accounting Template, but you can override it. The Generate Vendor Rebate Claims process will retrieve and create claim distribution lines with the ChartFields from here. Then the claim distribution lines will be passed to PeopleSoft Payables or PeopleSoft Receivables when the claim is settled.
Save the rebate rule by clicking the Save button.
Marketing Contribution Rule Type
To define a marketing contribution rule type:
Select Marketing Contribution in the Rebate Rule Type field.
(Optional) Enter a description for the rule using the Description field.
Enter the terms of the rebate using the Previous Period Basis Amount, Rebate Amount, or Rebate % (rebate percentage) fields.
Enter rule distributions using the Rebate Agreement - Distributions for Rebate Rule page.
Click the Rule ChartFields link.
The rule ChartFields will appear by default from the Accounting Template, but you can override it. The Generate Vendor Rebate Claims process will retrieve and create claim distribution lines with the ChartFields from here. Then the claim distribution lines will be passed to PeopleSoft Payables or PeopleSoft Receivables when the claim is settled.
Save the rebate rule by clicking the Save button.
Retrospective Rule Type
To define a retrospective rule type, follow the same procedure as you would to define a stepped or standard rule type. The only difference is that you select a Rebate Rule Type of Retrospective.