Configuring the Manager Dashboard Pagelets
To set up the Manager Dashboard, use the Alerts Pagelet Setup (UX_ALERT_SETUP), Approvals Pagelet Setup (UX_APPR_PLT_CFG), and Direct Reports Pagelet Setup (UX_DIR_PLT_CFG) components.
These topics provide an overview of the Manager Dashboard pagelets and setup, alerts, approvals, Direct Line Report pagelet features, and discuss how to configure the Manager Dashboard pagelets.
|
Page Name |
Definition Name |
Usage |
|---|---|---|
|
Manage Dashboard Pages |
PTAL_DASHBD_PAGES |
Use this page to access the properties, content, and layout related pages where you can select which pagelets should be available on the Manager Dashboard. For more information on dashboards, see PeopleTools: Portal Technology, “Administering Homepages and Dashboard Pages.” |
|
UX_ALERT_SETUP |
Set up the Alerts pagelet for Manager Dashboard. Define what options are available to users when setting personal preferences as well as identify the alert levels and number of alerts you want to display in the Alerts pagelet. The Talent Summary, Licenses and Certifications pagelet uses the setup definitions defined for the Expiring Licenses/Certifications row. |
|
|
UX_APPR_PLT_CFG |
Set up the Approvals pagelet by identifying transactions you want to support and defining date notification rules. |
|
|
UX_DIR_PLT_CFG |
Set up the Direct Reports pagelet by defining how you want to display information to your managers about their direct reports. |
|
|
GP_ELN_APP |
Define application data for the Manager Dashboard attributes. The Application Definition page defines the structure of the absence management data that will be mapped to the columns in the Direct Line Reports pagelet grid. This is used in conjunction with a List Set Definition to associate leave types by country to each of the three columns. |
|
|
GP_ELN_SET |
Define list sets for the Manager Dashboard direct line reports by mapping your element groups to the MGR_DASHBOARD list set. The Application field value must be MGR_DASHBOARD. |
|
|
SS_LINK_TBL |
Identify access types for the Direct Line Reports pagelet. The employees listed in the Direct Line Reports pagelet are based on the logged in manager and the access type selected for the pagelet component UX_DIRECTS_PLT when using setting up data for Manager Dashboard. As delivered, the Access Type field value is set to By Part Posn Mgmt Supervisor (by partial position management supervisor). |
The Manager Dashboard is a set of pagelets that enables managers to quickly and easily view and update human resource information as needed.
The following pagelets are delivered with the Manager Dashboard:
Alerts
Objective Alignment (narrow version of the Business Objective information)
Business Objective Alignment (wide version of the Business Objective information)
Pending Approvals
Direct Line Reports
Learning
Company Directory
My Job Openings
Quick Links
My Reports
The PeopleSoft system delivers seven manager alert types that can appear on the Alerts pagelet. Alert types include:
ePerformance
Checks the document due date for all the performance documents on the Current Documents page that are owned by the manager.
eCompensation
Alerts the manager that there are compensation cycle activities on the eCompensation Alert homepage.
Expiring Licenses/Certificates
Alerts the manager about licenses or certifications that are about to expire for his or her direct reports, as seen on the Current Team Profiles component, Qualifications tab.
Expiring Memberships
Alerts the manager about memberships that are about to expire for his or her direct reports, as seen on the Current Team Profiles component, Qualifications tab.
Scheduled Training
Notifies the manager of upcoming training for his or her direct reports.
Birthday Alerts
Checks and generates alert messages for upcoming birthdays for direct reports.
Anniversary Alerts
Checks and generates alert messages for upcoming anniversaries base on the original hire date.
The Alerts pagelet can display alerts and alert level icons next to an alert if selected to show. Alert levels can be informational (no icon displays next to the alert message), warning alerts, and critical alerts. You configure which alert types and levels display.
Alert Message Generation
The Alert messages are generated based on the existing components and data. Therefore, the system checks the access type for each component when access type security is enforced. This ensures that the system fetches the correct list of direct reports for a user. The alerts are generated base on this information:
For Expiring Licenses/Certificates Alerts and Expiring Memberships Alerts, the access type of Component - Current Team Profiles (JPM_PERS_PTSEL_MGR) is checked. It has all the direct reports that the manager has access to for information regarding licenses, certifications, and membership information.
For Scheduled Training Alerts, the access type of Component - Training Summary (CO_PE_MGR_TRAINING) is checked. It has all the direct reports training information that current manager has access to.
For Birthday Alerts and Anniversary Alerts, the access type of Component - View Employee Personal Info (HR_EE_INF_MGR) is checked. It has all the direct reports personal information that current manager has access to.
Approval workflow is triggered when a requester submits a transaction, such as a promotion, for approval. The application hands the transaction over to the Approval Framework, which finds the appropriate approval process definition and launches the approval workflow.
The system enables you to generate approvals for the following transaction types from the Manager Dashboard:
|
Manager Self Service Transactions |
(USF) Federal Manager Self Service Transactions |
|---|---|
|
|
Steps to Setting Up the Approvals Pagelet
To ensure that approvals are set up properly for the Manager Dashboard, you will need to perform the following steps to generate approvals:
Set up the Approvals Pagelet Setup page
Set the maximum number of approvals large enough or that the transaction sequence priority is set such that the approval type you are generating will appear in the pagelet.
Select to include an approval transaction under the Approval Workflow Engine (AWE) Transactions group box.
Confirm user profile settings
Ensure that only one user ID is associated to an employee. When multiple user IDs are linked to an employee, you cannot guarantee to which user ID the approval process will assign approvals. To change the employee associated to a user ID, access the ID page to view or modify the employee ID assignment.
Grant page access to the Manager Dashboard by assign the Manager Dashboard role to the user on the Roles page.
(USF) Enable Federal functionality on the Installation Table
Select the Federal check box on the Installation Table to generate or approve Federal-based approvals. When you change the settings for this check box, the application server cache must be deleted and all app servers bounced and restarted for changes to take effect.
The Direct Line Reports pagelet enables managers to view, in a single location, data from across HCM about each of their employees. To manage this large amount of information, the Direct Reports Pagelet Setup page enables you to group the field columns into eight different tab sections in the pagelet grid. The pagelet also enables managers to initiate self service actions for a specific employee through the use of the Actions menu link.
See Understanding Accessing Direct Line Report Information on the Dashboard Pagelets.
This topic discusses the delivered Direct Line Reports pagelet format.
The Delivered Direct Line Reports Pagelet Format
The Direct Line Reports pagelet contains a grid with eight tabs. The labels on the tabs are configurable and you can hide or show fields (columns). The user has the ability to personalize his or her grid by hiding columns and tabs, reordering columns and tabs, and freezing columns of their choice.
This tables list the delivered eight tab names and fields within those tabs for the Direct Line Reports pagelet:
Note: Unless otherwise noted, the fields come delivered on and available.
|
Summary Tab |
Job Details Tab |
Contact Tab |
Career Plan Tab |
|---|---|---|---|
|
Display Name (frozen) First Name (off) Last Name (off) Actions (frozen) Potential Job Title Performance Rating Bar Compa-Ratio (off) Position in Salary Range |
Employee ID Job Code Years in Job Job Title Schedule |
Telephone Department (off) Location (off) Instant Message (off) |
Review Date Relocate? International? Travel? |
|
Compensation Tab |
Performance Tab |
Time Tab |
Succession Tab |
|---|---|---|---|
|
Annual Salary Salary Currency Salary Range Minimum Salary Range Midpoint Salary Range Maximum Compa-Ratio Quartile Percent Range |
Last Rating Period Begin Date Period End Date |
Comp Time Balance (from Time & Labor) Vacation Balance (from Time & Labor)(off) Sick Balance (from Time & Labor)(off) Leave Balance 1 (from Absence Management) Leave Balance 2 (from Absence Management) Leave Balance 3 (from Absence Management)(off) |
Key Position Successors Risk of Leaving Impact of Loss |
Use the Alerts Pagelet Setup page (UX_ALERT_SETUP) to set up the Alerts pagelet for Manager Dashboard.
Define what options are available to users when setting personal preferences as well as identify the alert levels and number of alerts you want to display in the Alerts pagelet.
The Talent Summary - Licenses and Certificate pagelet uses the setup definitions defined for the Expiring Licenses/Certificates row.
Navigation:
This example illustrates the fields and controls on the Alerts Pagelet Setup page. You can find definitions for the fields and controls later on this page.
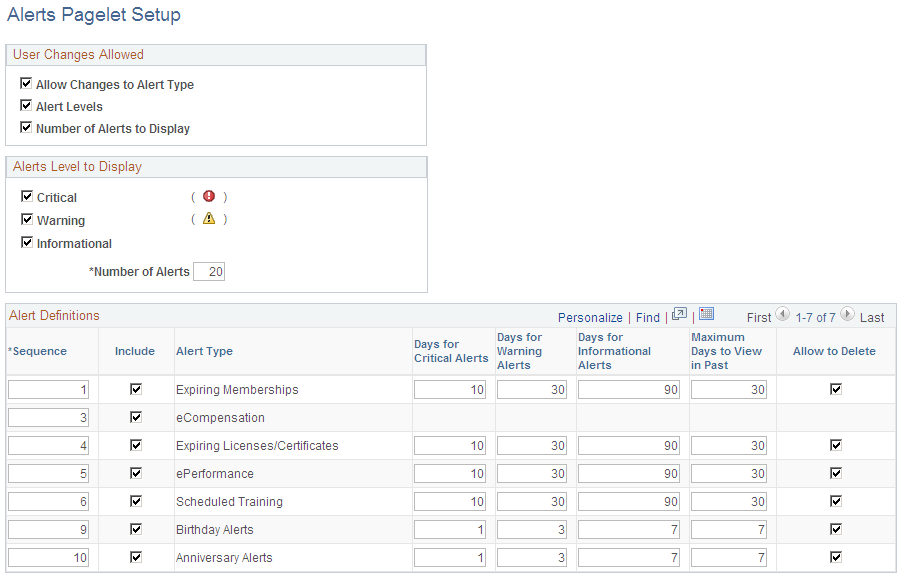
User Changes Allowed
Use this section to indicate the options that should be available to a user on the Personalize Alert page.
Field or Control |
Description |
|---|---|
Allow Changes to Alert Type |
Select to enable the manager to specify specific alert types he or she wants to see on the Alerts pagelet. By selecting this check box, the system will display the Alert Types to Include group box on the Personalize Alerts page for the manager. For a list of alert types, see Understanding Alerts. Deselect this check box to have all alert types display on the Alerts pagelet and to remove the ability for the manager to select alert types on his or her personalization page. |
Alert Levels |
Select to have the Alerts Level to Display group box available on the Personalize Alerts page for the user. This enables managers to specify which levels of alerts they want or don’t want to see on the Alerts pagelet. Alert types include:
Deselect this check box to hide the Alerts Level to Display group box on the Personalize Alert page for the user, preventing the manager from choosing which alert level he or she wants to display. With this check box deselected, only those alert levels you select in the Alerts Level to Display group box on this page will display on the Alerts pagelet. |
Number of Alerts to Display |
Select to have the Number of Alerts to Display group box available on the Personalize Alerts page for the user. This enables the user the ability to change the number of alerts that will show on the Alerts pagelet. Deselect this check box to hide the Number of Alerts to Display group box on the Personalize Alert page for the user and prevent managers from identifying the maximum number of alerts that show display on the Alerts pagelet. Instead, the Alerts pagelet will display up to the number of alerts defined in the Number of Alerts field on this page. |
Alerts Level to Display
Use this section to define the alert levels and the number of alerts that should display on the Alerts pagelet.
Field or Control |
Description |
|---|---|
Critical ( |
Select to have critical level alerts with the corresponding icon appear on the Alerts pagelet next to the alert type. When you deselect this check box, the Critical alerts option will be unavailable to the user on the Personalize Alerts page and these alerts will not display on the pagelet. |
Warning ( |
Select to have warning level alerts with the corresponding icon appear on the Alerts pagelet next to the alert type. When you deselect this check box, the Warning alerts option will be unavailable to the user on the Personalize Alerts page and these alerts will not display on the pagelet. |
Informational |
Select to have all informational level alerts with the corresponding icon appear on the Alerts pagelet next to the alert type. When you deselect this check box, the Informational alerts option will be unavailable to the user on the Personalize Alerts page and these alerts will not display on the pagelet. |
Number of Alerts |
Enter the maximum number of alerts that should appear in the Alerts pagelet when user first opens the pagelet. The user can override this number when the Number of Alerts to Display check box is selected on this page. If the number of alerts for the manager exceeds this number, the user can click the View All link on the pagelet to view the additional alerts. |
 )
) )
)Alert Definitions
Use this section to identify which alert type display priority and behavior definitions.
Note: The Talent Summary - Licenses and Certifications pagelet uses the setup definitions defined for the Expiring Licenses/Certificates row. The Talent Summary page does not use the configuration for the other rows or fields on this page.
Field or Control |
Description |
|---|---|
Sequence |
Enter the priority number for the alert type. The alerts on the pagelet are sorted first by alert level, and then by this sequence number. |
Include |
Select to include this type of alert on the Alerts (Manager Dashboard) and Licenses and Certifications (Talent Summary) pagelets. When an alert type and the Alert Types check box in User Changes Allowed group box of this page is selected, users can choose to include or exclude this alert type on the Manager Dashboard - Alerts pagelet using the Personalize Alerts page. |
Alert Type |
Displays the name of the alert type. You can define different options for each of the seven alert types. |
Days for Critical Alerts |
Enter the number of days prior to an event's due date or expiration date to identify when the system should display the alert type as critical. |
Days for Warning Alerts |
Enter the number of days prior to an event's due date or expirations date to identify when the system should display the alert type as a warning. |
Days for Informational Alerts |
Enter the number of days prior to a due date of an event for which the system should define the alert as informational for this alert type. |
Maximum Days to View in Past |
Enter the number of day after the due date of an event that the system should show this alert type. Overdue alerts will appear as critical. Past due alerts that have exceeded the number of days specified here will not display on the Alerts pagelet. |
Allow to Delete |
Select this check box to enable the user to delete this type of alert from the Alerts pagelet. Deselect this option to hide the delete icon for this type of alert from the Alerts pagelet. |
Note: The eCompensation alert definition is not performed on this page. The setup is on the eCompensation administration setup pages. You can access these pages by navigating to and
Use the Approvals Pagelet Setup page (UX_APPR_PLT_CFG) to set up the Approvals pagelet by identifying transactions you want to support and defining date notification rules.
Navigation:
This example illustrates the fields and controls on the Approvals Pagelet Setup page. You can find definitions for the fields and controls later on this page.
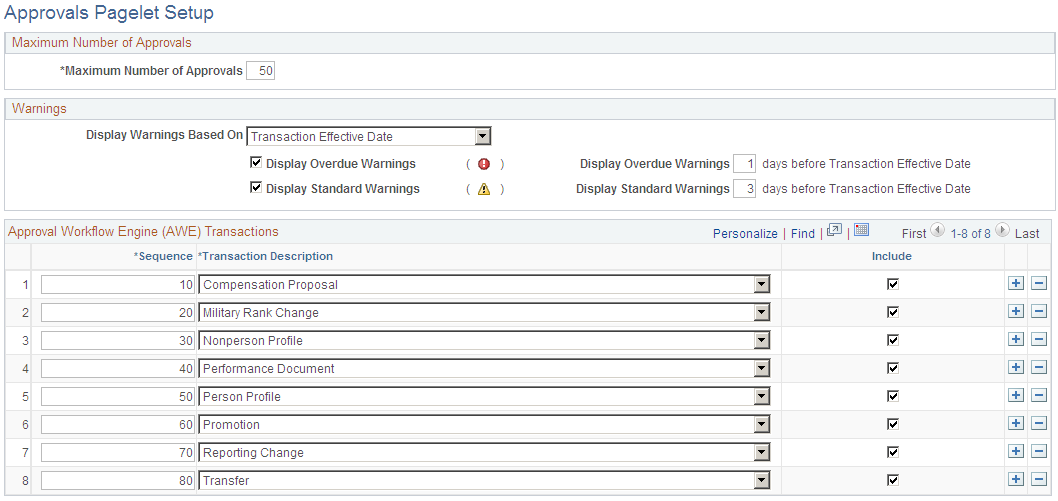
Maximum Number of Approvals
Field or Control |
Description |
|---|---|
Maximum Number of Approvals |
Enter the maximum number of approvals that should appear in the Approvals pagelet on the Manager Dashboard. |
Warnings
Field or Control |
Description |
|---|---|
Display Warnings Based On |
Chose the method the system should use to notify managers of an upcoming approval that requires their approval. The system uses this information to determine the date to calculate and display the overdue and standard warning icons in the pagelet grid. Valid values are:
The value you select here will determine the label text for the overdue and standard warning days fields. |
Note: Oracle PeopleSoft delivers Notification Composer Framework to manage the setup and administration of all notifications in one central location.
Once you have adopted the Notification Composer feature, you must use it to create new notifications and manage your existing notifications.
Notifications delivered with HCM Image 47 or later must use Notification Composer.
For more information about Notification Composer Framework, see Understanding Notification Composer.
Field or Control |
Description |
|---|---|
Display Overdue Warnings |
Select this check box to have the Response overdue icon display in the Warning column on the Pending Approvals pagelet. This works in conjunction with the overdue warning days field on this page. These approvals will appear first for each approval type. |
Field or Control |
Description |
|---|---|
Display Overdue Warnings -__ days after Approval Receipt Date |
This field is available when you select Approval Receipt Date in the Display Warnings Based On field and select the Display Overdue Warnings check box. Enter the number of days after a manager has received an approval request that the system should mark a pending approval as overdue. For example, you enter 7 in this field. An employee submits an approval request on October 20. On October 27, and forward, the system will mark this pending approval with the Response overdue icon. Note: This number should be larger than the number in the Display Standard Warnings __ days after Approval Receipt Date field, if both warnings are selected to display. |
Field or Control |
Description |
|---|---|
Display Overdue Warnings -__ days before Transaction Effective Date |
This field is available when you select Transaction Effective Date in the Display Warnings Based On field and select the Display Overdue Warnings check box. Enter the number of days before a transaction is to take place to mark a pending approval as overdue and requiring a response. For example, you enter 5 in this field. An employee is eligible for a promotion on October 20. On October 15, and forward, the system will mark this pending approval with the Response overdue icon. Note: This number should be smaller than the number in the Display Standard Warnings __ days before Transaction Effective Date field, if both warnings are selected to display. |
Field or Control |
Description |
|---|---|
Display Standard Warnings |
Select this check box to have the Response due icon display in the Warning column on the Pending Approvals pagelet. This works in conjunction with the standard warning days field on this page. These approvals will appear after approvals with overdue warnings for each approval type. |
Field or Control |
Description |
|---|---|
Display Standard Warnings __ days after Approval Receipt Date |
This field is available when you select Approval Receipt Date in the Display Warnings Based On field and select the Display Overdue Warnings check box. Enter the number of days after a manager has received an approval request that the system should mark a pending approval with a standard warning requiring a response. For example, you enter 3 in this field. An employee submits an approval request on October 20. On October 23 the system will mark this pending approval with the Response due icon and it will remain until the warning days number on this page is reached. Note: This number should be smaller than the number in the Display Overdue Warnings __ days after Approval Receipt Date field, if both warnings are selected to display. |
Field or Control |
Description |
|---|---|
Display Standard Warnings __ days before Transaction Effective Date |
This field is available when you select Transaction Effective Date in the Display Warnings Based On field and select the Display Standard Warnings check box. Enter the number of days before a transaction is to take place to mark a pending approval with a standard warning requiring a response. For example, you enter 10 in this field. An employee is eligible for a promotion on October 20. On October 10 the system will mark this pending approval with the Response due icon and remain until the warning days number is reached. Note: This number should be larger than the number in the Display Overdue Warnings __ days before Transaction Effective Date field, if both warnings are selected to display. |
Approval Workflow Engine (AWE) Transactions
Field or Control |
Description |
|---|---|
Sequence |
Enter a priority number for an approval transaction to determine the order in which the approvals should appear in the Pending Approvals pagelet. The lower the number, the earlier the approvals of that type are displayed in the pagelet grid. |
Transaction Description |
Select the approval transactions you support in your organization. The descriptions come from the Workflow Transactions registry This is also the description that will appear in the pagelet. AWE transactions are listed in the Understanding Approvals topic of the documentation. |
Include |
Select to have the Pending Approvals pagelet display an approval transaction type. An approval transaction will not display on the pagelet if this check box is deselected. |
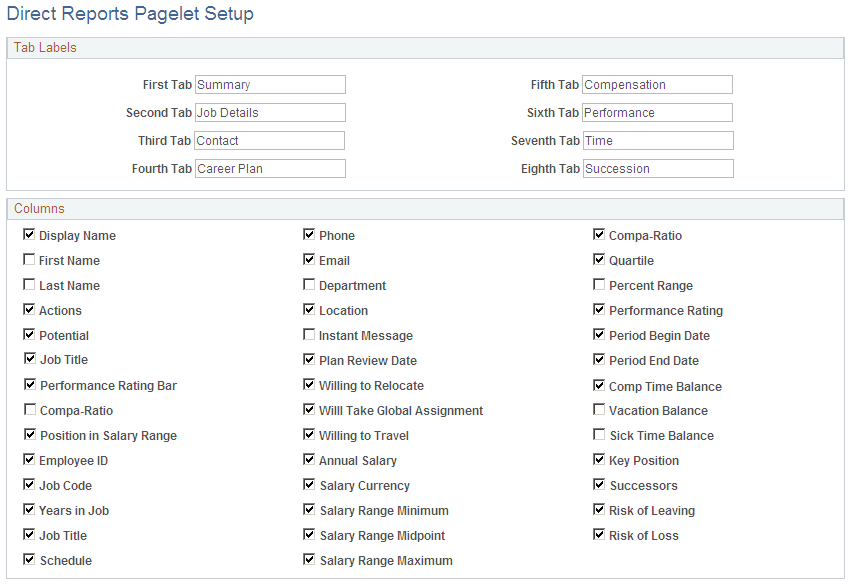
Use the Direct Reports Pagelet Setup page (UX_DIR_PLT_CFG) to set up the Direct Reports pagelet by defining how you want to display information to your managers about their direct reports.
Navigation:
This example illustrates the fields and controls on the Direct Reports Pagelet Setup page (1 of 2). You can find definitions for the fields and controls later on this page.
This example illustrates the fields and controls on the Direct Reports Pagelet Setup page (2 of 2). You can find definitions for the fields and controls later on this page.
Tab Labels
Use this section to identify the tab names that should appear on the Direct Line Reports pagelet. You can enter up to a total of eight tab names for the grid. If all of the columns under a tab are hidden using this setup page, then the tab label will be hidden as well.
Columns
Select each column (field) name that should be available to the manager when viewing the Direct Line Reports grid. The columns come predefined to map to a tab label, however the user can move or hide these columns on the Direct Line Reports: Personalize page.
Deselect a check box to hide the column from the user on the Direct Line Reports pagelet and on the Personalize page.
The following fields have special considerations:
Field or Control |
Description |
|---|---|
Actions |
Select this check box to make the Action menu drop-down list available in the grid. This enables the user to quickly access the manager self service pages to complete transactions for his or her employees. The Action menu values are configured through PeopleSoft Related Content Services. This framework enables developers and subject matter experts to link application pages with contextually relevant collaborative content. See Delivered Manager Self Service Transactions Available from the Manager Dashboard. See Understanding Related Actions and Self Service Transactions. For more information, see the product documentation PeopleTools: Portal Technology, “Developing and Configuring Related Content Services”. |
Field or Control |
Description |
|---|---|
Instant Message |
Select this check box to have the grid display IM availability for an employee. The instant message presence icon must be enabled in the Org Chart Viewer for the Direct-Line Reports org view type for the Manager Dashboard to display an IM icon. To activate this functionality for direct line reports, navigate to Access the component for the org view type Direct-Line Reports. The Manager Dashboard first checks the Org Chart Content page to see if the Instant Message Presence Icon field is selected and the IM protocol and IM Domain fields are entered. If these options are not defined, then the system checks the Profile Content page for this same information. If none of these IM options are defined in the Org Chart Viewer for Direct-Line Reports, the IM column will not be available on the Direct Line Reports pagelet. When using the XMPP protocol for instant messaging, you will also need to navigate to My System Profile at the root menu and on the General Profile Information page add the XMPP protocol domain, user ID, and password for the user. |
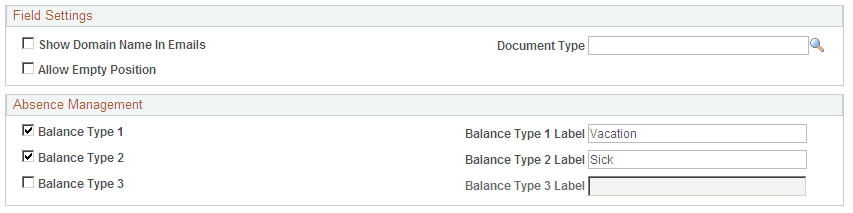
Note: Three additional check boxes related to Absence Management are located in the Absence Management group box on the bottom of this page.
Field Settings
Field or Control |
Description |
|---|---|
Show Domain Name In Emails |
Select this check box to have the domain name appear in the person’s email. The domain name is the text that appears after the @ sign in an e-mail address. Deselect this check box to have the system hide the domain name. This will save space on the page and avoid redundancy, such as when all employees have the same domain name in their business e-mail address. |
Document Type |
Enter the document type the system should use to retrieve employee performance ratings. The system will retrieve ratings from the last closed document of the document type specified in this field. If the document type is not specified, or the employee does not have a completed performance rating from the specified document, the performance rating information will not display. |
Allow Empty Position |
Select to display empty positions on the Direct Line Reports pagelet when using Position Management. Deselect this check box to hide unfilled positions from the manager. |
This table indicates whether a person or position will appear in the Direct Line Reports pagelet or My Organization grids:
|
Type of People or Position |
Direct Line Reports Pagelet Grid |
My Organization Page H-Grid |
|---|---|---|
|
Shows direct reports |
Yes |
Yes |
|
Shows indirect reports |
No |
Yes |
|
Shows empty position when Allow Empty Position is selected |
Yes |
Yes |
|
Show empty position when Allow Empty Position is deselected |
No |
No |
|
Shows inactive employees |
No |
Yes, but only when needed for drilling purposes. |
Field or Control |
Description |
|---|---|
Balance Type 1, 2, and 3 |
Select to enable any one of three user configurable Absence Management Leave Balance fields. The Balance Type 1 and Balance Type 2 options are selected by default and represent vacation and sick leave. To adjust for this, the Time and Labor Vacation Balance and Sick Balance options are deselected in the Columns group box. The default options for the Balance Type 3 are cleared. |
Balance Type 1, 2, and 3 Label |
Enter the column label that will appear in the column header for each of the three Absence Manager columns in the Direct Line Reports grid. The system delivers the Balance Type 1 Label field text as Vacation by default and the Balance Type 2 Label field text as Sick by default. |
Note: Additional setup to map Absence Management leave types, such as Vacation and Sick, to each of these columns is required. Use the existing Global Payroll and Absence Management Element Application component to map leave type elements for each desired country to the three columns.