(Fluid) Updating Job Data
Access the Manage Job Tile to use the Job Data activity guide process when you want add new job rows or update a person's job data using the fluid pages.
This topic provides an overview of the Manage Job - Search Criteria Page, Job Actions Summary statuses and approvals, and discusses using PeopleSoft Fluid User Interface to manage Job Data transactions.
For general information on updating job records, see the Changing Job Data topic, which provides overviews of updating effective-dated job data, security for updating job data, and personnel actions and human resources and payroll status, and discuss different types of job updates.
|
Page Name |
Definition Name |
Usage |
|---|---|---|
|
HC_HR_JOB_DATA_SUM_FL_GBL (this is the cref for the tile) |
Update and manage job data for your workforce using fluid pages. |
|
|
HR_JOBDATA_SUM_FL |
View job data rows and initiate the process to create, delete, edit, or view a job data row (based on your user access). |
|
|
Correct Job Data Page |
JOB_REQ_ADD_SCF |
Add a new effective data job data row and identify the action and reason for the job change. Note: When updating an existing job data row, the page title will display Correct Job Data. The field values entered on this page act as input parameters for the guided process. Meaning, the administrator can use any of these fields to configure the steps and fields in the guided process. In addition to Action and Action Reason, your organization may want to use fields such as Regulatory Region and the Business Unit of employees to configure the guided steps and page fields that the Page and Field Configurator displays. Regulatory Region and Business Unit fields are disabled by default, but you can enable them based on your organization requirements. |
|
JOB_REQ_RETRO_SCF |
Identify potentially impacted rows due to the addition of new or updated job data rows. |
|
|
The Activity Guide Composer Framework for the Manage Job Component |
N/A |
The Manage Job component pages in Fluid appear within the context of an Activity Guide Composer process. The PeopleSoft HCM application delivers the Job Data (JOBDATA) template for this component. |
|
HR_JOBDATA_WL_FL |
Update position and location information for a person's job, including the regulatory region, company, department, and location. |
|
|
HR_JOBDATA_JC_FL |
Update information about a person's job, including status, employee class, shift, or standard hours. |
|
|
HR_JOBDATA_JL_FL |
Update National Labor agreement data if the employee or contingent worker belongs to a National Labor agreement. |
|
|
HR_JOBDATA_SAL_FL |
Update information about a person's salary plan and compensation information. |
|
|
HR_JOBDATA_PAY_FL |
Update payroll processing data. The payroll system and pay group information that you enter here affects component compensation processing on the Salary and Compensation page. Distribute a person's compensation for one job among different departments, job codes, accounts, shifts, position numbers, or general ledger pay types. If the person's pay is regularly charged to more than one cost center, designate how much to allocate to each cost center. |
|
|
HR_JOBDATA_EMP_FL |
Update optional employment data, such as a worker's business title. |
|
|
HR_JOBDATA_BEN_FL |
Update the benefit program in which a person is enrolled for benefits in PeopleSoft Human Resources or PeopleSoft Benefits Administration. |
|
|
HR_JOBDATA_DZ1_FL HR_JOBDATA_DZ2_FL HR_JOBDATA_DZ3_FL HR_JOBDATA_DZ4_FL |
Update custom steps that use drop zones embedded in your activity guide process. |
|
|
HR_JOBDATA_ATT_FL |
Add or view attachments for a job data row. |
|
|
HR_JOBDATA_VAL_FL |
Verify the details you have entered during the course of the transaction. |
|
|
HR_JOBDATA_TS_FL |
Review a summary of the job row changes prior to submitting the transaction. |
|
|
HR_JOB_COM_SCF |
Add comments and finalize the submitting process for a Job Data change. |
|
|
HR_JB_SUB_CNF_FL |
Confirm that your job data updates have been submitted |
|
|
HR_JOBDATA_VW_FL |
View a complete summary of the job data rows for a person by effective date |
|
|
HR_REQ_HIST_SCF |
View all the comments related to a job data row. |
Note: The Job Search (HC_HR_JOB_DATA) search index supports real time indexing (RTI) with PeopleTools version 8.59.07 or higher. When enabled, RTI allows real-time updates to the indexed data to provide job search using the latest information.
For more information about Real Time Indexing, refer to PeopleTools Search Technology, “Administering Real Time Indexing."
Fluid Job Data uses the Configurable Search functionality, which gives organizations the ability to define how the search page will perform and the search field layout. Your organization has control over which fields should appear as criteria, as well as their field order, on the Fluid Manage Job - Search Criteria page. This allows you to search for an employee using other means, such as location, department, HR status, or job code.
For information on setting up search page configurations, see Setting Up Search Configuration documentation for more information.
These videos provide an overview of the Configurable Search feature:
Video: Image Highlights, PeopleSoft HCM Update Image 36: Configurable Search
Video: Image Highlights, PeopleSoft HCM Update Image 38: Fluid Job Data Search Enhancements
Delivered Manage Job Search Record
The PeopleSoft Job Data Modernization feature delivers the fluid Manage Job search page. This search uses the standard search record EMP_SRCH_COR_FL. Using this search record, administrators can configure the page to use search criteria such as preferred name, pay group, full or part-time status, HR status, and more.
Manage Job - Search Criteria Page
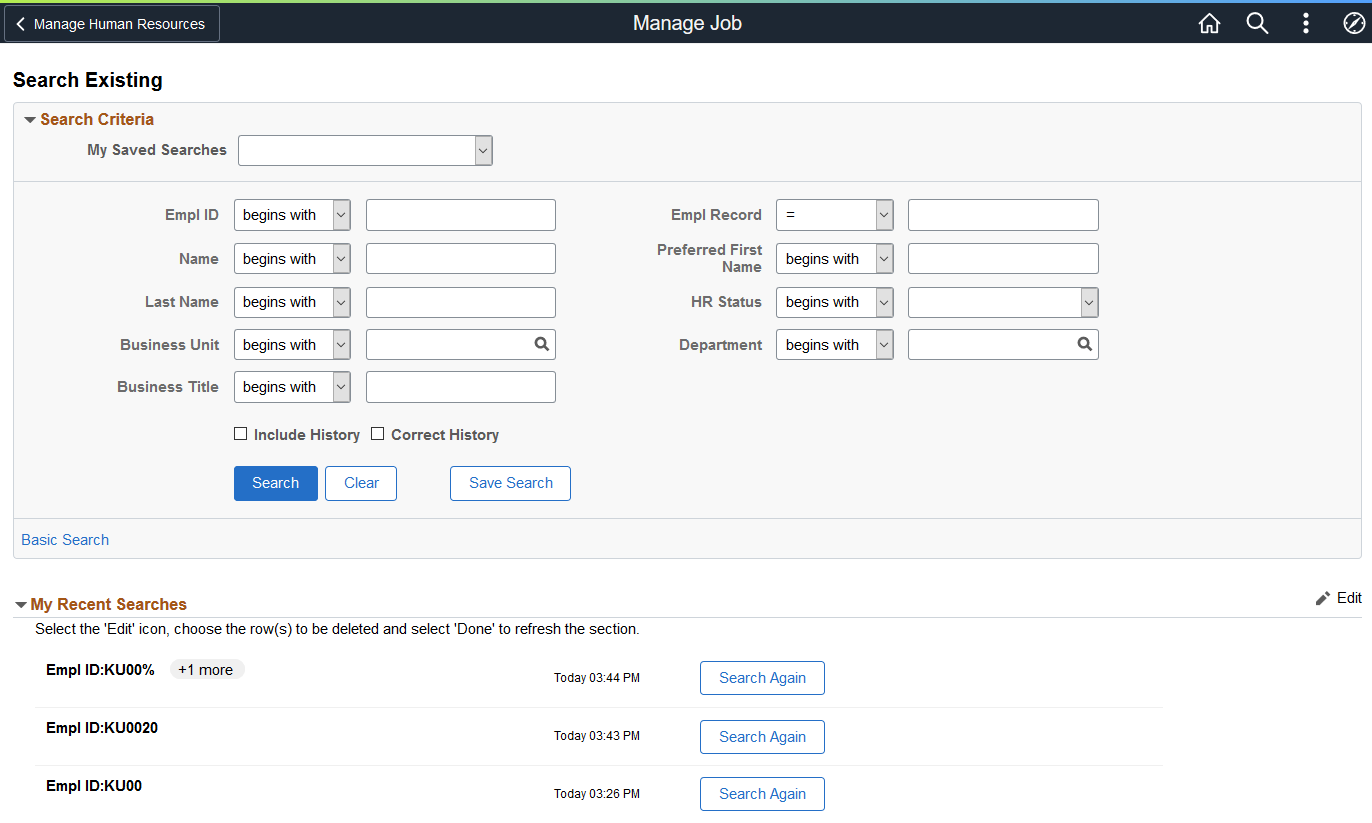
When you select the Manage Job tile, the system displays the configurable Manage Job - Search Criteria page (EOSF_SRCH_FL) to search for job records using fluid.
The page first appears in the Advanced Search mode, where you can use multiple search fields and save your searches, or you can switch to the Basic Search, where you can use the Search By field to retrieve data. Administrators responsible for creating search configurations can modify these options according to the needs of your organization.
This example illustrates the Manage Job - Search Criteria page and recent searches.
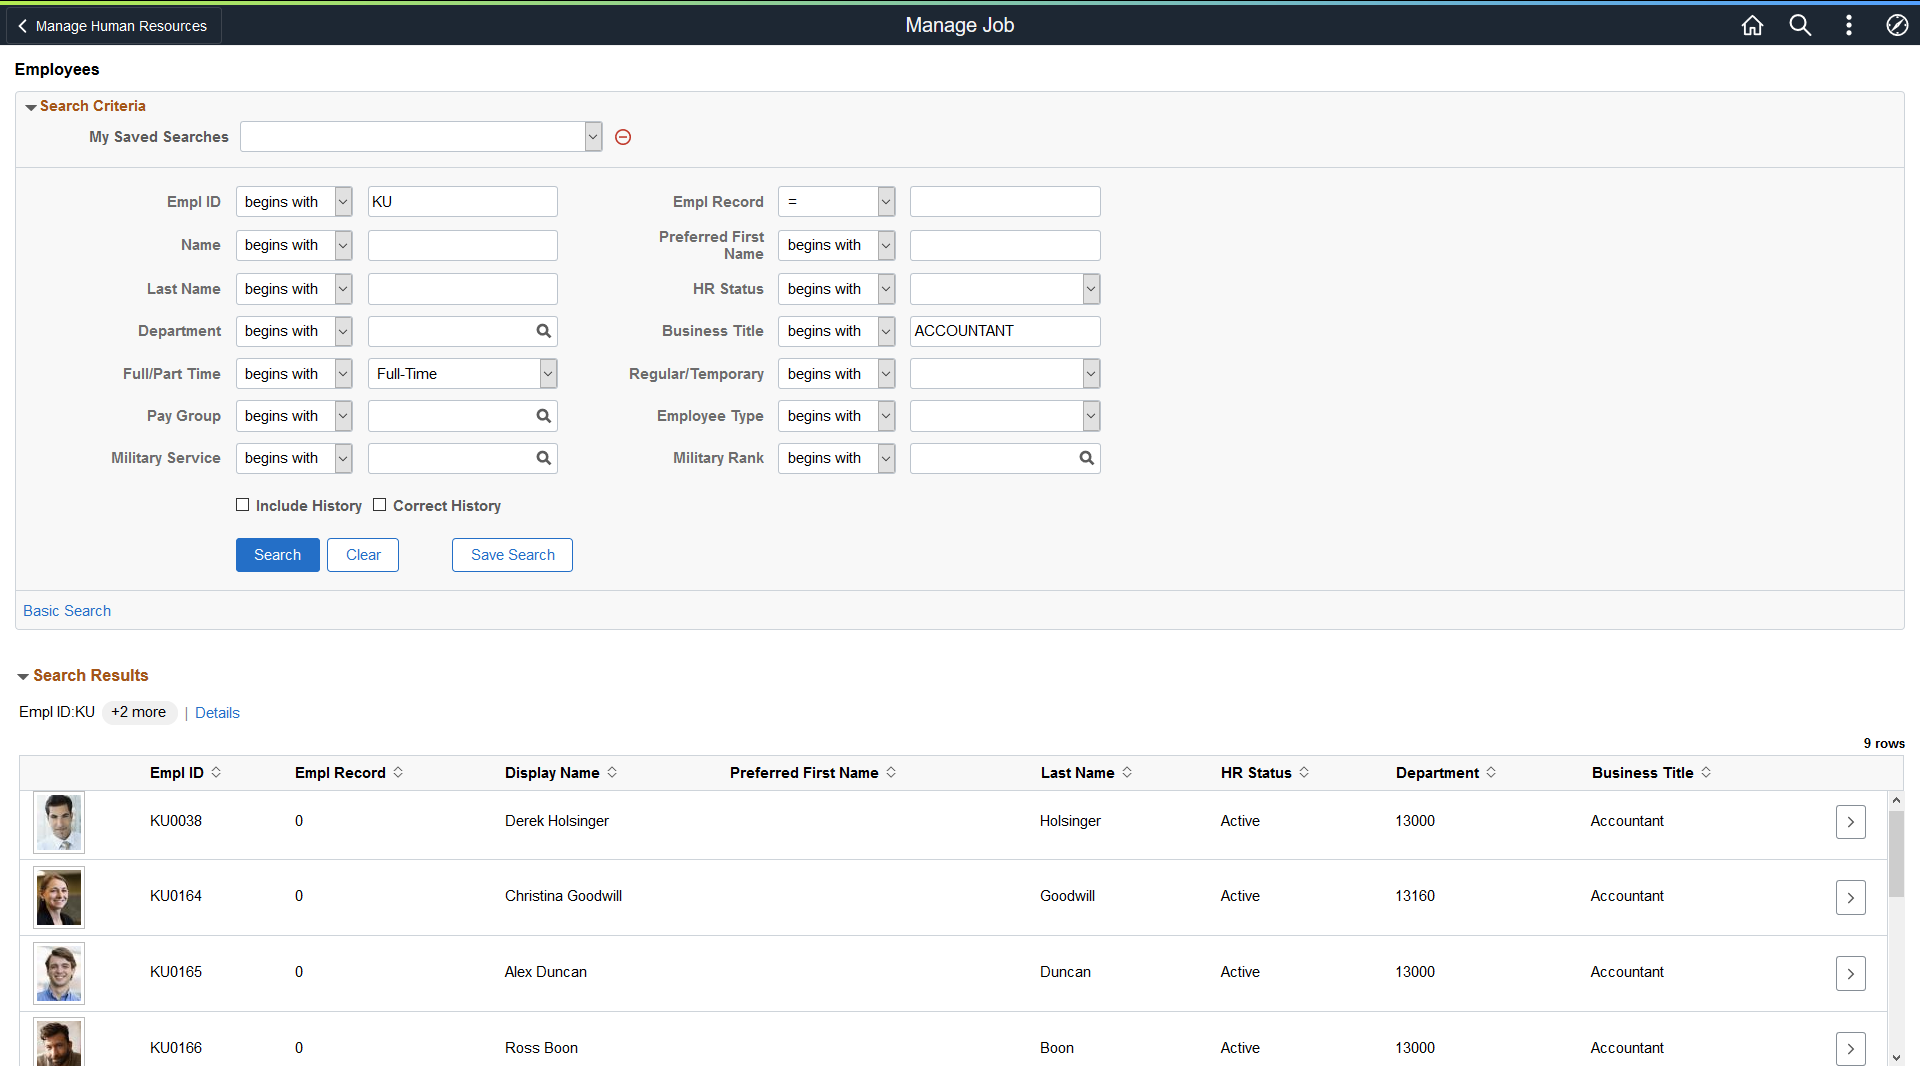
This example illustrates the Manage Job - Search Criteria page showing search results.
For an explanation of additional fields and controls on this page, see the Setting Up Search Configuration, <Transaction Search or Add> Page documentation.
|
Term |
Definition |
|---|---|
|
Include History |
Select to retrieve all rows for this person. Although you can view all the rows, you cannot make corrections to historical rows in this mode. |
|
Correct History |
Select to retrieve all rows for this person. In this mode you can make corrections to historical rows. You many need to select this option to performs reviews when the review process is enabled on the Person and Job Installation - Job Data Page. |
Note: Update/Display is the default mode that gets applied if Include History or Correct History is not selected. You can add a new top row in this mode but you cannot view historical rows. Availability to access modes are based on your security access and modes may not be available for all users.
The Job Actions Summary page lists the status for the various job rows. When approvals is enabled, the status of the transaction will vary based on where the transaction is in the approval process.
Submitting a New Transaction Request
When a user submits a new transaction request, the status of the job row is changed to In-Progress and submitted to the approvers. While the request still has an In-Progress status and the approval request is still pending, the user can opt to withdraw the request by clicking the Actions icon on the Job Actions Summary page and selecting Withdraw. When a row has the status of Withdrawn, the user can resubmit the request for approval or delete the job data row by clicking the Actions icon for the row and selecting the Delete option.
When the approver receives the request, he or she can perform one of the following actions:
Pushback: Changes the status to Rework and the requestor can delete the transaction request.
Deny: Changes the status to Denied or Correction Denied.
Approve: Changes the status to Completed.
This diagram illustrates how the status of a job transaction for a new row is updated when an approver responds to a job data request.

Submitting a Corrected Transaction Request
When approvals is enabled for correction and a corrected row is sent for approval, the status of the row set to Correction In-Progress.
When the Correction In-Progress row is approved, the status becomes Completed.
When a Correction In-Progress row is denied, the status changes to Correction Denied. Once denied, the Job Actions Summary page will display two rows: one with a status of Completed and another row with the status of Correction Denied. The original row that held the Completed status before the correction appears to ensure that the user can see the original details.
Note: Status values are delivered based on the delivered functionality and approval flow capabilities. The status values are not configurable.
Correcting Key Fields
When you correct a row and the update involves a key field change (such as, effective date or sequence) the Job Actions Summary page will show two rows: a parent row and the In-Progress row with the key field changes.
Note: In these cases, the parent row controls (Edit and View Job Details chevron buttons) will be disabled until the row with key correction changes is completed.
Administrators use the Manage Job tile to update and manage job data for your workforce using fluid pages.
Note: You must be assigned the HR Administrator Fluid role to access this tile and pages.
Navigation:
The Manage Job tile is delivered as part of the fluid Manage Human Resources Dashboard, or from any other fluid home page where you have added the tile.
You can add the Manage Job tile or Manage Human Resources Tile, which accesses the Manage Human Resources dashboard, to any home page through personalizations. From the Personalize Homepage page, click Add Tile. Enter the tile name or navigate to , select the tile, then save.
This example illustrates the Manage Job tile.
Click this tile to access the Manage Job - Search Criteria page and search for workers.
Use the Job Actions Summary page (HR_JOBDATA_SUM_FL) to view job data rows and initiate the process to create, delete, edit, or view a job data row (based on your user access).
Navigation:
Click the Continue arrow (>) button for a worker row on the Manage Job - Search Criteria page.
Note: When only one person matches the search criteria, the system will automatically direct you to this page. If you need to access the person’s job record using Include History or Correct History mode, use the Search Results button in the banner to return to the search page and select the appropriate mode.
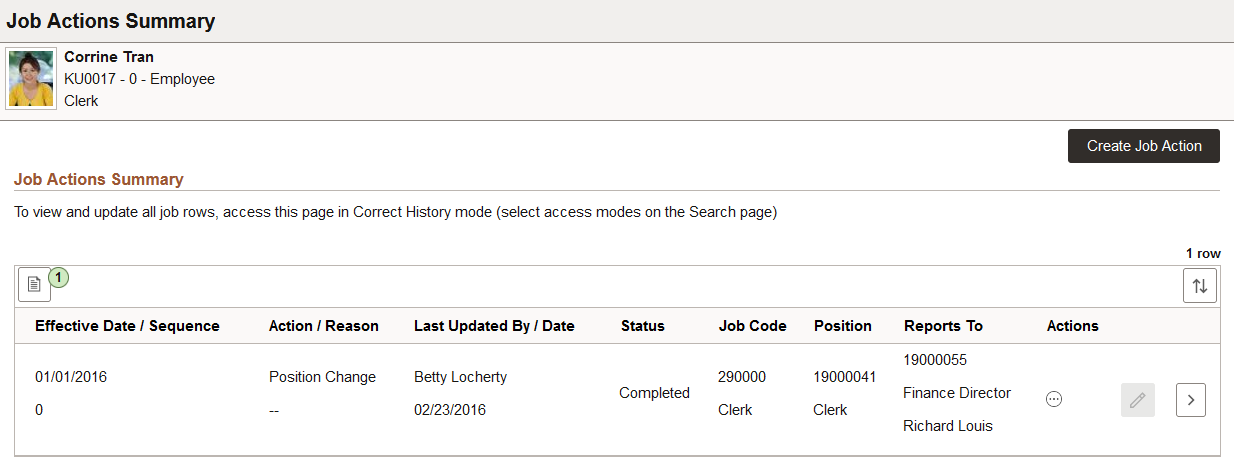
This example illustrates the fields and controls on the Job Actions Summary page in Update/Display mode.
This example illustrates the fields and controls on the Job Actions Summary page when accessed in Correct History mode.
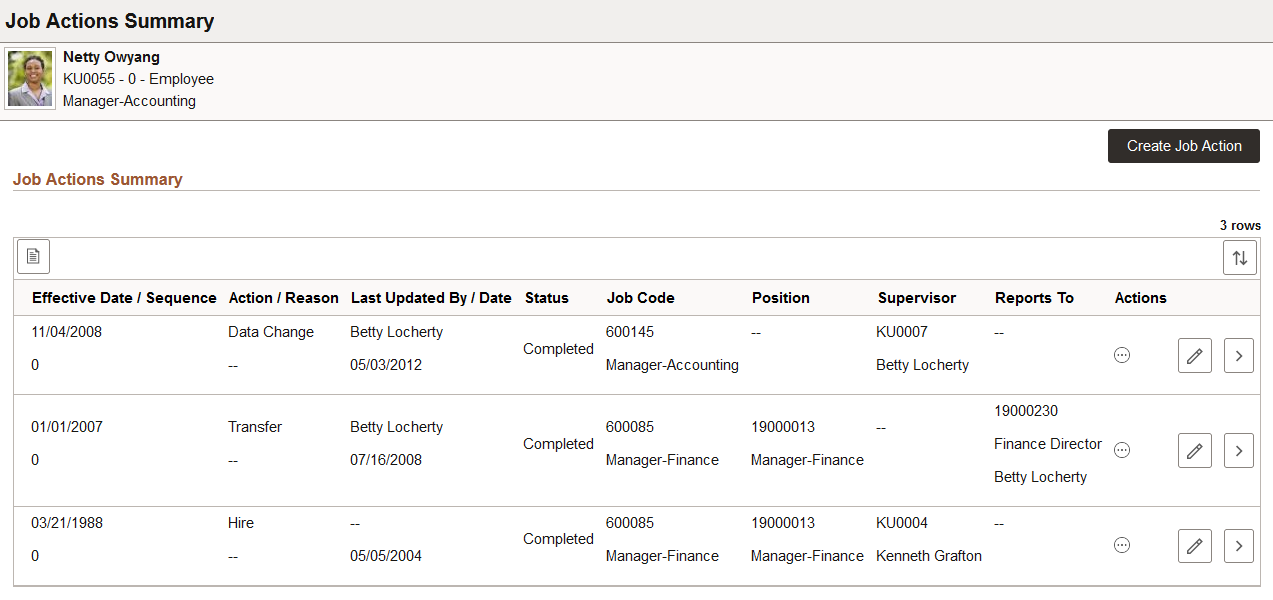
This page shows a quick summary of an employee’s job data. The default mode for accessing this page is Update/Display and typically shows only the most current row, although there may be other rows, such as future-dated or in-progress rows. To see all job data rows for an employee, access this page by selecting either the Include History or Correct History option from the Search Criteria page, if available with your user privileges.
The fields on the page are determined by the Page and Field Configurator. HCM provides configurations for all PeopleSoft actions delivered by PeopleSoft.
Important! You can enable or disable columns for the Job Actions Summary page using Page and Field Configurator. If you modify the HR_JOB_DATA_SUM_FL (Action and Reason Modal) component, consider displaying only those field columns that are of most importance for an employee’s job data summary to avoid the need of horizontal scrolling. If you make changes to the component in the Page and Field Configurator, you will need to click the Apply Configurations button on the Map Configuration page. See also the Job Actions Summary configurable grid technical brief on My Oracle Support for more information on updating this page.
Note: You should not disable fields that are required for an action. For example, for the action POS (Position Change), the Position Number field on Job Information page must be enabled.
For more information on setting up this information, see the Understanding Page and Field Configurator documentation.
|
Field or Control |
Description |
|---|---|
|
Create Job Action button |
Select this button to enter a new effective dated row. Note: You cannot add a new row after an In-Progress row. |
|
|
Select this icon button to open the Job Data Notepad page where you can enter or search for notes for this person's job data. Note: When setting up the HR Notepad Configuration - HR Notepad Configuration - Configure Keys Page, if you have included the Effective Date and Effective Sequence for fields for the JOB sub-ID, Oracle recommends that you deselect the Enterable and Required for Query check boxes in the configuration. If the Effective Date and Effective Sequence check boxes are selected in the configuration, the Notes icon and Related Actions - Notes link will have the following behaviors: 1) When you select the Notes icon from this page, the Job Data Notepad page will show all the notes available for the employee and employee record combination. 2) When you select the Notes icon from this page, you will not be able to add a new note if the Required check box is selected in the configuration for the Effective Date or Effective Sequence field rows in the configuration. 3) The Actions - Notes link will show the notes available for the particular effective date and effective sequence only. The Notes Icon with a number badge indicates the total number of notes available for this person's job data. If there are no notes available for the job, the number badge is not shown. |
|
|
Select to sort the rows by user prefernce. |
|
Status |
Displays the status of the job row. Note: You can only have two In-Progress rows at a time. If one In-Progress row exists, you cannot add a new row. You can however, correct another row or add a retroactive row, but you cannot exceed more than two In-Progress rows. We recommend that to add a new transaction row, complete the approval process for an In-Progress request first. You cannot add a row on top of rows with a Withdrawn or Rework status. For more information up status and how they are updated by the Approval process, see Understanding Job Actions Summary Statuses and the Approval Process. |
|
Actions
|
Select this icon to open the Related Actions popup menu and select from a list of additional action items. Although options may vary, items may include:
Note: The menu will display a related action only if the logged in user is authorized to access a component. |
|
|
This button is available for selection when in Correct History mode or for future rows. Click to access the row and make corrections to the job data. When you select an existing row to make updates, the system will open the Correct Job Data page (see also Create Job Action Page) using the existing date and job action for that row. Click Continue to move to the Job Data activity guide pages. When the system is set up to use the Review Process, and you are correcting a row that predates higher rows, the system will open the Review Details Page. To further understand this process, see the (Fluid) Working with the Job Data Review Process topic. |
|
|
This button is available in all modes. Click this button to open the Job Details Page in a new tab window and view job details. |
 (Notes button)
 Related Actions icon button
 (Edit) button
Note: When the same job data transaction row has been added from the Guided Self Service (GSS) pages, you will need to delete the In Progress row you created from this page to display the completed GSS row. See Performing Guided Self-Service Transactions in Manager Self-Service.
Use the Create Job Action page (JOB_REQ_ADD_SCF) to add a new effective data job data row and identify the action and reason for the job change.
Note: When updating an existing job data row, the page title will display Correct Job Data.
Navigation:
Click the Create Job Action button on the Job Actions Summary Page.
Click the Edit button for an existing job data row.
This example illustrates the fields and controls on the Create Job Action page.
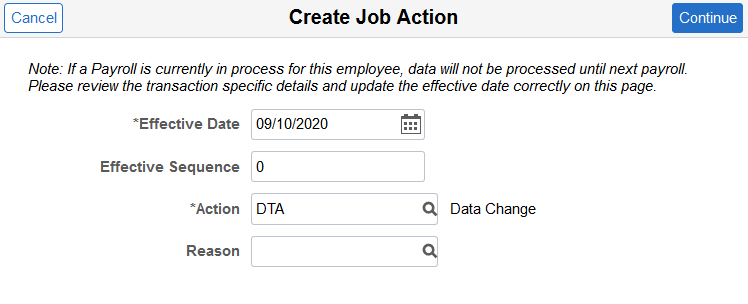
The field values entered on this page act as input parameters for the guided process. Meaning, the administrator can use any of these fields to configure the steps and fields in the guided process. In addition to Action and Action Reason, the your organization may want to use fields such as Regulatory Region and the Business Unit of employees to configure the guided steps and page fields that the Page and Field Configurator displays. Regulatory Region and Business Unit fields are disabled by default, but the administrator can enable them based on your organization requirements.
|
Field or Control |
Description |
|---|---|
|
Effective Date |
Enter the effective date. |
|
Effective Sequence |
Enter a number to track multiple administrative actions that occur on the same day. The default value is 0, the correct number for new instances. |
|
Action and Reason |
Select the action requiring you to create or modify this record. The system displays a default value when you create a new employment, contingent worker, or POI instance. Reason codes are associated with the action you select. Note: The action and reason you select here may impact the steps and fields that are available for the Job Data activity guide process. For more information about configuring the pages and fields by Action, see the Understanding Page and Field Configurator documentation. This video provides an overview of the Page and Field Configurator: |
Enter the pertinent information for the new row and click the Continue button to access the Job Data activity guide process.
Use the Review Details page (JOB_REQ_RETRO_SCF) to identify potentially impacted rows due to the addition of new or updated job data rows.
Note: The Review Process must be enabled on the Person and Job Installation - Job Data Page.
Navigation:
Click the Edit button for a job data row that predates other rows or click the Create Job Action button to insert a retroactive row from the Job Actions Summary Page.
This example illustrates the Review Details page.
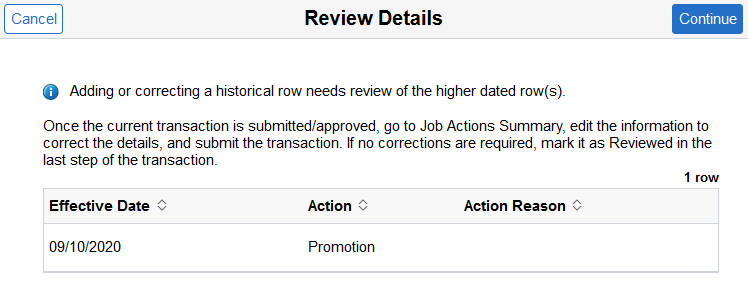
This page will display all the rows with a higher effective dated row than the one your are updating or adding. Click the Continue button to move to the Job Data activity guide process.
For more information on using the review process, see the (Fluid) Working with the Job Data Review Process topic.
The Manage Job component pages in Fluid appear within the context of the Activity Guide Composer process. The PeopleSoft HCM application delivers the Job Data (JOBDATA) template for this component.
The Manage Job component uses a vertical non-sequential activity guide template to render the guided process. The activity guide shows a list of Job Data pages (or steps) in the left panel and the page that corresponds to the current selected page step in the right panel. The activity guide also provides navigation buttons in the page sub-banner (gray area) and users can click the Next and Previous buttons to navigate between the steps, or they can simply click on any of the steps in the guided process.
To understand or set up templates using the Activity Guide Composer, see the Understanding the Activity Guide Composer documentation.
Note: You must be assigned the Job Data AG Administrator role to add or modify Job Data activity guide templates.
The following video provides an overview and demonstration of the Activity Guide Composer:
Video: PeopleSoft Activity Guide Composer
This example illustrates the layout for the Manage Job pages in Fluid.
Note: Throughout this topic, the page illustrations show sections of the Job Data process without the context of the left panel activity guide step list. Even though the framework is not illustrated, remember that all steps appear within that framework.
Page Banner
The top of PeopleSoft pages is called the page banner.
When adding or updating an existing job data row, the banner will display the action - action reason you are performing. For example, when you are entering a promotion for outstanding performance, the page banner title will display Promotion - Outstanding Performance. This will be displayed as <Action> – <Reason> throughout this documentation.
In PeopleSoft applications, the banner displays several standard icon buttons. These standard set of banner icon buttons include:
|
Field or Control |
Description |
|---|---|
|
|
Click this button to exit the Manage Job data pages and return to the Job Actions Summary page without saving your data. The page will display a warning message confirming that you want to exit the page. |
 Exit button
Job Data Header (Sub-Banner)
A gray area under the main page banner displays contextual information that is specific to the person, including the person’s name, employee ID, job title, and photo.
|
Field or Control |
Description |
|---|---|
|
|
Click this button to navigate to the previous page. Navigating to another page does not save your data. The button is not visible on the first step in the request. |
|
|
Click this button to navigate to the next page. Navigating to another page does not save your data. The Review and Submit page does not display the Next button. Instead it displays a Submit button. |
|
|
This button appears on the Summary page only. Click this button to save and submit the job data transaction. Important! Your job data will not be saved to the system until you click the Submit button. When approvals are required for updating or creating job data, the request will be sent to the approving managers, where they will use the Pending Approvals - Create Job Page or Pending Approvals - Correct Job Page to take action on a job data request. |
 Previous button
 Next button
 Submit button
Left Panel Navigation
The page framework includes a left panel that lists the page tabs in the Manage Job Data process. Each step displays a status, which is either Not Started or Visited. Users can navigate to steps by clicking the page tab or using the navigation buttons in the header (sub-banner).
Note: The activity guide uses the Page and Field Configurator framework to hide or show page steps and fields based on the Action and Action Reason selected for this job data transaction. For more information on how to configure the pages, see the Understanding Page and Field Configurator documentation.
Pages
The main panel displays the page for the current step in the transaction.
Note: For the discussion of the transaction page topics that follow, the page illustrations show the individual Job Data pages in Fluid without the context of the activity guide step list, although the system will display the left panel step navigation.
|
Field or Control |
Description |
|---|---|
|
<Title Text> |
Displays a page title that includes the step name. |
Supplementary Panel for the Manage Job Data Pages
The Manage Job Data pages include a supplementary panel that provides access to related information.
Navigation:
Click the Supplementary Panel tab on any of the Manage Job Data pages.
This example illustrates the supplementary panel options for the Manage Job Data pages.

|
Field or Control |
Description |
|---|---|
|
|
Click this tab to open the Related Information panel and view related content. |
|
|
This icon appears at the top of the Related Information panel. Click to open the Personalize page. This page lists the available related content so you can choose whether the Related Information panel shows or hides each item. |
|
|
This icon appears at the top of each individual related content item in the Related Information panel. Click to expand the item to open a modal dialog with a larger interactive version of the content. |
|
Related Information |
For fluid Job Data, this supplementary pane includes the following links:
You can add additional links as needed. |
 (Supplementary Panel) tab
 [Personalize RC (Related Content) icon]
 (Display <Related Content Item> in Modal Window icon)
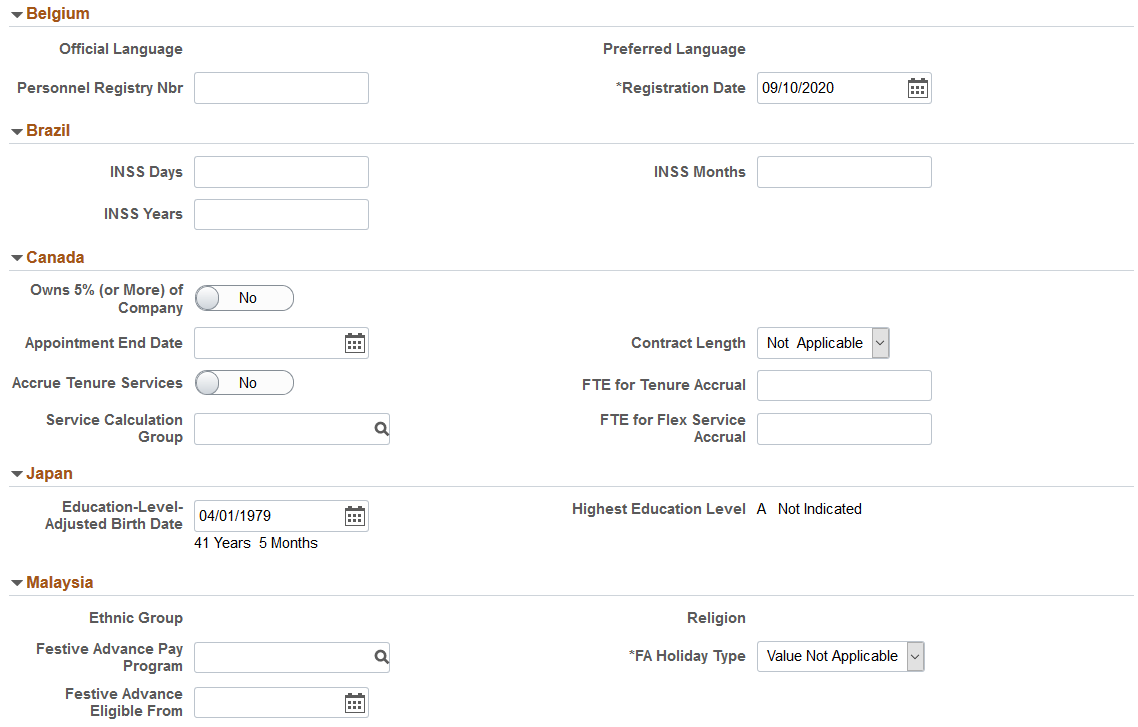
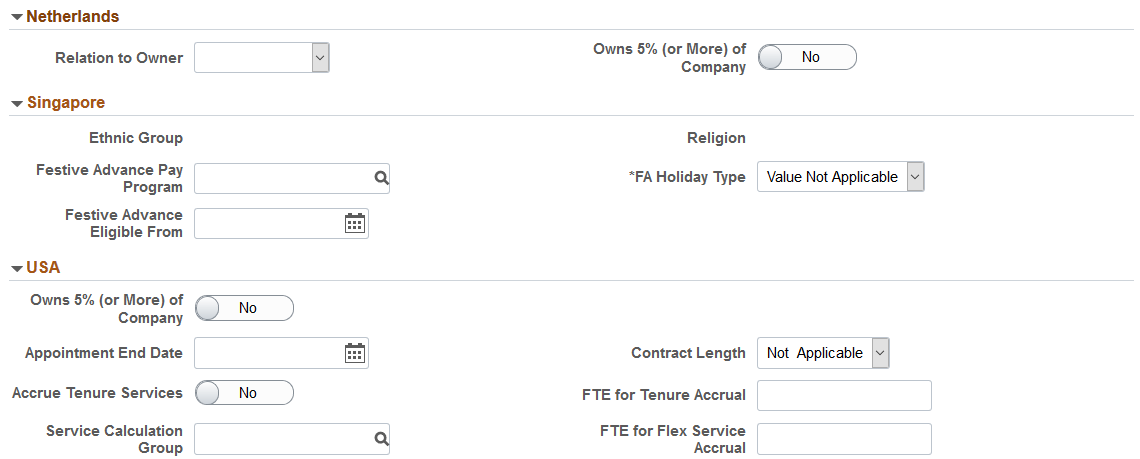
Use the Work Location page in Fluid (HR_JOBDATA_WL_FL) to update position and location information for a person's job, including the regulatory region, company, department, and location.
Navigation:
Select to add or edit a job row from the Job Actions Summary Page or select the appropriate tab from the left panel navigation steps.
This example illustrates the fields and controls on the Work Location page (1 of 2).
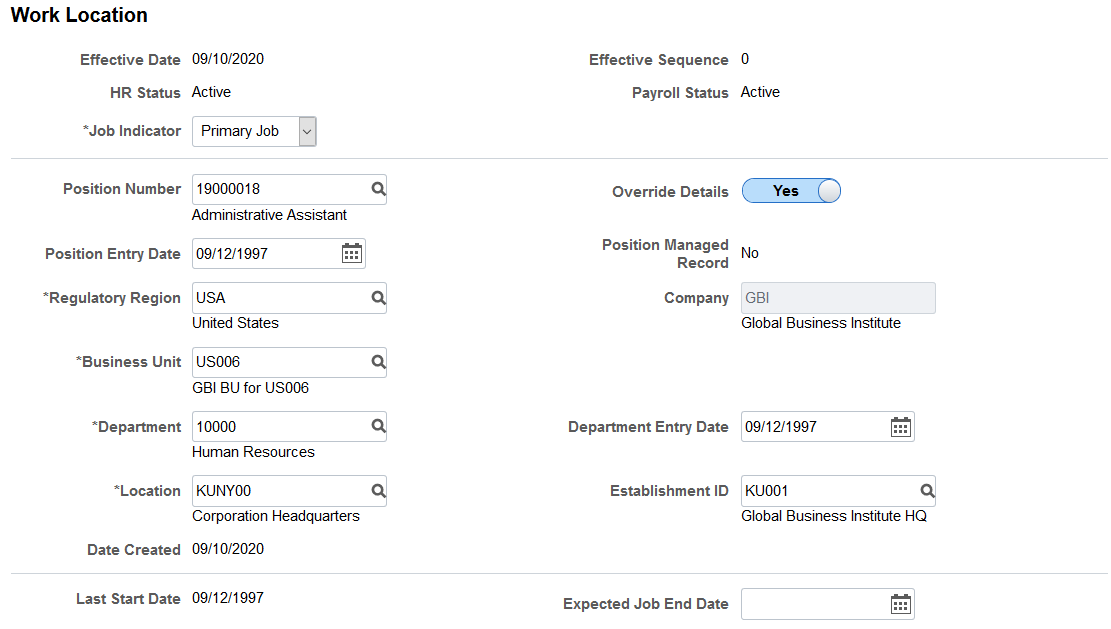
This example illustrates the fields and controls on the Work Location page (2 of 2).

The effective date, effective sequence, and <Action> – <Reason> (shown in the activity guide banner title) are entered on the Create Job Action Page.
For a list of field descriptions, see the Job Data Page - Work Location Section documentation.
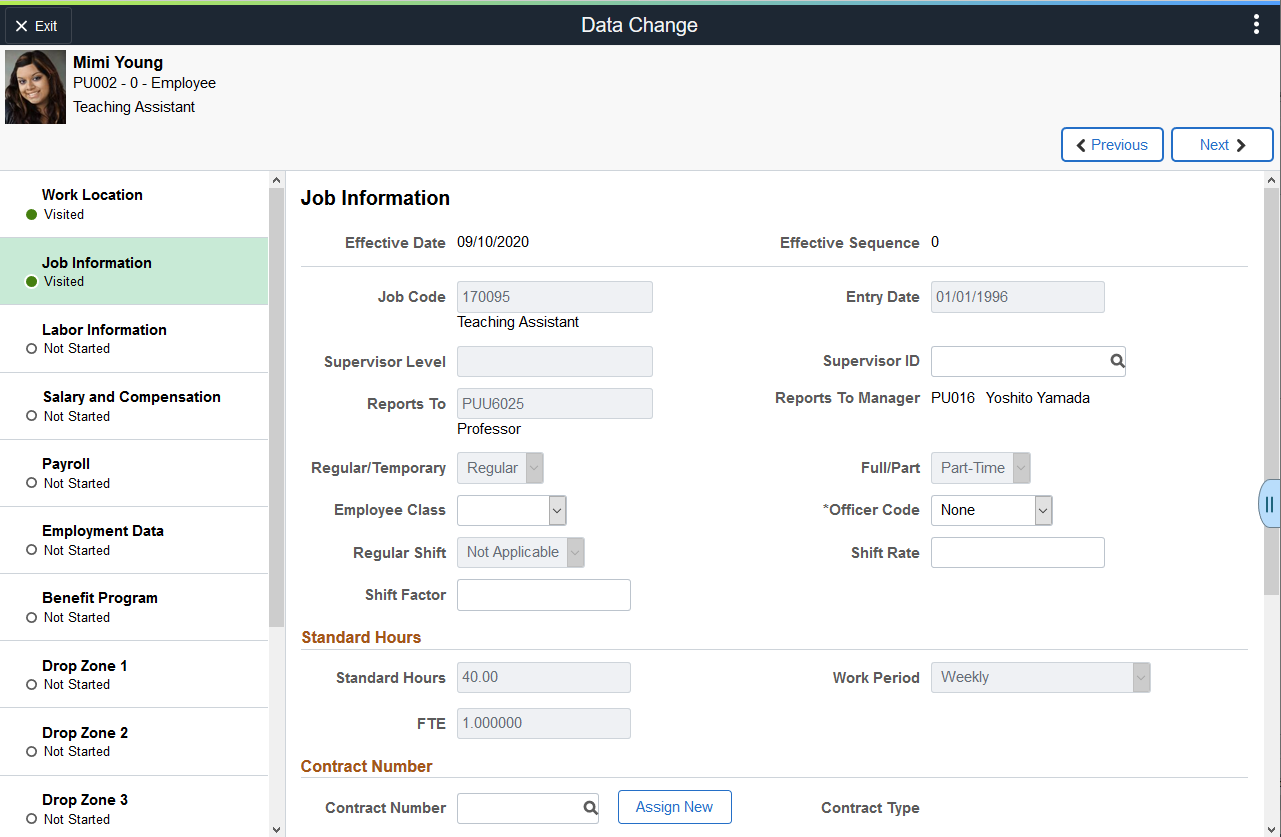
Use the Job Information page in Fluid (HR_JOBDATA_JC_FL) to update information about a person's job, including status, employee class, shift, or standard hours.
Navigation:
After accessing the Manage Job component, click the Previous or Next button or select the appropriate tab from the left panel navigation steps.
This example illustrates the fields and controls on the Job Information page (1 of 4).
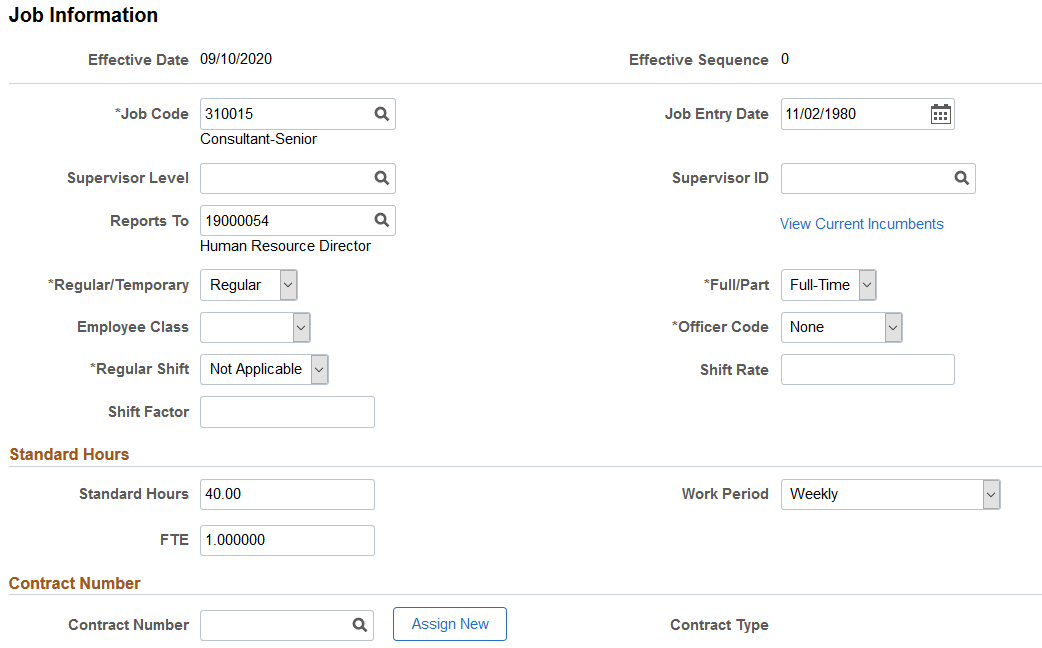
This example illustrates the fields and controls on the Job Information page (2 of 4).
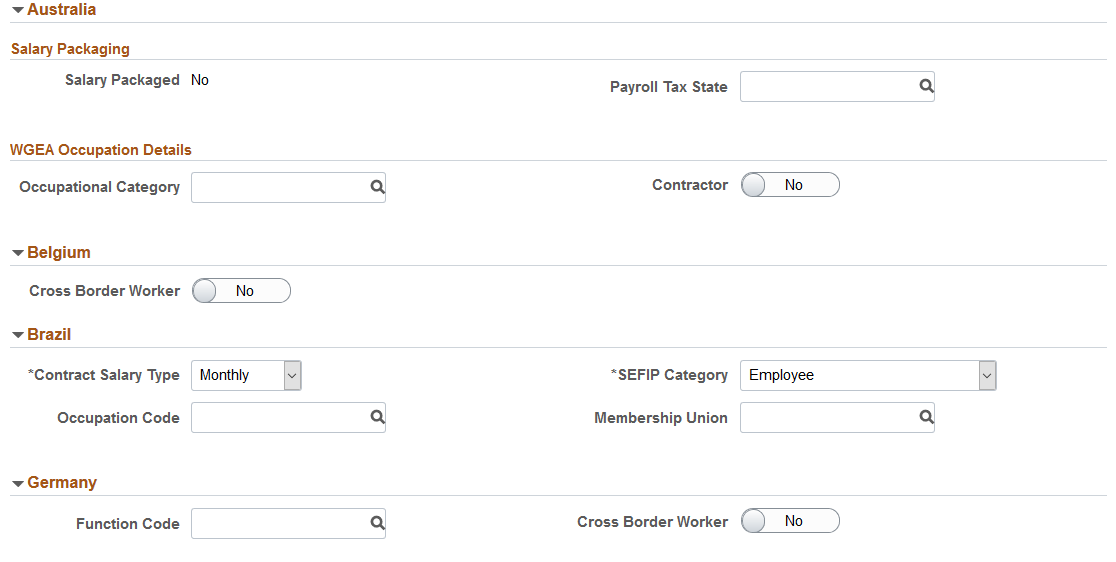
This example illustrates the fields and controls on the Job Information page (3 of 4).
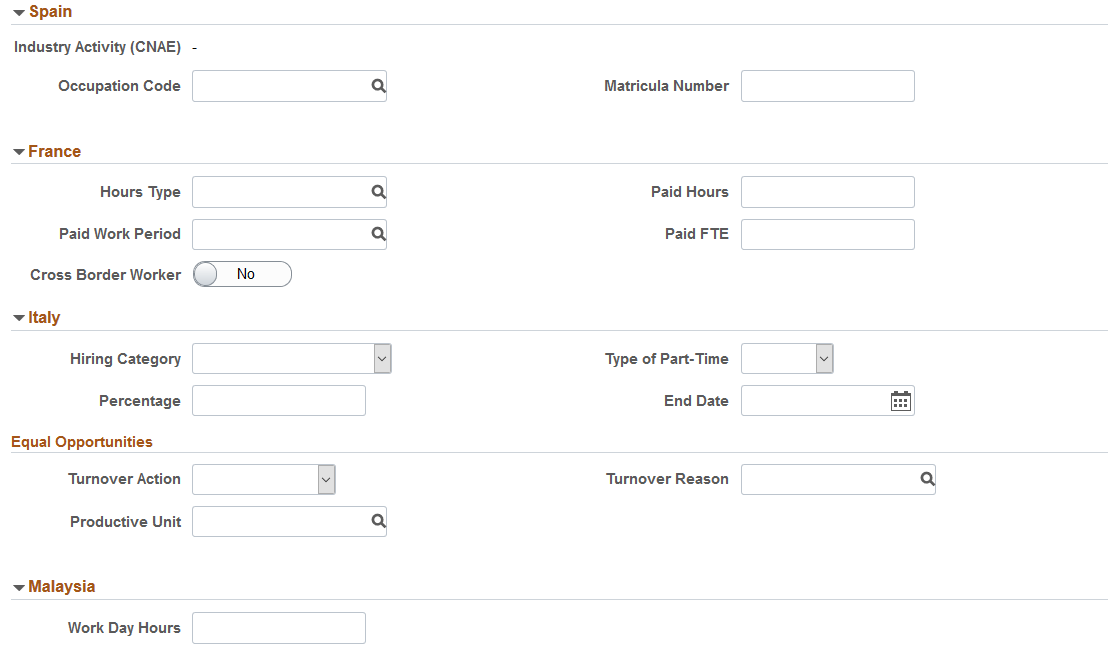
This example illustrates the fields and controls on the Job Information page (4 of 4).
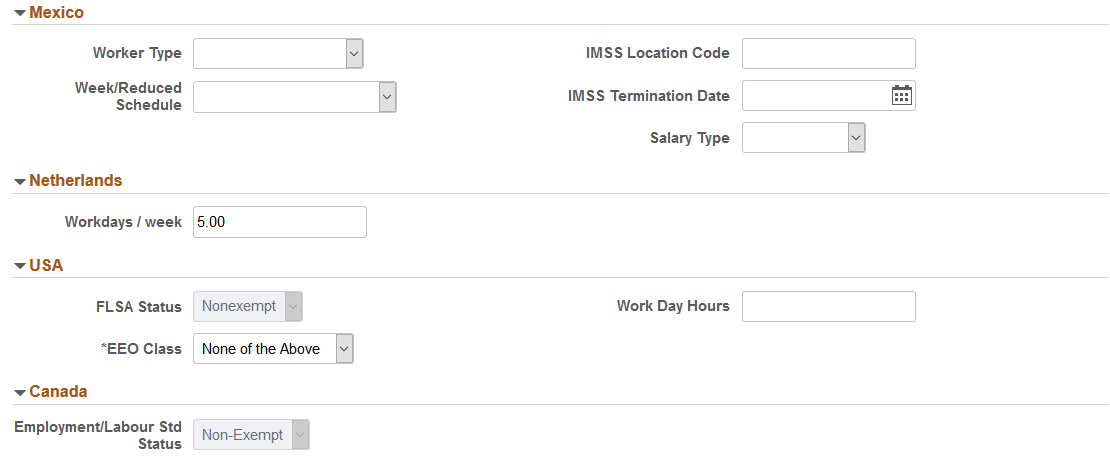
For a list of field descriptions, see the Job Data Page - Job Information Section documentation.
Use the Labor Information page in Fluid (HR_JOBDATA_JL_FL) to update National Labor agreement data if the employee or contingent worker belongs to a National Labor agreement.
Navigation:
After accessing the Manage Job component, click the Previous or Next button or select the appropriate tab from the left panel navigation steps.
This example illustrates the fields and controls on the Job Labor page (1 of 3).
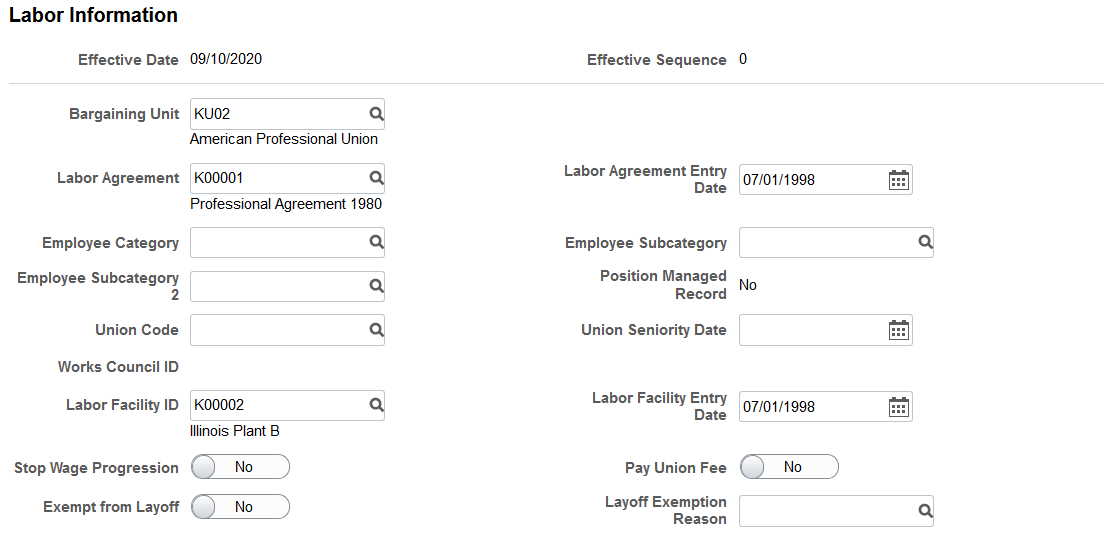
This example illustrates the fields and controls on the Job Labor page (2 of 3).

This example illustrates the fields and controls on the Job Labor page (3 of 3).
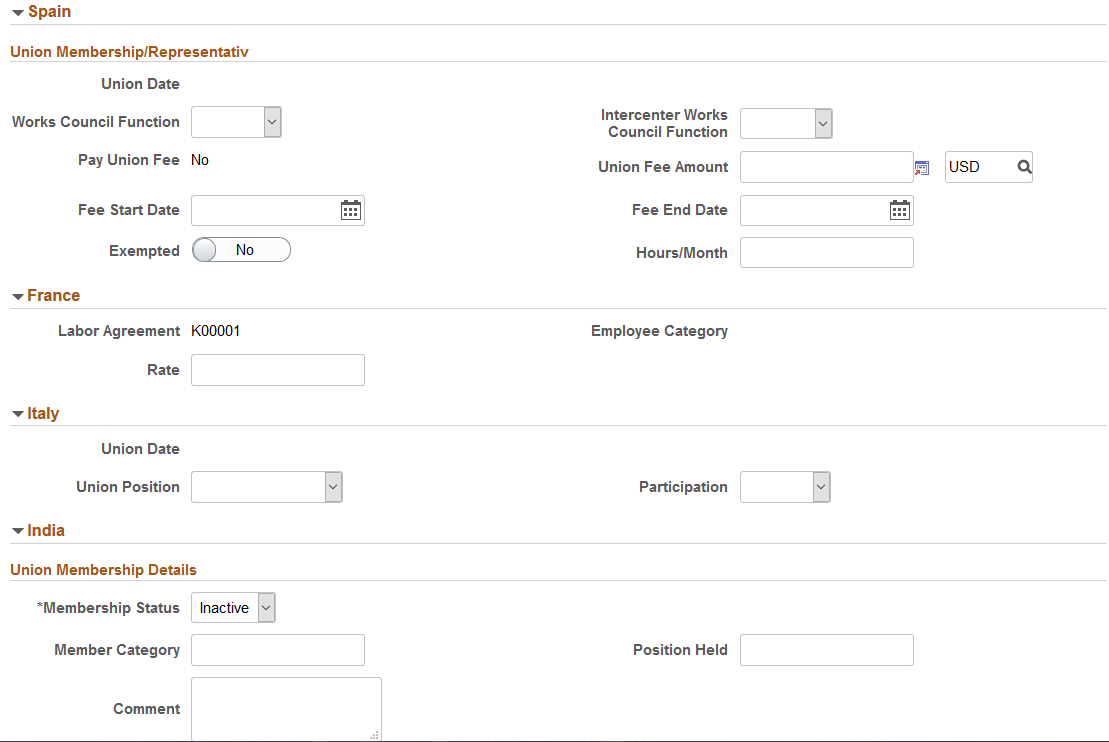
For a list of field descriptions, see the Job Data Page - Labor Information Section documentation.
Use the Salary and Compensation page in Fluid (HR_JOBDATA_SAL_FL) to update information about a person's salary plan and compensation information.
Navigation:
After accessing the Manage Job component, click the Previous or Next button or select the appropriate tab from the left panel navigation steps.
This example illustrates the fields and controls on the Salary Plan page (1 of 2).
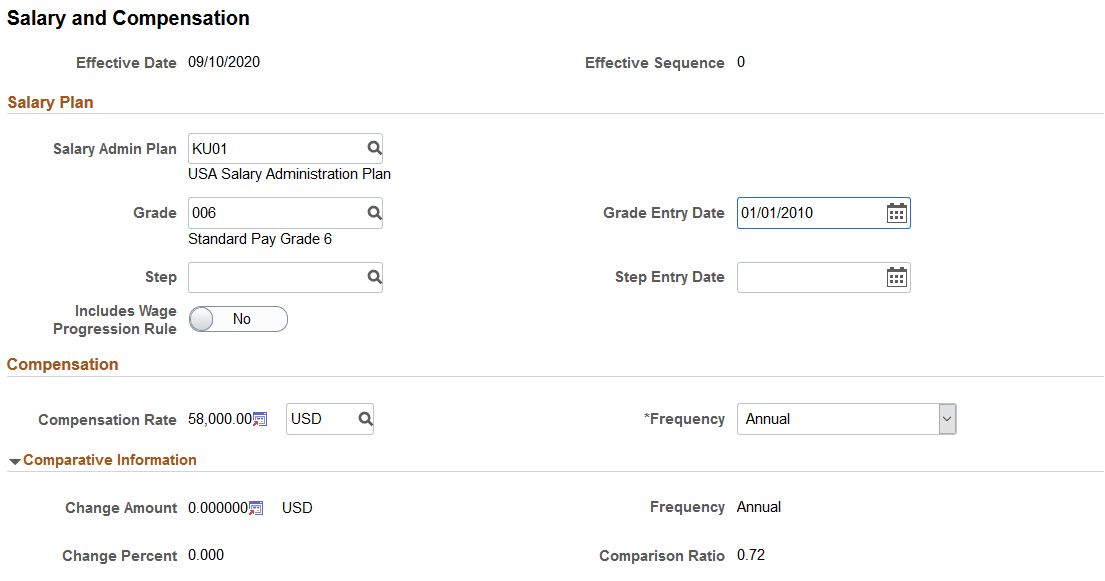
This example illustrates the fields and controls on the Salary Plan page (2 of 2).
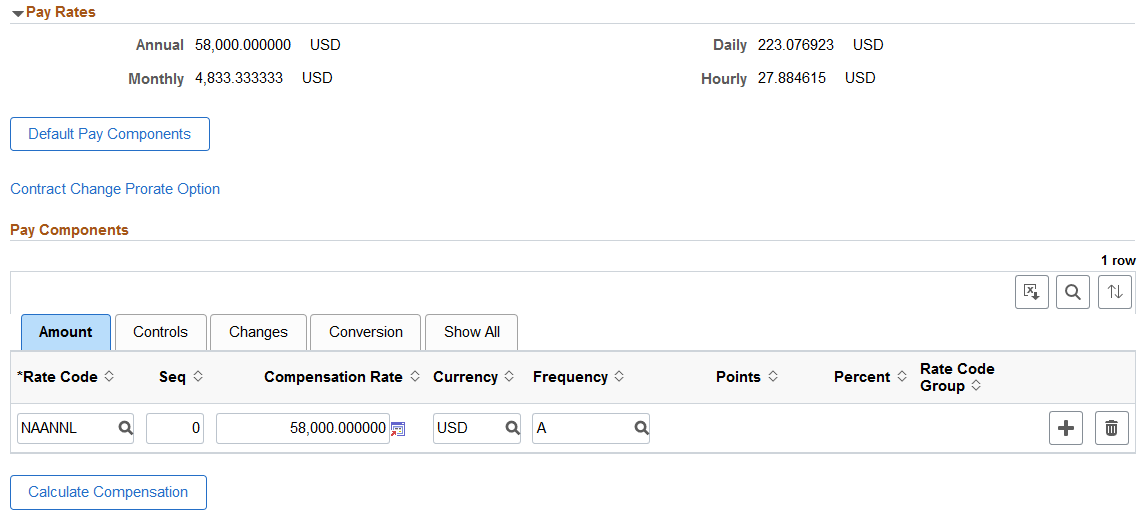
For a list of field descriptions, see the Job Data Page - Salary and Compensation Section documentation.
Use the Payroll page in Fluid (HR_JOBDATA_PAY_FL) to update payroll processing data. The payroll system and pay group information that you enter here affects component compensation processing on the Salary and Compensation page.
Distribute a person's compensation for one job among different departments, job codes, accounts, shifts, position numbers, or general ledger pay types. If the person's pay is regularly charged to more than one cost center, designate how much to allocate to each cost center.
Navigation:
After accessing the Manage Job component, click the Previous or Next button or select the appropriate tab from the left panel navigation steps.
This example illustrates the fields and controls on the Payroll page (1 of 2).
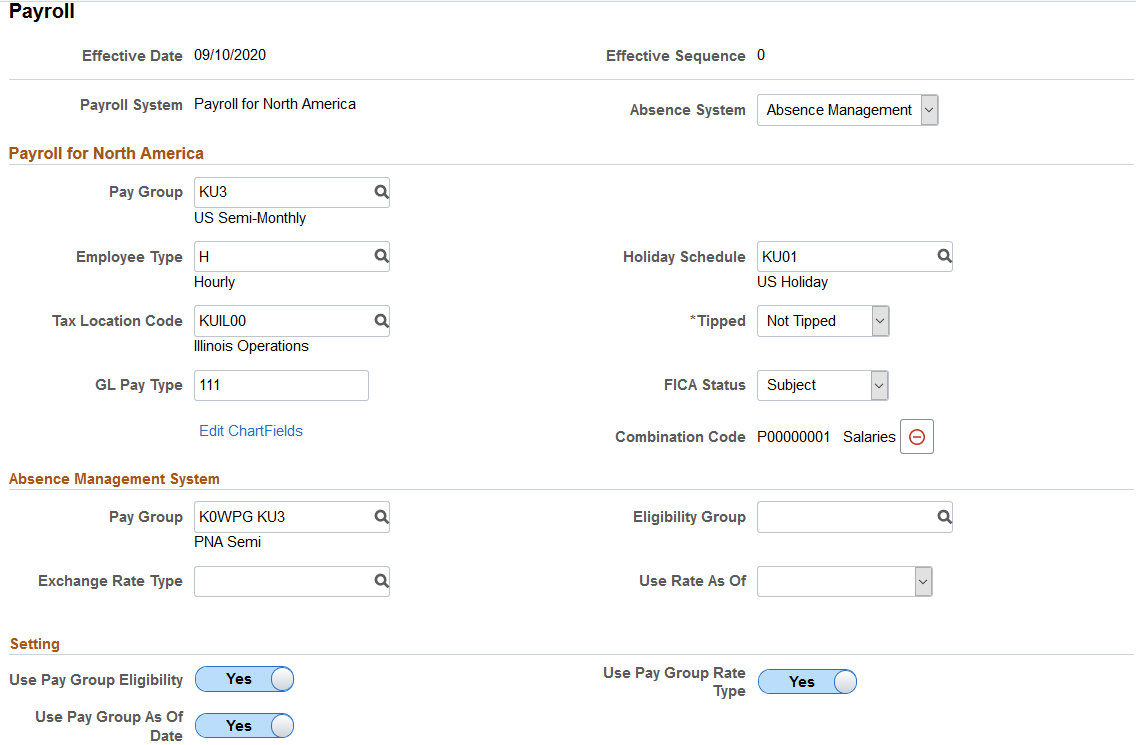
This example illustrates the fields and controls on the Payroll page (2 of 2).
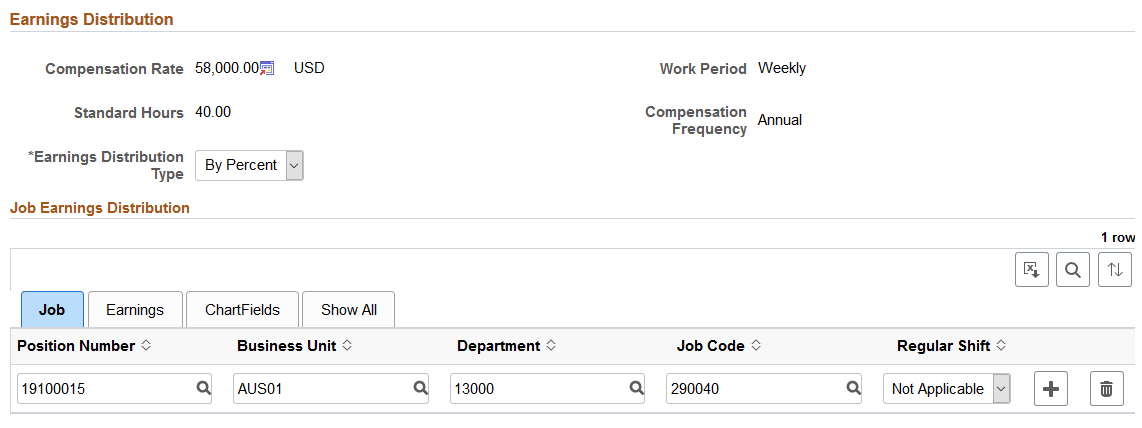
For a list of field descriptions, see the Job Data Page - Payroll Section documentation.
Use the Employment Data page (HR_JOBDATA_EMP_FL) to update optional employment data, such as a worker's business title.
Navigation:
After accessing the Manage Job component, click the Previous or Next button or select the appropriate tab from the left panel navigation steps.
This example illustrates the fields and controls on the Employment Information page (1 of 3).
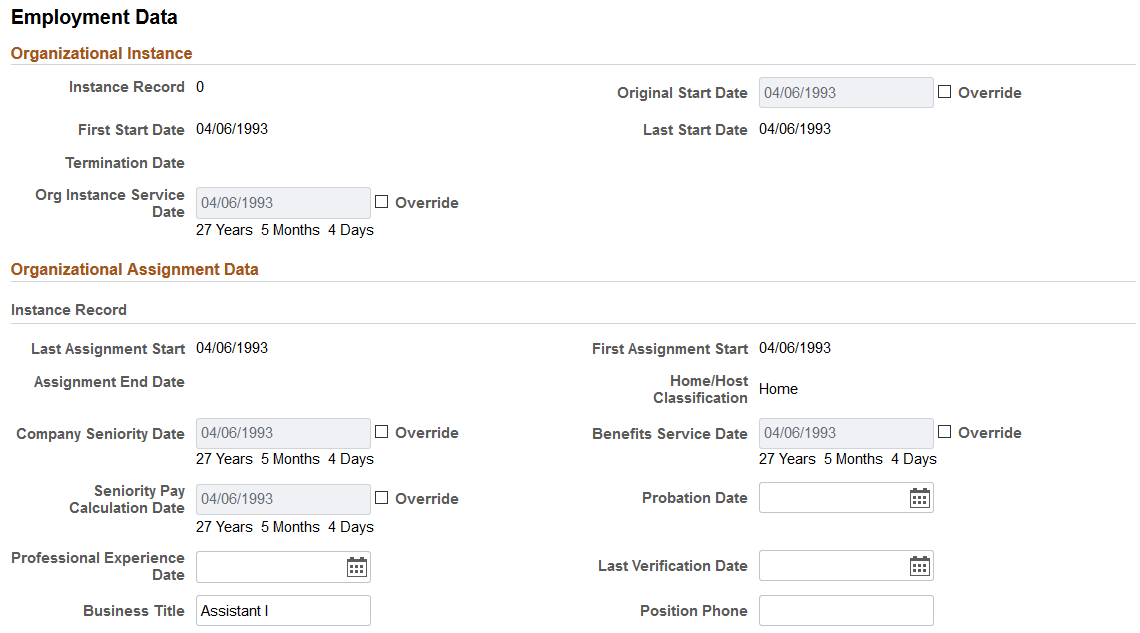
This example illustrates the fields and controls on the Employment Information page (2 of 3).
This example illustrates the fields and controls on the Employment Information page (3 of 3).
For a list of field descriptions, see the Job Data Page - Employment Data Section documentation.
Use the Benefit Program Participation page (HR_JOBDATA_BEN_FL) to update the benefit program in which a person is enrolled for benefits in PeopleSoft Human Resources or PeopleSoft Benefits Administration.
Navigation:
After accessing the Manage Job component, click the Previous or Next button or select the appropriate tab from the left panel navigation steps.
This example illustrates the fields and controls on the Benefit Program Participation page.
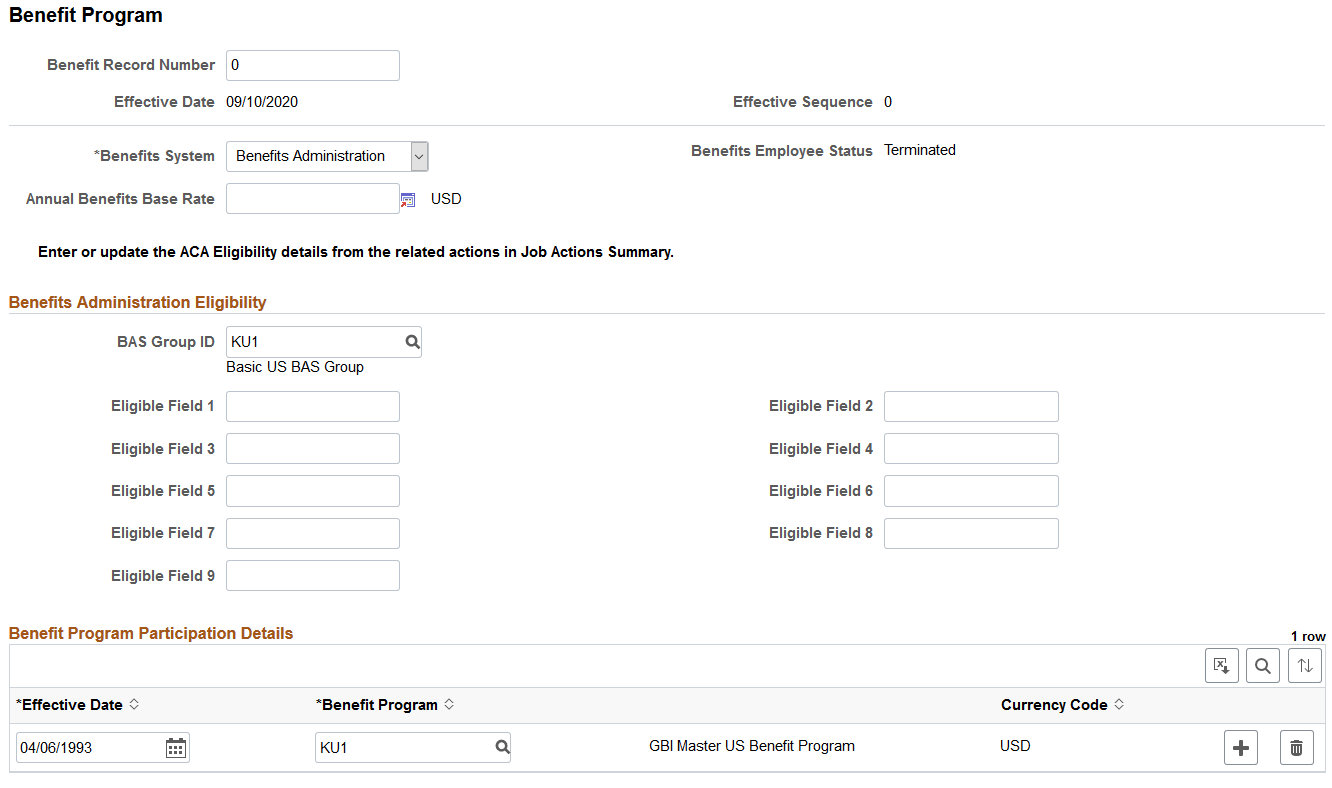
For a list of field descriptions, see the Job Data Page - Benefit Program Section documentation.
Use the <Drop Zone> pages (HR_JOBDATA_DZ1_FL, HR_JOBDATA_DZ2_FL, HR_JOBDATA_DZ3_FL, HR_JOBDATA_DZ4_FL) to update custom steps that use drop zones embedded in your activity guide process.
Note: The HCM system delivers four Drop Zone pages that you can configure to add steps that are specific to your organization. Use the Activity Guide Composer to rename a page. To rename a Drop Zone field, you need to use the Drop Zone configuration setup. See Understanding the Activity Guide Composer and Understanding Drop Zones.
If you do not want to use the delivered Drop Zone steps in the activity guide, turn it off using Page and Field Configurator (Understanding Page and Field Configurator).
Navigation:
After accessing the Manage Job component, click the Previous or Next button or select the appropriate tab from the left panel navigation steps.
This video provides an overview of Drop Zones:
Video: PeopleSoft Drop Zones on Fluid and Classic Plus Pages
Use the Job Data - Attachments page (HR_JOBDATA_ATT_FL) to add or view attachments for a job data row.
Navigation:
After accessing the Manage Job component, click the Previous or Next button or select the Attachments tab from the left panel navigation steps.
This example illustrates the fields and controls on the Attachments page.
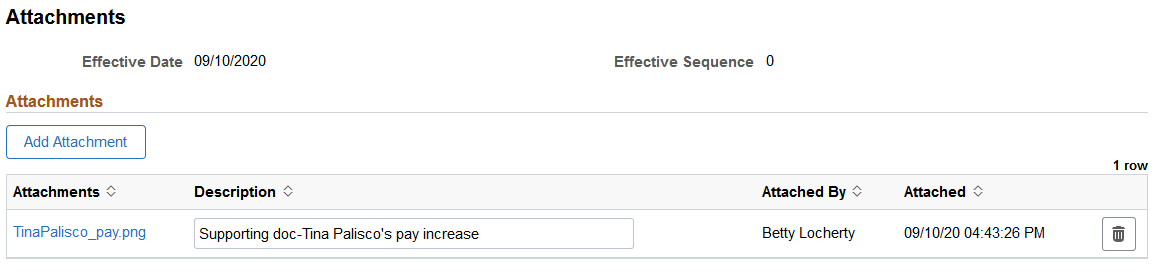
For a list of field descriptions, see the Job Data Page - Attachments Section documentation.
Use the Validate page in Fluid (HR_JOBDATA_VAL_FL) to verify the details you have entered during the course of the transaction.
Navigation:
After accessing the Manage Job component, click the Previous or Next button or select the appropriate tab from the left panel navigation steps.
This example illustrates the fields and controls on the Validate page when you are updating job data information.
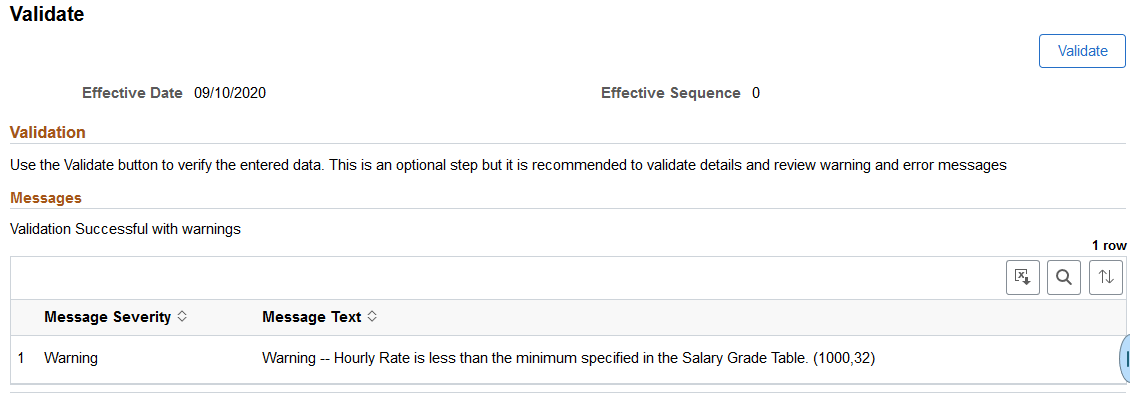
Note: Although this step is not required before moving to the Summary step in the guided process, we recommend that you perform the validation to ensure cleaner data entry.
|
Field or Control |
Description |
|---|---|
|
Validate button |
Select this button to displays errors or warnings, if any. This allows you to go back and fix information prior to submitting a transaction. Prior to selecting the Validate button, the Messages section displays that there are currently no exceptions to be displayed. When you click the button, the process triggers a test CI to pre-validate the data against the core Job validations and displays the errors. The Messages section is then updated to indicate if the process ran successfully and lists messages and their severity, if any. |
Use the Job Data - Summary page in Fluid (HR_JOBDATA_TS_FL) to review a summary of the job row changes prior to submitting the transaction.
Navigation:
After accessing the Job Data component, click the Next button or select the Summary tab from the left panel navigation steps.
This example illustrates the fields and controls on the Job Data - Summary page when you are updating job data information.
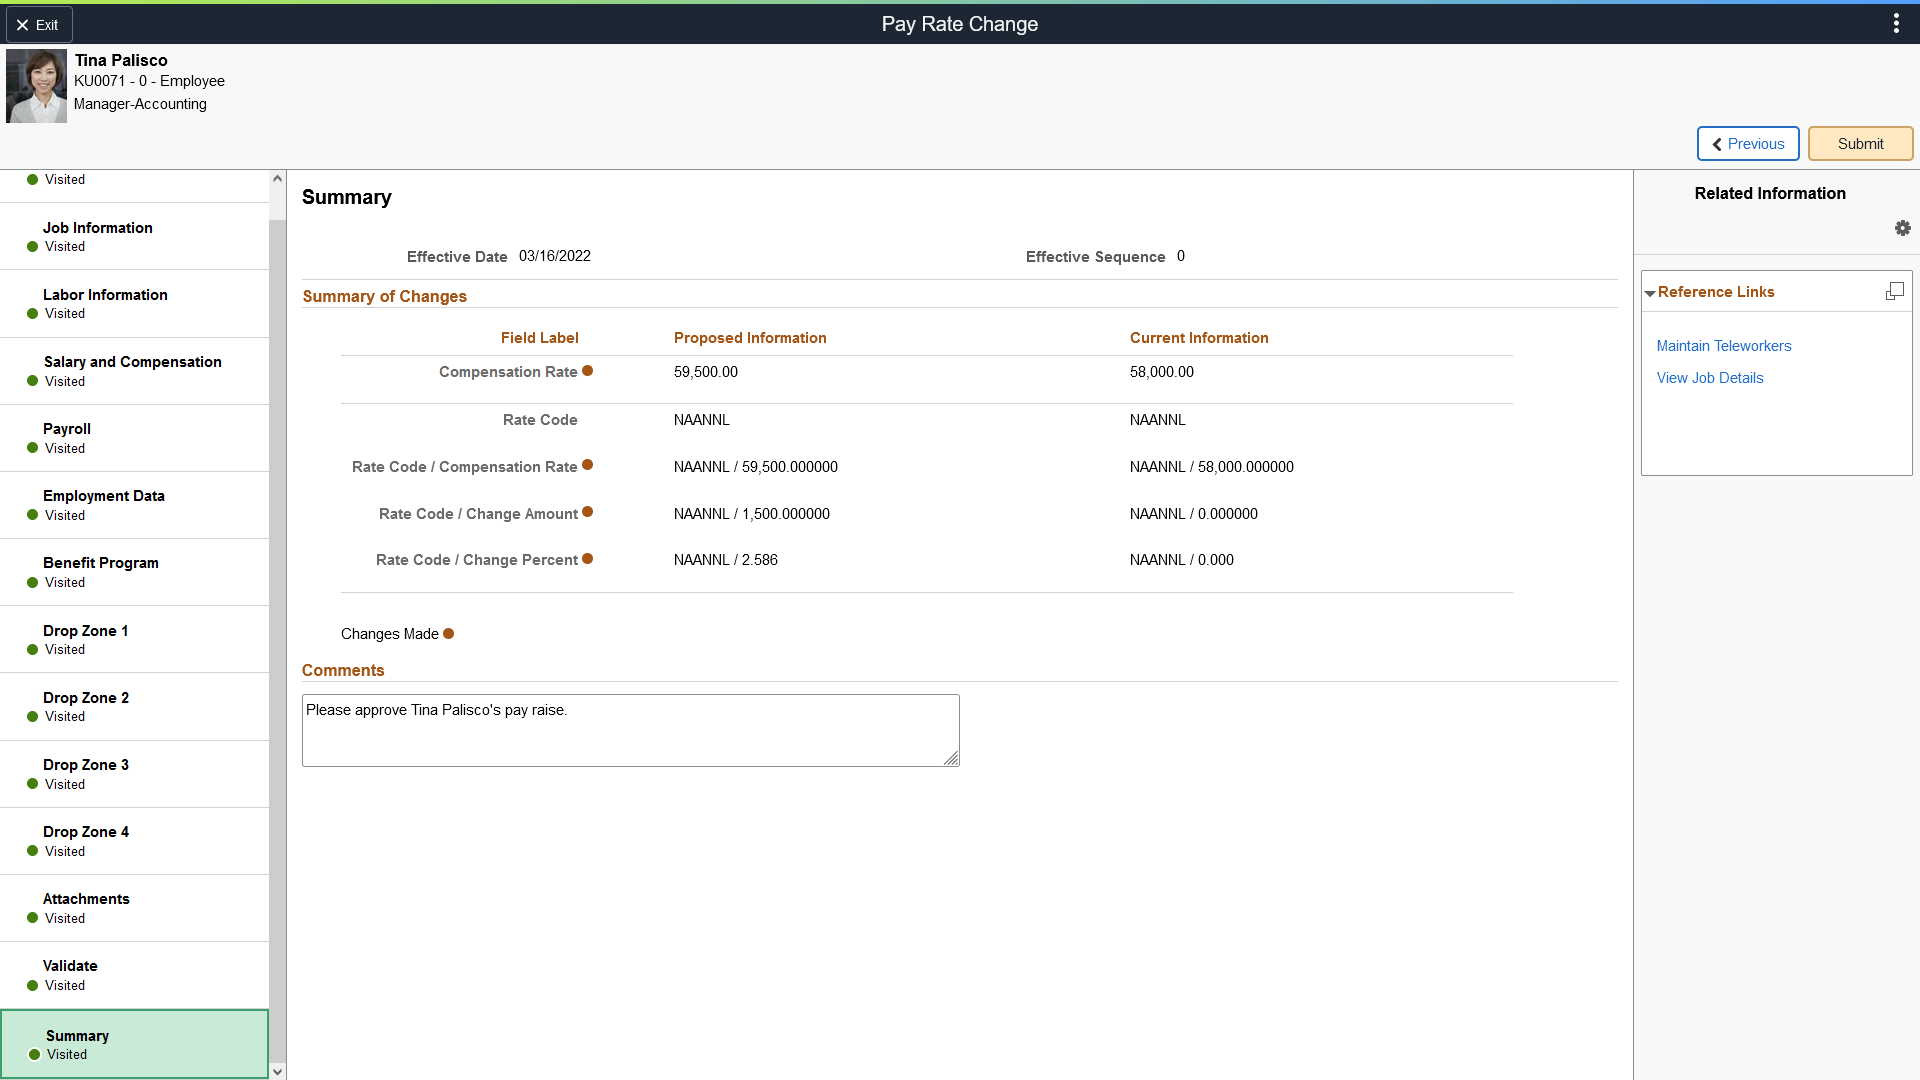
Summary Of Changes
Use this section to review changes you have made to the job data. The page will display the proposed value side-by-side with the current value for the changed fields followed by an indicator.
PeopleSoft HCM delivers the Manage Job - Summary page with a pre-seeded configuration. Administrators can configure this page to hide or show fields, even those that were not changed using the Transaction Summary functionality. For more information on setting up this information, see the Configuring Transaction Summary documentation.
Comments
Enter comments related to this transaction row.
If approvals are enabled, the approver will be able to see the comments when reviewing the approval request on the Pending Approvals - Create Job Page or Pending Approvals - Correct Job Page.
Comments are stored with the job row and are available to view by selecting the Request History option under the Summary section of the Job Details Page in fluid.
This video provides an overview of tracking comments:
Submitting a Transaction
|
Field or Control |
Description |
|---|---|
|
Submit button |
The Submit button appears on this page only. Select this button to initiate the process to save and submit job data information you just entered. Warning! Your job data changes will not be saved until you submit the transaction. If you exit out of the Manage Job activity guide without submitting your changes, your data will be discarded. Click Submit to access the (Fluid) Job Data - Comments Page, where you will confirm you want to submit and complete the save and submission process. |
Use the (Fluid) Job Data - Comments page (HR_JOB_COM_SCF) to add comments and finalize the submitting process for a Job Data change.
Navigation:
Click the Submit button on the (Fluid) Job Data - Summary Page.
This example illustrates the fields and controls on the Job Data - Comments page.
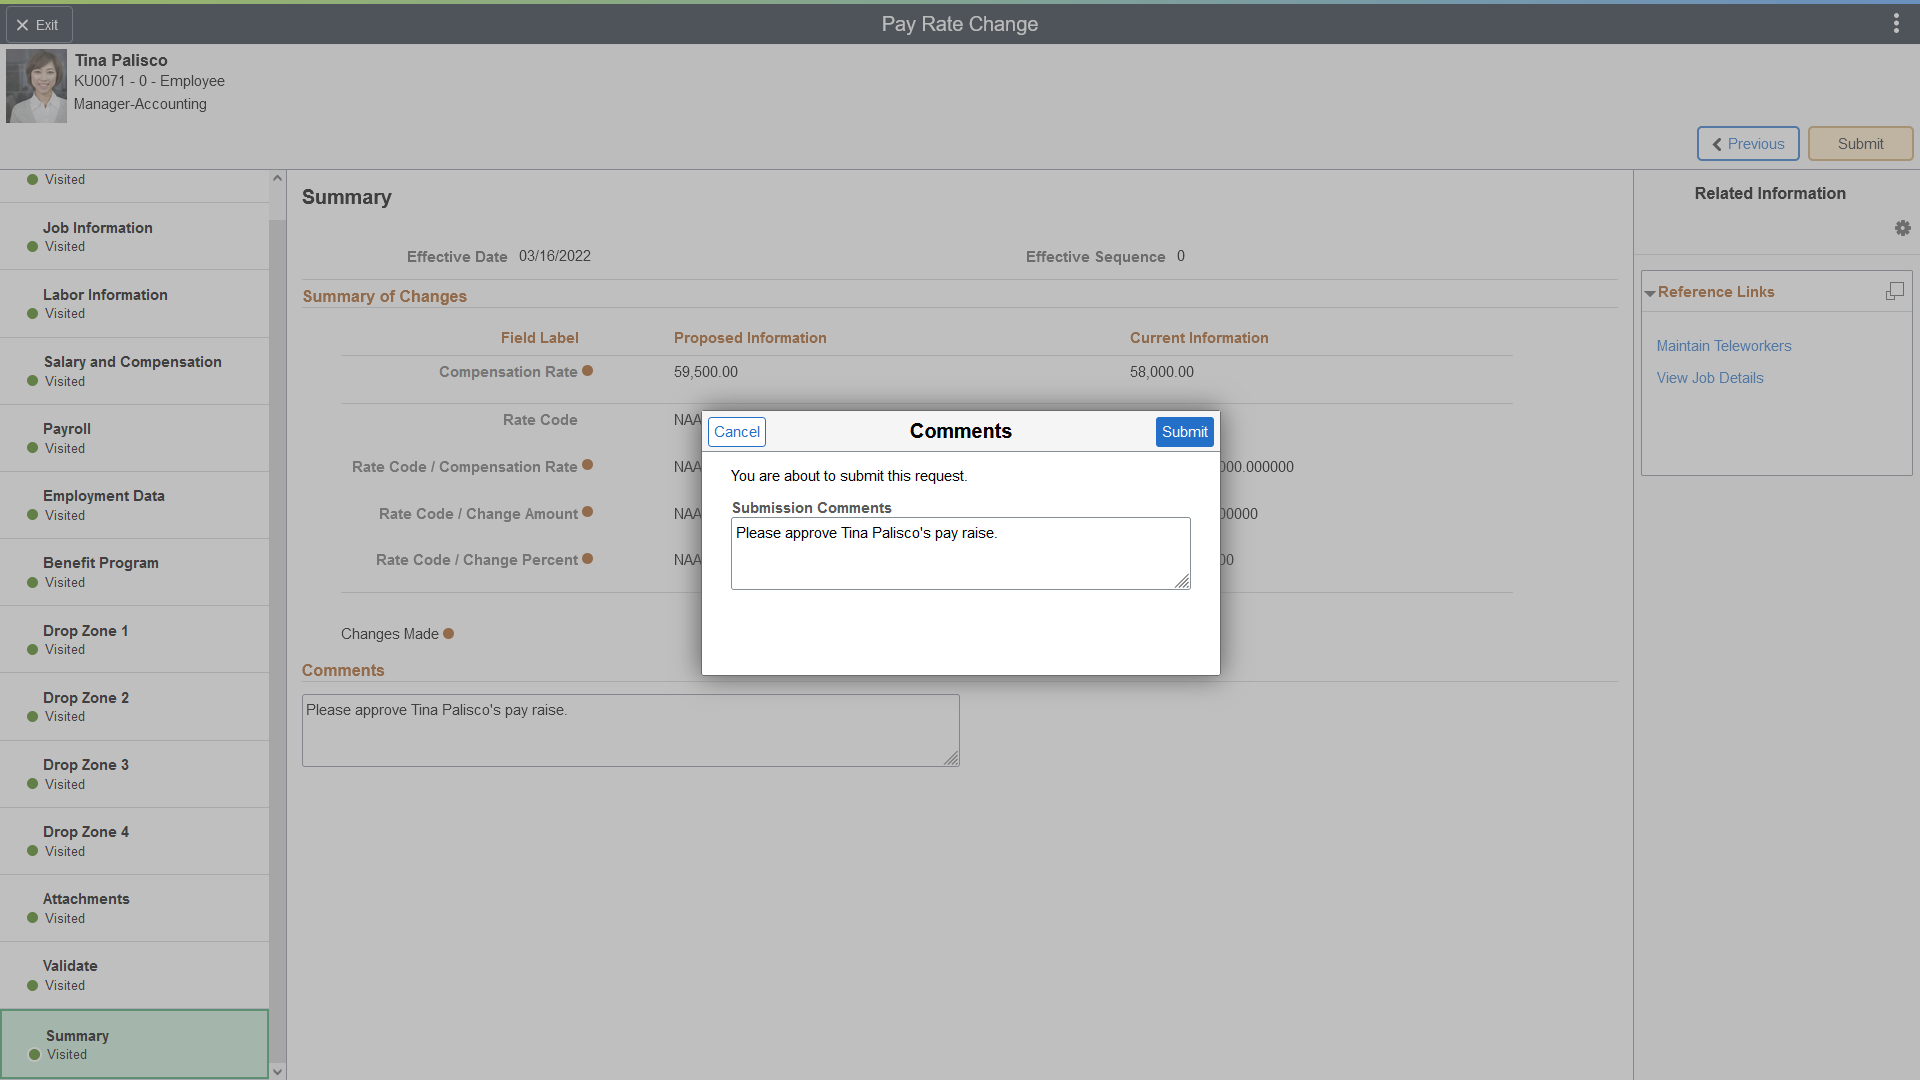
This final step in the fluid job data transaction process also includes the comments box to ensure remarks are not missed prior to submitting the job data change.
|
Field or Control |
Description |
|---|---|
|
Submission Comments |
Enter comments about this job transaction row, if any. If you entered comments on the Summary page, they are carried forward to this page. If approvals are enabled, the approver will be able to see the comments when reviewing the approval request on the Pending Approvals - Create Job Page or Pending Approvals - Correct Job Page. Comments are stored with the job row and are available to view by selecting the Request History option under the Summary section of the Job Details Page in fluid. This video provides an overview of tracking comments: |
|
Submit button |
Select the Submit button to complete the submission process. If approvals are not enabled, the data will be saved to the HR system. When approvals are required for updating or creating a job row (see Person and Job Installation - Job Data Page), the request will be sent to the approving managers, where they will use the Pending Approvals - Create Job Page or Pending Approvals - Correct Job Page to take action on a Mange Job data request. Warning! Your job data changes will not be saved until you click the Submit button. If you exit out of the Manage Job activity guide without submitting your changes, your data will be discarded. When a job data transaction has been successfully submitted, the system will display the (Fluid) Job Data - Submit Confirmation Page. |
On the submission of a job data transaction requiring approvals, the approval chain will appear on the following pages:
Job Actions Summary Page, under the related Actions column.
Status values on the Job Actions Summary page reflect the statuses as applicable for approvals.
Pending Approvals - Create Job Page or Pending Approvals - Correct Job Page.
Use the Job Data - Submit Confirmation page (HR_JB_SUB_CNF_FL) to confirm that your job data updates have been submitted.
Navigation:
Click the Submit button on the (Fluid) Job Data - Comments Page.
This example illustrates the fields and controls on the Job Data - Submit Confirmation page.
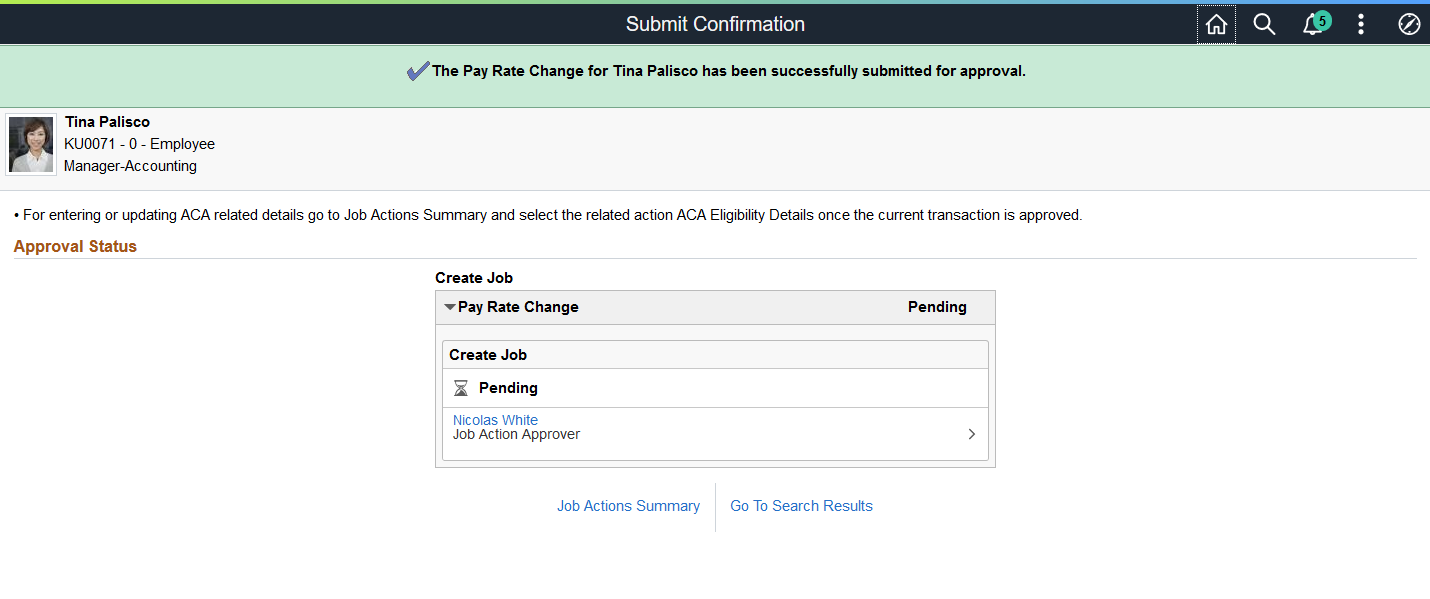
When approvals are enabled, the message at the top of the page will indicate that it was submit for approvals and the approval status fields will show the approval status and approval chain of the request.
|
Field or Control |
Description |
|---|---|
|
Job Actions Summary link |
Click this button to go to the Job Actions Summary Page for this person. You will see your newly created or update job transaction and it’s status in the list. |
|
Go to Search Results link |
Click this button to return to Manage Job - Search Criteria page and search for other people (See Understanding the Manage Job - Search Criteria Page). |
For job transactions that involve the Review Process, see the (Fluid) Working with the Job Data Review Process topic.
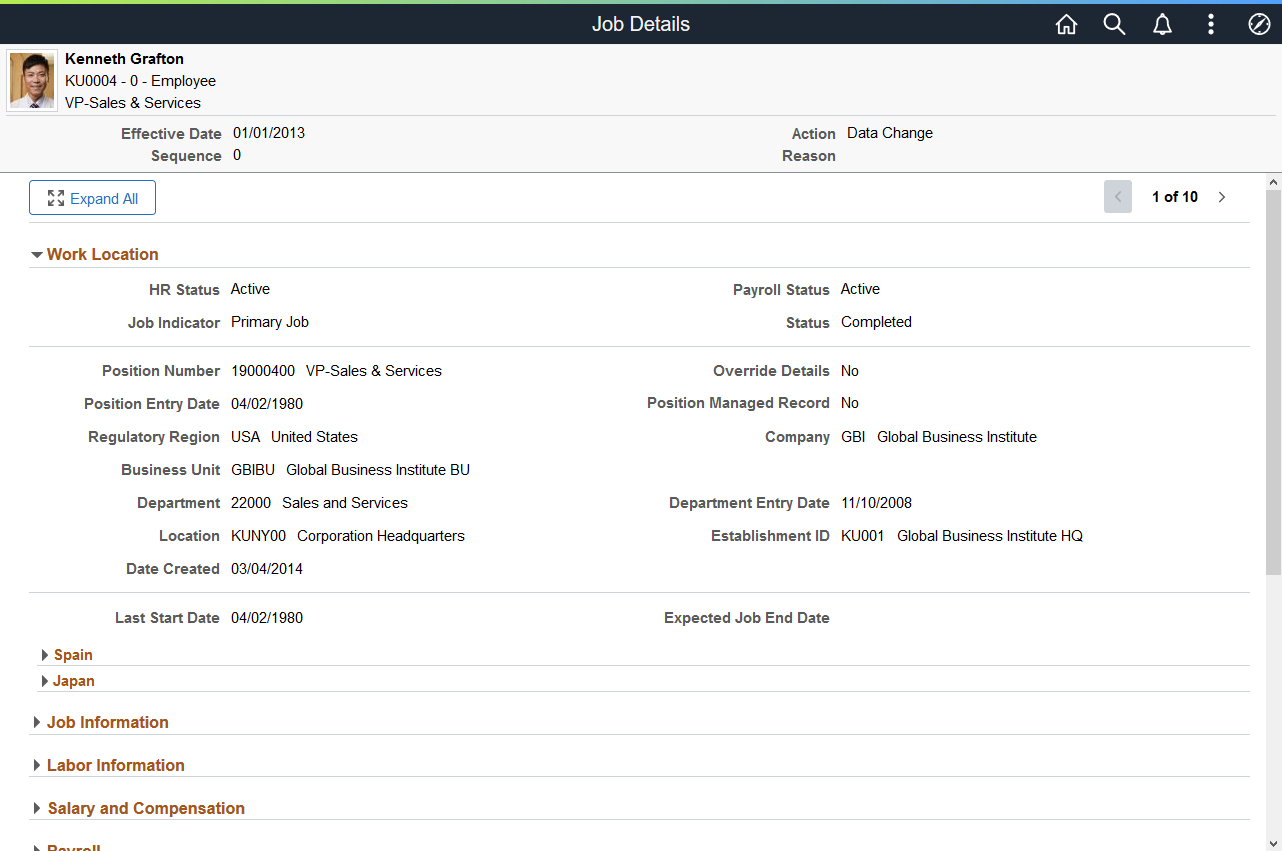
Use the Job Details page (HR_JOBDATA_VW_FL) to view a complete summary of the job data rows for a person by effective date.
Navigation:
Select the
 (View Job Details) button from the Job Actions Summary Page.
Select the View Job Details link from supplementary panel on any of the fluid Manage Job Data pages.
Click the View Job Details link from the Pending Approvals - Create Job Page or Pending Approvals - Correct Job Page.
This example illustrates the Job Details page.
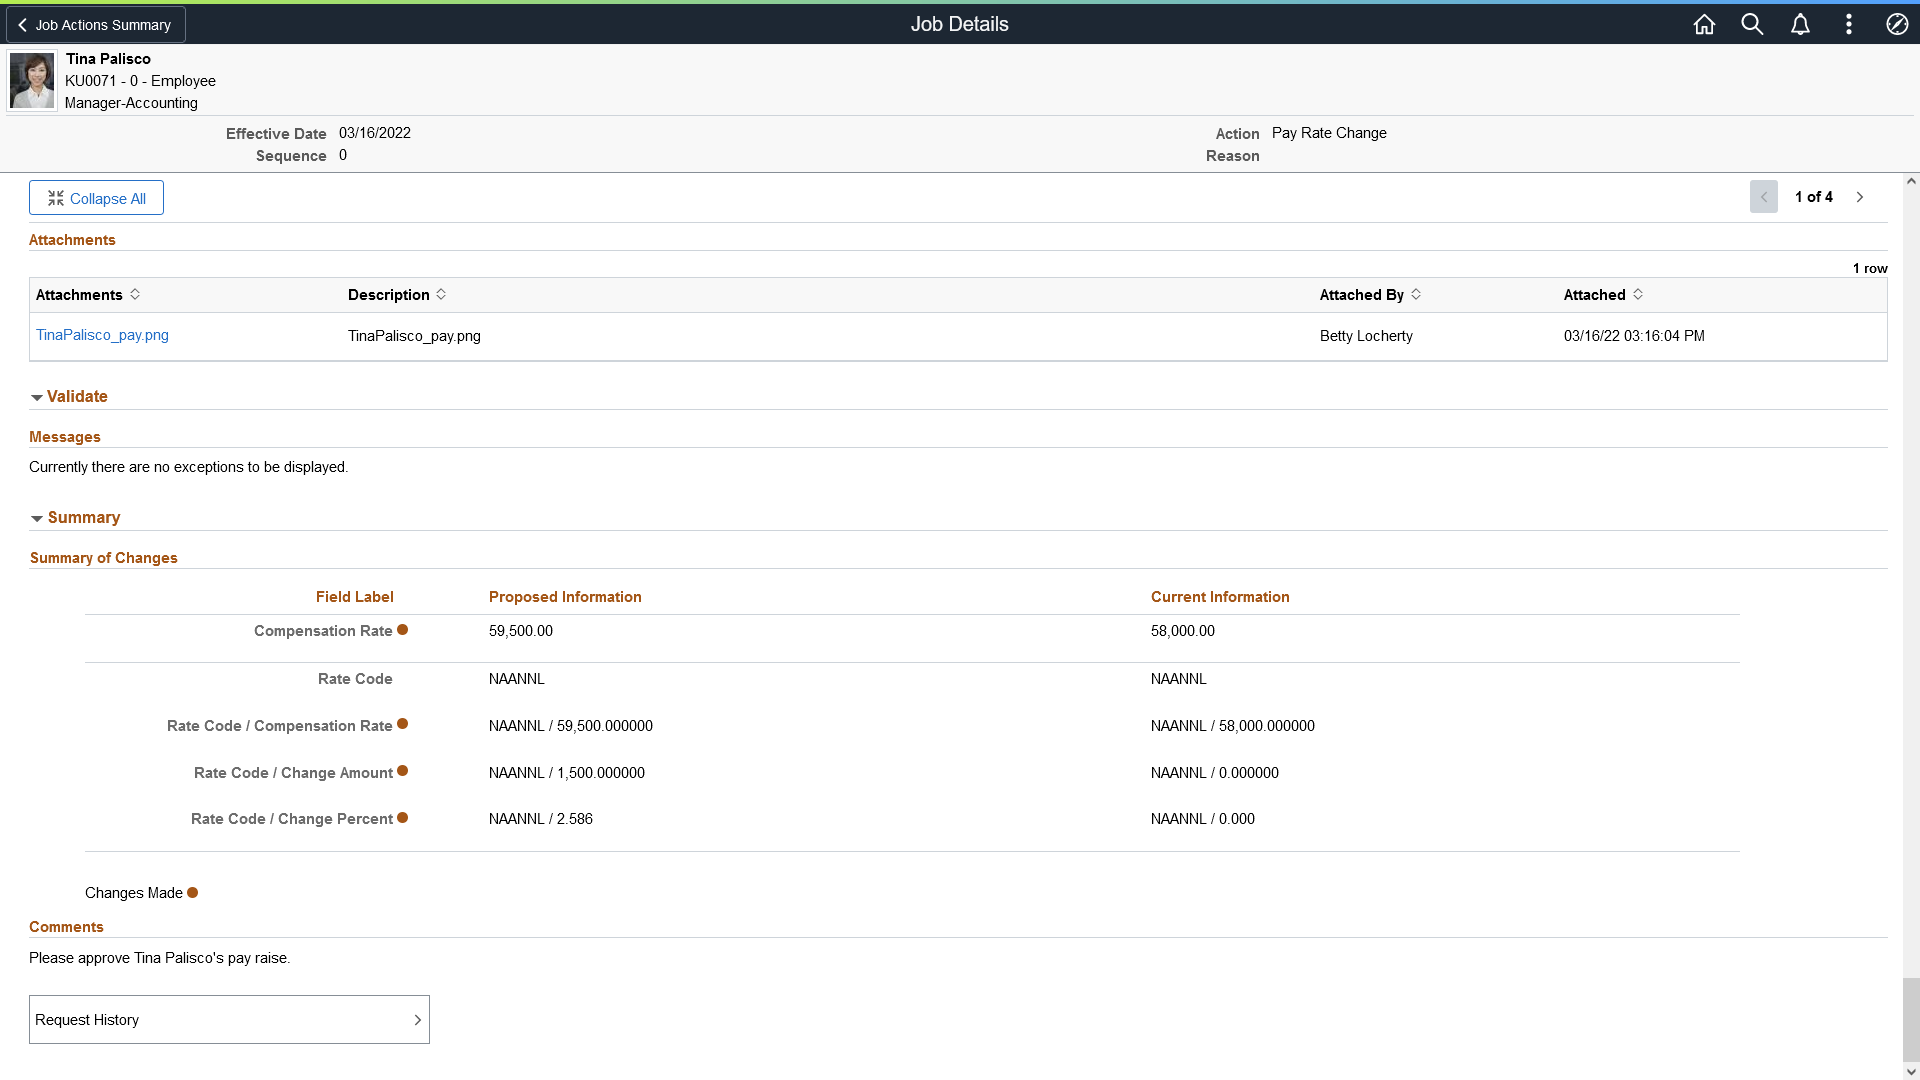
This example illustrates the Job Details page, Summary section showing the Request History option
The Job Details header displays information about the employee, including the job data transaction row you are viewing. Use the previous and next scroll arrows to view other rows.
The page also shows all the sections and fields of the Manage Job Data pages, with the Work Location section expanded by default when you first access the page. Expand each section individually, or use the Expand All and Collapse All buttons, to view additional information.
Note: The Page and Field Configurator, which you can use to hide information in the guided process, does not change the visibility of sections and fields on this page. If needed, you can configure this page using the Page and Field Configurator to display information based on actions. See the Technical Brief for this feature for more information.
|
Field or Control |
Description |
|---|---|
|
|
Select these buttons to expand or collapse all the sections on this page. |
|
< (previous) and > (next) buttons and row count |
Use these buttons to scroll through all the effective dated rows for this person. A job data transaction summary of the row you are viewing will appear at the top of the page below the header. |
 or
or  sections buttons
Attachments section
If attachments are included with a row, select the Attachments link to view the attachment.
Summary section
The section will display the latest comment, if any, under the Comments subheading for the given job details row.
|
Field or Control |
Description |
|---|---|
|
Request History |
Select this option to access the Request History Page and view all the comments for a job data row. |
Use the Request History page (HR_REQ_HIST_SCF) to view all the comments related to a job data row.
Navigation:
Click the Request History option from the (Fluid) Job Data - Comments Page.
This example illustrates the Request History page.
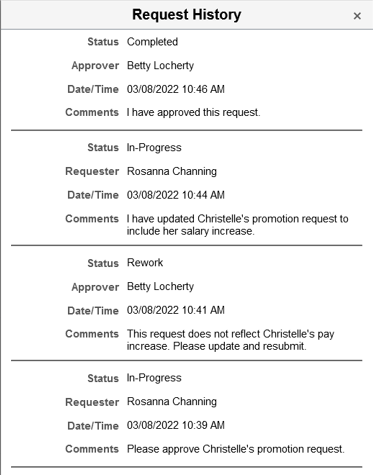
Request history allows you to view all the comments pertaining to this job transaction request. Multiple comments may happen when the approver has pushed back a request and it has been resubmitted.
This video provides an overview of tracking comments: