Setting Up Workgroups
To set up workgroups, use the Workgroup (TL_WKG_MAIN_PNLGRP) component. Use the TL_WKG_MAIN_PNLGRP component interface to load data into the tables for this component.
This section discusses how to set up workgroups.
|
Page Name |
Definition Name |
Usage |
|---|---|---|
|
TL_WRKGRP_DEF |
Define defaults, rounding options, and day breaker options for a workgroup. |
|
|
TL_WRKGRP_APPV |
Define approval options and timesheet control for a workgroup. |
|
|
TL_APP_GRPS_SEC |
Define the TL Group ID and instructions to help with the setup for approval usage related to an Approval Definition ID that starts with TLGroup. |
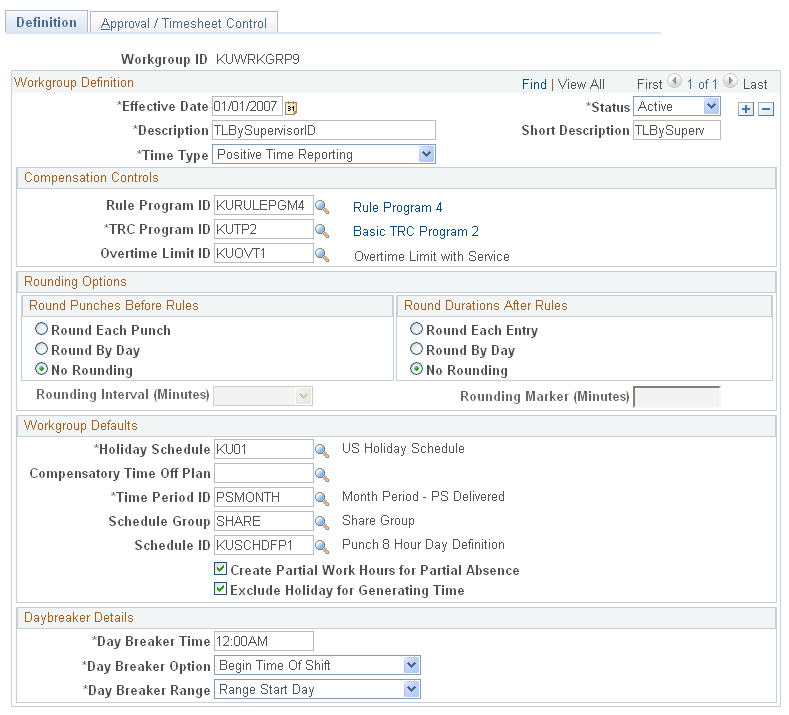
Use the Workgroup - Definition page (TL_WRKGRP_DEF) to define defaults, rounding options, and day breaker options for a workgroup.
Navigation:
This example illustrates the fields and controls on the Workgroup - Definition page. You can find definitions for the fields and controls later on this page.
Field or Control |
Description |
|---|---|
Status |
Valid values for Status are Active or Inactive. If you change the status of a workgroup to Inactive as of a particular effective date, the system will check if any time reporter is associated with the workgroup as of that effective date. If the association exists, the inactivation of the Workgroup will not be allowed. |
Note: The following fields on this page trigger Referential Integrity: Approve Payable Time, Rule Program ID, TRC Program ID, Holiday Schedule, Comp Plan, Schedule ID, Day Breaker, Day Breaker Options, Day Breaker Range, Rounding Options , Rounding Interval, and Rounding Marker. Additionally, if the Create Partial Work Hours for Partial Absence or the Exclude Holiday for Generating Timeoptions are changed for exception time reporting workgroups, Referential Integrity is triggered. For positive time reporting workgroups, modifying these options does not trigger Referential Integrity. For these fields, Referential Integrity ensures that if a time reporter's Earliest Change Date is less than the effective-dated change of the setup table, the Earliest Change Date will not be updated. If, however, the Earliest Change Date is null or greater than the effective date of the setup table change, the Earliest Change Date will be updated to the minimum effective date of Reported or Payable Time for the time reporter.
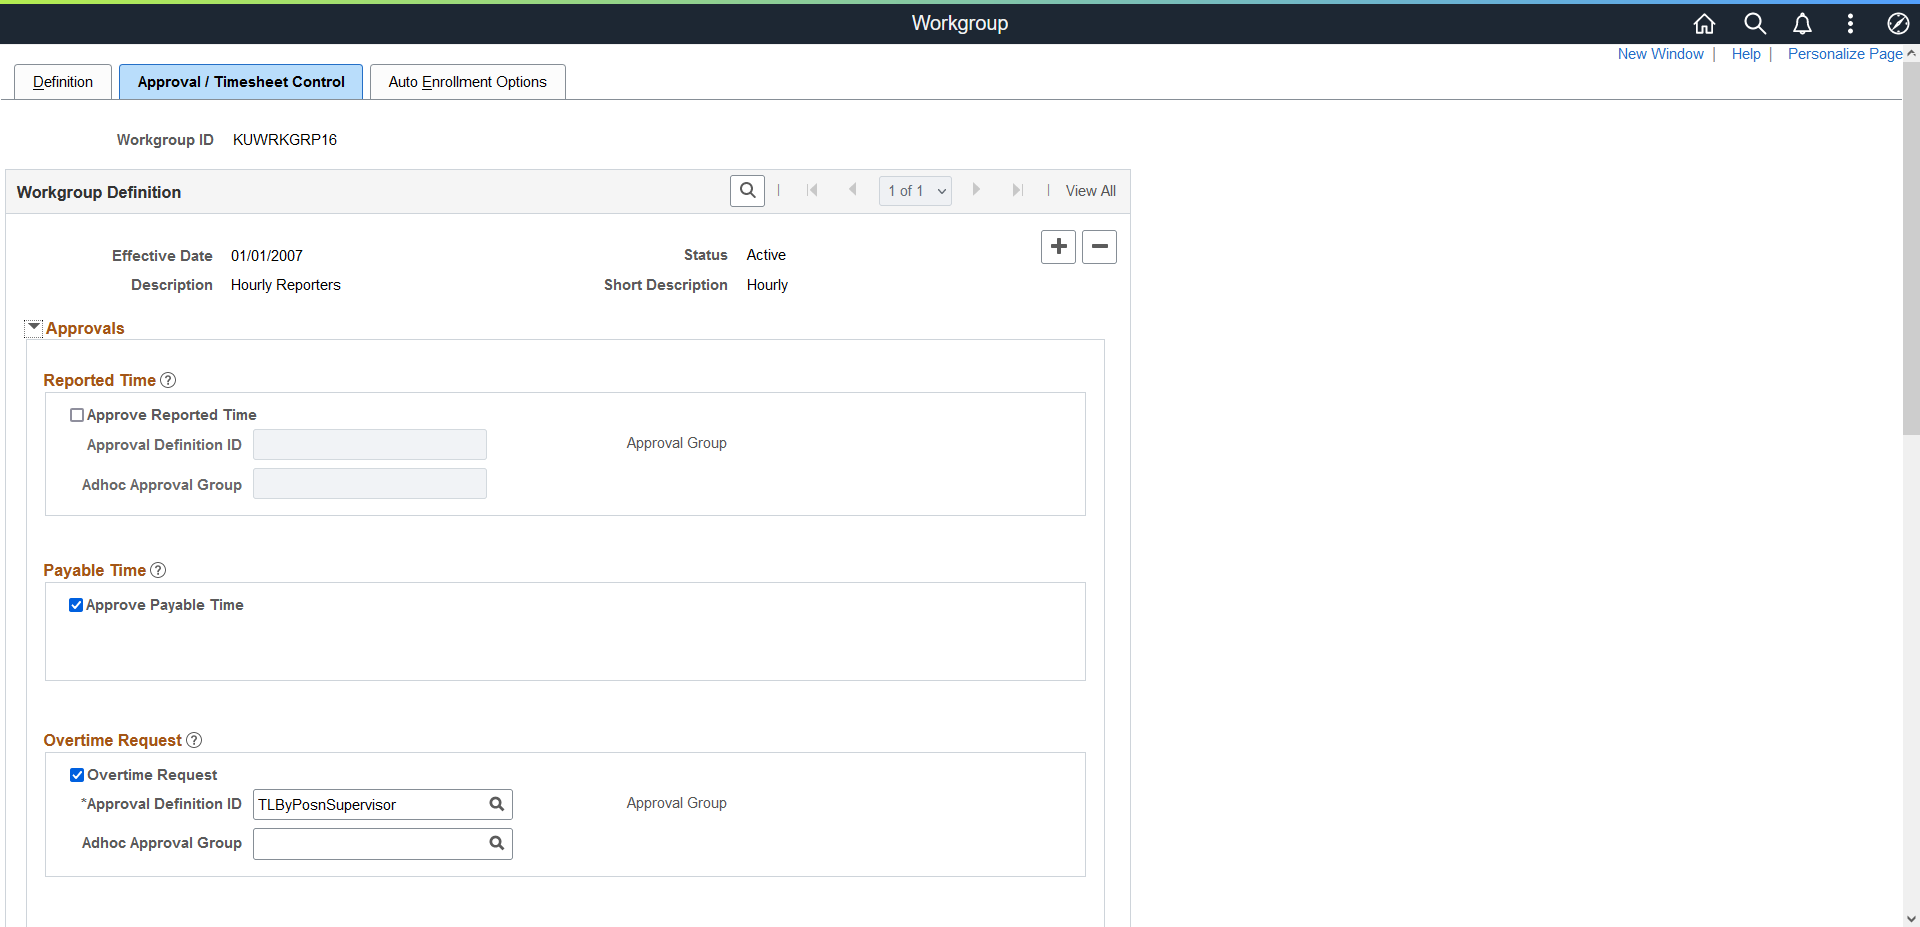
Use the Workgroup - Approval/Timesheet Control page (TL_WRKGRP_DEF) to define approval options and timesheet control for a workgroup. Name every workgroup and define its basic parameters, approvals and status.
Navigation:
This example illustrates the fields and controls on the Workgroup — Approval / Timesheet Control (1_2)Page.
This example illustrates the fields and controls on the Workgroup - Approval (2_2) page. You can find definitions for the fields and controls later on this page.
Note: The Approve Payable Time field on this page triggers Referential Integrity.
Reported Time
The Approve Reported Time feature is an option for the approval of reported time. If selected, it requires that a manager approve the actual time reported versus payable time that has been processed by the Time Administration process. Select the Approve Reported Time field if a manager's approval is required for reported time. Then select an Approval Definition ID that has been created for Time and Labor approvals. The definition ID also identifies the appropriate approval definition. You can also select an ad hoc approval group ID that is set up for approvals. You can insert ad hoc approval group users into the approval process flow, along with the original approver.
Field or Control |
Description |
|---|---|
Approve Reported Time |
Select this check box if a manager's approval is required for reported time. Leave the check box clear if you do not want a manager to approve reported time. The Approve Reported Time feature is another option for approval of time. Selecting this field requires a manager to approve the actual time that was reported before the Time Administration process selects the time, processes it, and generates payable time. If time is not approved, then the reported time is not selected and run by the Time Administration process, and payable time is not generated. |
Approval Process ID |
Displays the Time and Labor process ID. The process ID identifies the approval transaction. |
Approval Definition ID |
Select the approval definition created for Time and Labor approvals. The definition ID also identifies the appropriate approval definition. |
Approval Group |
Click to display the TL Approval Groups page. This link is available when the selected Approval Definition ID requires a Time and Labor approval group. Note: The Approval Group link is available when you select an Approval Definition ID that starts with TLGroup. |
Adhoc Approval Group |
Select an adhoc approval group ID that is set up for approvals. You can insert adhoc approval group users into the approval process flow, along with the original approver. |
Payable Time
Select the Approve Payable Time field if a manager's approval is required before the time reporters in this workgroup can be paid. When this field is selected and payable time is not approved by a manager, time reporters either will not be paid or their time will not be finalized. Then select an Approval Definition ID that has been created for Time and Labor approvals. The definition ID also identifies the appropriate approval definition. You can also select an ad hoc approval group ID that is set up for approvals. You can insert ad hoc approval group users into the approval process flow, along with the original approver.
Field or Control |
Description |
|---|---|
Approve Payable Time |
Select this check box if a manager's approval is required before the time reporters in this workgroup can be paid. If this check box is selected and payable time is not approved by a manager, time reporters will either not be paid or their time will not be finalized. Leave the check box clear if you do not want a manager to approve the time in order to be paid. If you change the value of this check box after time has been reported, the Validation process checks for any affected reported time. Affected instances of time need to be rerun through Time Administration to generate and update the status of Payable Time to either Needs Approval or Estimated, depending on the change you made. If the time reporter is recognized as not using any payroll system (based on the Send to Payroll flag on the Create/Maintain Time Reporter page), the Needs Approval status needs to remain as the only method of closing the time. Important! Selecting the Retain Basic (non-AWE) Model field on the Configurations page (TL_INSTL_PUNCH) causes the system to use a a simpler security based model for approving payable time, rather than using the Approval Framework for payable time. This means that a manager’s access and ability to approve a time reporter’s payable time is based on the same security that grants the manager access to view and modify the person’s time. See: Configurations Page |
Approval Process ID |
Displays the Time and Labor Process ID. The Process ID identifies the approval transaction |
Approval Definition ID |
Select the approval definition created for Time and Labor approvals. The definition ID also identifies the appropriate approval definition. |
Approval Group |
Click to display the TL Approval Groups page. This link is available when the selected Approval Definition ID requires a Time and Labor approval group. Note: The Approval Group link is available when you select an Approval Definition ID that starts with TLGroup. |
Adhoc Approval Group |
Select an adhoc approval group ID that is set up for approvals. You can insert adhoc approval group users into the approval process flow, along with the original approver. |
Overtime Request
Select the Overtime Request field if a manager's approval is required for employee overtime requests. Then select an Approval Definition ID that has been created for Time and Labor approvals. The definition ID also identifies the appropriate approval definition. You can also select an ad hoc approval group ID that is set up for approvals. You can insert ad hoc approval group users into the approval process flow, along with the original approver.
Field or Control |
Description |
|---|---|
Overtime Request |
Select this check box if a manager's approval is required for employee overtime requests. |
Approval Process ID |
Displays the Time and Labor Process ID. The Process ID identifies the approval transaction. |
Approval Definition ID |
Select the approval definition created for Time and Labor approvals. The definition ID also identifies the appropriate approval definition. |
Approval Group |
Click to display the TL Approval Groups page. This link is available when the selected Approval Definition ID requires a Time and Labor approval group. Note: The Approval Group link is available when you select an Approval Definition ID that starts with TLGroup. |
Adhoc Approval Group |
Select an adhoc approval group ID that is set up for approvals. You can insert adhoc approval group users into the approval process flow, along with the original approver. |
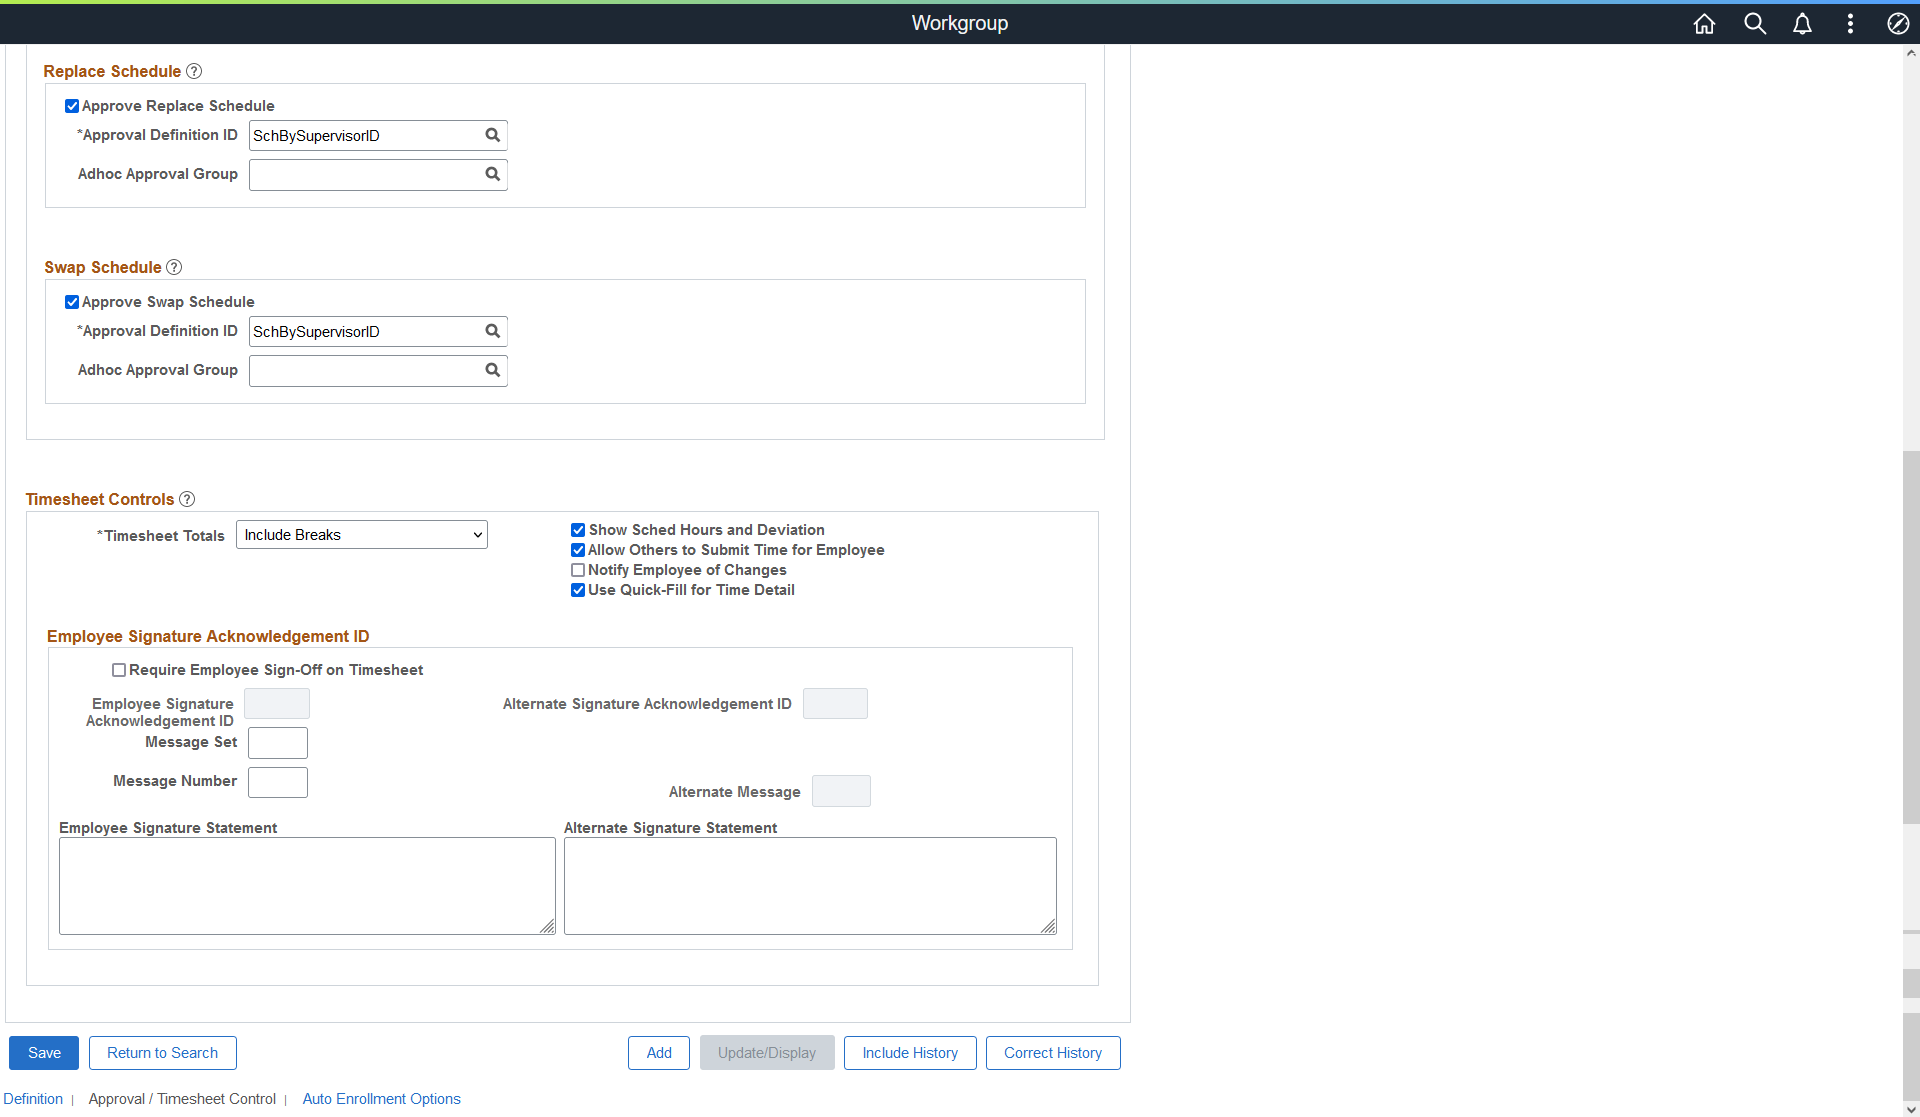
Replace Schedule
Select the Replace Schedule field if a manager's approval is required for employee to give up the shift. Then select an Approval Definition ID that has been created for Time and Labor approvals. The definition ID also identifies the appropriate approval definition. You can also select an ad hoc approval group ID that is set up for approvals. You can insert ad hoc approval group users into the approval process flow, along with the original approver.
|
Field or Control |
Description |
|---|---|
|
Replace Schedule |
Select this check box if a manager's approval is required for employee replace schedule requests. |
|
Approval Process ID |
Displays the Time and Labor Process ID. The Process ID identifies the approval transaction. |
|
Approval Definition ID |
Select the approval definition created for Time and Labor approvals. The definition ID also identifies the appropriate approval definition. |
|
Adhoc Approval Group |
Select an adhoc approval group ID that is set up for approvals. You can insert adhoc approval group users into the approval process flow, along with the original approver. |
Swap Schedule
Select the Swap Schedule field if a manager's approval is required for employee to trade their schedule. Then select an Approval Definition ID that has been created for Time and Labor approvals. The definition ID also identifies the appropriate approval definition. You can also select an ad hoc approval group ID that is set up for approvals. You can insert ad hoc approval group users into the approval process flow, along with the original approver.
|
Field or Control |
Description |
|---|---|
|
Swap Schedule |
Select this check box if a manager's approval is required for employee swap schedule requests. |
|
Approval Process ID |
Displays the Time and Labor Process ID. The Process ID identifies the approval transaction. |
|
Approval Definition ID |
Select the approval definition created for Time and Labor approvals. The definition ID also identifies the appropriate approval definition. |
|
Adhoc Approval Group |
Select an adhoc approval group ID that is set up for approvals. You can insert adhoc approval group users into the approval process flow, along with the original approver. |
Timesheet Controls
Select the Require Employee Sign-Off On Timesheet field to require an electronic signature on all submitted timesheets. When you select this field, you must also specify the text of the employee signature statement. Because this text is a message catalog entry, you must also specify the message set and message number.
Field or Control |
Description |
|---|---|
Allow Others to Submit Time for Employee |
Select this field to enable a user with row security access to the employee to edit the employee’s reported time on the Manager Self Service Timesheet. If this field is selected, you must enter a value in Alternate Signature Employee ID field. If this field is not selected, the Notify Employee of Changes field is not available. |
Notify Employee of Changes |
Select if you want the employee to receive notices when a manager enters time on behalf of an employee. This field is only available if the Allow Others to Submit Time for Employee field is selected. |
Use Quick-Fill for Time Detail |
Enable quick fill for time entries. |
Alternate Message and Alternate Signature Statement |
Enter a message catalog ID to use as notification text. When you select this option, the contents of the Alternate Signature Statement display on the Manager Self Service Timesheet. The system also captures the User ID, the date, and the time. |
Employee Signature Acknowledgement ID
Select the Require Employee Sign-Off On Timesheet field to require an electronic signature on all submitted timesheets. When you select this field, you must also specify the text of the employee signature statement. Because this text is a message catalog entry, you must also specify the message set and message number.
Whenever a timesheet is submitted by someone on behalf of an employee, the fields Alternate Signature Acknowledgement ID and Alternate Message are mandatory.
Field or Control |
Description |
|---|---|
Require Employee Sign-Off on Timesheet |
Select this check box to enable a user with employee sign-off on Timesheet required while entering time using Enter Time page. Note: If this field is selected, the fields Employee Signature Acknowledgement ID, Message Set, Message Number are mandatory. If this field is not selected, the Notify Employee of Changes field is not available. |
Employee Signature Acknowledgement ID |
Select the employee signature acknowledgement ID. Note: If you do not want to set-up acknowledgement IDs and provided the installation check box is turned off, then you can provide the message catalogue and message set numbers and the acknowledgement message will appear on the fluid time sheet as in classic. This applies to Enter Time, Report Time and Weekly Time pages. |
Message Set |
Specify the message set in numbers. |
Message Number |
Specify the message number as required. |
Employee Signature Statement |
This populates an employee signature statement defined as per the fields. |
|
Alternate Signature Acknowledgement ID |
Select if there is a need to choosing alternate signature acknowledgement ID. You must enter a value in the Alternate Message field if a value is selected in this field. |
|
Alternate Message |
Alternated message characters in number. |
Alternate Signature Statement |
This populates an alternate signature statement defined as per the fields. |
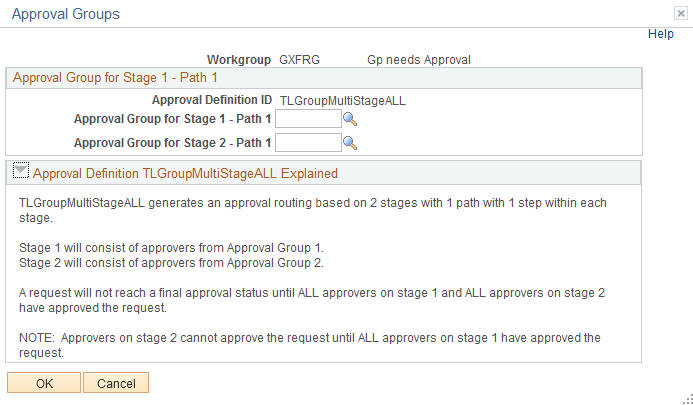
The selected Approval Definition ID generates an approval routing based on the selected definition. For example, TLGroupMutlipleStageALL has two stages with one path, and one step within each stage. The request reaches final approval status when all of the Stage 1 approvers and then all Stage 2 approvers have approved the request. Based on the selected Approval Definition ID, the Approval Groups page displays the correct approval groups and instructions to help with the setup for approval usage.
Use the Approval Groups page (TL_WRKGRP_APPV) to define the TL Group ID and instructions to help with the setup for approval usage related to an Approval Definition ID that starts with TLGroup.
Navigation:
This example illustrates the fields and controls on the Approval Groups page. You can find definitions for the fields and controls later on this page.
Field or Control |
Description |
|---|---|
Approval Group for Stage 1 - Path 1 |
Select the group of Stage 1 approvers. |
Approval Group for Stage 2 - Path 1 |
Select the group of Stage 2 approvers. Note: The Stage 2 approvers cannot approve a request until after the Stage 1 approvers have approved the request. |
On the Workgroup - Definition page access the Time Type group box.
If you change the Time Type for the workgroup from Positive to Exception, the effect is the ability to automatically create time for a given population by turning default schedule information into Payable Time.
If you change from Exception to Positive, time cannot be created for time reporters based on schedules -- all time needs to be positively reported.
When you make a change to the Time Type, the next time the system runs Time Administration, it will take into account the new time type.
Field or Control |
Description |
|---|---|
Exception Time Reporting |
Select this option if time reporters in this workgroup do not report their time on a daily basis, but are paid regularly. Examples of exception time reporting are time reporters who only report sick, vacation, or personal days. If no time is reported by an exception time reporter, the Time Administration process creates payable time based on the time reporter's schedule. Note: No payable time is created from the schedule when Time Administration is run on days when zero hours are reported. |
Positive Time Reporting |
Select this option if you want the time reporters in this workgroup to report their time on a daily basis in order to be compensated. An example of positive time reporting is time reporters who report their time on an hourly basis. |
Note: You should enter positive or exception time reporting into your description of each workgroup. This enables you to determine the workgroup to which you want to assign the time reporters from the Create Time Reporter Data page, or the Maintain Time Reporter Data page. It is important that you categorize your employees correctly, because Time Administration creates Payable Time differently for exception and positive time reporters.
On the Workgroup - Definition page, access the Compensation Controls group box.
Field or Control |
Description |
|---|---|
Rule Program ID |
Enter a Rule Program ID. To set up a rule program, you must use the Rule Program page. Although this field is not required when you create a workgroup, the Rule Program ID is needed in order for the time reporters in this group to have rules applied during Time Administration rules processing. If you try to save the page without entering a value in this field, you will get a warning message. The message will not prevent you from saving the page. You can save the page and come back to assign a Rule Program ID after you have your rule programs defined. If a time reporter reports time with a valid TRC, Time Administration will create payable time even if their workgroup has no rule program: Time Administration will round, distribute tasks, and validate time without running rules. If the TRC is invalid, the system will generate an exception. For elapsed time reporters, exceptions will be created for all positively reported time that doesn't have a valid TRC. If you change the rule program attached to a workgroup, the Referential Integrity process will determine the Payable Time affected by this change, and trigger Time Administration to reprocess this time. |
TRC Program ID |
Select a TRC Program ID. TRC programs contain the list of TRCs that the system uses to create payable time for time reporters belonging to this workgroup. When workgroup members report time through the Elapsed Timesheet, only TRCs in this TRC program will appear in the TRC field. If you try to change the TRC program attached to this workgroup, the Referential Integrity process will trigger Time Validation to check any reported or payable time that might be affected by this change. If there is any such time, the system creates exceptions and you will have to adjust the TRC to address the exceptions. If time is reported through the TCD Interface or Rapid Entry process and contains invalid TRCs, the system will create exceptions for these instances of time. If the interface includes new TRCs that should be added, you can add the new TRCs to the appropriate TRC program. When you add the new TRCs, the system should delete the exceptions. |
Overtime Limit ID |
Select the Overtime Limit ID (if applicable), that applies to the members of the workgroup. |
On the Workgroup - Definition page, access the Rounding Options group box.
This following illustrates the controls and definitions of Rounding Options.

There are three types of rounding in Time and Labor:
Field or Control |
Description |
|---|---|
Round Each Punch |
The system rounds all reported punches before applying rules to the time in Time Administration. Even if this option is selected, the rules that require actual punch times continue to evaluate time as it was originally reported. For example, rules that track attendance continue to evaluate the originally reported time. |
Round By Day |
For daily rounding of punch time before Time and Labor rules are processed, but after the Day Breaker is applied. Using this option, punch time is not changed, but the duration associated with the first punch (IN) for the day is adjusted. |
No Rounding |
No rounding rules are applied. |
Note: For punch time reporters, a segment is the duration between one punch and the next punch. For elapsed time reporters, a segment is one entry of time for a specific day. For example, if a time reporter reports 4 hours of REG and 4 hours of OT on one day, each entry of 4 hours would be considered a "segment." Two segments are considered "alike" if all the information in reported time (and all relevant fields in the TL_RPTD_TIME table) except TL_QUANTITY is the same.
Rounding in Time Administration
The units of time for Round Punches Before Rules is hours and minutes. Since this applies to punch time only, all pre-rules rounding is exact, because the rounding logic parameters are in minutes.
For post-rules rounding, the punch time is converted from standard hours and minutes to decimal time before the rules are processed to enable the punch time and elapsed time to be combined in the rules process.
For example, 8 hours and 30 minutes converts to 8.50 hours, and 8 hours and 29 minutes converts to 8.483333 hours.
When post-rules rounding is applied, the system performs the following conversions to the time units:
This example illustrates the fields and controls on the Workgroup — Approval / Timesheet Control Page. You can find definitions for the fields and controls later on this page.
The punch time is converted from hours and minutes to decimal time.
When the post-rules rounding is applied, the time is converted into hours and minutes.
The time is then rounded and then converted back to decimal time.
The back-and-forth time conversion for post-rules rounding means that rounding differences occur even when the rounding rules are not applied.
The following table shows the differences that are encountered when minute values are converted to decimal time and then back to minutes:
|
Punch Time Minutes |
Conversion to Decimal Time in TL_QUANTITY |
TL_QUANTITY Rounded to Five Decimal Places |
TL_QUANTITY Converted Back to Minutes |
Difference Between Original Entry and Final Converted Time |
|
1 |
0.0166666667 |
0.016670 |
1.000200 |
Plus .0002 |
|
2 |
0.0333333333 |
0.033330 |
1.999800 |
Minus .0002 |
|
3 |
0.0500000000 |
0.050000 |
3.000000 |
No Difference |
|
4 |
0.0666666667 |
0.066670 |
4.000200 |
Plus .0002 |
|
5 |
0.0833333333 |
0.083330 |
4.999800 |
Minus .0002 |
|
6 |
0.1000000000 |
0.100000 |
6.000000 |
No Difference |
|
7 |
0.1166666667 |
0.116670 |
7.000200 |
Plus .0002 |
|
8 |
0.1333333333 |
0.133330 |
7.999800 |
Minus .0002 |
|
9 |
0.1500000000 |
0.150000 |
9.000000 |
No Difference |
Note: The values in the Difference column of this table repeat for every three minutes up through a value of 59 minutes in the Punch time Minutes column.
Intervals and Markers
After you have selected a rounding option, define your option by specifying a Rounding Interval and a Rounding Marker.
Field or Control |
Description |
|---|---|
Rounding Interval (Mins) |
A rounding interval represents the number of minutes comprising a segment of an hour. For example, if you select 15 (minutes) in the Rounding Interval field, the following 4 intervals will be created for each hour: Interval 1: x:00 to x:15 Interval 2: x:15 to x:30 Interval 3: x:30 to x:45 Interval 4: x:45 to x:00 |
Rounding Marker (Mins) |
Rounding markers work in conjunction with rounding intervals (defined above) to define rounding rules: the rounding marker is a point in time in relation to which the system rounds either up or down within an interval. So if we return to the preceding example of four 15 minute rounding intervals, and select a rounding marker of 10 minutes, both the intervals and markers can be represented as follows: |
This image illustrates the example of four fifteen minute rounding intervals and a rounder marker of 10 minutes.
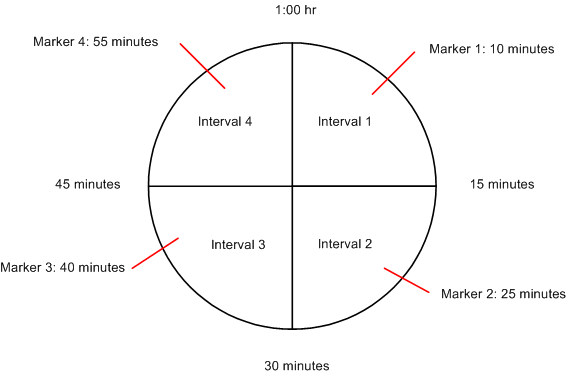
As illustrated in this example, each interval contains a corresponding rounding marker. A rounding marker cannot exceed the number of minutes in an interval, and occurs as many minutes after the start of each interval as the value you enter in the Rounding Marker field. So, in this example, the rounding marker occurs 10 minutes into each interval.
The way rounding intervals and rounding markers are used depends on whether you are using pre-rules rounding or post-rules rounding:
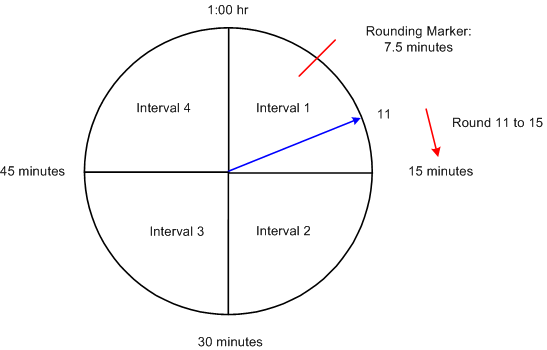
Pre-Rules Rounding
If you are rounding punches (pre-rules rounding), the system uses the rounding interval together with the rounding marker to round each punch to the closest start or end point of the interval in which the punch was made. The system then calculates the difference between each in and out punch and sends the resulting duration to Time Administration for rules processing. If a punch is made prior to the rounding marker, the system rounds down to the beginning of the interval. If a punch falls either directly on or after the rounding marker, the system rounds up to the end of the interval. A rounding marker always defaults to the midpoint of a rounding interval; the rounding marker can be modified.
The following example of pre-rules rounding illustrates how the system applies a rounding rule. Let's assume that you have selected the following rounding options, and that the punch to be rounded occurs 11 minutes into the first rounding interval:
Field or Control |
Description |
|---|---|
Rounding Option |
= Round Punches Before Rules |
Rounding Interval |
= 15 Minutes |
Rounding Marker |
= 7.5 Minutes |
In this example, the system rounds the punch up to 15 minutes. This is because 11 minutes is greater than the rounding marker of 7.5 minutes.
This image illustrates the described example when the system rounds the punch up to 15 minutes.,
Post-Rules Rounding
Post-rules rounding affects both punch and elapsed time. In the case of punch time, the system calculates the difference between individual consecutive punches (for example, an IN and an OUT punch) to create a duration for each set of matched punches. These durations are then rounded. In the case of elapsed time, time is reported as a duration, so the system simply rounds the reported duration up or down within its corresponding interval.
The post-rules rounding process first determines the interval (as defined previously) within which the duration falls and then rounds within that interval. If a duration falling within an interval is less than the rounding marker (for that interval), the system rounds down to the beginning of the interval. If the duration falling within the interval is equal to or greater than the rounding marker, the system rounds up to the end of the interval.
The following examples illustrate how the system applies rounding rules to both punch and elapsed time:
Example 1: Segment Rounding of Punch Time
Let's assume that we have selected the following rounding options, that we are rounding punch time, and that the duration to be rounded is 1 hour, 18 minutes:
Field or Control |
Description |
|---|---|
Round Duration After Rules |
= Segment |
Rounding Interval |
= 15 Minutes |
Rounding Marker |
= 10 Minutes |
Because our Rounding Interval is 15 minutes and our Rounding Marker is 10 minutes, the system rounds 1 hour, 18 minutes to 1 hour, 15 minutes. This is illustrated in the following diagram:
This image illustrates the discussion of rounding 1 hour, 18 minutes to 1 hour, 15 minutes.
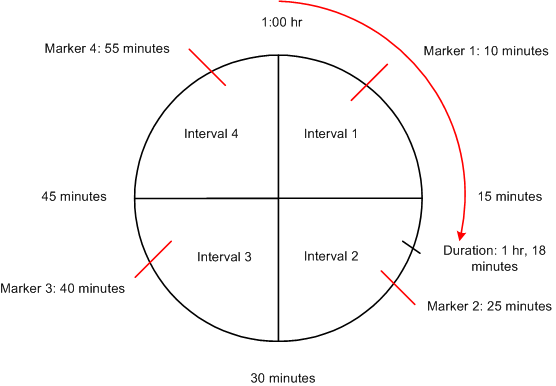
In this example, the duration to be rounded (1 hour, 18 minutes) falls within Interval 2 (00:15 to 00:30). This means that the duration must be rounded up or down within that interval. Because 18 minutes is less than the Rounding Marker for Interval 2 (25 minutes), the duration is rounded down to 1 hour, 15 minutes.
Example 2: Segment Rounding of Elapsed Time
To illustrate how the rounding process works in the case of an elapsed time reporter, let's assume that we have selected the same rounding options used in the previous example, and that our time reporter is scheduled to work 8 hours on a given day, but positively reports 4.33 hours (4 hours and 20 minutes). In this case, the system would round the time to 4.25. This is because 4.33 hours equals 4 hours and 20 minutes, and 20 minutes falls within Interval 2. The duration of 20 minutes is less than the Rounding Marker (25 minutes), so the duration is rounded down to 15 minutes, which is .25 hours. Therefore, the final time is 4.25.
Note: If you change your rounding options, the rounding interval, or rounding marker, the Referential Integrity process will trigger Time Administration to reprocess any affected payable time from the effective-dated change forward. Affected instances of time need to be rerun through TA in order to recreate correct durations for payable time for the correct dates under report.
Example 3: Segment Rounding After Rules of Punch Time
Rounding Interval = 15 minutes
Rounding Marker = 7.5 minutes
|
Reported Time |
|||||
|---|---|---|---|---|---|
|
Punch Time |
Punch Type |
Segment |
Rounded |
Project |
Department |
|
8:10 a.m. |
IN |
1 hour, 50 minutes |
1.75 |
A |
|
|
10:00 a.m. |
BREAK |
20 minutes |
.25 |
Y |
|
|
10:20 p.m. |
IN |
2 hours, 40 minutes |
2.75 |
A |
|
|
1:00 p.m. |
MEAL |
1 hour, 5 minutes |
1.00 |
Y |
|
|
2:05 p.m. |
IN |
2 hours, 55 minutes |
3.00 |
B |
|
|
5:00 p.m. |
OUT |
Note: All segments are rounded first, then like segments are summed.
|
Payable Time Results |
||
|---|---|---|
|
REG |
3 hours |
Project B |
|
REG |
4.5 hours |
Project A |
|
REG |
1.25 hours |
Department A |
Example 4: Day Rounding After Rules of Punch Time
Rounding Interval = 15 minutes
Rounding Marker = 7.5 minutes
|
Reported Time |
||||
|---|---|---|---|---|
|
Punch Time |
Punch Type |
Duration |
Project |
Department |
|
8:10 a.m. |
IN |
1 hour, 50 minutes |
A |
|
|
10:00 a.m. |
BREAK |
20 minutes |
Y |
|
|
10:20 p.m. |
IN |
2 hours, 40 minutes |
A |
|
|
1:00 p.m. |
MEAL |
1 hours, 5 minutes |
Y |
|
|
2:05 p.m. |
IN |
2 hours, 55 minutes |
B |
|
|
5:00 p.m. |
OUT |
Total all like segments first, then round:
|
Project/Dept. |
Totalled Time by Task |
|---|---|
|
Project A |
4 hours, 30 minutes |
|
Project B |
2 hours, 55 minutes |
|
Department Y |
1 hour, 25 minutes |
|
Payable Time Results |
||
|---|---|---|
|
REG |
3 hours |
Project B |
|
REG |
4.5 hours |
Project A |
|
REG |
1.5 hours |
Department Y |
On the Workgroup - Definition page, access the Workgroup Defaults group box.
Field or Control |
Description |
|---|---|
Holiday Schedule |
Select a Holiday Schedule from the drop-down list box. Time and Labor determines the holiday schedule by checking for the time reporter's Job record first. If no holiday schedule is listed on the Job record, the system checks this field at the workgroup level. If you change the holiday schedule associated with a workgroup, the Referential Integrity process will trigger Time Administration to process any time affected by the change in holiday schedule. |
Compensatory Time Off Plan |
If your organization tracks compensatory time, and you would like to associate time reporters with compensatory time plans at the workgroup level, select a Compensatory Time Off Plan from the drop-down list box. Compensatory time-off plans are associated with TRC programs, just like workgroups. The TRCs attached to your compensatory time off plan must be part of the TRC program associated with this workgroup, so that compensatory time is processed correctly. If the Default from the Workgroup field on the TL Installation Options page is selected, any Compensatory Time Off Plan entered here will be associated to all time reporters as of the date they are associated with the workgroup. If the default from the Workgroup field on the TL Installation Options page is not selected, any entry in this field is not considered for batch or online compensatory time validation. If you change the compensatory time-off plan on your workgroup, and the Default from Workgroup field on the TL Installation Options page is selected, the Referential Integrity process will trigger Time Administration to reprocess any compensatory time from the point of the effective date of the plan change. Time reporters' compensatory time balances may change as a result. In addition, the Comp Plan Enrollment page will be updated automatically with the plan change for the time reporters in this workgroup. |
Time Period ID |
Select from the drop-down list box. From a time reporting perspective, the system uses the time period on the Workgroup page to differentiate between time belonging to the current period and time that falls within a prior period. The only day-type periods you can enter in this field are periods with an offset of 1. |
Schedule Group |
Select a Schedule Group value. This value will filter the Schedule IDs available per SetID. This field is a required field if Schedule ID is selected. |
Schedule ID |
Select from the drop-down list. The system uses the value you designate here as the default schedule assignment for all time reporters in this workgroup. If you are creating an "Exception" type workgroup, you must select a value in this field or the system cannot create payable time. If you are creating a "Positive" type workgroup, this field is optional. All time reporters in this group do not have to use the default schedule assignment. You can assign other schedules to each time reporter on the Assign Schedules page. This default is only for convenience. You can assign the same Schedule ID to several workgroups. If your time reporter is using the workgroup default Schedule ID and the Schedule ID is changed on the workgroup, the system deletes any Workday Overrides for that time reporter that are of a different type than the schedule assignment (such as Elapsed versus Punch), and have a date greater than or equal to the new schedule assignment. Changes to the workgroup Schedule ID will also trigger the Referential Integrity process. This means that any reported or payable time with a date greater than or equal to the date of the new assignment will be reevaluated by Time Administration. This is to allow for any corrections that may be needed if payable time was created from schedules or rules were run against schedules. |
Timesheet Totals |
This totalling option is used to determine total reported hours on the punch Timesheet. Select a totalling option for the workgroup default. Valid values are Exclude Meals and Breaks, Include Breaks, Include Breaks and Meals, or Include Meals. |
Rotation ID |
This field is displayed if the Schedule ID chosen is a Rotating Schedule ID. |
Show Schedule Hours and Deviation |
If this field is selected, additional fields appear on the Timesheet page. In the Timesheet grid, the Schedule Hours field appears. In the Reported Time Summary grid, the Total Scheduled Hours and Schedule Deviation fields appear. |
Create Partial Work Hours for Partial Absence |
This check box affects generated or forecasted time differently depending on the method you use to generate time. When selected:
The reported time source code (RT_SOURCE) is set to SCH for all time that is created based on scheduled hours. Note: The default setting for the Create Partial Work Hours check box is cleared. The default setting forces the system to use full day absence logic when generating time, provided that the Regenerate Reported Time for Absence Entry check box is selected on the TL Installation page. If the Create Partial Hours check box is selected and the Regenerate Reported Time for Absence Entry check box on the TL Installation page is not selected, there is no impact on reported time. |
Exclude Holiday for Generating Time |
This check box affects generated or forecasted time differently depending on the method you use to generate time. The default setting for this option is cleared. With the default setting:
The opposite occurs when the Exclude Holiday for Generating Time check box is selected: The system will not generate time on scheduled holidays or include holidays when forecasting time. The reported time source code (RT_SOURCE) is set to SCH for all time that is generated based on scheduled holidays. |
On the Workgroup - Definition page, access the Day Breaker Options group box.
In Time and Labor we refer to the point where one day crosses over to the next as the "day breaker." Although the day breaker is usually midnight—the moment when one calendar day becomes the next—you can set the day breaker to a different time to create virtual days that more closely mirror actual shifts worked by your time reporters. The system will then use the day breaker to determine the exact date under report (DUR) of each punch or collection of punches that comprise the shift. Based on the Day Breaker and what we refer to as the Day Breaker Options, you can:
Assign all the time in a shift to a date based on when the first punch was logged.
Assign the time to a date based on when the last punch was logged.
Assign the time based on when the majority of the time in a shift was worked.
Split the time between different dates on either side of the day breaker.
Note: Although the normal day breaker is midnight, the optimum day breaker for your company depends on your company's work hours. We recommend you choose a time when there are no shifts or time reporters scheduled to work so that you won't have to split time on either side of the day breaker. For example, if your company has two shifts, a morning and an evening shift with hours from 08:00-17:00 and 18:00-02:00 consecutively, you may want to choose 04:00 as your day breaker.
Controlling the Date Under Report (DUR) of Reported Time
In Time and Labor, use the Day Breaker to define a "Day Breaker Range" (a virtual 24 hour day), and then choose a Day Breaker Option to control the DUR (date under report) assigned to reported time.
Consider the following example:
If the day breaker is 12 midnight, the virtual Day Breaker Range is a 24 hour period from 12:00:00 a.m. to 11:59:99 p.m. of a given calendar day.
To define the DUR Assigned to Reported Time:
Select a Day Breaker to Define a Day Breaker Range
In Time and Labor, each punch in a shift is associated with a virtual 24 hour time reporting period called the Day Breaker Range. This period begins with (includes) the Day Breaker at the beginning of the period and ends with the following Day Breaker (it does not include the next day breaker). Although you can create Day Breaker Ranges that coincide with actual calendar days (days that begin at 12:00 midnight and continue for 24 hours), the Day Breaker Range can begin whenever you want it to (because it represents a "virtual" 24 hour day rather than an actual calendar day).
Once you have defined your Day Breaker Range, you will assign punches to this range in Step 2 (below).
Select a Day Breaker Option to Assign Punches to a Day Breaker Range
To assign punches to one of the "ranges" you defined in Step 1, you must specify a Day Breaker Option.
Your options are as follows:
Field or Control
Description
Begin Time of Shift
Select this option if you want the system to assign all the punches in a shift to the Day Breaker Range in which the shift began.
End Time of Shift
Select this option if you want the system to assign all the punches in a shift to the Day Breaker Range in which the shift ended.
Majority of Shift
Select this option if you want the system to assign all the punches in a shift to the Day Breaker Range in which the majority of the shift was worked.
Split by Day Breaker
Select this option if you want the system to split the shift between two Day Breaker Ranges on either side of the Day Breaker itself.
Move the DUR for the Punches Assigned to a Day Breaker Range Backwards or Forward.
For any punch (or collection of punches) assigned to a Day Breaker Range in Step 2, you can move the date under report (DUR) in two directions: towards the Range Start Day or towards the Range End Day.
Field or Control
Description
Range Start Day
Select this option if you want to assign punches within a Day Breaker Range to the calendar (or actual) day intersected by the start of the range.
Range End Day
Select this option if you want to assign punches within a Day Breaker Range to the calendar (or actual) day intersected by the end of the range.
Establishing a DUR Example
The following example illustrates how to use the Day Breaker and Day Breaker Options to define the date under report (DUR) of your employee's punch time. Assume the following:
We've set the Day Breaker to 4:00 AM.
We've chosen to assign all the punches in a shift to the Day Breaker Range on which the first punch was logged and our Day Breaker option is Begin Time of Shift.
Our Day Breaker Range is Range End Day.
Our shift begins at 9:00 PM on June 3 and ends at 6:00 AM on June 4. The shift therefore crosses the Day Breaker.
This scenario can be represented as follows:
This image illustrates the parameters of the example for establishing a DUR.
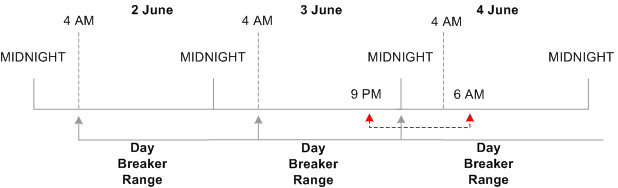
Because the first punch occurs at 9 PM on June 3, the system includes the entire shift within the Day Breaker Range in which the first punch falls—the range that begins at 4:00 AM June 3 and ends at 3:59 AM on June 4. However, the system will set the DUR for the shift as a whole to June 4. The reason for this is that the Day Breaker Range is Range End Day, and the day (the actual calendar day) intersected by end of the range is June 4.
Note: If we had set the Day Breaker Range to Range Day Start in this example, the DUR would be June 3, because the start of the range falls on the 3rd of June.
Note: If you change your Day Breaker or Day Breaker Options, the Referential Integrity process will trigger Time Administration to reprocess any affected payable time from the effective-dated change forward. Affected instances of time must be rerun through Time Administration to recreate payable time.
Example 1
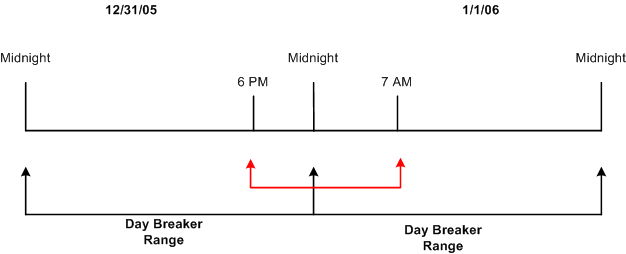
In this example, assume that a time reporter reports time that crosses the day breaker, which is set to 12 midnight.
The time reporter enters the following punches:
Punch IN: 18:00, December 31, 2005
Punch OUT: 07:00, January 1, 2006
Using this data, the following diagram shows the dates and day breaker ranges:
This image illustrates the dates and day breaker ranges for Example 1.
The results of applying different day-breaker options to the reported time are illustrated below:
|
Day Breaker Option |
Day Breaker Range |
Resulting DUR |
|---|---|---|
|
Begin Time of Shift |
Range Start of Day |
December 31, 2005 |
|
End Time of Shift |
Range Start of Day |
January 1, 2006 |
|
Majority of Shift |
Range Start of Day |
January 1, 2006 |
|
Split by Daybreaker |
Range Start of Day |
6 hours fall on December 31, 2005 and 7 hours fall on January 1, 2006. |
|
Begin Time of Shift |
Range End of Day |
December 31, 2005 |
|
End Time of Shift |
Range End of Day |
January 1, 2006 |
|
Majority of Shift |
Range End of Day |
January 1, 2006 |
|
Split by Day breaker |
Range End of Day |
6 hours fall on December 31, 2005 and 7 hours fall on January 1, 2006. |
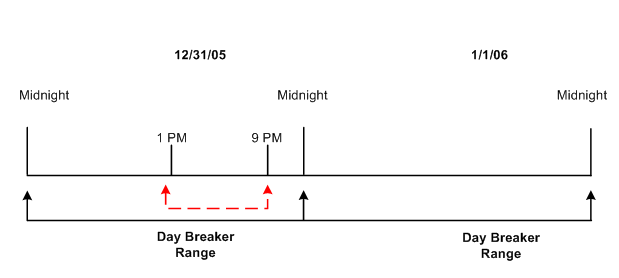
Example 2
In this example, assume that the time reporter's time does not cross the day breaker. The day breaker is set to midnight.
The time reporter enters the following punches:
Punch IN: 13:00, 31 December 2005
Punch OUT: 21:00, 31 December 2005
The following diagram shows the dates and day breaker ranges, based on the data above:
This image illustrates the dates and day breaker ranges for Example 2.
The results of applying different daybreaker options to the reported time are illustrated below:
|
Day Breaker Option |
Day Breaker Range |
Resulting DUR |
|---|---|---|
|
Begin Time of Shift |
Range Start of Day |
Because the begin time of the shift (1:00 p.m.) is on December 31, 2005 and the Range Start of Day falls on the day of December 31, 2005, the resulting DUR is December 31, 2005. |
|
End Time of Shift |
Range Start of Day |
Because the end time of the shift (9:00 p.m.) is on December 31, 2005 and the Range Start of Day falls on the day of December 31, 2005, the resulting DUR is December 31, 2005. |
|
Majority of Shift |
Range Start of Day |
December 31, 2005 |
|
Split by Daybreaker |
Range Start of Day |
December 31, 2005 |
|
Begin Time of Shift |
Range End of Day |
Since the begin time of shift (1:00 p.m.) is on December 31, 2005 and the Range End of Day falls on the day of December 31, 2005, the resulting DUR is December 31, 2005. |
|
End Time of Shift |
Range End of Day |
Since the end time of the shift (9:00 p.m.) is on December 31, 2005 and the Range End of Day falls on the day of December 31, 2005, the resulting DUR is December 31, 2005. |
|
Majority of Shift |
Range End of Day |
December 31, 2005 |
|
Split by Daybreaker |
Range End of Day |
December 31, 2005 |
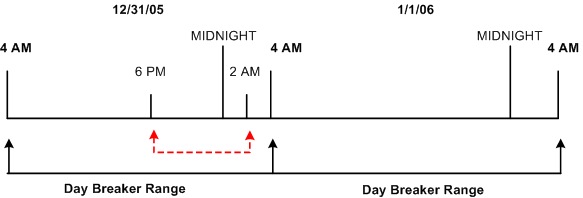
Example 3
In this example, assume that the time reporter's time does not cross the day breaker. The day breaker is set to 04:00.
The time reporter enters the following punches:
Punch IN: 18:00, 31 December 2005
Punch OUT: 02:00, 1 January 2006
The following diagram shows the dates and day breaker ranges, based on the data above:
This image illustrates the dates and day breaker ranges for Example 3.
The results of applying different daybreaker options to the reported time are illustrated below:
|
Day Breaker Option |
Day Breaker Range |
Resulting DUR |
|---|---|---|
|
Begin Time of Shift |
Range Start of Day |
December 31, 2005 |
|
End Time of Shift |
Range End of Day |
December 31, 2005 |
|
Majority of Shift |
Range Start of Day |
December 31, 2005 |
|
Split by Daybreaker |
Range Start of Day |
December 31, 2005 |
|
Begin Time of Shift |
Range End of Day |
January 1, 2006 |
|
End Time of Shift |
Range End of Day |
January 1, 2006 |
|
Majority of Shift |
Range End of Day |
January 1, 2006 |
|
Split by Daybreaker |
Range End of Day |
January 1, 2006 |
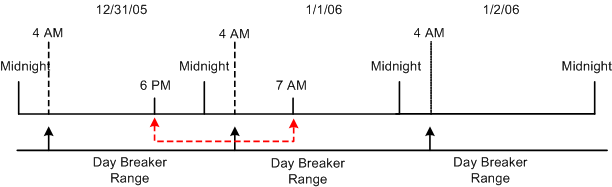
Example 4
In this example, assume that the time reporter reports time that crosses the day breaker, which is set to 4 AM.
The time reporter enters the following punches:
Punch IN: 18:00, December 31, 2005
Punch OUT: 07:00, January 1, 2006
The diagram below shows the dates and day breaker ranges based on the data above.
This image illustrates the dates and day breaker ranges for Example 4.
The results of applying different daybreaker options to the reported time are illustrated below:
|
Day Breaker Option |
Day Breaker Range |
Resulting DUR |
|---|---|---|
|
Begin Time of Shift |
Range Start of Day |
Because the begin time of the shift (6:00 p.m.) is on December 31, 2005 and the Range Start of Day falls on the day of December 31, 2005, the resulting DUR is December 31, 2005.. |
|
End Time of Shift |
Range Start of Day |
Because the end time of the shift (7:00 a.m.) is on January 1, 2006 and the Range Start of Day falls on the day of January 1, 2006, the resulting DUR is January 1, 2006. |
|
Majority of Shift |
Range Start of Day |
December 31, 2005 |
|
Split by Daybreaker |
Range Start of Day |
10 hours fall on December 31, 2005 and 3 hours fall on January 1, 2006. |
|
Begin Time of Shift |
Range End of Day |
Because the begin time of the shift (6:00 p.m.) is on December 31, 2005 and the Range End of Day falls on the day of January 1, 2006, the resulting DUR is on January 1, 2006. |
|
End Time of Shift |
Range Start of Day |
Because the end time of the shift (7:00 a.m.) is on January 1, 2006 and the Range Start of Day falls on the day of January 2, 2006, the resulting DUR is January 2, 2006. |
|
Majority of Shift |
Range End of Day |
January 1, 2006 |
|
Split by Daybreaker |
Range End of Day |
10 hours fall on January 1, 2006 and 3 hours fall on January 2, 2006. |