Integrating User Interfaces with the Rules Engine
In addition to the system-delivered interfaces with the Rules Engine (Rules Engine Tester, Rules Engine Batch Processing, and selected user interfaces in Program Enrollment, Activity Management, Research Tracking, and Evaluation Management System), you can create custom integrations to the Rules Engine for user interfaces throughout Campus Solutions.
In this topic, we are illustrating the creation of a custom interface to the Rules Engine to meet the following business requirement:
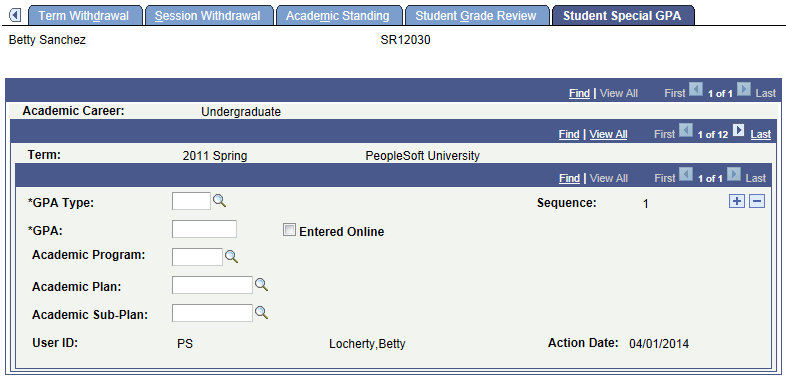
Provide a button on component Records and Enrollment > Student Term Information > Term History > Student Special GPA that calculates a Special Grade Point Average based on courses from a student’s major and displays the result on the page.
The steps to meet this requirement are:
Build and test a Functional Rule.
Generate a Trigger to call the Functional Rule.
Generate boilerplate code.
Attach the generated code to the component event.
The first step is to build and the test a Functional Rule to integrate with Student Special GPA page; in this example, a Rule that calculates a Special Grade Point Average based on a student’s Academic Program, Academic Plan, or Academic Sub-Plan. Using the functional business requirement as a starting point, start by looking at how to retrieve the needed data.
Data and Entity Considerations
To determine how to retrieve the data, decide which role to use to build the Rule: Functional Expert Role or Developer Role. This example uses the Functional Expert Role instead of the Developer Role to create an Expert Rule. This assumes that Functional Experts want to create similar grade point average calculation Rules at a later stage and/or adjust the business logic for the created Rule over time. Rules created by a Developer Role are created in Application Package PeopleCode by developers. So, while Functional Experts are able to use such Rules, they have no means to adjust their business logic. By creating an Expert Rule, Functional Experts are able to clone or adjust the Rule.
Since this is an Expert Rule, an Entity is required to be in place for this data. For this example, system-delivered Entities are used, but new Entities can be created if needed. For information on creating Entities, see Creating a New Entity.
In this example, the Student Grade Inquiry page (Records and Enrollment > Student Term Information > Student Grades) is based on the record view CLASS_TBL_SE_VW, which contains all the information needed for this Rule. Since record tables are not being updated with this Rule, a record view is suitable.
This example illustrates the Student Special GPA page before a custom integration with the Rules Engine.
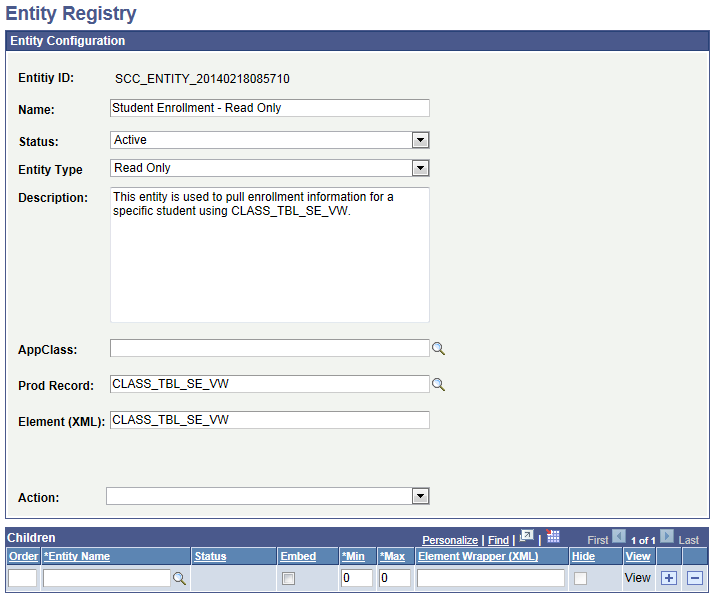
Navigate to the Entity Registry () to find that there is an existing matching Entity, Student Enrollment – Read Only, for record view CLASS_TBL_SE_VW. For this Entity, Entity Type is set to Read Only for Prod Record CLASS_TBL_SE_VW. The Read Only Entity Type does not allow an update or save to be executed by the Rules Engine. The Entity Status is set to Active. No AppClass (application class) is needed for Read Only Entities. The AppClass is reserved for Application Class PeopleCode which controls the save Validation logic for the Entity. Use the Action drop down and select View Hierarchy to view the Entity structure and its properties.
This example illustrates the Entity Registry page for the Student Enrollment – Read Only Entity.
Although this Rule is not updating CLASS_TB_SE_VW, it does access and update the calculated Special GPA. The production record for Special GPA is STDNT_SPCL_GPA.
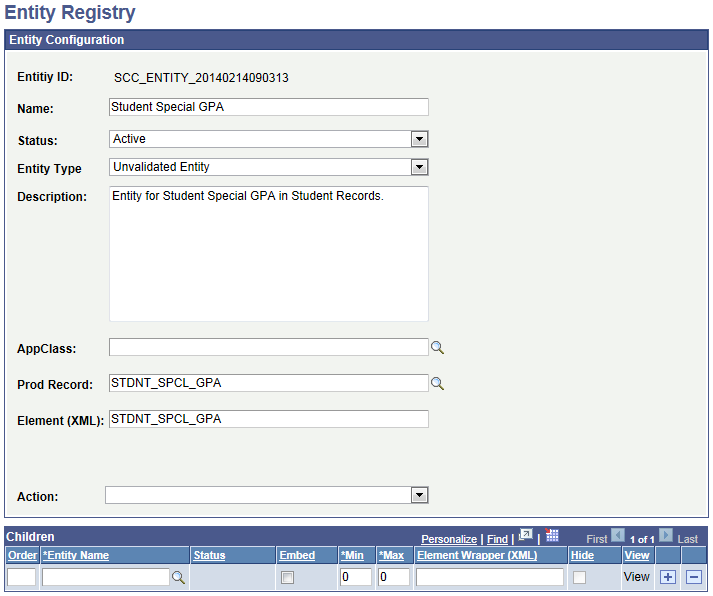
Navigate to the Entity Registry ( ) to find that there is an existing matching Entity, Student Special GPA, for production record STDNT_SPCL_GPA. For this Entity, Entity Type is set to Unvalidated Entity for Prod Record STDNT_SPCL_GPA. The Unvalidated Entity Type allows data to be inserted and updated with no validation. The Entity Status is set to Active. No AppClass (application class) is needed for Unvalidated Entities. The AppClass is reserved for Application Class PeopleCode which controls the save Validation logic for the Entity. Use the Action drop down and select View Hierarchy to view the Entity structure and its properties.
This example illustrates the Entity Registry page for the Student Special GPA Entity.
If you want to limit access to only certain properties of any Entity that you are using, you can do so by creating an Entity View. Do this by selecting Entity View from the Action drop down on the Entity Registry page.
This example illustrates the Entity View Editing page for the Student Enrollment Partial View of the Student Enrollment – Read Only Entity.
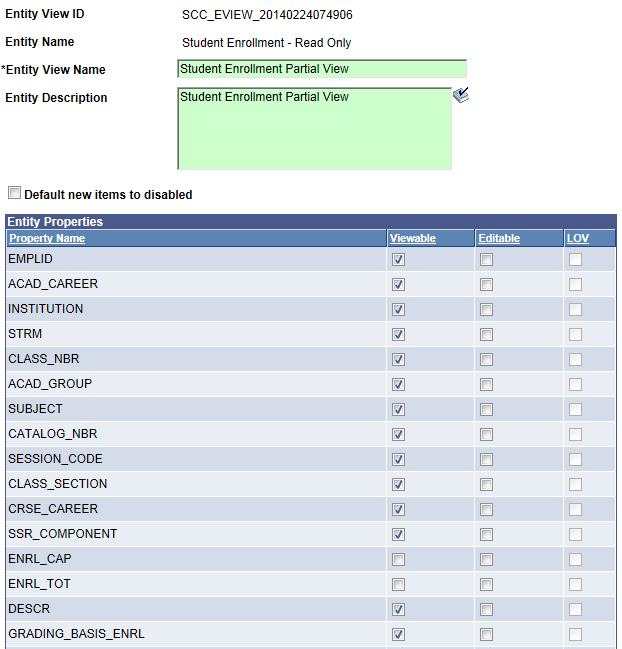
Provide the Entity View with a name and deselect the property options as required:
Viewable – The property can be viewed by not changed.
Editable – The property is changed when saved.
Note: When a new Entity is created from a production record and saved, the Entity Registry is automatically updated. The record fields become available as Entity Properties and existing Yes/No, translate value, and prompt table validations on the RECORD.FIELD definition are made available for prompting without specifically defining a LOV. .
Providing Entity Security Access
Before an Entity can be used in the Rules Engine, you must create the appropriate security setup. This is done using the Entity Profile and Define Rule Category setups.
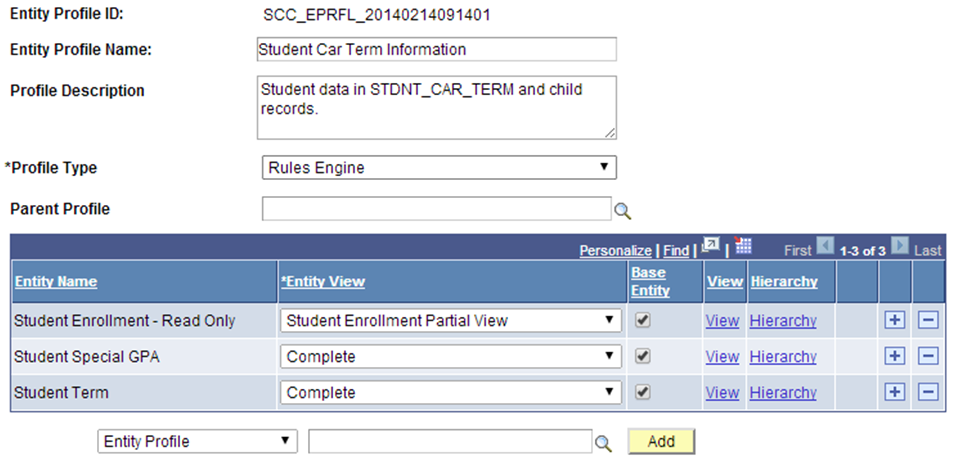
The Entity Profile controls how the Entity can be accessed by selection of a Profile Type. In this example, Rules Engine. The Entity Profile also controls whether the Rule is allowed to use the Entity Structure as a starting point for data access in the Rule. This is controlled by the selecting Base Entity for each Entity Name in the Entity Profile to which you want to have access.
This example illustrates the Entity Profile page for Student Car Term Information for the Rules Engine User Interface Example.
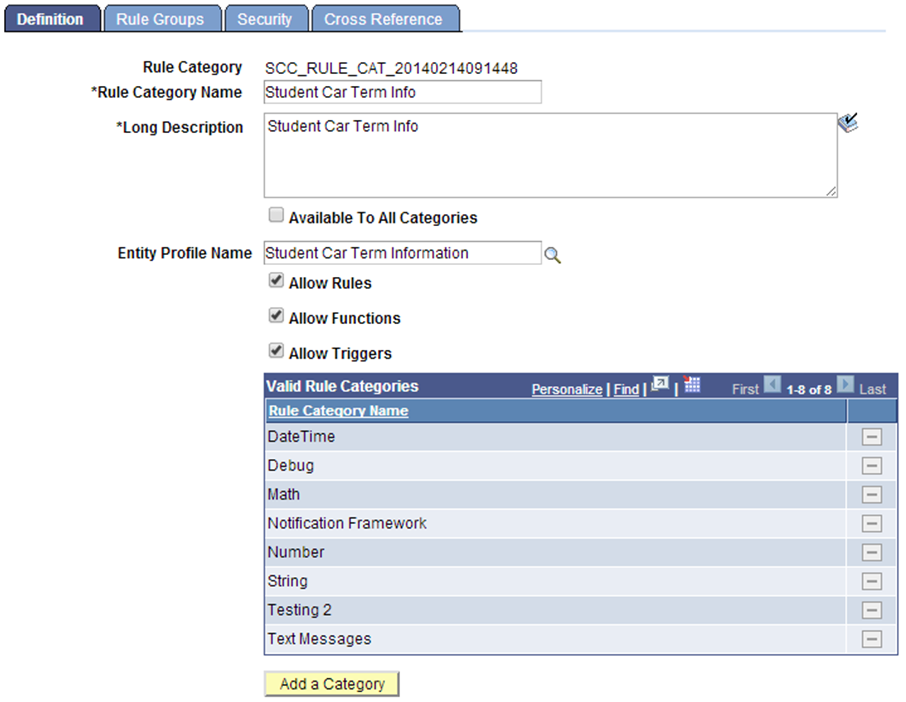
The next part of Entity Security is setup using Rule Category Definition. Here, you can:
Create a Category in which to create the Functional Rule. In this example, we want all Student Car Term related Rules created in one Rule Category.
Grant access to the Entity Profile Student Car Term Information.
Control access to types of Rules. we want to create Functions, Rules and Triggers.
Control which from Valid Rule Categories business logic can be accessed. We are creating a Rule that uses business logic from other Rule Categories; for example, to perform calculations (category Math) .
Control who can create Rules for Student Car Term Information; this may be one or more specified users or all users in associated Role.
This example illustrates the Define Categories page for Rules Engine User Interface Integration Example.
Build and Test the Functional Rule
With Entity security in place, t the Functional Rule to calculate the Special GPA for our business case can be created and tested.
Access the Define Rule page ().
This example illustrates the Define Rule page for Functional Rule for Rules Engine User Interface Example
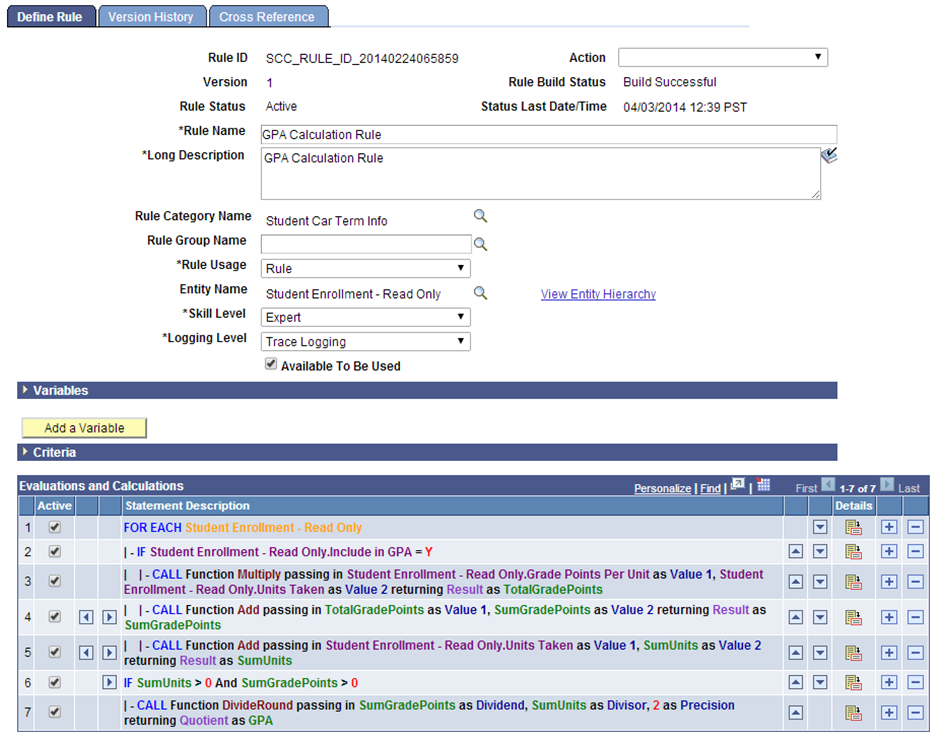
This Functional Rule uses the Student Enrollment – Read Only Entity, created from production record CLASS_TBL_SE_VW. Assumed is the selection of data using the following Criteria:
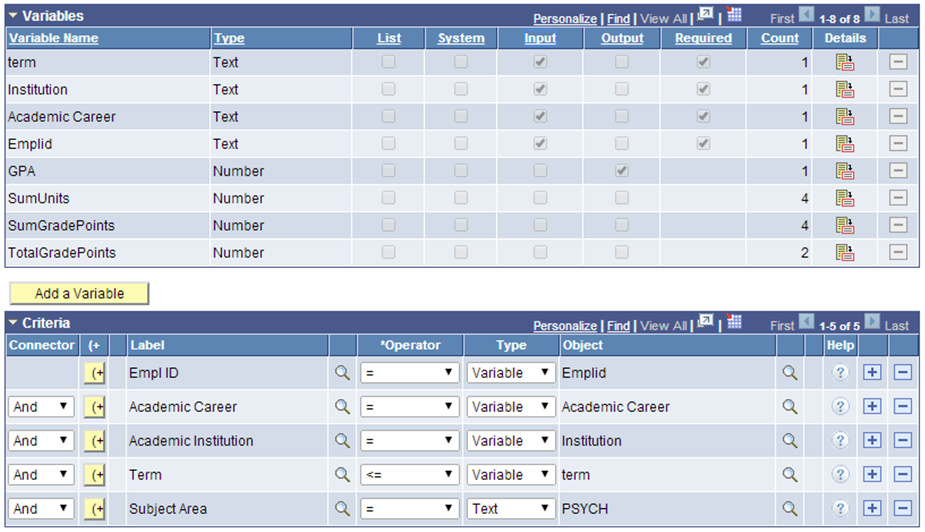
EmplID
Academic Career
Institution
Term
Subject
Using these Criteria, the Rule returns all Psychology class results for the specified Student ID, Academic Career, Institution and those Academic Terms which are less than or equal to the specified Term. The Criteria need to be passed into this Rule. The needed Values are obtained from Variables designated as required input:
This example illustrates the Variables and Criteria for Define Rule Page for Functional Rule for Rules Engine User Interface Example.
Test the Rule (select Test Rule from the Action drop down on the Define Rule page) to ensure it is producing the desired results before proceeding with the next step of generating a Trigger to call the Rule.
Note: This example describes the creation of a Functional Rule and a separate Trigger Rule. However, the separation of business logic and user interface integration, although beneficial, is not strictly necessary. You may create one Rule that performs both functions.
The Trigger is the connection between the user interface and the Functional Rule. The Trigger calls the Functional Rule and passes the information from the user interface to the Functional Rule. Using a Trigger Rule allows you to separate the functional business logic (in this case the GPA calculation) from the logic which dictates when and how that Functional Rule is called. Over time, the Functional Rule may change due to changes in the business case whereas the Trigger Rule controls the interaction with the user interface and the how and when of calling the Functional Rule.
In this example, the Trigger must pass the specified input values (EmplID, Academic Career, Institution, Term, and Subject area) from the user interface to the Functional Rule to successfully select Grade Points and Units from the Student Enrollment Entity and calculate the GPA. A Component Event using PeopleCode (in this example, clicking a button) calls the Trigger which then calls the Functional Rule. This is discussed further in Generate Boilerplate Code.
There are two approaches to creating a Trigger in this example:
Method A: Pass the needed Variables to the Functional Rule by retrieving and passing the Entity to the Rule.
Considerations for Using Method A
The Rule Usage is Function or Trigger and has a Base Entity. A Function or Trigger does not have criteria. This means that for this Function to work with the Base Entity attached, it needs Entity information obtained by the calling Rule or the Component Event PeopleCode which calls the Trigger or Function.
There is a need to act upon multiple sections of a flexible Entity Structure (for example Entities for Program Enrollment) or Entity Tree.
You do not want to lock-down the Input Variables for the Trigger or Function as the data needed may change over time.
The execution of the Rule depends on the data in the component, which may not be the same as the data saved in the database. Any changes in the Rule update the component from which the data is retrieved and does not save the data to the database directly.
Method B: Pass the needed Variables to the Functional Rule using Variables taking their values from the user interface.
Considerations for Using Method B
The Rule Usage is Trigger so the component needs to pass input Variables to a called Rule.
The Trigger Rule should not have a base entity defined.
The Input Variables are not expected to change over time.
Any data needed by the rules and not passed in using input Variables must be retrieved in a rule called from the trigger rule as the base entity defined by the criteria of a rule.
If the Rule changes values in the component, the data must be returned to the component as output Variables.
Creating a Trigger Using Method A: Passing an Entity using an Entity
In Method A, the Trigger is defined to work with the Student Special GPA Entity as a Base Entity. The production record for this Base Entity, STDNT_SPCL_GPA, is available on the user interface from which the Trigger is called. The needed information from the Entity can be passed directly to the Trigger. Although the Trigger has no Criteria, the correct Entity is provided to the Trigger.
This example illustrates the Define Rule page for Creating Method A Trigger for Rules Engine User Interface Integration Example.
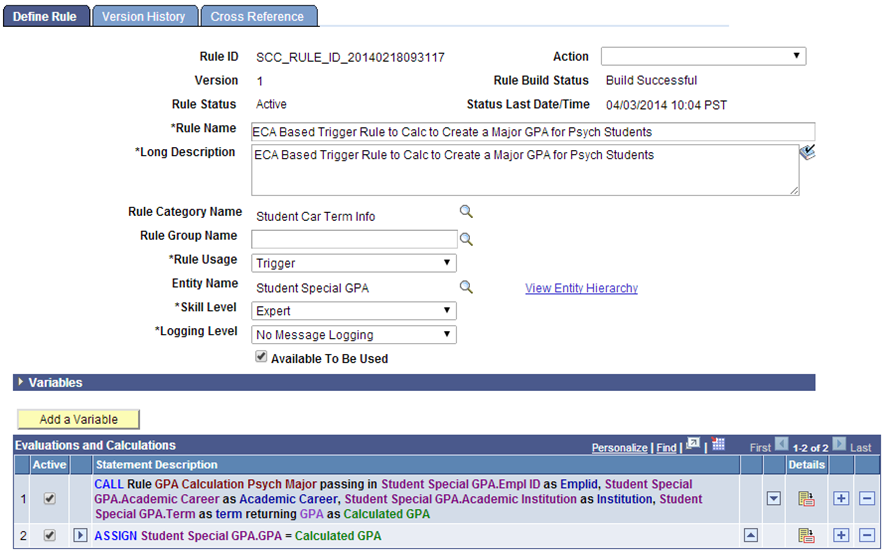
This Trigger updates the Student Special GPA Entity with the calculated GPA. This update is displayed on the Special GPA page. This is the Define Call Statement to the GPA Calculation Rule:
This example illustrates the Define Call Statement page for Creating Method A Trigger for Rules Engine User Interface Integration Example
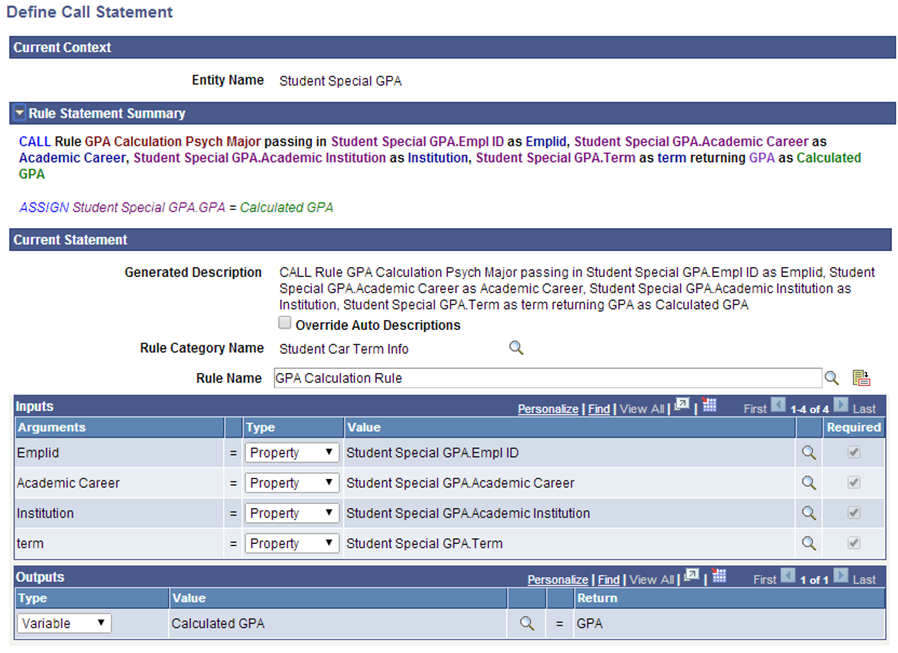
From the call to the Functional GPA rule, it is apparent that the input values needed are passed in using Entity Properties from Student Special GPA Entity.
Creating a Trigger Using Method B: Passing Parameters
In Method B, the Trigger is defined to receive all input values as Variables from the user interface. There is no Base Entity as it is not needed to provide the called GPA Functional Rule with the values it needs.
This example illustrates the Define Rule page for Creating Method B Trigger for Rules Engine User Interface Integration Example

The calculated GPA is passed into a GPA output Variable. The calling PeopleCode event takes this value and updates the GPA on the Special GPA page. This is the Define Call Statement to the GPA Calculation Rule:
This example illustrates the Define Call Statement page for Creating Method B Trigger for Rules Engine User Interface Integration Example.

With a Trigger created, the boilerplate code can be generated and connected it to a Component Event. In this example, the code calls the Rule to calculate the GPA by clicking a button on the Student Special GPA page. The example shows two new buttons added: ECA Calc, representing the Method A approach to the Trigger, and Parm Calc, representing the Method B approach to the Trigger. You would likely only use one approach in the customization of your system and would, therefore, only have one button.
This example illustrates the Student Special GPA page after Customization for Rule Engine User Interface Example.
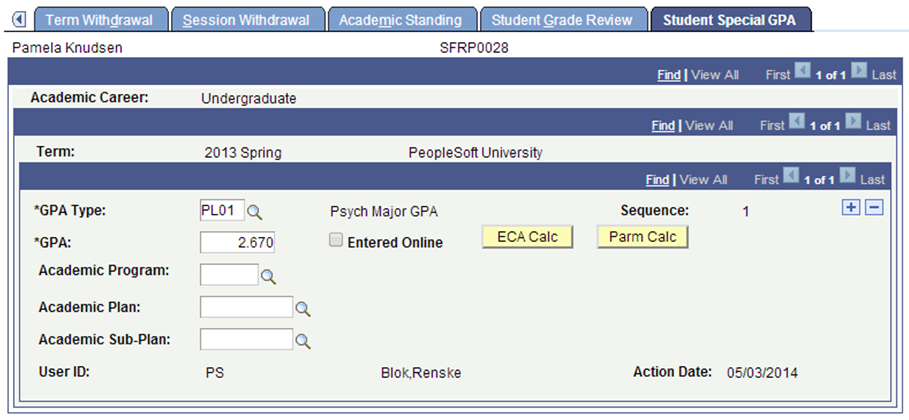
The act of clicking a button is the FieldChange Event to which the PeopleCode should be added to call the Trigger.
Use the Define Rule Triggers page (Set up SACR > System Administration > Rules Engine > Setup > Define Rule Triggers) to generate boilerplate code and attach that code to the Component Event. The setup created here also acts as an administrative reference to Events and associated Rules. You must minimally specify a PeopleCode Event, a Record, and a Field. The following PeopleCode Events can be selected:
FieldChange
FieldEdit
SavePostChange
SavePreChange
You may also add a Component for reference. Once you have the setup, click the Generate Code button to generate the boilerplate PeopleCode. The Generate Code option uses information from the Trigger to create a Code example which can be used to call the Trigger from the Component.
Generating Code for the ECA Calc
This example shows a Trigger based on Method A, which contains an Entity and assumes that an Entity is passed to the Trigger. The calculated GPA is updated directly on the Entity.
Access the Define Rule Triggers page ().
This example illustrates the Define Rule Triggers page for Parm Calc for Rules Engine User Interface Integration Example.
Here is the example generated code:
* ---------------------  About This Example Code  -------------------------- */
/* The following Example Code has been created as a starting point from       */
/* which to create Rule –UI Integration.  In the code you will find that the  */
/* rule refers to the Trigger Rule provided on the component as well as its   */
/* Arguments.  The code below will need to be adjusted before it can be used  */
/* to call the (Trigger) Rule.  For more information please refer to the      */
/* PeopleBooks documentation available for Rules Engine Functionality.        */
/*                                                                            */
/* ----------------  Understanding this Example Code  ----------------------- */
/* There are two ways to bring information from a Page or Component into a    */
/* Rule:                                                                      */
/*                                                                            */
/* Method 1: Providing Arguments from Rowset                                  */
/* Provide Local Strings with Values obtained from the appropriate Component  */
/* Rowset.  This method may be appropriate when calling a Rule or Function    */
/* without an Entity which requires a set of input Arguments (Variables) or   */
/* for a Rule with a Base Entity which requires a set of parameters which can */
/* be easily obtained and passed into the Rule.                               */
/*                                                                            */
/* Method 2: Providing Entity using EntityComponentAdapter                    */
/* Use the Entity Component Adapter to obtain Entity values from the          */
/* Component.  This method should be used when calling a Function with a Base */
/* Entity which needs to work with that Entity information from the UI.       */
/* -------------------------------------------------------------------------- */

import SCC_RULES_ENGINE:Util:RuleFactory;
import SCC_RULES_ENGINE:Util:RuleInterface;
import SCC_COMMON:ENTITY:COMPONENT:EntityComponentAdapterAbstract;
import SCC_COMMON:ENTITY:IEntity;

Local RuleFactory &sccRuleFactory = create RuleFactory();
Local RuleInterface &SCC_RTRIG_20140218092909= &sccRuleFactory.getRule("SCC_RULE_ID_20140218093117", true);

Local EntityComponentAdapterAbstract  &objECA;
Local array of SCC_COMMON:ENTITY:IEntity &arrIEntity;
Local SCC_COMMON:ENTITY:IEntity &objIEntity;
Local row &row;
Local number &i;

/* Make sure you are using the proper Entity Component Adapter implementation for your Component */
/* Remove the comment markers below to implement the ECA */

/* &objECA=CreateObject("SCC_COMMON:ENTITY:COMPONENT:ECAErrorGrid"); */

/*  If the current row is not the row where the entity exists, replace logic below to get the correct row in the component */

&row = getrow();

/* Bind the row of data in the comonent to an entity */
/* Be sure to correctly bind the component to the entities used by the rule */

/* &arrIEntity = CreateArrayRept(&objIEntity, 0); */
/* &arrIEntity.Push(&objECA.BindToUIFromRowWithEntityID(&row, "SCC_ENTITY_20140214090313")); */
/* &SCC_RTRIG_20140218092909.Context = &arrIEntity; */


/* Execute the Rule */

&SCC_RTRIG_20140218092909.Invoke();
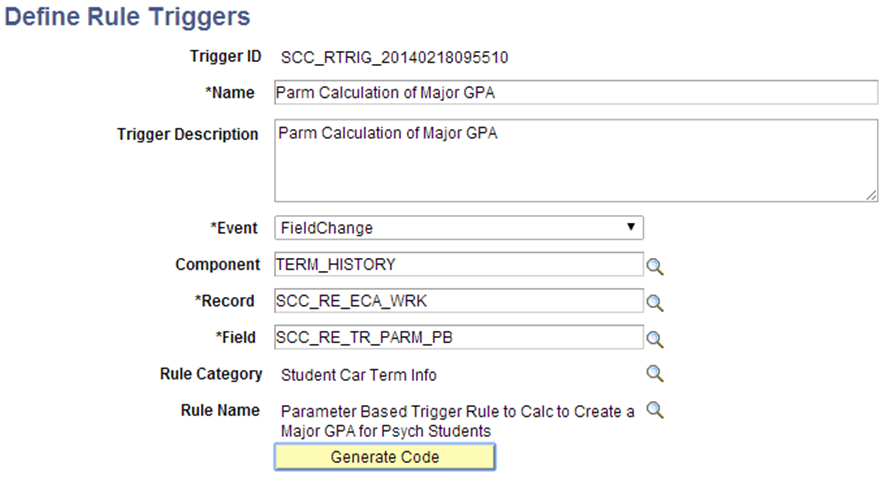
Generate Code for the Parm Calc
This example shows a Trigger based on Method B, which only contains Input Variables. The calculated GPA is passed back to the Component Event which takes care of updating the GPA value.
Access the Define Rule Triggers page ().
This example illustrates the Define Rule Triggers page for Parm Calc for Rules Engine User Interface Integration Example.
Here is the example generated code:
/* ---------------------  About This Example Code  -------------------------- */
/* The following Example Code has been created as a starting point from       */
/* which to create Rule –UI Integration.  In the code you will find that the  */
/* rule refers to the Trigger Rule provided on the component as well as its   */
/* Arguments.  The code below will need to be adjusted before it can be used  */
/* to call the (Trigger) Rule.  For more information please refer to the      */
/* PeopleBooks documentation available for Rules Engine Functionality.        */
/*                                                                            */
/* ----------------  Understanding this Example Code  ----------------------- */
/* There are two ways to bring information from a Page or Component into a    */
/* Rule:                                                                      */
/*                                                                            */
/* Method 1: Providing Arguments from Rowset                                  */
/* Provide Local Strings with Values obtained from the appropriate Component  */
/* Rowset.  This method may be appropriate when calling a Rule or Function    */
/* without an Entity which requires a set of input Arguments (Variables) or   */
/* for a Rule with a Base Entity which requires a set of parameters which can */
/* be easily obtained and passed into the Rule.                               */
/*                                                                            */
/* Method 2: Providing Entity using EntityComponentAdapter                    */
/* Use the Entity Component Adapter to obtain Entity values from the          */
/* Component.  This method should be used when calling a Function with a Base */
/* Entity which needs to work with that Entity information from the UI.       */
/* -------------------------------------------------------------------------- */

import SCC_RULES_ENGINE:Util:RuleFactory;
import SCC_RULES_ENGINE:Util:RuleInterface;
import SCC_COMMON:ENTITY:COMPONENT:EntityComponentAdapterAbstract;
import SCC_COMMON:ENTITY:IEntity;

Local RuleFactory &sccRuleFactory = create RuleFactory();
Local RuleInterface &SCC_RTRIG_20140218095510= &sccRuleFactory.getRule("SCC_RULE_ID_20140218095142", true);

Local EntityComponentAdapterAbstract  &objECA;
Local array of SCC_COMMON:ENTITY:IEntity &arrIEntity;
Local SCC_COMMON:ENTITY:IEntity &objIEntity;
Local row &row;
Local number &i;

/* Make sure you are using the proper Entity Component Adapter implementation for your Component */
/* Remove the comment markers below to implement the ECA */

/* &objECA=CreateObject("SCC_COMMON:ENTITY:COMPONENT:ECAErrorGrid"); */

/* Input Variable Declaration */

Local String &Emplid;
Local String &Institution;
Local String &Career;
Local String &Term;
/* Output Variable Declaration */

Local Number &GPA; /* Maps to Rule Output GPA*/

<*

/* Assign values from the component to the rule variables */
/* Replace ? with the appropriate values */
/* Required variables must have values passed into the rule */
/* If optional variables do not need values assigned, leave the line commented out */

&Emplid = ?;  /* Maps to Rule Input Emplid (Required) */
&Institution = ?;  /* Maps to Rule Input Institution (Required) */
&Career = ?;  /* Maps to Rule Input Career (Required) */
&Term = ?;  /* Maps to Rule Input Term (Required) */

*>

ObjectSetProperty(&SCC_RTRIG_20140218095510, "V0001" , &Emplid);
ObjectSetProperty(&SCC_RTRIG_20140218095510, "V0003" , &Institution);
ObjectSetProperty(&SCC_RTRIG_20140218095510, "V0005" , &Career);
ObjectSetProperty(&SCC_RTRIG_20140218095510, "V0007" , &Term);/* Execute the Rule */

&SCC_RTRIG_20140218095510.Invoke();

/* Assign values from the rule back to the component */
/* Replace ? with appropriate values */

&GPA = ObjectGetProperty(&SCC_RTRIG_20140218095510,"V0013");
Understanding the Generated Code
The generated code contains a reference to the EntityComponentAdapterAbstract because the Trigger uses a Base Entity. The Entity information must be passed from the Component to the Trigger Rule. The Entity Component Adapter provides the following functionality:
The EntityComponentAdapterAbstract (ECA) is code that maps the data in the component to the Base Entity attached to the Rule.
If the Base Entity has child Entities, the ECA also maps the Entity children.
Rather than pulling data from the database, the ECA uses data in the component which may include unsaved changes. This means that the Rule can interact directly with data from the component.
Changes made to the Entities in the Rule are made to the component data also.
The ECAErrorGrid handles any Errors which may be generated by the EntityComponentAdapter. This code is required whenever an ECA is used and provides the necessary Error Handling for the Entity Component Adapter. Two error methods exist:
ECAErrorGrid – This code takes care of the error messages coming back from the ECA.
ECAErrorPoPup – Opens a popup page which displays the errors coming back from the ECA.
The IEntity array needs to be instantiated as an Array object before you can map the data from a Component to the base Entity of a rule. Errors are generated if the Entity is directly pulled into the code without a push to the array first. In this example, the data is being retrieved and mapped using the BindToUIFromRowWithEntityID method.
BindtoUIfromRowWithEntity selects the correct Entity based on the Base Entity ID associated with the Trigger Rule on the Trigger Component. This generated code has already placed the BaseEntityID in the BindtoUIfromRowWithEntity construct.
Other methods are available through which to retrieve the Entity. They can be added but are not included in the Generated Code:
BindToUI: This grabs the Entity Based on the record on level 0. This would be the first non–Work, non–View encountered in the Component.
Note: For any Component which uses, for example, a record such as INSTALLATION on level 0, this does not work well. Binding at level 0 also implies you may be creating a relatively large Entity Tree. Performance is a consideration.
BindToUIfromRow: This picks the first Entity on that rowset level for example level 1. It assumes that the Component structure and the Entity structure are going to be similar or the same. It “walks” the Component and tries to match what is in the Component with what is in the Entity.
Note: This returns the first Entity found based on the RowSet indicated. Problems may occur when the there are multiple RowSets in the Component on that level.
BindToUIfromRecord: This picks the Entity from the user interface based on the record indicated. This record is assumed to be the Production Record from which the Entity is mapped.
Note: Multiple Entities could be mapped to the same Production Record. In this case, the first Entity is returned which may not be the right one.
For more extensive and technical information regarding these Entity Methods, see Setting Up Entity Registry.
The code can be copied from the Generated Code window and pasted into the PeopleCode Event. Open Application Designer and navigate to the PeopleCode Event. In this example, the Event is added to the FieldChange event of a WorkRecord field:
This example illustrates the Application Designer Example for Rules Engine User Interface Integration Example.

Open the FieldChange event and paste the Generated Code for the ECA Trigger into the appropriate event. Adjust the code to retrieve the correct row from which to select the Entity. This is the adjusted PeopleCode on the FieldChange Event of field SCC_RE_TR_ECA_PB which is the field for the ECA Calc button:
import SCC_RULES_ENGINE:Util:RuleFactory;
 import SCC_RULES_ENGINE:Util:RuleInterface;
 import SCC_COMMON:ENTITY:COMPONENT:EntityComponentAdapterAbstract;
 import SCC_COMMON:ENTITY:IEntity;

 Local SCC_RULES_ENGINE:Util:RuleFactory &sccRuleFactory = create SCC_RULES_ENGINE:Util:RuleFactory();
 Local SCC_RULES_ENGINE:Util:RuleInterface &SCC_RTRIG_20140218092909 = &sccRuleFactory.getRule("SCC_RULE_ID_20140218093117", True);

 Local SCC_COMMON:ENTITY:COMPONENT:EntityComponentAdapterAbstract &objECA;
 Local array of SCC_COMMON:ENTITY:IEntity &arrIEntity;
 Local SCC_COMMON:ENTITY:IEntity &objIEntity;
 Local Row &row;
 Local number &i;

 /* Make sure you are using the proper Entity Component Adapter implementation for your Component */
 /* Remove the comment markers below to implement the ECA */
 &objECA = CreateObject("SCC_COMMON:ENTITY:COMPONENT:ECAErrorGrid");

 /*  If the current row is not the row where the entity exists, replace logic below to get the correct row in the component */
 &row = GetRow();

 /* Bind the row of data in the comonent to an entity */
 /* Be sure to correctly bind the component to the entities used by the rule */


 &arrIEntity = CreateArrayRept(&objIEntity, 0);
 &arrIEntity.Push(&objECA.BindToUIFromRowWithEntityID(&row, "SCC_ENTITY_20140214090313"));
 &SCC_RTRIG_20140218092909.Context = &arrIEntity;


 &SCC_RTRIG_20140218092909.Invoke();
Based on the level 1 row in this example, the Entity can be selected from the current row. References to Variable and Calculated_GPA have been removed from code. As we are using the Rule to update the GPA Entity Property, there is no need to declare or assign a value to the &Calculated_GPA variable in this PeopleCode.
This is the adjusted PeopleCode on the FieldChange Event of field SCC_RE_TR_PARM_PB which is the field for the Parm Calc button:
import SCC_RULES_ENGINE:Util:RuleFactory;
 import SCC_RULES_ENGINE:Util:RuleInterface;
 import SCC_COMMON:ENTITY:COMPONENT:EntityComponentAdapterAbstract;

 Local SCC_RULES_ENGINE:Util:RuleFactory &sccRuleFactory = create SCC_RULES_ENGINE:Util:RuleFactory();
 Local SCC_RULES_ENGINE:Util:RuleInterface &SCC_RTRIG_20140218095510 = &sccRuleFactory.getRule("SCC_RULE_ID_20140218095142", True);

 Local SCC_COMMON:ENTITY:COMPONENT:EntityComponentAdapterAbstract &objECA;
 Local Row &row;
 Local number &i;

 /* Make sure you are using the proper Entity Component Adapter implementation for your Component */
 /* Remove the comment markers below to implement the ECA */
 /* &objECA=CreateObject("SCC_COMMON:ENTITY:COMPONENT:ECAErrorGrid"); */

 /*  If the current row is not the row where the entity exists, replace logic below to get the correct row in the component */
 &row = GetRow();

 /* Bind the row of data in the comonent to an entity */
 /* Be sure to correctly bind the component to the entities used by the rule */
 /* &SCC_RTRIG_20140218095510.Context = CreateArrayRept(&objECA.BindToUIFromRowWithEntityID(&row, "SCC_ENTITY_20140214090313"), 1); */

 /* Input Variable Declaration */

 Local string &Emplid;
 Local string &Institution;
 Local string &Career;
 Local string &Term;
 Local number &Sequence_Number;
 Local string &GPA_Type;

 /* Output Variable Declaration */

 Local number &GPA; /* Maps to Rule Output GPA*/

 /* Assign values from the component to the rule variables */
 /* Replace ? with the appropriate values */
 /* Required variables must have values passed into the rule */
 /* Optional variables do not need values assigned, leave the line commented out */

 &Emplid = &row.STDNT_SPCL_GPA.EMPLID.Value; /* Maps to Rule Input Emplid (Required) */
 &Institution = &row.STDNT_SPCL_GPA.INSTITUTION.Value; /* Maps to Rule Input Institution (Required) */
 &Career = &row.STDNT_SPCL_GPA.ACAD_CAREER.Value; /* Maps to Rule Input Career (Required) */
 &Term = &row.STDNT_SPCL_GPA.STRM.Value; /* Maps to Rule Input Term (Required) */
 &Sequence_Number = &row.STDNT_SPCL_GPA.SEQ_NUM.Value; /* Maps to Rule Input Sequence Number (Required) */
 &GPA_Type = &row.STDNT_SPCL_GPA.GPA_TYPE.Value; /* Maps to Rule Input GPA Type (Required) */

 ObjectSetProperty(&SCC_RTRIG_20140218095510, "V0001", &Emplid);
 ObjectSetProperty(&SCC_RTRIG_20140218095510, "V0003", &Institution);
 ObjectSetProperty(&SCC_RTRIG_20140218095510, "V0005", &Career);
 ObjectSetProperty(&SCC_RTRIG_20140218095510, "V0007", &Term);

 &SCC_RTRIG_20140218095510.Invoke();

 /* Assign values from the rule back to the component */
 /* Replace ? with appropriate values */

 &GPA = ObjectGetProperty(&SCC_RTRIG_20140218095510, "V0013");

 &row.STDNT_SPCL_GPA.LS_GPA.Value = &GPA;
The PeopleCode has been adjusted to provide a FieldValue for each Variable to be provided to the Trigger. For example, &Emplid =&row.STDNT_SPCL_GPA.EMPLID.Value. In this example, the &GPA value retrieved is updated on the component by updating &row. STDNT_SPCL_GPA.LS_GPA.Value.
When the Events PeopleCode has been adjusted, the user interface integration can be tested from the Component page.