Deploying PeopleSoft Campus Solutions Digital Assistant
Campus Solutions (CS) delivers a digital assistant (commonly known as a chatbot) equipped with various skills. Skills are individual chatbots, designed to interact with users to fulfill specific tasks using a combination of text messages and simple user interface (UI) elements. Users can interact with the digital assistant using natural language conversations.
To use the digital assistant, these are the minimum requirements:
-
PeopleTools 8.57 or higher
-
PeopleSoft Campus Solutions 9.2.015 or higher
Here's an overview of the digital assistant deployment process.
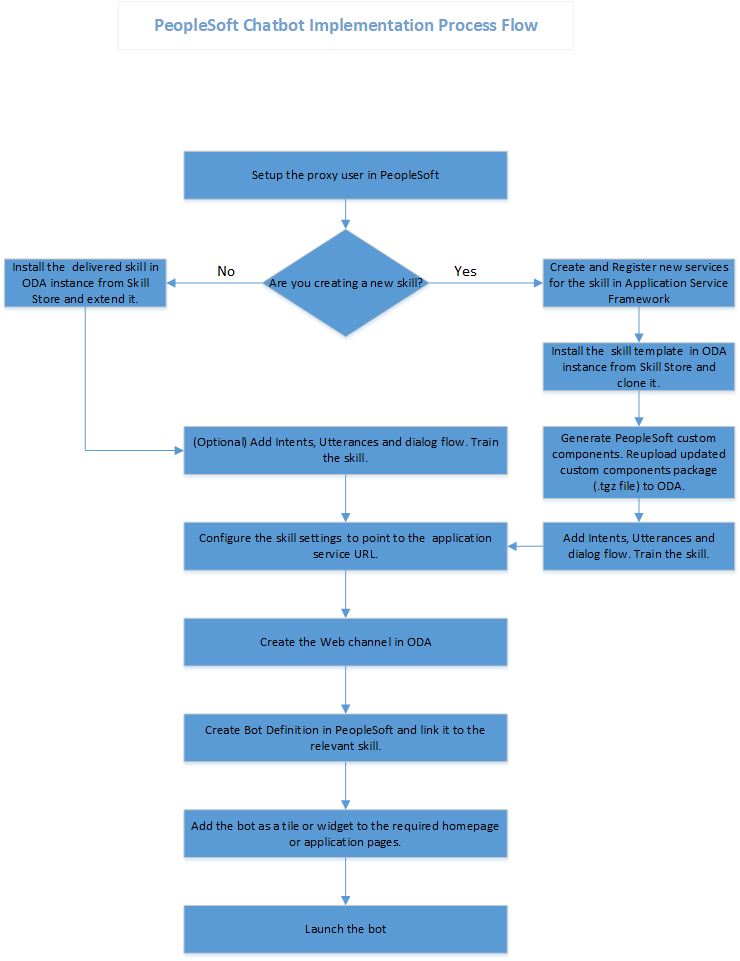
And here are a few things to note:
-
The basic digital assistant or skills you install from the Skill Store may not satisfy all your requirements, or you might want to modify them to align with your business processes. You can't modify an installed assistant or skill directly, but you can create an extension of it and then modify that extension.
-
If you want to add skills to the digital assistant in the future, you would need to install the skill, add the skill to the digital assistant, then extend the skill.
For information on fluid pages and controls, see the product documentation for PeopleSoft Enterprise Components: "Working With the PeopleSoft Fluid User Interface."
See also the product documentation for Oracle Digital Assistant (ODA).
A proxy user is necessary to integrate the digital assistant with application services in the Chatbot Integration Framework.
-
As an administrator, navigate to .
-
Click Add a New Value.
-
In User ID, enter PSFTPROXY, then click Add.
-
On the General page, in Symbolic ID, select SYSADM1.
-
In New Password, enter a password.
-
In Confirm Password, enter the same password you provided.
-
Deselect Password Expired.
-
Click ID.
-
Make sure ID Type is set to None.
-
Click Roles.
-
In User Roles, add the following roles:
-
PTCB_USER
-
EOCB Service User
-
EOCB Admin User
-
EOCB Client User
-
-
Click Save.
Once you have an ODA subscription and have created a proxy user, you can install the digital assistant.
-
Log in to your ODA instance, then click
 , then select .
 -
Search for the digital assistant. For example, to get PeopleSoft Campus Solutions assistants, search for "Campus Solutions."
-
In the tile of the skill or assistant you want to add, click
 , then select Pull.
Note that the process to install skills is similar to installing a digital assistant.
Extending a digital assistant enables you to customize it in several ways. When a new version appears in the Skill Store, you can transfer your customizations to the new version by rebasing.
Not that you won't be able to modify an installed assistant or skill directly, but you can create an extension of it and then modify that extension. For more information on extending skills or digital assistants, refer to the ODA documentation. There you'll find details about what extending a skill or digital assistant is for, and the difference between cloning and extending.
Here's what you need to do to extend a digital assistant:
-
Click
, then select . -
Search for the digital assistant.
-
In the tile for the digital assistant you want to extend, click
, then select Extend. -
Fill out Display Name and Name. You should provide a display name and name that's different from the name of the digital assistant you're extending.
-
Click Extend.
-
Click the tile of the new digital assistant, and note the skills included in it.
When you extend a digital assistant, the base skills that were in the original version are carried over to the extended version of the digital assistant.
After extending the digital assistant, you have to extend the base skills that it uses. Doing so lets you change the configuration of the base skill.
Note: You don't have to extend the Small Talk Skill. But if you plan to update the skill at any point, you can choose to extend it.
You will have to run through these steps for every skill in the extended digital assistant.
-
Click
, then select . -
Search for the skill.
-
In the tile for the skill you want to extend, click
, then select Extend. -
Fill out Display Name and Name. Similar to what you did for the digital assistant when you filled out the name fields, make sure you provide names that are different from the base skill you're extending.
-
Click Extend.
After extending the skill, add them to the digital assistant you extended.
-
Click
, then select . -
Look for the extended digital assistant, then select it.
-
Click
 , then click Configurations.
 -
Look for the System Intents Mappings section.
-
Note down the values in "Digital Assistant Custom UnresolvedIntent Skill" and "Digital Assistant Custom UnresolvedIntent State." You will need them later.
-
In Digital Assistant Custom UnresolvedIntent Skill, select No Selection. Doing this also automatically sets Digital Assistant Custom UnresolvedIntent State to the same value.
-
Click
 . You should see all the base skills in the extended digital
assistant.
. You should see all the base skills in the extended digital
assistant. -
To replace a base skill with its extended version, you need to perform the following actions for each skill contained in the digital assistant:
-
Click the skill.
-
Click Update Skill.
-
From the Update Skill dialog, select the new version of the skill.
-
Click Update Skill.
-
-
Click
, then click Configurations. -
Go to the System Intents Mappings section.
-
In Digital Assistant Custom UnresolvedIntent Skill, select the extended Grade skill.
-
In Digital Assistant Custom UnresolvedIntent State, select or enter ssr_unresolved.
Channels serve as messaging platforms, which lets users access the skill or digital assistant. A single digital assistant or skill can have several channels configured to allow access to it. This setup enables the digital assistant or skill to run on different services simultaneously.
In this section, we're creating a Web channel. While creating the Oracle Web Channel, note down the Channel Id value generated that's generated. This value is added to the corresponding PeopleSoft bot definition in Creating Bot Definitions. The Client Authentication Enabled option should be disabled.
-
Click
, then click . -
Click Add Channel.
-
In Name, enter a name for your channel.
-
In Channel Type, select Oracle Web.
-
In Allowed Domains, enter the actual domain name of the production environment.
-
Make sure the Client Authentication Enabled switch is off.
-
Keep the default value in Session Expiration (minutes).
-
Click Create.
-
With your channel selected, click the Channel Enabled switch to activate the channel.
-
In Route To, select the digital assistant you extended.
-
Note down the value in Channel Id.
Setting up the bot definitions creates digital assistant clients in PeopleSoft, which then lets you use the digital assistant and skills.
-
From Campus Solutions, navigate to .
-
From the General Configurations page, in Default Branding Template, keep the default value.
-
In ODA Server URI, enter the value that's part of the link to your ODA instance. For example, the link to your ODA instance will look something like this:
https://<ODA_Server_URI>/botsui/homeGet the value in the ODA_Server_URI portion of the URL, then place that value in ODA Server URI.
-
In Bot Definitions, click the Edit button that corresponds to the the Bot ID STU_CHAT_ASST.
-
On the Maintain Bot Definition page, in Bot Channel ID, enter the channel ID value that you took note of when you created the channel.
-
Save your changes.
The digital assistant can be launched on CS fluid pages. Based on the settings you defined on the Bot Definition page, the assistant can be launched as a tile or widget.
-
From Campus Solutions, navigate to .
-
Click Add Content Reference.
-
On the General page, in Name, enter EOCB_STUCHATASST_FL_GBL.
-
In Label, enter a descriptive label for the digital assistant. For example, you can use "Student Assistant."
-
In Node Name, select SA.
-
In URL Type, select PeopleSoft Generic URL.
-
In Portal URL, enter c/EOCB_MENU_FL.EOCB_CLIENT_FL.GBL?BOTID=NEW_SKILL
Make sure you replace NEW_SKILL with the Bot ID value from the Chat Definitions page. The value you enter will look like:
c/EOCB_MENU_FL.EOCB_CLIENT_FL.GBL?BOTID=STU_CHAT_ASST
-
Click Security.
-
Make sure you select Author Access.
-
From Security Authorizations, in Permission List, select EOCB_CLIENT_USER.
-
Click Fluid Attributes.
-
In Image Name, select your preferred image.
-
In Display In, select Modal.
-
In Modal Parameters, enter:
$Style@frame-pt_chatclientpage;bAutoClose@0;width@600;height@1000;
-
In Folder, select a folder to create a link to the tile repository. For example, you can select CS_SCC_STUDENT_SELFSERV (Student Self Service).
-
Save your changes.
Students or university staff would have to configure their homepage in order to launch the digital assistant. This means adding the tile where the digital assistant is configured to their homepage.
-
From Campus Solutions, click the Homepage Actions button, then click Personalize Homepage.
-
Click Add Tile.
-
Search for the label you assigned in Configuring the Tile (step 4), then click Add.
If you entered "Student Assistant," then search for that.
-
Save your changes.
You should see the digital assistant on the homepage. Clicking the tile launches the digital assistant.
Note: To ensure the digital assistant appears on the homepage, the user's user profile should have the "EOCB Client User" role assigned.
You would have to update the component package of a skill to interface with ODA's custom component service. This service is an active connection from the skill to the host server.
Note that you will have to perform this procedure for any new skills that you add to the digital assistant in the future.
-
Make sure you have these software:
-
Oracle Digital Assistant Bots Node.js software development kit (SDK) (bots-node-sdk), which you can get from GitHub.
-
Node.js 8.11.4, which you can get from https://nodejs.org. Install this for global access. Node Package Manager (npm) is distributed with Node.js.
-
-
To test if Node.js and npm are installed, open a terminal window and type these commands:
node –v npm –v -
To verify your Oracle Digital Assistant Bots Node.js SDK installation, type the following command:
bots-node-sdk -vThe command should print the Oracle Digital Assistant Bots Node.js SDK version.
-
Log in to your ODA instance.
-
Click
, then select . -
Select the digital assistant to open its page. You will see the first skill on the list selected.
-
From the selected skill, click Go to Skill.
-
Click
 .
. -
Download the package (.tgz) file, then update the
environments.jsonfile.-
Look for the package (.tgz) file you downloaded.
-
Extract the contents of the file to your local drive.
-
Extract the .tar file in the same folder that the package file is in.
A
packagefolder will appear. -
From the
packagefolder, navigate to . -
Open environments.json.
-
Update the server, port, and node values in baseURL using the information from your PIA server.
"baseURL": "http://<server>:<port>/PSIGW/RESTListeningConnector/<node>/PTCB_APPL_SVC.v1"So, if your PIA URL looks like this:
http://server.com:8000/psp/s17cbguix/?cmd=login&languageCd=ENG&Then your baseURL value will look like this:
Field
Value
<server>
server.com
<port>
8000
<node>
S17CBGUI (this alphanumeric text should be capitalized)
If your PIA URL uses
http, then the baseURL should also usehttp. If it useshttps, then usehttps. -
From your computer, launch the command prompt.
-
Go to the directory where the package folder is stored, then from the command prompt enter npm pack.
This creates a package with the updates you made and a new TGZ file is saved in the same package folder.
In the future, if you wish to update the component package file, make sure you delete the existing .tgz file before you run the
npm
                                    pack
command.
-
-
Upload the package (.tgz) file you updated.
-
Go back to your browser where you have your ODA instance open.
-
From the Components page of the digital assistant (the one you accessed from step 8), make sure you're on the page of the skill you downloaded the package file from.
-
In Package File, click the Change package file icon, then locate the .tgz file you created to upload it to the skill.
The upload is complete when the Status indicates
Ready.
-
-
Repeat steps 7 to 10 for the other skills.
Note: Skip the Small Talk skill.
Training your digital assistant or skill facilitates goal-oriented conversations between users and a machine. This means the machine must understand natural language. This understanding isn't semantic, but a prediction the machine makes based on a set of training phrases.
-
From your ODA instance, click
, then select . -
Click the extended digital assistant.
-
Select a skill from the assistant's list of skills, then click Go to Skill.
-
Click
 .
.The red indicator on the train icon means the skill needs to be trained.
-
From the dialog that appears, select Trainer Tm, then click Submit.
-
Repeat steps 3-5 for the other skills in the digital assistant.
-
After training all the skills in the digital assistant, navigate again to your extended digital assistant, then click the corresponding train icon.
-
From the dialog that appears, select Trainer Tm, then click Submit.
In your ODA instance, navigate to the extended digital assistant's page, then update the parameters of each skill using the information from your PIA server. Start with the Enrollment Skill.
Note: When you update the parameters for the Enrollment Skill, the parameters for Grade and Schedule Skills that you've added to the digital assistant are also automatically updated. The same is true for all new skills that you add to the digital assistant.
If your PIA URL looks like this:
http://server.com:8000/psp/s17cbguix/?cmd=login&languageCd=ENG&Then the parameters should look like this example:
|
Field |
Value |
|---|---|
|
CS domain |
|
|
CS domain base url |
|
|
da.PSauthurl |
|
If your PIA URL uses http, then the domain
base URL and PSauthurl should also use http. If it uses
https, then
use https.
Do the following to test the chatbot functionality.
-
Log in as the student or university staff whose homepage was configured in Adding the Tile to the Homepage.
-
Click the chatbot Student Assistant.
The chatbot launches. You should be able to engage the chatbot using the skills that were added to it. For example, you can find the enrollment dates of the logged-in user.
This section lists issues you might run into when using the digital assistant.
Assistant isn't loading
Check if the ODA server URI and Bot channel ID are correct. See Creating Bot Definitions.
Assistant isn't responding to a message
-
Make sure the channel is routed to the appropriate skill or digital assistant.
-
Turn off client authentication.
-
In Allowed Domains, enter * to allow requests from all domains.
You could also restrict the value to a PeopleSoft domain.
See Creating a Channel.
Error messages
|
Error |
Solution |
|---|---|
|
Oops! I'm encountering a spot of trouble. Please try again later. |
ODA may be down. Wait until ODA is up and running. |
|
Oops! Something went wrong while connecting to PeopleSoft. Check your network connection, or contact your system administrator. |
Try the following solutions:
|
|
Failed to sign in! Please check your credentials and try again. |
This error appears either because the skill doesn't have the EOCB_CLIENT_USER or an incorrect role is assigned to it. To assign the role:
|