Defining and Maintaining Containers
To define storage containers, use the Define Storage Container (CONTAINER_ID) component. To define container types, use the Container Types (CONTAINER_TYPE) component. To create container defaults, use the Container Defaults (CONTAINER_SETUP) component.
In PeopleSoft Inventory, you can create two kinds of containers: storage containers, which facilitate the storage and movement of stock within a business unit; and shipping containers, which consolidate stock for shipment. This section focuses on storage containers.
Placing stock into storage containers enables you to conduct a variety of business processes more efficiently. You can:
Perform stock movements (receiving, putaway, transfers, picking, adjustments, and physical accounting) by container.
Build containers of manufacturing completions from PeopleSoft Manufacturing.
Display and update container information, including all containers for a specific item, all items in a specific container, and all containers for a specific lot.
If you have an electronic data collection system, you can also:
Transfer items from one container to another.
Remove all contents from a container.
Place a storage container into a shipping container.
Convert a storage container into a shipping container.
You define storage containers for loose stock only; that is, you cannot put a container into another storage container.
For each business unit, you can permit automatic container creation or require that containers be defined before use. In the former case, the system builds new containers during inventory transactions; in the latter, container IDs must exist before you can perform inventory transactions involving containers.
Note: If you are using an electronic data collection system and you do not permit automatic container creation, you can only put away or transfer stock into an existing container. To complete the transaction, you must add the container and then correct the error in the Transaction Maintenance component.
|
Page Name |
Definition Name |
Usage |
|---|---|---|
|
CNTR_TYPE_INV_1 |
Begin defining parameters for a specific type of container. |
|
|
Container Types - Attributes Page |
CNTR_TYPE_INV_2 |
Define weight and material attributes for a container type. |
|
Container Defaults Page |
CNTR_SETUP_IN |
To define defaults for a container, use the Container Defaults (CONTAINER_SETUP) component. Select a default container type and determine how storage containers are created in the business unit. |
|
CNTR_ID_INV |
Establish parameters for individual storage containers. |
|
|
CNTR_MGMT_INV |
Transfer items into or out of a storage container. |
|
|
Container Selection Criteria Page |
CNTR_MGMT_INV_SP |
Search for items to add to a storage container. |
|
Container Detail (inquiry) Page |
CNTR_INQ_INV |
View detailed storage container information. |
|
Container Detail - Selection Criteria Page |
CNTR_INQ2_INV |
Define parameters for container records to view on the Container Detail page. |
|
Container Detail - Order Details Page |
CNTR_INV_SEC |
View information about allocated stock in a container. |
Use the Container Types page (CNTR_TYPE_INV_1) to begin defining parameters for a specific type of container.
Navigation:
This example illustrates the fields and controls on the Container Types page. You can find definitions for the fields and controls later on this page.
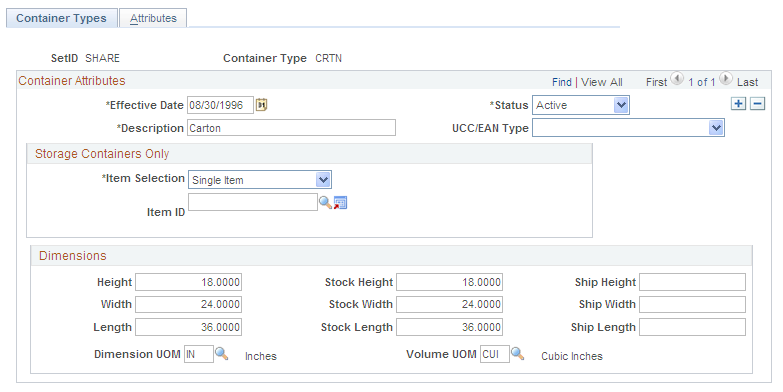
Before you can create either storage or shipping containers, you must establish default values for both the SetID and the business unit. You can have a variety of container types; for example, you might use both cartons and pallets.
Container Types Tab
Field or Control |
Description |
|---|---|
UCC/EAN Type |
If you ship containers, this information prints on the Packing Slip report. Values are: Cs/Crtn (case or carton), Intra-Comp (intracompany defined), Pallet, Truckload, or Undefined. |
Storage Containers Only |
Indicate whether this is a multiple-item or single-item container type. For single-item containers, you can specify an item ID. |
Height, Width, and Length |
Enter dimensions of the container itself. |
Stock Height, Stock Width, and Stock Length |
Enter dimensions of the base container plus any extra material (such as packaging or straps) used to store the item. |
Ship Height, Ship Width, and Ship Length |
The dimensions of the base container plus any extra material (such as packaging or straps) used to ship the container. |
Dimension UOM (dimension unit of measure) |
Select a unit of measure in which to express all dimensions defined on this page. |
Attributes Tab
Field or Control |
Description |
|---|---|
Material |
Enter the material from which the container type is constructed. |
Empty Weight |
Enter the weight of the empty container. PeopleSoft Inventory adds this value to the weight of the contents to derive the container's gross weight. |
Max Weight (maximum weight) |
Enter the maximum weight that this container type can hold. |
Weight UOM (weight unit of measure) |
Enter the unit of measure in which weight is expressed. This information is for reporting and inquiry purposes only. |
On the Container Defaults page, specify a default container type for each business unit and determine whether automatic container creation is permitted in the business unit.
If you do not define a default type, PeopleSoft Inventory automatically creates all new containers as multiple-item containers.
Use the Define Storage Container page (CNTR_ID_INV) to establish parameters for individual storage containers.
Navigation:
This example illustrates the fields and controls on the Define Storage Container page. You can find definitions for the fields and controls later on this page.
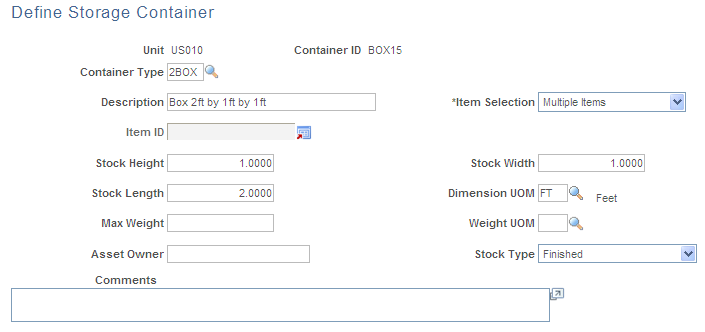
Use this page if the business unit requires the creation of containers before use, or to override default container values. If the business unit uses only one type of container, and the container does not require detailed attributes, you do not need to enter information here.
Field or Control |
Description |
|---|---|
Asset Owner |
Enter the owner of the container. This field is for reporting and inquiry purposes only. |
Stock Type |
Select the type of stock stored in the container. Values are: Finished, Raw Matl (raw material), and WIP. |
Use the Container Management page (CNTR_MGMT_INV) to transfer items into or out of a storage container.
Navigation:
This example illustrates the fields and controls on the Container Management page (1 of 2). You can find definitions for the fields and controls later on this page.
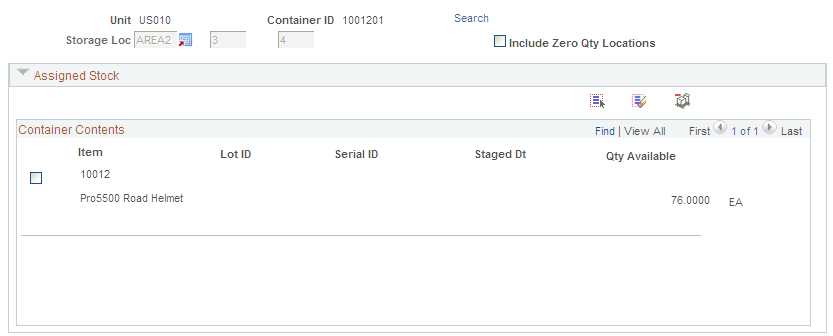
This example illustrates the fields and controls on the Container Management page (2 of 2). You can find definitions for the fields and controls later on this page.

Field or Control |
Description |
|---|---|
Storage Loc (storage location) |
If this is a new container, define a material storage location for the container. If you are managing an existing container, the material storage location information appears. Because a container with quantity can exist in only one location, you cannot modify this information. |
Include Zero Qty Locations (include zero quantity locations) |
If the business unit allows negative quantities, select to display items with a quantity of zero. |
Search link |
Click to access the Container Selection Criteria page and search for items to add to the container. |
Assigned Stock |
Displays items currently stored in the container. To remove an item from the container, select its check box and click the Remove from Container button. The selections move to the Unassigned Stock section. When you remove an item, you can enter the item's new material storage location in the Assigned Stock section. This type of movement is similar to an item transfer. |
Unassigned Stock |
Displays items matching the search criteria. To add an item to the container, select its check box and click the Add to Container button. The selections move to the Assigned Stock section. |
Note: You can only move items with available quantity. You can, however, move partial quantities of items, and if negative inventory is allowed, you can choose more than the quantity available by selecting the check box next to a line and overriding the quantity available). In addition, you must move owned items into owned material storage locations and non-owned items into non-owned material storage locations. Finally, to move the entire storage container to a new material storage location, use the Transfers component in the Maintain Inventory menu.