Maintaining Multiple Par Locations
The Maintain Par Locations component enables you to update information for multiple par locations at once. You can change header or item attributes, or add, replace, or delete an item in all or selected par locations in a business unit.
Note: While you can maintain individual par locations using the Maintain Par Locations component, PeopleSoft recommends that you use the Define Par Location component for this purpose.
|
Page Name |
Definition Name |
Usage |
|---|---|---|
|
CART_MASS_MAINT |
Modify header or item information for multiple par locations. |
|
|
Enter Details Page |
CART_MASS_LINE_DTL |
View or modify item replenishment options. |
|
Enter Details Page (Usage) |
CART_MASS_LINE_USG |
View or modify item usage information. |
|
Enter ChartField Overrides Page |
CART_MASS_CFH, CART_MASS_CFL |
Override par location header or line-level ChartField values. |
Use the Maintain Par Locations page (CART_MASS_MAINT) to modify header or item information for multiple par locations.
Navigation:
This example illustrates the fields and controls on the Maintain Par Locations page. You can find definitions for the fields and controls later on this page.
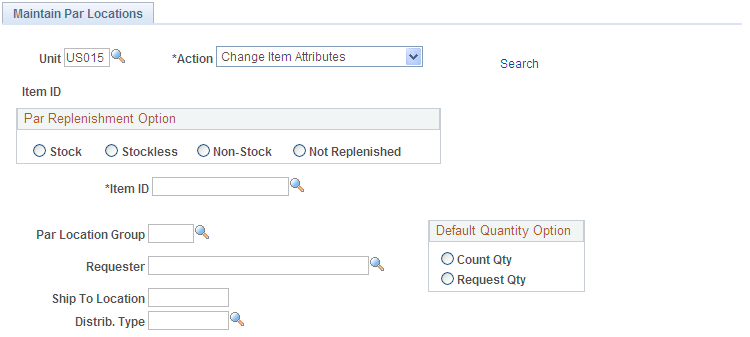
To perform par location mass maintenance:
Enter a business unit and select an update action: Add Item, Change Header Attributes, Change Item Attributes, Delete Item, or Replace Item.
Click the Search link to transfer to the selection criteria page, then enter criteria for the par locations to be updated.
Note: The selection criteria page name and the fields that appear vary according to the action that you selected on the Maintain Par Locations page.
Indicate whether you are updating all par locations in the business unit or a specific par location group.
If you are adding an item, select a par replenishment option.
The default is the value that you defined on the Inventory Definition - Business Unit Options: Replenishment Options page.
Enter the item to be added, modified, replaced, or deleted.
For the Add Item action, values depend upon the replenishment option that you selected; for the other item actions, values include all items that you define for the specified par location group or for all par locations in the business unit.
If you are adding an item, select an order unit.
The system adds the selected item only to par locations that match this business unit.
If you are adding an item or modifying item or header attributes, you can specify a general ledger business unit that must be matched by par locations that are returned to the Maintain Par Locations page.
Entering a value here also activates the ChartField Overrides link on the main page.
For the Add Item action, if you leave the business unit field blank, the new item inherits the general ledger business unit and any ChartField values that you defined on the par location header record.
Enter the header or item information to be updated, using the group box in the center of the page.
The values that you enter in this group box override existing values on the par location records; any fields that you leave blank retain the previously defined values.
Note: The fields in this group box vary depending upon the action that is being performed.
The entries here do not update any outstanding requisitions, purchase orders, or material stock requests.
For the Change Header Attributes and Change Item Attributes actions, you can clear entries when you click the Reset button.
Select par locations to be updated.
The grid at the bottom of the page displays the par locations that match the selection criteria. Select the check box next to each par location that you want to update. To update all of the par locations that appear, click Select All; to clear all selections, click Deselect All.
Change Header Attributes
The default field values for the action of Change Header Attributes come from the Define Par Location - Header page.
You can change par location group assignments by entering a par location group.
If the installation includes PeopleSoft Purchasing, you can change the requester and ship to location.
Note: You cannot make mass changes for location, ordering business unit, or PeopleSoft General Ledger business unit information. To modify these fields, use the Define Par Location component.
Select a default quantity option.
Click the ChartField Overrides link to access the Enter ChartField Overrides page, where you can override par location header ChartField values.
Add Item or Change Item Attributes
To add an item or change item attributes (action of Change Item Attributes or Add Item):
Select a replenishment control method and enter any new quantity options.
For the Add Item action, the default is Par. For Change Item Attributes, there is no default value.
Enter the item quantity for this par location. The fields available (Optimal Qty, FOQ, or Maximum Qty) are based on your entry in the Replenishment Control field.
Enter the item's unit of measure to be used when the Create Par Replenishment Requests process generates a material stock request, purchase order, or requisition. If this item is used within the Consumer Usage component of PeopleSoft Inventory, then the UOM defined here must be the standard UOM entered on the Define Item - General: Common page (Items, Define Items and Attributes, Define Item, General).
For stock items, a default value can populate this field as follows:
The UOM entered in the Standard Ordering UOM field on the Setup Item Fulfillment page. This UOM must be defined as an ordering UOM on the Units of Measure page. If not, then the system uses:
The UOM defined as the Default Req UOM on the item's Units of Measure page. If the Default Req UOM is not defined, then the system uses:
The UOM defined as the Default Stocking UOM on the item's Units of Measure page. This UOM must be defined as an ordering UOM; if not, the system uses:
The standard UOM defined on the Define Item - General: Common page (Items, Define Items and Attributes, Define Item, General).
For stockless and non-stock items, the default value that can populate this field is the default UOM of the item's priority 1 supplier. To find this UOM, select the priority 1 supplier for this item using the Purchasing Attributes - Item supplier page (Items, Define Items and Attributes, Purchasing Attributes, Item supplier) and then click the Item supplier UOM link to access the supplier's UOM & Pricing Info page. The Default check box is selected for one UOM. If an item/supplier combination does not exist, then the default value for this page is the standard UOM from the Define Item - General: Common page.
Click the Details link to access the Enter Details page, where you can view or modify item replenishment options.
Click the Usage link to access the Enter Details (Usage) page, where you can view or modify item usage information.
Click the ChartField Overrides link to access the Enter ChartField Overrides page, where you can override line-level ChartField values.
If you are adding an item and you select Use Defaults here, the new item inherits ChartField values from the par location header record, but entries on this page override these values.
If you are changing item attributes and you select Use Defaults, the system looks first for line-level ChartField values and then for header-level values. Entries on this page override these values.
Note: When you save the Maintain Par Locations page, the system sets the count order to the maximum value plus one. To change the par location sort option or count order, use the Define Par Location component.
Replace Item
To replace an item use the action of Replace Item and:
Select a par replenishment option for the new item.
Select a replacement item.
Values depend upon the replenishment option.
Delete Item
To delete an item use the action of Delete Item and:
Select the par locations impacted.
Click the Save button.