Making Stock Location Transfers Online
Use the Transfers component to record the movement of stock from one material storage location to another within the same inventory business unit or to convert the unit of measure (UOM). The Transfers component enables you to:
Move stock from one material storage location to another (bin to bin transfer) within an inventory business unit on an ad hoc basis.
Move allocated stock that is loose or in a container. Allocated stock is stock that has been hard-allocated to a demand line.
Convert item quantities from one UOM into another UOM within a material storage location.
You physically move stock between material storage locations and then record the relocation details by using either the entire Transfers component or just the EZ Transfers page. The Transfers component provides you with search criteria for selecting material to transfer. Use the EZ Transfers page for a more streamlined approach.
In addition, you can use the Inventory Transfer enterprise integration point (EIP) or Storage Location Transfer transaction page to record transfers using electronic data collection devices. For more information, see the next section in this topic, "Transferring Stock Using Integration Points."
See Transferring Materials Using the Inventory Transfer EIP.
Transferring Allocated Stock
PeopleSoft Inventory enables you to transfer stock that has been hard-allocated to a material stock request, sales order, or work order. You can use the Transfers component to find and move loose stock or an entire storage container that includes some or all allocated stock. For more information on transferring allocated stock, see the "Understanding Stock Quantity Adjustments and Transfers in a Business Unit" section of this topic.
See Understanding Stock Quantity Adjustments and Transfers in a Business Unit.
|
Page Name |
Definition Name |
Usage |
|---|---|---|
|
TRANSFER_INV |
Select the material that you want to transfer and the storage area from which you physically move stock. |
|
|
TRANSFER2_INV |
Move item quantities to another material storage location. |
|
|
TRANSFER4_INV |
View items in a storage container or transfer containers to a new location. To transfer part of the stock in a container, use the Container Management page. |
|
|
TRANSFER_BC_INV |
Streamline internal stock transfers. The page automatically verifies the information that you enter and saves the transactions without using queries or the Save button, making it ideal for a workstation setup with a wedge bar code reader. |
Use the Transfers page (TRANSFER_INV) to select the material that you want to transfer and the storage area from which you physically move stock.
Navigation:
This example illustrates the fields and controls on the Transfers page. You can find definitions for the fields and controls later on this page.
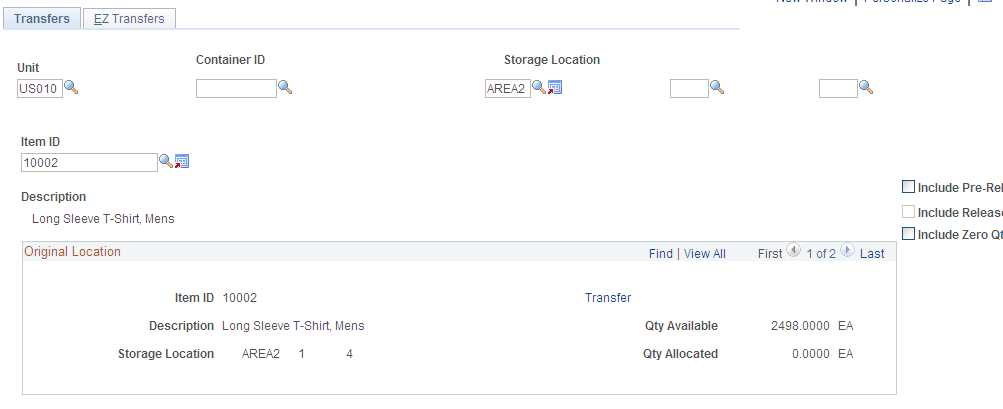
Enter the appropriate search criteria to display the material storage locations that you want to update. Only items with a status of Active, Hold, Discontinue, and Inactive are available for movement.
Field or Control |
Description |
|---|---|
Unit |
Enter the inventory business unit where you are transferring stock. This component only transfers stock within one inventory business unit. Use an interunit stock request to transfer between inventory business units. You must select a business unit and either the container ID, the material storage location, or the item ID of the material that you are relocating. |
Container ID |
Select a storage container ID if you are moving an entire container from one material storage location to another location. |
Storage Location |
Select a storage area and any levels to search for stock by material storage location. |
Item ID |
Select the item ID of the material that you are transferring. If you select an item ID, you can also select a lot ID or serial ID, when applicable, to limit the number of lines that are returned. For lot-controlled items, a warning message appears when you save the page if the current date is before the date the lot becomes available or after it expires. |
Include Pre-Released Allocations |
Select this check box to display and enable the transfer of stock that has been pre-allocated or lot-allocated to demand lines before the picking process. The default value for this check box comes from the Setup Fulfillment page for this Inventory business unit. By selecting this check box, you can display and transfer pre-allocated and lot-allocated items that are:
|
Include Released Allocations |
Select this check box to display and enable the transfer of allocated stock when the demand lines have already entered the picking stage and a pick batch ID has been assigned. This check box is not available until you select the Allow Transfer of Released Allocations check box on the Inventory Definition - Business Unit Options page for this Inventory business unit. The default value for this check box comes from the Setup Fulfillment page. By selecting this check box, you can transfer allocated items that are:
|
Include Zero Qty Locations (include zero quantity locations) |
Select this check box to display any material storage locations that did contain the item ID but are now empty. This enables you to view a material storage location that usually holds the item that you are looking for and verify that the location is currently empty. |
Search |
Click the Search button to retrieve item stock matching your search criteria. Before using this button, you must select a business unit and either the container ID, the storage location, or the item ID. Search results are displayed in the Original Location group box. |
Original Location |
This group box displays the results of your search. Each line returned includes the item ID, material storage location, and quantity plus the lot, serial, and staged date as applicable. Be sure to check the number of rows retrieved by using the right-side of the group box bar. In order to display and move allocated stock, you must have selected the appropriate check boxes, Include Pre-Released Allocations or Include Released Allocations, before clicking the search button. |
Qty Available |
Displays the current available quantity at this material storage location that can be transferred. In this context, available quantity includes all on-hand stock less allocated stock. |
Qty Allocated |
Displays the current stock quantity that has been allocated to fulfill a demand line. This amount only displays if you have selected one or both of the appropriate check boxes, Include Pre-Released Allocations and Include Released Allocations, to transfer allocated stock. |
Transfer |
Click this link to access the Item Transfer page. |
Use the Item Transfer page (TRANSFER2_INV) to move item quantities to another material storage location.
Navigation:
Enter search criteria on the Transfers page. Click the Search button, and then click the Transfer link in the Original Location group box.
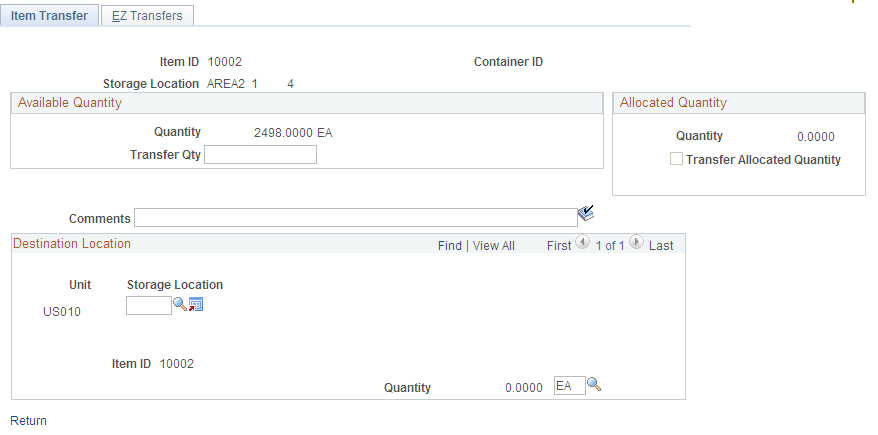
This example illustrates the fields and controls on the Item Transfer page to move non-container stock. You can find definitions for the fields and controls later on this page.
Field or Control |
Description |
|---|---|
Quantity(within the Available Quantity group box) |
Displays the current available quantity that can be transferred within this business unit. |
Transfer Qty (transfer quantity) |
Enter the amount of the available quantity that you want to transfer from the location specified at the top of the page. If negative inventory balances are permitted in the business unit, you can transfer more quantity than is available, driving the system balance for the original location negative. If the item is not stocked in its standard UOM, you can enter a transfer quantity in either the stocking or the standard UOM. You can change the stocking UOM in the destination material storage location by changing the current UOM that appears next to the quantity. |
Quantity(within the Allocated Quantity group box) |
Displays the current allocated quantity that can be transferred within this business unit. The quantity is shown in the UOM of the material storage location. This amount only displays if you have selected one or both of the appropriate check boxes, Include Pre-Released Allocations and Include Released Allocations, on the Transfers page. |
Transfer Allocated Quantity |
Select this check box to transfer the stock that has been allocated to a demand line. If you decide to transfer the allocated quantity, you must transfer the entire quantity of allocated stock from this material storage location. |
Comments |
Enter a comment using up to 254 characters for the transfer transaction. These comments are written to the TRANSACTION_INV table. |
Destination Location |
If transferring the quantity to a different material storage location, specify the item's new material storage location and retain the same UOM. The Quantity field within the Destination Location group box displays only the available quantity to be transferred even if you are also transferring the allocated quantity. If converting the UOM, enter the same location that you are transferring from and specify the target UOM. The system will use the setup defined on the Units of Measure page to convert the quantity. You can convert the UOM for available quantity only; this feature is not applicable to allocated stock. The UOM field is not available for entry when you have selected the Transfer Allocated Quantity check box. When transferring allocated quantity, the nettable and WIP settings of the source and destination locations must be the same. In addition, allocated stock cannot be moved if the transfer would cause the available quantity of the business unit to change. |
Save |
Click the Save button to execute the transfer. |
Use the Container Information page (TRANSFER4_INV) to view items in a storage container or transfer containers to a new location.
To transfer part of the stock in a container, use the Container Management page.
Navigation:
. Enter a Container ID and click the Search button.
This example illustrates the fields and controls on the Container Information page to identify the destination for the storage container. You can find definitions for the fields and controls later on this page.
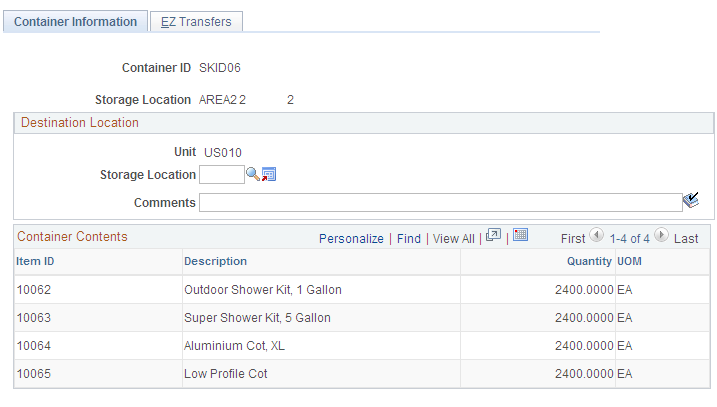
To move an entire storage container, use the Destination Location group box to identify the container's new location. The Container Contents scroll area displays material in the container. To adjust the quantity in a container, use the Adjustments page.
If this storage container includes allocated stock, then you must have selected one or both of the appropriate check boxes, Include Pre-Released Allocations and Include Released Allocations, on the Transfers page. For container moves, if any items in the container cannot be moved, then the transfer of the entire container fails.
Click the Save button to execute the transfer.
Use the EZ Transfers page (TRANSFER_BC_INV) to streamline internal stock transfers.
The page automatically verifies the information that you enter and saves the transactions without using queries or the Save button, making it ideal for a workstation setup with a wedge bar code reader.
Navigation:
This example illustrates the fields and controls on the EZ Transfers page. You can find definitions for the fields and controls later on this page.

Select a business unit and either a container ID or the complete material storage location and item ID.
Note: You cannot use the EZ Transfers page to select a specific staged date, even if the item is staged-date controlled. If this is a requirement, use the Transfers page.
Note: If you transfer to this page from the Fixed Pick workflow, the business Unit, Item, and original and destination Storage Location fields are populated automatically and are unavailable for entry. The Transfer Qty (transfer quantity) field is initially populated with the optimal quantity to be transferred, but you can override this value.
The following conditions also apply to the use of this page:
If the item that you enter is serial or lot controlled, the Serial ID and Lot ID fields appear.
This information is required and can be entered manually online or automatically with a barcode reader.
If you are transferring lot-controlled stock from a non-WIP to a WIP location, a warning message appears when you save the page if the current date is before the date that the lot becomes available or after it expires.
Unless you are transferring a container, define the original material storage location and item to transfer and specify the destination location and transfer quantity.
The EZ Transfers page cannot be used to transfer allocated stock. Use the Transfers page or the inventory transfer integration points to move allocated stock.
Field or Control |
Description |
|---|---|
Destination Location |
After you enter the last value in this group box, the system automatically saves the transaction. For serial-controlled items, the quantity is 1 and the page is saved after you enter the last piece of material storage location information. For items that are not serial controlled, the page is saved after you enter the quantity to transfer. For containers, the original location appears and the page is saved when you enter the destination location. If you define a container for transfer, enter the destination material storage location. The Transfer Qty field is unavailable for entry for container transfers; the entire contents of the container are transferred to the destination location. |