Creating and Processing Picking Plans
PeopleSoft Manufacturing uses picking plans to translate requested stock into material picking instructions for stockroom processing. The system supports PUSH and PULL picking methods:
Field or Control |
Description |
|---|---|
PUSH picking plan |
The system determines the locations from which to pick each item, and it creates a hard reservation for the item when you generate the pick list. A hard reservation reserves the item in a specific location. Once a hard reservation exists, the item is unavailable for other inventory transactions. |
PULL picking plan |
The system lists all available locations from which the picker can pull the items. The picker then enters the actual location information. When pulling material to production, PeopleSoft Manufacturing doesn't make a hard reservation at the time that the picking plan is generated. |
Note: Item quantities in WIP are not available to fulfill sales orders or material stock requests.
You can create a picking plan for items in a production area that use the production issue or production kitting material issue methods. Floor stock and expensed items are never kitted or issued.
If you pick lot-controlled items and the lot is not yet available (or has already expired), the picking plan report prints the applicable date. If the date has already passed, the lot has expired. If the date is in the future, the lot is not yet available. The picking plan displays material from a lot as available even if it has expired, but you can then change the location using the Review Plan process (SFS6000).
The system generates picking plans for production IDs and production schedules in the Released or In Process status.
To create and process a picking plan for issue or kit components:
Create a picking plan using either a PUSH or PULL picking method by using the Picking Options page.
Pick the material.
If you use the PULL method, record the picked components and the storage area and location from which they were picked. If you use the PUSH method, confirm that the components were picked from the storage area and location recommended in the pick plan. You can simultaneously confirm the picking plan and release material to production. To automatically initiate the Material Release process, select Release at Save, confirm the pick plan, and then save the page. Alternatively, you can schedule the process by running the Update Pick Batch process. Confirm the pick plan and selecting either the Update Pick Batch process or the Update Pick Batch and Release process.
Review and confirm the picking plan using the Review Plan page.
If you pick quantity for the pick line in phases, then you should not check the complete option until you execute the final pick.
Issue material to the shop floor using the Material Release page, if the release process wasn't automatically initiated from the Update Pick Batch process or the Update Pick Batch and Release process.
|
Page Name |
Definition Name |
Usage |
|---|---|---|
|
RUN_SFS6000 |
Generate picking plans for production. You can generate pick plans for production with a status of Released or In Process. |
|
|
RUN_SFS6000_SEC |
Indicate that you want to print the extract file for bar codes, and indicate where the file is located. |
|
|
RUN_SFS6000B |
Define the range of production IDs, production schedules, production areas, and item IDs for which you want to generate a picking plan. |
|
|
RUN_SFS6000A |
Indicate the maximum number of locations to display once quantity has been fulfilled when running a pull pick plan and when displaying substitute items. Also, use this page to set the commit level during processing. The commit level is the number of components that are processed between updates to the database and is used to minimize database locking. This page is typically hidden, and it should be only be accessed by a system administrator. Once this page has been configured, the page should again be hidden. |
|
|
SF_ISS_DIALOG |
Select the specific pick batch that you want to review. You must generate at least one pick plan by using the Material Picking Plan process. |
|
|
SF_PICK_TRANS |
Confirm that the material was pulled from the suggested stores location, or to indicate from which location the material was pulled. You must generate at least one pick plan by using the Material Picking Plan process. |
|
|
Pick Batch Options Page |
RUN_SFS6002 |
Select the report parameters for the pick batch you'd like to update. You must first generate a pick plan for selected production. |
|
Update Pick Batch - Production Selection Page |
RUN_SFS6002B |
Select the production to update. |
|
Material Release Page |
RUN_SFS6001 |
Issue material to the shop floor. Use this page if you selected the Do Not Release at Save option on the Review Plan page or if you did not select the two-step process in the Update Pick Batch component. You must pick and confirm at least one pick plan. |
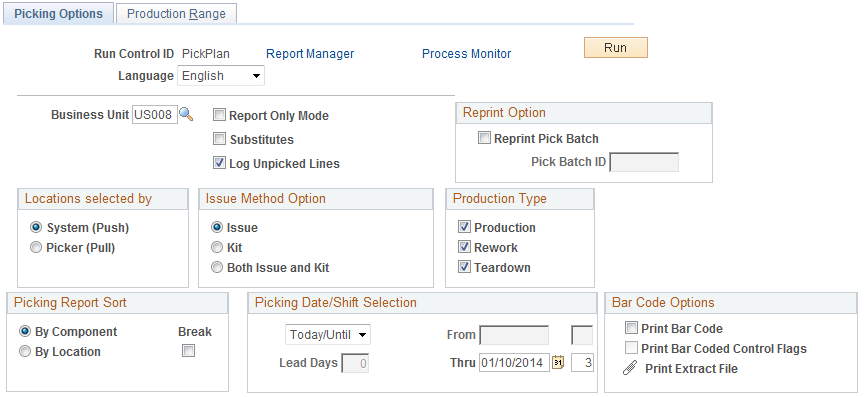
Use the Picking Options page (RUN_SFS6000) to generate picking plans for production.
You can generate pick plans for production with a status of Released or In Process.
Navigation:
This example illustrates the fields and controls on the Picking Options page. You can find definitions for the fields and controls later on this page.
Field or Control |
Description |
|---|---|
Report Only Mode |
Select to preview the pick plan before running it. The system does not create material reservations in Report Only mode because it is an information-only report. |
Substitutes |
Select to print substitutes on the pick plan. However, if you do not want the picker to pick substitutes, run the pick plan without displaying any substitutes. In this case, you can also run the pick plan in Report Only mode first, list substitutes, and then make the substitution on the component list before running the final pick plan. Note: Substitute items for rework and teardown end items do not appear. Once a partial pick has been done using an item or its substitute, it must be completed with the same item. No partial picking is permitted. If there is a shortage of the original item and it has substitutes, the substitutes appear on the pick plan. They are distinguished by a border around the substitute items. Note: The pick plan does not perform automatic substitutions. |
Reprint Pick Batch |
Select to reprint a previously printed pick batch. |
Pick Batch ID |
This edit box becomes available when you select Reprint Pick Batch. Select the pick batch ID number. If this is the first time you're printing the picking plan, do not select the Reprint Pick Batch check box. |
System (Push) or Picker (Pull) |
Indicate whether the system uses one of the following methods to determine the locations from which is picks components:
|
Issue Method Option |
Select from the following options: Issue, Kit, and Both Issue and Kit. Subsequent selection options depend on the issue method selected here. |
Issue |
When this method is selected, components on production IDs or schedules whose issue method is set to Production Issue are picked. Because these components are sent to WIP locations for consumption during end-item completions, the Production Selection process prompts you for WIP location information. The issue method uses netting to determine the amount of components to send to the WIP locations. The system includes all requirements through the selected date, even past due requirements when a date range is entered. It also checks requirements from production areas outside the selected range of production areas, if they share the same WIP locations. For each required component, the system determines the available quantity on hand in the WIP location. If the quantity on hand is negative, the system treats it as 0. The system then determines the required quantity of the component for the selected production. The system also reviews the quantity of in-process picking plans for the component and the WIP location. The system then checks the WIP minimum quantity, which is defined at the item and location level. It defines the additional quantity to be issued over and above the demand for Issue components. If all requirements occur as planned—and no additional material is issued to the WIP location—the component should have this quantity remaining in the WIP location. Once all demand is calculated (quantity required + WIP minimum quantity), it's netted against all supply (quantity on hand in the WIP location + all pending pick plans destined for the location). If the demand is greater than the supply, that amount appears on the pick plan. If supply is greater than demand, the component is not printed on the pick plan. |
Kit |
When this method is selected, components on production IDs whose issue method is set to Production Kit are picked. Because these components are issued directly to a production ID and are not consumed from WIP locations during end item completions, you specify the production area, production ID, and operation to which you want to send material. You cannot send material to a WIP location. The pick plan nets the component's scheduled quantity against the issued quantity. If the scheduled quantity is greater than the issued quantity, it prints the quantity on the pick plan. If the issued quantity is equal to or greater than the scheduled quantity, the system considers that component requirement fulfilled and does not print it on the pick plan. |
Both Issue and Kit |
This method assumes that you're picking components for production regardless of the issue method. Using this option, some components are sent to WIP locations and some directly to a production ID. On the Production Selection page, you specify to which production ID kitted components are sent as well as which WIP locations are stocked. |
Production Type |
Select Production, Rework, or Teardown. Note: A component with the item status of Hold for the production type Production cannot be picked. However, a component with item status of Hold for rework and teardown production can be picked. |
Picking Report Sort |
You can sort the picking plan by component, location, or production area. The production area option is available for only pull and push kits. |
Break |
Select to indicate that you want each component or location to print on its own separate page. The options available depend on the issue method selected. These are the valid combinations and sort options: |
|
Push or Pull |
Issue Method |
By Component |
By Location |
By Production Area/ID |
|---|---|---|---|---|
|
Push |
Kit |
Yes |
Yes |
Yes |
|
Push |
Issue, Both |
Yes |
Yes |
No |
|
Pull |
Kit |
Yes |
No |
Yes |
|
Pull |
Issue, Both |
Yes |
No |
No |
Field or Control |
Description |
|---|---|
Picking Date/Shift Selection |
Indicate the production start dates and shifts for which you want to include picking plans. This information is required. The system issues a picking plan for all components associated with operations due to start within specified periods. Options are:
|
Print Bar Code |
Select to have the system print bar codes for bar coded fields on the Pick List. Note: PeopleSoft SCM applications do not support the printing of bar codes from processes running on OS390 servers. You should run your SQRs that print barcodes on a process scheduler server that is running on a non-OS390 operation system. |
Print Bar Coded Control Flags |
Select to attach an item's control flags to the bar code printed on each line of the Picking Plan report. These control flags enable the electronic data collection system to prompt for the lot ID, serial ID, staged date, or shipping serial ID immediately after the user scans the bar-coded line number field. For cases that do not require control flags (for example, when you are using a wedge to scan the pick batch ID or pick batch line number bar codes directly into the Inventory Picking page), you might prefer not to select this check box. The format for the bar code printed for each detail line is LSDAH:99999, where:
Note: PeopleSoft Inventory delivers printer settings for all Structured Query Report (SQR) output to a generic line printer. However, when printing bar coded information on reports, such as the Material Putaway Plan report and the Picking Plan report on a printer control language printer (for example, HP LaserJet), you must first define the printer type accordingly. You can do this by changing the printer type settings that PeopleSoft Inventory delivers in SETENV.SQC from LINEPRINTER to HPLASERJET. If you use electronic data collection, you can create a pick plan extract file. This file can be downloaded to a data collection device and used instead of a paper pick plan. The extract file is ASCII format and contains all the information included within the regular pick plan. |
Use the Pick Plan Extract page (RUN_SFS6000_SEC) to indicate that you want to print the extract file for bar codes, and indicate where the file is located.
Navigation:
Click the Attachment button to select a Pick Plan Extract file.
Field or Control |
Description |
|---|---|
Print Extract File |
Select to create a picking plan extract file. |
File Directory and File Name |
Enter the location to which you want to save the pick plan extract. |
OK |
Click to return to the Picking Options page. |
Use the Picking Options - Production Selection page (RUN_SFS6000B) to define the range of production IDs, production schedules, production areas, and item IDs for which you want to generate a picking plan.
Navigation:
Field or Control |
Description |
|---|---|
Production Area Information |
The production selection options available on this page depend on the material issue method that you choose on the picking options page. For example, if you select the kit method on the picking options page, the WIP Location Range for Issues group box items are not available. |
Prdn Areas (production areas) |
You can select one of these options when generating picking plans for components using the issue or kit method:
|
Options for Kits |
You can select one of these options when generating picking plans for components using the kit method:
|
WIP Location Range for Issues |
Select All or Range if all production areas use the issue method. Within the range of storage area, you can further define the selection by any of the four location levels set up in the inventory. If you selected a range of production areas, you cannot select a range of WIP locations. Note: If you're selecting consigned kit issue components, including lot- and serial-controlled components, the system picks from both owned and non-owned WIP storage locations. |
Run |
Click to run this request. Process Scheduler runs the Pick Plan process and report (SFS6000) at user-defined intervals. |
Use the Runtime Settings page (RUN_SFS6000A) to indicate the maximum number of locations to display once quantity has been fulfilled when running a pull pick plan and when displaying substitute items. Also, use this page to set the commit level during processing. The commit level is the number of components that are processed between updates to the database and is used to minimize database locking.
Navigation:
Field or Control |
Description |
|---|---|
Pick Plan Commit Batch |
This field controls database pick plan commit level processing. |
Pick Plan Commit Batch |
Enter the number of components that you want to process before a database update is performed. If you do not want to do intermittent commits, then set the commit level to a higher number that is larger than the normal number of components that are usually processed within a pick plan. You may need to try different commit levels to achieve the maximum level of performance while minimizing database locking. The default is 100. |
Max Pull/Substitute Locations (maximum pull/substitute locations) |
Enter the maximum number of locations that you want displayed when running a pull pick plan. This value is also used to determine the number to display for substitute components and their locations. The default is 10. |
Once you generate the picking plan, you must review the plan, make any modifications to PUSH picking plans before picking the material, and enter the picking locations for the material if you're using the PULL method to issue material. You can modify the picking plan before or after you pick the material.
Use the Review Plan - Production Selection page (SF_ISS_DIALOG) to select the specific pick batch that you want to review.
Navigation:
Field or Control |
Description |
|---|---|
Unit and Pick Batch ID |
When reviewing the pick plan, these fields are required. |
Line #, Component ID, Production ID, and WIP Location |
You can use these fields to narrow the selection or as a way to view the pick plan. |
Pick Batch ID |
Enter the number associated with the batch. You can select the ID for the entire pick batch, or you can select From Line # and To Line # to review part of the pick batch. The pick list line number is a sequential number corresponding to each heading on the report, the component and production ID, or production schedule and operation for kitted production, or a component and a WIP location for issue production. |
Component ID |
Enter to review a picking plan for a specific component ID. |
Production ID |
Enter to review a picking plan for a specific production ID. |
WIP Location and storage Area |
For picking plans using the issue method, enter values for these fields and for the levels of locations defined for the PeopleSoft Inventory business unit to review a picking plan for a specific location. |
Search |
Click to retrieve the selected pick plan. |
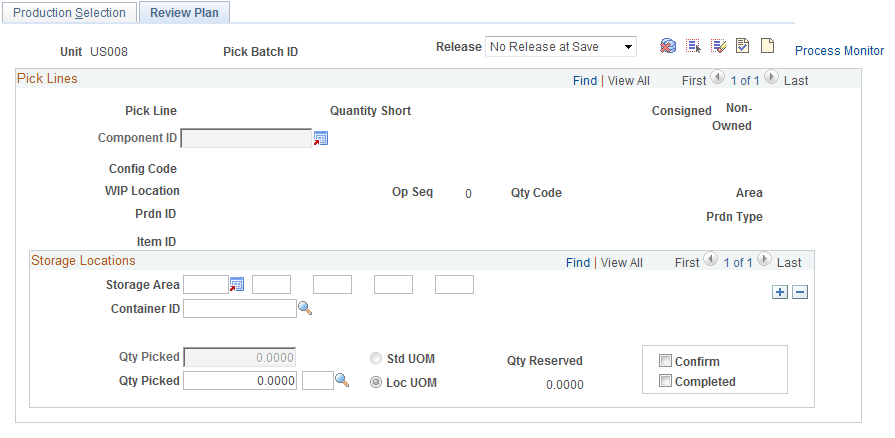
Use the Review Plan page (SF_PICK_TRANS) to confirm that the material was pulled from the suggested stores location, or to indicate from which location the material was pulled.
Navigation:
Enter information on the Production Selection page and click the Search button to retrieve the plan.
This example illustrates the fields and controls on the Review Plan page. You can find definitions for the fields and controls later on this page.
Field or Control |
Description |
|---|---|
Release |
Select how you want the material release to occur. Options are:
|
Kit Components |
Where substitutes exist, the Comp ID (component ID) field is available, and you can display substitutes for the component. The substitute component list is obtained from the BOM. No partial substitutions are allowed if components have previously been issued. Note: When a kit component is substituted, the component list is updated to reflect the substitution when you click Save on the Review Plan page. If a substitution is done on a PUSH pick plan, the original component is unpicked and the new component quantity picked. If the substitution is done on a PULL pick plan and a pick has already been recorded, the substitution is treated the same as for a PUSH plan. |
Issue Components |
For issue components that are consigned, the pick plan prints only non-owned material locations. If this component exists in an owned location, it must be manually transferred to an owned WIP location to be used in production. This cannot be done using the pick list. The substitute component list is obtained from the business unit level because the component may be associated with multiple end items, resulting in multiple substitute item lists. Where substitutes exist, the Comp ID (component ID) field is available, and you can display substitutes for the component. When an issue component is substituted, you must maintain the information at the component list on the Component List Maintenance page or the Edit/Issue Components page to record the substitution on the appropriate production IDs and production schedules. Until the data is updated or if another pick plan is run, the system attempts to pick the original component again. |
|
The system displays the number of storage levels defined for each storage location. Click the Storage Location Search button to search for a different storage area. If you're using the PUSH material issue method, the recommended storage area appears. You can modify the storage area, if you pulled material from an alternate location, as well as the quantity picked. If you need to change the picking location for a component, set the quantity to 0 or delete the existing row, and insert a new row. |
Storage Area |
If you're selecting consigned kit issue components, including lot- and serial-controlled components, you can pick from both owned and non-owned WIP storage locations if material exists in both. If you're using the PULL material issue method, specify the storage location such as Aisle, Level 1, Level 2, Level 3, and Level 4, depending on the storage level setup. When using the PULL material issue method for rework or teardown production, you can override the typical method and select a nettable location. |
Container ID |
Enter the value if you're picking from containers. |
Confirm |
After reviewing each entry, you can confirm the selection by selecting this option. If you confirm an item with the item status of Hold, you'll receive a warning at save time. However, you are not prevented from confirming the pick. Only those components that have been confirmed are released to production. Note: If you're modifying previously saved pick information, only the quantities can be modified. If you want to change picking location information, set the quantity to 0 or delete the row, and insert a new row. |
Completed |
Select to indicate that you are finished picking this pick line location. This option works with the Confirm option as follows
|
Lot ID and Serial ID |
If you're using the PUSH material issue method, the serial ID is the serialized component that should have been picked from the storage area. If the component is lot-controlled, the system displays the lot ID from which the component should have been picked. If you need to change the serial ID or lot ID for a component, set the quantity to 0 and insert a new row. If you're using the PULL material issue method, specify the serial ID or lot ID for each component that you picked. If you are entering data for rework or teardown production IDs that are using serial genealogy, keep these points in mind:
Note: If the component to be issued is not serial-controlled but trace usage is serial, the Pick Plan process does not suggest the serial ID to pick. You must indicate which serial IDs are to be picked. The system verifies that the components have not been assigned to another production ID. Note: This logic is also applied to other kit issues. |
|
If you do not need to make any changes to locations or quantities (or once all changes and selections have been made), you can confirm all of the suggested locations and quantities at one time when you click the Confirm All button at the top of the page. |
|
Click the Unconfirm All button to reverse all confirmed locations and quantities. |
|
If you do not pick any of the items on the pick plan, click the Delete All button to remove these rows from the pick plan. This relieves any hard material stock reservations that have been made. |
Confirm |
You can confirm selected pick lines by selecting this check box to indicate that these pick lines are correct and material is ready to be released. |
|
Click the Next button to access additional items in the scroll area. |
|
Click the All Complete button to indicate that all pick lines have been picked and there is no other quantity to be picked. |
|
Click the All Incomplete button to indicate that all pick lines are not complete. This indicates that you may want to pick additional quantities for specific pick lines. |
Save |
Click to process the review plan. |
 (storage location search button)


Use the Update Pick Batch component to review the plan for a pick batch as a whole, or for a range of components, WIP locations, or production. This enables you to confirm, unconfirm, complete, uncomplete, or delete entire pick batches rather than maintaining each component one at a time. When you select the delete option, it will not affect any lines that have been previously released. Use this transaction to clear any unpicked pick lines.
In addition, you can simultaneously update the pick batch and release material to production using this component by running the Update Pick Batch and Material Release process (SFCONREL) or the Update Pick Batch process (SFS6002).
You can select pick batch options to update.
To select pick batch options to update:
Access the Pick Batch Options page.
Enter the following information:
Select the pick batch ID.
Select all or a range of line numbers.
Select the option of Confirm, Unconfirm, or Delete (Unreserve).
Select the option of Complete, Incomplete, or Unchanged.
To update the pick batch only, select Update Only - No Report.
To delete the pick batch detail, select Update and Report.
Note: All items specified on the pick plan are confirmed, even if they have been placed on hold subsequent to the generation of the pick plan.
You can select production pick batches.
To select a production pick batch:
Access the Production Selection page.
If you're updating a pick batch for kitted material, select a range of production IDs or item IDs.
(Optional) Click the Item Search button next to the Item ID field to access the Item Search link to locate a different item.
Select all or a range of WIP locations by storage location, depending on the storage level setup, when updating a pick batch for components using the Issue method.
(Optional) Click the Storage Area Location button next to the WIP location fields to access the Storage Location Search link to select a different storage location.
Click Run to run this request.
You can choose to run the Update Pick Batch and Material Release (SFCONREL) process or the Update Pick Batch (SFS6002) process. The Update Pick Batch and Material Release process is a two-step process that simultaneously updates pick batches and releases material to the production floor. This process must run on a server. If you do not want to release material to production at this point, select the Update Pick Batch process. Process Scheduler runs either process at user-defined intervals.
You can issue material to the shop floor.
To run the Material Release process to issue material to production:
Access the Material Release page.
Indicate whether you want to release material for all confirmed picking plans, or only for those picking plans that are associated with a single pick batch.
Click Run to run this request. Process Scheduler runs the Material Release process at user-defined intervals.
Note: Items with the item status of Hold can be released.